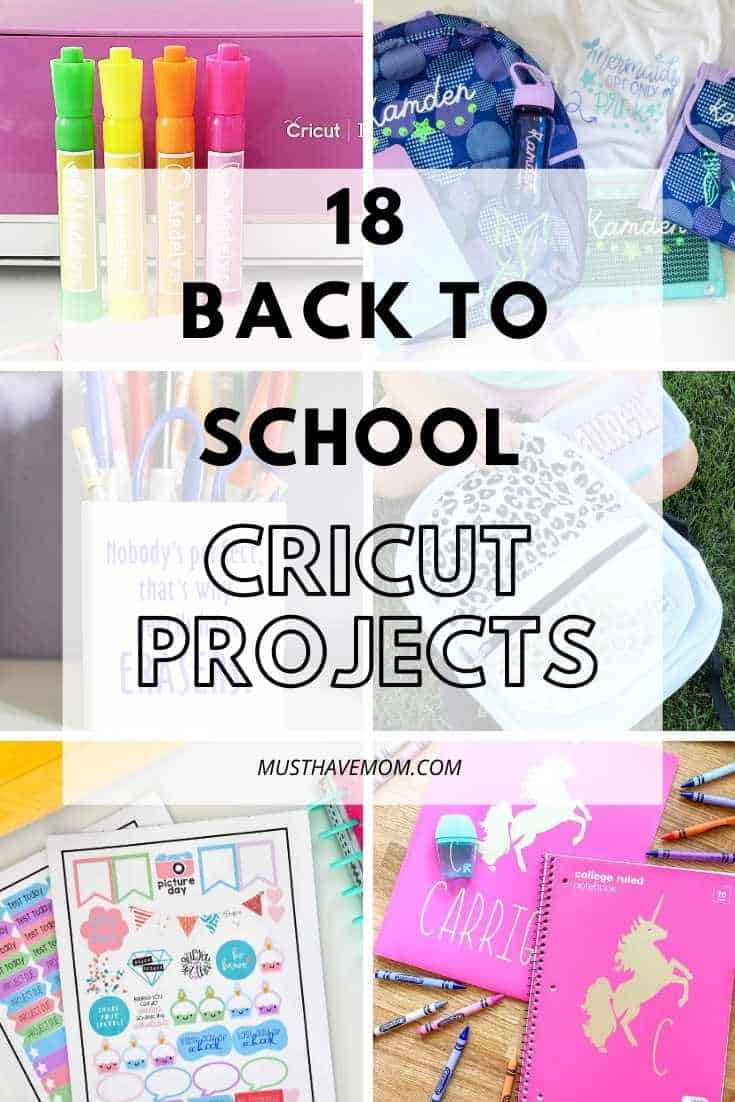
How To Personalize Back To School Supplies With Cricut
This is a sponsored post written by me on behalf of Cricut. All opinions are 100% mine.
This school year is likely to be unlike any other and we are planning on making it super special! We are personalizing everything for back to school using our Cricut machine! I’ll show you how to make personalized back to school supplies for your child, no matter what their name is. No kids left out of this one! It’s guaranteed to make kids feel extra special this year.
We love using our Cricut to create everything from personalized birth announcements to etched glass and even tic tac toe bags! Now that back to school season is here we are using Cricut to personalize all of the kids school supplies! We will show you how to make this year extra special for your child with personalized school supplies. It’s SO easy!
Personalized Back To School Supplies
When you were a child do you remember going to that special gift shop and finding a pencil or trinket with your name on it? It felt SO special to get something with your NAME on it, didn’t it? Or maybe you were the child with a unique name that could NEVER find anything with your name on it? That was so disappointing wasn’t it? Thanks to Cricut everyone can have personalized supplies now! No kid left out!!
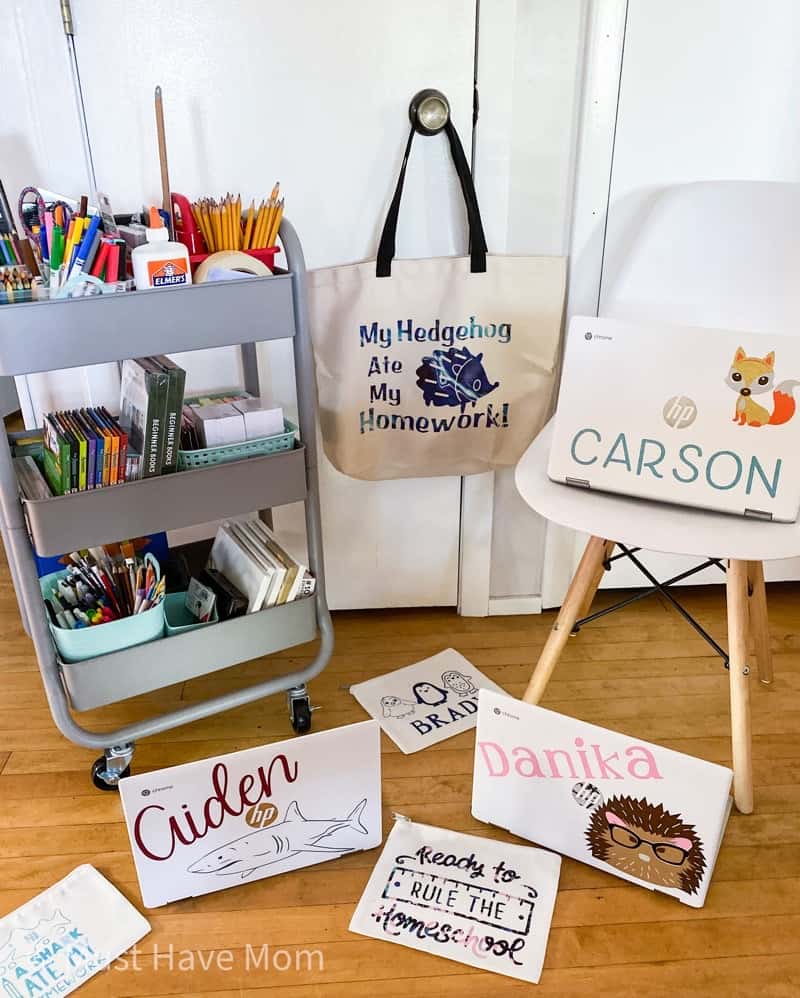
Personalized Laptop
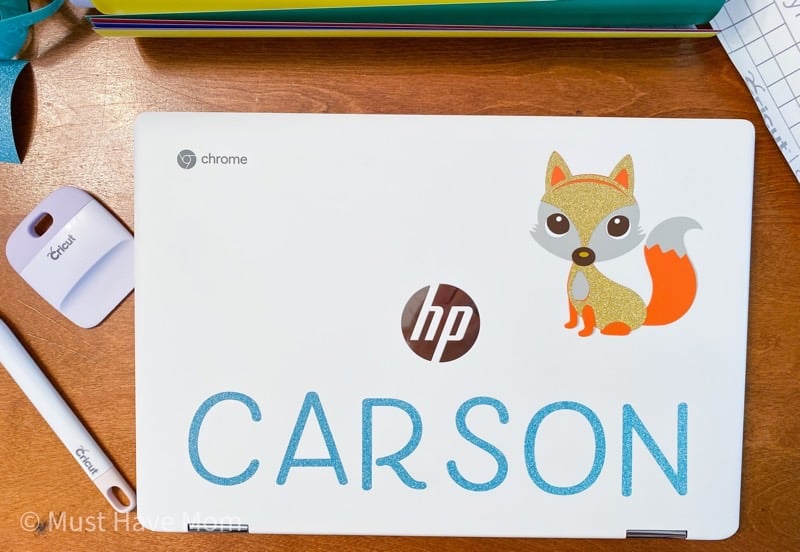
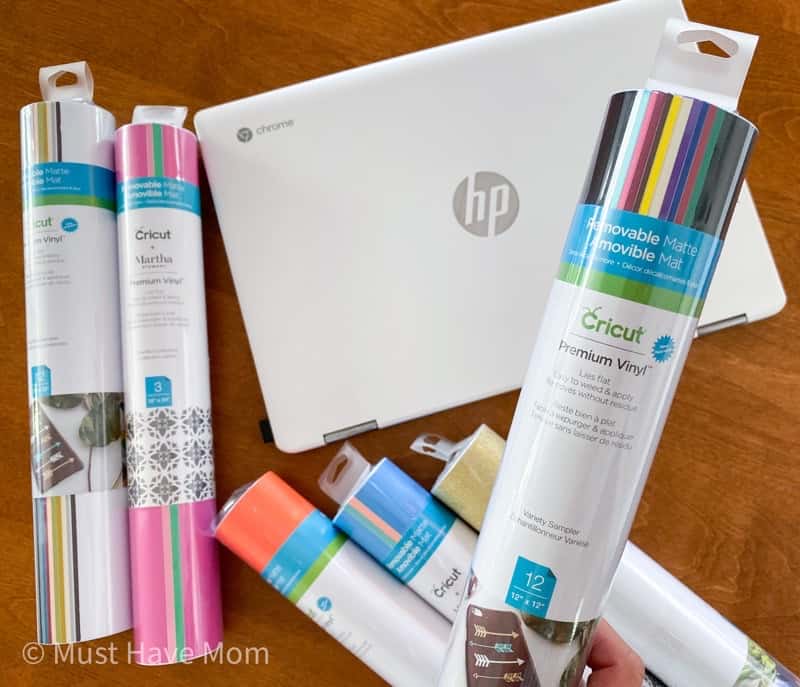
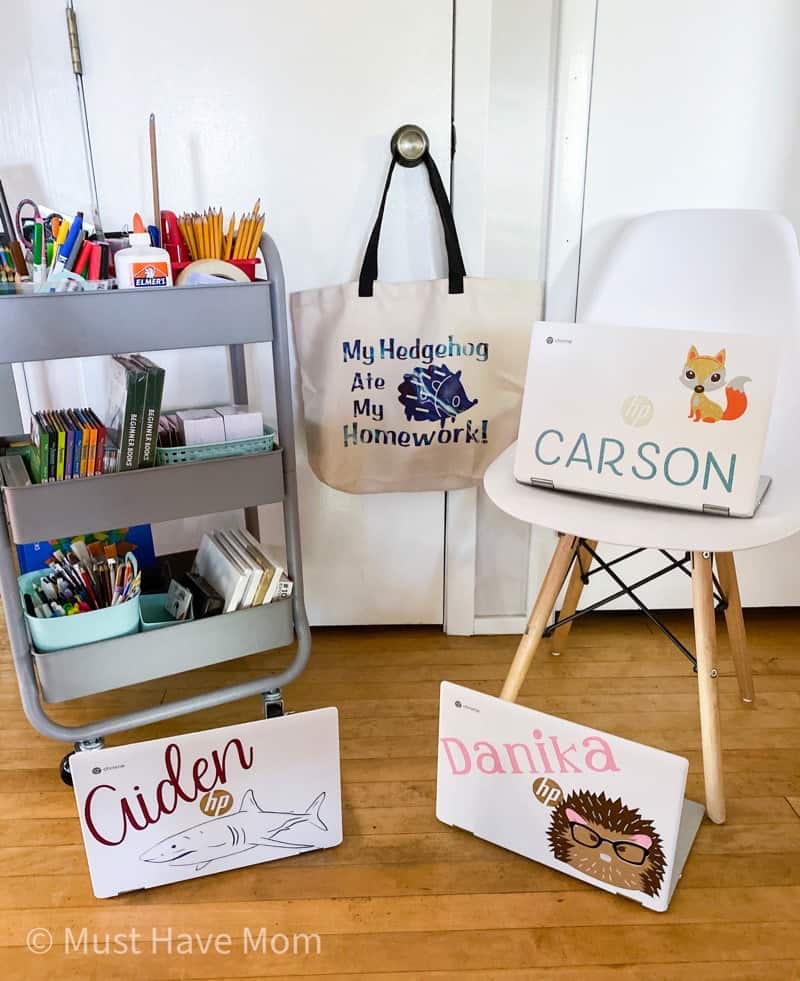
We decided to start our personalized back to school supplies by personalizing each child’s laptop. This year my kids will be doing homeschool so 3 of the 4 kids needed a laptop in order to do their curriculum. Since they all have the same laptop, it was hard to quickly figure out which computer was which. We used Cricut’s removable vinyl to personalize each laptop with the child’s name and chosen image. They had so much fun picking it out their colors and fonts and image.
Personalized Laptop Supplies:
- Cricut Maker, Explore Air 2 or Joy
- Cricut Removable Vinyl
- Cricut weeding tools
- Cricut transfer tape
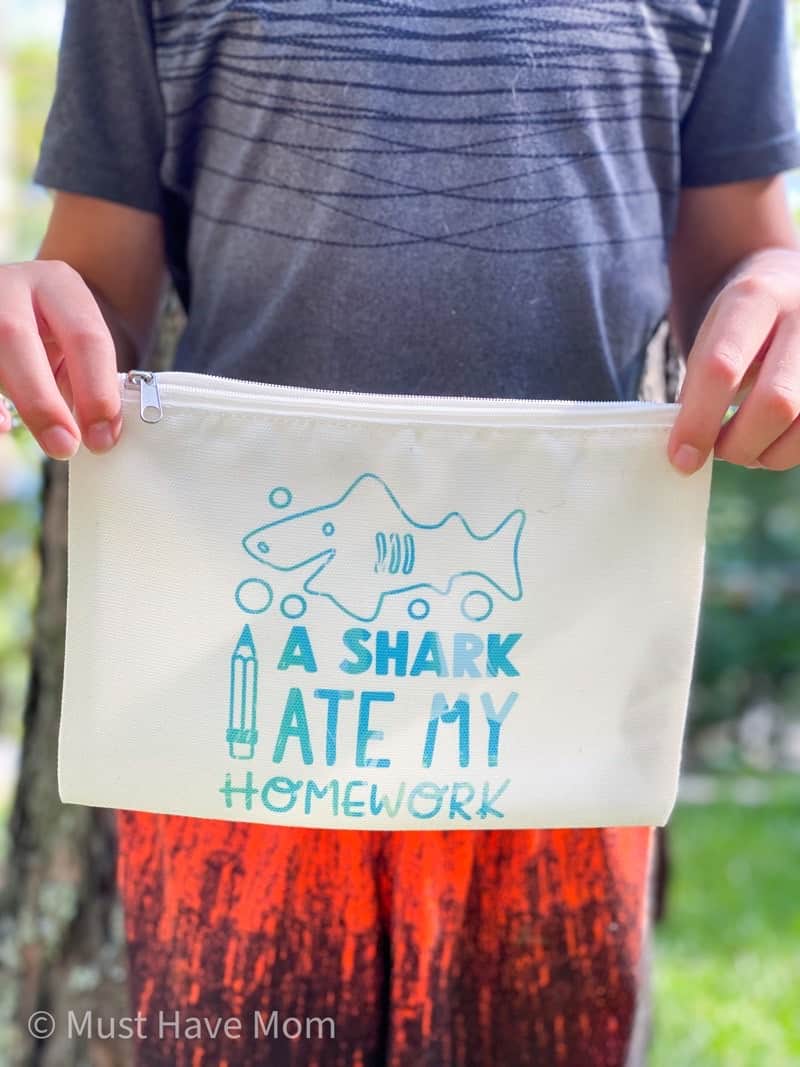
Start by having your child choose the font and color for their name. Then browse Design Space for the image they’d like to use. My son chose a shark and his brother chose a fox. My daughter had her heart set on an SVG that she purchased of a hedgehog in glasses! Each child’s personality really shone through on this project. The shark and fox are both free in Design Space, along with the fonts we used, with your subscription.
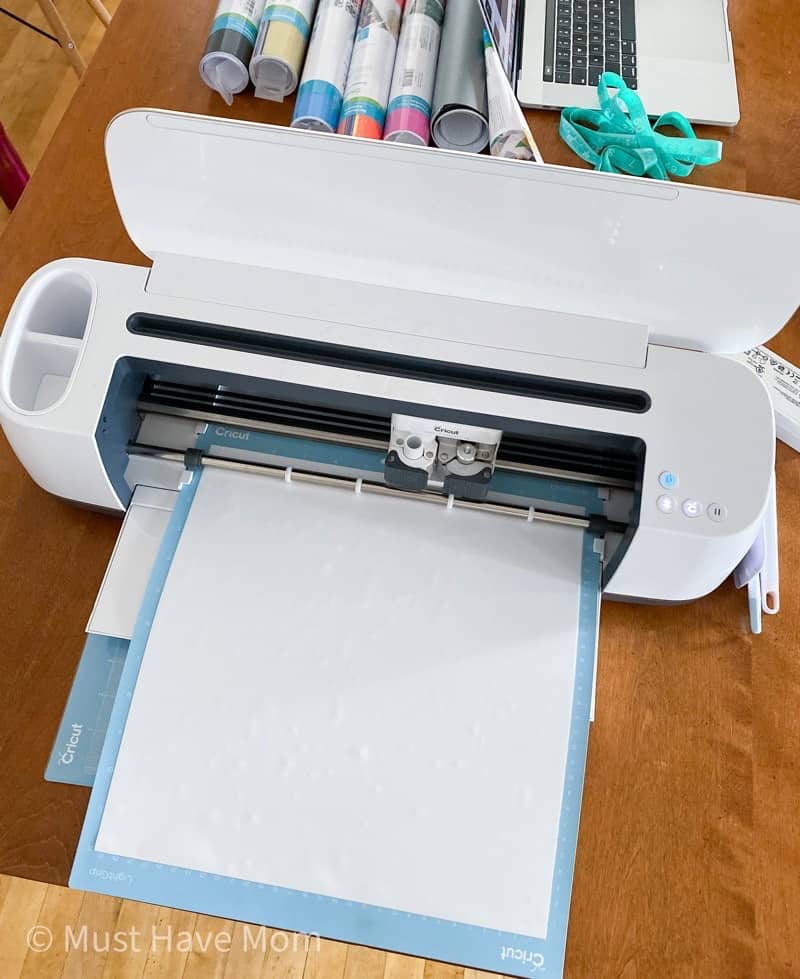
After finalizing your design in Design Space, cut the vinyl using your Cricut machine.
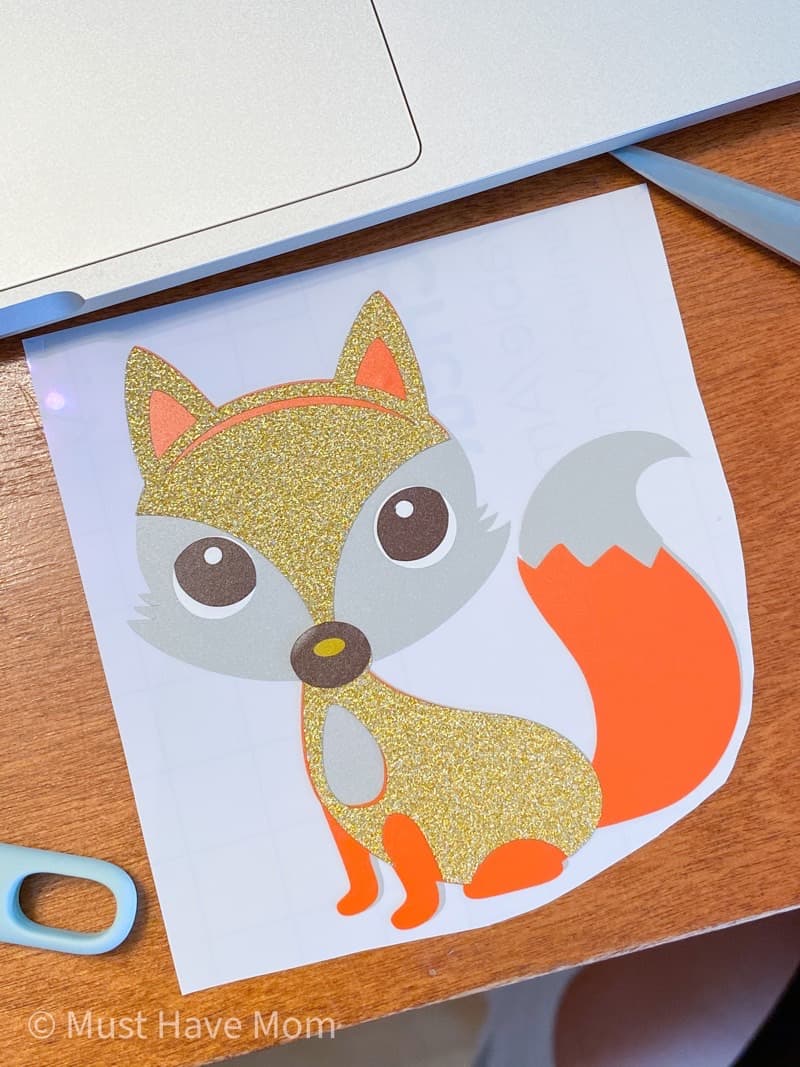
Weed the vinyl and use Cricut transfer tape to apply it to the laptop. Be sure to apply it so that when the computer is open the design is oriented correctly. Since it is removable vinyl you don’t need to worry about damaging the surface and your child can change the design anytime they like!
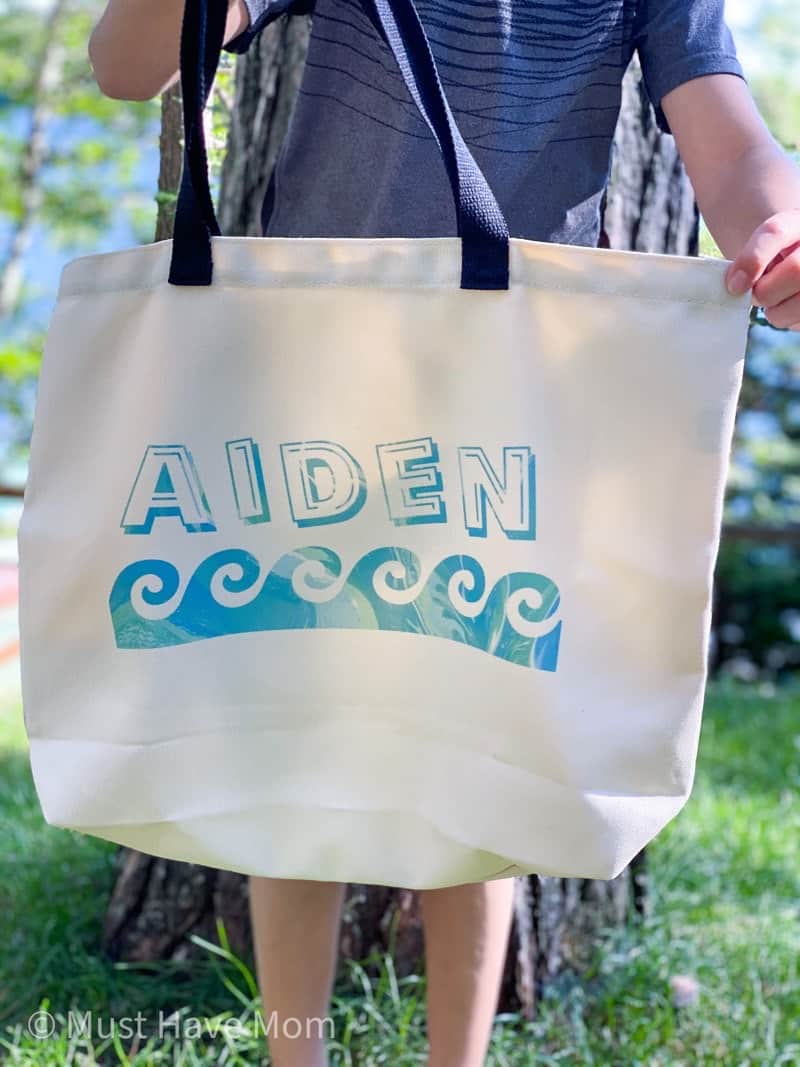
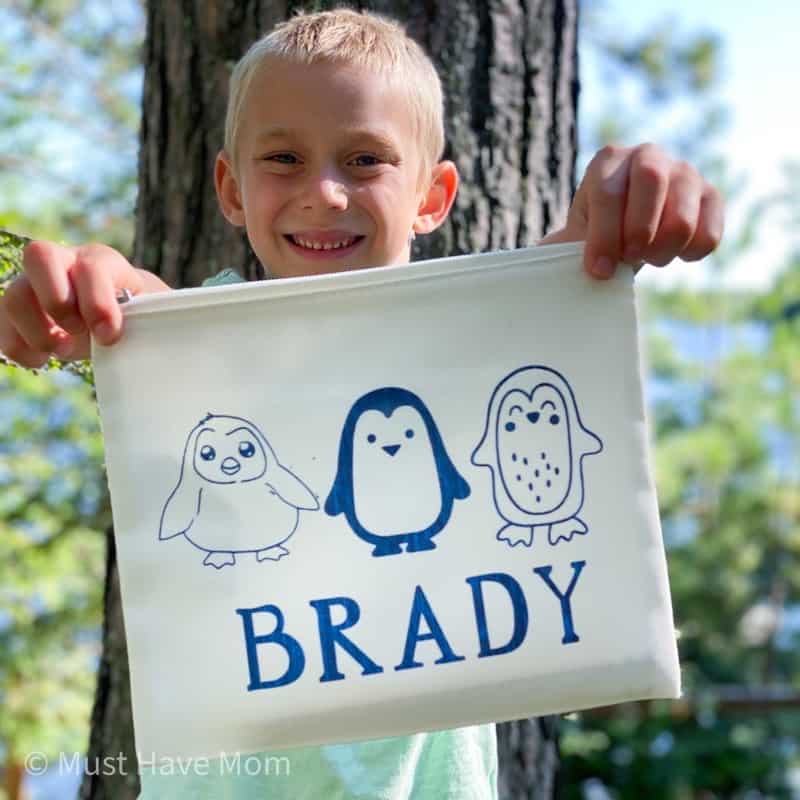
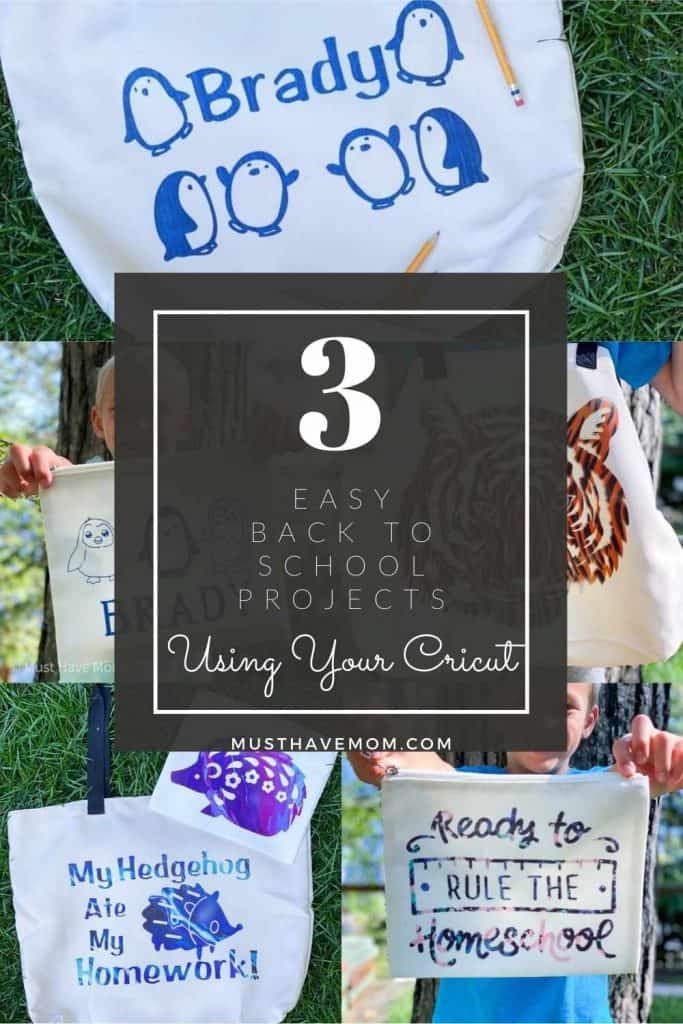
Cricut Infusible Ink Tote Bag
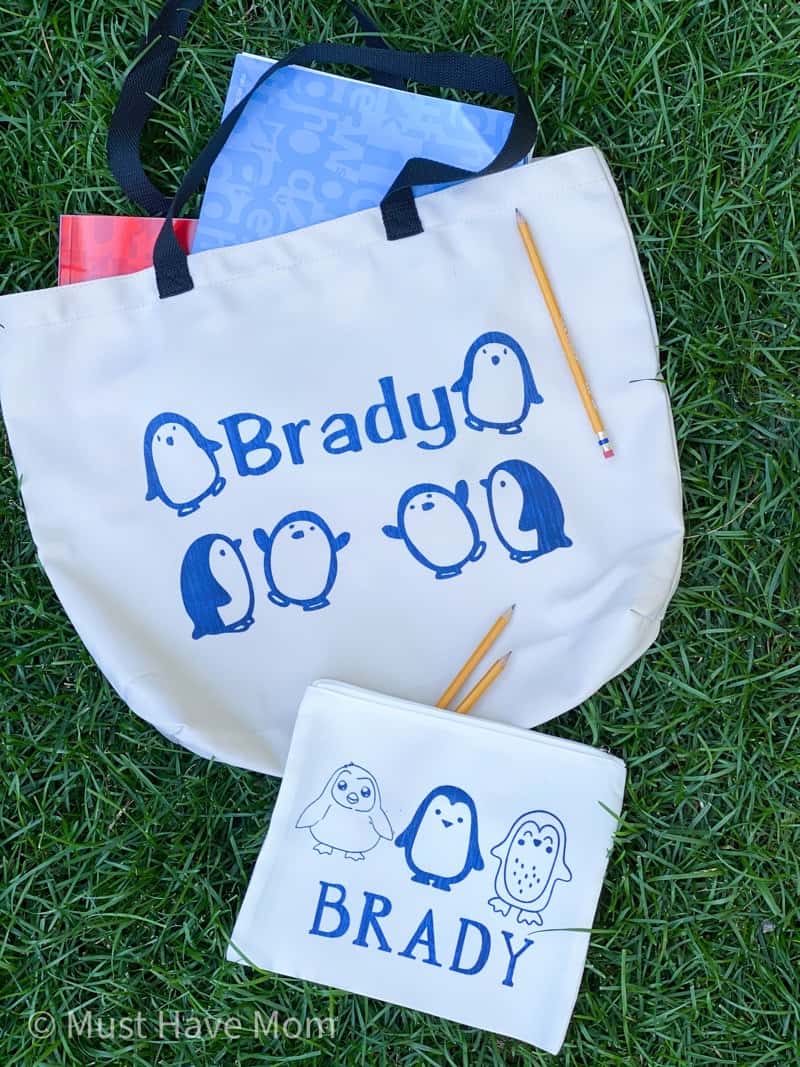
Since we will be doing lots of school at home this year, along with borrowing many library books for our studies, we decided that instead of personalizing backpacks we would personalize book bags! We used these Cricut tote bags and Cricut Infusible Ink to create a personalized book bag for each child’s library books!
Personalized Tote Bag Supplies:
- Cricut Maker, Explore Air 2 or Joy
- Large tote bag blank
- Infusible Ink – your choice color/pattern
- EasyPress 2
- EasyPress Mat
Begin by using Design Space to personalize your design. I let each child have their own time to create a design for their tote bag.
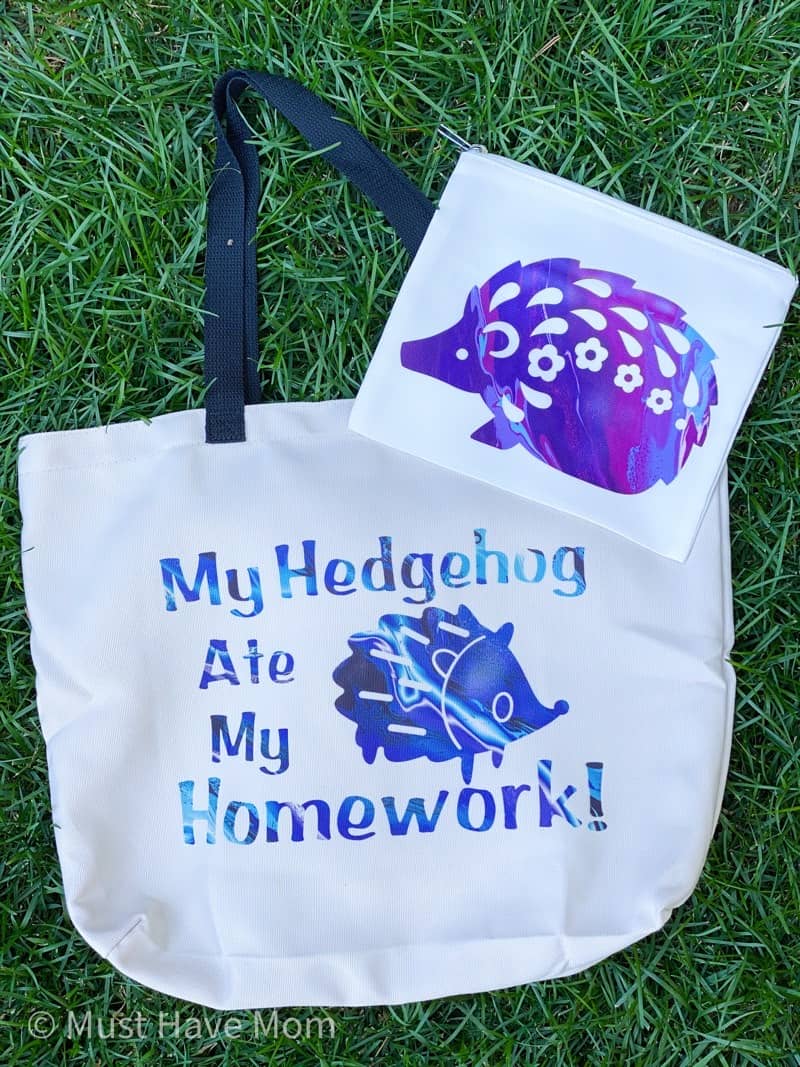
My daughter stuck with her hedgehog theme and used images available in Design Space.
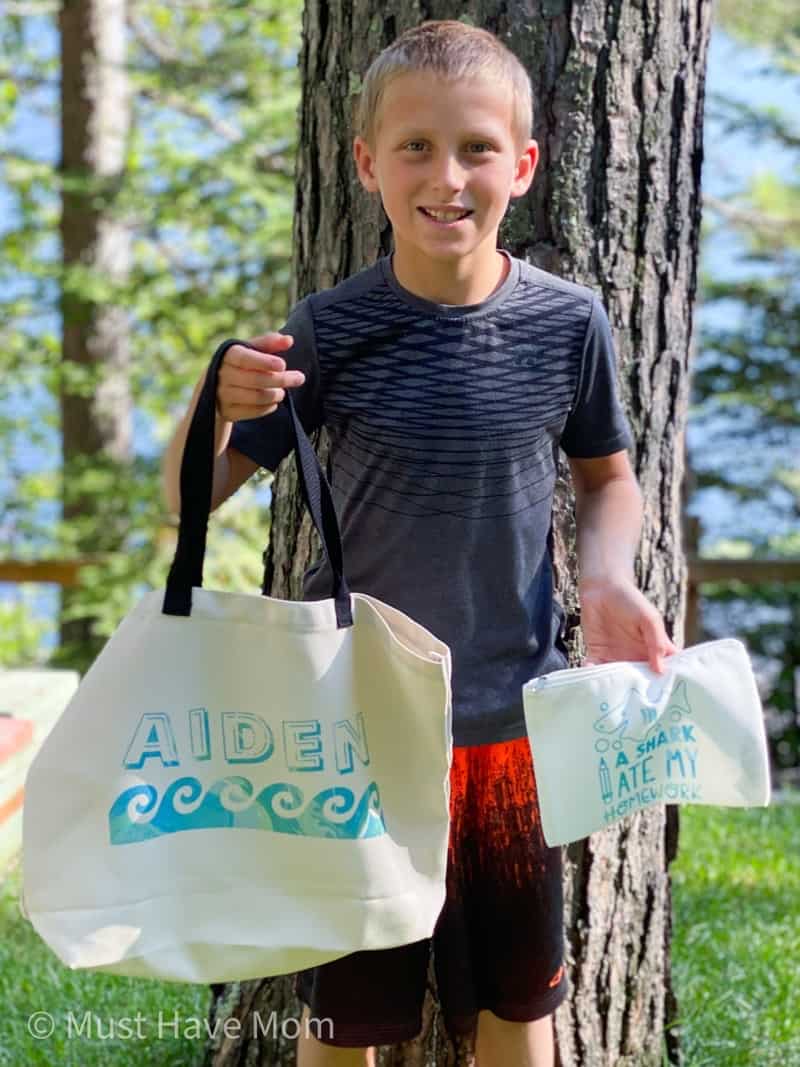
My son Aiden chose a shark theme.
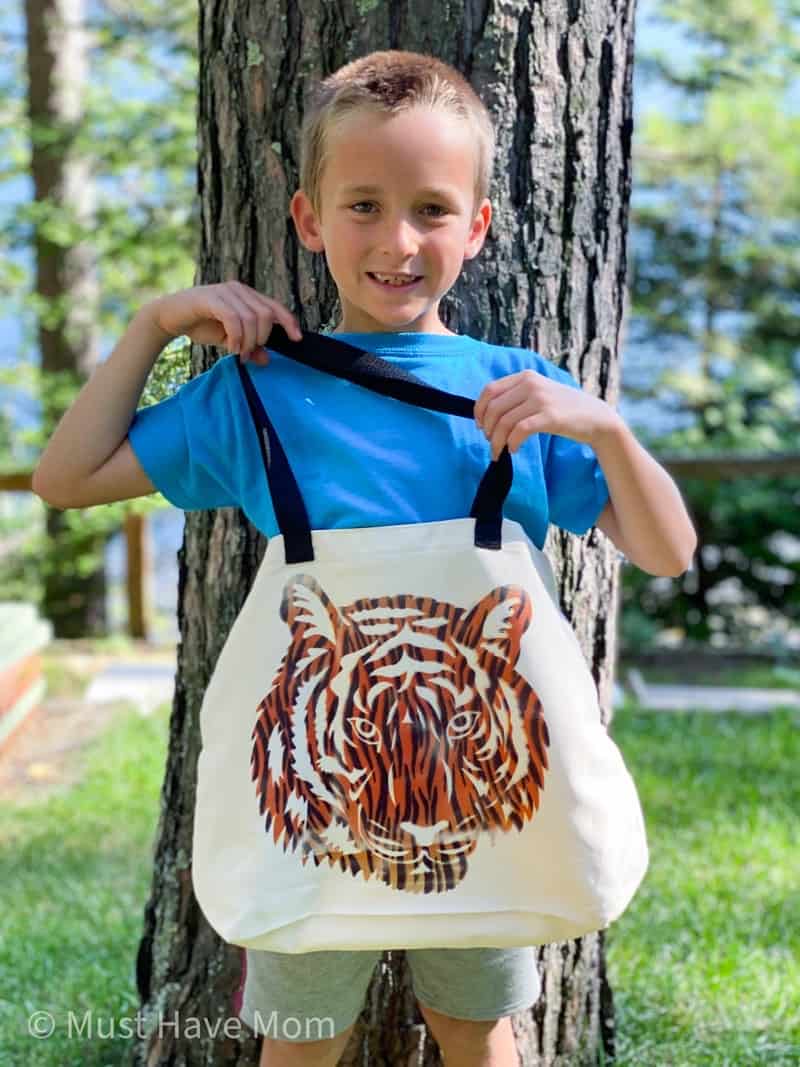
Carson did a huge tiger head which is also available in Design Space!
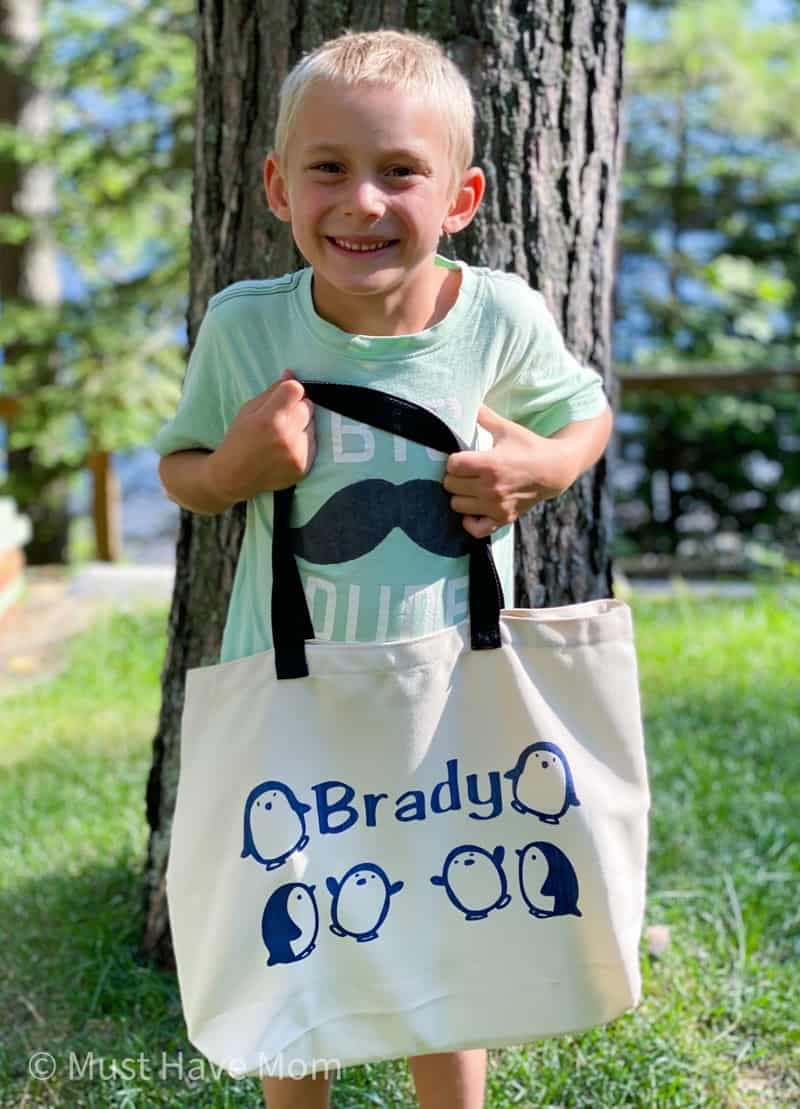
Brady loves penguins so he chose those. All the images shown here are from Design Space!
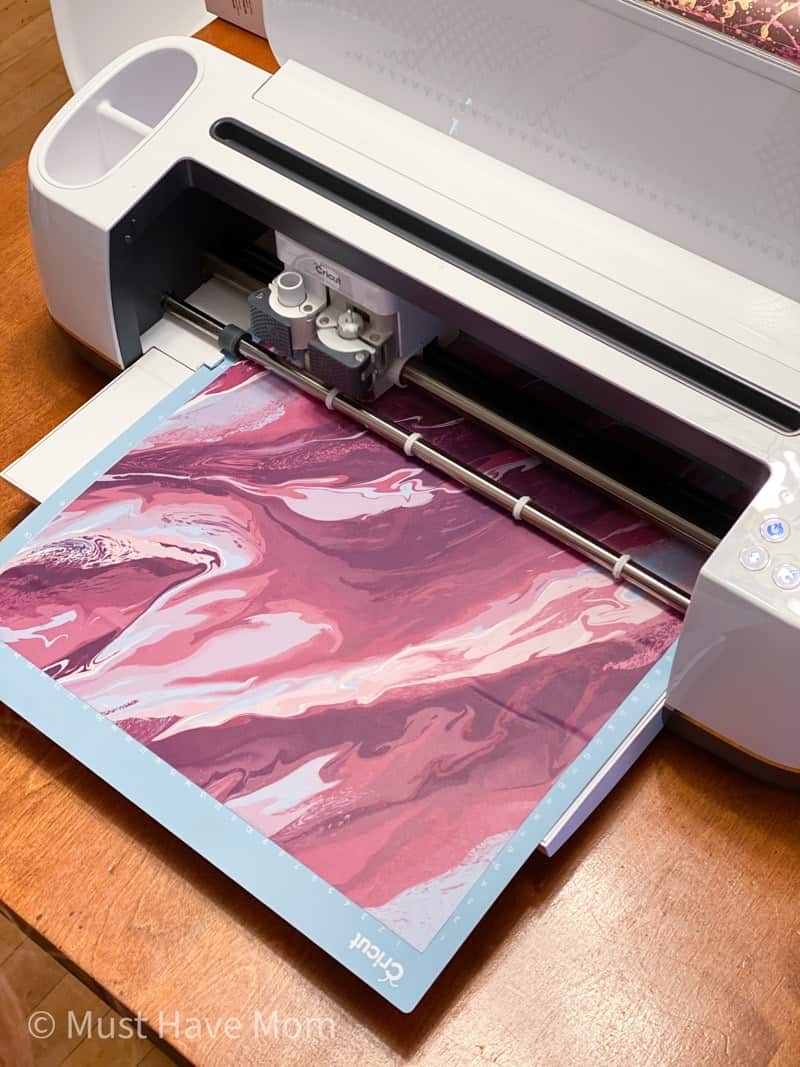
After creating the design, use your Cricut machine to cut out the Infusible Ink transfer sheets. You’ll want to place the Infusible Ink right side up on the cutting mat.
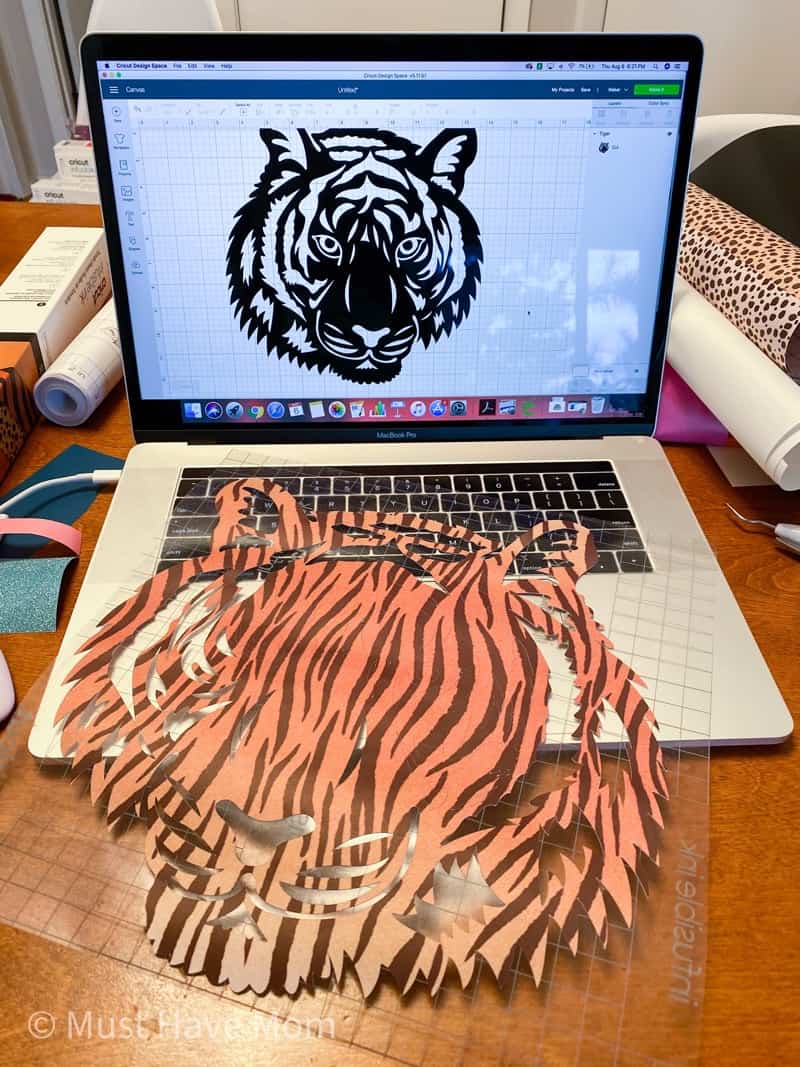
Weed the designs. Follow the Infusible Ink directions in the Cricut Heat Guide or in this Infusible Ink post to transfer your design onto the tote bag blank using your EasyPress 2.
It is SO cool how the Infusible Ink becomes the fabric! I absolutely LOVE Infusible Ink and it’s not hard to do at all!!
Personalized Pencil Pouch
When my daughter was in kindergarten she went through so many pencil boxes! We bought the inexpensive plastic pencil boxes and the kids would put their chairs up on the tables with their pencil boxes and for whatever reason, they fell off the table and cracked often. We have now switched to pencil pouches because the fabric zipper totes don’t crack and they are easier to carry around without having them spill open and dump the contents. Make your own personalized pencil pouch with Infusible Ink!
Cricut Pencil Pouch Supplies:
- Cricut Maker, Explore Air 2 or Joy
- Cricut Cosmetic Bag Blanks
- Infusible Ink in your choice colors/patterns
- EasyPress 2
- EasyPress 2 Mat
Begin by creating a design for your pencil pouch using Design Space. Use your Cricut machine to cut the Infusible Ink. Lay the Infusible Ink right side up on the mat. Weed the design. Follow the Infusible Ink directions in the Cricut Heat Guide or in this Infusible Ink post to transfer your design onto the tote bag blank using your EasyPress 2.
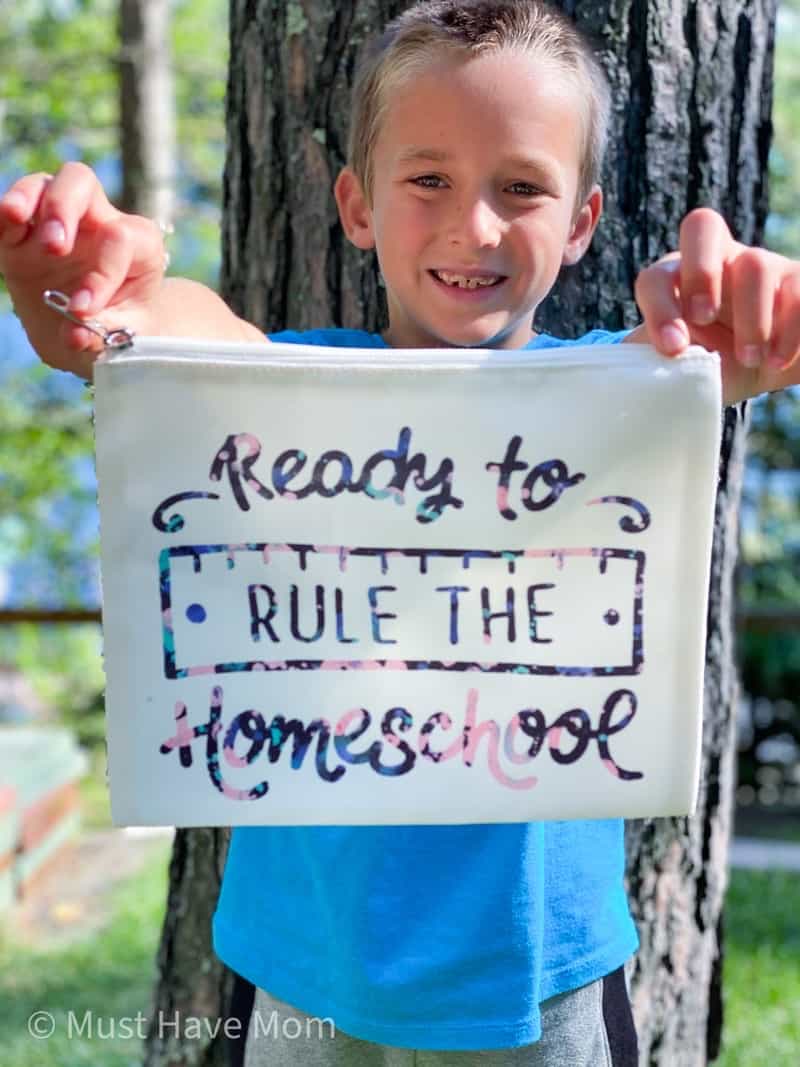
Now the zipper pouch is ready to be filled with pencils, erasers, markers and more!
Using your Cricut to personalize your children’s supplies for back to school couldn’t be any easier! It’s an inexpensive way to label all their supplies and make them more fun. I have spent a small fortune on fancy labels that don’t come close to being as cool as these personalized back to school projects we did with our Cricut. This is just the start of my personalizing too! Since we are homeschooling I also have clear plastic tubs for each child with their books inside. I’ll be adding their names to each tub and organizing my metal supply carts with Cricut labels too! It’s easy, it’s economical and it is so much fun! This turned out to be a super fun tradition that the kids want to do every year.
No matter if your child is going back to in-person schooling, distance-learning or you chose to homeschool this year, make it more fun with these personalized back to school projects!!
Pin Personalized School Supplies

This is SUCH a good idea! It makes the items fun but also easily recognizable. I love this. Pinning! 🙂 Visiting from Happiness is Homemade.
Such a great back to school project with Cricut! And love how practical this is, too, Sarah! We hope to see you at Tuesday Turn About this week! Pinned (and followed… I can’t believe I wasn’t following you on Pinterest!)!
So cute and perfect to help kiddoes recognize and remember their things. Featuring when my link party opens.
Sakuya.in is one of best online toy shop for kids.You can buy toys for kids online at https://sakuya.in
I love the idea of using removable vinyl for a personalized laptop design. It’s great that your child can change the design whenever they like without worrying about damage. Do you have any tips for ensuring the vinyl stays smooth and doesn’t get any bubbles during application?
Your sharing style is excellent and highly beneficial; it will make the study area more attractive and make organization simpler.
For my birthday, my friends gave me a certificate with a small deposit at the 1win casino. At first I thought it was a joke, but then I decided to give it a try. I chose roulette – it always seemed like a game with character to me. And what do you think? Black-black-red – and my bet doubled! Of course, luck was not always on my side, but the process itself was so captivating that I even forgot about time. A great gift – emotions and excitement at their best!
Your method of exchanging information is first-rate and very useful; it will spruce up the study space and facilitate organisation.
@drive mad
Using Cricut to personalize back-to-school supplies is a really inventive approach to get kids excited about the next term. A personal touch can be added to each object by adding names, symbols, or themes. I adore how kids’ imaginations are stimulated and back-to-school items can be personalized with Cricut creations!
Manchmal gibt es außerdem 5 Gratiswetten für Sport. In manchen Fällen erhalten E-Wallets
keine Gelder, wenn du per Bankkarte eingezahlt hast. Leon Casino bietet
Spielern aus dem Deutschland verschiedene Zahlungsmethoden, die auf unterschiedliche
Profile und Budgets zugeschnitten sind. Es ist eine großartige Möglichkeit, bei internationalen Turnieren bis hin zu den neuesten Amateurligen live dabei zu sein.
Richten Sie einen Manager ein, um Ihr eindeutiges Passwort sicher aufzubewahren. Beim Auschecken wird der Mindesteinzahlungsbetrag in € angezeigt.
Sie erhalten E-Mails und sehen Statusaktualisierungen in Ihrem Profil.
Wenn Sie keine echten Informationen verwenden, können Ihre Auszahlungen zurückgehalten werden, bis wir Ihr Profil überprüfen. Die Website unterstützt deutsche und lokalisierte Zahlungen und verwendet SSL-Verschlüsselung und unabhängige Tests, um sicherzustellen, dass sie fair sind.
Spielst du viel Slots, gibt’s Freispiele. Tischspiele wie Blackjack nur zu 10 % oder weniger.
Überweisung erfolgt sofort – 100 % Bonus bis zu € 1.000 wird
gutgeschrieben, Freispiele folgen meist innerhalb von 24 Stunden. Stellen Sie außerdem sicher, dass die Zwei-Faktor-Authentifizierung aktiviert
ist und dass schnelle Auszahlungsmethoden Vorrang haben. Bei Responsible Play bietet Ihnen Leon Casino eine schnelle
Selbsteinschätzung und Links zu hilfesuchenden Websites wie GamblingTherapy und lokalen Beratungsstellen.
References:
https://online-spielhallen.de/casino-bregenz-aktionscodes-mehr-ihr-umfassender-leitfaden/
Insbesondere die Willkommensboni fallen häufig so lukrativ
aus, dass ihr euch diese nicht entgehen lassen solltet.
Schließlich würde die Freude daran ein jähes
Ende finden, wenn ihr feststellen müsstet, auf Betrüger reingefallen zu sein. Es lohnt sich, hier ein wenig mehr Aufwand zu betreiben, um einen Anbieter zu finden, der optimal zu
euren persönlichen Vorlieben passt. Außerdem sollten attraktive Quoten bei neuen Wettanbietern dafür sorgen, dass ihr auch bei
Sportwetten von den optimalen Gewinnchancen profitiert.
Denn natürlich sollte dieser Sektor durch eine umfangreiche
Wettauswahl und Boni mit fairen Konditionen ebenfalls ansprechend
gestaltet werden.
Die GGL gewährleistet, dass alle lizenzierten Anbieter in Deutschland
sicher und legal operieren und ihre Angebote regelmäßig kontrolliert werden. Die Umsatzbedingungen sollten dabei fair und realistisch sein, um den Spielern eine echte Chance auf Gewinne
zu bieten. Montags gibt es zum Beispiel 5 Freispiele für den Slot der Woche, während treue Mitglieder am Wochenende insgesamt 150
Freispiele erhalten können. BingBong beispielsweise bietet neuen Spielern einen 100% Bonus bis zu 100 € und 50 Freispiele.
Unsere Experten analysieren technische, finanzielle und spielerische Faktoren, die langfristige Sicherheit,
Fairness und Spielspaß garantieren. Kennst du
dich bei Automatenspielen aus oder ist das alles komplettes Neuland für dich?
Neue Casinos sind in dem riesigen Glücksspielmarkt-Dschungel gar nicht leicht zu finden.
References:
https://online-spielhallen.de/instant-casino-erfahrungen-meine-umfassende-bewertung/
купить виртуальный номер для приема смс
rent car umm al quwain
Access the excitement of The Star from your device — play live games
and pokies 24/7 across Australia. Enjoy your favourite
pokies, classic table games, and live dealers — anytime, anywhere.
Your account helps you do more by personalizing your Google experience and offering easy access to your most important
information from anywhere. Mississippi stud poker,
three card poker, Caribbean stud poker, and Texas Hold ’em bonus poker are
among the poker games available on the casino floor. With full account functionality, real-time updates,
and seamless navigation, you can manage your gameplay effortlessly and securely from your mobile device.
Our interface and customer service are built to accommodate a wide range of players across Australia and beyond.
We only work with trusted providers like Evolution, Pragmatic Play, Red Tiger,
NetEnt, and Microgaming. All RNG-based games are independently audited to guarantee fairness and transparency.
The Star Gold Coast Casino Online operates under a reputable international gaming license and complies with Australian and global regulatory
standards.
References:
https://blackcoin.co/39_best-vip-online-casino-2022_rewrite_1/
On the left side of the homepage theres this whole section dedicated
to their PAGCOR certification which is the Philippine
gaming authority. Watch regional jackpots grow in real time and jump in when the prize pool peaks.
The setup is simple and the games run smoothly, I had no issues have
encountered with this site, they’re really good I must
say
In 2017, viewers on average watched YouTube on mobile devices
for more than an hour every day. On April 9, 2025, YouTube
expressed support for the NO FAKES Act of 2025, introduced by Senator Chris Coons (D-DE) and Senator Marsha Blackburn (R-TN), and announced an expansion of
its pilot program that is designed to identify content generated by AI.
The user must go through age verification via payment, scanned ID,
or selfie to access all features if they are detected to be a minor.
On YouTube, this will be based on factors such as searches and video history, and the age of the
account.
References:
https://blackcoin.co/how-online-casino-vip-programs-work/
Deposits hit your account instantly, withdrawals process quickly and every payment method is built around convenience.
Whether you’re collecting spins or filling your cashback jar, the more you play, the more delicious your wins become.
The terms are simple, the perks are sweet and the value is real.
Big Candy Casino knows how to make every
player feel like a kid in a candy store. The game lobby is
stacked with themed pokies, smooth table games and thrilling live
rooms, all designed to deliver variety and fun. From the
moment you enter, you’ll find rewards as tempting as the sweets they’re named after.
Regretfully, there is still no telephone support available, which is a significant
difference from competitors in the industry who provide voice assistance.
For more in-depth questions, email support is available at [email protected].
The primary means of communication is live
chat, although access necessitates account registration and login.
The casino employs 128-bit SSL encryption, firewall defence, and fraud prevention protocols to protect user data.
Regular users can redeem extra perks via the A Big Candy casino promo code system.
Once registered, users unlock a three-tier welcome package that boosts
deposits and adds plenty of free spins. Each title is optimised for smooth performance on mobile devices, and every spin is verified for fairness through RNG certification. We do not have a mobile version of our website.
References:
https://blackcoin.co/microgaming-casino-bonuses-and-how-they-work/
He specializes in evaluating licensed casinos, testing payout speeds, analyzing software providers, and helping
readers identify trustworthy gambling platforms.
The casinos above are the top all-rounders, but if you want to learn more about a specific game genre, you can refer to any of the pages below.
Recognizing the critical role of support services,
Las Atlantis provides round-the-clock customer assistance
through live chat and telephone, ensuring players’ needs are promptly addressed.
This thorough evaluation ensures that the Safety Index accurately reflects a casino’s
commitment to fair play. Larger casinos are generally deemed safer due to their resources and established reputation, whereas
smaller casinos may face challenges in fulfilling large payouts.
Over 600 casinos have amended their T&Cs based on Casino Guru’s recommendations.
References:
https://blackcoin.co/the-match-game-rules-wins-and-popular-strategies/
online casino paypal
References:
https://precisionscans.net/employer/us-online-casinos-that-accept-paypal-2025/
online australian casino paypal
References:
https://skillproper.com
online real casino paypal
References:
http://www.muadirect.co.uk
paypal casino android
References:
geokofola.geopivko.cz
online casinos that accept paypal
References:
https://cvbankye.com/
online casino roulette paypal
References:
adm.astonishkorea.com
https://unlimboost.com/bmw/4er/2013-2017-4er/f3x-420d-190-%d0%bb%d1%81