Cricut EasyPress 2 Review, Settings & Beginner Project
The Cricut EasyPress 2 makes iron-on projects easy and fool-proof! It is far superior to a household iron and I’ll share why I love it, how to use your Cricut EasyPress 2 and the settings for it. Plus, I have an easy beginner project tutorial that anyone can do!
This is a sponsored conversation written by me on behalf of Cricut. The opinions and text are all mine.
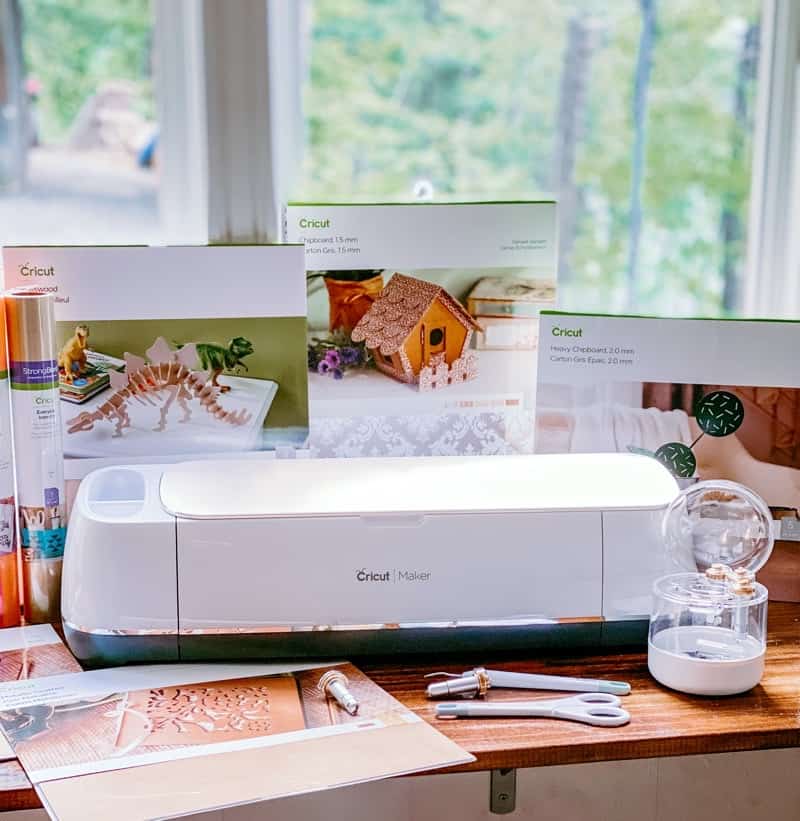
Cricut EasyPress 2
Cricut products have added a new dimension of fun for me when it comes to making craft projects. My craft projects have moved to a higher level since I started using Cricut.
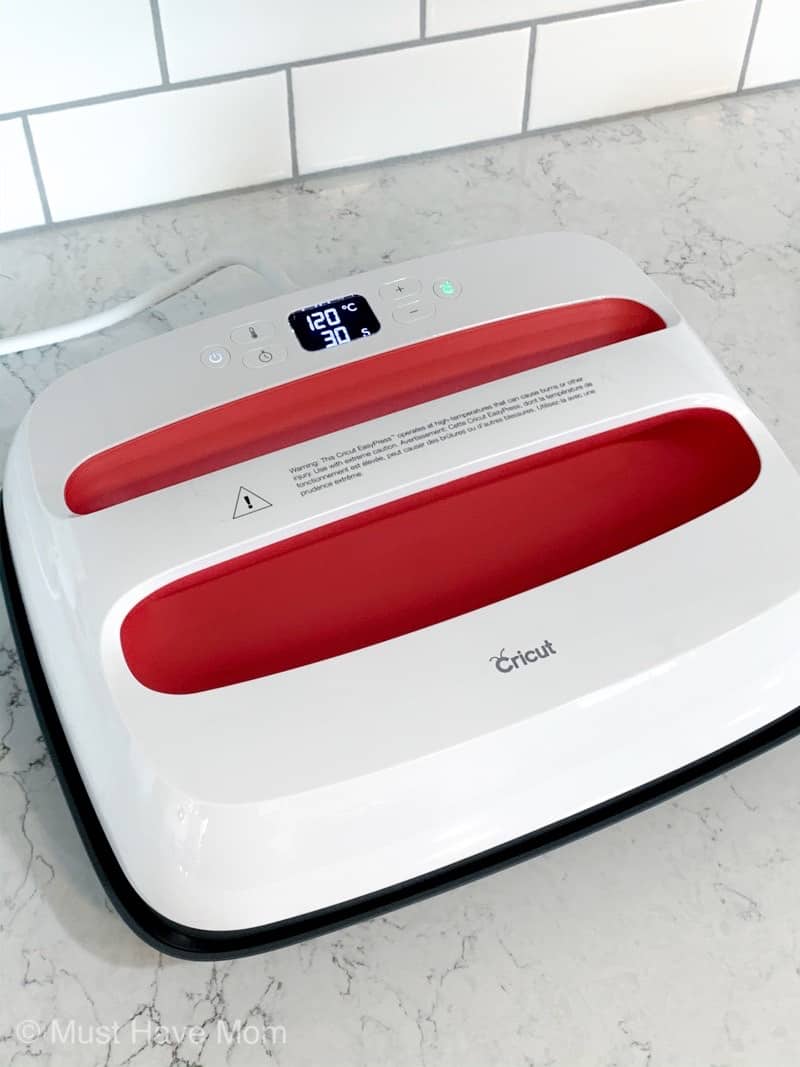
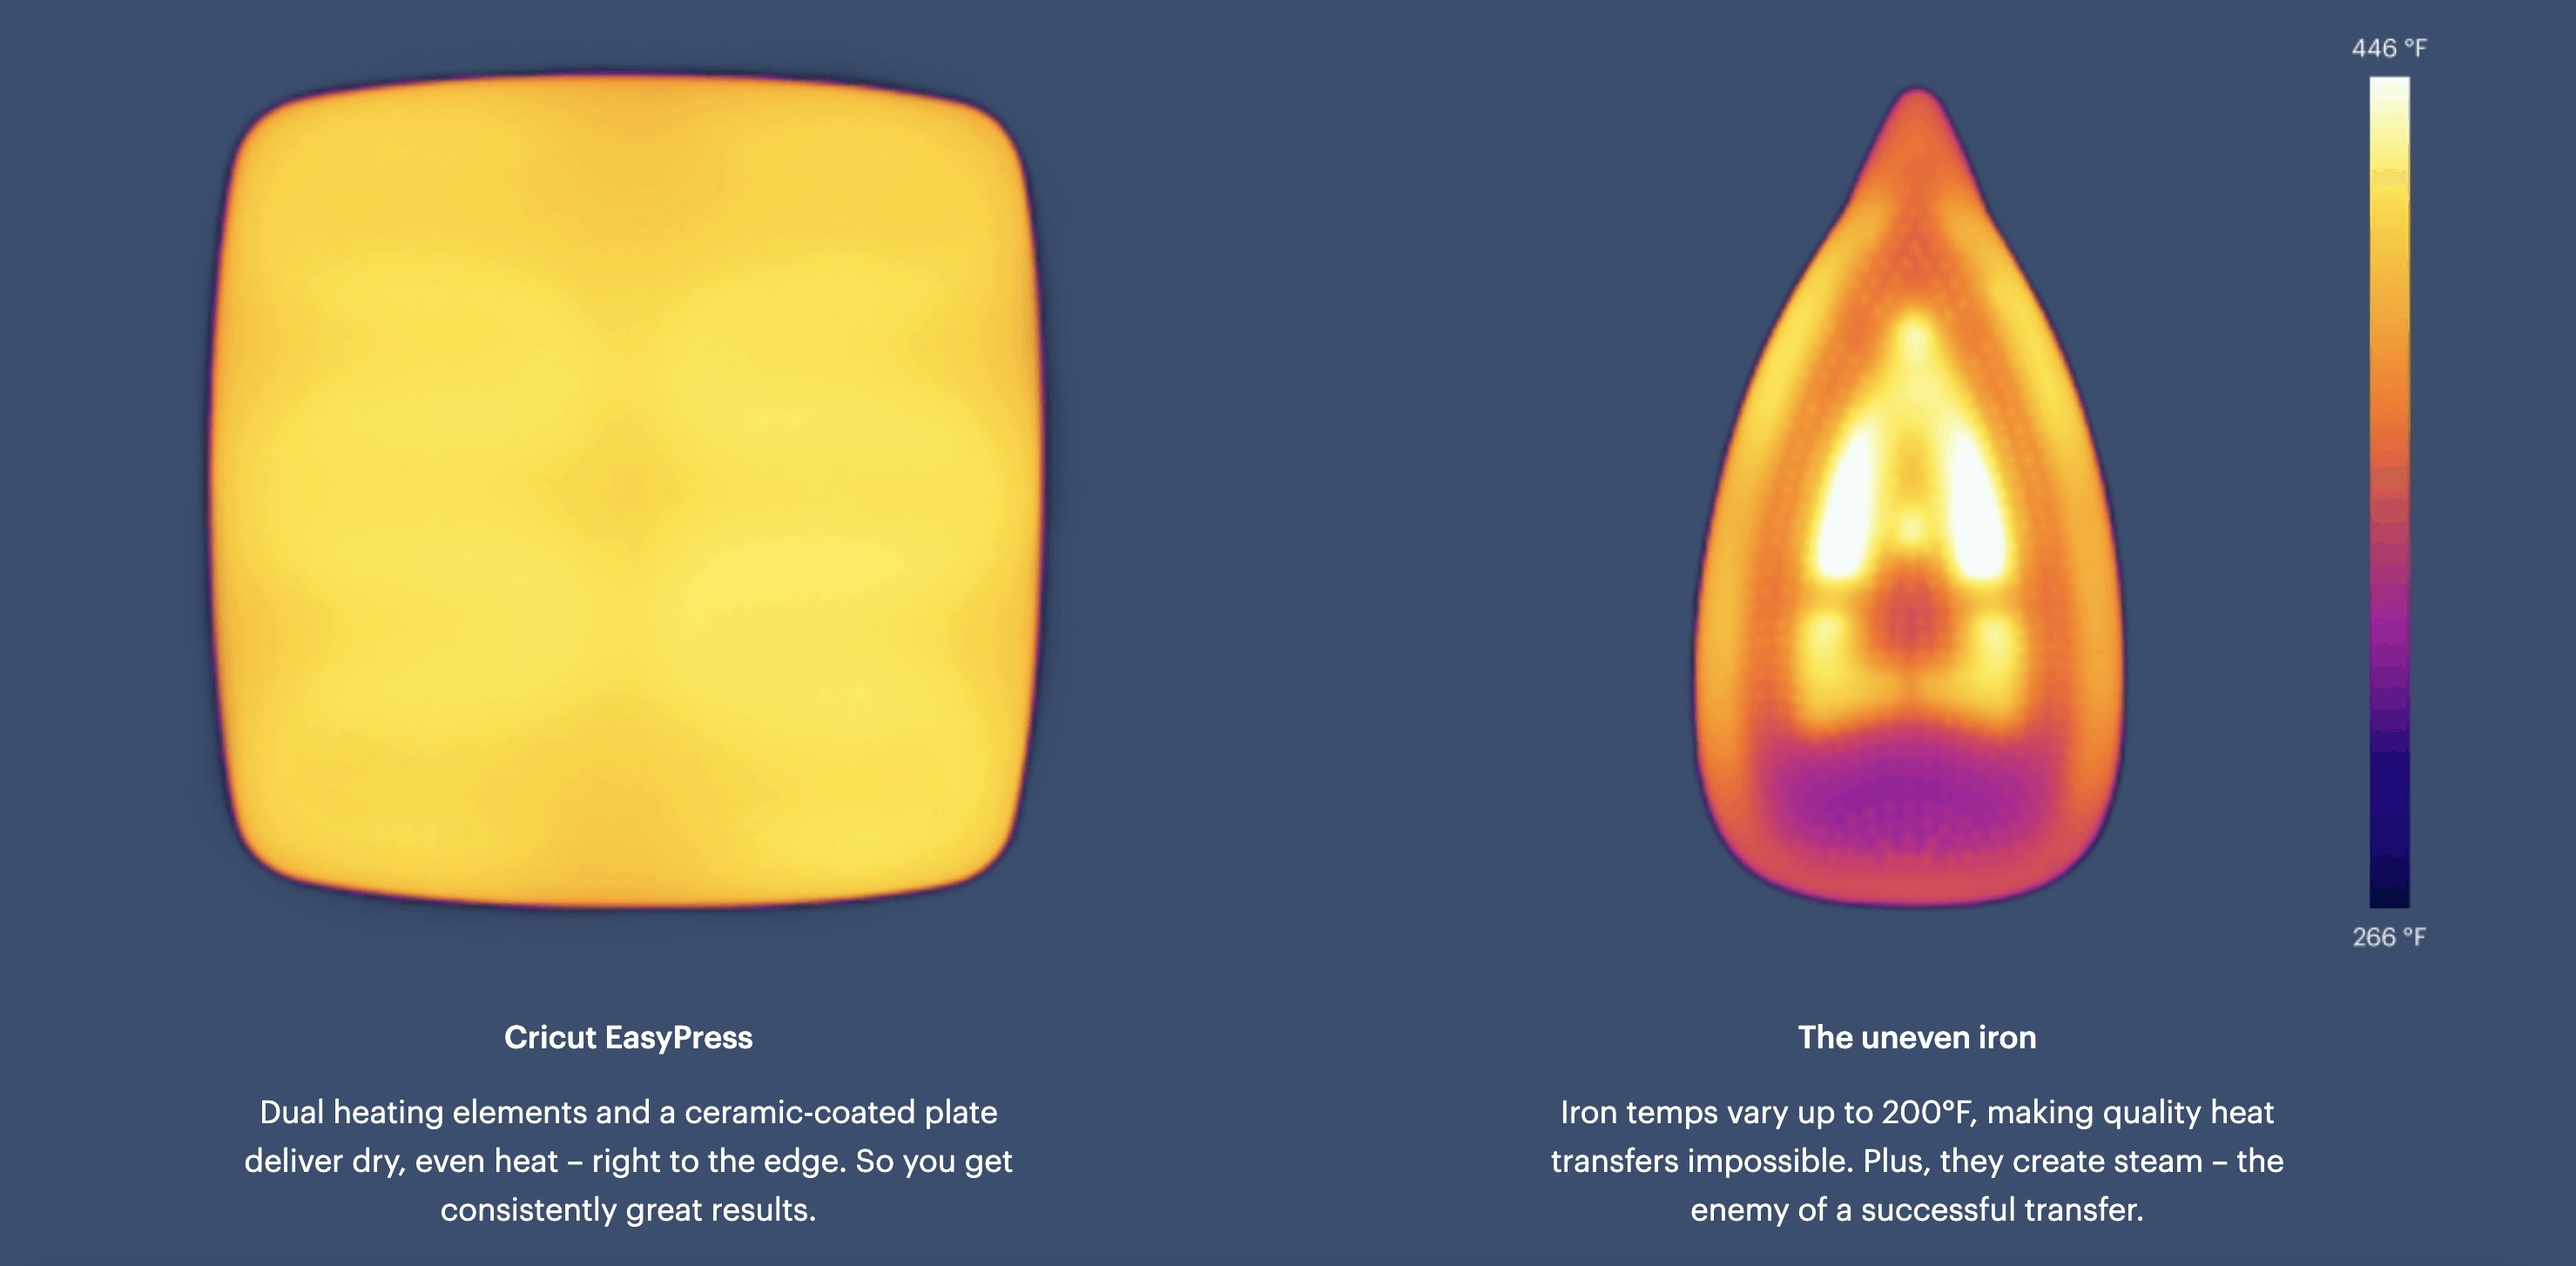
The Cricut EasyPress 2 is another machine that can really amp your crafting skills. It works like a heat press, except it is portable, and so much easier to use. It is far superior to using a household iron to apply your heat transfer projects. It delivers even heat as opposed to a household iron which has holes in it and can vary in temperature accuracy by as much as 100 degrees! That can greatly affect the final quality of the projects you make.
The Cricut EasyPress 2 delivers consistent, accurate heat so you know that your project will turn out right every time. It also eliminates the need to move back and forth over your project. The large heat plate covers most designs entirely so you can press it down for the right amount of time without having to move it around (and risk moving your design).
If you are looking for something easy to handle and something foolproof, this machine is ideal. I also recommend this machine to my friends who work crafts with their children. That’s because the Cricut EasyPress is safer to use than a standard heat press machine. It also pairs perfectly with my Cricut Explore Air 2 for making custom vinyl iron-on projects.
The Cricut EasyPress 2 comes in three sizes: 6×9, 9×9 and 10×12 in a very cool raspberry color.
If you are planning on using it for small projects, like baby onesies, the smaller one would do. However, if you are buying it to print banners and bigger sized T-shirts, then go with the biggest size. I’ve invested in the largest 10 by 12 inch EasyPress.
How to Use Cricut EasyPress 2
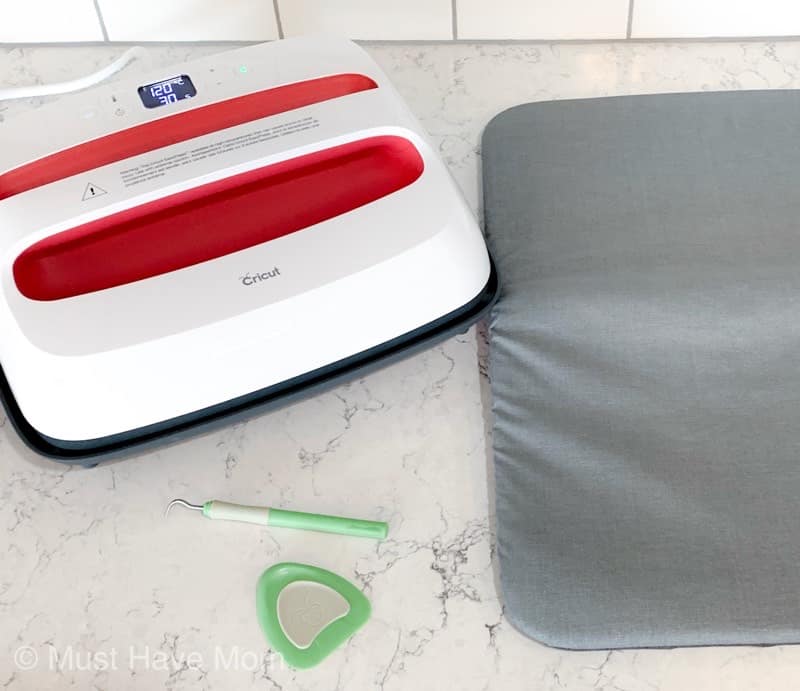
The Cricut EasyPress Setting is very simple to use. Get your things in order, including your design, the material, the Circuit EasyPress, and the Cricut EasyPress Mat.
The Cricut EasyPress Mat does not come with the machine. You need to buy it separately. But it’s worth the investment. It gives your design an even and finished look. If you absolutely cannot invest in the mat you can use a fluffy bath towel.
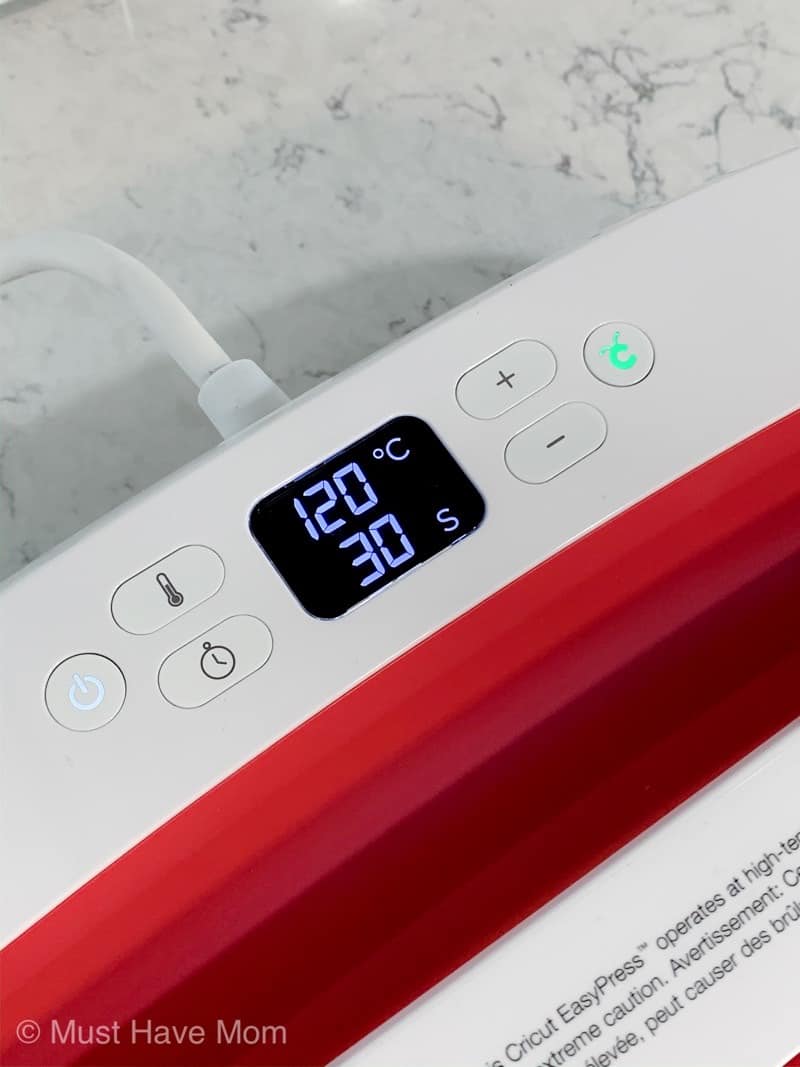
Start by turning on your Cricut EasyPress 2 using the on/off button.
Now you have to set the temperature. This you will be setting based on what you are printing and what material are you printing it on. 320℉ degrees work well with your average T-shirt material.
You can adjust the temperature using the plus and minus buttons on the machine. With each press, the temperature goes up a 5. The Cricut EasyPress 2 can go up to 400℉.
Once you are done with adjusting the Cricut Easy Press Setting, the machine starts heating up to the required temperature. You’ll hear a beep when it’s ready and the Circuit Go button will light up. It takes about 1-3 minutes for the machine to heat up.
Once you hear the beep your Cricut EasyPress is preheated. Now put your material along with the design on the mat.
Set the timer to the desired time and hit the green flashing button. Place and press the machine firmly on your design for an even, clean design. In some cases, you have to remove the design when it is still warm. That depends on the material you are using (See below for Cricut EasyPress Settings).
Once the timer goes off, replace the machine onto its base. Wait for a few minutes to let it cool completely before you peel off the design. This allows the design to set properly.
Cricut EasyPress Settings
| Material | Temperature (℉) |
| T-Shirt | 400 |
| Polyester | 400 |
| Metal | 400 |
| Ceramic | 350 |
| Vapor Apparel | 380-390 |
| Glass Tiles | 400 |
| Foil | 315 |
For more detailed Cricut EasyPress Settings, check here. Enter your materials, your machine and Cricut will tell you the exact temperature and time that you will need to set your EasyPress 2 to.
Cricut EasyPress Reviews
Before I buy any craft machine or accessory, I always try to look at some online reviews. I’d suggest the same to you. Go look at Circuit EasyPress 2 Reviews online.
If you ask my opinion, I like my Cricut Easy Press because:
- It’s light-weight which makes it easier to operate.
- It’s portable. I store it in one of my cupboards. Since it’s small and handy, this saves a lot of fuss of saving the machine properly.
- The handles on the top of the machine make it safer to operate.
- It guarantees great results almost every time. Just go with the recommended settings, and your designs will always turn out good. For me, this is important because I don’t like wasting materials trying to get the designs right.
- It is very suitable for beginners. It comes with a user manual so you can set it up easily. Plus, the customer service is really good. There is support for everything you need. Even if there isn’t, I always find good advice from other users.
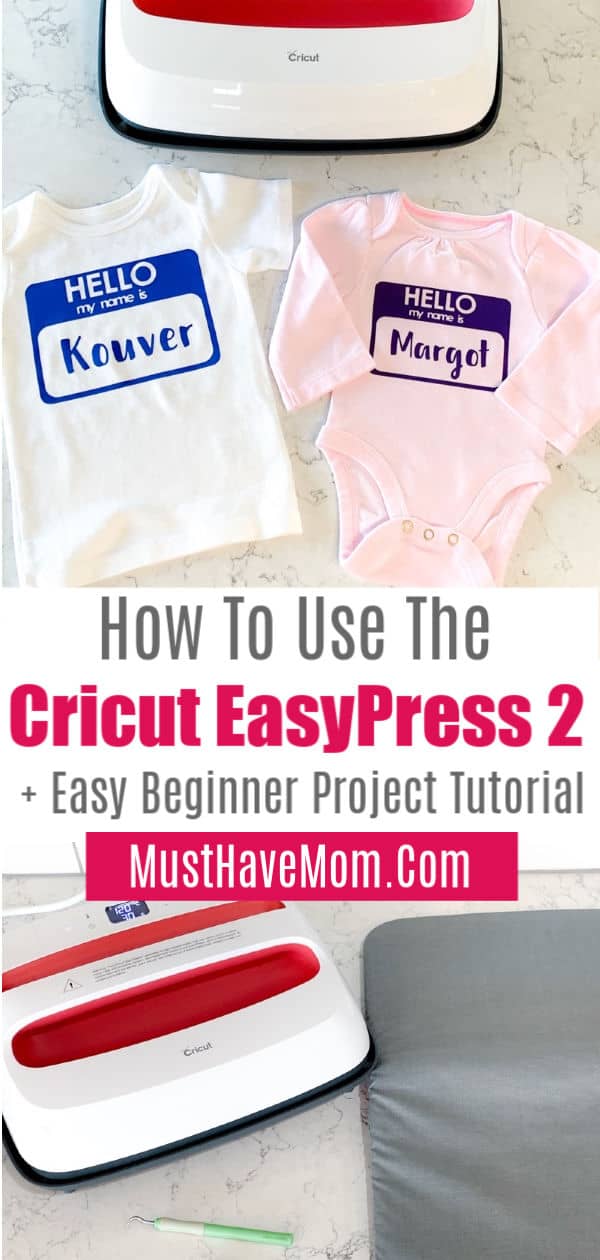
Cricut EasyPress 2 Beginner Project
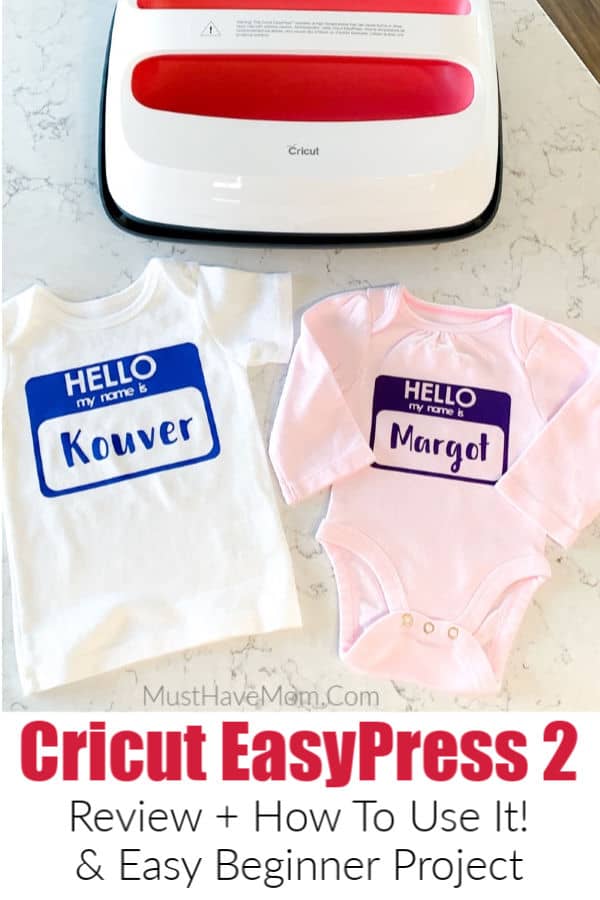
Now that I shared why I love my Cricut EasyPress 2 so much, let’s do an easy beginner project together! These DIY baby bodysuits are so easy and the best part is that the design file is free in Design Space so you can easily personalize any baby tee as the perfect baby shower gift idea. I’ll walk you step by step through making these cute “Hello my name is…” baby shirts.

For this project you will need:
- Cricut Explore Air 2 or Maker
- Cricut EasyPress 2
- Cricut EasyPress 2 Mat
- Cricut Iron On Vinyl
- Baby bodysuit or tee (100% cotton)
- Scissors (included in the basic tool set)
- Weeding tool
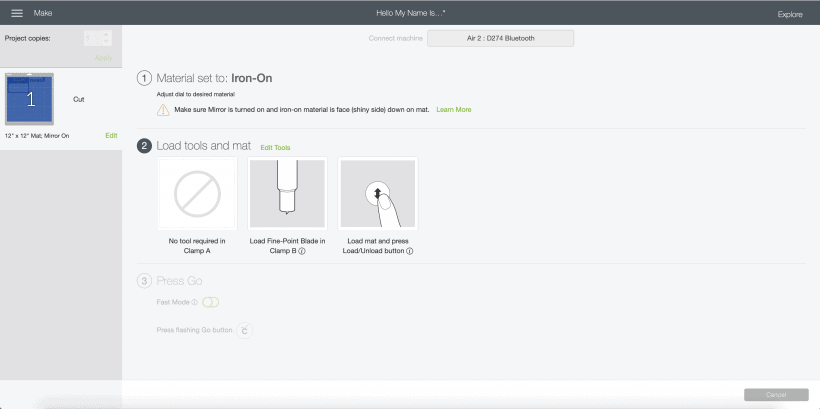
Begin by creating the project in Design Space. There is a pre-made project template for this so just find the “Hello My Name Is…” project and customize it with the desired name you choose. Then click “make it”.
You’ll want to load the vinyl shiny side down on your mat so that the “right” side is face down. Make sure you have clicked the toggle to “mirror” the image so that when you iron it on it is the correct side facing. Then follow the on screen directions.
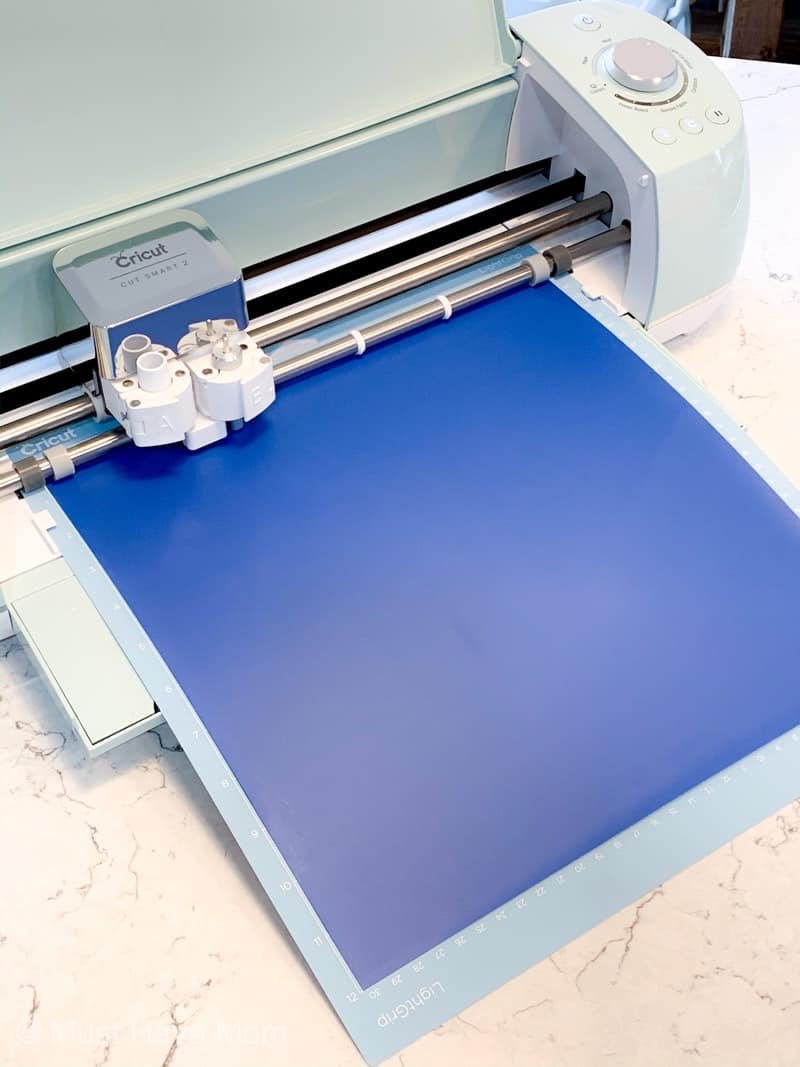
Load your mat with the vinyl shiny side down into the EasyPress 2 or Maker machine. Click the flashing button and it will cut the vinyl for you. Once it’s done remove the mat and take the vinyl off the mat. Cut out the design into two pieces (the name itself and the hello my name is graphic). Weed the design so only the pieces of vinyl required for the project remain on the backing.
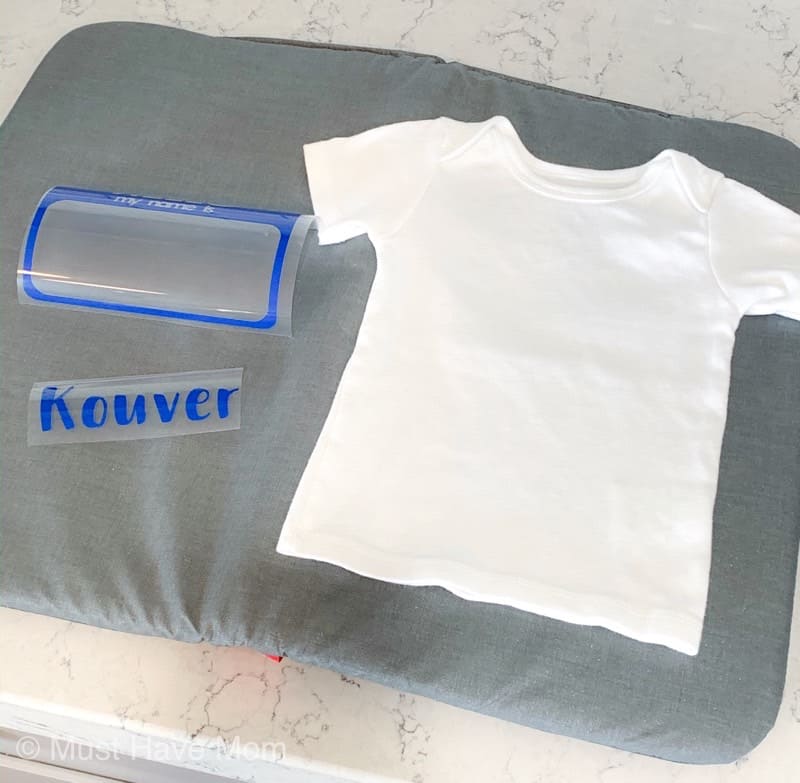
When you are done it should look like the photo above. Now it is time to use the EasyPress 2 to iron them onto the shirt.
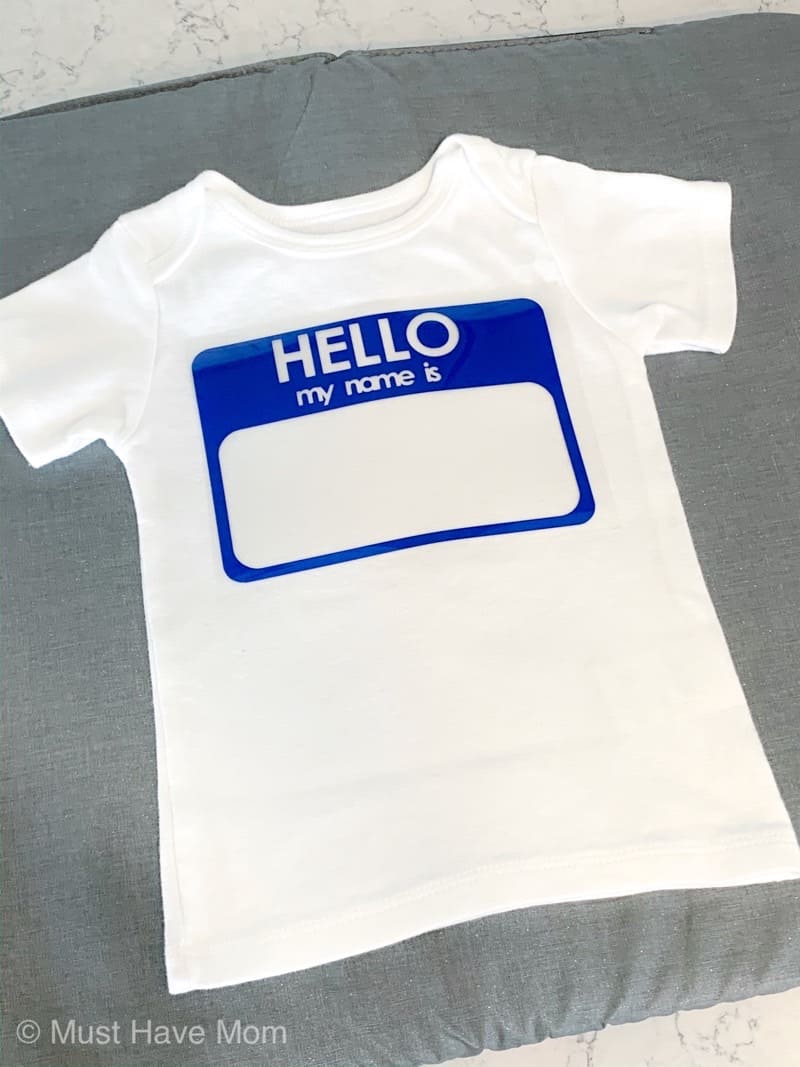
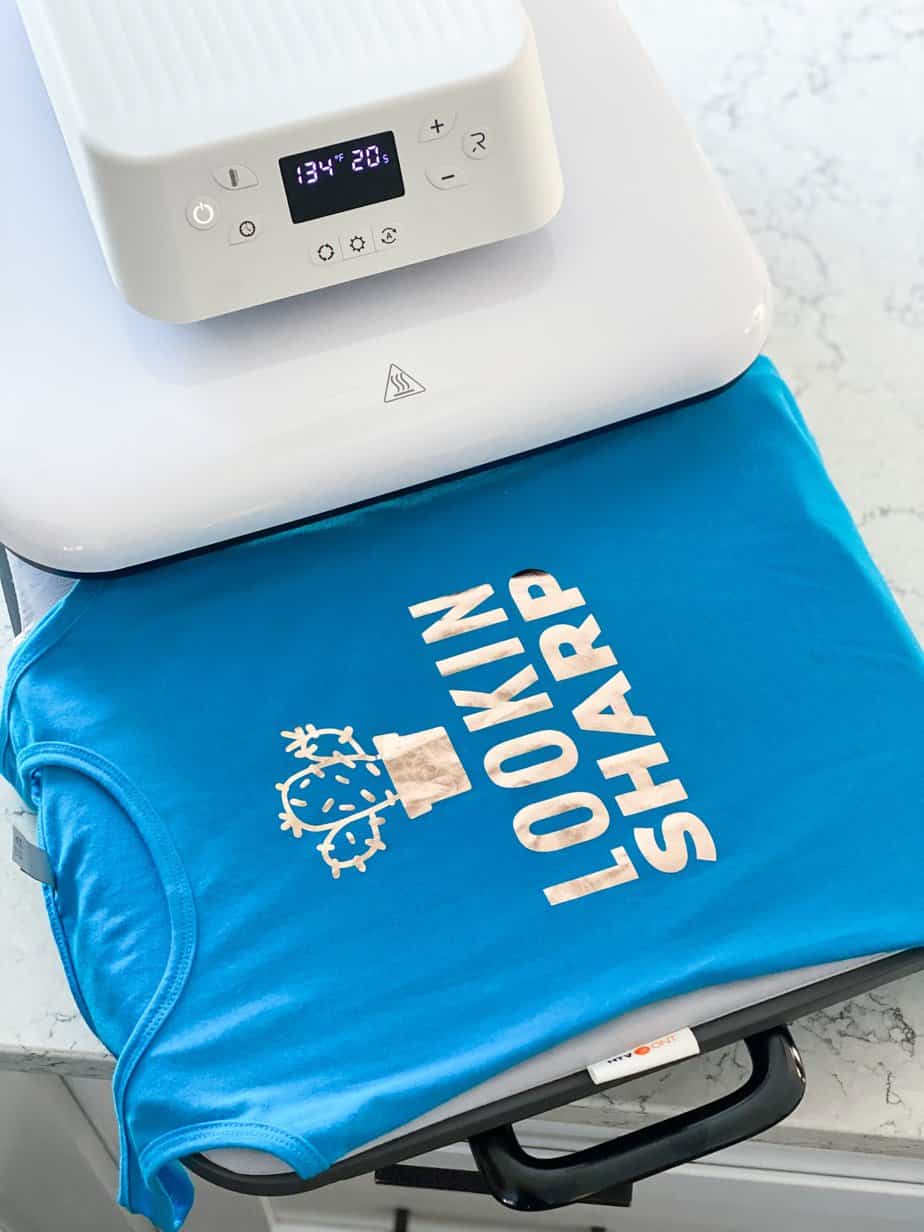
Begin by pressing the EasyPress 2 onto the shirt for 5 seconds just to preheat the shirt. Then add the “hello my name is…” vinyl to the shirt and place it where you want it to go. Your EasyPress 2 should be heated to 315 degrees F and will be applied for 30 seconds (according to Cricut EasyPress 2 settings guide). Use firm pressure on the EasyPress 2 while heating the vinyl and press the green flashing button to start the timer. Once it finishes I flip the shirt over and press the back of the shirt for 5 seconds as well to help adhere the vinyl even better.
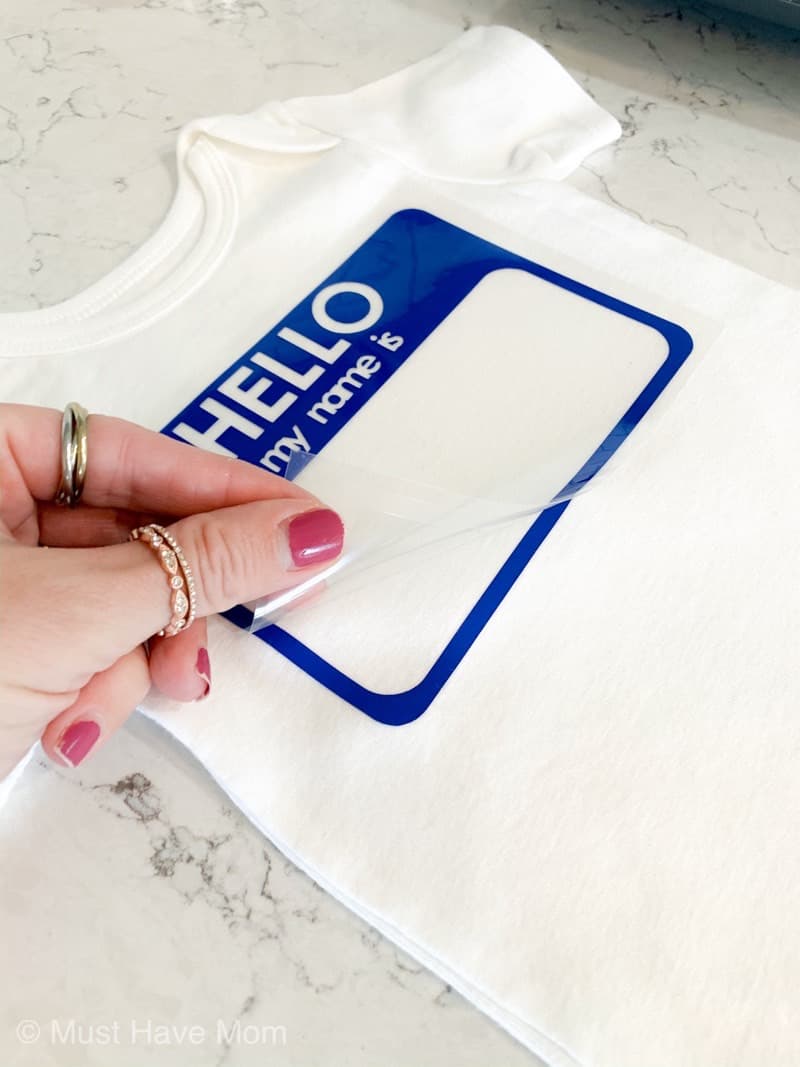
Allow the design to cool and then slowly remove the clear backing from the vinyl. If any spots are not adhered fully to the shirt just place the clear backing down on the shirt and press it again with the EasyPress 2 for another 30 seconds. Remove the clear backing and place the vinyl name in the box where you want it to adhere. I place the full clear backing over the entire design again and then press for another 30 seconds on the front and 5 seconds on the back. Allow to cool and remove all the clear backings.

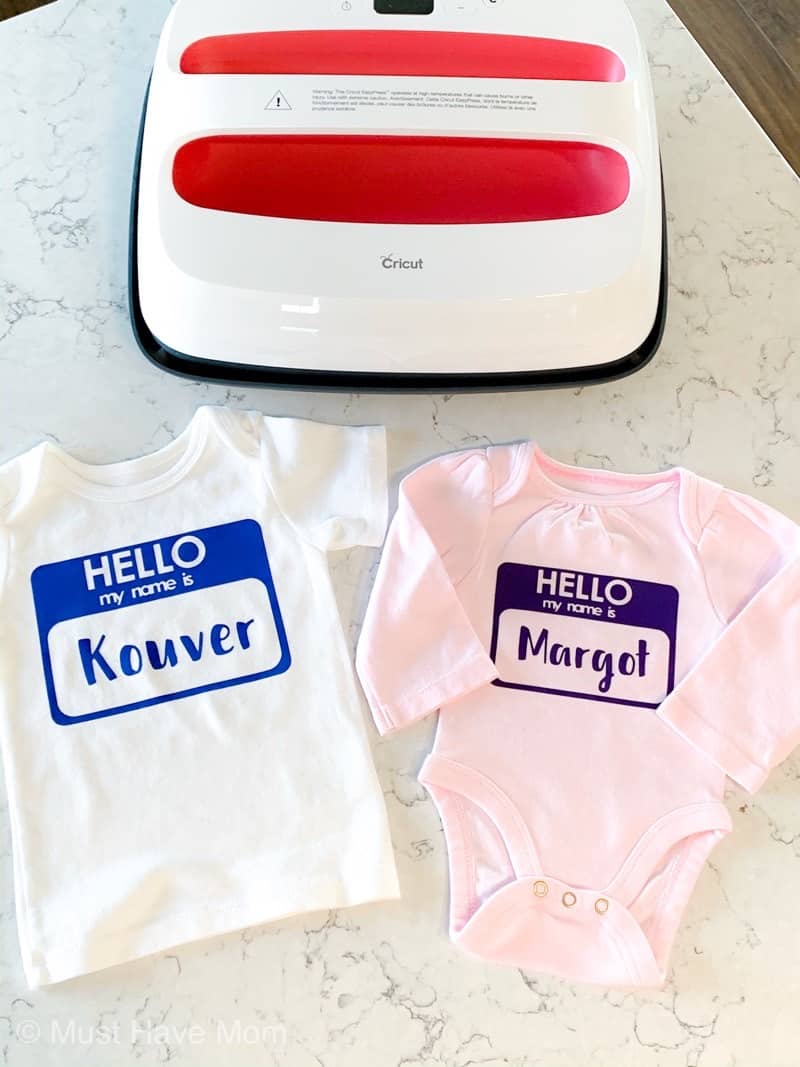
When you are done it should look like this! You can make them as great baby gifts!

Get your Cricut EasyPress 2 Now!
I cannot believe how much fun I am having with mine and I can’t wait to make even more projects with it! The possibilities are endless!
Pin Cricut EasyPress 2
If you enjoyed reading about the Cricut EasyPress 2, you might also enjoy reading:


These are super cute. I would love a Cricut easypress.
I just got both of these machines and turned them on for the first time last week so your tutorial is very timely. Thank you 🙂
Oh that is SO exciting!!! You will love them!
Your instruction couldn’t have come at a better time; I just received and powered on both of these devices last week. I am grateful Monkey Mart .
Allenati con wordle deutsch 5 buchstaben su Wordle Play! Indovina parole di 5 lettere in tedesco e migliora la tua conoscenza linguistica giocando ogni giorno.
So, a friend told me about captain spins after hearing me complain about never winning anywhere. I tried it out one evening, checked out the NZ player bonuses, and figured — why not? Played a few rounds of Starburst, lost a bit at first, then a lucky streak hit hard. Watching my balance jump like that was pure adrenaline. The platform runs flawlessly, and now it’s my favorite late-night spot to unwind.
Salut! Sunt din Ploiești și un prieten mi-a recomandat chickenroad. Am încercat jocul pentru câteva runde și am fost surprins de mecanica sa captivantă. După câteva pierderi, bonusurile mi-au adus o câștig mare care a acoperit totul și mi-a lăsat un mic surplus. Serverele locale fac ca totul să fie rapid și fără probleme, iar jocul este foarte distractiv și ușor de urmărit.
Natürlich werden auch noch etliche weitere Slots und die bekannten Tischspiele
(Roulette, Black Jack usw.) angeboten. Neben den bekannten Slots von Net-Entertainment
(u.a. „Starburst“ und „Crime Scene) werden auch einige Merkurspiele (u.a.
„Magic Mirror“ und „Knight’s Life) angeboten. Bei diesen gibt es Bedigungen für die Teilnahme, wenn man diese erfüllt, kann man Freispiele usw.
Man erhält für ein abgeschlossenes Level Freispiele.Es gibt ganz
viele Casumo Races.
Für das Spielen auf Casumo erhält man einfach erklärt Fortschritts-
bzw Erfahrungspunkte, man erhält immer wieder sogenannte “Wertsachen” hinter denen sich dann oft Freispiele verbergen. Dies ermöglicht es leichter,
auch unterwegs (z. B. in einem Internet-Café) zu spielen. Vor jeder Einzahlung kann gewählt werden, ob man mit oder mit welchem Bonus man spielen möchte.
Dieses hochmoderne Online-Casino bietet eine große Auswahl an herausragenden Spielen mit einem benutzerfreundlichen Interface.
Sehr schönes, sehr übersichtlich, netter Willkommensbonus & auch schnell auszuzahlen. Ein sehr schöner Willkommensbonus und alles funktioniert perfekt,
sehr zufrieden damit Sehr große Spielauswahl, viele Ein- und Auszahlungsmöglichkeiten. Gus hat sich durch seine jahrelange Erfahrung zu einem echten Experten auf
dem Gebiet der Casinospiele und Anbieter entwickelt.
References:
https://online-spielhallen.de/boaboa-casino-aktionscode-ihr-schlussel-zu-exklusiven-vorteilen/
AUD is supported, cards and e‑wallets are instant, and crypto is available for quick, high‑limit deposits.
Enjoy Crazy Time, Monopoly, Funky Time, Pachinko, Treasure Island, and other studio game shows with lively hosts and bonus rounds.
Wagering is x40 unless stated, max bet is €/$5 on bonus funds, and
excluded games/jackpots apply as standard. The lobby is packed with pokies, live tables,
game shows, and even sports.
KYC checks apply before withdrawals. I rely
on licence, payments, and game coverage. I present a precise audit for Australians.
Woocasino.com is owned and operated by Dama N.V. If you have a question about the functionality of the
casino, you can consult FAQs. Gamblers can contact support agents anytime.
The help centre covers account, bonus, and payment topics.
Comp points convert to bonuses or cash equivalents per rules.
Woo Casino applies x40 wagering and a €5 max bet on bonuses.
References:
https://blackcoin.co/woospin-premier-pokies-paradise-for-aussie-players-in-2025/
This iconic venue is ideal for a romantic occasion, iconic birthday milestone celebration, or intimate gathering with
family and friends. An unforgettable experience awaits you.
Kindly remember to bring your gift voucher on the
day of treatment; otherwise, the full treatment amount will need
to be paid. While you can easily book solo treatments online, we kindly ask that couples treatments be
arranged over the phone or via email to ensure the best possible experience.
Our facilities include a relaxation lounge, a private tropical courtyard, and an inner
sanctum – featuring eight treatment rooms (solo and couples rooms), some with private outdoor showers.
Accessible from within the resort, or from our Hotel
Reception, this inner-city sanctuary offers a range of beautiful treatments that will leave you feeling relaxed and revitalised.
Live DJ every Saturday & Sunday from 2pm – 7pm Gaming positions require successful
applicants to obtain a casino operatives licence,
which stipulates a clear criminal history. Employees enjoy free meals
while on shift, fully-laundered uniforms where required, and free parking.
At Mindil Beach Casino Resort, we operate as a team
and strive to provide an outstanding experience for our guests and employees
alike. Every Wednesday & Thursday dinner only
References:
https://blackcoin.co/basic-draw-poker-rule/
paypal casino canada
References:
https://wisewayrecruitment.com/employer/us-online-casinos-that-accept-paypal-2025/
online casinos that accept paypal
References:
market.pk
thanks for provide this content. Harivansh Tours is a name you can trust and the largest Tempo Traveler rental service provider in Jaipur. Perfect for family vacations, corporate events, or group trips, we offer a modern fleet of 9, 12, 17, and 26-seater AC and luxury Tempo Traveller in Jaipur.
thanks for provide this content. PuF Panel Sheet is manufactured by Pronto Panels.
thanks for provide this content. Increase your online sales with our expert ecommerce account management services on platforms like Amazon, Flipkart, Meesho, etc.
thanks for provide this content. Travel in comfort in Jaipur and nearby destinations with a Tempo Traveller rented by Maharana Cab.
thanks for provide this content. Rent a 27 Seater Bus in Delhi at the cheapest fare with Maharana Cabs and make the journey a pleasurable one.
Thanks , I’ve recently been searching for information approximately this topic for ages and yours is the best I have came upon till now. However, what in regards to the bottom line? Are you sure concerning the source?
Wow, that’s what I was searching for, what a data! present here at this blog, thanks admin of this website.
Good info. Lucky me I ran across your site by accident (stumbleupon). I have book-marked it for later!
Hurrah, that’s what I was exploring for, what a data! existing here at this webpage, thanks admin of this site.
Hurrah, that’s what I was exploring for, what a stuff! present here at this web site, thanks admin of this web site.
Wow, that’s what I was seeking for, what a information! existing here at this weblog, thanks admin of this website.
Wow, that’s what I was looking for, what a data! existing here at this weblog, thanks admin of this web site.
Hurrah, that’s what I was exploring for, what a material! present here at this website, thanks admin of this web site.
Wow, that’s what I was seeking for, what a stuff! existing here at this web site, thanks admin of this site.
Hurrah, that’s what I was searching for, what a information! existing here at this website, thanks admin of this web site.
Hurrah, that’s what I was seeking for, what a stuff! present here at this website, thanks admin of this website.
Hurrah, that’s what I was searching for, what a data! present here at this weblog, thanks admin of this web page.
Hurrah, that’s what I was exploring for, what a information! present here at this weblog, thanks admin of this web page.
Hurrah, that’s what I was searching for, what a material! present here at this weblog, thanks admin of this web site.
After I originally commented I seem to have clicked on the -Notify me when new comments are added- checkbox and from now on each time a comment is added I get 4 emails with the same comment. Perhaps there is a means you are able to remove me from that service? Thank you!
When I originally left a comment I appear to have clicked the -Notify me when new comments are added- checkbox and now whenever a comment is added I recieve four emails with the same comment. Is there an easy method you are able to remove me from that service? Cheers!
After I originally commented I seem to have clicked on the -Notify me when new comments are added- checkbox and from now on every time a comment is added I get 4 emails with the same comment. There has to be a means you are able to remove me from that service? Kudos!
There is definately a great deal to find out about this issue.
I love all the points you made.
When I originally commented I seem to have clicked on the -Notify me when new comments are added- checkbox and from now on whenever a comment is added I receive 4 emails with the same comment. Is there a means you are able to remove me from that service? Cheers!
After I originally commented I seem to have clicked on the -Notify me when new comments are added- checkbox and from now on whenever a comment is added I receive 4 emails with the exact same comment. Perhaps there is a way you can remove me from that service? Kudos!
After I initially left a comment I seem to have clicked on the -Notify me when new comments are added- checkbox and now each time a comment is added I recieve 4 emails with the same comment. Perhaps there is a way you can remove me from that service? Thanks!
When I originally left a comment I seem to have clicked on the -Notify me when new comments are added- checkbox and now each time a comment is added I get 4 emails with the exact same comment. Perhaps there is an easy method you are able to remove me from that service? Kudos!
After I originally left a comment I seem to have clicked the -Notify me when new comments are added- checkbox and now every time a comment is added I receive 4 emails with the exact same comment. Perhaps there is a way you can remove me from that service? Appreciate it!
When I initially left a comment I seem to have clicked on the -Notify me when new comments are added- checkbox and now every time a comment is added I receive 4 emails with the same comment. There has to be a way you are able to remove me from that service? Thanks!
When I initially commented I appear to have clicked the -Notify me when new comments are added- checkbox and now whenever a comment is added I recieve 4 emails with the same comment. Perhaps there is an easy method you can remove me from that service? Thanks!
After I originally commented I seem to have clicked the -Notify me when new comments are added- checkbox and now whenever a comment is added I receive four emails with the same comment. Perhaps there is a means you are able to remove me from that service? Appreciate it!
Good day! Would you mind if I share your blog with my facebook group? There’s a lot of folks that I think would really enjoy your content. Please let me know. Cheers
I was suggested this website by my cousin. I’m not sure whether this post is written by him as nobody else know such detailed about my problem. You are wonderful! Thanks!
We’re a group of volunteers and opening a new scheme in our community. Your site offered us with valuable info to work on. You’ve done an impressive job and our whole community will be thankful to you.
What’s up colleagues, its impressive paragraph about tutoringand fully defined, keep it up all the time.
Having read this I believed it was really informative. I appreciate you finding the time and effort to put this article together. I once again find myself spending way too much time both reading and commenting. But so what, it was still worthwhile!
Hello there! Do you know if they make any plugins to protect against hackers? I’m kinda paranoid about losing everything I’ve worked hard on. Any suggestions?
If you would like to improve your know-how just keep visiting this web site and be updated with the newest news update posted here.
You really make it seem so easy with your presentation but I find this matter to be actually something which I think I would never understand. It seems too complicated and very broad for me. I’m looking forward for your next post, I’ll try to get the hang of it!
I read this paragraph fully on the topic of the difference of hottest and preceding technologies, it’s remarkable article.
Hi there I am so delighted I found your blog, I really found you by mistake, while I was browsing on Askjeeve for something else, Nonetheless I am here now and would just like to say thank you for a remarkable post and a all round interesting blog (I also love the theme/design), I don’t have time to read through it all at the moment but I have bookmarked it and also added your RSS feeds, so when I have time I will be back to read much more, Please do keep up the superb b.
I was able to find good information from your blog articles.
Hi there! I just wanted to ask if you ever have any issues with hackers? My last blog (wordpress) was hacked and I ended up losing several weeks of hard work due to no data backup. Do you have any solutions to protect against hackers?
Hi to all, since I am really eager of reading this webpage’s post to be updated regularly. It consists of pleasant material.
I am no longer sure the place you are getting your information, however good topic. I needs to spend some time learning much more or understanding more. Thanks for excellent info I used to be looking for this information for my mission.
You are so cool! I don’t think I’ve truly read anything like this before. So good to find someone with some genuine thoughts on this subject matter. Really.. many thanks for starting this up. This website is one thing that is needed on the internet, someone with a bit of originality!
Howdy would you mind letting me know which web host you’re working with? I’ve loaded your blog in 3 completely different web browsers and I must say this blog loads a lot quicker then most. Can you recommend a good web hosting provider at a honest price? Thank you, I appreciate it!
Hi to all, how is all, I think every one is getting more from this website, and your views are fastidious for new users.
Very great post. I just stumbled upon your weblog and wished to mention that I’ve truly enjoyed surfing around your blog posts. In any case I will be subscribing in your feed and I hope you write once more very soon!
What’s up, I desire to subscribe for this weblog to take most recent updates, therefore where can i do it please help out.
Hello, I desire to subscribe for this website to obtain hottest updates, so where can i do it please assist.
Hey there! I just would like to offer you a big thumbs up for the great information you have here on this post. I’ll be returning to your web site for more soon.
Hey, I think your website might be having browser compatibility issues. When I look at your blog in Opera, it looks fine but when opening in Internet Explorer, it has some overlapping. I just wanted to give you a quick heads up! Other then that, awesome blog!
I’m really loving the theme/design of your website. Do you ever run into any web browser compatibility issues? A number of my blog visitors have complained about my site not working correctly in Explorer but looks great in Opera. Do you have any recommendations to help fix this issue?
I every time spent my half an hour to read this web site’s content daily along with a cup of coffee.
What’s up to every one, the contents existing at this web site are actually awesome for people knowledge, well, keep up the good work fellows.
Hi there! I could have sworn I’ve been to this website before but after browsing through some of the articles I realized it’s new to me. Nonetheless, I’m definitely pleased I came across it and I’ll be bookmarking it and checking back frequently!
Hey there! I know this is kind of off-topic but I had to ask. Does managing a well-established blog such as yours take a large amount of work? I’m brand new to operating a blog but I do write in my diary on a daily basis. I’d like to start a blog so I will be able to share my personal experience and thoughts online. Please let me know if you have any ideas or tips for new aspiring blog owners. Appreciate it!
I’m not sure why but this web site is loading incredibly slow for me. Is anyone else having this issue or is it a issue on my end? I’ll check back later and see if the problem still exists.
Hi there just wanted to give you a quick heads up. The words in your content seem to be running off the screen in Ie. I’m not sure if this is a formatting issue or something to do with web browser compatibility but I thought I’d post to let you know. The layout look great though! Hope you get the problem fixed soon. Thanks
Howdy! This article could not be written much better! Going through this article reminds me of my previous roommate! He constantly kept preaching about this. I am going to send this post to him. Pretty sure he will have a very good read. Many thanks for sharing!