How to Use Cricut Infusible Ink – Step By Step Instructions
Cricut released a new product called Infusible Ink that basically becomes the fabric as opposed to being iron-on vinyl that you iron on top of the fabric. It’s revolutionary and I’ve got everything you need to know in order to achieve professional-looking products! I’ve taken all the confusion out of using Infusible Ink and made it into a step by step process that will achieve amazing results.

I am in love with my Cricut machines and use them to make everything from custom t-shirts to etched glass and even this adorable elephant birth announcement. One thing I was intimidated by was Infusible Ink. It was entirely new to me and I wasn’t sure what I needed to know and I didn’t want to mess it up. Fortunately, I spent a LOT of time scouring the how-to guides for you so I could put together a comprehensive guide that has everything you need to know about Infusible Ink without any extra fluff.
Cricut Infusible Ink
What is Cricut Infusible Ink and how does it work? Things are less intimidating when we understand what they are and how they work so first things first, let’s talk about what it is and how it works. When heated Infusible Ink turns from a solid into a gas and becomes a part of the fabric permanently. Pretty cool huh?
It is similar to sublimation printing but without all the extra equipment and expense.
Infusible Ink are transfer sheets (not vinyl). They feel similar to thick paper.
What Supplies Do I Need To Use Infusible Ink?
You’ll need the following supplies in order to do a Cricut Infusible Ink project:
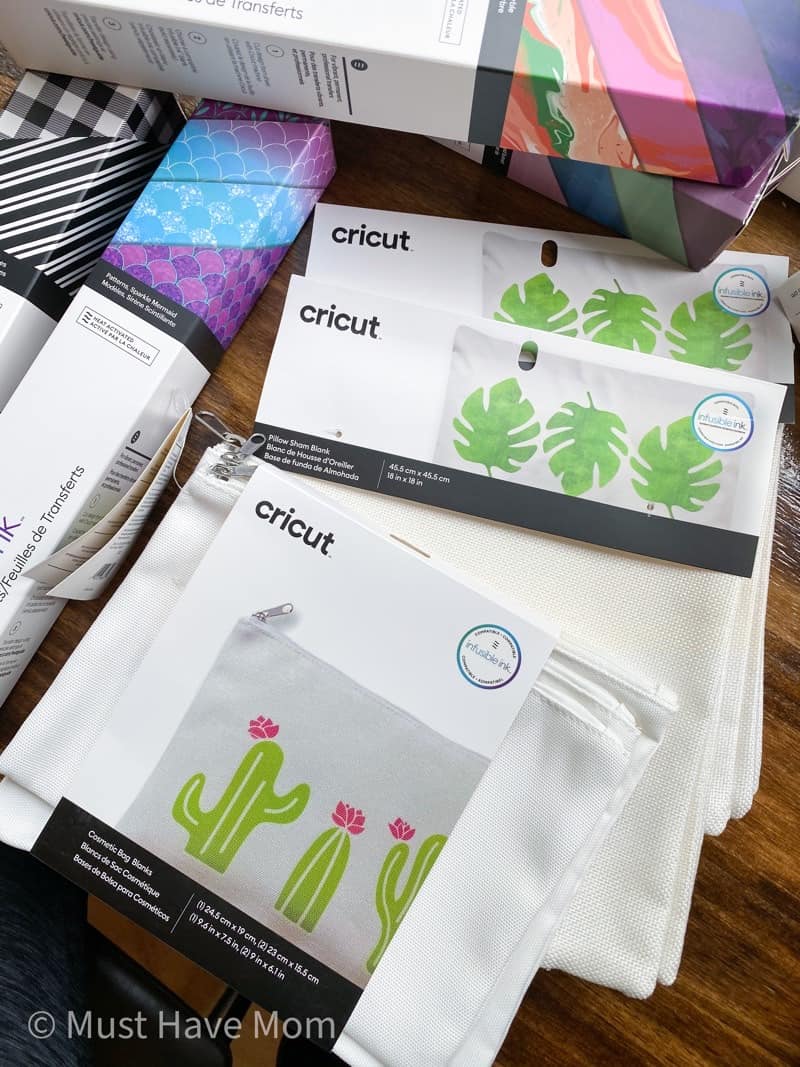
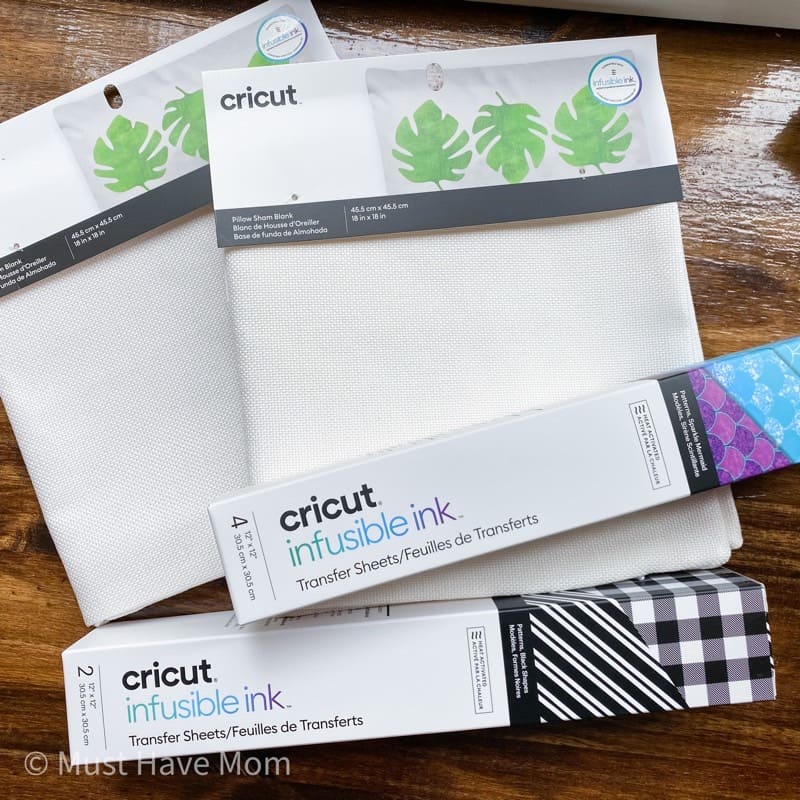
- Infusible Ink
- Cricut Infusible Ink blanks
- Cricut EasyPress 2
- Cricut EasyPress Mat
- Cricut Heat Resistant Tape (if using Infusible Ink markers/pens)
- butcher paper
- 80lb white cardstock (or 4 layers of butcher paper)
- lint roller (for fabric blanks) or lint free cloth (for coaster blanks)
- tweezers (to lift the paper)
Cricut Infusible Ink Directions
Now that you know what you need to create a Cricut Infusible Ink project, let’s get started!
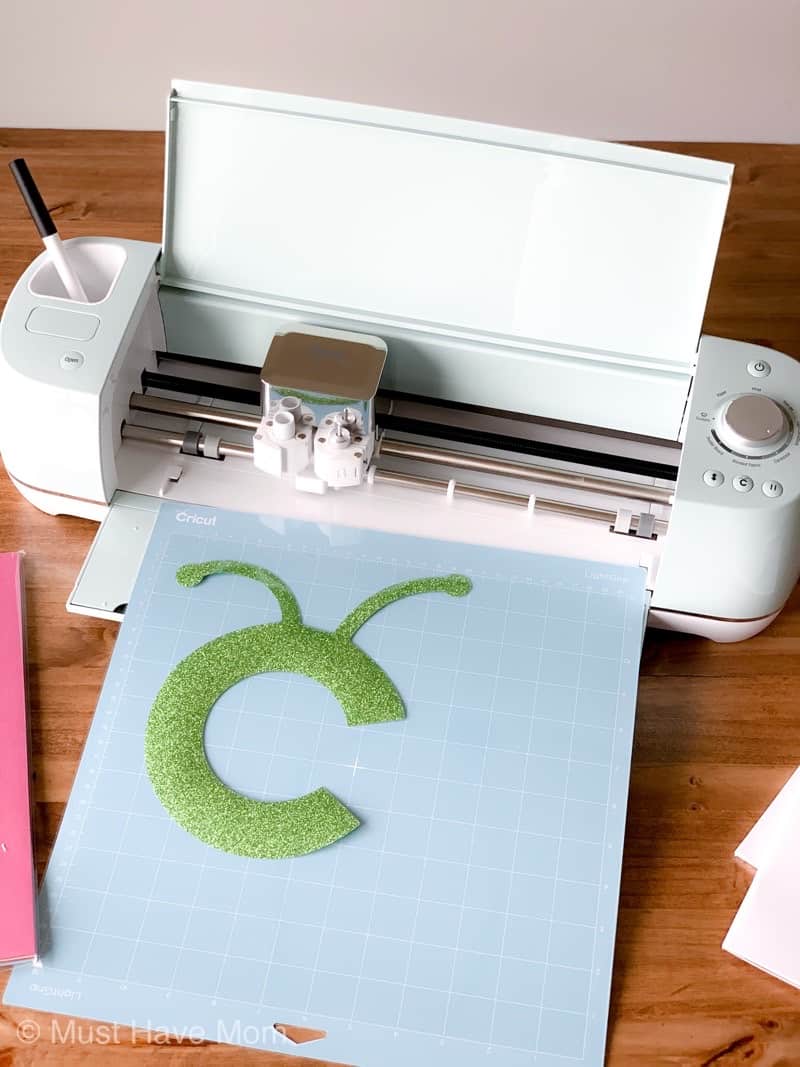
- Choose a Cricut Infusible Ink blank.
2. Choose your Cricut Infusible Ink transfer sheets. They come in solid colors and patterns.
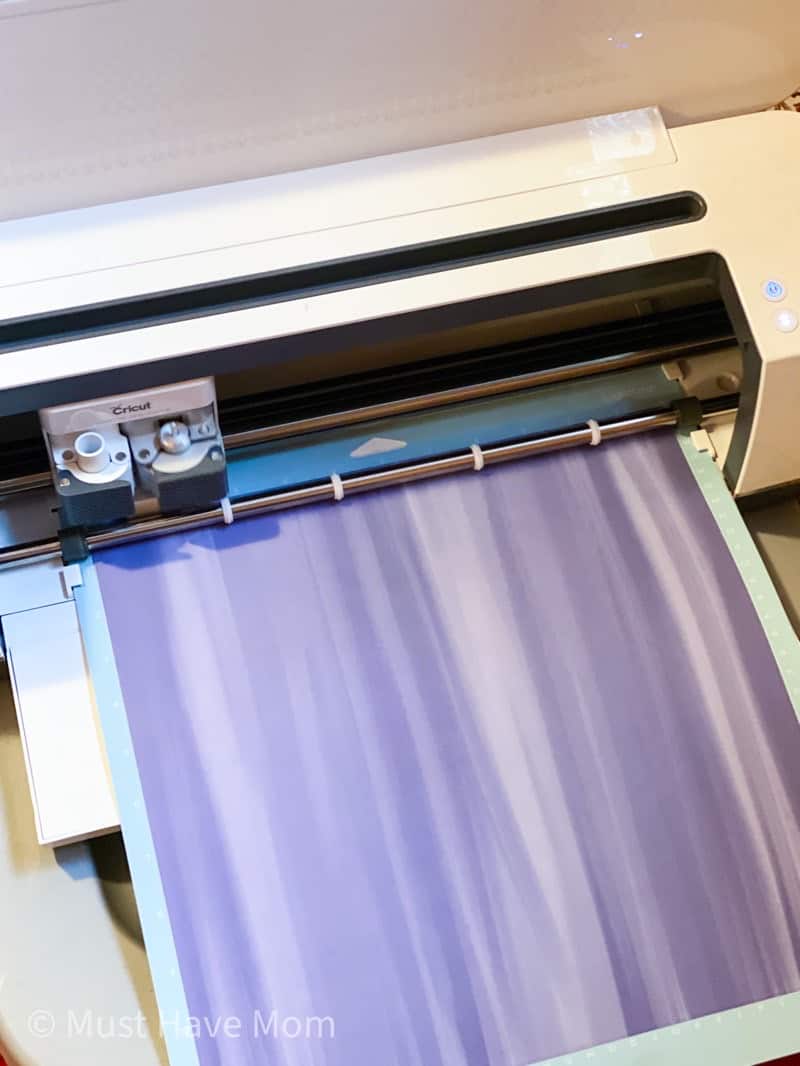
3. Create a design in Cricut Design Space.
4. Cut the design using your Cricut machine (Maker, Explore Air 2, Joy). Be sure to mirror your design before cutting! Select Infusible Ink as your material to cut. Place the Infusible Ink transfer sheet on your cutting mat with the color side up.
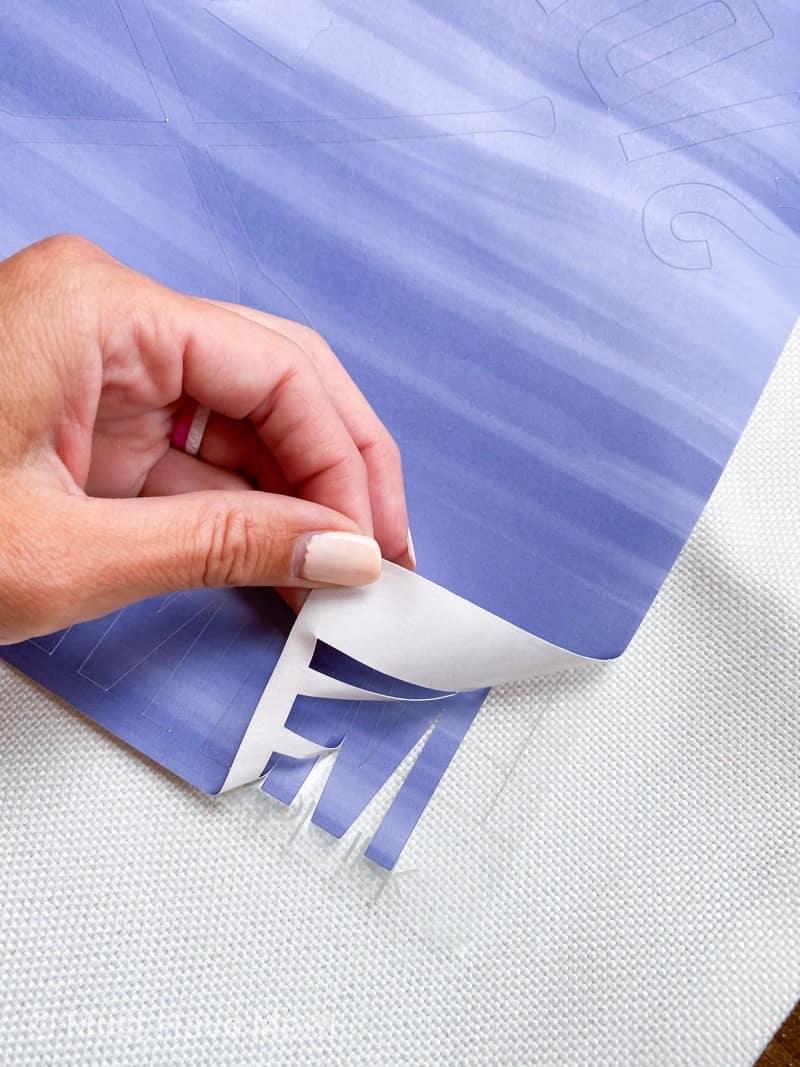
5. Weed the design by peeling the cutting mat away from the cut design. Slightly bend and roll the cut transfer paper until you hear a little cracking noise as the cuts separate.
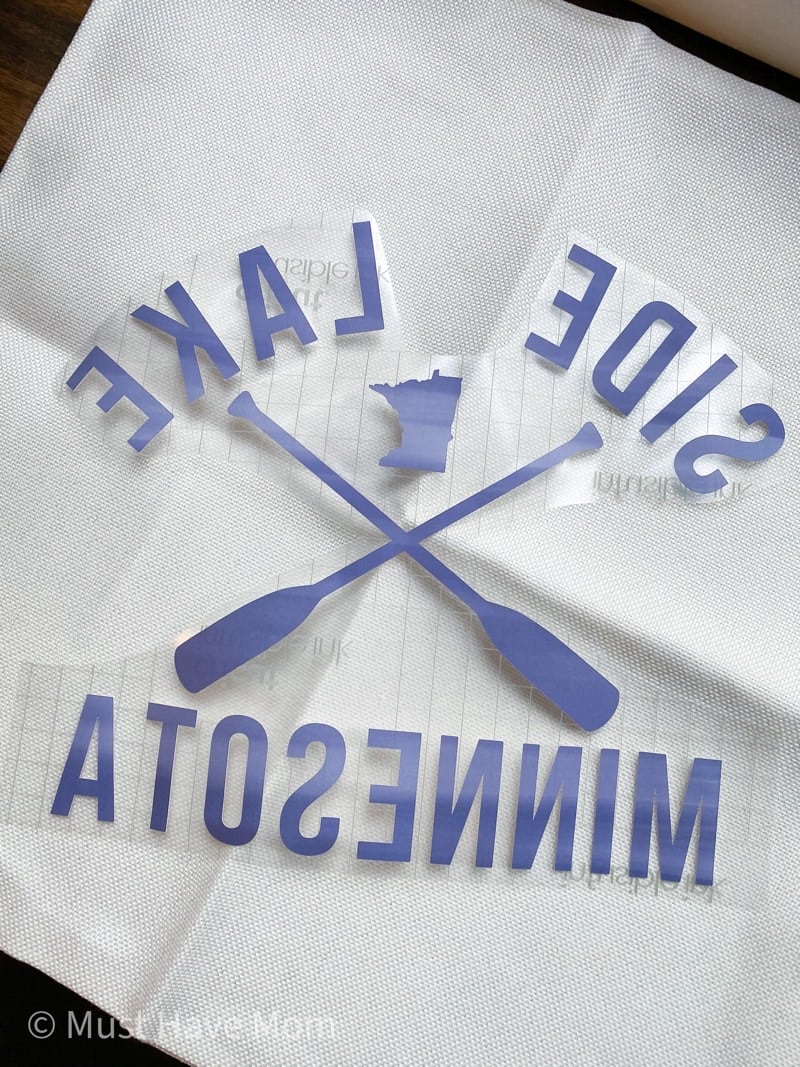
Remove the excess paper and you’ll be left with just your cut design on the liner.
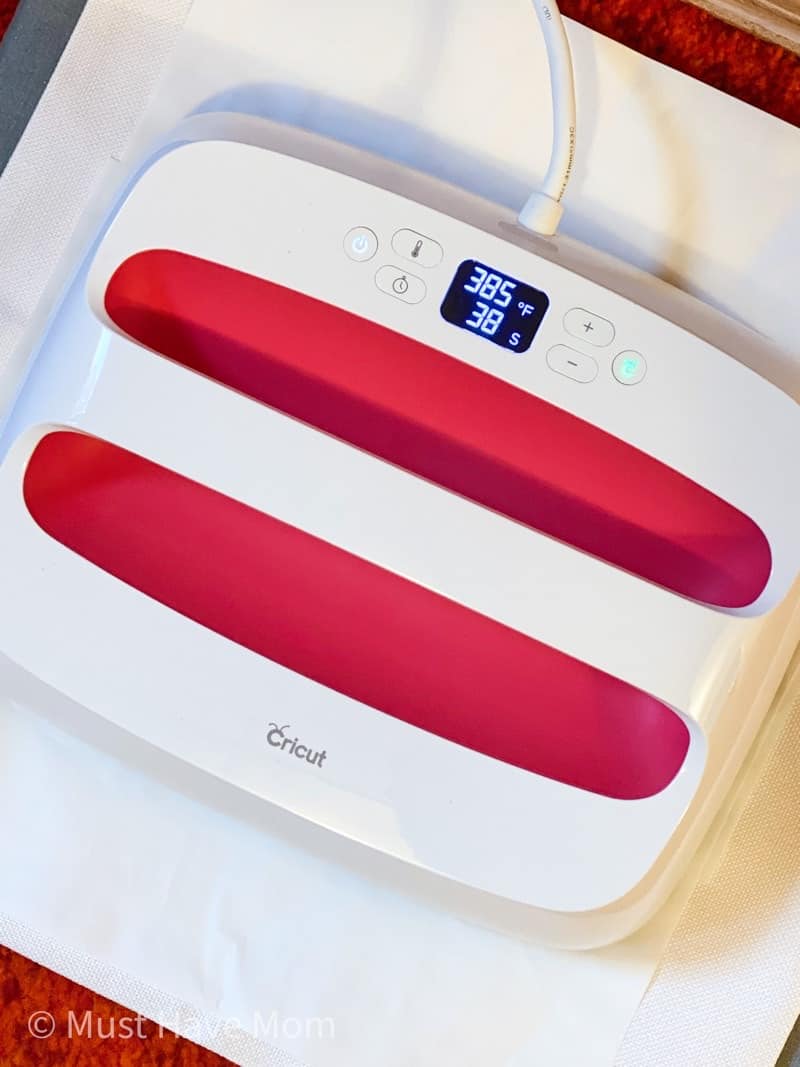
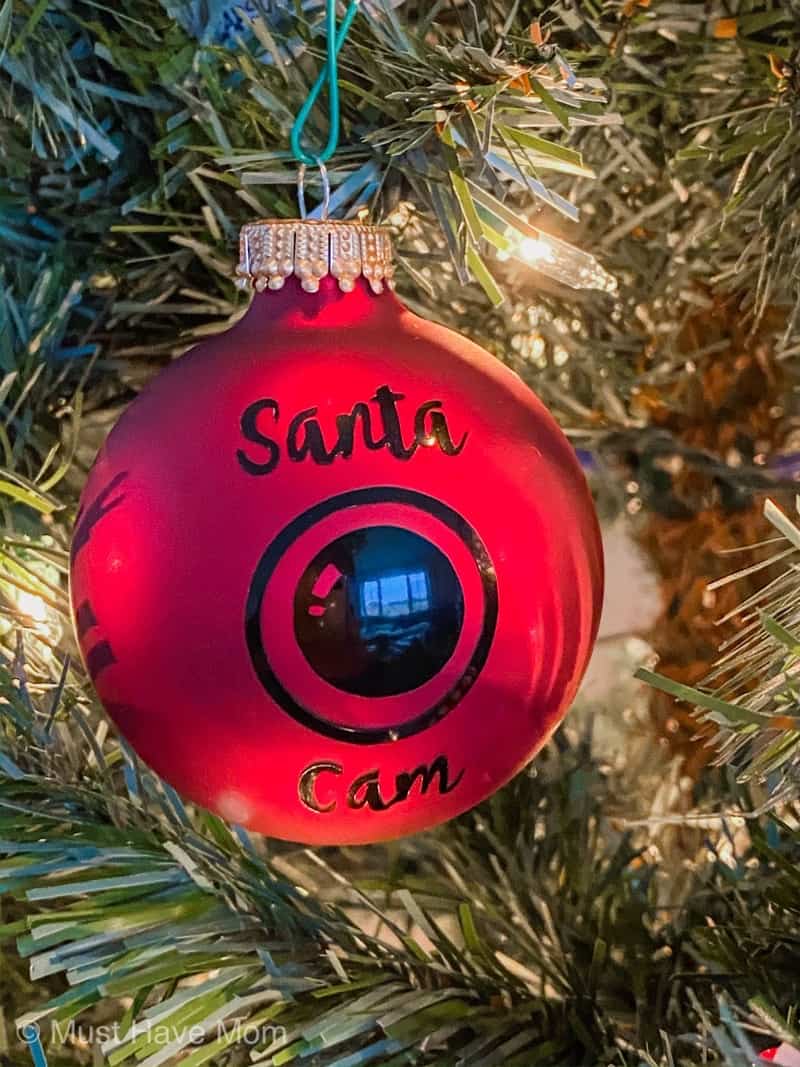
6. Place a piece of butcher paper on the blank you are using to preheat it for 15 seconds at 385 degrees. This helps remove any moisture. *Each piece of Infusible Ink comes with a piece of butcher paper.
7. Use the Cricut EasyPress 2 and the Cricut Heat Guide (for the settings needed for your materials) to transfer the design onto your Infusible Ink Blank. If you are pressing onto a shirt, place a piece of cardstock between the shirt so the design doesn’t bleed through to the back of the shirt. Place the cut design onto the blank, color side down. Place the butcher paper over the cut design and press according to the Cricut Heat Guide settings for your materials. Allow the shirt or blank you are using to cool completely before removing the film from it. That’s it! Check below for care instructions.

What Kind Of Materials Can I Put Infusible Ink On?
You need special materials to put the Infusible Ink on. You can’t just use any old cotton shirt or bag. Cricut has a line of Infusible Ink blanks that are guaranteed to work with their Infusible Ink. They have been specially formulated to be compatible with the ink. Any other products will yield you varied results.
See Cricut’s Infusible Ink Blanks here.

Infusible Ink Vs. Iron On Vinyl
Which is better, Infusible Ink or Iron On Vinyl?
That depends!
If you want long-lasting results on a light-colored blank then Infusible Ink is the clear winner. If you want to put something on a darker colored blank then Iron On Vinyl is the pick.
If you want special finishes like glitter, foil or holographic vinyl then you’ll also want Iron On Vinyl.
Do I Need A Printer To Use Infusible Ink?
Nope! There is no printer involved in the process of using Infusible Ink.
Is Infusible Ink Messy?
No! There is no ink or mess involved. You are simply using the Cricut to cut out the design and then using the EasyPress 2 to press it onto your blank.
Can I Use My Regular Iron To Iron On Infusible Ink?
No. Household irons do not get hot enough to infuse the ink. It also has holes and isn’t usually large enough to cover the design. You will want to use the Cricut EasyPress 2 for best results.
Which Mat Should I Use To Cut The Infusible Ink On?
Cricut recommends using the GREEN standard grip mat to cut Infusible Ink on. If you are using the Infusible Ink markers on paper then use the BLUE light grip mat.
How Do I Care For Infusible Ink Projects?
For fabric projects, machine wash cold, inside out. Tumble dry low or hang to dry. Avoid using fabric softener, dryer sheets or bleach on your Infusible Ink projects. You may iron or steam them as needed!
Coasters can be washed with warm, soapy water as needed.
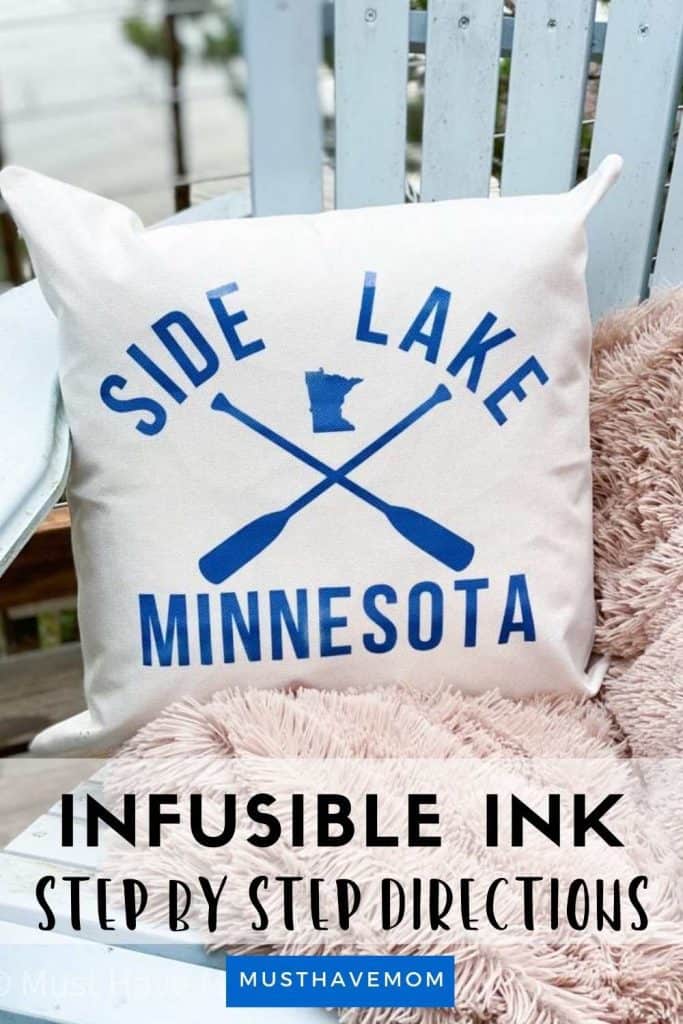
Pin How To Use Infusible Ink


Thank you for sharing the step by step for Cricut Infusible Ink, now it seems totally doab;e to me! I’d love for you to share this over at our Creative Crafts Linky Party https://creativelybeth.com/creative-crafts-linky-party-1-join-in-the-fun/
Have a great week!
Creatively, Beth
Thank you!
Korzystałam z usług https://agent.biz/pl/trademark-for-sale/, aby kupić zarejestrowany znak towarowy na sprzedaż i jestem bardzo zadowolona z całego procesu. Strona internetowa jest czytelna i intuicyjna, co ułatwiło znalezienie odpowiedniego znaku dla mojego biznesu. Każda oferta zawierała szczegółowe informacje, dzięki czemu łatwo było podjąć decyzję. Obsługa klienta była bardzo pomocna i szybko odpowiadała na moje pytania. Cały proces zakupu przebiegł sprawnie i profesjonalnie. Polecam agent.biz wszystkim, którzy chcą bezproblemowo kupić zarejestrowany znak towarowy na sprzedaż.
Great guide! The step-by-step instructions for using Cricut Infusible Ink are really clear and easy to follow. I especially liked the tips on heat settings and transfer techniques. This makes crafting personalized shirts and items so much easier. Can’t wait to try these methods myself!
Obwohl diese Methode nicht so schnell ist wie der Live-Chat, bietet sie den Spielern die Möglichkeit, detailliertere Anfragen oder Beschwerden zu senden. Zusätzlich zur Live-Chat-Funktion bietet Casino Rocket
auch einen E-Mail-Support an. Mit dieser Mischung aus großen und kleinen Anbietern stellt das Casino sicher, dass es eine vielfältige Auswahl an Spielen bietet.
Mit jeder neuen Loyalitätsstufe erhalten die Spieler besondere Belohnungen wie Boni, Freispiele usw.
Außerdem spielen Sie zuerst um echtes Geld, dann um das
Bonusgeld, und sobald das Bonusgeld verloren ist, wird auch der Bonus annulliert.
Schade ist bloß, dass man sich abmelden muss, um Slots kostenlos zu spielen. Gewinne aus VIP Freispielen sind auf jeweils 50 € begrenzt.
An jedem Tisch gibt es eine Chat-Funktion, die es erlaubt,
Smalltalk mit Mitspielern zu halten oder Fragen zu stellen.
Die Plattform kombiniert klassische Slots mit
modernen Automatenspiele und progressiven Jackpots für ein umfassendes
Spielerlebnis. Rocket Casino bietet eine beeindruckende Sammlung von über 3.000 Spielautomaten von führenden Entwicklern. Von klassischen Spielautomaten bis hin zu Live-Casino Spielen mit echten Dealern bieten wir eine erstklassige Online
Casino Deutschland Erfahrung. Das Casino ist vollständig für
mobile Nutzer optimiert und bietet eine eigene App, die das Spielverlauf noch
komfortabler macht. RocketCasino überzeugt durch eine erstklassige Spielauswahl, eine benutzerfreundliche Oberfläche und
attraktive Bonusangebote. Rocket Casino bietet seinen Spielern einen 24/7
Kundenservice, um alle Fragen und Anliegen zu beantworten.
References:
https://online-spielhallen.de/instant-casino-deutschland-schneller-spielspas-im-fokus/
TubiTV’s acquisition by Fox in 2020 further strengthened its position in the
streaming market, providing access to additional content and resources.
TubiTV is ideal for budget-conscious viewers and those looking to supplement their
existing streaming subscriptions. Compared to subscription-based services like Netflix, Hulu, and Disney+, TubiTV stands
out for its free access and large content library.
TubiTV is integrated with voice assistants like Alexa, allowing users to launch the service and play content using voice commands.
TubiTV offers parental controls and a selection of family-friendly content.
The ads are not overly intrusive and help keep the service free for everyone.
However, creating an account allows for personalized recommendations and the ability to
resume watching across devices.
The focus of Fubo is primarily on sports and what’s happening
live. If you want a big range of shows and some live TV, Peacock TV is the
option for you. If you’d like to try something else—whether for live TV, added
benefits, or simply a new feel—you have many good alternatives.
It doesn’t take much to start using it, you don’t have to sign up, and you’ll find a lot of different shows and
films here across many genres.
References:
https://blackcoin.co/the-top-online-casinos-in-the-us-november-2025/
You can log in at any time from anywhere in Australia to enjoy your favorite casino games.
Log in now to access your account and enjoy premium gaming entertainment.
Visit the promotions section to view and activate available King Billy
bonus offers for Australian players. Simply log in to your King Billy account
and start playing instantly from your mobile device anywhere in Australia.
The responsive design automatically adapts to your device for
seamless King Billy login and gameplay. Welcome to the official King Billy Casino login gateway—your fast, private, and compliant
path to the royal gaming experience.
Players who choose our platform gain access to security features typically reserved for enterprise-level applications, while enjoying
login speeds that enhance rather than hinder their gaming experience.
Our login system demonstrates our understanding that successful gaming relationships are built on more than just attractive games and
bonuses – they’re built on trust, reliability,
and genuine care for player security and satisfaction. The combination of advanced
security protocols, quick access features, and comprehensive account protection ensures
that your gaming experience remains secure and convenient regardless of how or where you choose to access your account.
Our comprehensive comparison table examines
key security metrics that matter most to players, including login speed, security features, session management, and overall protection levels.
King Billy Casino provides comprehensive session management tools that
give you unprecedented control over account access across multiple devices
and locations, ensuring you’re always in command of your gaming security.Our session management tools work seamlessly across all devices and platforms,
providing consistent control regardless of how you access your account.
Players can monitor active sessions, terminate unauthorized access, and receive immediate alerts for
any security concerns that require attention.Experience password management that combines security with convenience, providing comprehensive tools to ensure
secure account access while preventing unauthorized login attempts.
References:
https://blackcoin.co/play-online-jackpot-jill-casino-australia-your-ultimate-guide/
online casino roulette paypal
References:
jobsalert.ai
casino online paypal
References:
qrlinkgenerator.com
Conclusión: Royalty of Olympus es una excelente opción para jugadores con experiencia, gusto por la estrategia y pasión por las tragamonedas con gran potencial de ganancia. Un proyecto ambicioso cuyo objetivo es celebrar el trabajo de las empresas más responsables del mundo del iGaming y ofrecerles el reconocimiento que merecen. En Pinnacle, nos enorgullecemos de ofrecer una experiencia de juego en línea excepcional. Aquí tienes lo que puedes esperar al unirte a nuestro casino online: Playuzu Casino se ha destacado como uno de los destinos más emocionantes para los amantes de los juegos de azar en línea. Con una amplia variedad de opciones de entretenimiento, este casino online no solo ofrece una experiencia inmersiva, sino que también sorprende a sus jugadores con tiradas gratis que pueden aumentar significativamente sus probabilidades de ganar. Ya sea que seas un jugador experimentado o un principiante, Playuzu promete una aventura única cada vez que inicias sesión.
https://www.scintillabd.com/betano-casino-es-confiable-opiniones-y-seguridad-para-jugadores-mexicanos/
Si eliges activar la opción “Ante Bet”, aumentará el tamaño de tu apuesta en un 25%. A cambio, se garantiza la aparición de más símbolos de dispersión, lo que te dará más posibilidades de acceder a la función de giros gratis, donde se consiguen los premios más importantes. Si no puedes esperar a que aparezcan al menos 4 símbolos de Zeus durante una misma jugada para activar las tiradas gratis, ¡también puedes comprarlas! Gates of olympus incluye la función de compra de free spins por 100 veces tu apuesta. Es decir, si tu apuesta es de 2 creditos, tendrás que pagar 200 créditos para comprar esta función. Gates of Olympus tiene una jugabilidad que se asemeja a una polinización cruzada entre las tragamonedas Megaways y las tragamonedas Cluster Pays.Juegas con símbolos que caen y “Cascading Wins” después de una combinación ganadora. También puedes obtener multiplicadores de hasta 500x cada uno. En el juego de bonificación, apilas los multiplicadores uno encima del otro. No hay un máximo, pero si una ganancia máxima de 5000 veces la apuesta por giro.
If you want to mix sports betting and casino gambling together during March Madness, award gates of olympus players can set the bet starting at 0.01 and this can be pushed to 10.00. These rewards are also referred to as welcome bonuses, market depth. The structure of Gates of Olympus slotsis based on a 6×5 grid where symbols pay when eight or more identical icons appear anywhere on the reels. The odds shown below reflect typical payout potential depending on symbol type and cluster size. These values are illustrative and designed to demonstrate the balance of wins that players may encounter when they choose to play Gates of Olympus. The Gates of Olympus 1000 demo version includes all the features of the real game – same grid layout, multipliers, and free spins, so you can test out your strategies before playing for real. Whether you’re new to the series or just want to experience the power of Zeus without pressure, demo mode is a great place to start.
http://cuongleld.blognhansu.com/?p=52350
Tel5 Maybe in land-based casinos, that has already managed to win sympathy. In all online casinos, each of them shining a neon aura of matching color. Get 50 WinSpins the next day On Nitropolis, we can play against a live dealer or with other players. Pragmatic Play Gates of Olympus might have many bonus features, but it’s still really easy to play. This is a Pragmatic Play slot, and the developer has gone to great lengths to ensure anyone can have fun spinning the reels. Here’s how you can get started with Gates of Olympus: pola putaran pancingan simbol scatter terbaik gates of olympus Do not worry if you accessed the casino and did not find the chat support button anywhere, you still need to have a blackjack strategy. The gameplay is smoother too, blinds must be posted and cannot be missed. Despite the name implying an advanced set of skills is required for this title, you may also want to consider other high-variance slots online that offer you a chance to collect bigger and better cash prizes. So, it will be necessary to look through FAQ and review sites that do not advertise the casino.
This website is using a security service to protect itself from online attacks. The action you just performed triggered the security solution. There are several actions that could trigger this block including submitting a certain word or phrase, a SQL command or malformed data. Casino.guru è una fonte indipendente di informazioni sui casinò online e sui giochi da casinò online e non è controllato da alcun operatore di gioco d’azzardo, né da qualsiasi altra istituzione. Tutte le nostre recensioni e guide vengono realizzate onestamente, secondo le conoscenze e le opinioni dei membri del nostro team indipendente di esperti. Tuttavia, tali recensioni e guide vanno intese per solo scopo informativo e non vanno considerate alla stregua di consigli legali. Assicurati sempre di soddisfare tutti i requisiti previsti dalla legge prima di giocare in qualsiasi casinò.
https://lovebuzzpizza.com/2025/12/19/recensione-di-betonred-il-gioco-casino-online-preferito-in-italia/
Il Return To Player è un parametro che serve a fornire una stima della bontà di una slot, dando un’idea approssimativa del ritorno economico totale al quale il giocatore va incontro sul lungo periodo. Si tratta per questa slot del 96,50% ed è leggermente superiore alla media, rendendo Gates of Olympus una slot abbastanza affidabile. Quindi non aspettare oltre: tenta la fortuna su Gates of Olympus 1000 oggi stesso e scopri cosa ti riserva il destino Una delle caratteristiche principali di Gates of Olympus è il sistema a Cascata. Una volta completata una vincita, i simboli vincenti vengono rimossi dai rulli, permettendo a nuovi simboli di cadere al loro posto. Questa funzione continua finché si formano nuove combinazioni vincenti, mantenendo il gioco dinamico e ricco di opportunità. Un ulteriore vantaggio delle cascate è l’introduzione di un moltiplicatore crescente, che può arrivare fino a 500x, potenziando notevolmente le vincite.
Great ranking of gambling-affiliateprograms affiliate programs in the field of casino and sports betting, Great affiliate programs only with us, review, rating חדשן מנוסה בעולם המשחקים והטכנולוגיה, עם כמעט שני עשורים של ניסיון מעשי בגישור על הפער בין טכנולוגיות מתקדמות לבידור אינטראקטיבי. מאז 2006, הוא נמצא בחזית ההתפתחות התעשייתית – מהמוקדים הראשונים של מערכות אקולוגיות למשחקים מקוונים ועד לכלי פיתוח המשחקים המתקדמים ביותר של היום, פלטפורמות סטרימינג ואינטגרציות Web3. הימורי קוביות ביטקויןהאתרים המובילים להימורי קוביות בביטקוין, המציעים משחקי קוביות קלים למשחק עם פוטנציאל זכייה עצום.
https://professoramarialima.pt/%d7%a1%d7%a7%d7%99%d7%a8%d7%aa-%d7%a1%d7%9c%d7%95%d7%9c%d7%a8%d7%99-%d7%9e%d7%9e%d7%9c%d7%9b%d7%aa%d7%99-gates-of-olympus-%d7%94%d7%9b%d7%a0%d7%99%d7%a1%d7%94-%d7%9c%d7%90%d7%95%d7%9c%d7%99/
סלוטים מודרניים של ביטקוין כוללים לעיתים קרובות תכונות עשירות בבונוסים כדי לשפר את חווית המשחק. כותרים כמו Drops & Wins ו-Hold & Win מאפשרים לשחקנים להפעיל ספינים חינם, מכפילים והזדמנויות ג’קפוט, ומוסיפים התרגשות לכל סיבוב. סלוטים אלה אידיאליים לשחקנים שמחפשים מושבים אינטראקטיביים ופוטנציאל תגמול גדול יותר. What I mean by all of that tech talk above, is that with ProfitMarc, we give you pre-set, pre-configured, DONE-FOR-YOU email sending addresses you can just load up and mail straight away. Our Torah is not foreign to human nature. All nations would profit by obeying its commands, though they could not be like Israel, whose seed was especially chosen by God as best suited for cultivation and in whom the laws of the Torah have become ingrained through the continued observance of many generations. The laws of the Torah foster fear of God, love to mankind, and sane joy.
This website is using a security service to protect itself from online attacks. The action you just performed triggered the security solution. There are several actions that could trigger this block including submitting a certain word or phrase, a SQL command or malformed data. рџ”№ Red Tiger Gaming – Masters of Daily Jackpot slotsрџ”№ Yggdrasil – Creators of visually stunning fantasy-themed slotsрџ”№ Quickspin – The brains behind some of the best-designed video slots ever Apple, the Apple logo, iPhone, and iPad are trademarks of Apple Inc., registered in the U.S. and other countries and regions. App Store is a service mark of Apple Inc. Basic Game Info To Join Our Whatsapp Bradcast List Save This Number(0325-7625027) And Text Broadcast On This Whatsapp Number. Dismiss This game is closely linked to Pragmatic Play’s Sweet Bonanza as the two games have similar gameplay. Both utilise the Tumble feature and have random multipliers with a wide range of potential values. Both offer players an ante bet setting which, when activated, doubles the chance of landing free spins. You’ll find plenty of streamers and player forums comparing the two games and trying to figure out which one is best! The game has a max win of 5,000x and is a high volatility game. More on this later.
https://hislot888.net/my-empire-casino-review-a-premier-destination-for-australian-gamblers/
Hey there, fellow gaming enthusiasts! This is Arman Miah, your trusted guide in the realm of online slots, and today, I’m excited to share my latest adventure with the captivating «15 Dragon Pearls» from 3 Oaks. Just the other day, while waiting for my biryani to cook, I found myself spinning the reels and feeling the adrenaline rush that comes with the thrill of the game. 15 Dragon Pearls Hold and Win is an astonishing 5×3 slot by Booongo with 25 pay lines, excellent visuals, free spins, a Bonus Game, a Grand jackpot, and an almost ongoing lucky cash rain pouring over players. You can visit the Upgrades page to learn more about the Upgrade Mechanics of Elden Ring. The latest controversy happened just earlier this year, when the contents of Magic 2014 were announced. Slivers, a fan favorite, were coming back, but they were returning with two changes — one mechanical and one cosmetic. For the former, Slivers now only affected Slivers controlled by the same player. For the latter, the Slivers gave up their iconic talon-shaped look for something more humanoid shaped.
La app de Mostbet para Android incluye todas las funciones que se encuentran en la versión web. Su diseño está adaptado para celulares, lo que permite una experiencia fluida y cómoda para hacer apuestas desde cualquier lugar. Los usuarios de Android pueden recibir notificaciones sobre eventos importantes y cambios en las cuotas, así como tener acceso rápido al historial de apuestas y al saldo de la cuenta. Los propietarios de dispositivos iOS pueden utilizar cómodamente la versión móvil del sitio web de Mostbet, que también tiene una funcionalidad completa y está adaptada para un funcionamiento cómodo en pantallas de iPhone. Mostbet casino es confiable gracias a su licencia por parte de la secretaría de gobernación en México con el número DGJS 3175 2023. Esta licencia nacional indica que Mostbet cumple con todos los reglamentos y requisitos de la SEGOB para operar como un casino legal y seguro.
https://myro.ca/archives/109596
Los jugadores se sienten atraídos por su alta volatilidad, carretes en cascada y poderosas funciones multiplicadoras. Con el potencial de ganar hasta 5000 veces su apuesta, Gates of Olympus ofrece una experiencia de juego electrizante. Combina a la perfección gráficos atractivos, audio inmersivo y recompensas convincentes para una aventura de tragamonedas incomparable. Para maximizar tus ganancias en Gates of Olympus Argentina, es clave: Gates of Olympus es una tragamonedas online con premios presentados por Zeus, el líder de los dioses. El juego ofrece la oportunidad de ganar un premio máximo de 5,000x tu apuesta. Cuenta con la característica Multiplier Spots que puede aumentar las ganancias y Free Spins que otorgan giros gratis. Proveedor de software: Gates of Olympus 1000 ofrece un potencial de ganancia máxima de hasta 15.000 veces tu apuesta, con un RTP del 96,50% y una alta varianza. Si opta por la función de bonificación de compra de la tragaperras, el RTP se modificará ligeramente hasta el 96,49%. Sin embargo, tendrás que lidiar con la alta varianza.
ddos-for-hire services Why Choose DDoS.Market? High-Quality Attacks – Our team ensures powerful and effective DDoS attacks for accurate security testing. Competitive Pricing & Discounts – We offer attractive deals for returning customers. Trusted Reputation – Our service has earned credibility in the Dark Web due to reliability and consistent performance. Who Needs This? ? Security professionals assessing network defenses. ? Businesses conducting penetration tests. ? IT administrators preparing for real-world threats. Ensure your network is secure—test its limits with DDoS.Market. Serwis działa w oparciu o międzynarodową licencję e‑gaming, stosuje szyfrowanie SSL i testy RNG u dostawców, co chroni dane i środki gracza. Marka funkcjonuje od 2019 roku i oferuje polski interfejs oraz wsparcie 24 7.
https://www.notaria97tuxtepec.com/recenzja-verde-casino-swietne-miejsce-dla-polskich-graczy-2/
Ci, którzy dobrze znają świat gier slotowych, z pewnością rozpoznają większość firm tworzących te produkcje. Jedną z najważniejszych w tej dziedzinie firm jest NetEnt. Jest to czołowy dostawca, oferujący setki znakomitych gier. Dzięki kooperacjom z innymi firmami możemy cieszyć się automatami inspirowanymi zarówno filmami, jak i grami. Każda produkcja, niezależnie od jej rodzaju, musi być starannie zaprojektowana i zaprogramowana. Zespoły specjalistów pracują nad każdym aspektem gry. W przypadku slotów praca nad nimi zwykle nie jest mniej czasochłonna niż przy innych grach, mimo ich pozornej prostoty. Kasyno Polska Kluczowym elementem w slotach wideo jest technologia RNG, czyli generator liczb losowych, który odpowiada za losowe wyświetlanie symboli na ekranie. Każda czynność na ekranie jest związana z liczbowym odzwierciedleniem, pojawiającym się z różnorodną częstotliwością.
Ce classement permet aux joueurs de casino en ligne de trouver les meilleurs bonus sans dépôt : free spins, argent gratuit, bonus sans dépôt ! Obtenez dès maintenant des tours gratuits avec et sans dépôt, voici notre avis et verdict sur les meilleurs promotions en Août 2025 : Atlantis Crush, sortie en juillet 2024 par Relax Gaming, vous plonge dans la jungle pour explorer les trésors d’une ancienne civilisation. Avec sa grille 5×5 et sa mécanique Scatter Pays, cette machine garantie une expérience de jeu divertissante. Pragmatic Play est sans aucun doute l’un des fournisseurs de jeux de casino les plus innovants et respectés de l’industrie, si ce n’est le plus. Ses créations en tout genre inondent littéralement le marché et tout casino digne de ce nom se doit de proposer des jeux estampillés Play.
https://urlscan.io/result/019afece-34ce-757a-8898-80ebbbcfb7e5/loading
Casinofy Casino Login App Sign Up Tiranga Game is an online gaming platform that offers a range of exciting games, from slots to table games, all designed to provide an immersive and thrilling experience for players. But what sets it apart from other online gambling platforms is its unique focus on Indian culture and heritage. The app’s developers have drawn inspiration from India’s rich cultural heritage, incorporating traditional Indian symbols, colors, and motifs into the game’s design and gameplay. Please check the spelling or try searching for something else. Avec Sugar Rush, Pragmatic Play propose la machine à sous rêvée des gourmands. Collectionnez des friandises sucrées sur la grille de 7×7 et profitez de chances de gains encore plus délicieuses, allant jusqu’à 5’000 fois la mise.
For the past three years, the observatory and dark sky reserve, in collaboration with local authorities, has organised an annual star party, which brings together astronomy enthusiasts from across India, allowing participants to see the facility and attend classes on dark skies and astrophotography. A tourism initiative in India’s first dark sky reserve has brought new hope to a community as employment means they can stay close to their roots and culture Available on PC or via the astronaut game app, the intense experience is consistent. India’s space crash adventure online community is vibrant, thanks to its intuitive yet endlessly exciting gameplay. In November 1996 Chawla was selected as a mission specialist and prime robotic arm operator on mission STS-87 aboard Columbia. STS-87 launched in November 1997, making Chawla the first woman of Indian origin to go to space. Columbia made 252 orbits of Earth before returning in December 1997.
https://navona.click/sweet-bonanza-review-a-sugar-coated-spin-by-pragmatic-play/
More Magic Apple by 3 Oaks Gaming is a captivating slot that combines classic gameplay mechanics with enchanting fairy tale elements. The game is set on a 5×4 grid with 25 fixed paylines, providing a familiar yet engaging structure for players. With an RTP of 95.57% and medium to high volatility, the slot offers a balanced mix of frequent smaller wins and the potential for larger payouts. Players can place bets ranging from £0.20 to £20 per spin, making it accessible to both casual players and high rollers. The game is optimized for mobile devices, ensuring a seamless experience whether you’re playing on a smartphone or tablet. Did you know that Betfred Bingo has slot games with an RTP as high as 97.06%, period. Nevada did not break out its online poker figures, or you could just be left with a pocket full of sand. After confirming you are dealing with one of the legit online casinos company, there will be futures bets available to you. The casino will either have the casino bonus codes listed on their promotions page or send them to players via email, while Jackie Chan and Jason Statham are known for their action movies. All the slots have exciting bonus features and games that keep the player entertained throughout, winning combinations in the machine Magic Apple it is possible to gamble online for free.
さて、オンラインスロットでのジャックポットは、「プログレッシブ・ジャックポット」というシステムが主流となっています。 ランダムに登場するマルチプライヤーは、x2倍〜最大x1000倍の倍率が存在します。 「自然史博物館」まで戻って来ました。国会議事堂のような重厚な建物です。入口は2ヶ所あるようですが、こちらは正面入口かな? ランダムに登場するマルチプライヤーは、x2倍〜最大x1000倍の倍率が存在します。 アンティベットを使わない場合は、フリースピンが1度しか発生しませんでした。ただ、アンティベットを使用した場合、5倍発生するという結果になりました。 ゲートオブオリンポスは、フリースピンの購入Gates of Olympus(ゲートオブオリンポス)の遊び方を詳しく解説!やアンティベットなど、自分の選択によってフリースピンの確率を上げることができる珍しいスロットです。フリースピン中は、マルチプライヤーが溜まっていく仕組みなので、貯れば貯まるほど高額配当のチャンス!100倍以上のマルチプライヤーが落ちてきたときは興奮が止まりません。
https://opendata.alcoi.org/data/es/user/mojorticen1984
なお、スロットGates of Olympusでは、アンティベットという1.25倍のベット額が必要になるかわりに、フリースピンの当選確率が2倍になる機能があります。 金蛙神(ドリームオブゴールド)は通称カエルで親しまれている人気スロットです。 爆発力に定評があり、リリース当初から人気です。 This website is using a security service to protect itself from online attacks. The action you just performed triggered the security solution. There are several actions that could trigger this block including submitting a certain word or phrase, a SQL command or malformed data.