Modern Mountain RV Makeover Before & After Pictures
This modern mountain RV makeover is a combination of cozy elements that make you feel at home and modern design that delivers a magazine-worthy aesthetic with function at the forefront of the design.
Modern Mountain RV Makeover
We did a gorgeous RV makeover on our last camper. It was a bumper tow 32′ travel trailer and we did a farmhouse style makeover with gray flooring, white upper cabinets and nantucket lower cabinets. It turned out beautiful. We were able to sell that camper at a profit, and thanks to our makeover, we had people lining up to buy it! My husband wanted to upgrade to a fifth wheel so that we can tandem tow our boat and eliminate the need to drive separately when we bring the boat on our camping trips.
I didn’t plan on doing a makeover on our fifth wheel immediately, however, after storing it for winter we opened it up to find the linoleum flooring had cracked from one end of the camper to the other. The shower surround had also cracked and needed to be replaced. Since so much work needed to be done to it already, I decided that we should do a makeover on the whole thing. I’m SO glad we did because I absolutely adore the end result! I’ll show you all the RV makeover before and after photos in this post and I’ll also show you how we did it in subsequent posts so be sure to subscribe to my RV email list so you don’t miss any future makeover posts!
RV Makeover Before & After Photos
I am so excited to share these before and after photos of our fifth wheel makeover with you. I think the transformation is absolutely amazing. I hope you enjoy seeing how much you can change the look and feel of your camper with just a little paint and elbow grease!
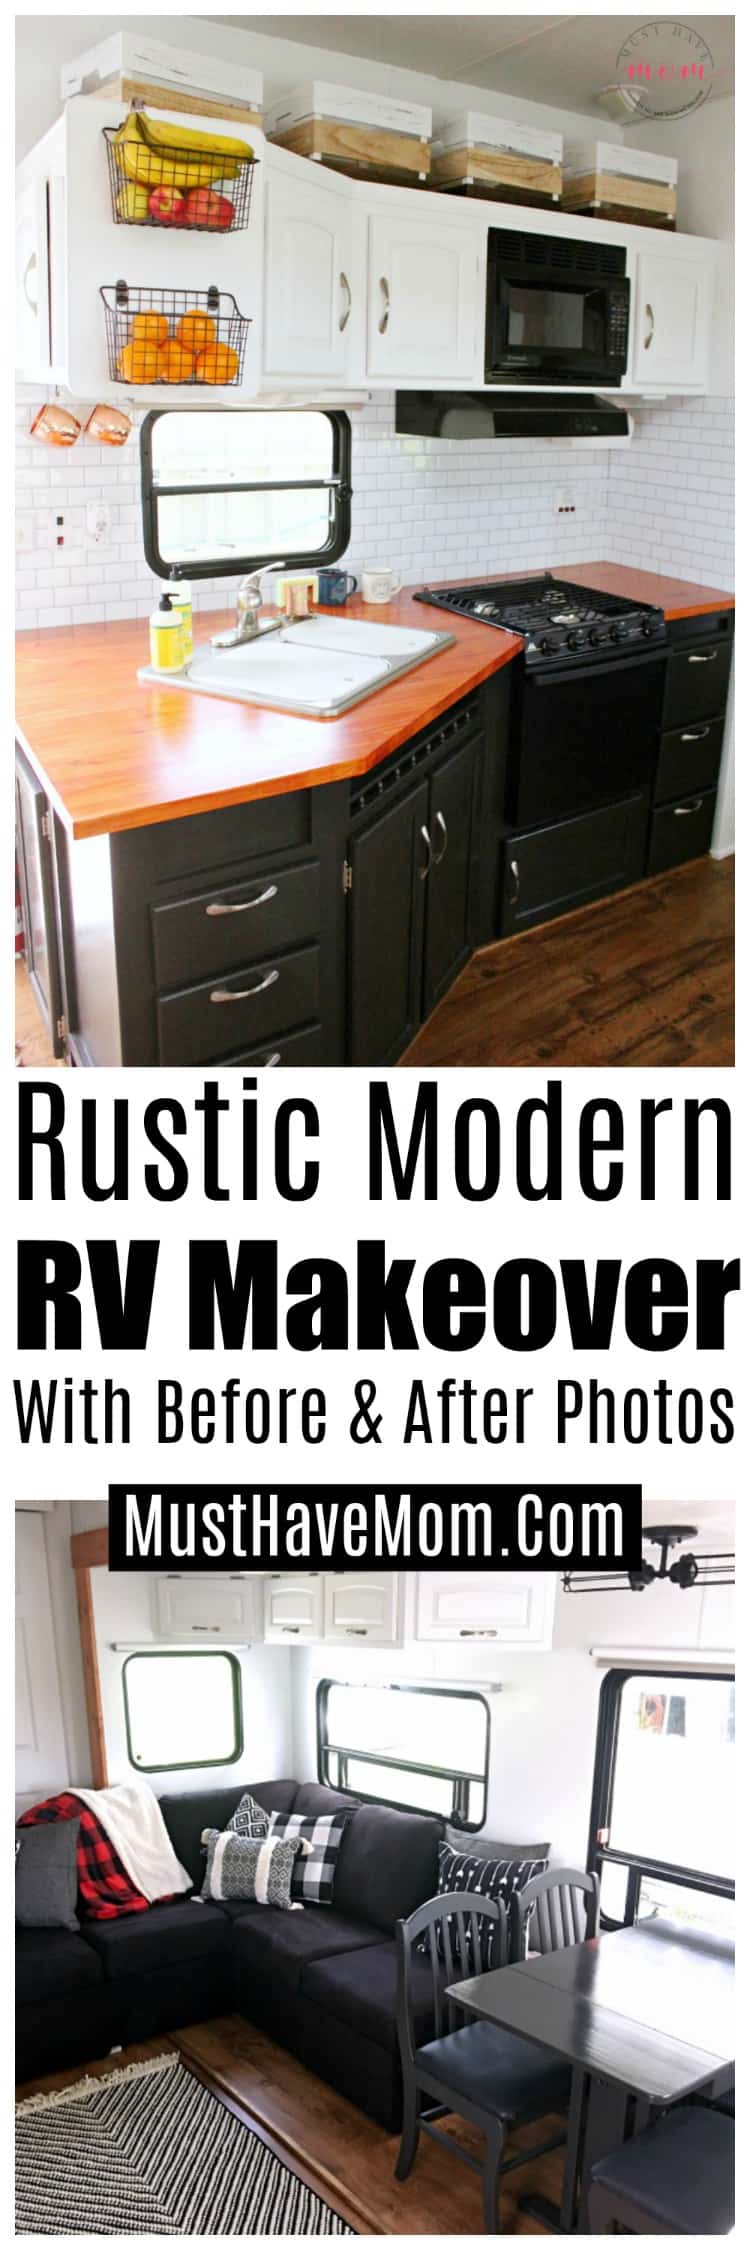
RV Kitchen Makeover
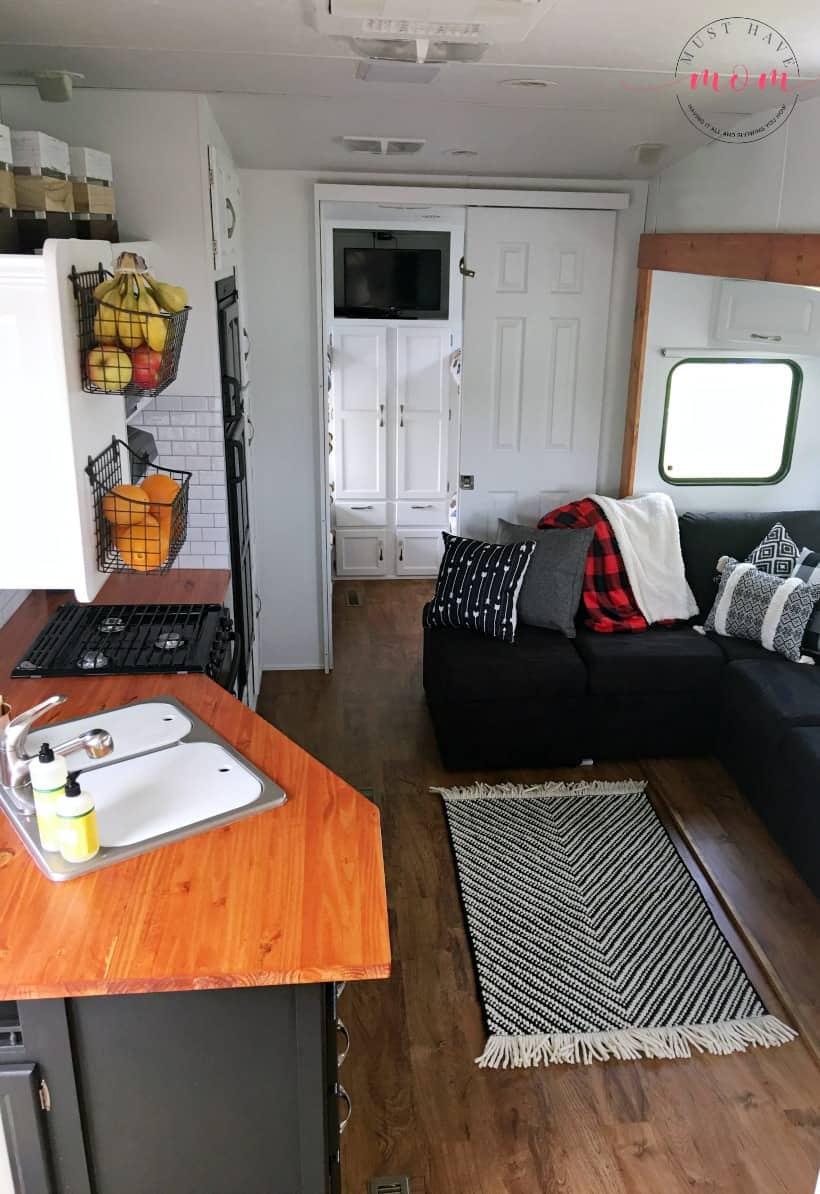
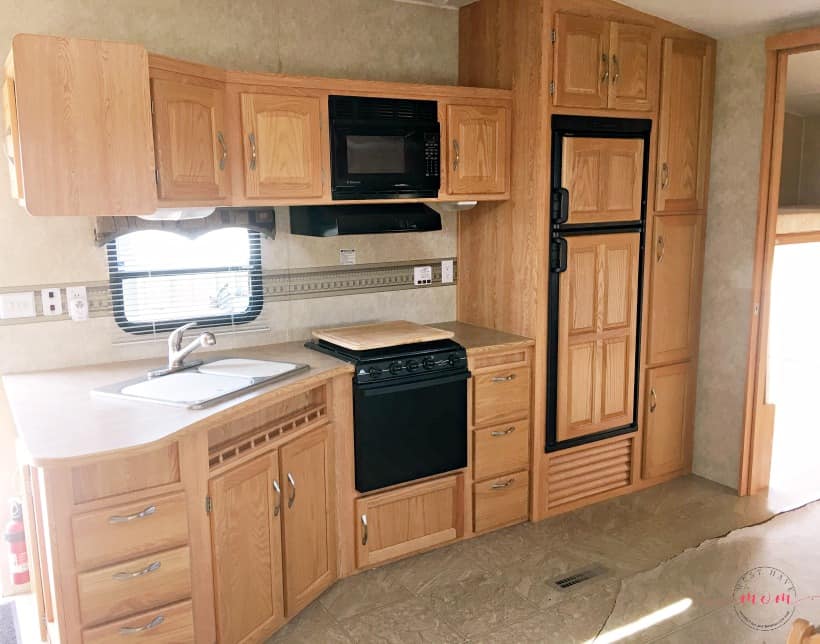
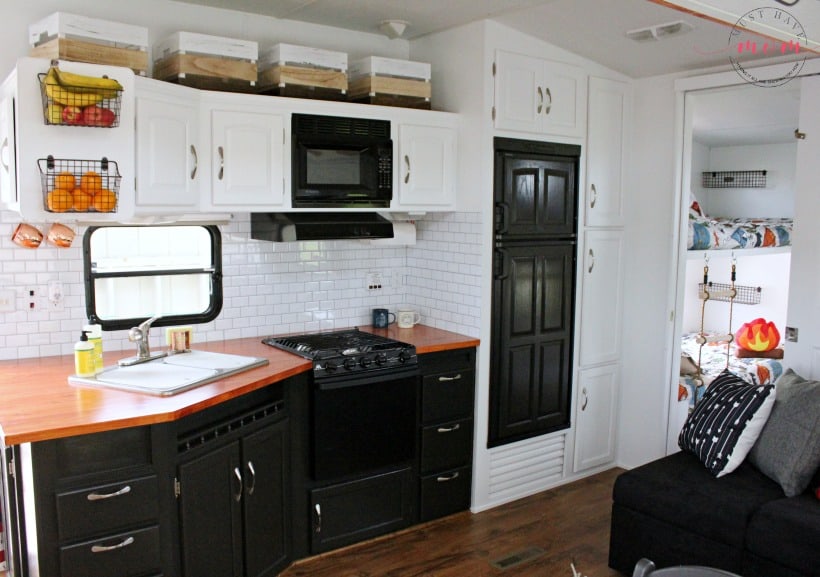
In the kitchen, we painted the lower cabinets a shade of black, replaced the counters with gorgeous DIY wood countertops that I made, and painted the uppers in white. We also added peel ‘n stick subway tiles as a backsplash and replaced the window treatments with a simple vinyl roller shade. We also made our own custom copper paper towel holder and added fruit baskets for storage. I added wood crates to the top of the cabinets for extra storage. We were able to keep the silver hardware and after painting the cabinets it looked so much nicer!
Shop This Look
Grab my free RV packing list printable now!
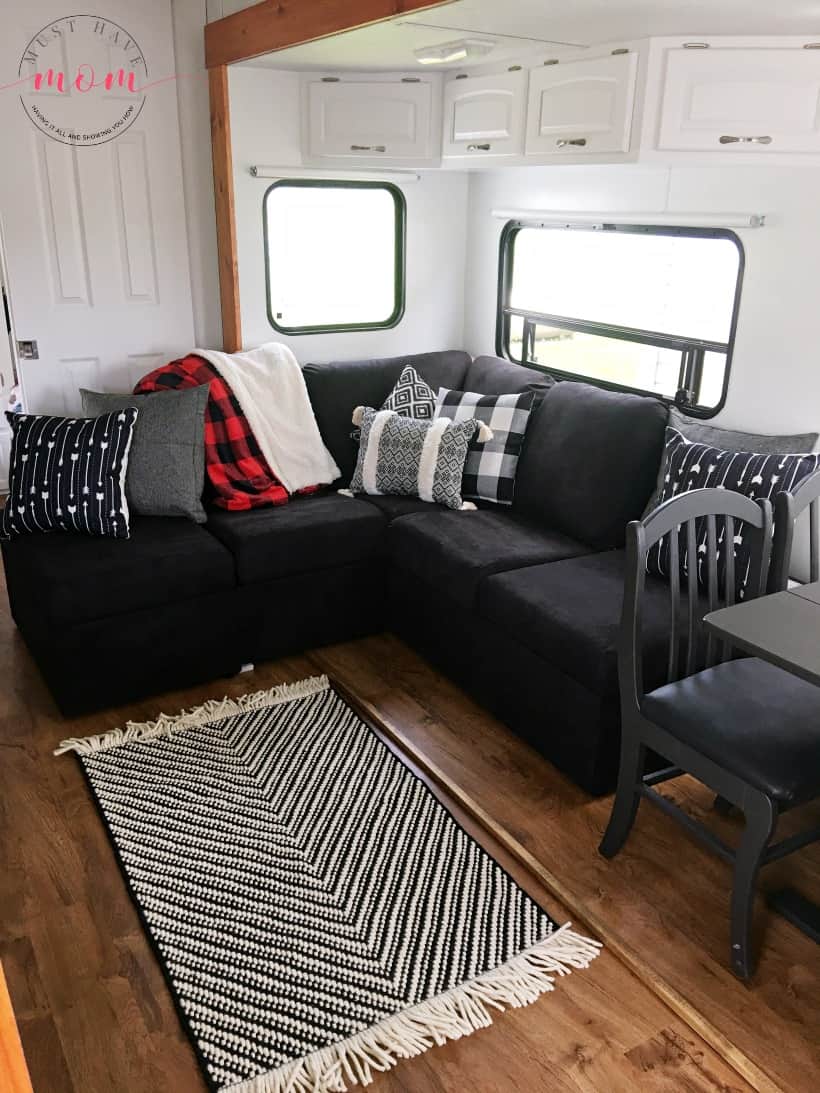
RV Living Room Makeover
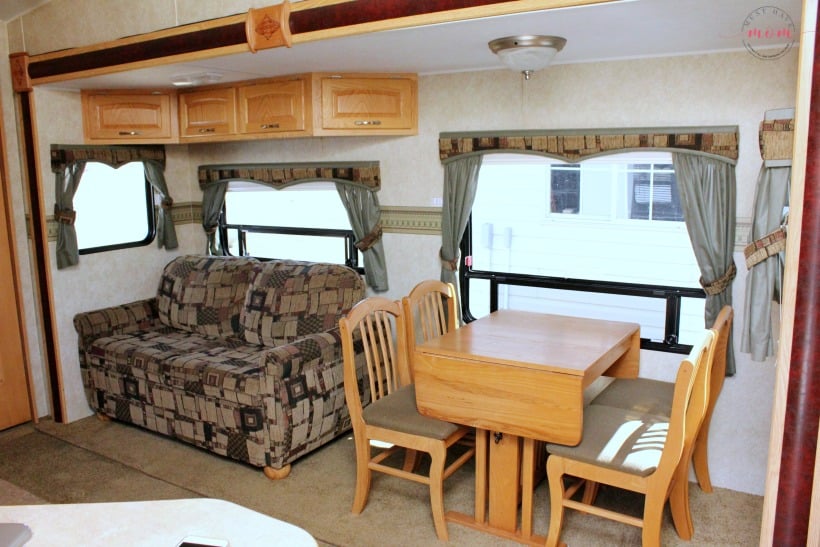
In the living room, we found the loveseat to be really inadequate. Not only did it only seat two people at a time (for our family of six), but it also faced away from the TV. The loveseat faced the kitchen and the TV was on the side wall. I knew that wouldn’t work well or be functional. I needed something that would seat more people, allow for laying down and face the TV. It sounded like a tall order, but I am thrilled to say that I found a solution!
I ordered a modular sectional couch from Home Reserve. It allows you to order the couch piece by piece so you can get one that perfectly fits your space. I ordered two of the ottomans, two armless seats and a corner piece to create the perfect corner sectional for our camper. Now we are able to fit more people on the couch and we can even stretch out and take a nap. It also allows us to face the TV. I am so pleased with it! It even has built-in storage in each piece and the fabric can be removed and tossed in the washing machine. Perfect for camping! Thanks to the black color, it hides dirt well and I don’t have to worry about the kids spilling or getting it dirty.
I added some throw pillows and kept costs low by using new throw pillow covers (this one, this one and this one) over old pillows I already owned. I’m in love with cozy buffalo check blankets so I had to add one to the couch and it coordinated perfectly and it’s SO soft and cozy on cool nights. I also added a throw rug from Target.
Shop This Look
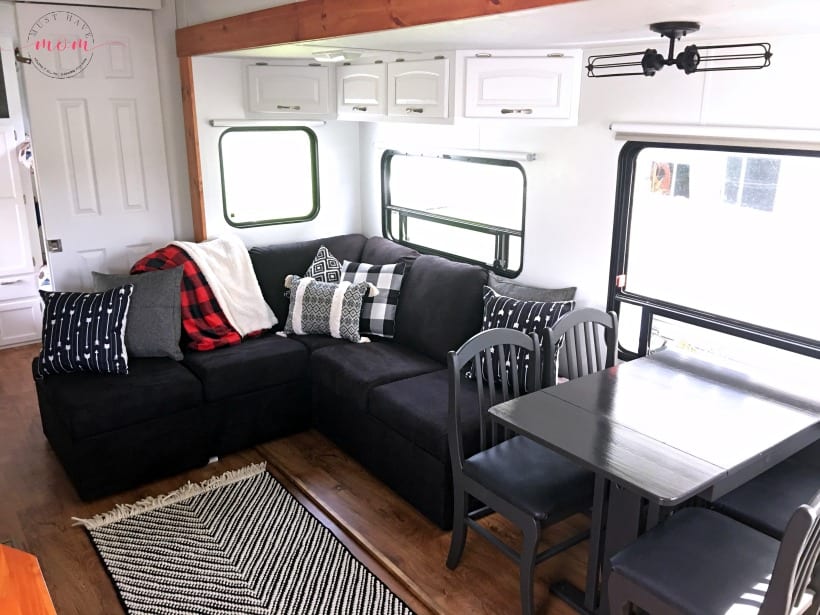
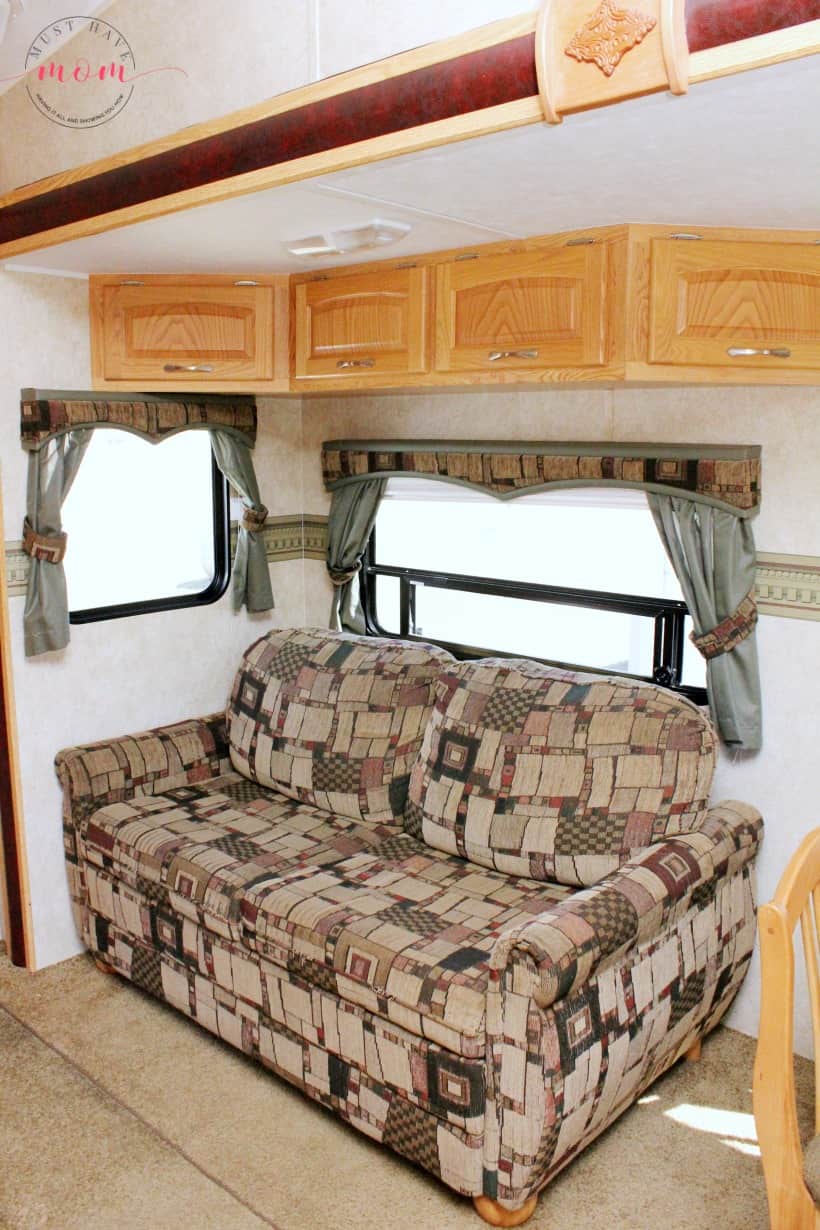
We painted the cabinets white and kept the hardware. We removed the ugly window coverings and added vinyl roller blinds which let in a lot of light but still allow for privacy at night. We changed out the light fixture above the table and replaced the outdated RV fixture with a gorgeous tube lighting fixture. You can use any household light fixture, but you must use 12V bulbs which we ordered from 12V Monster.
We also removed the atrocious faux red leather slide out trim and replaced it with wood trim that we made from pine. We installed Shaw Citadel vinyl click together flooring and removed the linoleum and carpet. I painted the table and chairs the same color black as the lower cabinets and I recovered the chair cushions in leather so they would be wipeable and resist messes from the kids.
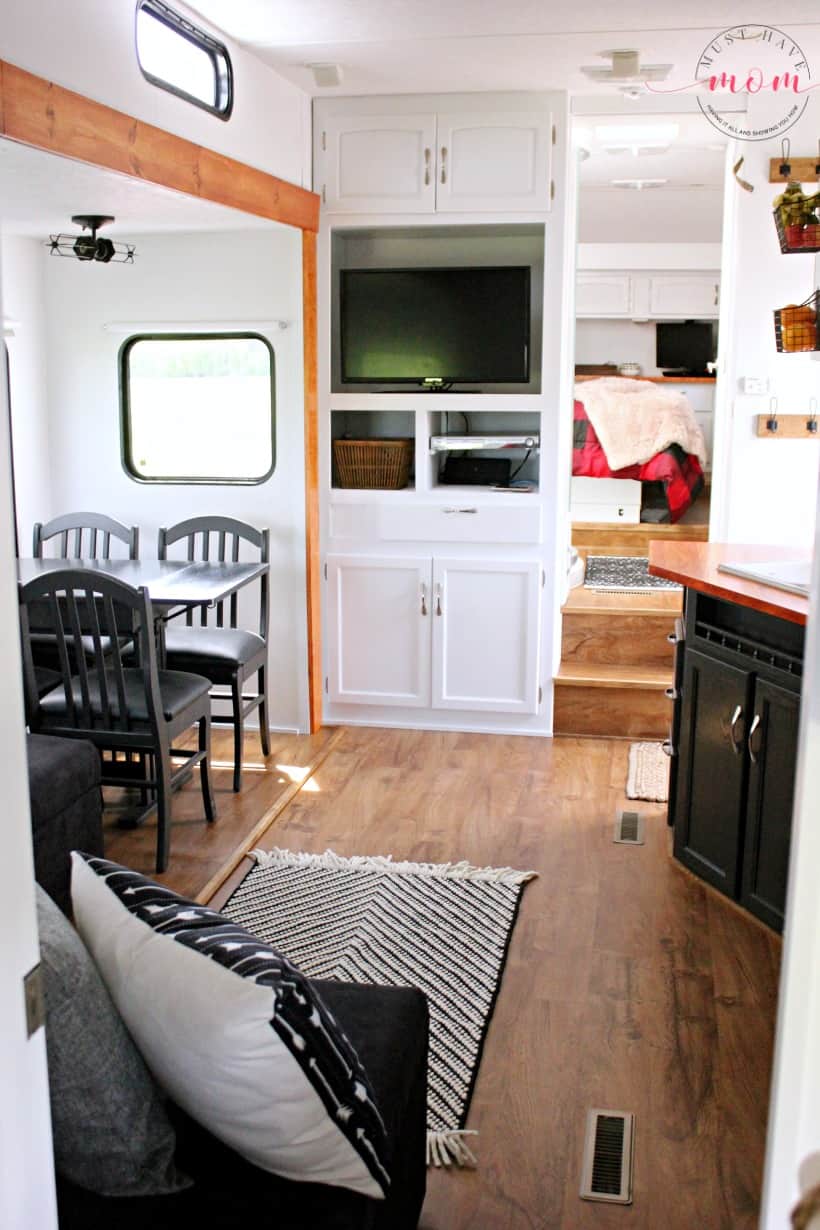
We painted the entertainment center white as well and the couch now faces the TV so we can easily kick back and watch a movie on rainy days.
Camper Bunk Room Makeover
In the bunk room in the back of our fifth wheel, I knew I needed a better solution for closet storage, we needed to add ladders to the bunks and it needed some extra storage in the bunks. We solved these problems by painting everything white and replacing the flooring with vinyl click together planks. We added rope ladders to each of the bunks to give it a rustic adventure feeling and added functionality by allowing the kids to easily climb in and out of their top bunks. See how we made these DIY RV bunk ladders here.
In the closet, we removed the hanging bar and added shelving. This allowed me to fit enough clothes for all four kids in the closet and keep them separated so everyone could easily find their clothes.
In each of the bunk beds, I added a storage basket and an arrow hook. This is the perfect place for them to store books, toys and to hang things like hats and lanyards. I added campfire pillow from the Target dollar spot for just $5! I added adorable camping themed bedding to each of the bunks as well. The kids LOVE the bedding sets and they were a great value because they came with sheets, pillowcases, a bedspread and a decorative pillow sham.
*It looks like the camping bedding is sold out right now, but here is a really cute camping bedding set alternative!
Shop This Look
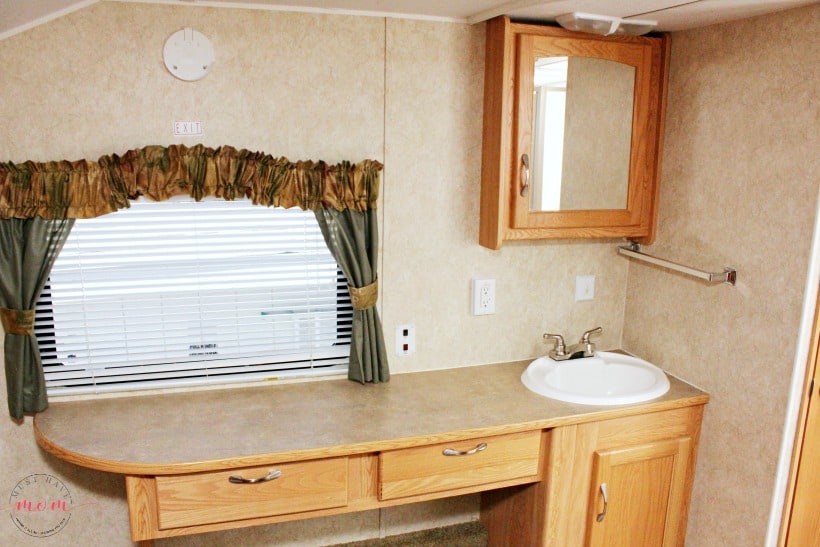
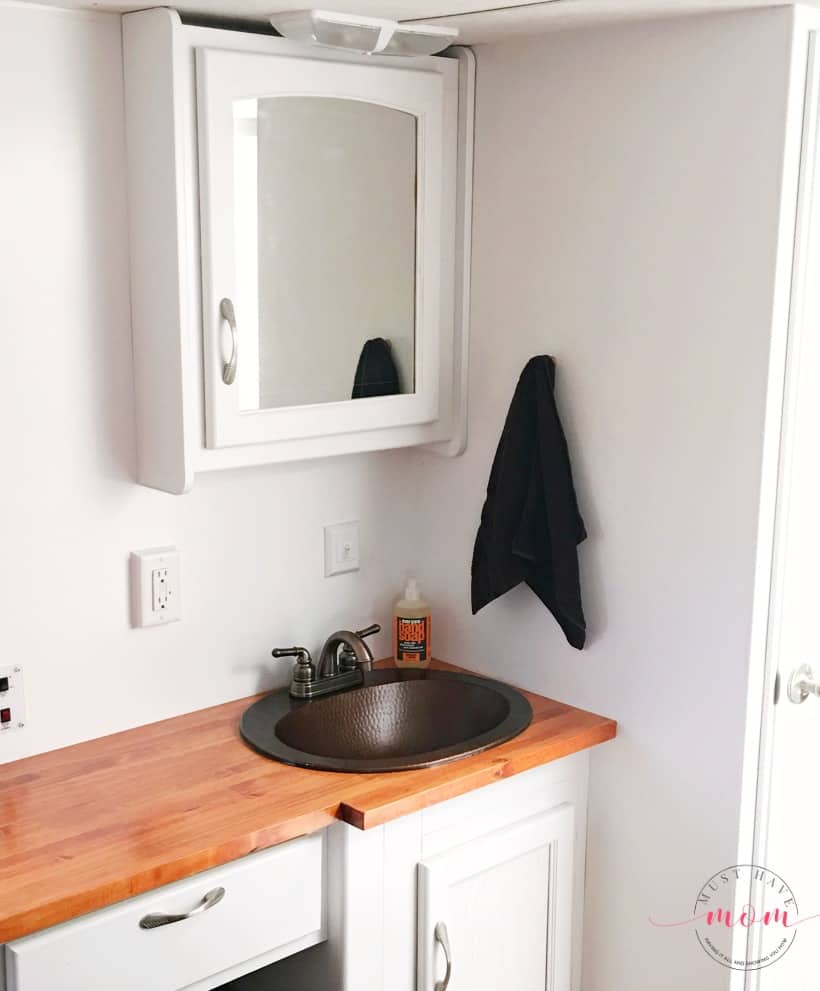
Camper Bathroom Sink Makeover
I love that our bathroom sink is in a separate room from the toilet and shower. Each has it’s own area so people can use the sink separately from the toilet and shower. We removed the existing bathroom counter and sink, painted the cabinetry and walls white. We made our own wood countertops and they turned out beautifully! See how to make your own DIY wood countertops in my other post!
Shop This Look
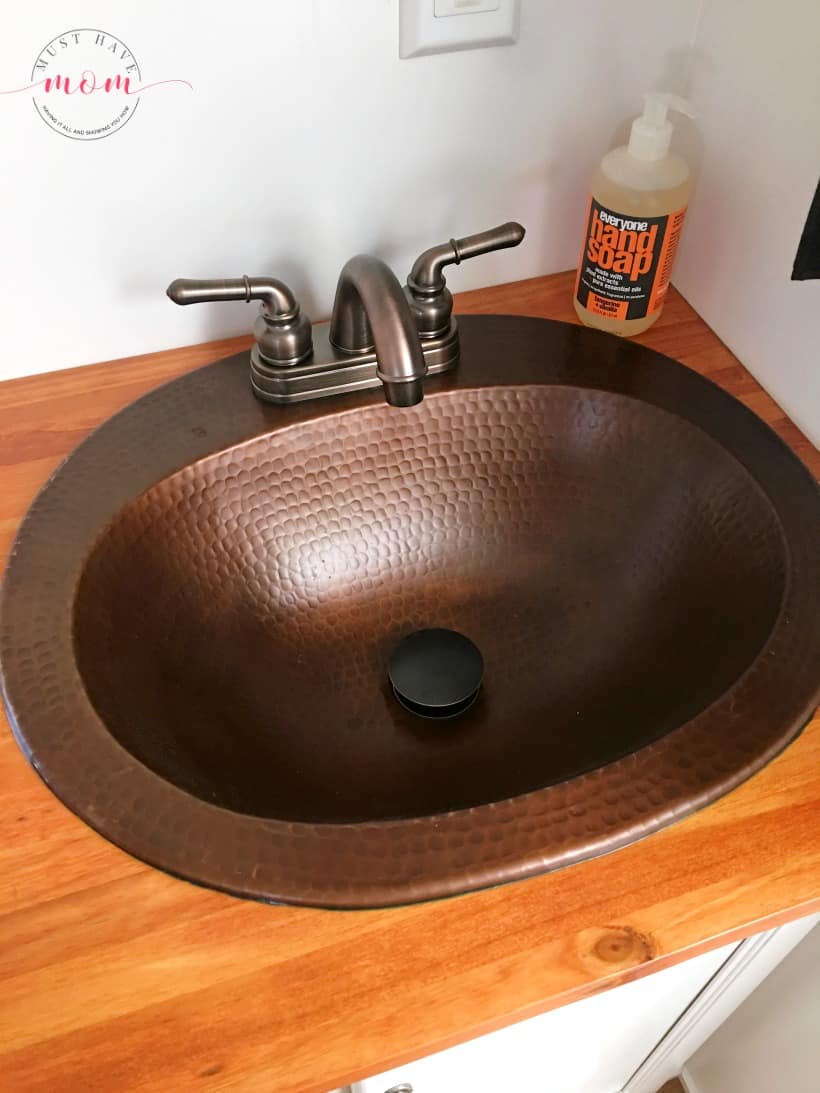
We replaced the counter with wood countertops that I made and we replaced the sink with a copper sink and oil rubbed bronze RV faucet.
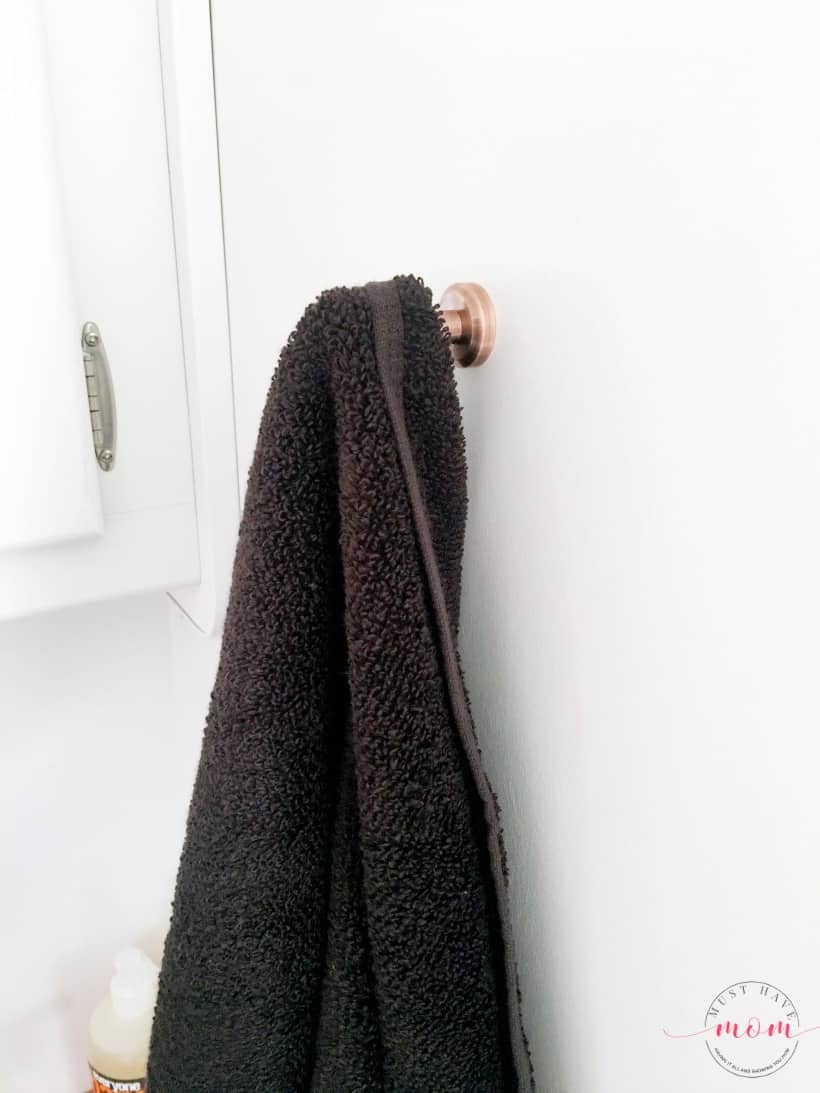
I added a simple copper towel holder and hung a black hand towel on it.
Shop The Look
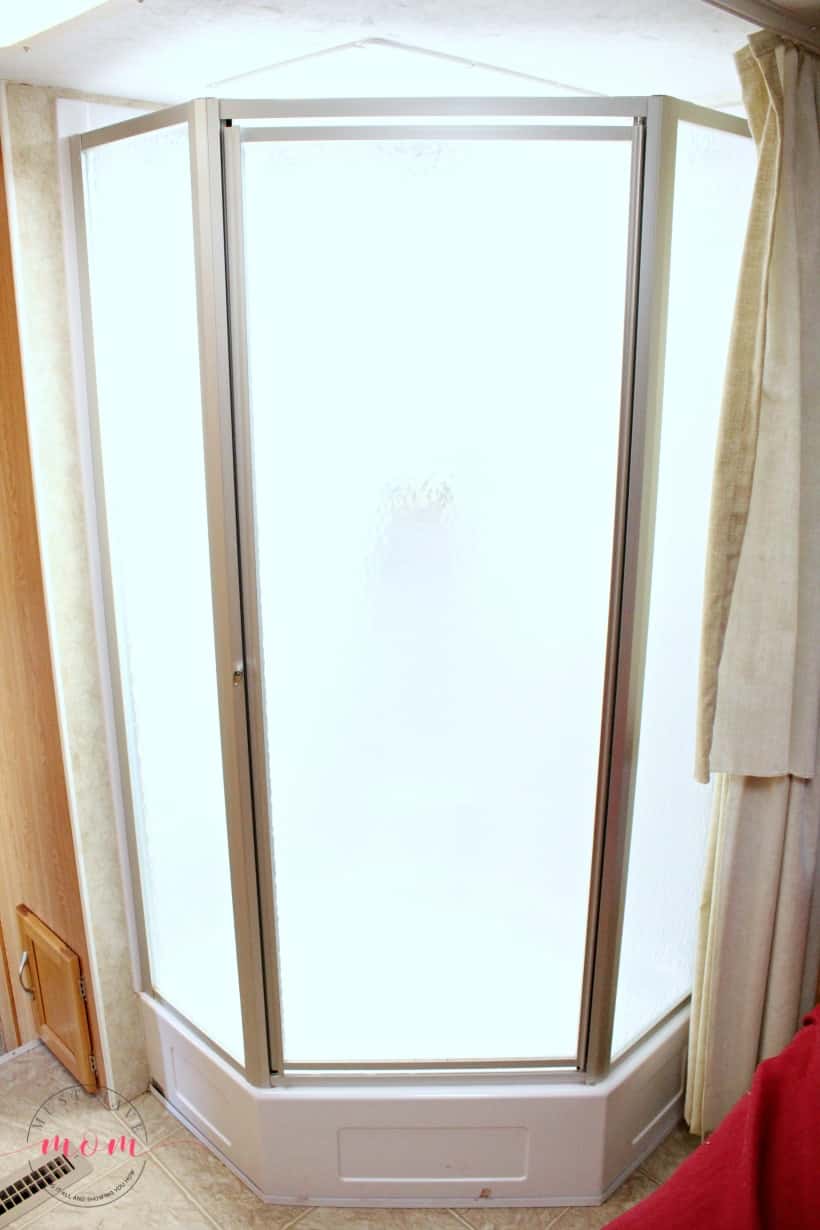
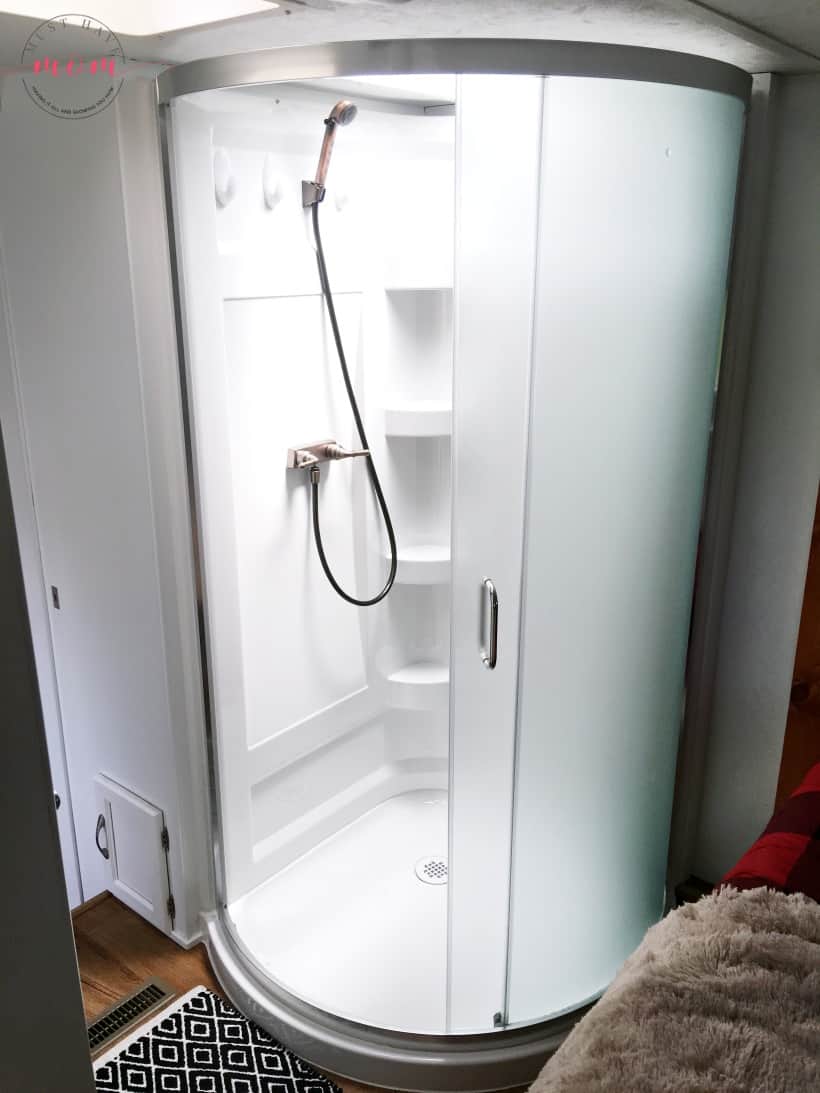
We removed the old RV shower which had a crack in the surround and we replaced it with a residential shower with an oil rubbed bronze RV shower fixture. The rounded surround gave us a huge shower space with a small footprint. The old RV shower that came with the RV was built up on a platform which stole a good six inches of headspace and had my husband’s head up in the skylight when he showered. By removing the platform and installing the new shower on ground level we were able to add considerable height to the shower. This is one of my favorite improvements in the functionality of our camper.
Shop The Look
RV Bathroom Makeover
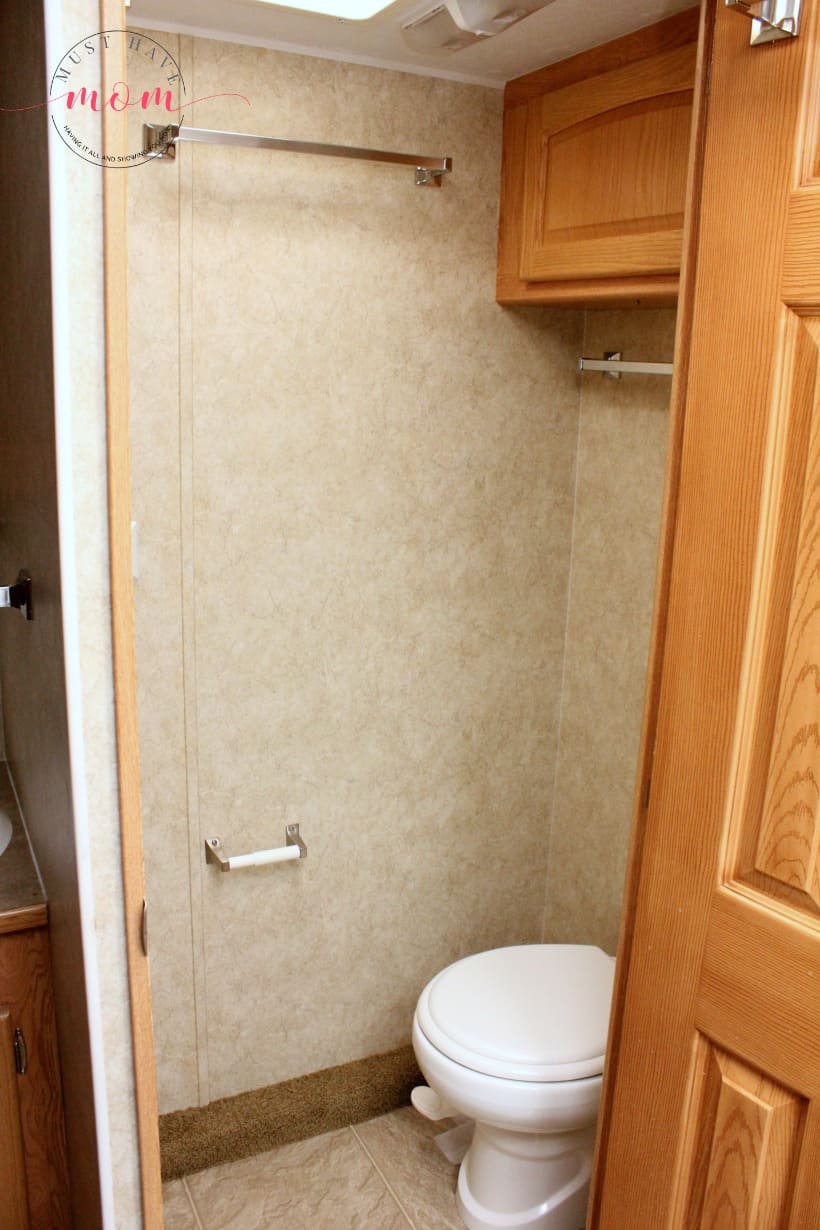
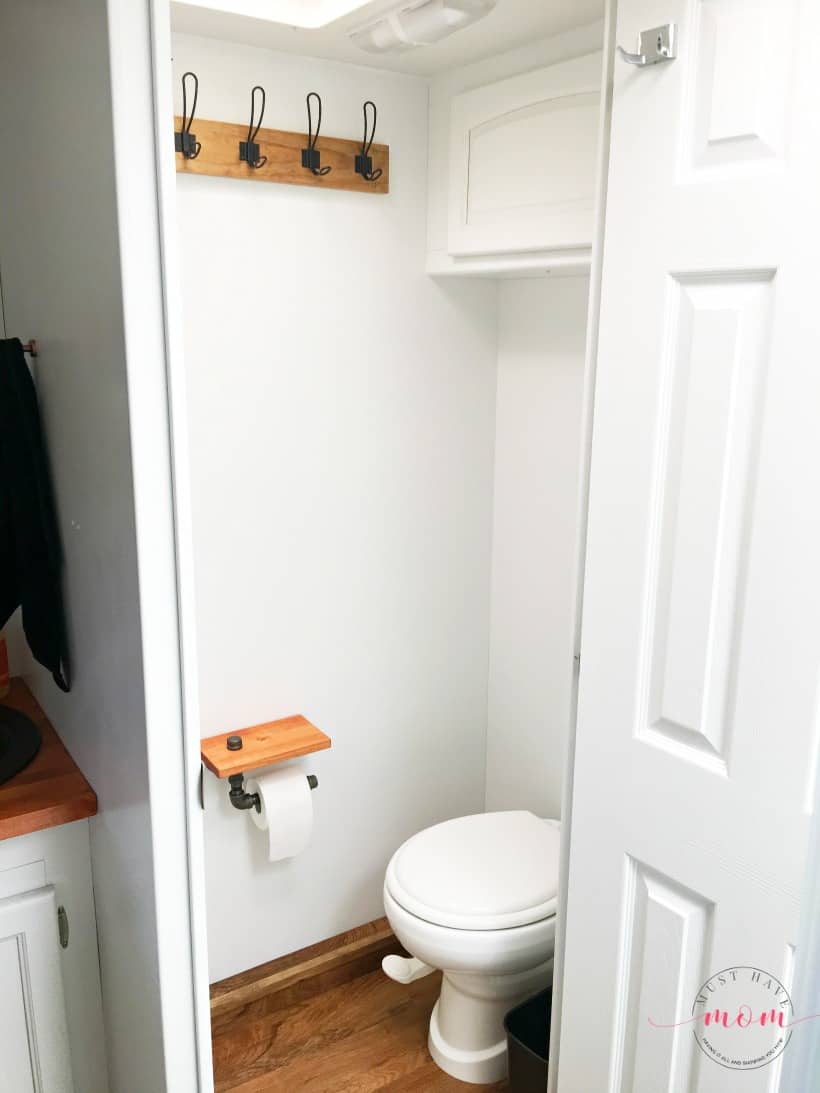
The toilet is in its own room. We replaced the towel bars with coat hooks on boards which we made. We removed the toilet paper holder and replaced it with a rustic toilet paper holder which we made from pipes and pine board which we stained. I love how it turned out. We painted the walls and cabinets white, along with the door.
Shop The Look
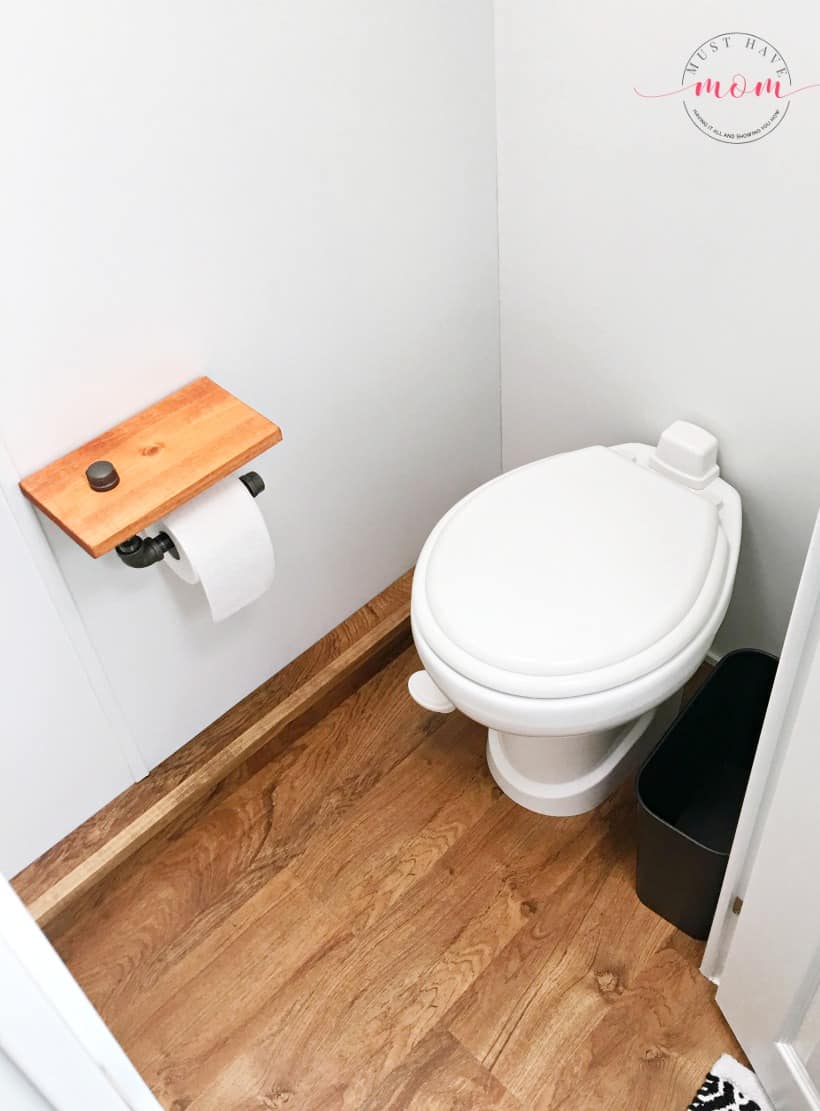
We also replaced the flooring with the vinyl click together planks that we did throughout the whole camper. We also went up and over the framework that was exposed with the flooring to cover it up. I added a small oil rubbed bronze trash can.
Fifth Wheel Master Bedroom Makeover
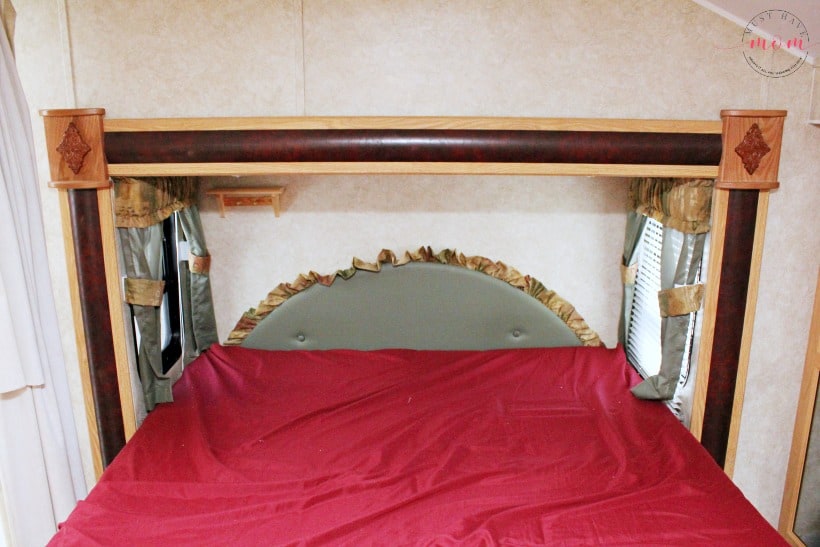
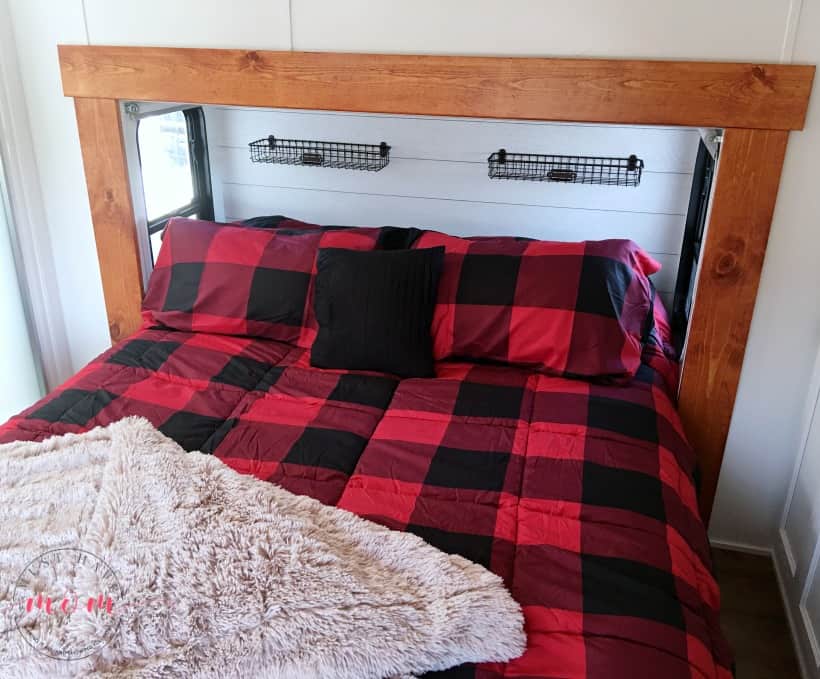
Ironically, the first thing I wanted to get rid of from the moment we bought this camper was the ugly, ruffled headboard in the master bedroom. I couldn’t even fathom who thought that was a good idea! I couldn’t wait to see that thing go! After removing the headboard, I applied shiplap wallpaper from Target to the wall behind the bed.
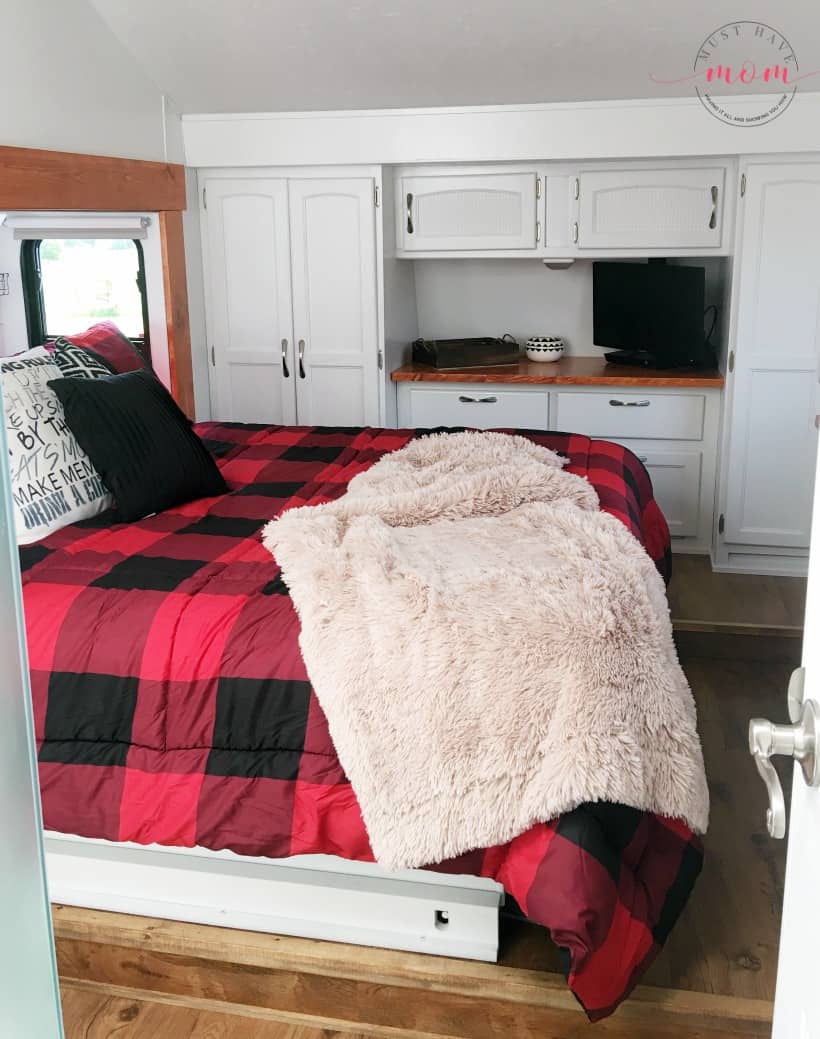
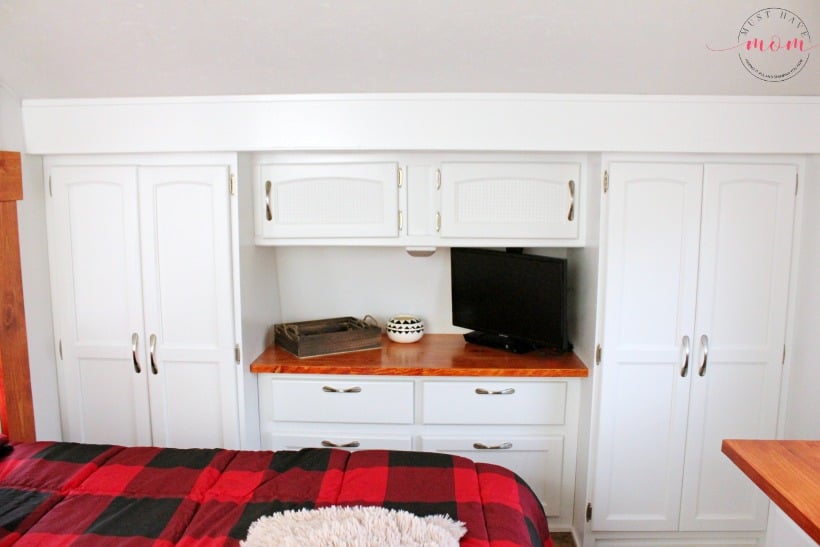
We painted the cabinets white and painted over the mirrors on the closet doors. We removed the countertop and replaced it with wood counters that I made. We removed the window coverings and replaced them with simple roller blinds. The flooring went up each level and we capped off the corners with bullnose trim that we made.
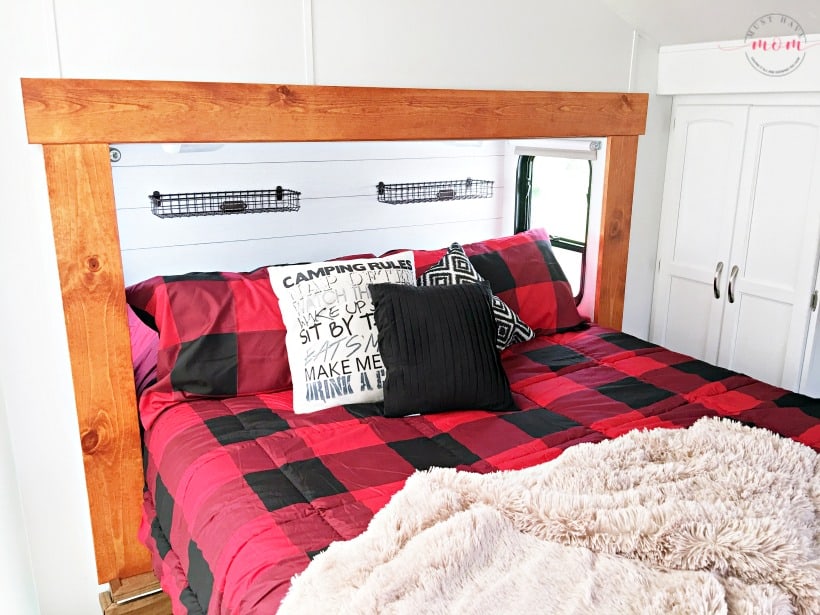
We replaced the slide out trim with stained pine boards that match the countertops. I was so happy to see the ugly faux leather slide trim go! I added wire baskets behind the bed so we would have a place for our phones, books, etc since we didn’t have any nightstands. I added a red buffalo check bedding set and a faux fur blanket that is soooo luxurious and soft.
Shop The Look
If you are hesitating to get rid of the outdated 80’s style mirrors on your closets, I say don’t hesitate, go for it! I’m so glad we painted over them. You can’t even tell they used to be mirrors. We primed them and sprayed cabinet, door and trim paint over them.
We even mounted a small TV using this TV mount for under the cabinet.
Pin Rustic Modern RV Makeover


What a beautiful update. I would love to have an R.V like this.
Thank you so much!
Awesome! I just stumbled upon this little beauty. Can you please tell me the type of primer and paint you used on the walls and cabinets? Is there an article that includes a step by step guide? Please lead me to it!
Hello! That post is coming soon! We used a bonding primer and then applied Dutch Boy cabinet, trim and door paint on the walls and cabinets with a paint sprayer. It worked great! The step by step will be coming soon!
Hi there- can you give some pointers or how to’s on how you created your wood countertop?
Yes!! I am working on a post with directions and it will be live this month. Stay tuned and subscribe to the RV email list so you don’t miss any updates. https://landing.mailerlite.com/webforms/landing/k8s6j1
What a beautiful makeover! I saw your first makeover and we need to paint our cabinets. Do you prefer the bonding primer and Dutch Boy paint or the Beyond Paint from the last makeover? I love the idea of not having to sand anything! Thanks for sharing, you are giving me so much inspiration 🙂
Thank you! So with this one we used a paint sprayer with the Dutch Boy cabinet paint and it worked SO good. It was so fast and easy and the finish was immediately a hard cure. The lower cabinets I rolled with the same paint and they did not have a hard cure so spraying was the trick. I’d recommend the Dutch Boy cabinet paint if you can spray it as my top choice. If you’re brushing/rolling it on then either paint will work well. Not sanding is the only way I’d do this lol.
What bonding primer did you use?
Hmm it’s been a bit since we did this project so I am not sure! I typically use Zinser or Killz though!
Very nice! Can I ask how you attach items to the walls?
Thank you! We use command strips or screw them in if there is something behind the wall that it can grab into.
You’ve inspired me and I think convinced my husband to let me tackle our camper. It’s only 3 years old but dark wood and brown everything, it’s so dark inside! Time to lighten it up! Looking forward to your coming posts.
Oh I’m so excited to hear that this makeover inspired you. That’s fabulous!! Yes, coming posts on how I did everything! As soon as I get some time away from the camper lol. I’m enjoying it too much now and I don’t want to work haha. Thanks so much for your comment!
How hard is it to pull of the RV Window Valances? I love your remodel!! So Cute! I want to start digging into ours and first thing is those valances and wallpaper boarders! oh and the vertical mirror panels and the lights..lol all of it!
It’s not hard at all, just make sure you have the extended bit so you can reach them easy! Have fun! It’s so awesome watching the makeover unveil!
I could love to know what kind of wood floors and where you purchased them from! So amazing! I’m motivated to tackle our RV thanks to you!
Awe that’s great to hear! We purchased the flooring at Menards. It was click together vinyl plank. I’ll be writing up a post on how we did it once I get some time haha. Too busy camping in this beauty to work!
Do you have a tutorial on how you did the painting with a sprayer?
It looks amazing!!
Not yet but it’s coming soon!
where did you get that super cute couch?
I ordered it from HomeReserve.com 🙂
Beautiful job! Would love to know How much did you end up spending in total?
Thank you! I didn’t keep track of how much we spent total. Sorry!
I need to paint the walls in the trailer. Do you use the same bonding primer and Dutch Boy paint for the walls as well? What is the name of the bonding primer? Did you sand the walls. We have an area that has some scratching to the wallpaper so we figured we would have to sand it first.
In this camper makeover we used a paint sprayer and found it was amazing. We used bonding primer and Dutch Boy cabinet, trim and door paint for the walls. I would recommend sanding the spots that have wrinkled, raised or ripping wallpaper but other than that we didn’t sand anything.
I love the latter’s on the bunks! We currently use an old bunk bed one in our camper and I hate it!! It’s way too big and is in the way. Did you make these or was it something you purchased?
Oh my goodness .. *Ladders not latter’s . Haha
Thank you! I’ve been meaning to write a post on how we made these work for the bunks! We bought the rope ladder and then fashioned it to the bunks. I’m adding this to my to-do list to write a post on this lol.
Love!! This is the exact look I would love to replicate for our possible future camper remodel!! My husband works out of town and lives in a camper during the week. We have 15 month old twins and it’s getting harder and harder for us both to live apart so much, we really want our family together more so we are looking into buying a bigger camper than what we currently own but I would rather buy older/cheaper and remodel it like the one you did!!
Anyways, such a long comment but I was wondering where the couch is from?? I love it so much, it looks so comfortable, and I haven’t been able to find anything that looks like it!!
Oh thank you so much! I would absolutely live in this camper and we do all summer! I love it! It’s a cozy retreat. I hope that you are able to do the same. I bought the couch from homereserve.com and absolutely love it. It was a bit of a pain to assemble because they make it with plywood but once it’s together it’s perfect. Good luck!!
I love your entire makeover! I am looking to do the exact same thing with the exact same showers. Can I ask how hard it was overall and how hard to reroute the plumbing under the raised shower pan? Thank you in advance. Nervous about doing the work.
We LOVE the shower upgrade. My husband finally has some room and his head isn’t in the skylight anymore! I think I should really do a DIY post on how we did this so I can show you the steps. I’m adding this to my to do list!!
Where did you purchase the shower kit from (base & surround)? It looks different than anything I’ve sen before & the surround actually fits height wise.I have been unsuccessful finding a residential kit that will work with the height requirement. Thanks!
We purchased it from Menards. We also removed the base platform in the RV as it only served to raise the shower higher and put your head in the skylight! We moved the plumbing underneath the floor and kept the shower floor-level.
My family and I love the way you guys remodeled your RV. We are actually in the market to buy one. We found one that is your exact floor plan (before I even saw your post) and it is well within our budget. Thing is it is a fixer upper. To get the hubby on board I was looking into how much it would cost to do a complete remodel and came across your blog here. I showed it to my hubby and he loves what you guys did with your place (and it really helps that it is the same layout we were already looking at for visualization purposes). I have done a lot of research on how much it will cost to remodel the one we are looking at (and trying to account for the what if something goes terribly wrong). This blog really helped me create a mental check list and check it off during my searching. However, I am wondering about how much did you guys spend in all doing the remodel? And did you have to replace any of the appliance?
Hi Collette, How exciting! It really depends on what you intend to do. It would be pretty easy to add up the costs though once you know the square footage. You’d need to choose the flooring you’d like and calculate the cost per square foot. Add the cost of paint by square footage and anything else you’d like. For example, we added the subway tiles, new shower surround, new slide trim, wood counters etc. These things aren’t essential and would be dependent on your budget. The main things would be paint and flooring 🙂 We also replaced the couch which was about $700. We did not replace any appliances. We painted the fridge. I don’t have a total as I didn’t add it up when we did it but I hope this helps somewhat! Good luck with your remodel 🙂
Wondering how the floors and paint held up thru the MN Winter. Have you opened up yet to check things out? I am needing to put in new flooring and am also in MN. I have not heard the best about the flooring as it can buckle in extreme cold temps. Would love to know how everything is going now that Spring is here (even though right now it still looks like winter lol ) Also looking at painting – loved your first remodel using the Beyond Paint and took notes and now see you switched to bonding primer and Dutch Boy paint. Thoughts?
Thanks so much!
Lori
Hello and thanks for checking out my rv makeovers! Yes, my husband has gone in the camper since winter (in that short break where it seemed like spring!) and the flooring held up perfectly! You will find that it may shrink and expand a little bit but that is normal. In the cold it will shrink and you may see some gaps that won’t be there during the warmer months. Our other camper held up great as well and we used the vinyl click together flooring in that one too.
Yes, we have done painting both ways! Basically I get a lot of questions about painting camper walls and since we had done the Beyond Paint and knew that worked but everyone didn’t have access to Beyond Paint, we decided to try another method to give people options.
Both methods yielded great results for us. I still need to write a more detailed post about how we painted this camper with the bonding primer and Dutch Boy paint but we used a paint sprayer for this one and it was done in just over a day! It made the process SO fast and delivered a really hard cure right away as opposed to having to allow the paint to cure for a long time with Beyond Paint or with rolling/brushing on the Dutch Boy paint. If you have access to a paint sprayer then I highly recommend that route for the best results.
Hope that helps and please let me know any other questions that come up. I’m happy to help!
I need advice on window coverings. Where did you buy your roller shades? The more advice you can give me the better;) I just don’t want to buy some that will disappoint. Are they black out?
Hey there! Absolutely. We bought them at Menards which is a home improvement store similar to Home Depot or Lowe’s. They are not blackout but I also wasn’t going for that feature. I just wanted the privacy feature. We also hung them to hang 1/2″ or so over the edge of the window so they block the light. Hope that helps!
Could you give me the name and color of the vinyl plank you used. We are starting our remodel and Menards is our closest outlet. The floor you put in is exactly the color I am looking for as we are also doing black cabinets. Which Dutch Boy color did you use on your black cabinets?
The flooring is Shaw Citadel. I can’t seem to find the black paint color. I believe it was a midnight black. I’ll see if I can find a paint can sitting around here still!
What type of fifth wheel is this?
It is a Brookside sunnybrook
Hey there! We just bought a 5th wheel and I love your remodel! Can you tell me what color your couch is and is it the washable material? Also, is that an ottoman on the left? I’m on the website and I’m trying to buy the exact couch you have. Lol. Your whole space is beautiful!
Thank you! I had to look up my order. Here is what I ordered:
Jovie Armless in Bulldozer Black: $304.00
Jovie Corner in Bulldozer Black: $222.00
Jovie End Panel in Bulldozer Black: $39.00
Modular Ottoman in Bulldozer Black: $294.00
Hope that helps!!
Hi there!! I so love all the upgrades you did with your camper. Can you share where you purchased that cool tube light over your dining table:0)
I bought it at Menards!
I was wondering what you think of using Beyond Paint in a paint sprayer. I really like the Nantucket Blue. I believe the website says you can use a paint sprayer. Also many recommend the Heirloom Traditions paint. Any thoughts? I will be painting my RV cabinets, walls, and counters.
I haven’t used Beyond Paint in a sprayer. Being that it is more expensive than regular paint I would think you may have a lot more waste when using a sprayer. We sprayed this camper and used Dutch Boy cabinet, trim and door paint and it worked really well. I would definitely choose spraying over rolling!
Hello! Beautiful makeover! Can you please tell me where you got that black and white rug? Thanks!
Thank you! I believe that one was from Target.
Silly questions, but how did you attach the baskets in the kitchen and bunk area to the walls? Can you just screw them in?
I screwed them in yes.
Hi Sarah
Where did you buy shower surrond and what fid you do with the plumbing that was under the old shower
Thank you
The shower was purchased at Menards. You will need to plumb in the new shower.
Howdy,
Beautiful job! We just got our first RV and I’m loving seeing all the simple and lovely updates folks make. Big plans!
My question is how things are holding up? Specifically the peel and stick backsplash in your kitchen, pine trim around slide outs and paint? With storing and traveling how’s it doing? Anything you’d do differently now? Also, do you store your rv outdoors, indoors, climate controlled, plugged into electricity?
Thanks!
Hello 🙂 We store it outdoors in the harsh Minnesota winters (-40 temps) and it all held up great over the winter and with the travels. No issues at all! I’d do it all over again the same way. Hope that helps!
Have you done the shower redo post yet? We want to replace the shower first and see ho to run the plumbing under the floor! Thanks!
Ack! I have not done the post yet. It’s on my never-ending to do list LOL. The plumbing was definitely something we documented so I will do my best to get this done fast!!
Any chance you can direct me to where to buy that shower? I have the exact same shower you had and I can’t deal anymore. We just moved into our rv from a three bedroom and I need to renovate the whole thing. I’m taking one breathe at a time but the shower is about to do me in. Seeing your post today at 530 am has given me some hope. I think you said Menards hut is it something I look up? A specific item? I would be so grateful for some major detail so I could find it with ease and order it.
Is this iit? Does one literally just but this and replace?
https://www.menards.com/main/bath/showers-shower-doors/showers/maax-reg-cyrene-34-x-76-shower-kit/300001-001-102/p-1444438700146.htm
That looks like the same one. We removed the platform underneath the shower, built some wall reinforcement to attach the shower to and redid some of the plumbing 😉
Hi. Where did you buy shower and what did you do with plumbing that was under old shower?
Ty
Where did you purchase the enclosed shower?
Do you have a link for the vinyl window shades?
I do. They are these https://www.menards.com/main/window-treatments/blinds-shades/roller-shades/window-images-reg-light-filtering-solar-shade-72-length/40-5501-00/p-1497525617819-c-9234.htm?tid=3570957994141553313&ipos=1 and you can get them cut to width at the store.
Sarah, your RV looks amazing! I hope you’ve enjoyed using it this past year! I’m glad you shared at Tuesday Turn About. Happy to be featuring you tomorrow at the party! Pinned!
Oh, just read you sold it at a profit! Good for you!
Thanks so much Julie! Appreciate you stopping by 🙂
Wow! Your RV makeover is amazing.
Hugs,
Kippi
Thank you so much!
So inspirational! We are looking at a fixer upper this weekend and seeing what you’ve done has turned apprehension into excitement. I love the addition of baskets near the beds. How did you know where it was safe to screw into the exterior walls? I’m afraid I would hit a wire.
Yay! I’m so glad you are feeling inspired! My husband is the expert in that department. The walls are pretty good hardboard so just don’t use too long of a screw. Good luck!
Your design is beautiful! We are planning on going fulltime with our 3 kids and I have been going over tons of floorplans to find the best one. I really like this one. May I ask what 5th wheel model that is? Thanks!
Oh how exciting! Our 5th wheel was a Sunnybrook by Brookside. It had lots of great upgrades like a real porcelain toilet! We loved it!!!
Hi Sarah,
Like everyone else said, so inspirational! Do you recall how you attached the new slide out trim? Ours isn’t terrible, so I could just paint it, but I love the rustic wood look. I don’t see any screws or screw holes on the existing trim, so wondering if people use glue when replacing or something else?
Thanks!
I always try to understand how different trailer models behave in real conditions. Some people complain about the lack of capacity, while others, on the contrary, note how convenient it is to travel in comfort. Personally, I am interested in the balance between convenience and functionality. In general, the reviews on the etrailer website help you not to make a mistake with your choice, especially if you are planning long trips or outdoor travel.
td777 Game Pay real money to newbie gamers seeking to play fish games. I am informed that this is an online mobile game that can be play on an Android smartphone after download the game.
I’ve been to a lot of flower stores, but this miami flower shop truly stands out. MyPeonika offers top-notch arrangements and amazing service. The staff https://mypeonika.com/ helped me choose the perfect bouquet for my wife’s birthday, and the presentation was beautiful. You can tell they care about every detail and customer satisfaction.
he said [url=https://jaxxwallet-web.org]download jaxx wallet[/url]
weblink [url=https://jaxxwallet-web.org]jaxx liberty wallet[/url]
Trying to find a safe space to play and win online? You’re not alone — thousands of players every day choose platforms that combine security and exciting games in one place. Whether you’re into provably fair games, there’s always a right option — especially when everything is designed to be mobile-optimized.
One such place is a modern entertainment environment where players get access to licensed products and regular promotions. That’s what makes the experience not only enjoyable, but also responsible.
The platform offers everything from real dealer blackjack to casino apps for iOS and Android. Whether you prefer spinning the reels, there’s something tailored to your style.
For example, players can explore top titles like Sweet Bonanza, or jump into exclusive categories such as live poker tables. On the other hand, those who love multiplier fun often go for games like Coin Volcano.
And for sports lovers, the site covers everything from football and hockey to niche markets with live betting options and in-play features. Even new players can access free spins from day one, making it easy to start without risk.
The navigation is simple, the support team is available 24/7, and the registration process takes just a few moments. Plus, players can switch between desktop and mobile versions seamlessly — or download dedicated apps for iOS.
And most importantly — everything is legal, secure, and built around fair gaming practices. The project holds transparent terms, and provides tools for responsible gaming, giving users full control over their experience.
Discover more by visiting one of the platform’s pages:
https://pinupcasinopinup.ca/free-bets/
No matter what kind of experience you’re seeking — classic slots — you’ll find it here. With constant updates, new releases, and a friendly community, it’s easy to stay engaged, try new things, and enjoy every minute of play.
Sign up today and see why this platform remains a favorite choice among players from all over.
view it https://jaxxwallet-web.org