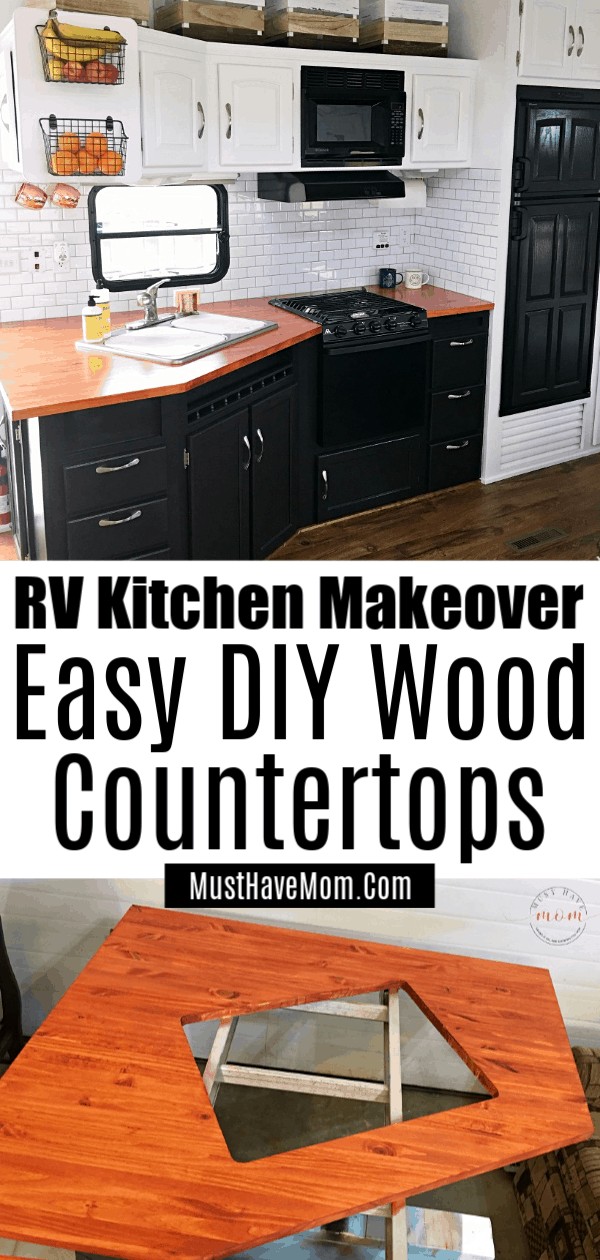
How To Make DIY Wood Countertops That Look Insanely Expensive
You don’t have to spend a bundle to get beautiful countertops! I’ll show you how to make DIY countertops that look crazy expensive but cost very little in comparison to traditional countertops! These DIY wood countertops are absolutely gorgeous and functional and easier than you think to DIY!
DIY Countertops
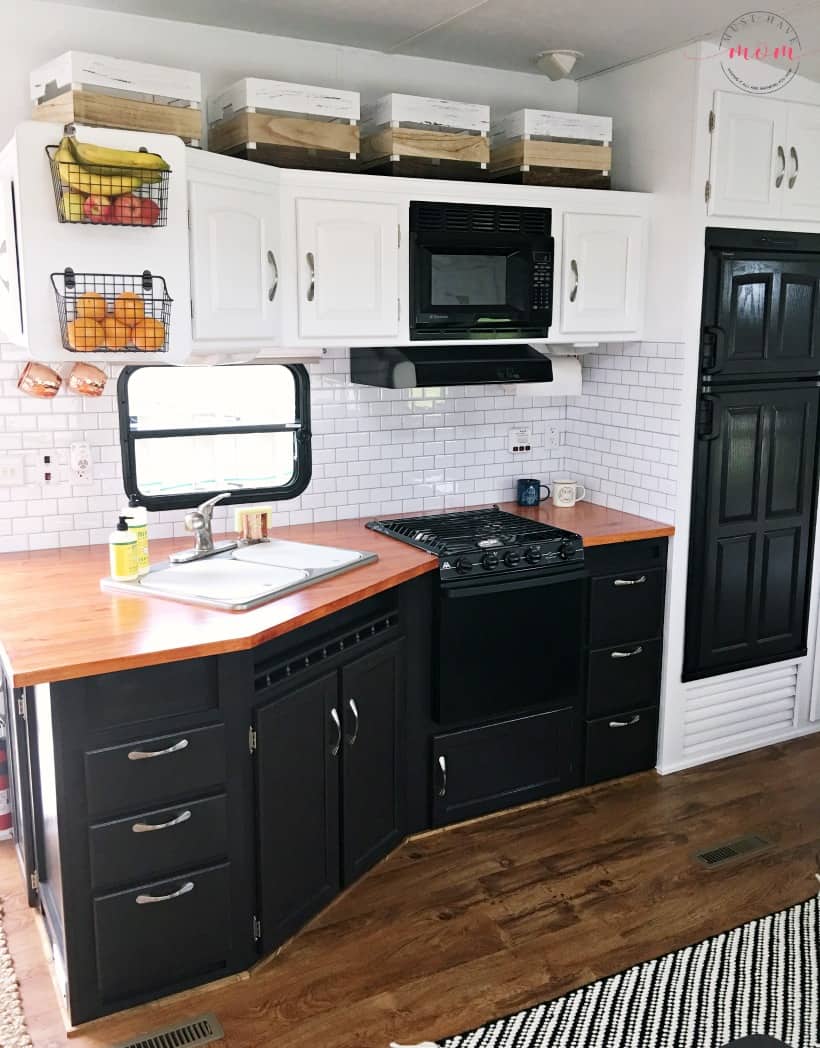
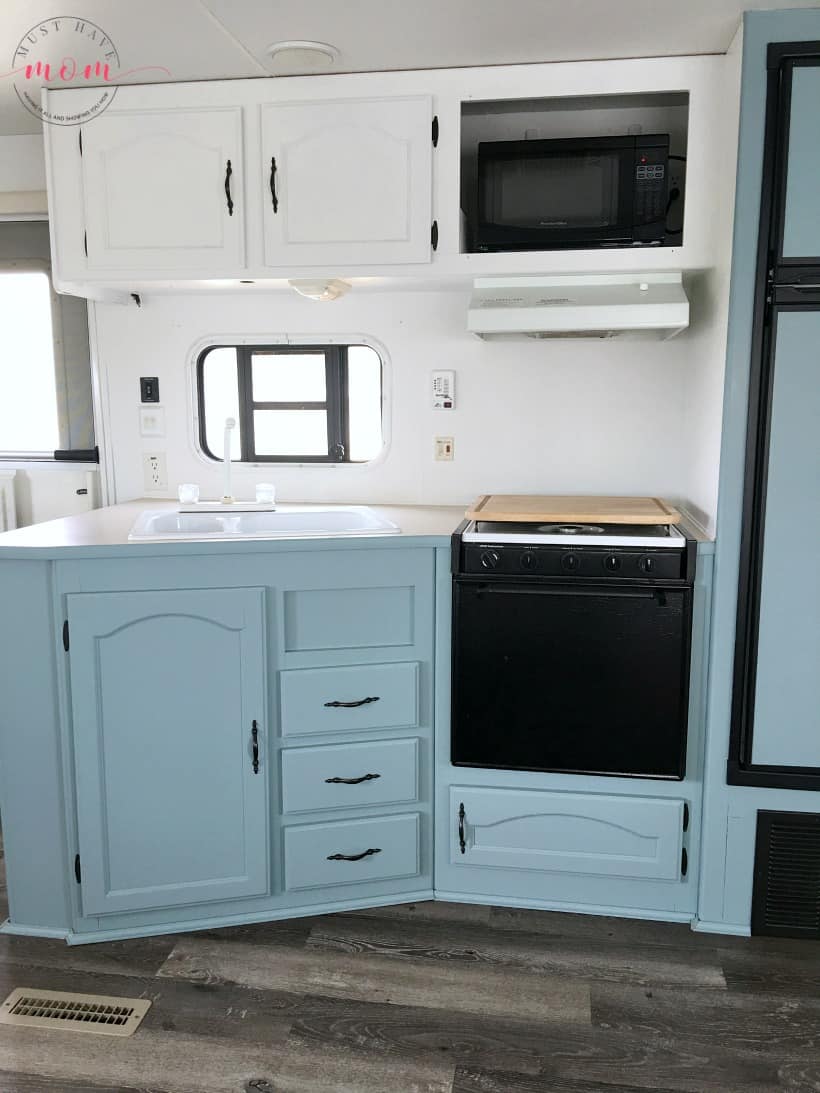
This past spring we did a major makeover on our camper. You can see our before and after photos of our modern mountain RV makeover which showcases the DIY wood countertops we made. I knew the countertops we had in our fifth wheel were not going to match the modern cozy mountain vibe I was going for but I also knew that I didn’t want to spend hundreds of dollars on new countertops. I priced out butcher block counters and was unpleasantly shocked at the cost that replacing all of our camper’s countertops would be. We had a countertop in the kitchen, bathroom sink area and master bedroom to replace so I knew I needed a budget-friendly option that didn’t include formica! My end cost for all three countertops was around $100 total!
I scoured the internet in search of a solution and found everything from people using wood flooring for countertops to reclaimed barn wood. I didn’t have access to reclaimed barn wood and I knew I didn’t want to putz around with flooring on a countertop so I set out to create my own DIY wood countertops and the end result was so much more than I even hoped for! They are gorgeous, look high-end and they are durable too! I couldn’t ask for more. If you are looking to get rid of the ugly countertops in your camper but aren’t sure how to DIY your own countertops then look no further because I will show you how I did it and I am willing to bet it is easier than you think!
How To DIY Wood Countertops
These DIY wood countertops are inexpensive, relatively easy and I’ve found them to be more durable than butcher block (and far less expensive). You’ll need a few materials to get started and some basic tools.
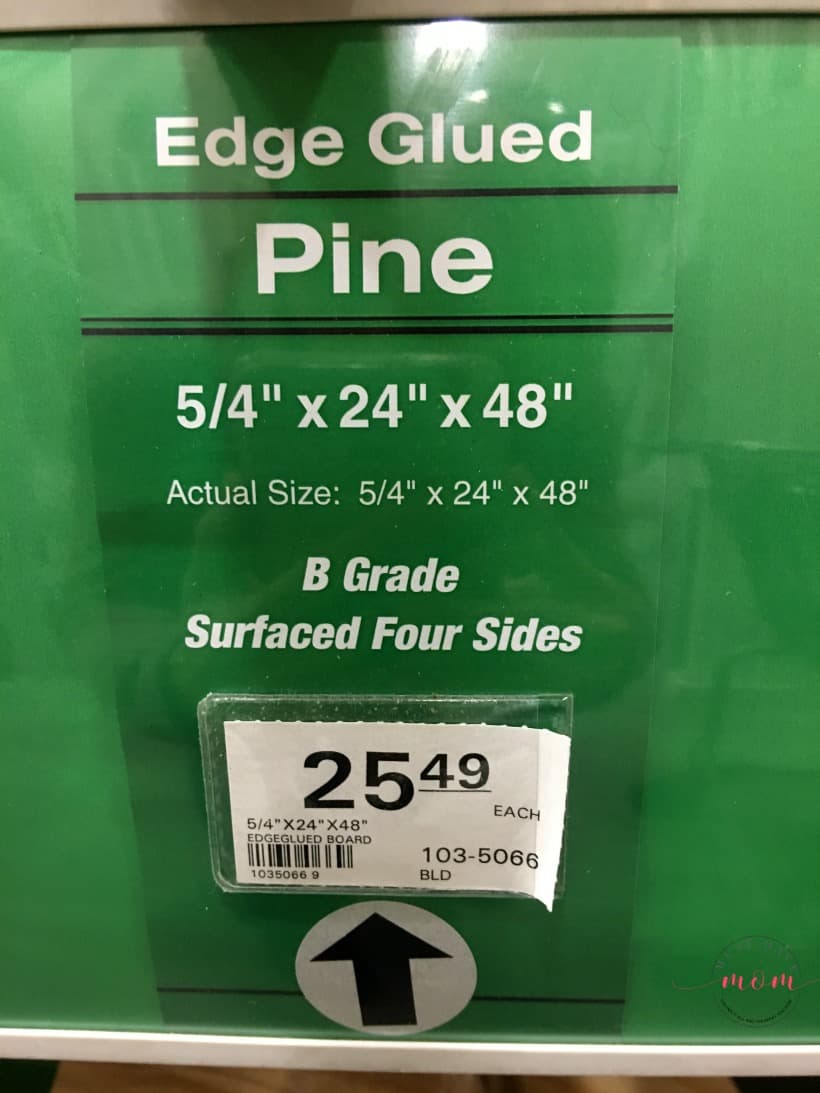
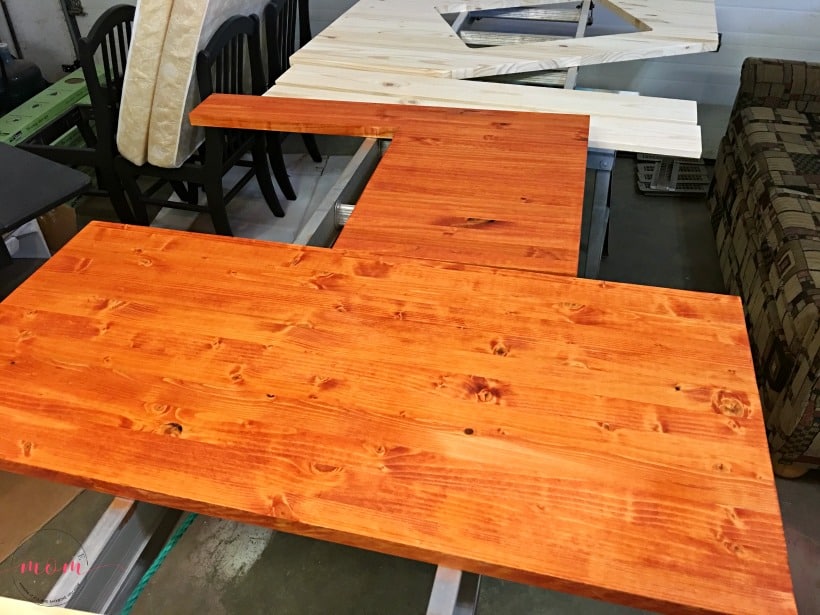
To make these DIY wood countertops we used inexpensive edge glued pine which you can find at most Home Improvement stores (Menards, Lowe’s, etc). I used the one pictured above. Be sure to measure each of your countertops so you can calculate how big or small of a piece you will need. For our large kitchen countertop, I used three pieces and glued two of them together. You can get various lengths, just make sure they are the same thickness. When you select the boards be sure to choose boards that are straight and not warped at all. Also, check them for knicks or damage.

Stain Color For DIY Wood Countertops
You’ll also need a wood stain in the color of your choosing. I used this stain in Gunstock on my countertops. You’ll also need a sealer for the countertops. I used a waterproof polyurethane sealer on mine. Grab some rags to apply the stain and a paintbrush for the poly.
How To Measure And Cut Your DIY Wood Countertops
First, you’ll need to determine how you’d like your countertops to look. We opted to make ours slightly different from the RV countertops that were originally installed in our camper. I didn’t love the rounded edges on our existing countertops and knew I wanted more square counters that would utilize the space better and provide more counter space. I’ll show you what I mean.
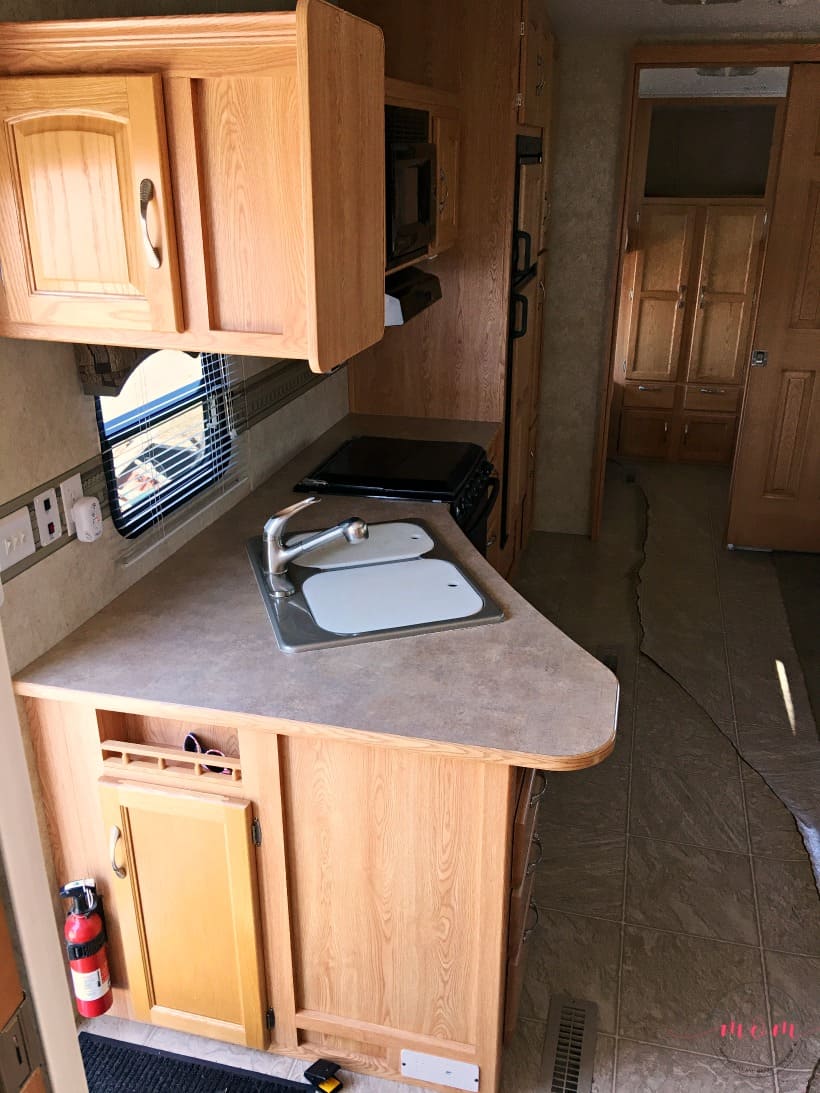
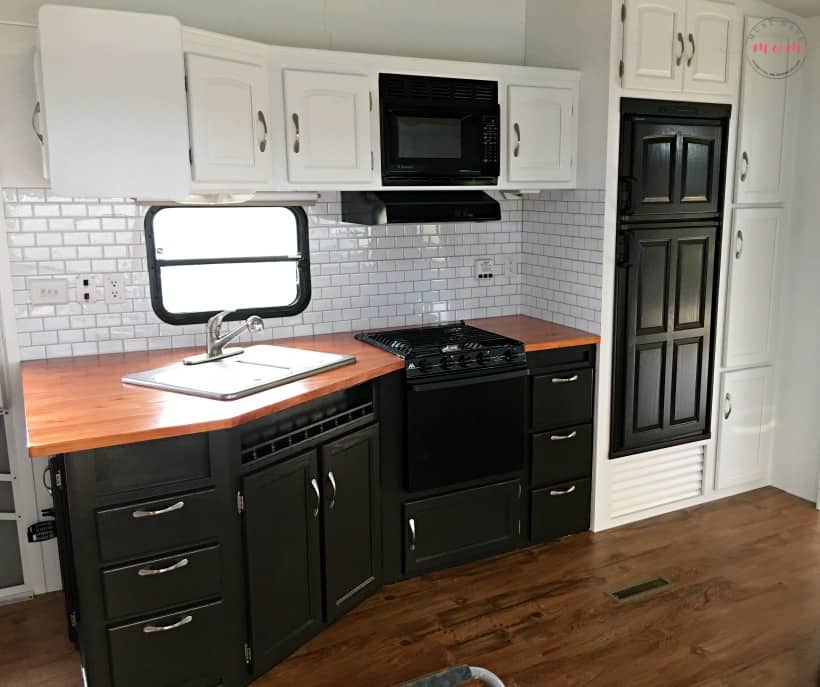
Our kitchen countertop had this rounded edge that came jutting out but didn’t provide much counter space for prepping food. There was very little usable space on our countertops.
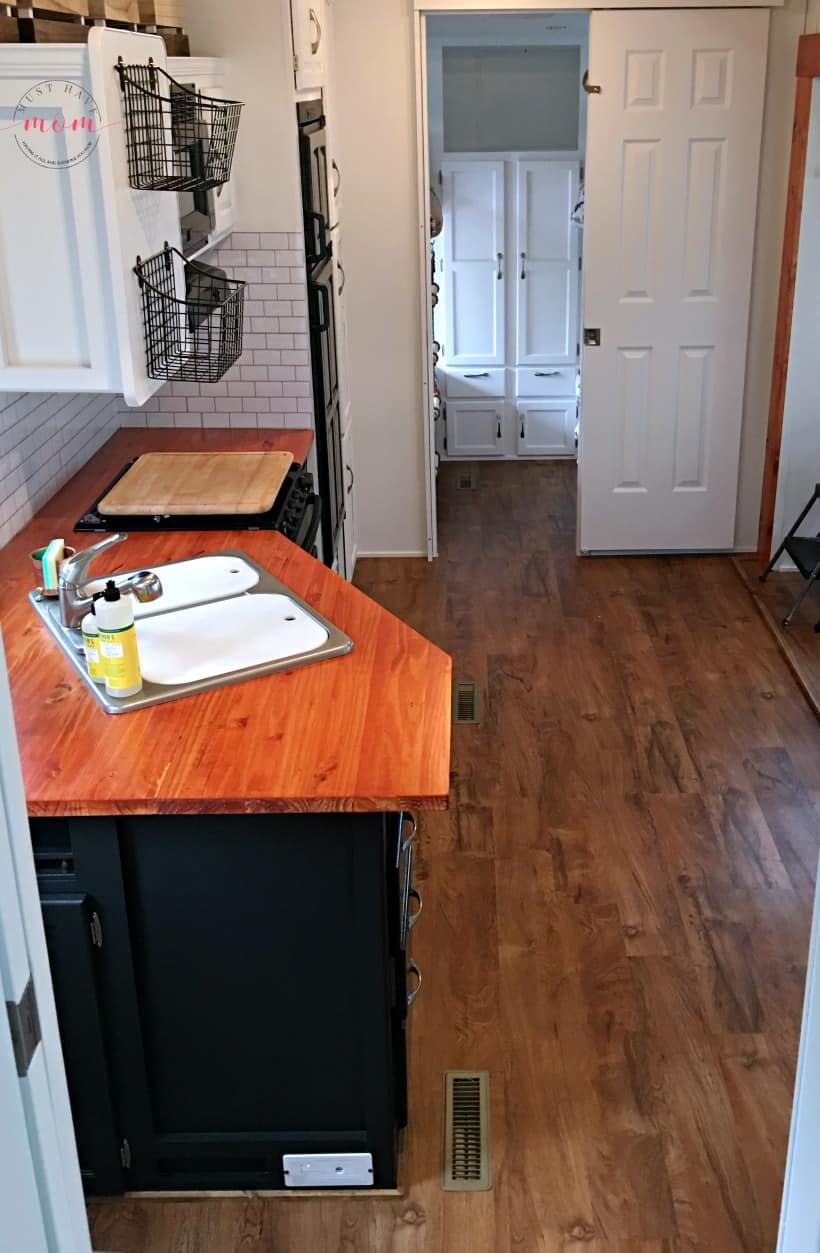
By configuring the new countertops to come out a little further and have a square end we were able to gain a lot more usable counter space. We also brought the countertop out a little further in front of the sink to give some space. I love this new configuration and it has given me a noticeable increase in counter space.

In the master bedroom, our countertops had a spot that rounded outward to provide room for the TV. I didn’t love the look of it at all.
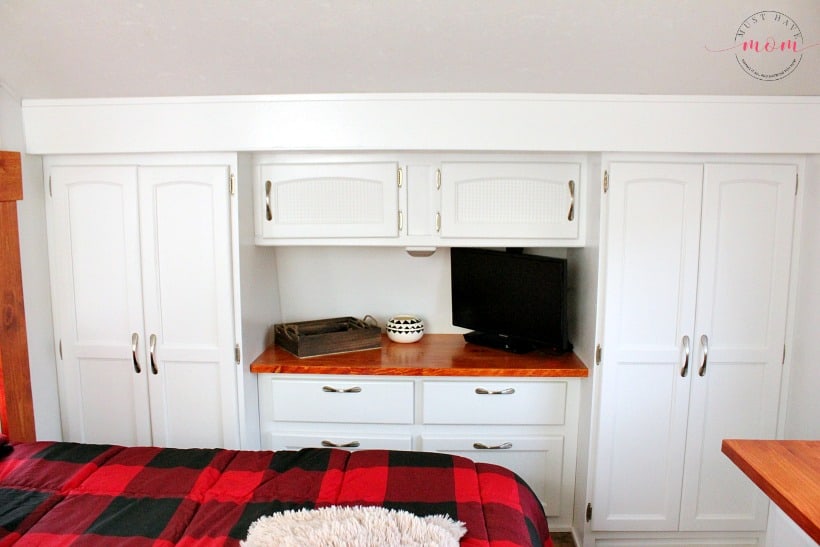
We opted to instead have the countertops come out the same distance as the rounded out portion on the existing countertops and kept them straight across. We gained counter space the whole way across which is really useful when I’m working and need room to spread out papers. It looks much prettier too!
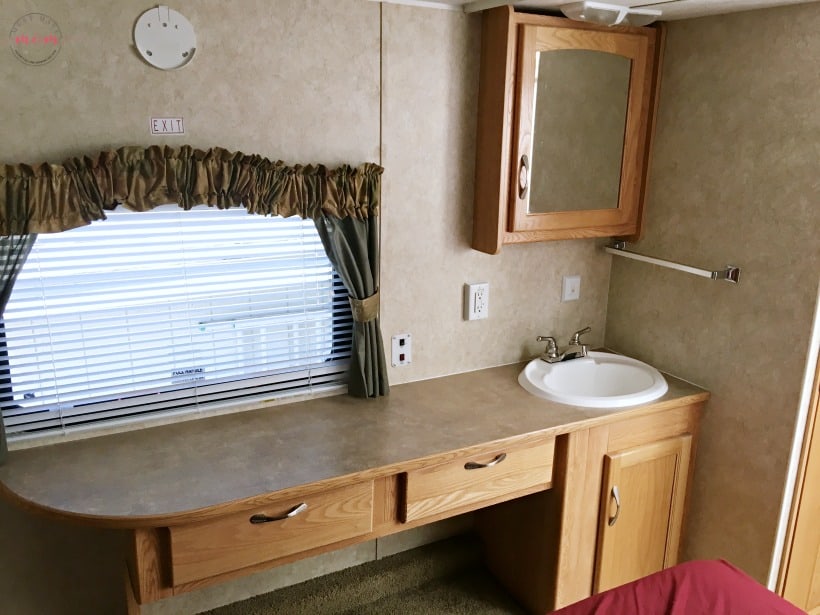
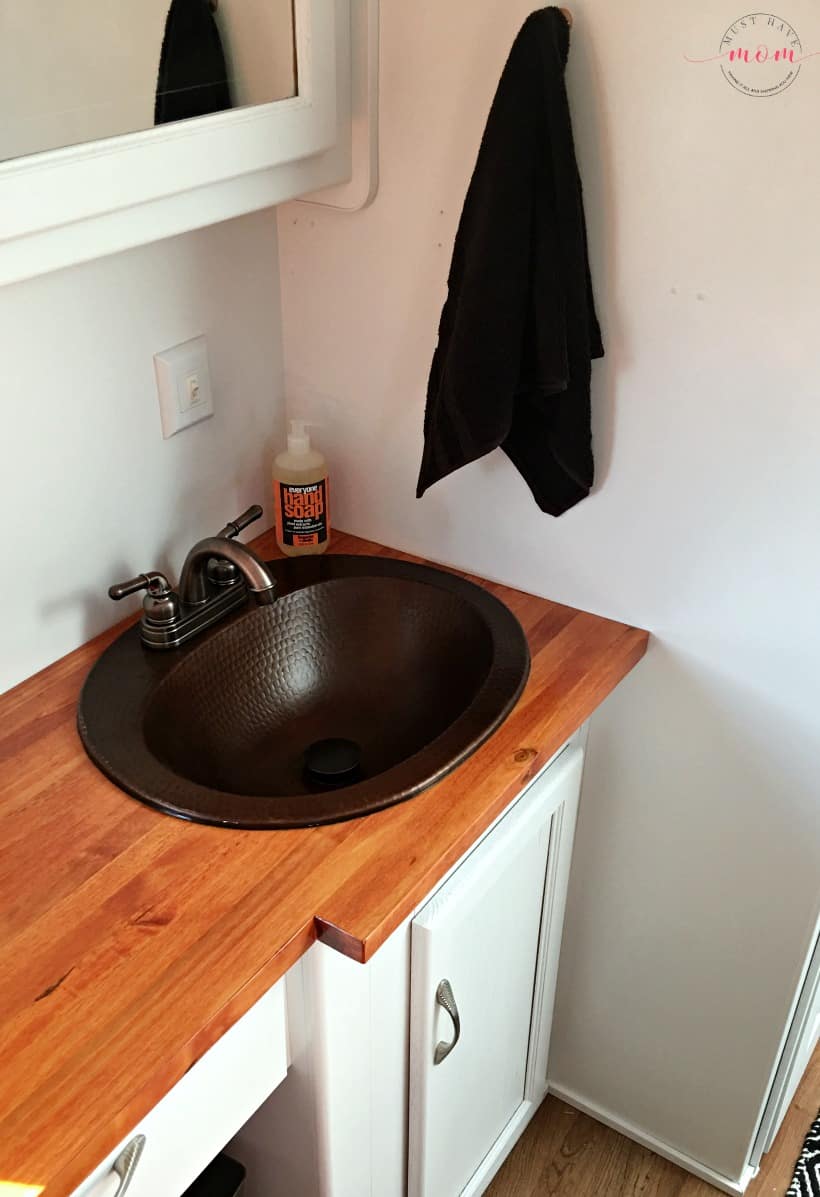
Finally, our bathroom countertop was also rounded on the end. I didn’t like the rounded look and you’ll also notice that in front of the sink it is straight across.
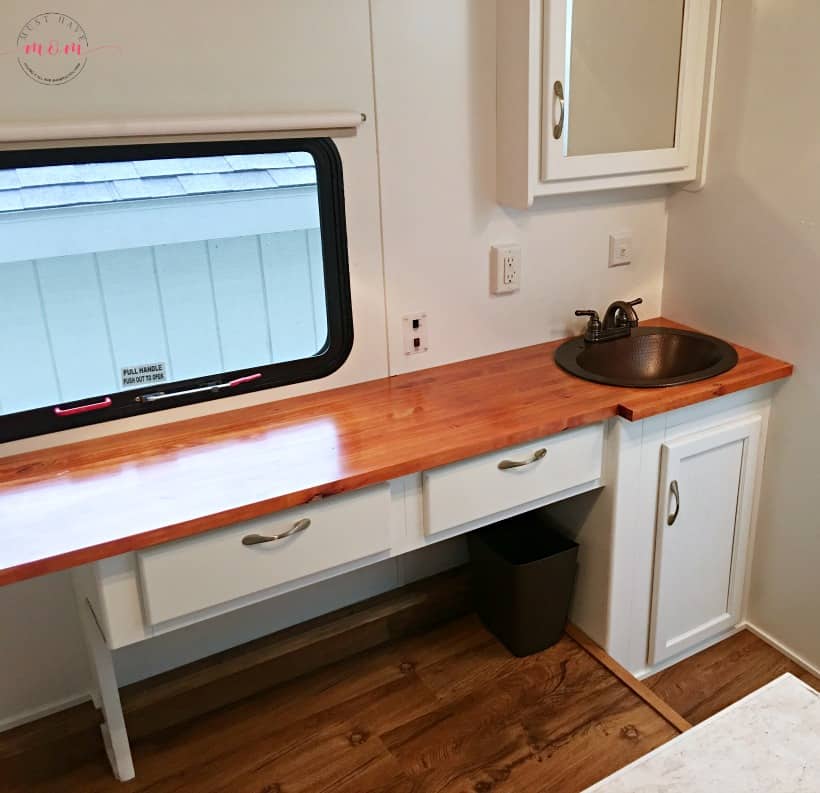
When we made the new bathroom countertops we opted to square the end of the countertop which provided more counter space without impeding access to the closet. We also had the countertop jut out in front of the sink which allowed us to use a bigger sink than the one that was there (this is a standard copper bathroom sink with an RV faucet in bronze) and still have a little room in front of the sink to look aesthetically pleasing.
As you can see, doing an RV makeover is about more than just making it look better. It is also about making it more functional and making it work for your needs. By stopping to think about these minor adjustments in shape and size of the countertops you’ll gain more counter space and increase the functionality of your small space. These are the little details that make a big difference in the end result!
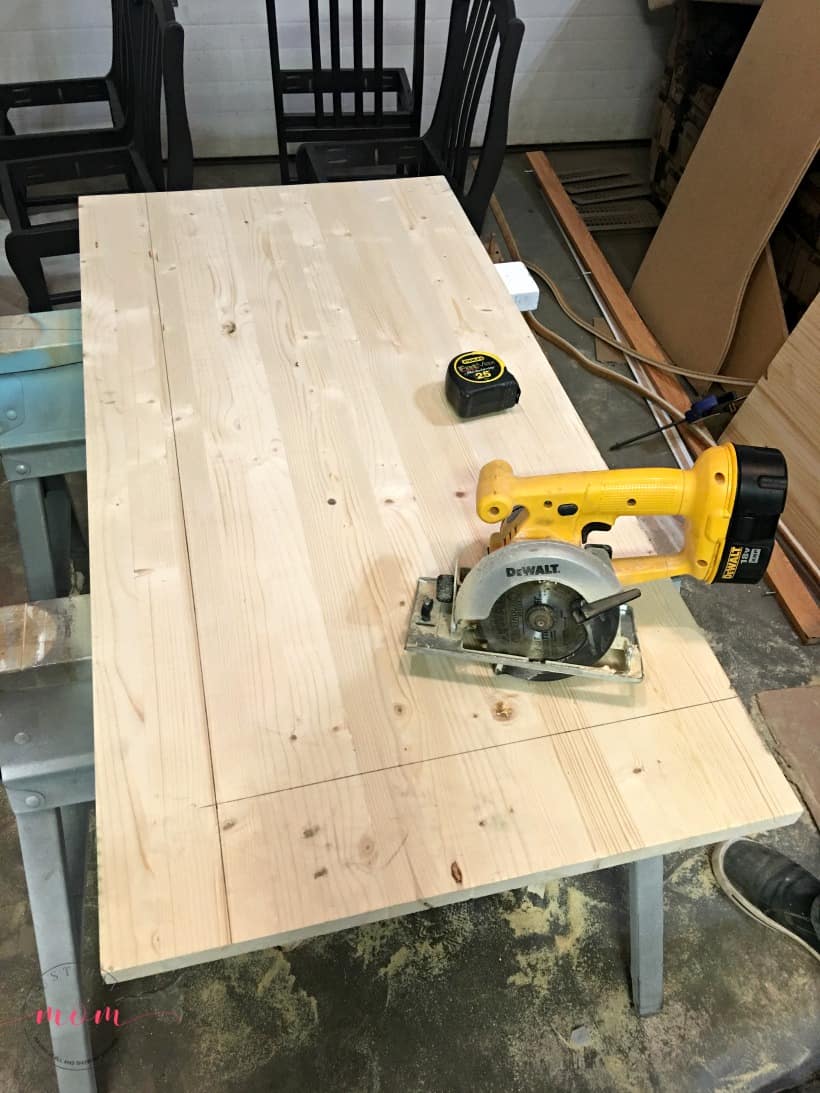
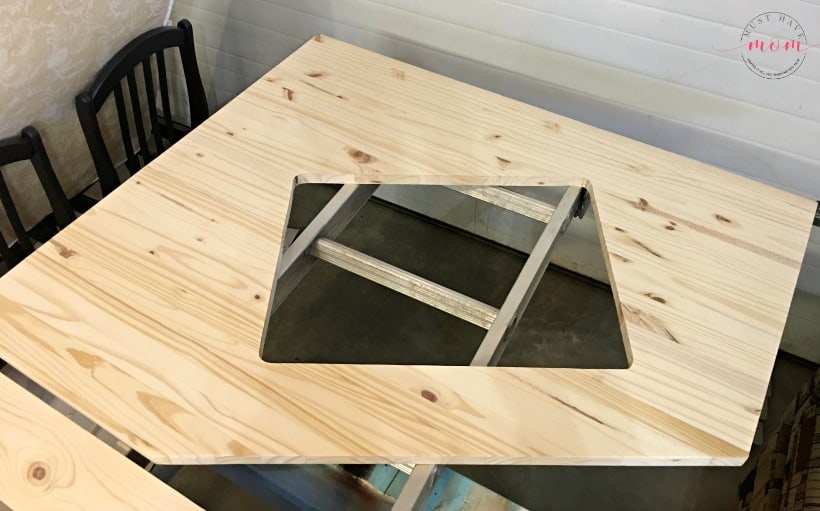
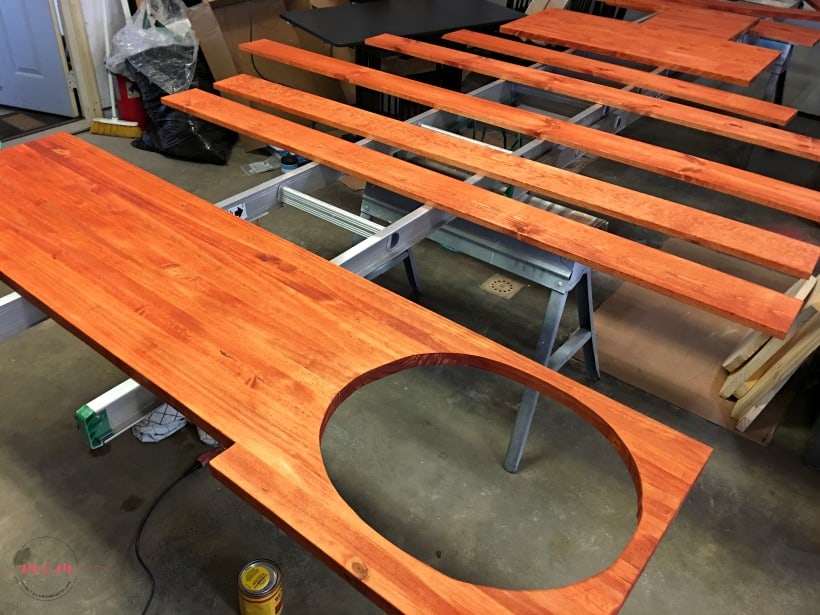
Once you have settled on measurements and shape for your countertops, it is time to cut them out. I recommend creating a cardboard template and trying that out in your space to ensure it works how you want. We tried out our template for the modifications we were making and we had to tweak it slightly to make sure it worked for walking space and working space on the counters. Measure twice, cut once!
For our kitchen countertop, I couldn’t find a large enough piece of glued together pine to create the wide counter I needed so I took two smaller pieces and glued them together with wood glue. Clamp them together and allow to dry overnight before cutting the sink hole.
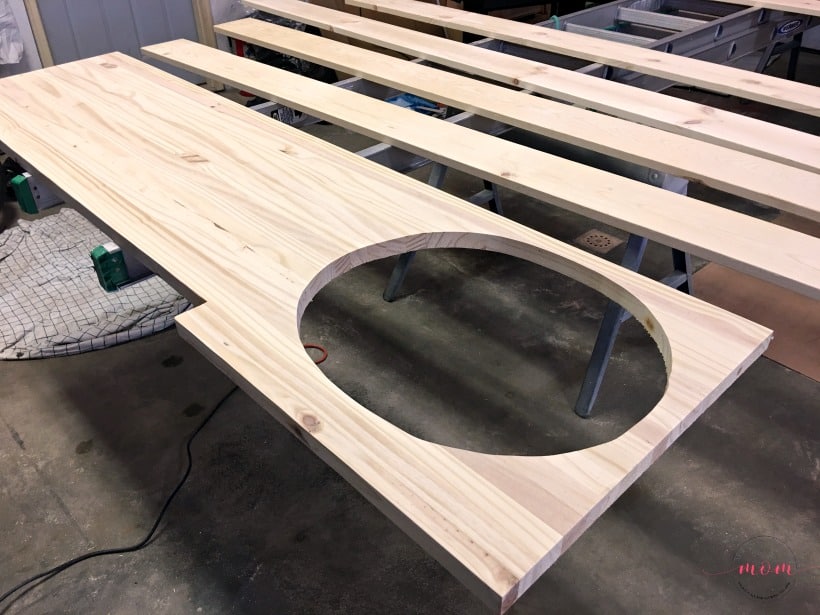
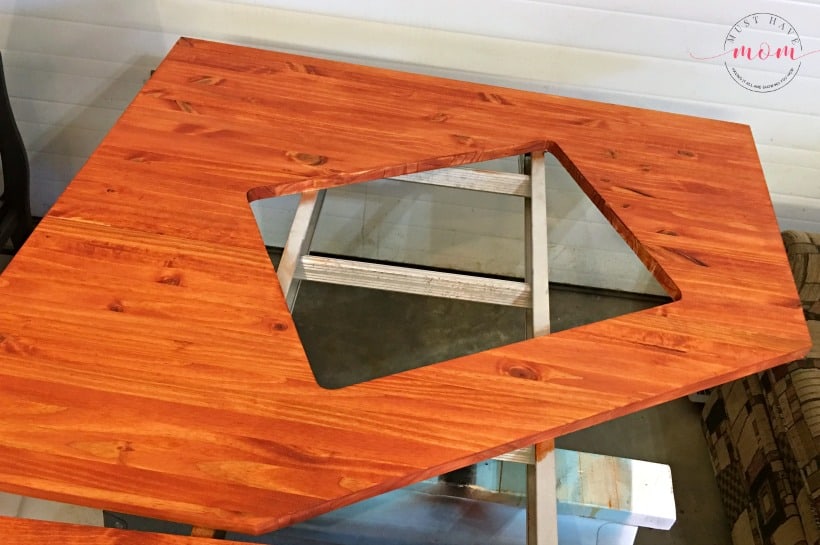
We used a circular saw and a jigsaw to cut the countertops out. You’ll also need to cut a hole for the kitchen and/or bathroom sinks. Measure the sink and if you are replacing your sink be sure to cut the hole to the proper measurements for that sink. New sinks often come with a template to help you cut out the hole in the countertops. Use it! We used our existing kitchen sink so we traced the hole from the previous countertops onto the new countertops. For the bathroom sink, we replaced that with a standard copper bathroom sink so we had to tweak that one a little bit to ensure it was positioned properly above the open cabinet underneath and that it lined up correctly. Be sure before you cut that it will fit properly!
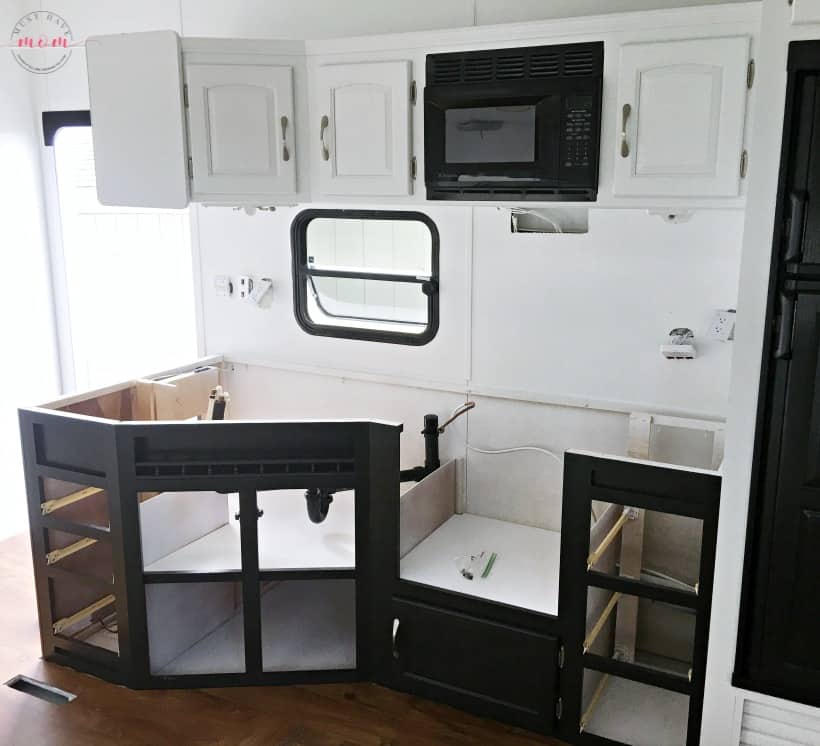
Remove Appliances and Old Countertops
Remove the old countertops (save the screws if they are in good condition or save one to buy replacements with). Before removing the countertops you should remove the sink and stove. I’ll have a tutorial coming soon on removing the stove if you aren’t comfortable with this. Be sure to shut off the gas line first!
After you’ve removed them, this is a great time to paint the cabinets! We went with black for the lowers and white for the uppers.
How To Sand and Stain Your DIY Wood Countertops
Once you have cut out all of the countertop pieces make sure to bring them into the camper or your home kitchen and fit them onto the top of the cabinets and ensure everything fits properly. You need to make sure that all of your final cuts are made and tweaked before sanding and staining the countertops.
Once you are satisfied that they will work it is time to sand and stain them! Use 220 grit sandpaper to sand the tops and edges of all the countertops. Be sure that all rough edges are sanded down. I used an electric handheld sander for this because it’s fast and I hate sanding! Once you are satisfied with how smooth they are, take a rag and wipe them down good to get all the dust off.
Then apply a coat of stain using a rag. Wipe on a section at a time and then wipe off the excess stain. Be sure to read the directions on the can of stain and follow them. I like using a rag instead of a brush because I find it to be easier and I like the look of the stain that it gives versus using a brush. You can do whichever you prefer though! If you have any areas that will overhang the cupboards be sure to also stain the underside of the countertop in that area because you will see it if you are sitting on the floor and you don’t want the raw wood exposed. I made the mistake of forgetting to do this and had to go back and stain it after.
Once you have followed the directions on your stain can for drying time, you can move on to applying the polyurethane sealer to them. I used Helmsman spar urethane indoor/outdoor clear satin to seal mine. This can cause yellowing over time so if you are concerned about that then choose a water-based poly sealer instead. Since my countertops have an orange hue I didn’t mind taking the risk of it yellowing.
Continue applying layers of poly until you are satisfied with the finish. I applied 3-5 layers of poly to my countertops. Be sure to get all the edges as well as inside the sink cutout. You want to seal them well to keep water out.
Installing DIY Wood Countertops
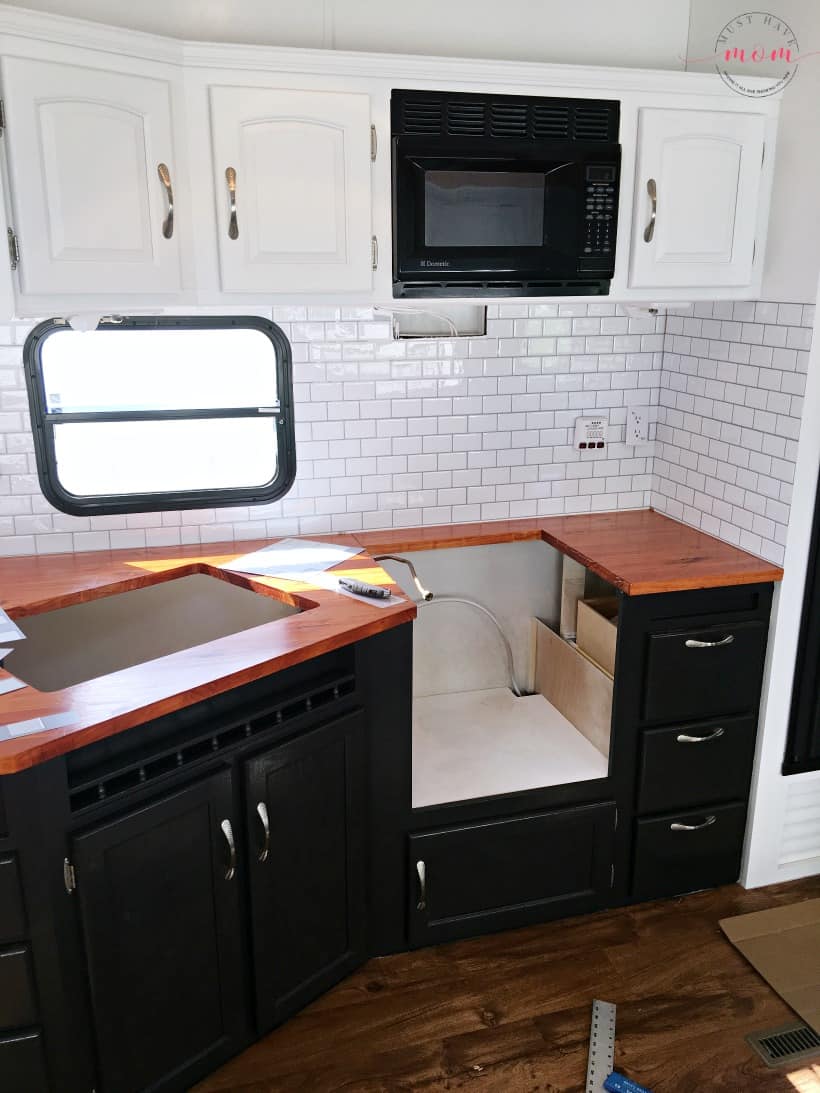
Once your poly finish has dried completely, you can install your beautiful new DIY wood countertops! This is the best part!! Place them on top of the cabinets and secure them with the screws that held the old countertop or replace those screws if needed. At this point we stopped and installed our peel and stick subway tile backsplash. We did this before installing the stove because it was easier to access the backsplash area with the stove removed. Another reason we installed the backsplash at this point was because in an RV everything is not square. We knew that we may need to shim the countertop up to make the subway tile line straight on the bottom. We chose to use peel and stick subway tile over traditional tile because an RV is made to move down the road and traditional tile is heavy and not flexible which may lead to cracking and weight problems. The peel and stick tile is lightweight and flexible which is needed in an RV.
After installing the subway tile we did indeed need to shim the countertop up a bit. Be sure to also use a level to ensure the countertops are somewhat level. Keep in mind that your camper needs to be level in order for your level on the countertop to be correct. Check the level on the floor to determine how level the camper is and reference that when checking the countertops.
Install Sink and Stove
Now comes the time to install the sink and stove and finish your project! Yay! Be sure to hook up the plumbing and stove lines properly. Run a bead of caulk around the sink to seal it as well. We used clear caulk for this.
Add Finishing Touches
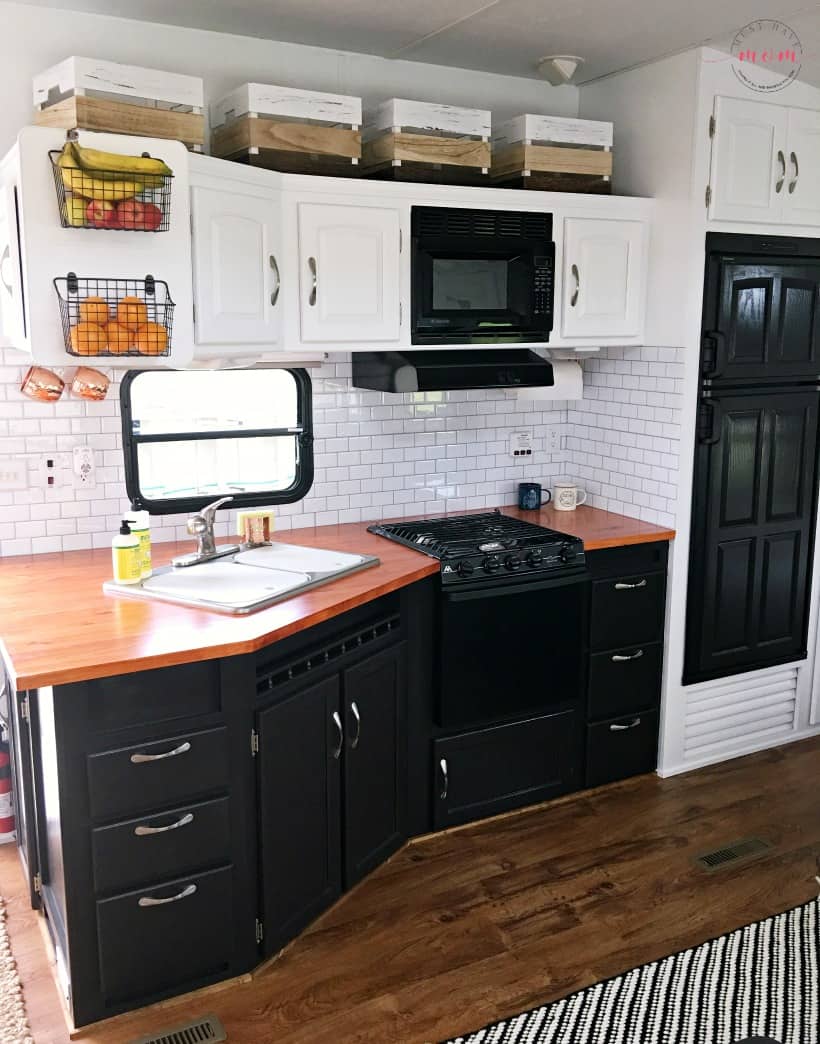
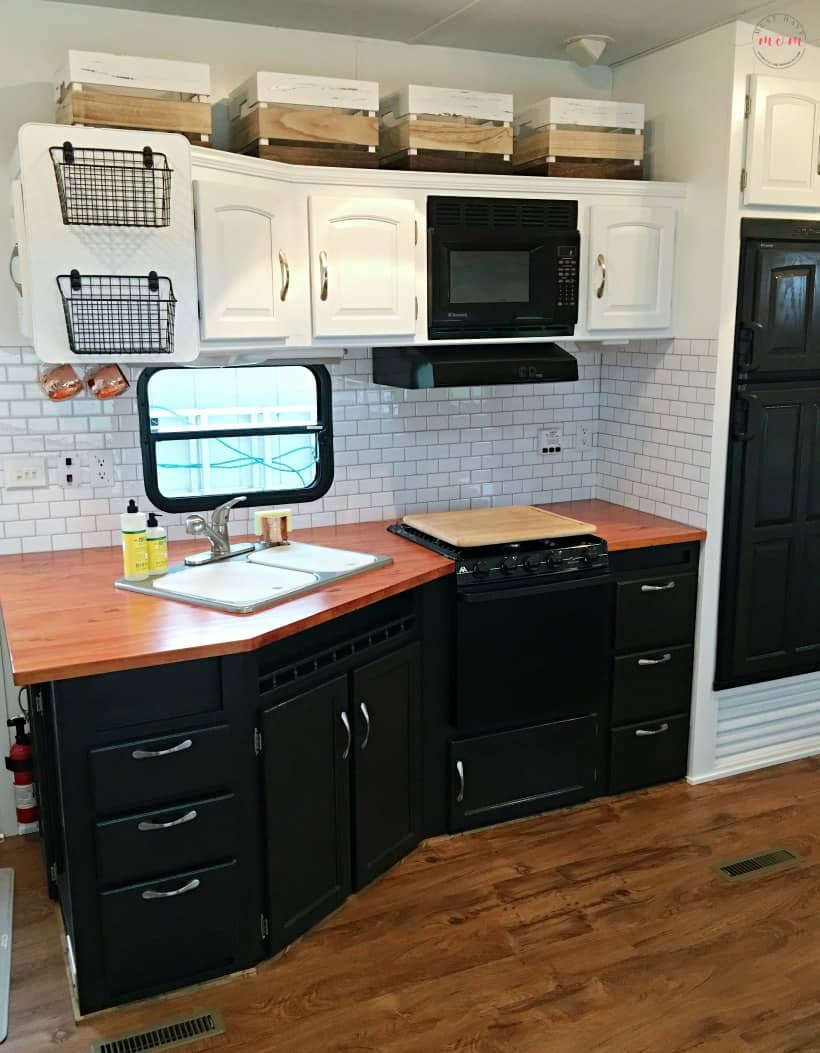
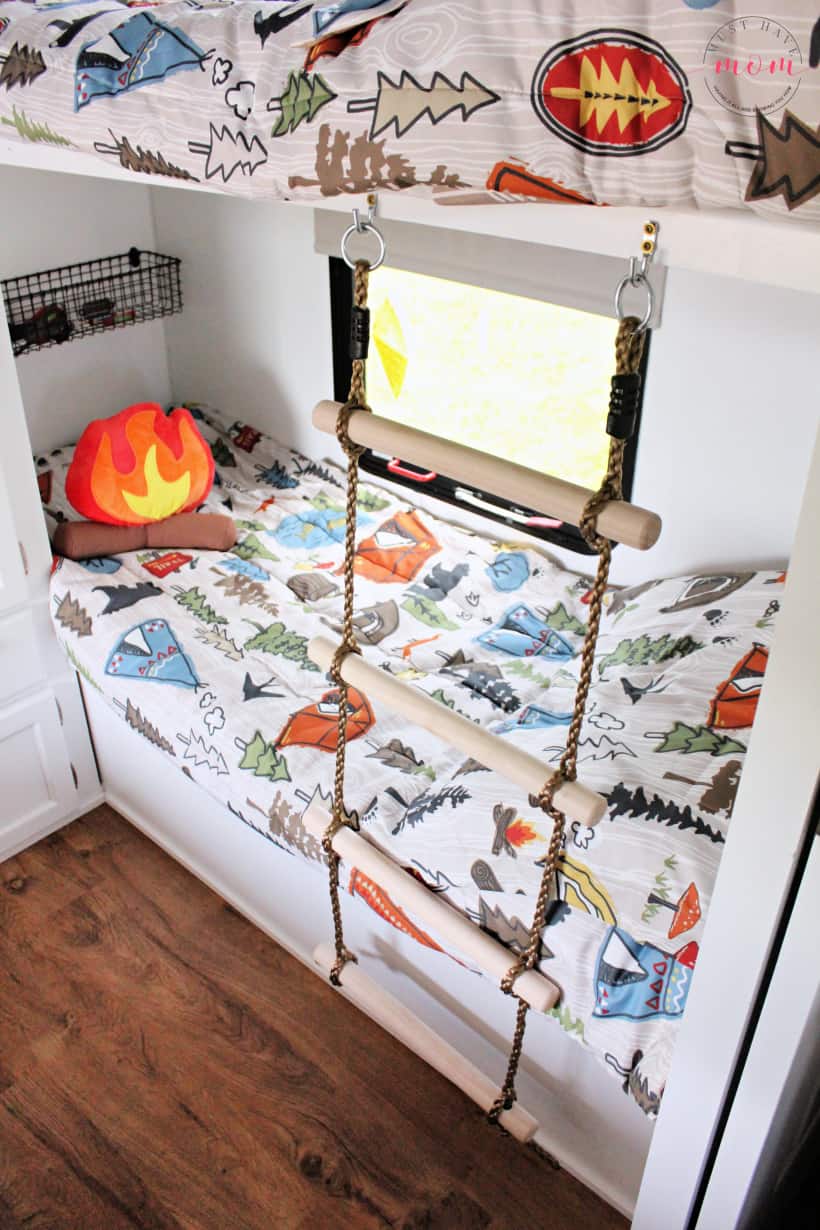
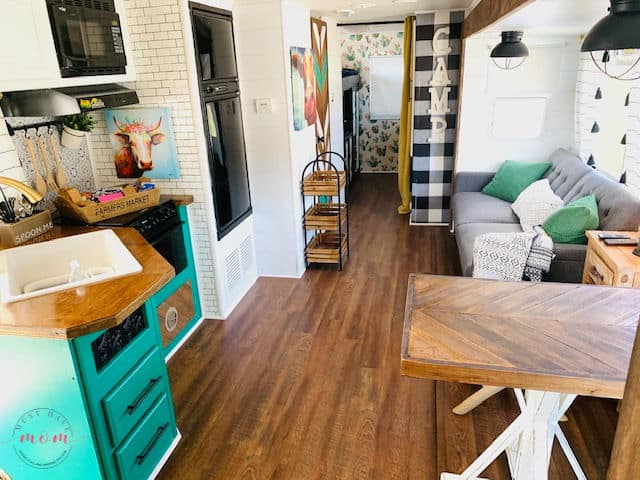
Now that your gorgeous countertops are finished it’s time to add the finishing touches that take it to the next level. If you’ve done the subway tile as we did then you’ll agree that it adds a whole new level of awesomeness to your RV kitchen! Add some pretty soap to the sink and a pretty copper sponge holder. Some mug hooks under the cabinets with some copper moscow mule mugs added to them adds in another material to your design and makes the countertops really pop. Fruit baskets added to the upper cabinets gave us additional storage space and looks pretty too! We replaced the old window covering with a simple roller blind that is understated but functional. I added wood baskets above the upper cabinets as well to make good use of the dead space that was there. I store light items like chips and bread, that would otherwise be crushed in the cupboards, in these baskets.
The whole RV kitchen has been transformed by the addition of these beautiful DIY wood countertops. The space is more functional and it has held up beautifully for an entire camping season already.
Caring For Your DIY Wood Countertops
These DIY wood countertops are very durable and require very little care. Keep them as dry as possible by wiping up spills as they happen. Use warm soapy water to clean them. That’s it! Avoid setting any hot pans on them and be sure to use hot pads if you do. Do not cut directly on the countertop as you’ll create cuts in the poly finish. Always use a cutting board. I use this stove top cutting board because it adds even more counter space to the area when I’m not using the stove and doubles as a cutting board.
I hope you found this tutorial very helpful for making your own DIY wood countertops! Have questions that I didn’t answer here? Leave them in the comments and I’ll do my best to help you!
Want more fun camping tips? Join our camping group on Facebook! Don’t miss my free RV packing list printable either! Requesting it will also get you on my RV email list so you won’t miss out on future DIY camper makeover posts!
Pin DIY Wood Countertops

These countertops are just stunning! And so creative! We have two more bathrooms to remodel in our home and I’m pinning this to make sure I don’t forget this wonderful idea!
Thank you so much! I love how they turned out.
Hi!!! Looking to do this in our RV! Do you have a link for how to remove the stove/oven?! Thanks for your tutorial!!
I do not have a tutorial written for that. You’ll need to disconnect the gas and remove the clips holding the stove in place. Perhaps your manual would have instructions on how to do that.
Love how this looks and I’m going to try it! What size pieces and how did you join the two to make your large kitchen countertop? Did you use regular wood glue?
Thanks! The size will depend on your own measurements. I used 5/4″ thick 24″ x 24″. We used Gorilla wood glue to glue it together.
Can you give an estimate of how much this project costs? I‘m in the process of remodeling a camper & want to replace the countertops as well 🙂
It would totally depend on your square footage of countertops you will be replacing. We did the kitchen and the master bathroom and bedroom counters so my costs will vary from anyone else’s 🙂 I would suggest adding up the cost of the square footage of wood that you need, add a can of stain and a can of poly and you’ll have a rough estimate.
These turned out great, thanks for joining the Linky Party! Please be sure and join us again this Wednesday (9/23) for our next Linky Party https://bellacraftspublishing.com/creative-crafts-linky-party-8/
Thanks Ann!
I love the remodel. We have an RV and Im always looking for ideas for small space. Thanks for posting at Funtastic Friday .
Thanks for stopping by!
Hi Sarah!
How well does the pine countertop hold up against dings and dents over time? I imagine the soft wood could get damaged easily from something like a pot falling or otherwise. How long have you used this countertop and how does it look now? Do you have any finishing tips or upgrades for making it more durable?
Thanks!
Hi Jake, thanks for your question. I have found that with the poly finish it has been quite durable. I of course don’t cut directly on the counter and I try to be kind to my camper in general. We used it for a year and I never had any issues with it getting easily damaged. You could certainly use any type of wood that you desire. A harder wood would be fine too. Do several coats of poly to seal it and I also recommend doing both sides (underside of the overhang). I hope that helps!
Looks great! Do you have any tutorials on how you prepped and painted the walls? We purchased a Bigfoot trailer and while its a 2014 the walls are so beige I would like to lighten them up! They are so smooth im nervous about painting. Thanks!
Hello and thank you! I have a tutorial here about painting if you plan on rolling it: https://musthavemom.com/easy-rv-remodeling-instructions-rv-makeover-reveal/
For this RV we used a paint sprayer and sprayed white on all the walls (not Beyond Paint for the sprayed paint). I rolled the lower cabinets using black.
My wife and I loved the way yours came out so we decided to redo our travel trailer counter tops. I read somewhere that with pine you should always condition the wood prior to staining. Did you do this or go without? Just curious how the staining process went if you went without as far as uneven staining or anything. Thank you for this great idea and walk through of your process.
Hello and thank you! I did not condition the wood and it came out stunning. I’m a bit of a rebel and I never condition the wood and have yet to encounter any problem from skipping this step. Best of luck!
This is beautiful! You did a great job. I am inspired and working on my first trailer. It has a similar layout to yours. I am wondering if you travel with those wooden boxes about the kitchen cupboards. If so how do you make them stay in place? So they don’t fall down and wrench someone or spill the contents?
Hello! Yes, we traveled with the boxes up there. I put that rubber shelf liner underneath them so they wouldn’t move at all. Worked great! I’d store chips and light things up there that I didn’t want to get crushed in the cabinets.
What a transformation it looks stunning, well done. Pinned
Thank you!
Hi, I am looking to replace my rv countertop as well. My brother has suggested doing the epoxy (he did all his bathrooms), but I wasn’t sure how it’ll hold up with a moving house. How’s the upkeep with it.. is it easy to fix if it cracks?
It held up great! No upkeep or cracks.
Looks Great! We have the same exact camper! I am just now starting to remodel it. I would love to see more pictures of the rest of your camper. Do have a link with more pictures?
Laura
Thank you! Yes, before and after pics of the whole camper are here: https://musthavemom.com/modern-mountain-rv-makeover-before-after-pictures/
I just purchased these boards to redo my countertops in a pop up camper. I love the way they look but I’m concerned by some reviews saying they crack and warp easily. I want to avoid damaging them as they cost me a fortune as it is. How did you attach them to the cabinets? If screwed, how?
Thank you!
Yes screwed from underneath. Make sure to measure properly so you don’t screw too far and go through the top.
I’m so grateful for this tutorial since my kitchen counter shape and lower cabinets are EXACTLY like yours! Did you do anything to hide/join the more narrow wood piece by the oven from the wider glued sink piece?
I’m so glad you found it! Yes, the pieces are wood glued together and held with clamps until dry so it is one piece.
Wow! I like the outcome of your DIY project. Wooden countertops are a great choice, indeed!
Choosing innovative kitchen equipment means balancing design, efficiency, and durability. Before picking anything, it’s important to dig into detailed reviews and comparisons—otherwise, it’s easy to end up with gear that doesn’t last or meet your needs. Found a helpful comparison here: https://help-center.pissedconsumer.com/is-black-and-decker-or-hamilton-beach-better/ — it breaks down real user experiences, which makes it easier to understand which brand might fit better in a modern kitchen setup.
Daher bieten wir schnelle und sichere Zahlungsoptionen an. Diese Partnerschaften ermöglichen es uns, dir eine vielfältige und
ständig wachsende Spielauswahl zu bieten. Von Zeit zu Zeit bieten wir auch einen No Deposit Bonus an,
der es dir ermöglicht, unser Casino ohne eigenes Risiko auszuprobieren. Zudem steht unser Kundensupport rund um die Uhr bereit, um dir bei Fragen oder
Anliegen zu helfen.
Shuffle setzt 2025 den Standard für Krypto-Casinos, indem es eine erstklassige
Online-Glücksspielplattform mit modernster
Blockchain-Sicherheit und blitzschnellen Krypto-Einzahlungen verbindet.
Die Nachfrage nach verschiedenen Zahlungsmethoden für Online-Glücksspiele ist sehr hoch, weshalb Shuffle eine breite Palette von Währungen akzeptiert, um den Spielern gerecht zu werden. Im Zeitalter der schnellen Krypto-Zahlungen ist
es wichtiger denn je, sein Glücksspielverhalten zu beobachten und Grenzen zu setzen. Shuffle weiß, wie
wichtig es ist, lokale Märkte zu bedienen, und hat daher die gesamte Website in mehrere Sprachen übersetzt, um den lokalen Spielern ein besseres und bequemeres Erlebnis auf der Plattform zu bieten.
Der Australier kommt aus der Kryptoszene, hat 2018 bei
der Handelsplattform BitMEX angeheuert und dann dabei geholfen,
FTX groß zu machen. Unter “Partnerprogramm”
im Wettkonto finden Spieler ihren persönlichen Empfehlungslink, den sie an ihre Freunde und Bekannte weiterleiten können. Um diesen zu finanzieren, stellt Shuffle 15% des Gaming-Umsatzes (non-SHFL gaming
revenue) bereit. Der Blog auf shuffle.com – hier gibt es Infos zu Casinoangeboten, die Nutzung von Kryptowährungen und diverse Spielanleitungen.MehrWeniger Allerdings haben wir auch schon Rückmeldungen erhalten, dass
der Chat teilweise auch ohne Verifizierung funktioniert.
References:
https://online-spielhallen.de/sg-casino-freispiele-ihr-umfassender-leitfaden/
With a wide selection of games, secure payment methods and
attractive bonuses, this casino provides all the necessary conditions
for comfortable gaming. The casino also supports a mobile
version of the site, allowing players to enjoy the game on any
device – be it a phone, tablet or computer.
SkyCrown Casino is a premier online gambling
destination that boasts an extensive and diverse collection of games, catering to all types of players.
The platform strives to process withdrawal requests quickly,
understanding that players want prompt access to their funds.
The minimum deposit amounts are reasonable, making the
platform accessible to all players. It’s a carefully structured welcome that
rewards loyalty and encourages players to explore the vast library of games.
The game selection is heavily skewed towards online pokies, the heart of Australian gaming culture.
Discover why this premier online gaming hub is the top choice for Australian players.
SkyCrown Casino is a fully licensed online casino, which ensures that it is legal and safe for Australian players.
It boasts a colossal collection of over 6,000 games, made possible through partnerships with the world’s leading
software developers. Beyond the initial welcome, the promotional calendar is packed with weekly cashback, free spins, and special
reload bonuses. There will also be a minimum deposit, a
maximum bet size, and specific game contribution percentages.
The journey begins with a lucrative first deposit bonus, often a matched bonus where the house matches your deposit by a certain percentage.
References:
https://blackcoin.co/best-online-pokies-for-real-money-in-australia/
At National Casino Australia, players can enjoy fast payouts, with some of the quickest withdrawal times in the industry.
The National Casino welcome offer is an attractive introduction,
ensuring that players get the most out of their first experience.
We run regular tournaments where you can compete against other players for cash prizes and free spins.
Our games come from certified providers like NetEnt, Microgaming, and Evolution Gaming.
New players joining our community receive a generous welcome bonus
package to enhance their gaming journey from the very start.
Playing in such a casino enriches your idea
of the traditional casino game with new live impressions
and indispensable experiences. And playing live casinos – that
is exactly where you can play with real, live dealers.
References:
https://blackcoin.co/live-casino-hotel-maryland-the-ultimate-online-gambling-guide/
casino with paypal
References:
https://diseotuweb-w9a.com
paypal casinos for usa players
References:
https://career-hunters.com/employer/paypal-casino-canada-️-online-casinos-with-paypal-payments
Недропользование — это совокупность процессов, связанный с разработкой подземных богатств.
Оно включает разведку минерального сырья и их дальнейшую переработку.
Данная сфера регулируется законодательством, направленными на сохранение природного баланса.
Ответственное ведение работ в недропользовании помогает сохранять ресурсы.
оэрн