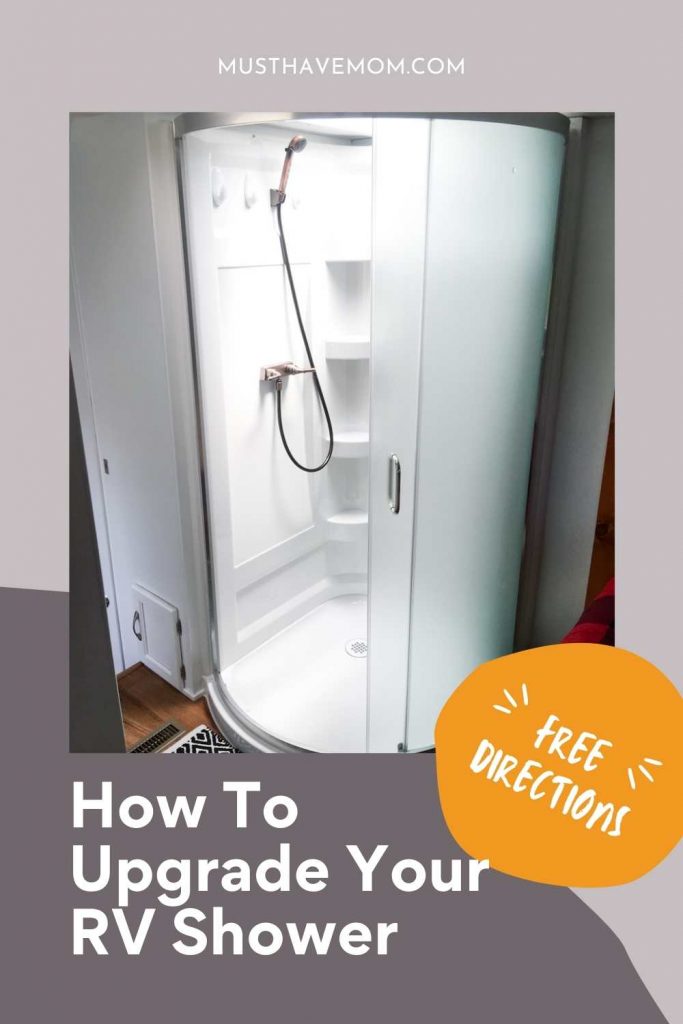
RV Shower Stall Upgrade
Yes, it is possible to install a residential shower in your RV! Say goodbye to those awful RV showers spent ducking down under a faucet while holding your head in the skylight. Enjoy your showers from now on! I’ve got all the info you need to install a residential shower in your camper or fifth-wheel RV.

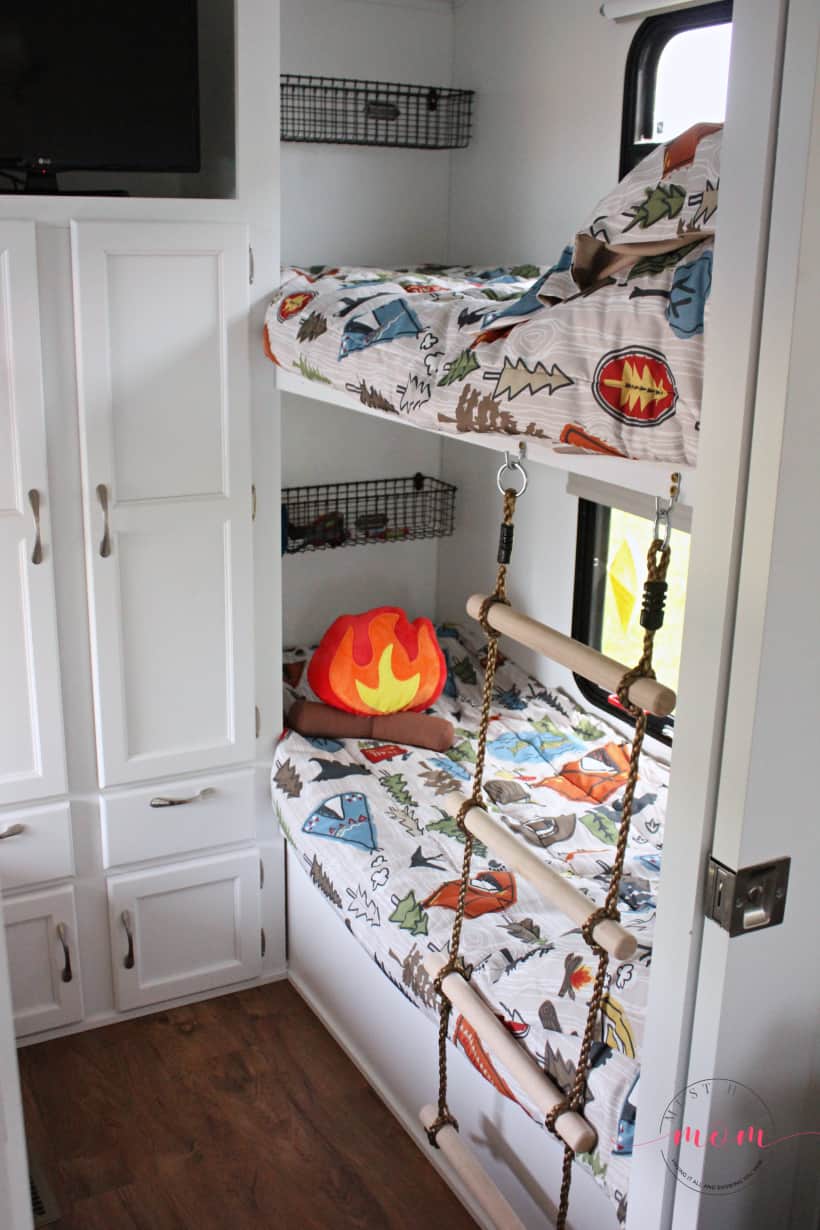
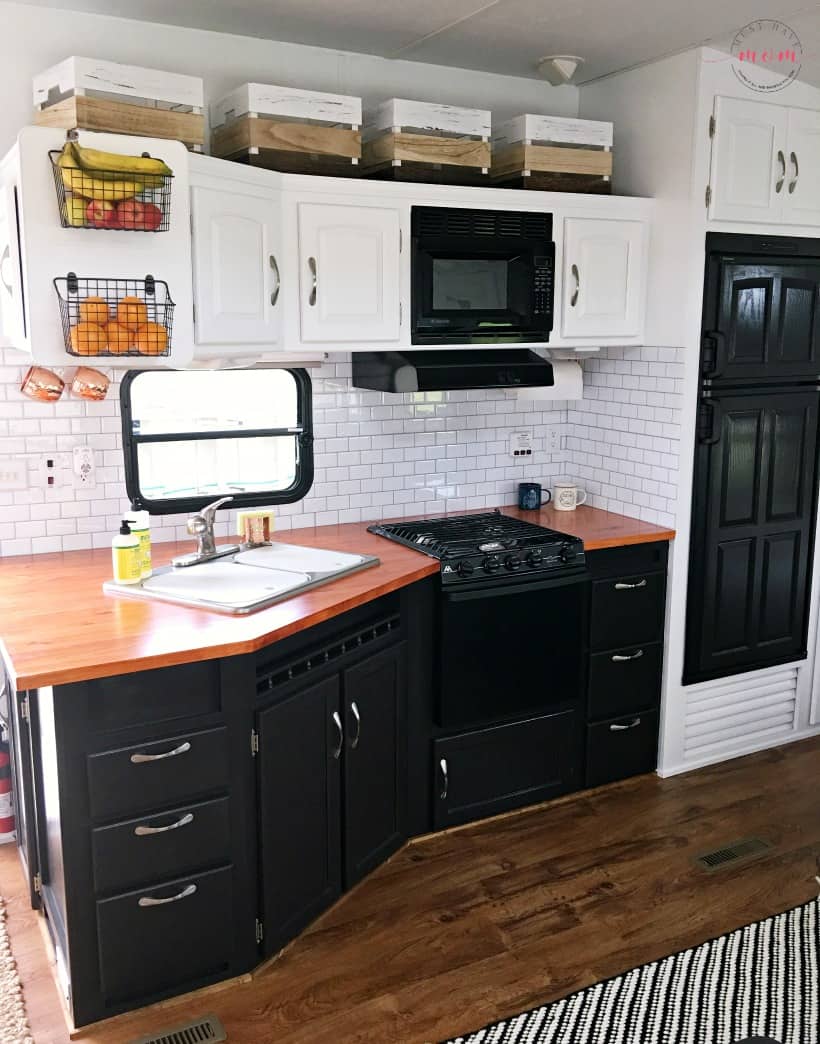
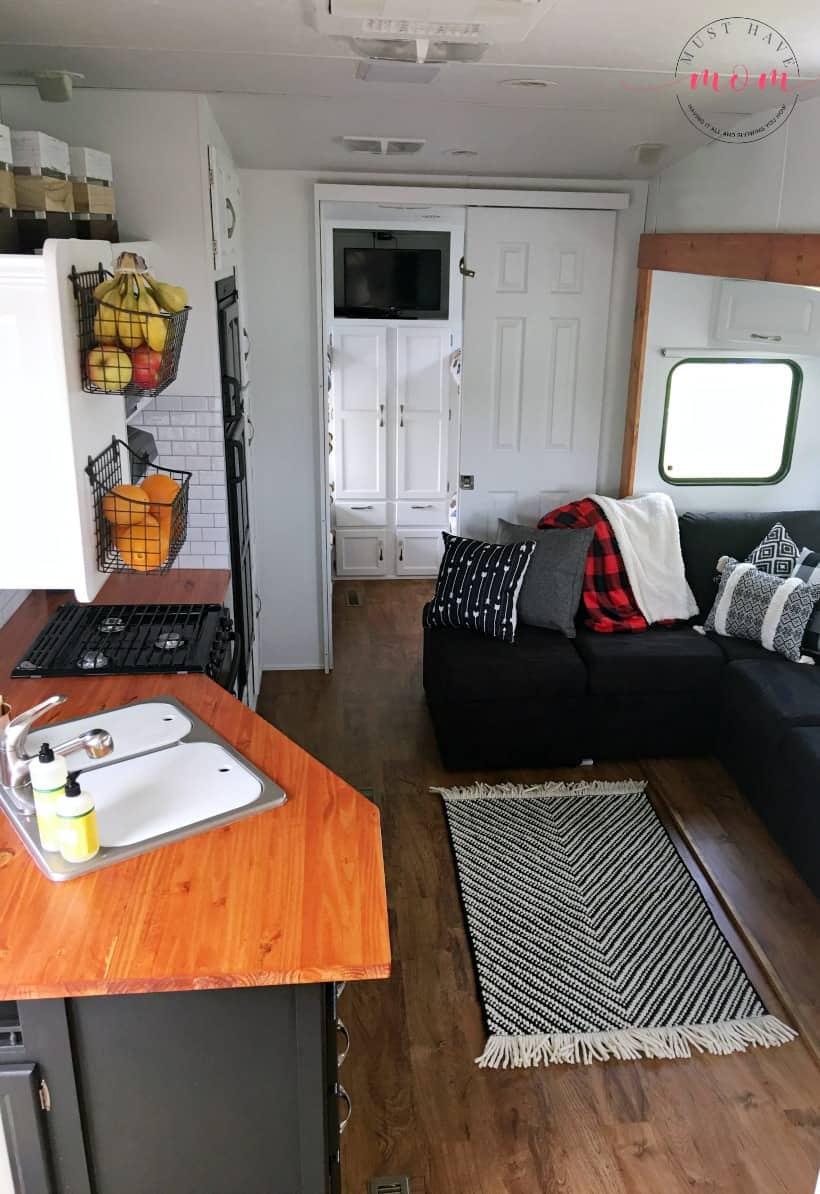
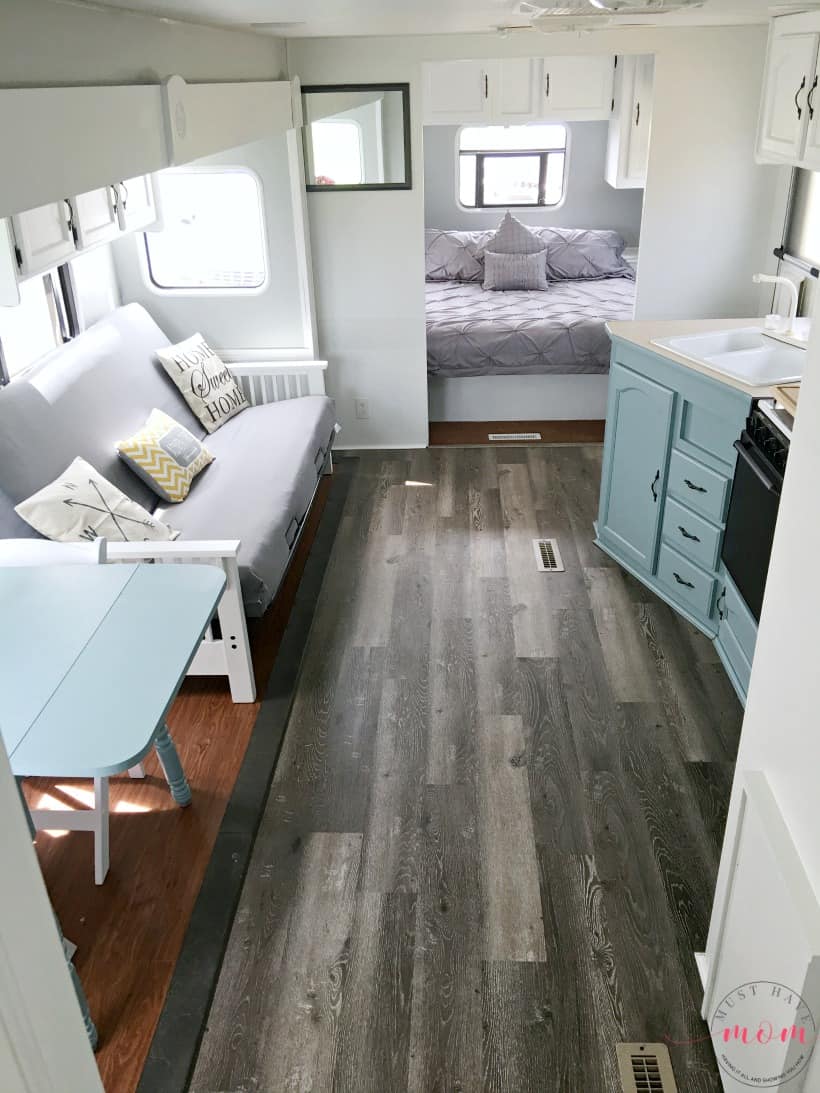
We love doing RV makeovers and we’ve shared several of them with you in the past. We’ve shown you how to paint your camper’s interior, how to install new wood countertops and even how to make rope ladders for your bunkhouse. Now it’s time to dig into the details and show you how to install a new shower in your camper. It’s not as hard as you might think!
RV Corner Shower Upgrade DIY
If you use your camper as much as we do, you know how nice it is to have the luxury of a nice warm shower in the comfort of your own RV!
I know most campgrounds have shower houses. However, let’s be honest, who really wants to gather up all their toiletries and head down to the nearest bathhouse. Although, sometimes even when we had full hookups, I would, just so I didn’t have to struggle in those tiny RV showers!
Well, struggle no more! We decided to go ahead and install a residential shower in our camper! Read on for a step-by-step process of the install so you can install your very own and never have to, or want to, use one of those public washrooms ever again!
Installing a residential shower in your RV can be one of the most useful upgrades you can do, so let’s get started!
First off before you get to the fun part of the job, the demolition stage, it is time to do the most important part. Planning!
Take your time measuring and planning to make sure you can find a shower that will fit in your space. Believe me, it will be a tight fit, but it can be done!
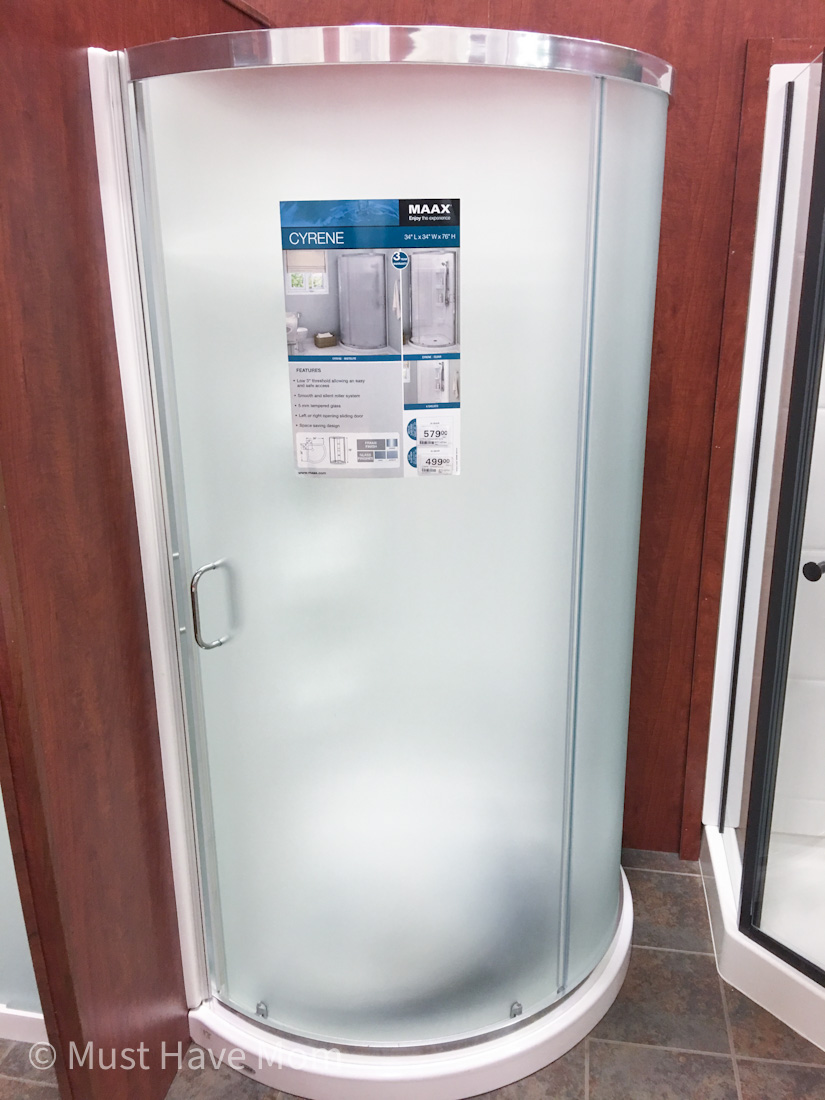
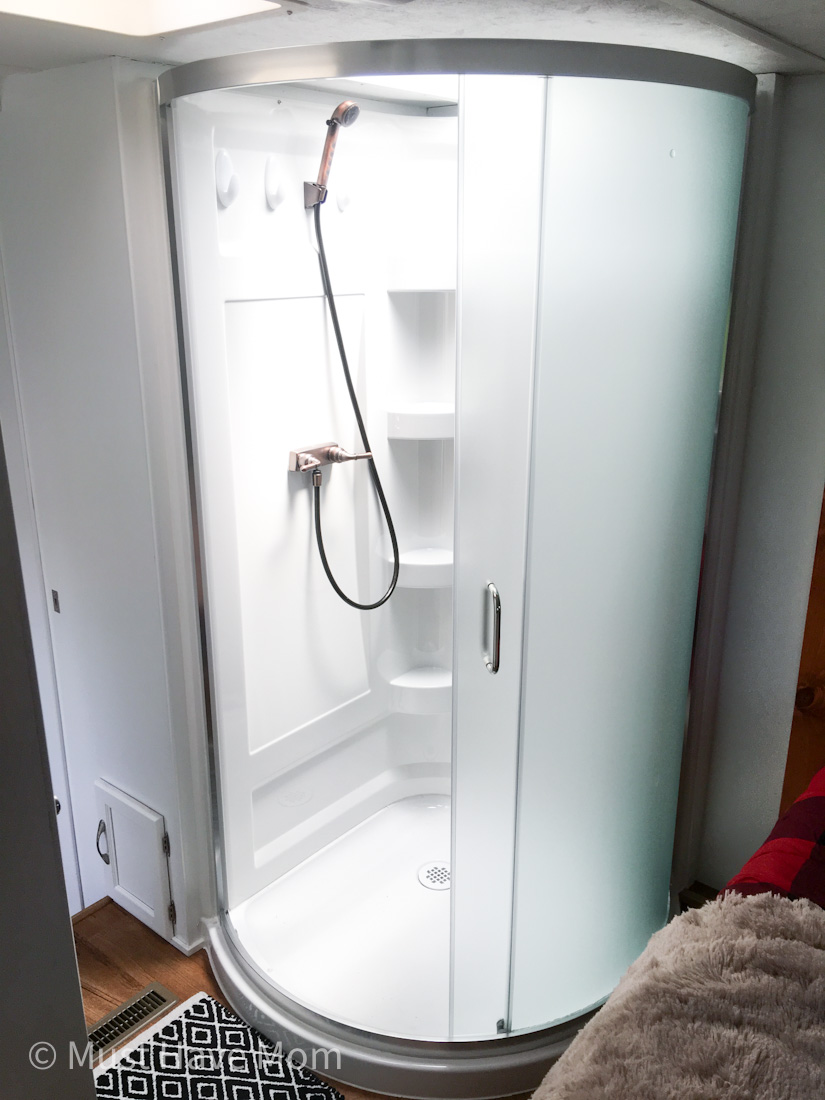
Also, make sure to purchase your new shower and have it on hand before removing your old one. After a ton of research, we decided to go with the MAAX Cyrene shower from our local Menards. The beauty of this shower is, that it comes in four pieces which are perfect for fitting through the camper door!
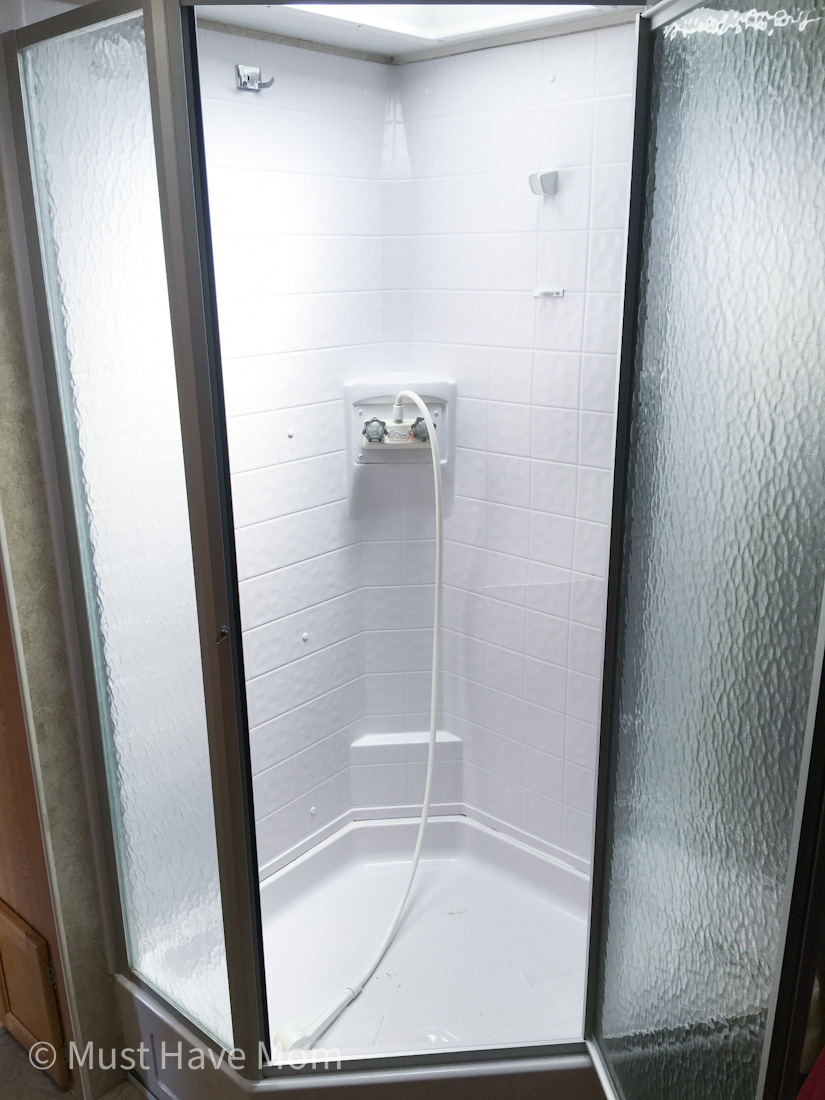
Now it is time to remove your old shower. Every shower will be a little different. First, remove the door and frame assembly. The door frame has screws and caulk attaching it to the walls. Next, work on removing the walls, ours had plastic rivets and some caulk holding it in place. You should be able to tap the center of the rivet out with a hammer and punch, then pull the rivet out with a plier.
I was not able to do that on ours. I ended up just prying the rivets out. I knew we weren’t going to be saving the shower so I wasn’t worried if it got a little wrecked.
Finally, move on to the base, you will need to access the plumbing for the drain. I was able to get to ours in the storage compartment under our floor. Disconnect the drain from the shower. Now you can go ahead and remove the base.
On to the install! At this point, you can refer to your specific shower installation instructions. I will provide you with tips and pointers on how we went about our install.
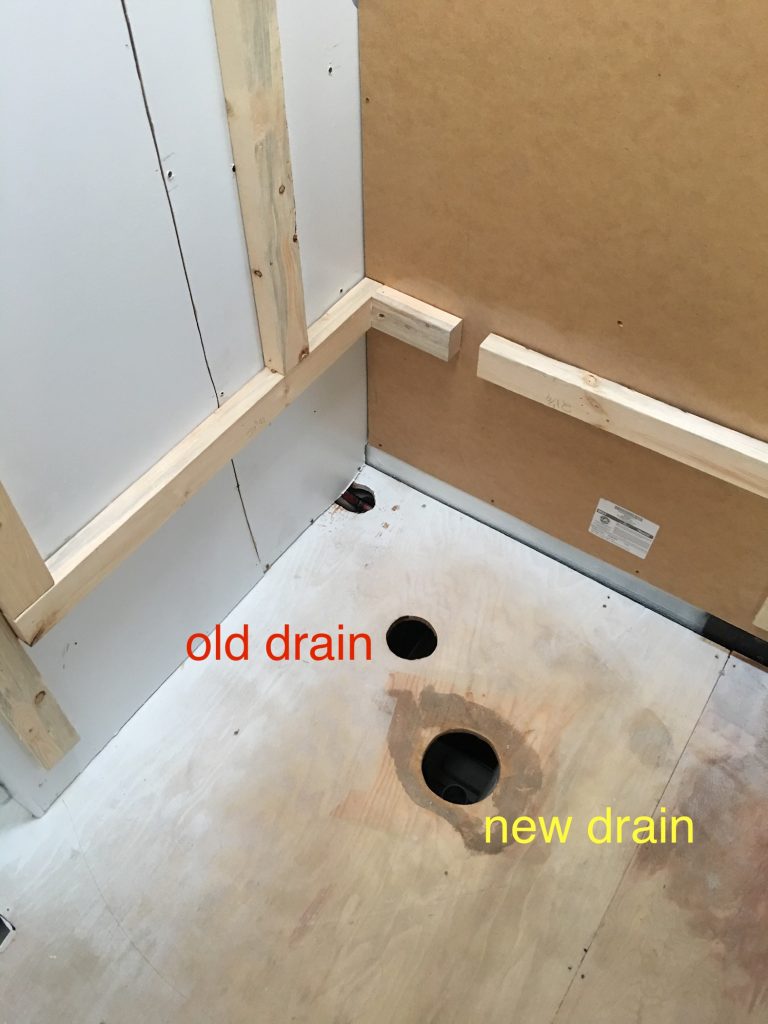
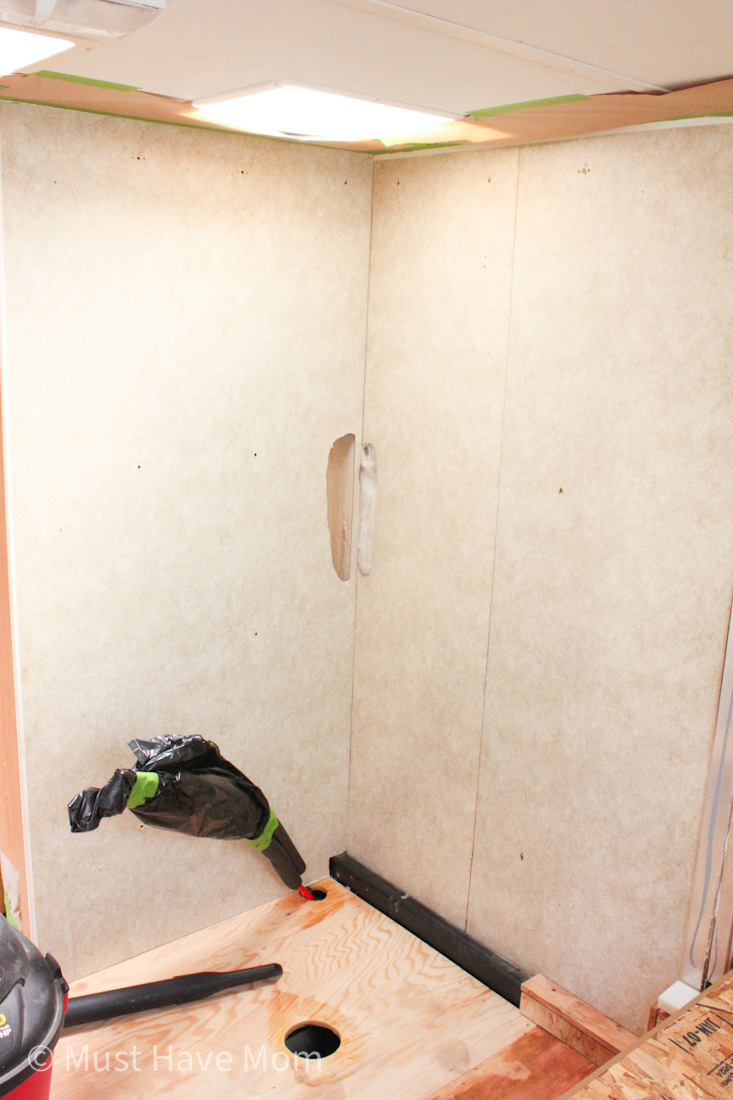
For starters, I needed to make a new opening in the floor to run the drain pipe for the new shower since it would be in a slightly different place than the original drain.
I used a hole saw on my drill. Make sure to look where you will be drilling to check and see there are no wires or anything else you could damage.
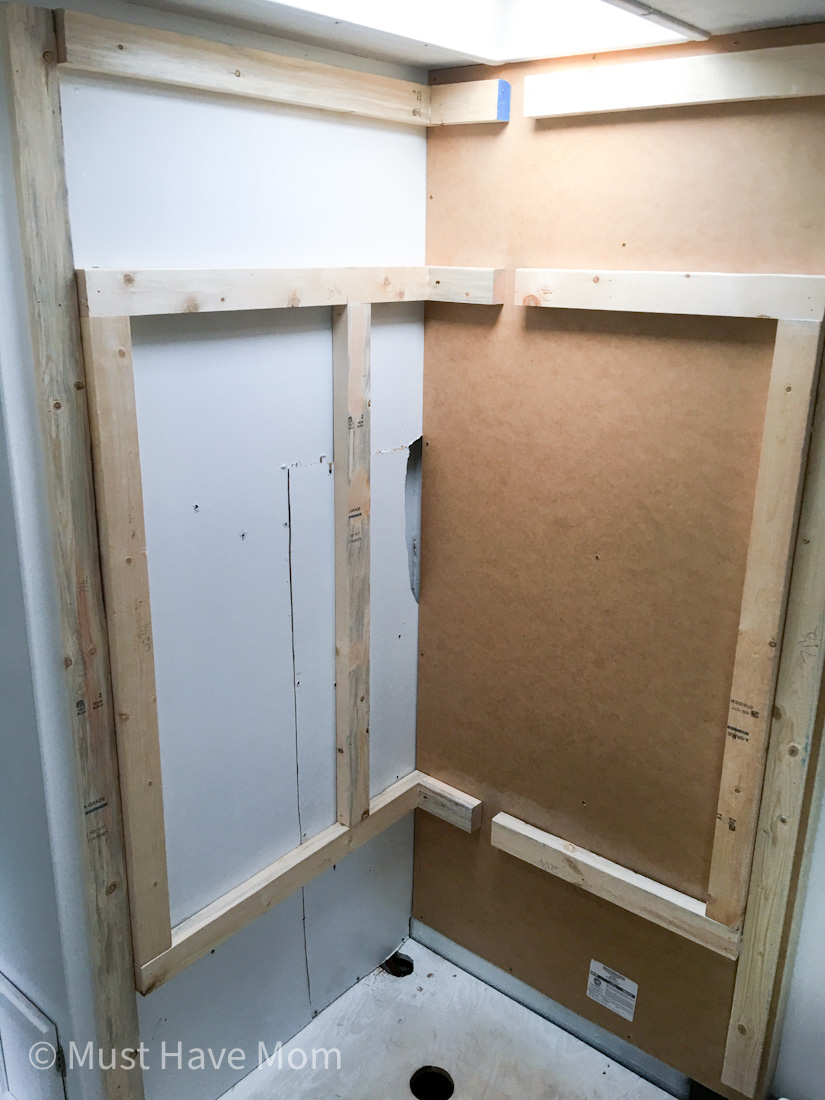
This specific model of shower has you build a frame out of 2X4’s to secure the shower walls to. The quantity and length of boards are listed in the instructions.
Installing the boards can be the tricky part. As you may know, RV’s don’t have regular stud walls like a house. I did use a stud finder to find what structure is behind the walls. I then used screws and liquid nails to mount the 2X4’s in the exact locations shown in the installation diagram.
This is a good time to rough in your plumbing for your water. Our camper already had pex tubing. Pex is very easy to work with. I just added on to the hot and cold plumbing so they would end up right where I wanted my faucet.
Now, we can move on to setting the base and installing the walls. This step will be the hardest part since you will be working in such tight quarters. Install the drain assembly into the base, then place the base in position but away from the walls enough so you can access the backside. Bring in the 2 piece walls and assemble them together per instructions.
Next, stand them up in position on the base and do a dry fit of the base and wall assembly into the corner, to make sure everything will fit properly. Now, you can slide the assembly away from the wall and attach the walls to the base as suggested in the instructions.
After that is complete go ahead and slide the assembly back into place for final positioning. Once you are happy with how everything looks secure the shower assembly to the boards that you previously mounted to the camper walls. Now it is starting to look like something!!!
You can now go ahead and follow your shower-specific instructions on installing the door frame and door.
RV Shower Head and RV Shower Faucet Install
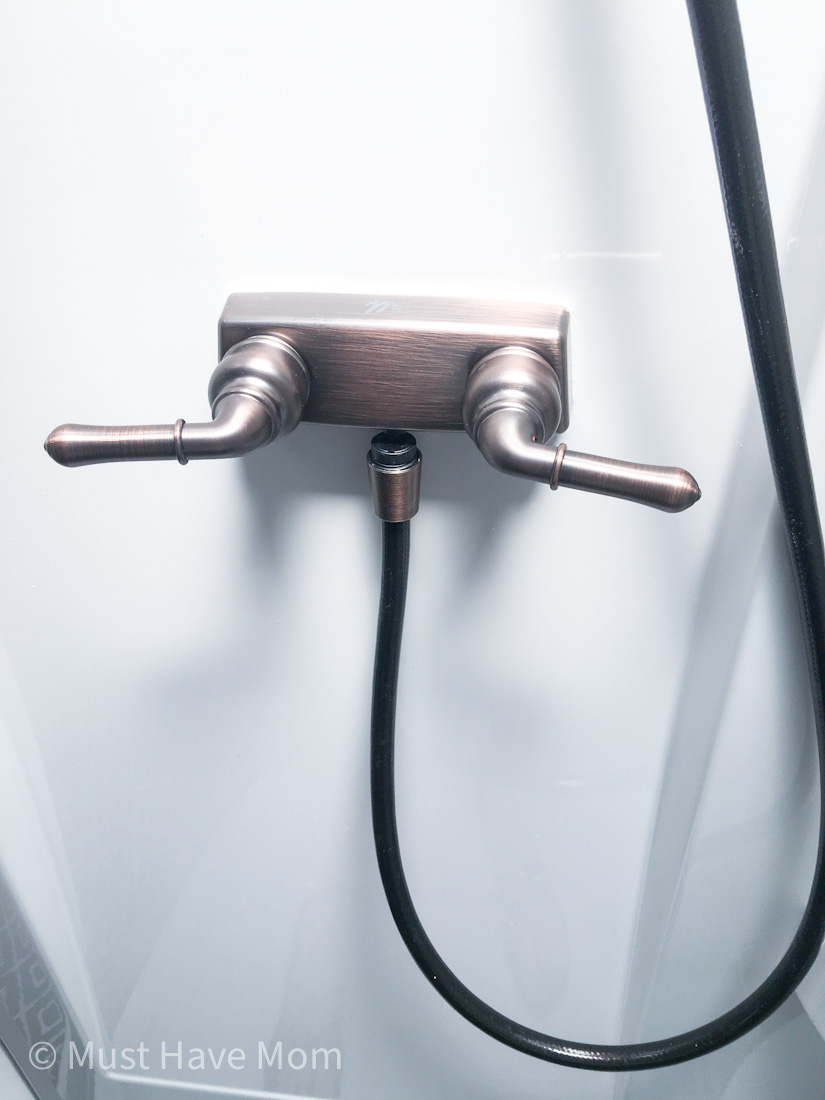
After that, you will need to do some drilling in your new shower surround. You will need to find where your shower head and faucet will be positioned. It is best to have your shower fixture on hand for this step.
*NOTE* This is the RV shower head and faucet we used
The RV shower fixture usually has a template for mounting. Make sure wherever you decide to mount your fixture, you have access to the backside to complete your plumbing. Also always make sure it is in an area that is unobstructed from other plumbing or wiring to ease drilling and installation.
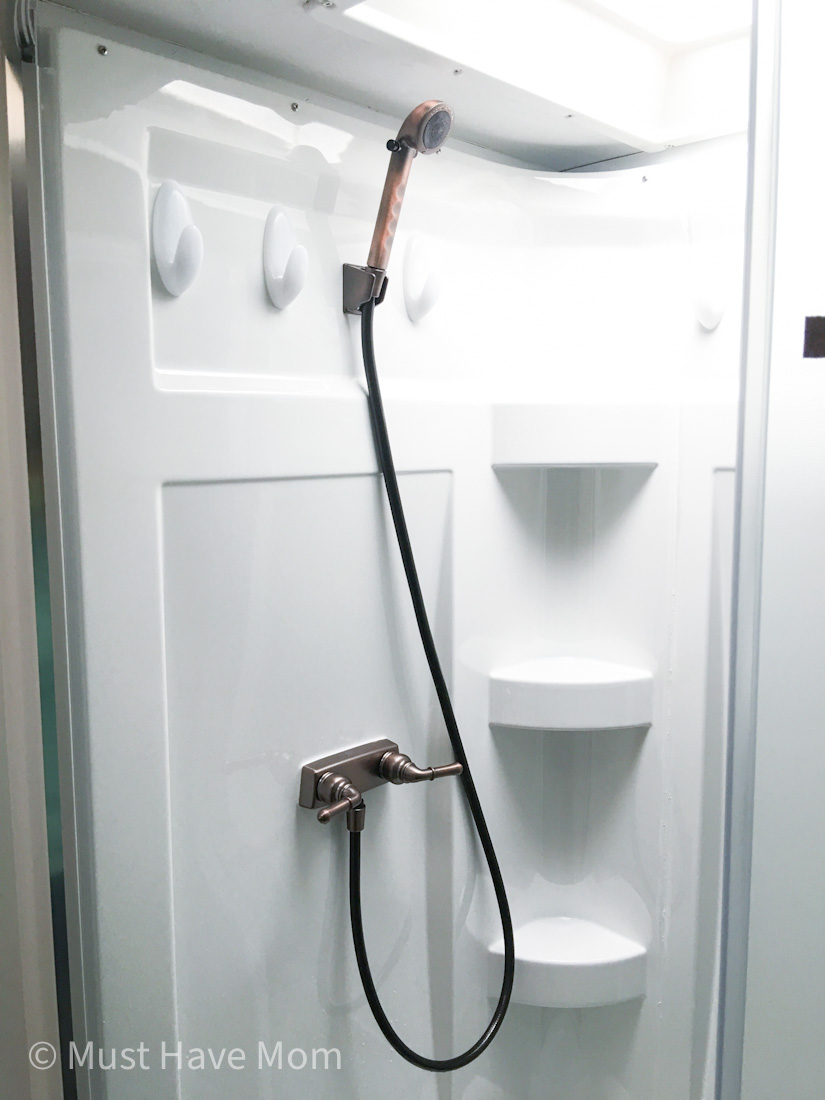
Once the water supply is hooked up and the drain is plumbed back into the main plumbing system you are ready for a test run. While paying very close attention to your plumbing lines, pressurize your water system and check for any leaks, repair if necessary.
Then run your RV shower while closely examining the drain line to also confirm there are no leaks!! After that give a big sigh of relief!! You have just completed one of the best upgrades to your camper that I can personally think of!! Time to book your next camping trip and RELAX!!!
Share This Post On Pinterest
You May Also Like…
How To Remove RV Window Coverings
How To Remove RV Wallpaper Border
Great post. These processes are as straightforward as fixing a broken kitchen tap. I can have a good-looking water fixture in my RV shower within minutes.
Once the water supply is hooked up and the drain is plumbed back into the main plumbing system you are ready for a test run.
Who can recommend a casino that offers not only slots but also cool table games?
This place will definitely suit you! There are blackjack, roulette, baccarat, and many other options in a high-quality performance. If you want to know more, read a full review of LuckyWands I have already tested many games and everything works flawlessly, especially in the live casino!
My friend was here last weekend, planning a group outing. Wanted a site to win some cash for it. Tried https://matetech.in/, and it’s got bets and slots, super clear to use. The bonuses are decent – a boost when you sign up, and free spins or cash if you keep at it, so you don’t spend too much. Honestly, it helped with our plans.
On a weekend, I craved gaming industry insights. Needed a deep dive. Found https://hacker9.com/how-india-built-its-gaming-giants/ on a tech site. Hacker9 explores India’s gaming boom, from Dream11 to Nazara, with 560M gamers and UPI-driven growth. It covers 5G’s impact and regulations, offering stats and success stories. My day was enriched with knowledge of India’s gaming giants.
Great post.
These processes are as straightforward as fixing a broken kitchen tap
Regelmäßige Spieler sollten unseren wöchentlichen Belohnungskalender
im Auge behalten, der Freispiele, Cashback-Angebote und Turniere auflistet.
Wenn Sie in Echtzeit unterhalten werden möchten, bringt das Live-Casino professionelle Gastgeber auf Ihren Bildschirm.
Sie können Funktionen wie kaskadierende Walzen, Sticky
Wilds und Freispiele an jedem Spielautomaten im Rolling Slots
Casino ausprobieren, bevor Sie echtes Geld einzahlen.
Der maximale Gewinn aus den Freispielen ist auf 100€ beschränkt und das maximale
Gewinnlimit des Bonus auf das 10-fache des Einzahlungsbetrags.
Sowohl der Bonusbetrag als auch die Gewinne, die aus den Freispielen resultieren, müssen dann 45-mal umgesetzt werden. Eine umfassende Spielauswahl und durchaus interessante Bonusangebote bietet das seit 2021 bestehende Rolling
Slots Casino seinen Spielern.
References:
https://online-spielhallen.de/umfassender-leitfaden-zum-spirit-casino-bonus-code/
LUGAS ist das zentrale System der GGL, das monatliche Einzahlungslimits von 1000 € pro Spieler anbieterübergreifend in allen deutschen Casinos überwacht.
Wichtig dabei ist, dass Sie sich der Risiken bewusst sind und nur bei lizenzierten und
vertrauenswürdigen Casinos aktiv werden, wenn Sie mit hohen Einsätzen spielen. Wenn deutsche
Spieler ohne Einsatzlimit im Casino Plinko spielen oder andere Games
zocken, dann müssen Sie evtl.
So können Sie ohne Tischlimit im Casino spielen, nachdem Sie
Ihr Konto mit Bitcoin oder einer anderen Kryptowährung aufgeladen haben. Gestreamte Casino Spiele ohne Limit sind laut
deutschen Gesetz grundsätzlich verboten, ermöglichen aber oft die höchsten Einsätze im Casino.
Diese können jedoch deutlich flexibler gestaltet
werden, da die Vorgaben des deutschen GlüStv entfallen.
Das heißt, Sie können nach Ihren persönlichen Vorlieben ohne Limit mit Echtgeld im Casino spielen. Die
folgenden Casinos ohne Limit bieten großzügige Auszahlungslimits, eine seriöse Lizenz und werden von vielen Spielern besucht.
Gemäß den aktuellen Gesetzen müssen Glücksspielanbieter strenge Vorgaben einhalten, um den Schutz
von Spielern zu gewährleisten und problematisches Spielverhalten einzudämmen. In Deutschland werden alle Glücksspiele
gemäß dem Glücksspielstaatsvertrag von 2021 (GlüStV) geregelt.
Um solche lockeren Spielbedingungen anbieten zu können, operieren diese
Casinos mit ausländischen Lizenzen.
References:
https://online-spielhallen.de/der-cosmo-casino-aktionscode-ihr-weg-zu-exklusiven-vorteilen/
Zusätzlich kannst du ein riesiges Willkommenspaket auf deine ersten vier
Einzahlungen beanspruchen – mit bis zu €3.625 an Bonusguthaben sowie 350 Freispielen. Um diesen kostenlosen Willkommensbonus zu
erhalten, registriere dich über unseren exklusiven Link und gib den Bonuscode „NFSND“ im Anmeldeformular ein.
Denn Einzahlungsboni wie beim Instant Casino bieten oft deutlich
bessere Vorteile – höhere Bonusbeträge, Cashback und mehr Freispiele.
Beachten Sie, dass manche Boni Einschränkungen bei Tischspielen haben, deshalb ist ein Blick in die Bonusbedingungen wichtig.
Allerdings werden bei den umsatzfreien Freispielen die Gewinne
sofort als Echtgeld gutgeschrieben, ohne dass ein weiterer Umsatz notwendig ist.
Statt Geld erhalten die Spieler bei diesem Casino ohne Einzahlung Bonus eine feste Anzahl an Freispielen für ausgewählte Slots.
Ein No Deposit Bonus ist ein Angebot mit Bonusgeld oder Freispielen,
das ohne vorherige Einzahlung gewährt wird.
Melde dich noch heute bei Trino Casino an und
sichere dir 30 Freispiele ohne Einzahlung auf Gates of Olympus 1000 mit dem Bonuscode NFSND.
Melde dich bei HunnyPlay Casino an und erhalte 150 Freispiele ohne Einzahlung für Gates
of Olympus mit dem Bonuscode BB100. Melden Sie sich noch heute im Snatch Casino an und sichern Sie
sich ein 450%-Bonuspaket sowie 325 Freispiele für Ihre ersten Einzahlungen. Melde dich noch heute bei SpellWin Casino mit dem exklusiven Promo-Code NFSND20 an und sichere dir 20
Freispiele ohne Einzahlung für Hand of Midas
2 von Pragmatic Play.
References:
https://online-spielhallen.de/zet-casino-auszahlung-ein-umfassender-leitfaden-fur-reibungslose-transaktionen/
Bitcoin and eZeeWallet tend to be the fastest options, often clearing within minutes once your account’s verified.
You’ll find classic three-reel sets, feature-packed video pokies, and big hitters with progressive jackpots that climb faster
than petrol prices. The lobby houses 500+ real-money titles, most powered by Real Time
Gaming — a well-known developer in the Aussie market.
If pokies are your bread and butter, Ozwin’s a comfy spot to settle in. Winnings from free spins must be
wagered at least 20 times on the pokies listed above.
The website is well-designed, allowing players to navigate smoothly.
Sign up, claim your bonus, and start playing today!
Ozwin Casino operates under a licensed platform, ensuring fair play and security.
References:
https://blackcoin.co/online-slots-in-australia/
The details you find at Casinority are presented without warranty, so
check the terms and local laws before playing a casino.
Yet, it may differ from what you find on casinos’ sites
when T&Cs change unilaterally. Take a look at our TOP
5 new casino sites, and try out one that you think will serve you best.
For instance, we love a good bonus for our players.
As affiliates, we take our responsibility towards casino players
seriously – we never feature brands where we would not play ourselves.
NewCasinoUK.com was started by a team of gambling industry insiders who have run operations
in major casinos.
Beyond Blue offers phone counselling, webchat, and
community forums, plus practical strategies for sleep, worry cycles,
and managing triggers. If gambling stress, debt, or relationship pressure feels overwhelming,
trained counsellors offer immediate, non-judgmental help and
can guide you toward next steps, including
financial and mental health services. Keep play in check with limits, short sessions, and a clear budget.
Sites must show responsible gambling tools, real support
hours, and transparent T&Cs. The library balances pokies with
table and live options, and the site runs reliably on mobile.
Our answer is that you SHOULD NOT attempt
to fake VPN to accessthe location-restricted new casinos.
References:
https://blackcoin.co/vip-program-in-uk-casino-advice-and-techniques/
Interact with other gamblers and the dealer via online chat.
Hell Spins’s collection of slots is regularly updated.
Because Hell Spin is ready to offer you a hell of a good
time!
The team is responsive, friendly, and dedicated
to helping you have the best gaming experience possible.
It’s user-friendly, fast, and lets you enjoy your favorite games anytime, anywhere.
Would you like to find out what bonuses are available?
If you understand you cannot meet all these requirements in time,
you can refuse to get a particular bonus. But when you win money with this extra cash,
you cannot withdraw this sum instantly.
When you deposit a certain amount, the casino adds money to your bonus balance.
If you are an active player, the casino offers you extra rewards.
Hell Spin is more than just an online casino; it’s a fiery fiesta of
fun that brings the heat right to your screen. The app maintains the same fiery theme and easy navigation as the website,
ensuringa seamless gaming experience.
References:
https://blackcoin.co/best-skrill-casinos-for-uk-players/
Crown Melbourne’s privileged position as the exclusive casino operator in Victoria brings with it an obligation to be a leader in providing a safe gambling
experience, free from criminal influence. Take advantage of exclusive Stay &
Play offers that combine luxurious accommodation with gaming vouchers, fine dining
credits, and spa treatments. But enjoying casino play online is all about getting the right deal and finding the right site.
The beauty of online casino play in Australia is that no-one
is going to come storming through your front door shutting
down your gambling and putting you under arrest.
In January 2006, Microsoft announced the purchase of Safeco’s Redmond campus after the company had begun consolidating its offices at the Safeco Tower in Seattle’s University District a year earlier.
The campus was originally leased to Microsoft from the Teachers Insurance and Annuity Association, a pension fund manager, until
it was bought back in 1992. The initial campus
was on a 30-acre (12 ha) lot with six buildings,
and was able to accommodate 800 employees but
eventually grew to 1,400 by 1988.
Crown Melbourne Casino offers world-class entertainment,
gaming, and hospitality in the heart of Southbank.
Situated on Southbank, steps from major attractions, with riverfront views,
luxury shopping, and easy transport access. Access private gaming
salons, luxury transfers, VIP lounges, personal hosts, and
bespoke packages for elite guests and high rollers.
References:
https://blackcoin.co/winx96-casino-in-australia-real-money-gaming-fun/
You can also connect your crypto wallet via MetaMask to start your journey.
Whether it’s digital art, music, videos,
or even domain names, Mintable lets you create and trade NFTs with
ease. The platform also collaborates with global artists, bringing exclusive NFT art
drops that rival those of Nifty Gateway. With just a 1% platform fee, it’s far cheaper than most NFT platforms.
From smart contracts to seamless buying and selling, it’s a versatile NFT platform for the modern collector.
Colle AI integrates AI and blockchain technology to enhance NFT curation, discovery, and market efficiency.
This move aligns with Colle AI’s vision of making NFT ecosystems more dynamic and user-friendly.
With these enhancements, Colle AI continues to bridge the gap between AI technology and blockchain innovation.
References:
https://blackcoin.co/high-limit-slots-play-25-100-500-slot-machines-online/
Players looking for realism can join our live casino tables online.
In addition to traditional tables, the casino features a full suite of electronic table games, including digital roulette, blackjack, and baccarat
terminals. With over 20 live-dealer tables on the main floor,
guests can experience authentic casino action with professional croupiers in a comfortable setting.
In February 2006, Microsoft announced that it intended to expand its Redmond campus by 1,
100,000 square feet (100,000 m2) at a cost of $1 billion and said that this would create space for between 7,
000 and 15,000 new employees over the following three years.
In January 2006, Microsoft announced the purchase of Safeco’s Redmond campus after the company had begun consolidating its
offices at the Safeco Tower in Seattle’s University District a year earlier.
The first major expansion of the campus came in 1992, bringing the total
amount of office space to 1.7 million square feet (160,
000 m2) on 260 acres (110 ha) of land. The campus was originally leased to
Microsoft from the Teachers Insurance and Annuity Association, a pension fund manager, until
it was bought back in 1992. The initial campus was on a 30-acre (12 ha) lot with
six buildings, and was able to accommodate 800 employees but
eventually grew to 1,400 by 1988.
References:
https://blackcoin.co/20_which-casino-has-the-best-loyalty-program-vip-rewards-explained_rewrite_1/
us online casinos that accept paypal
References:
vads.in
online betting with paypal winnersbet
References:
morningstar24.com
online betting with paypal winnersbet
References:
https://www.referall.us/employer/uk-deposit-method/
gamble online with paypal
References:
https://jobsinoptometry.com/employer/best-paypal-casinos-2026-online-casinos-that-accept-paypal/
casino online paypal
References:
https://hwekimchi.gabia.io/bbs/board.php?bo_table=free&tbl=&wr_id=1445567
online slots paypal
References:
https://empleos.contatech.org/employer/best-online-casinos-australia-top-aussie-gambling-sites-2025/