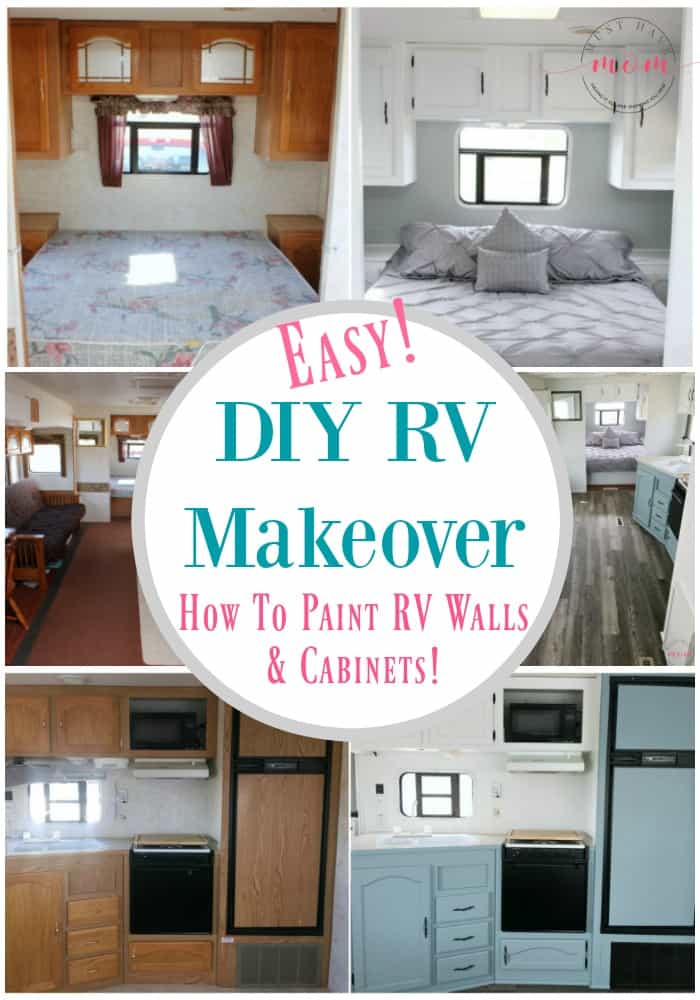
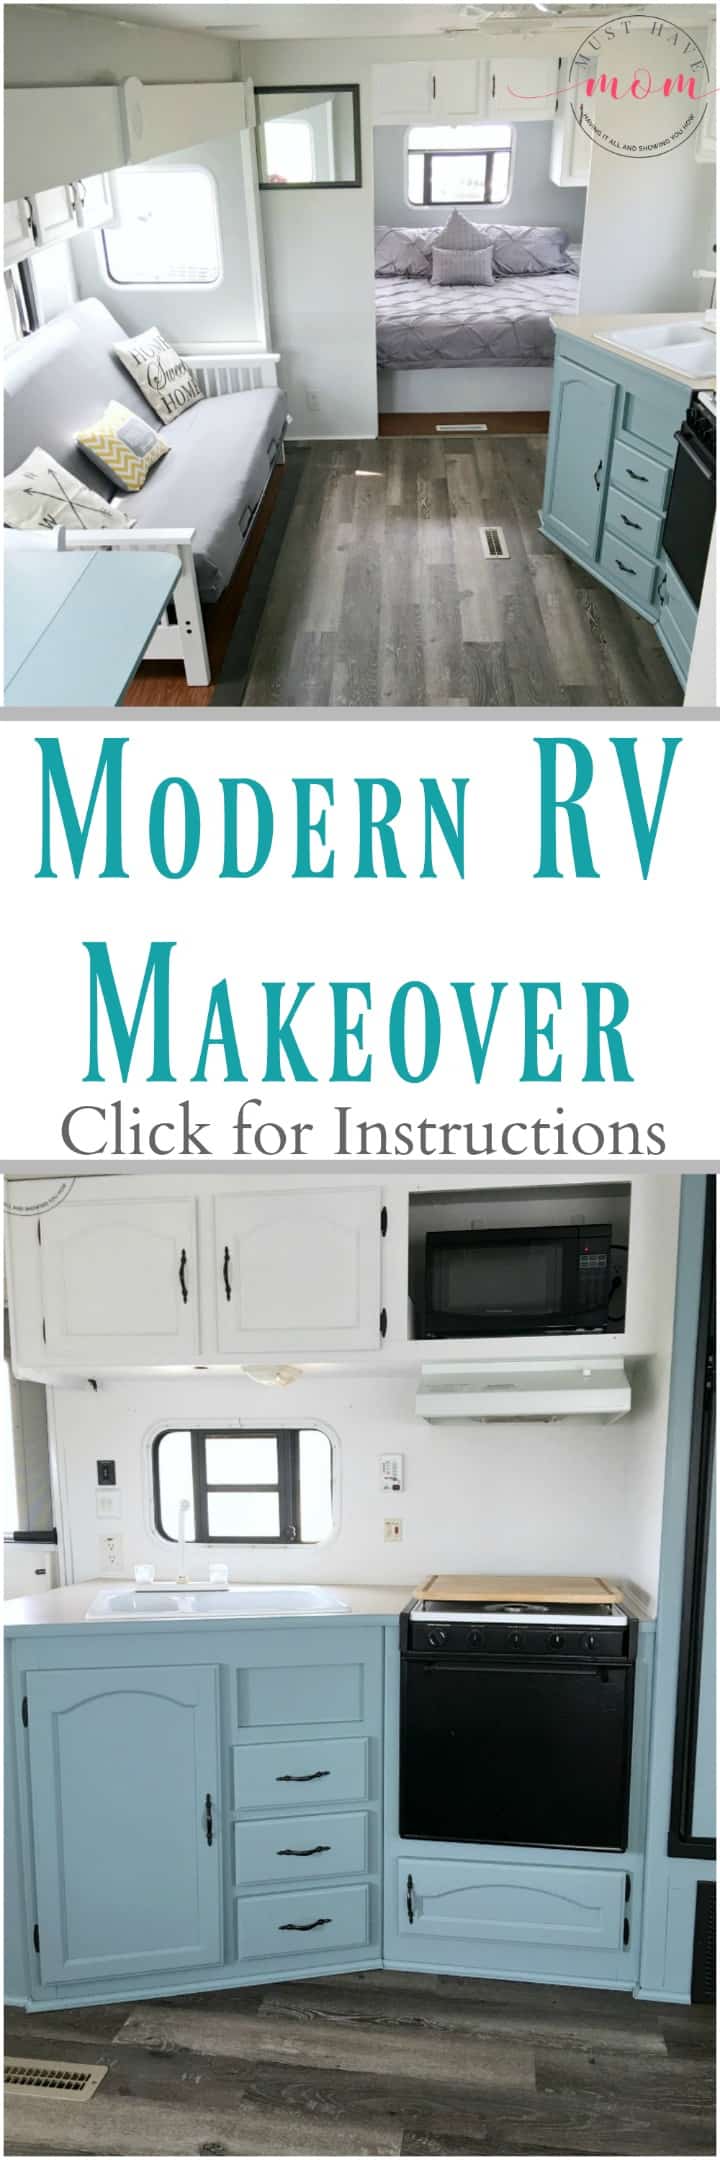
Easy RV Remodeling Instructions + RV Makeover REVEAL!
Last week I shared my RV remodeling plan with you in my Facebook live video and I promised to share my big RV makeover reveal with you. I can’t wait to show you how our RV makeover turned out!!! It’s finally time to lift the curtain and show you our RV makeover and I’ll also tell you exactly how we did it so you can do it too!
RV Remodeling
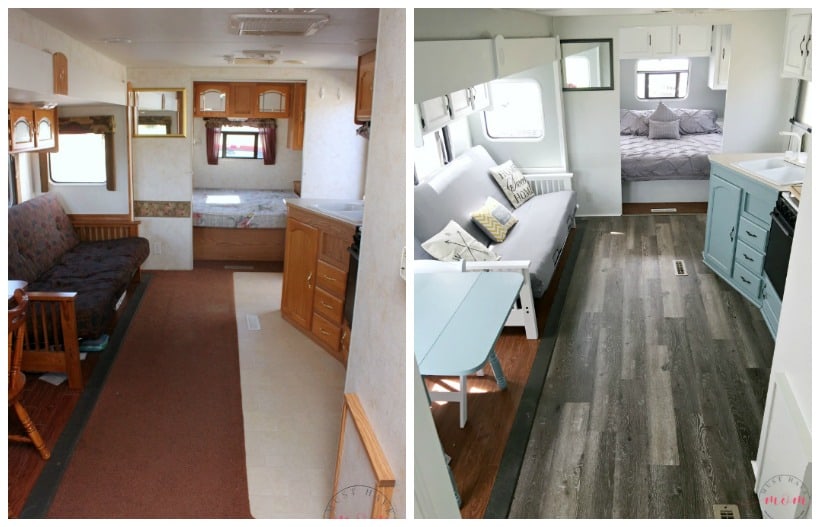
I’m not really sure who is behind the designs that you see in every RV across the country, but I know one thing, they need help! The dark, drab, cave-like feel that is overwhelmed in browns and outdated patterns just has TO GO! I couldn’t wait to do an RV makeover on our beloved camper and I am over the moon with the final results!
How To Paint RV Interior
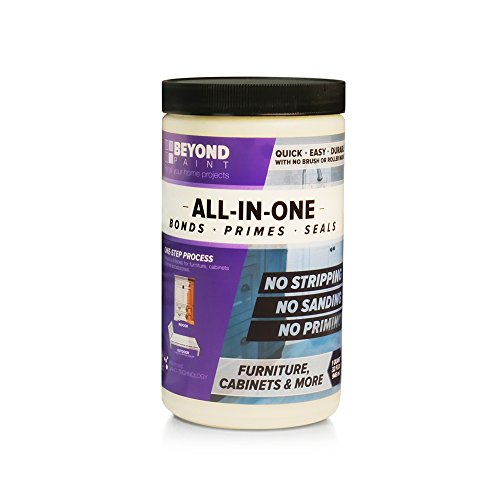
Before we decided to dive into RV remodeling, I did a LOT of research into painting RV walls, painting cabinets and even painting the faux wood cabinets in our camper. I discovered a product called Beyond Paint and it seemed to fit all of my needs for our RV makeover.
As I shared with you in my Facebook live video (below), Beyond Paint will adhere to just about any surface, doesn’t require any sanding, stripping or sealing and it comes in a variety of colors. I was SO excited to try it out and really see how it worked and see if it lived up to all the hype.
I’m super pleased to announce that Beyond Paint was extremely easy to use, required no prep (other than making sure the surface was clean), and turned out absolutely beautiful when we were finished. I highly recommend using Beyond Paint for your RV remodeling plans. You can use it on the RV wallpaper, cabinets, furniture, and more. We used it for all of our painting in the RV interior.
RV Remodeling Prep Work
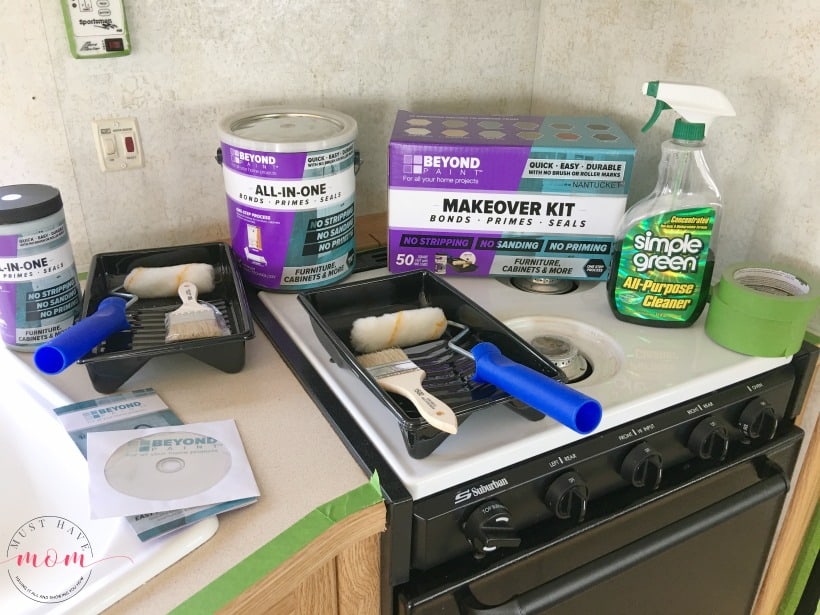
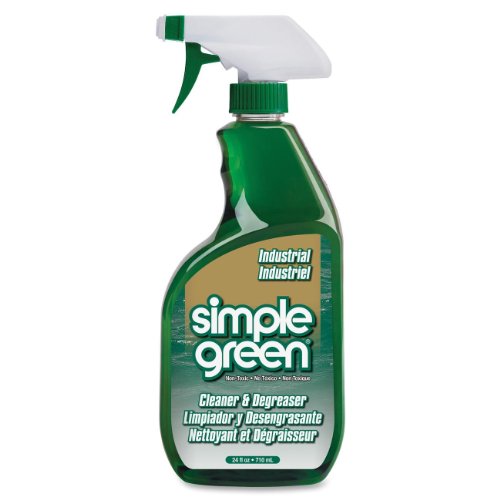
Let’s start out by talking about what prep work needs to be done before you start your RV makeover. First, you’ll want to use a cleaner (Beyond Paint suggests Simple Green or a vinegar/water solution) that will de-grease your surfaces and clean all the built-up dirt off of them. Stay away from anything that will leave behind a waxy residue (like oil soap or polish).
After you thoroughly clean all the surfaces that you plan to paint, you’ll need to remove any wallpaper borders that you aren’t keeping. Instructions on how to remove RV wallpaper border. ONLY remove the wallpaper borders and DO NOT attempt to remove the wallpaper from the walls themselves. The wallpaper will be glued onto the plywood-type material that makes up your walls. You should not remove it!! You should instead paint over it with Beyond Paint. Wash the walls as well if you plan on painting them.
Next, you need to remove the RV window coverings so that you can paint behind them. Instructions to remove RV window coverings. I hated the ugly fabric on our RV window valances so I opted to leave them off entirely. If you want to you can recover the RV window valances in a more modern fabric.
After you’ve done these steps then remove the cabinet doors and hardware so that you can paint them. I recommend painting the cabinet doors in the garage so they aren’t in your way. You can also use Beyond Paint to paint your furniture so wash any furniture you plan on painting. I painted the outdated wood dining room table and wood futon in our RV.
Finally, tape around any edges that you need to. We taped off the floors, windows, etc. Use a quality painter’s tape and not masking tape.

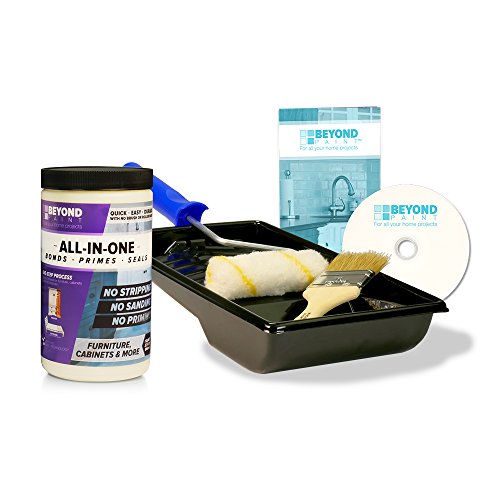
Now you are ready to start painting! For your painting project, you will need a small roller, brush, paint tray, and Beyond Paint. You can get the Beyond Paint makeover kit and it includes all of the painting tools in it, as well as a quart of paint. You can pick whichever color you like for your kit. The kit also comes with instructions and a DVD.
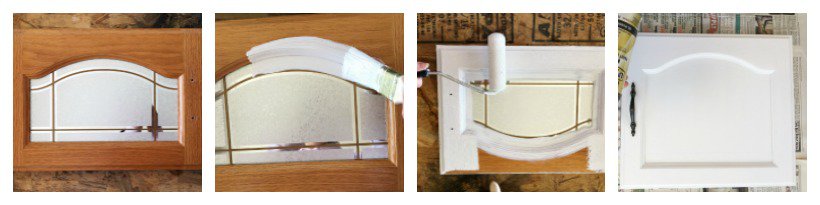
Beyond Paint worked perfectly on the wainscoting in our camper’s living room and only required two coats (no need to prime!). It even covered the cabinet door that had a glass inlay. After painting it with Bright White, you couldn’t even tell it had glass in it. I painted right over the glass and it covered it perfectly. I suggest doing fairly thick coats so you get the best coverage. In most cases, we only needed 2 coats of paint. Allow 2 hours between coats for them to dry. The only time we needed 3 coats was when we used Bright White on dark wood.
RV Remodeling Color Palette
For my RV makeover, I used three different colors of Beyond Paint. I used Bright White, Soft Gray, and Nantucket. The final look turned out exactly as I envisioned it!!
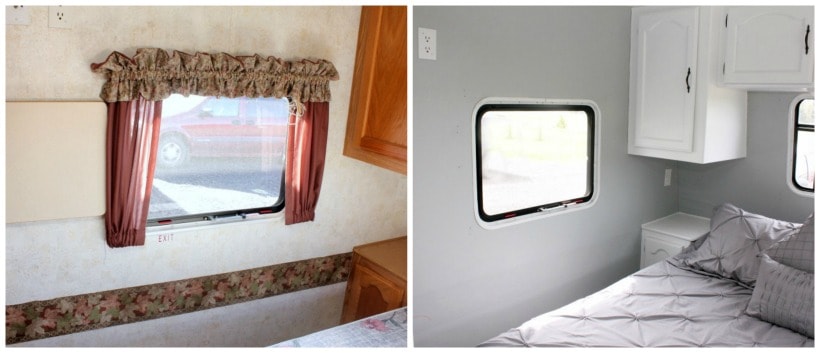
In our master bedroom, we removed the wallpaper border and RV window treatments. We then painted the walls Soft Gray and the cabinets, Bright White. The final look was stunning!
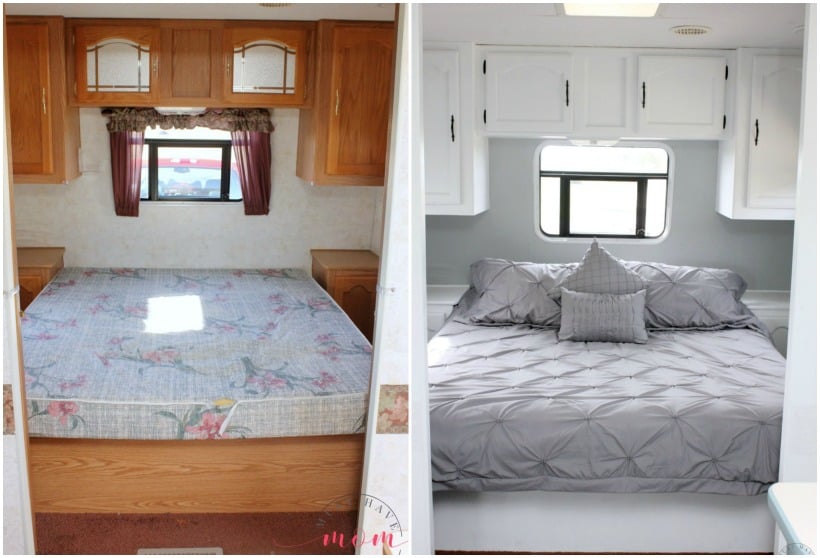
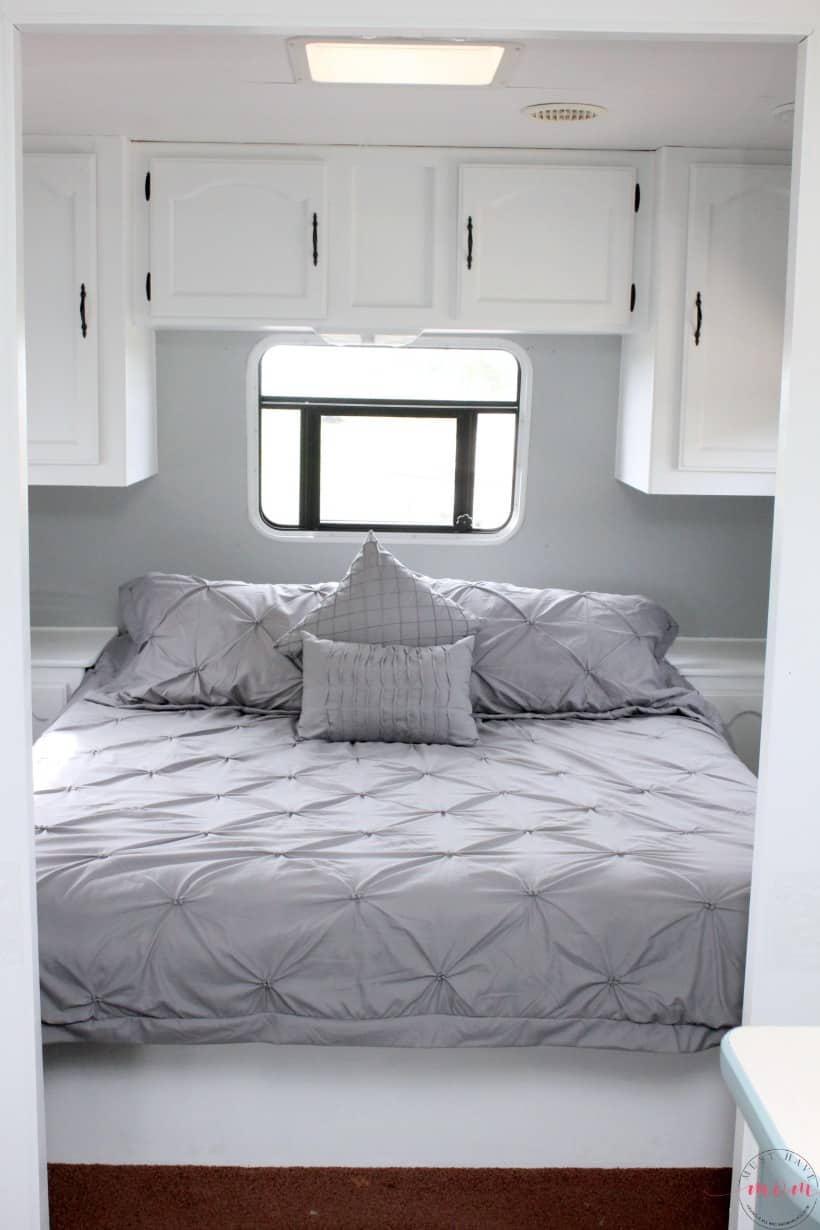
By simply painting the room it created an entirely different look. I never cease to be amazed at the dramatic results that a simple coat of paint can deliver! Isn’t it inviting?
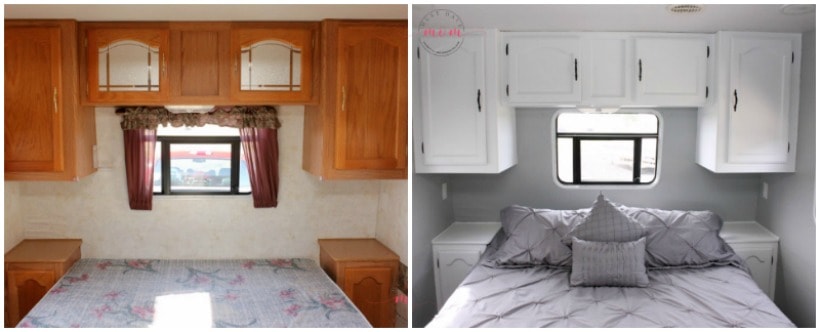
The end result of this easy RV remodeling project was a sanctuary where I can relax and feel tranquil. I love it!
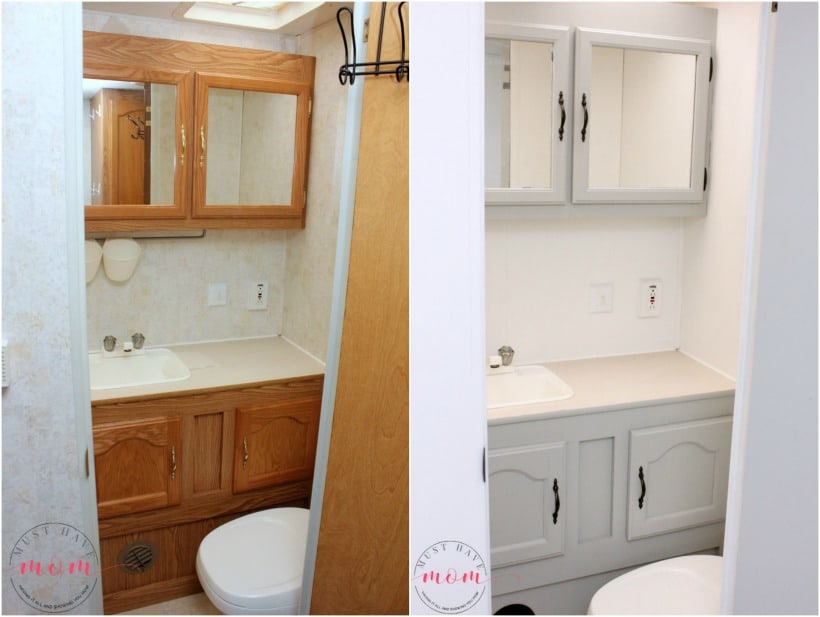
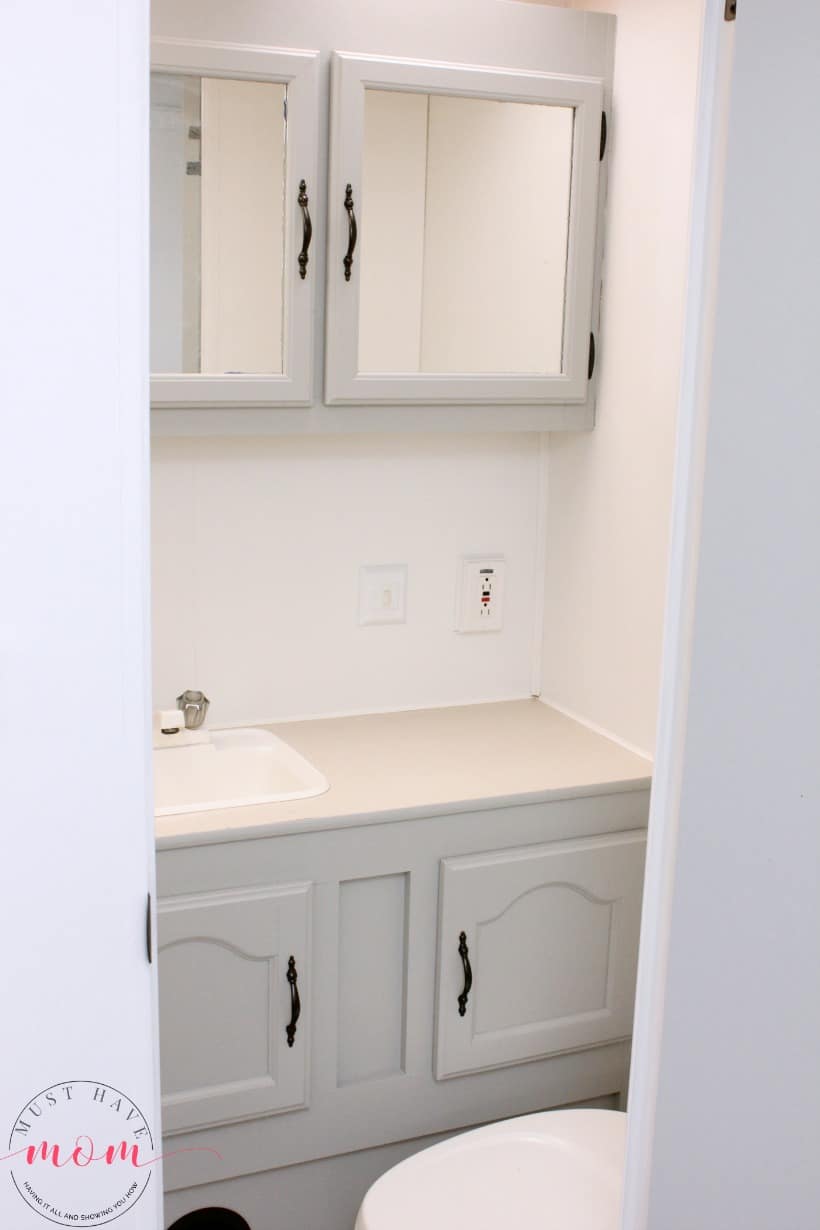
In our RV bathroom, we painted the walls Bright White and the cabinets Soft Gray. Can you believe the difference painting over that wallpaper makes?!
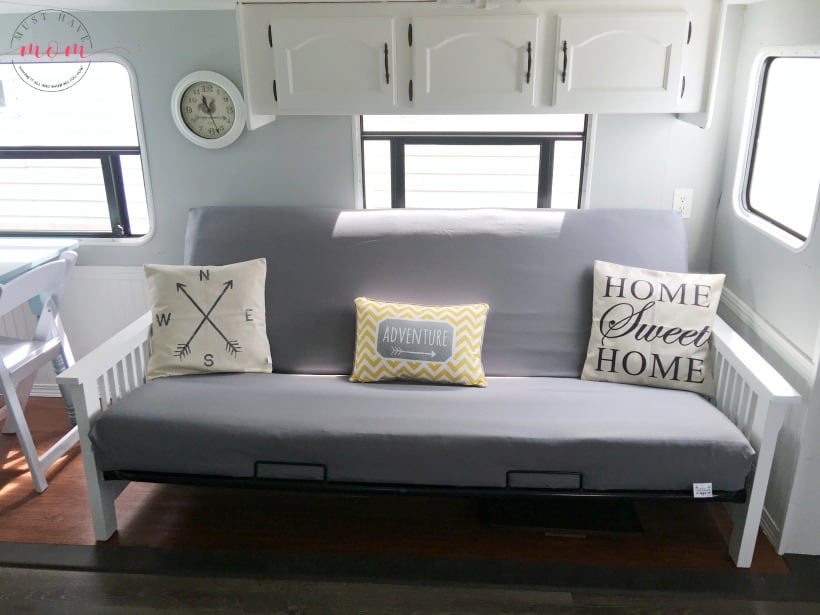
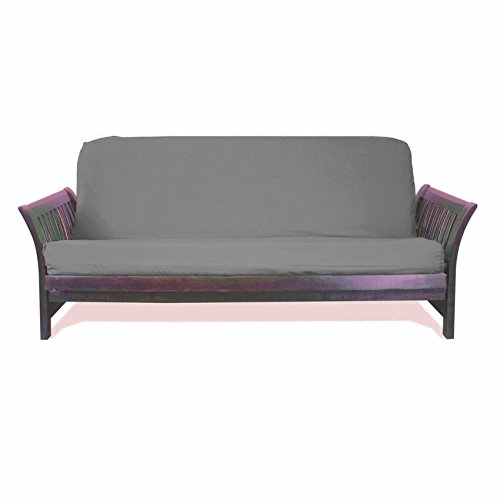
I also took the woodsy-feeling futon and painted the wood white and added a gray slipcover over the outdoor fabric. I also added a few pillow covers over my old throw pillows to give them new life. For under $40 I was able to transform the futon into a modern piece of furniture!
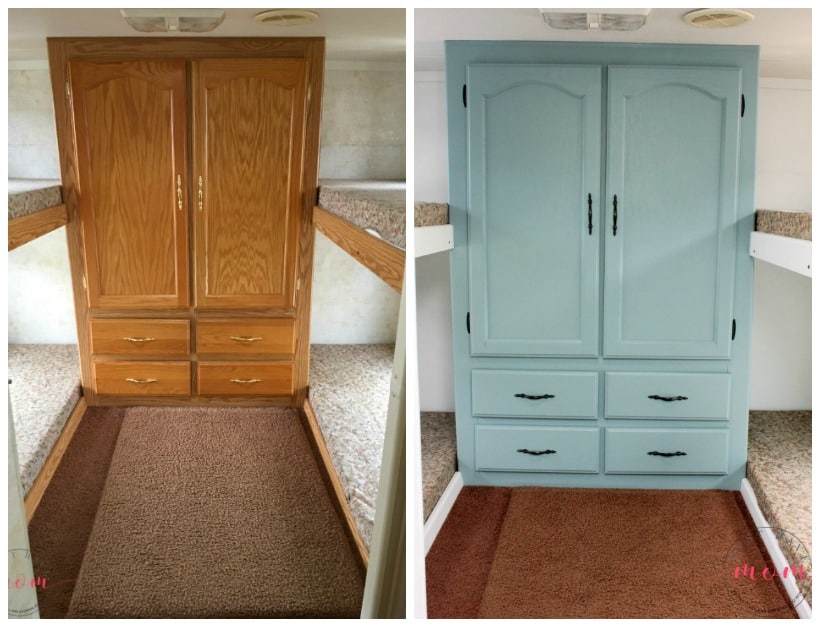
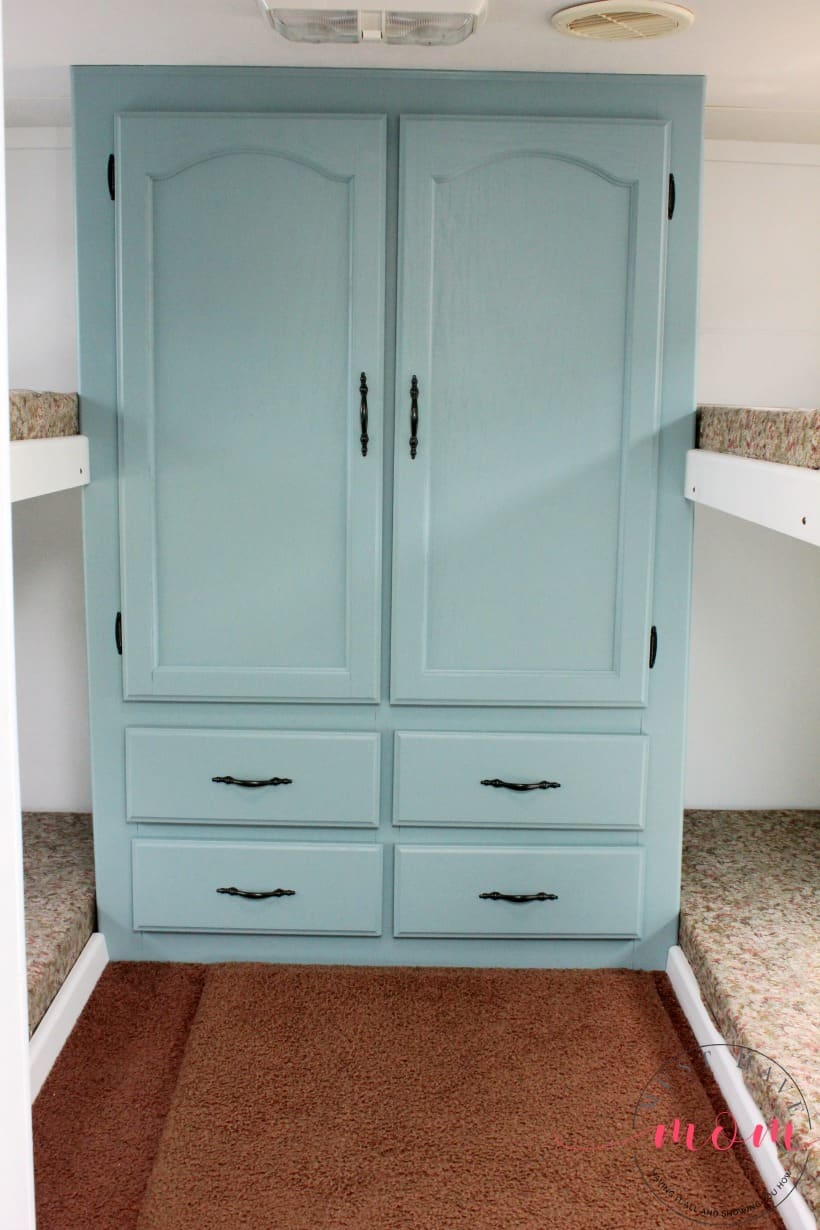
In the bunk area of our camper, we painted the walls and trim white and painted the fake wood cabinet Nantucket. The end result was a showpiece that looked worthy of a high-end home. I love how beautiful the cabinet turned out. We painted all of our outdated gold hardware with oil-rubbed bronze spray paint. When that is combined with the Nantucket, it really delivers a rich look.
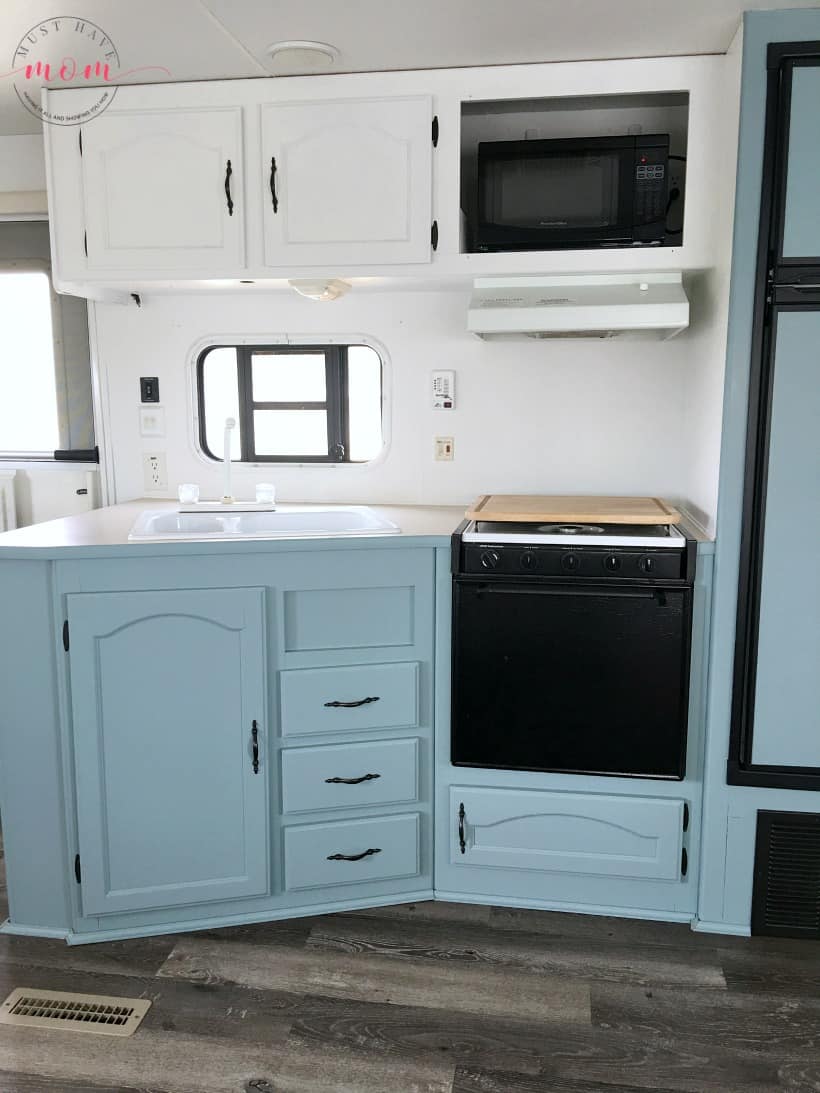
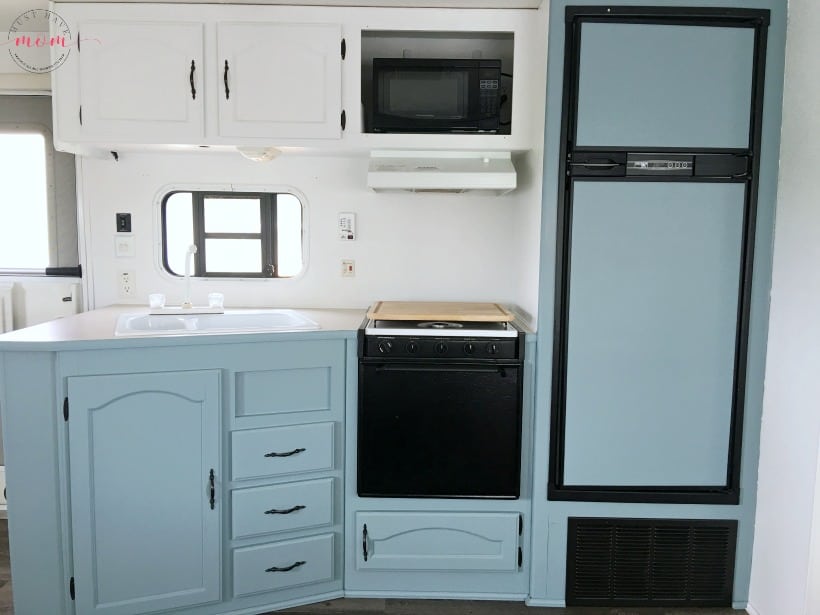
In our kitchen, we opted to do two-tone cabinets in Nantucket and Bright White. I love the end result! Combined with the new laminate flooring we installed, it looks amazing and really pops! It went from a dark-feeling cave to a bright and airy kitchen.
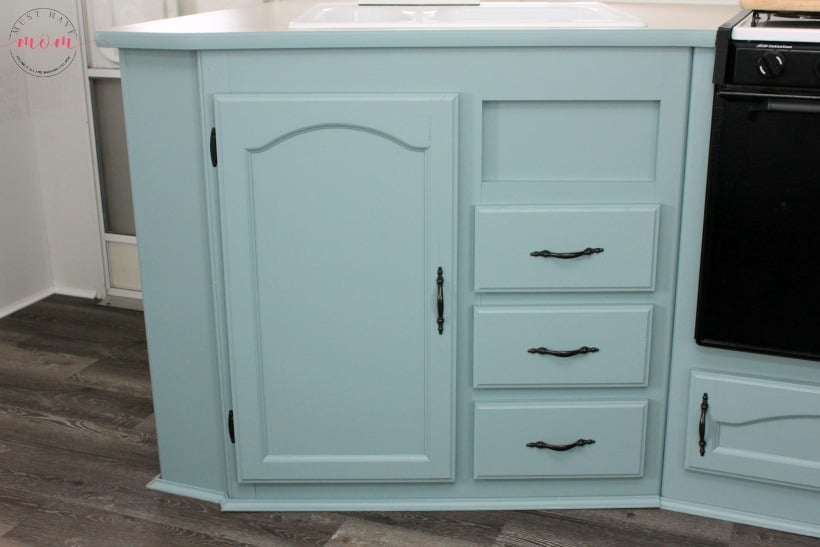
We removed all of the cabinet doors and drawers to paint them. I LOVE the color!
Don’t be afraid to experiment with new trends and try out the two-tone cabinet colors! They are really on-trend and look beautiful.
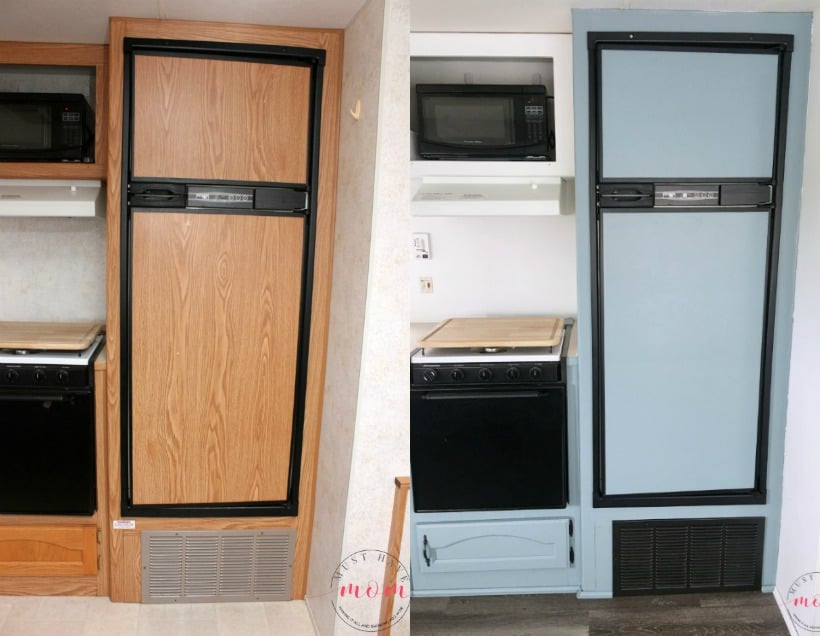
We even painted the RV fridge which had a fake-wood sticker panel on the front of it. We taped off the black plastic and painted over the wood with Nantucket. I love how it turned out!
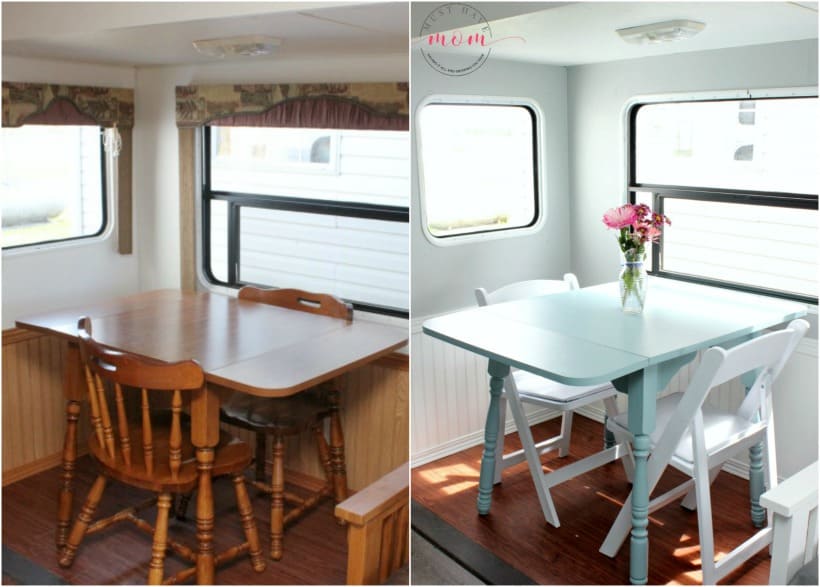
In our camper’s dining area we painted our old wood table in Nantucket and did the walls in Soft Gray with Bright White wainscoting. It really transformed the space and saved us a ton of money by simply updating our existing furniture. We opted to get rid of the old chairs as they were too big and bulky, and we replaced them with lightweight white folding chairs.
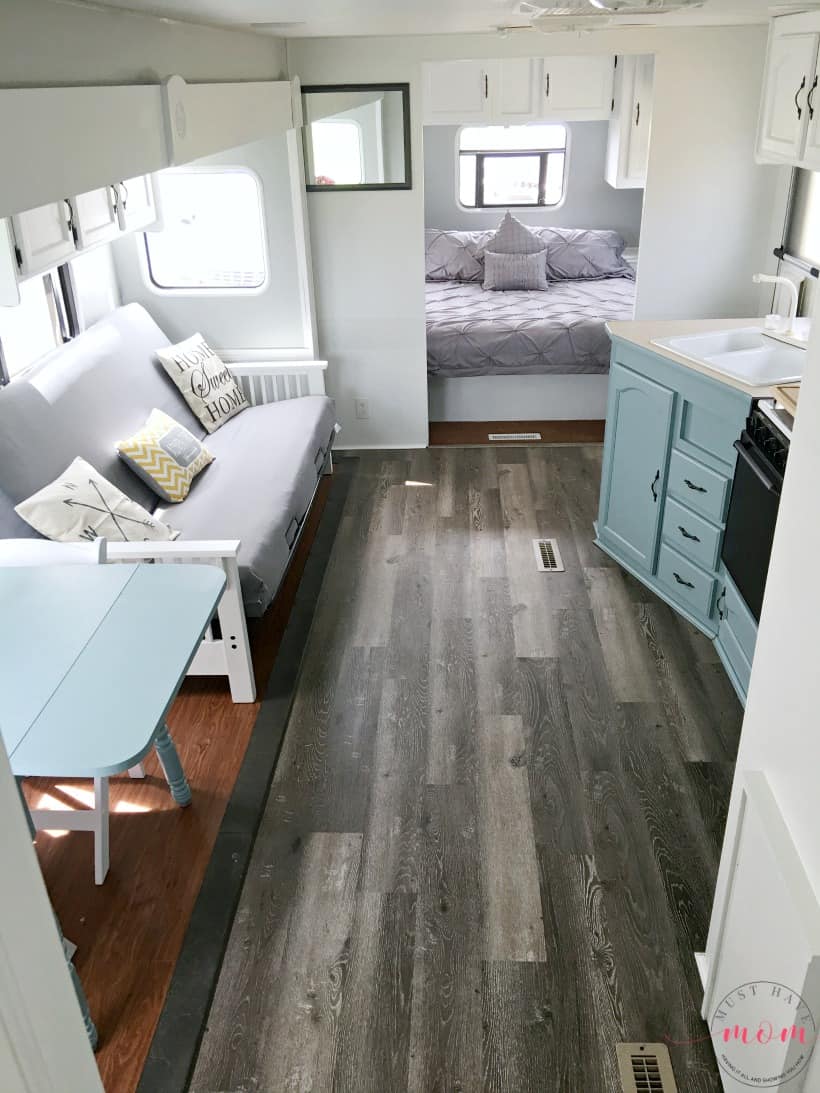
Our camper now looks like it is out of a magazine and it feels so bright and airy. It lets in a lot more natural light now and with the light color palette, it feels much bigger. This RV remodeling project took my husband and I (working together) just 2 weekends to complete! Since an RV is a small space, it is a really doable project in a couple of weekends’ time!
Are you ready to update your RV or maybe you want to paint your kitchen or furniture in your home? You can find Beyond Paint on their site or on Amazon, Home Depot (order and pick up in-store too!), or Walmart.com! I can’t say enough good things about it! Use promo code MUSTHAVEMOM to save 10% off your order.
Buy the Supplies We Used for this Makeover:
Here are the supplies we used for our RV makeover! You can order them now and be ready to start on your own camper makeover project! Use promo code MUSTHAVEMOM to save 10% off your order.
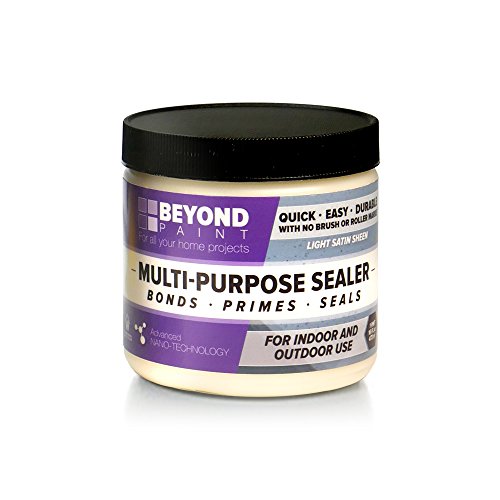
BEYOND PAINT – Furniture, Cabinets and More All-in-One Refinishing Paint -Quart of Bright White BEYOND PAINT – Furniture, Cabinets and More All-in-One Refinishing Paint Quart- color: NantucketBEYOND PAINT Furniture, Cabinets and More All-in-One Refinishing Kit / Color- SOFT GRAYBeyond Paint BP37 Multi Purpose SealerFrogTape 1358463 Multi-Surface Painting Tape, Green, 0.94-Inch x 60-Yard RollRust-Oleum 249131 11 oz Universal All Surface Spray Paint, Oil Rubbed Bronze MetallicHERCULES Series 800 lb. Capacity Premium White Plastic Folding ChairOnker Cotton Linen Square Decorative Throw Pillow Case Cushion Cover 18Magshion@Futon Cover Slipcover (Dark Gray, Full (54×75 in.))All Purpose Concentrated Cleaner, 24 oz, Sassafras Scent18The Good Life – Camping / Traveling – French Flea Market Burlap Accent Throw Pillow – 8-in x 8-in


Did you enjoy this post? We love it when you share on social media using the sharing buttons above this post! Thank you!!
Pin the RV Makeover image below:


It looks amazing!
everything is amazing, I am so ready to do work to mine, but my biggest project will be the floors, I saw a new home done in laminante floor material and love it, what did you use, how did you apply, the paint is amazing you did, I have a 39′ motorhome
Thank you so much! We used a click together laminate flooring. We made sure it was a thin laminate so the slide out could easily come in. When we put the slide out in we put down an outdoor rug with a rubber backing so that the slide out doesn’t scratch the flooring. They make slide slippers to prevent this also, but they are a lot more expensive and the rug works better!
What brand of flooring did you use? Where did you get your comforter set?
Hi Anna! We bought the flooring at menards and I belive it was “Shaw” brand. My comforter set was from amazon (http://amzn.to/2eNHfkh)
What material did you use on the floor?
We used click together vinyl planks by Shaw.
I discovered Fusion paint so much easier & cheaper. Used your makeover as an example and did my bottom cabinets dkr grey & ivory for the tops. Love the freshness of it.
Oh I bet that looks fantastic Barbara! Thanks for sharing your tip about the paint you used as well.
Fantastic information! I want to remove my balances but then the blinds look weird. You don’t have any blinds anymore? So no privacy? Any suggestions to keep the blinds but make them look better and not stick out? Thanks!
Yes, we did roller shades in my newer camper remodel that you can see here: https://musthavemom.com/modern-mountain-rv-makeover-before-after-pictures/
Hi! How is the paint holding up?
I have a dumb question. How do you keep holes for hardware open when painting? I plan to paint the old hardware and reinstall it after i paint the caninets. as you described in your article. But do i need tocover the holes with tape before painting so the holes dont get ovvluded with paint?
Hi Marie! Not a dumb question at all. You can just paint right over them and then when you put the hardware back on you’ll use a drill to screw the screws back in place and it will go through any paint that is covering the holes. Hope that helps clarify for you!
Hello how much was for the flooring and the Beyond Paint cost
Hello I am from Ontario Canada i wanted to know was this a alkalyd paint or something similiar to tremclad , I love what you have done and i am going to do this spring . advice
regards
lee
Hi Lee! I’m not sure about that but I do know I have had readers in Canada find Beyond Paint in Canada 🙂 Hope that helps!
What year make and model is your RV? We are looking for one just like t for our family of 5 and that bunk house is ideal. Your flip is amazing!
Our RV is a 2002 Sportsman KZ 32′ bumper tow. It works great for our family of 6! We love the set up. Thanks for stopping by to check out my makeover!
Hi! What kind of vehicle do you use to tow that size camper? Looks beautiful!!
How is the paint holding up? When i read reviews for the paint on amazon. There were a lot of complaints.
So far, so good. It has only been a week or so. I’ll try to update again in a month or so.
Looks great! Has the paint gotten knicked and chipped a lot? I don’t want to spend all the time and money doing it if it chips fast. I have three small children and a big dog so the trailer gets lots of tough love! Thx!
Hi Amber! We have four kids and two dogs and a year later this paint was still looking great! Just make sure you allow it 30 days to cure and don’t scratch anything sharp on it when it’s curing. The only spots that scraped off were where I had metal rubbing on the paint before it cured.
Hi Sarah, you said that it needs 30 days to cure… that is a long time. We are selling our home & moving into our camper for the summer… I was going to paint the walls for sure (maybe the cabinets) I won’t have a full 30 days once done before we are living in it… do you mean you can’t put anything ON the walls or that will touch the cabinets/surfaces? OR do you recommend something different now since it’s is 4 years later? Also, do you have a post that talks about taking down the trim that is halfway up the wall? Thanks!
Hello! How exciting. No, you can live in it and use it but just be very gentle with it and don’t rub or scratch the surface until fully cured. We used ours during that period of time. I do have a post about the wallpaper trim here: https://musthavemom.com/how-to-remove-wallpaper-border-quick-easy-trick/
How is the paint holding up at this point?
It held up great! Just make sure to allow it to cure properly 🙂
Sarah, you mentioned not. To remove the wall paper. Unfortunately I had already begun the long HARD process of peeling the paper were ever it was coming up. I started this prior to reading your post 🙁 I have large areas throught that have not wall paper and the sticky residue and other ears the paper is still down. What do you suggest I do from here? Help from someone who has done it please….
Sorry I missed your comment Lindsey. I hope you’ve resolved this! Have you taken off the wallpaper down to the wood that is behind it?
Wow that is beautiful! Friends of mine are looking into getting a used RV and I think they would be more apt to getting one if they know they can do this kind of snake over.
Wow! I absolutely love your remodel. The clean lines and light colors appear to open up the space so much. RV manufacturers/designers need to take a hint from you. I’d feel much more comfortable staying in an RV space like this much more than the brown, dark and sad original look.
Beautiful! I was wondering how much white paint you used. It’s more expensive than I usually buy.
Dawn
Hi Dawn, I believe I used a gallon of white, a gallon of grey and a pint of Nantucket.
Did you paint the ceiling?
No I didn’t. There was SO much stuff to paint around on the ceiling and it didn’t really need it so I didn’t tackle that big project!
You did such an amazing job! I love the color palette you chose. So much more inviting than the brown from before.
WOW! This is one of my absolute favorite RV renovations. My bf and I are going to buy one soon and I’m already thinking of how I want to renovate it. I completely agree with you. Whoever designs RVs needs major help!
Thanks so much for sharing this!
This is crazy awesome. WOW. I am in love with this camper and it is much better than brand new in everyway. So cozy and so bright and open now. fresh and wonderful! So happy to find your post on Pinterest today and of course I had to share it!
This RV makeover looks terrific! It’s amazing how changing the colors makes the space look so much brighter and more inviting. There must have been a law passed somewhere that ALL RV and camper interiors must be brown and beige.
Amazing job! Pinned for ideas when we get our RV. I purposely want to get one to remodel. Thanks for the post. Saw the link at Home Matters linky.
Wow! I want to run out and buy a camper now! Your color choices are beautiful and that flooring is amazing! Thanks so much for sharing for the Home Matters Linky Party! #HomeMattersParty
Hey! So how did it all hold up?
The paint and floors ?
Hello! It held up great!! No issues at all.
Your RV makeover is an amazing transformation. We have been shopping for a camper trailer and looked at so many old ones that looked a lot like your RV Before pictures. I never would have imagined that they could be made to look so much better and up to date! Your ideas are so helpful. I pinned this post so it can inspire others, too!
Thank you for linking up with us at the #HomeMattersParty this week.
How did you remove the carpet that goes a little under the slide out?
We just put the slide out all the way out and ripped up the carpet. It came out easily.
Did you put a sealer over yours? I know it’s supposed to seal itself, but Seems the amazon reviews for this product say it’s chalky and those that “love it” because it lasted used a sealer. Also did it self level, any advice on that, I’m getting ready to try it this weekend and worry about the brush marks.
Thanks, Chris
I did not use any sealer. Beyond Paint includes the sealer in the product so there is no need for a separate sealer.
Love the remodel! How does it look over the wallpaper borders? Mine has tape on the walls where the boards meet and this has my husband not wanting to paint because he thinks it will look bad. Was yours like tape or actual trim?
It was trim but it was glued on. We used Goo Gone Gel, allow it to sit for a bit and scrub it off with a sponge or rag. Repeat this process until all the adhesive is gone. You can also remove the tape and use sandpaper to lightly remove any adhesive.
Awesome job and post! Could you please explain what for did you use Goo Gone Gel? In your post you only mention Pure Citrus Orange Air Freshener and Simple Green All-Purpose Cleaner. Thanks
Our team at Beyond Paint loves coming back to look at this post! The transformation is incredible!!! What a wonderful project Sarah! Thanks for loving our products!
Thanks so much! I can’t wait to tackle more projects with Beyond Paint!
How much of each paint did you buy? Did you buy gallons of each?
Thank you! It looks amazing!
I bought one kit that came with one color than a gallon of each.
Looks amazing!! How much did the whole project cost?
You said to paint over the wallpaper with Beyond Paint. Our wallpaper is peeling. What do you suggest?
I would just glue down the areas that are peeling up and then paint it. That should work fine! We did the same thing in areas where it was peeling up.
With what type of glue?
I am in the depths of renovating my 2006 Class A and am hoping that by painting the ceiling (to remove mold around the vent), and walls and replacing the flooring with a vinyl (looks like wood) and recovering the furniture with bright new colors would be enough. I have also removed all of the window treatments and plan to replace them with the same bright fabric as the furniture. You have not replaced your shades on any of the Windows. What about privacy? As a single woman often traveling alone, I don’t want to feel like I’m in a fish bowl, especially when I pull into a rest area for the night on my way to my destination. Any thoughts or suggestions?
An amazing job by the way. Thanks so much for the hints and shopping lists. Pulling my carpet out from under the edge of the slide out has been a challenge, as has the removal of the hundreds of staples throughout the entire floor space. But I’m getting there. I also intend to put down carpet padding under the vinyl flooring to assist in dampening road sounds. And the floor of the cockpit area also will have additional sound and heat abating foil backed covering. My V-10 engine is VERY loud.
Congrats on your remodel project! It sounds like you’re making great progress. Pulling all those staples is a lot of work. My husband was fast at it but I wouldn’t be! For the photos I left the blinds off to let in maximum light for photos. Afterwards I put up just the blinds and no valance. This way I get the light flowing in when I want it and complete privacy when I need it. I found the valance blocked a TON of light so I didn’t want to put those back up. You could just put up blinds if you wanted and you’d have complete privacy. I’d love to see your after photos when you finish! Share them on my Facebook page ???? Good luck with the rest of your remodel!
Can you just paint over mold and it will not come thru or grow?
No, you need to take care of the mold first or it will get worse. That is a health concern as well so be sure to bleach the wall and clean up the mold first. You may need to check that it doesn’t have underlying water damage issues.
Do you have a step by step post about how you did your flooring? We just bought a 2005 Sprinter & that’s the first thing on the list to do!
Actually I’m afraid of doing all the painting first (which is so much less intimidating!) because I fear the removal of the carpet and old vinyl might ding up my walls/cabinets.
Your project came our beautifully!
I don’t have a tutorial on that. Maybe I’ll have to talk my hubby into writing one! We removed the old flooring first and then painted and finished with the new flooring install. That’s the best order to tackle it in! I’ll see what I can do about a flooring tutorial ????
How is the paint holding up??
Hi Amy, it hasn’t been too long since we painted it, however we have been heavily using it and so far it has held up great. The table (which I sealed with Beyond Paint sealer) is doing great with multiple washings a day. The cabinets also still look amazing. I think the biggest thing is to try and give it that first 30 days of no use/gentle use to cure. We are loving it!
You did an incredible job! Which Shaw flooring was it that you used? I am on the
Menards website and there is a huge list of Shaw laminate flooring.
I actually had to go back through my photos and see if I could find one with the box. I think it was actually Urban Cafe vinyl plank flooring in espresso oak. I used the Shaw in my bathroom makeover 🙂 But we really loved the Shaw flooring in our bathroom too! Either one would be good.
I LOVE your makeover and my kit came in the mail today!! NOWHERE in any of the material I’ve read or googled can I find out how to clean my brush. Is it soap and water clean up or a onemtime use thing? Thanks!!
Oops! never mind, I saw soap & water clean up in the fine print!
Can’t wait to paint!
Sorry I missed your question Deb! Glad you were able to find the answer 🙂 When we are in between coats we just put the brush or roller in a plastic zip top baggie until we are ready to use again. I wash them once we are totally done (soap and water). Good luck with your project!!
HI Sarah! Your remodel is GORGEOUS!! I would love to know if the beyond paint is holding up now, a year later? Thanks!
Hi, I just bought a camper and it is identical to yours. Did you eventually put blinds up or some form of curtains? i would love to see what you did.
This is exactly what I have been looking to do! Thank you.
Did you have to sand down your cupboards before you painted them ?? you did you an amazing job !!! Love your colour choices
Hi there,
Your transformation is amazing! Out of curiosity, why did you choose to not do the flooring of the pop out section?
Thanks!
I was wondering that also. Doesn’t look quite finished.
Did you paint the cabinet hinges? We have a 2004 Georgie Boy motorhome, and the gold trim is everywhere! I don’t really want the expense of replacing every hinge and handle, but I am curious as to how they would hold up when painted. Your makeover is amazing! I just got home from tearing out the carpet, and there was your post. Inspirational!
What a great job! Well done! We are in the process of redoing out 28’ Mako fifth wheel. We had a leak problem in the upper bedroom, so my hubby redid 2 walls from studs out..what a job! We also put in new flooring in the upper area, bathroom, hall, steps and in the bunk room. Vinyl will be so much easier to clean. We are going to replace the slide with new carpet in spring…taking the easy way out on that job! The rest of the click flooring was in great shape & I loved the color, so it’s staying. I have painted all the cupboards & panels of fridge, but still have a few more walls to do. It’s looking wonderful, and as you said, it’s amazing what a huge difference a can of paint can make! RV manufacturers really should pay attention to what the public wants, and if they looked at Pinterest at all, they would certainly find out that people want bright spaces to spend their vacations in, not doom & gloom! Again, a job well done!
I’d love to get our carpet with slide outs changed. It’s not quiet shag, but nearly…plus it’s a dark olive green. HOW did you get yours all out and redone???
We removed the carpet and installed vinyl click together plank flooring. We love it!
Looks fabulous now!
I came across your blog a few weeks ago and started my own RV remodel today! I’ve removed all the padded valences and the ugly boarders. What did you use to patch the holes before painting the walls? I’ll be ordering the Beyond Paint supplies soon. I am excited to revamp my entire RV!
Sorry I missed your question Donna! I hope you got it figured out! I would recommend using paintable caulk.
We were wondering how your paint has held up on the wall paper now. We know a friend who painted their wall paper and
it started peeling within months of it being painted, especially in the kitchen close to the stove.
Over a year later and it’s still looking beautiful and holding up great!
Love your make over I do have one question I love that you took the window treatment off of the windows however what about privacy did you have a solution for that I noticed that you have no covering I would feel that I need something maybe not all the time so what would you suggest
Hello! Thank you 🙂 Yes, we put up simple white blinds that mounted over the windows and we left the valances off completely. They looked clean and minimalist while providing privacy.
You did an amazing job. Did you compare this paint to the chalk paint?
Thank you! I have not used chalk paint, but I did consider it. I liked that with the Beyond Paint I didn’t have to put wax or anything over the top.
We just bought a vintage 1978 Chinook International Constellation. According to what we are finding it is a really rare bird. Can’t seem to find anyone that knows much about it. Your RV Renovation was amazingly gorgeous. My concern is keeping it original. Does painting the stuff detract from it’s originality. The upholstery has got to go for sure…yuk. Also this particular model the cabinets are solid wood, just too dark for my taste. When you pulled the carpet up, did you put anything on the actual wood flooring before applying the vinyl clip strips? Thank you in advance!
Hi Sandra! How exciting!! I bet you are itching to get started. Yes, I can understand the desire to keep it original. For us with our camper we weren’t looking to keep anything original so that didn’t come into play. I loved making it light and bright! It seemed so much bigger and happier. I suppose painting it could detract from the originality but I’d do what you love best! When we pulled up the carpet we didn’t have to apply anything before we did the floating vinyl flooring. It was click together flooring so no clip strips or anything! Good luck with your project!!
This looks amazing!!! I’m curious what you did to the floor in the bunk area. Did you build the floor up to add more storage?
Hi Rachael! Actually, the floor was that way originally. Underneath is a storage area that can be accessed from inside or outside the camper.
How much beyo d paint did it take to complete your project?
I believe we used a gallon of white, a gallon of gray and a quart of Nantucket.
We had a fire – our RV battery exploded & while it was charging & our camper end-cap is charred. My camper smelt like burnt plastic. We’re in the process of replacing the mattress, etc., & have cleaned, cleaned, cleaned, but there is still a faint hint of a plastic-like smell. I’m thinking about painting some areas to see if that will help get rid of it. Does this product have a strong chemical/paintlike odor?
Oh how awful! I’m so sorry to hear about your RV. What a mess to deal with. I don’t recall it having a strong odor. I was in the camper painting for hours on end and didn’t get a headache or feel like it smelled strongly. You may want to try some kind of primer that is made to cover odors? I’m not sure if that would help more than just painting in itself would. Best of luck in your renovations!
Did you secure the futon and table to the floor somehow, or does is move around as you travel?
No, we did not find it necessary to bolt the furniture to the floor. It slid minimally while traveling, but not enough to require bolting to the floor. I imagine every piece of furniture/setup will be different though.
What paint do you use in the bathroom, like for in the shower?? We are concerned about the water hitting the walls, but then again it is the same wallpaper as in the rest of the trailer so we aren’t sure what to use.
I used this paint everywhere, however, I did not paint our bath tub or shower surround. I would use marine grade paint if you are going to paint the surround.
In your supply list you list Beyond paint multi purpose sealer. I didn’t see this mentioned in your how to paint the interior of an rv. Did you need to seal your cabinets?
I’m sorry for the confusion. The sealer is only if you do a tabletop like my table I painted. I sealed the top of it and it held up beautifully to repeated wiping. The cabinets don’t need to be sealed.
Hi! This is amazing, amazing! My husband and I just bought a trailer and plan on remodeling it and want to follow your work. Question – Did you have to replace the couch? We have a pull out couch installed in the camper already and I was wondering if you had to go thru the process of pulling it out. I think it might be a game changer when it comes to pulling up the carpet. I’d like to replace the couch we have in there with a futon, as you’ve done…
Hello and thank you! We actually did not have to remove the couch. The futon was in it when we bought it and we simply added a new cover to it and painted it. It is possible to pull the couch out of your camper however you should make sure there isn’t a storage compartment or anything that the couch is built around. Many people have removed them only to find a box underneath that sticks up and makes it impossible to put in a regular couch. If you don’t have that to worry about then go for it!
Love this! I plan to use a similar color scheme. How much paint of each color did you need to paint the cabinets and walls?
I believe we used a gallon of white, a gallon of gray and a quart of nantucket for the whole thing 🙂
Hi! Your RV looks amazing and thank you for the step by step! Does the Beyond paint wash well after it is cured to wipe of stains and spills? How has the paint been holding up for you? Also did you have to remove all the cabinets etc. to put in the flooring ? we are planning to redo our fist trailer we bought and it has that fake wood paneling everywhere walls included . I am happy to hear there is a product that will paint right over this with no prep:)
Thank you! Yes, once it has properly cured it washes up really well. Just soap and water on a rag. It has held up well. It’s imperative to let it cure properly though. For the flooring, we installed it around the cabinets. Just removed the carpet and laid it over the linoleum and plywood. Good luck with your makeover!
Hi Sarah! Thank you so much for the step-by-step. So thorough and I love your color scheme! My question is actually about your futon… do you have to slide it away from the wall in order to make it into the bed? Thinking about a futon for our space, but I want to be able secure the couch legs in place. Thanks!!
Hello and thank you! Yes, we slid it out to make into a bed but we did not secure the legs. We found it didn’t move much during transit and wouldn’t go beyond the lip of the slide out flooring. Hope that helps!
Great transformation! Can you tell me what the length of this trailer is?
Thanks!
Denise
Hello and thank you! This is on a 32′ travel trailer.
I am so impressed! Wow!!! bloggng about this now and have been very inspired by your post! Great work…
Thanks so much!
How much paint did you use?
Approximately a gallon of white, gallon of gray and a quart of nantucket for a 32′ travel trailer.
Did you paint over the mirror/glass of the cabinets? I love how they turned out!
I did! It worked great and you can’t even tell they used to be glass!
I would like to know if you had to rinse the walls after using simple green?
No, I did not rinse them. I sprayed it on and wiped clean with a paper towel. Then allow to dry completely.
Love Love Love this! I have my husband busy painting the cabinets with bright white and now I’m trying to pick a color for the bottom ones! Yes I am a copy cat LOL! We are doing the walls as well! I want a gray for the walls, can you suggest a light, medium or dark gray?
Hi Gina! Sorry I missed your comment. I was away from the computer doing another makeover 🙂 I would go with a light gray to keep it bright! Hope your makeover is going well!
Absolutely in love with this. We have an old Mallard and the refrigerator seals are a very ugly gray/brown. Have you stumbled across anything we could use to paint them? Also, do you think it is possible to paint the countertops with beyond paint and then seal them like you did the table? Last question, our cabinets have a trim going around in various spots. Is it safe to paint over them with the beyond paint?
I wonder if you could paint the seals with Beyond Paint? I would contact them and ask because it works so well on every surface I’ve used it on. Beyond Paint also has countertop paint kits, yes! I painted over the plastic trim with Beyond Paint as well. I hope that helps!!
Question…our RV has vinyl contact paper type covering on the walls which has shrunk and come up tearing in areas. Do I need to remove this off the walls before painting?
I don’t recommend removing any of it. If you have places peeling up I would glue them back down and sand any bumpy spots.
Would the camper be livable while curing? Dumb question, is curing using the sealant material mentioned in your items list your used?
There are no dumb questions 🙂 Curing is just allowing the paint to fully dry and harden. It may feel dry to the touch but it needs to fully dry and “cure” and become hard. You can use the camper while it is curing for the 30 days but you’ll need to be very careful not to damage the paint. The sealant was only used on the tabletop. Hope that helps!
Did you paint the counter tops in the bedroom with the beyond paint?
Yes, we did!
Hi. Thanks for all of your work here!! Love all the pictures!! Just curious….but did you ever need to find any stock parts for the dash area? I broke my doghouse/center glove box and can’t find any used RV parts places to respond to questions. Thanks again!!
Oh what a bummer! No, we never needed stock parts. From experience, though the majority of RV parts places and dealerships are notoriously difficult to deal with and so slow to respond. It’s very frustrating.
This was one of the more truly inspiring websites on RV remodelling so light and airy and lovely choice of colours!! Also, a great choice on the paint; lots of great reviews on it.
I have new RV but sadly it’s still as dated as ones from 20 years ago…or more. The only good thing is that they use wood-look vinyl flooring now, so thankfully that isn’t an issue, but the sad old fake wood look of the cabinets and hardware, the dull beige walls, and tacky looking brown upholstery and valences are all still there. I have no room to work on my trailer from home it’s in storage but accessible. Thank you again. Your comments and replies to others have answered all my questions and I’ll be ready next spring to do a little makeover myself..
Oh I am so glad to hear you found my post inspiring and helpful! Good luck with your makeover!!!
Looks great! Ours is almost the same layout. I’m curious, is your slide out raised or level with the floor? And what’s that you used to connect the slide out with the actual floor? Just a plastic ramp? We’re looking into redoing our floors as well. We have a raised slide out, and I’ve seen that plastic thing in a few renos but I still don’t know what it is, but I want to know if it will work and where to find it!
Hello and thanks! The slide is raised higher so we used a vinyl trim piece to connect the two. It was an easy fix. You could also do a bullnose trim piece.
Did you just paint over the glass on the cabinet doors? We have very similar doors and I want to figure out how to redo them.
Yes, I did! It turned out great.
Amazing remodel. I plan to tackle my remodel this coming Springoh. Our family has lived full time in a 1999 Sportsman 29′ bunkhouse for a few years now. 🙂 I’m tired of the oak cabinets and can’t wait to modernize it. I have read your entire post and all the comments. Did your husband do the flooring tutorial? If so, can you post the link? That’s the one thing that makes me nervous because of our slide out.
Oh how exciting! It is so fun to see the transformation come together. I haven’t put together the flooring tutorial yet but I will add this to my calendar for this month! I’ve been putting it off for too long! Be sure to subscribe to my newsletter here: https://landing.mailerlite.com/webforms/landing/k8s6j1 so you get notified when future RV tutorials get posted. Thanks!
Hi! I was just wondering how everything eventually held up using the beyond paint for the walls and cabinets without sanding/priming. For instance did you experience any peeling or chipping ? I’m remodeling my rv and and very interested in using the same paint for the walls and cabinets !
Thanks for your comment! The paint held up great! The key is really to make sure you allow it proper time to cure. As long as you do that, you will not have any issues with peeling. It’s held up great for us.
Wow. This was so helpful!! Thank you so much. Now that’s been a little while, is the paint on the walls still holding up? No signs of peeling?
You are very welcome! I am so glad you found it helpful 🙂 Yes, the paint held up great. No peeling! Just be sure to allow it time to cure properly. That is the key!!
I really love your re-do, simple and so clean. Your explanations are great as well as where to buy eveyrhing–I am using this–we just bought a Jayco Featheright 2009 and will be updating it!
Oh how exciting! Good luck on your renovations!!
How long did it take you for the renovation?
It took us about 2 weeks of working on it full time. 🙂
Hi ! Thanks !
I don’t understand went you say “we need to sure is time to cure”. Please explain this. Thanks and congrats for you amazing job.
Sure, you need to allow enough time for the paint to cure or harden. Once it is dry does not mean it has fully cured yet. Giving painted surfaces 30 days to fully cure is optimal. This allows the paint to harden so it will not be easily scratched off. I hope that helps clear things up for you!
We have the exact same camper an I’m dying to do this to ours. Love it!!
Thank you! You should. It makes such a huge difference! 🙂
This looks amazing and I am thinking about doing the same in my RV. I am wondering where you used the Sealant that you listed was used in the makeover?
Thanks for the great suggestions
The sealant was only used on the tabletop. Thanks!
I can’t wait 2 remodel mine. I have a 30.5 ft Sportsman KZ 5th wheel. And I plan 2 use this paint, & do a cream & pewter grey. I want Ash Grey vinyl plank floors and my accent color on furniture and such is going 2 b purple. LOVE ur idea. And helped me decide on mine.
Sounds amazing!! Good luck with your remodel. You will love the end result!
Thank you for sharing! I will definitely be using your suggestions and supplies. Love your paint colors as well. Your RV REDO came out beautiful.
Thank you so much! Best of luck with your makeover
Hi there! Love the flip – the colors are amazing! How many quarts did your camper need? My husband and I have a 42 foot pull behind.
Thank you! I used a gallon of white and a gallon of gray and 1 quart of Nantucket I believe.
I love your remodel! We are the final stages of completing ours! Almost done!
Thank you so much!
Looks great! Question: how is the paint with living with is for a while? Does it clean? chip? etc… What does the finish look like? Flat? I am concerned about it’s staying power. I was going to use Annie Sloan’s Chalk paint and wax finish but it’s so expensive and hard to come by.
The finish is great and it is wipable. Definitely more durable than a wax finish would be for everyday use and cleaning often. We really like it.
Glad someone asked about this – I was wondering the same! So 2 years in and it’s holding up – That’s good to hear! How much of the beyond paint, in total, did you end up using? From your supply list it looks like 1 quart each of Gray, Nantucket, and White – but I wasn’t sure if that really did it all or if you used more of the white since it seems like you had to cover a lot of wood? And you mentioned sealing the table – Did you seal it first, and THEN paint it? or Vice-Versa? Thank you!
I used a gallon of white and a gallon of gray and 1 quart of Nantucket in total. I sealed the table after painting it. I only sealed the tabletop itself since it would be wiped down daily.
I would love to do something like this with our 2007 Itasca Sunova! It is so dark and drab inside! But, I doubt my husband would favor the idea because of the cost. Is it very costly to do the painting? I might try peel and stick wallpaper over the existing wall paper,. Do you think that would work? Reason being is that you can remove it if you don’t like it. i did buy some peel and stick vinyl back splash tiles. My husband was confused as to why I would replace a perfectly good back splash. This is what I’m going to have to deal with. He only cares if something serves it’s purpose, no matter how ugly it is. He can’t see fixing something that isn’t broken. Me? I need cheerful surroundings! If something is dark and drab it depresses me. I will show him the renovations you did. Maybe that will convince him. Wish me luck!
Oh good luck! Convert him haha. I think paint is the cheapest way to makeover a space. I did the peel and stick subway tiles in our second camper for the backsplash and loved it! Made a huge difference. The hardest part is how much work it is, not so much the cost. Being that it’s such a small space the materials are pretty inexpensive! Sending positive makeover vibes your way haha!
I see you purchased the sealer, where did you use it?
I used it to seal the tabletop and that was it!
What an amazing transformation! I read through all the comments but before I start the project, I just wanted to check in, now I think 3 yrs. Post paint job, how it’s holding up. Nothing is perfect but most curious how all these plastic track and molding pieces have held up – like the door frames and the raised plastic flat trip often used in the ceiling to connect panels. I’ve been reading tons of posts on prep work – manual sanding, liquid sander for those fake sticker sides of cabinets, etc. And this is the first mention I’ve seen ANYWHERE of Beyond Paint – like almost scary to try it because you are the first I’ve seen use it in this way. Much more cost but seems worth it given the prep time and no need for the additional priming step. Just wanted to double check as I get my final plan together! Second – is the final finish a matte, satin, semi-gliss? I typically go with flat to hide more imperfections so just curious. Lastly, did you happen to paint the black metal interior portion of your windows – Im guessing not since they’d likely scratch to pieces if you opened the windows much.
Hello! Thank you so much 🙂 Yes, it’s been a few years. We bought a cabin less than a year ago and sold the camper so I can’t speak to how it is now but when we sold it the paint was still holding up beautifully. The biggest part, which I can’t stress enough, is allowing it to fully cure! Then you get a nice hard finish that won’t scratch. We also did a second RV makeover here: https://musthavemom.com/modern-mountain-rv-makeover-before-after-pictures/ which we used a different paint method to test it out for everyone. This one we used cabinet, trim and door paint and we used a paint sprayer to apply it. We also did no sanding on anything with this method. This worked GREAT as well. Both worked well so it just depends on your preference and if you have a paint sprayer, etc.
The final finish on Beyond Paint kind of depends on what you apply it to. It has a finish similar to a semi-gloss. We did not paint the black window frames. I would think with all the moving pieces that would be difficult to do at best.
I hope that helps 🙂 good luck with your renovation and feel free to email us your before and after pics if you’d like us to feature your makeover! We love to share them.
I love this and it looks alot like mine does. I want bright cheery colors and this is beautiful. Did you paint the inside of all the cabinets?
Thank you! No, we opted to not paint the inside of the cabinets. Lots of extra work for something you don’t really ever see anyway was our reasoning 🙂
My husband and I just purchased almost this exact camper! We will be starting our remodel this week. I can’t wait to see the finished result. Hopefully it looks just as good as yours!
That is awesome! Congrats! Share pics when you are done!!
I love the transformation! It’s amazing!
Is your futon secured to the floor in any way?
We currently have a sofa in our RV. We want to pull it out and put in a futon but I feel like it should be secured.
We didn’t secure it to the floor but you certainly could! Ours didn’t move much during travel.
Curious as to how it has held up over the years. Looks amazing
Thank you! They held up great. We used them and loved them and then sold them to others who were thrilled with them.
Hello. It is amazing! How much paint did you use to do the cabinets
Thanks!
I don’t recall but I may have answered in the comments somewhere previously if you scroll through. Sorry!
Nice RV roof repair article. Thanks for sharing an RV remodeling journey and instruction guide with us. Wow, the camper looks so good after its renovation. After reading your blog, I want to do a renovation myself. Maybe I’ll try it, we’ll see. Still thanks for sharing this great post.
I love the transformation! It’s amazing! Thanks for sharing
This information is highly informative for me, providing valuable insights and practical guidance. It enhances my understanding and aids in making well-informed decisions. The clarity and detail ensure that I am well-equipped with the knowledge needed to proceed confidently with my plans or projects.
https://unisolarpakistan.weebly.com/
Outstanding article brimming with valuable insights! Keep up the excellent work and continue sharing such informative updates. Your dedication to providing useful information is greatly appreciated. Thank you for consistently delivering top-notch content to your readers!
I really like this article. I came to read this article because my friend recommended it.but i love this content more than i expect.
I was particularly impressed with the originality and unique ideas presented throughout. It’s not often that I come across such refreshing and thought-provoking perspectives. Keep up the fantastic work
I also appreciate the emphasis on affordability and accessibility in your approach. It’s inspiring to see how you managed to achieve such a high-end look without breaking the bank.
Excellent article filled with valuable information! Keep up the fantastic work and continue sharing insightful updates with everyone. Thank you!
Thank you for creating such a welcoming and enlightening space. Your dedication and generosity in sharing knowledge set this community apart. The warmth and inclusivity here are undeniable, and it’s inspiring to see so many come together to help one another grow and thrive. – 24kbet bonus
Such a very useful article. Very interesting to read this article.I would like to thank you for the efforts you had made for writing this awesome article
punk rock outfits male
24betting is a comprehensive online platform offering a wide range of sports betting and online gaming options for enthusiasts.
lotus365 offers a comprehensive suite of tools designed to enhance productivity and streamline project management for businesses of all sizes.
24kbet app download to enjoy a seamless and engaging betting experience with all your favorite games and features right at your fingertips.
Pitbull puppies for sale near me
Pit bull puppies for sale near me
Blue Great Dane Puppies For Sale
Harlequin Great Dane Puppies For Sale
Buy Snack Vending Machines
Buy used Outboard motors
خرید از نمایندگی رسمی نینجا به شما اطمینان میدهد که محصولی اصل و با کیفیت را دریافت میکنید. با ارائه خدمات پس از فروش و گارانتی معتبر، نمایندگی رسمی نینجا تجربهای مطمئن و رضایتبخش از خرید را برای شما فراهم میکند
Your work is truly outstanding, consistently delivering content that not only informs but deeply resonates with your audience. The dedication to excellence in every piece is unmistakable, leaving a lasting impact on everyone who engages with it. Please keep up this high standard—your creativity and commitment are greatly appreciated. Keep up the fantastic work!
Your work is exceptional, consistently producing content that not only educates but profoundly connects with the audience. The commitment to excellence in every piece is evident, leaving a lasting impression on all who engage with it. Please continue maintaining this high standard—your creativity and dedication are truly valued. Keep up the fantastic work!
Online lottery games are very popular online games, this game involves numbers to be drawn, if you win you will get a prize according to the rules. If you are looking for a site that provides this popular game, you can try it at abutogel . Trusted online lottery dealer site, famous for its super fast service and very high level of security.
This article is incredibly insightful and a pleasure to read. I genuinely appreciate the effort and thoughtfulness that went into crafting such an excellent piece. Thank you for sharing this valuable information.
Your work is truly outstanding, consistently delivering content that not only informs but deeply resonates with the audience. Keep up the exceptional work!
Your work is exceptional, consistently crafting content that not only informs but deeply resonates with the audience. Every piece reflects your unwavering commitment to excellence, leaving a lasting impact on all who engage with it. Your creativity and dedication are invaluable—please continue maintaining this remarkable standard. Truly outstanding!
Your work is nothing short of exceptional, consistently producing content that not only informs but deeply resonates with the audience. Each piece showcases your unwavering dedication to excellence, leaving a lasting impact on everyone who reads it. Your creativity, passion, and meticulous attention to detail are truly invaluable. Please continue maintaining this remarkable standard—you are making a profound difference!
slot gacor one of the games known as public entertainment. of course slot games have also been popular since the past. for more information, please click the link below…https://slotergacor2023.wordpress.com/.https://slotergacor2023.wordpress.com/
Your work is truly article , consistently delivering content that not only informs but deeply engages the audience. Every piece reflects your unwavering commitment to quality, leaving a lasting impression on readers. Your creativity, passion, and keen attention to detail are invaluable. Continue setting this high standard—you’re making a profound impact!
Your work is outstanding, consistently delivering content that both informs and deeply engages the audience. Each piece reflects your unwavering commitment to excellence, leaving a lasting impression on readers. Your creativity, passion, and attention to detail are exceptional. Continue raising the bar—you’re truly making a profound impact!
Your ability to consistently produce creative and original content is remarkable. I’m always excited for your next post!
Your ability to consistently produce creative and original content is remarkable.
I’m always excited for your next post!
Your work is truly exceptional, consistently crafting content that not only informs but deeply resonates with the audience. Every piece showcases your dedication to excellence, leaving a lasting impact on readers. Your creativity, passion, and meticulous attention to detail are remarkable. Keep pushing the boundaries—you’re making a significant and inspiring difference!
Your work is nothing short of outstanding, consistently delivering content that not only educates but profoundly connects with the audience. Each piece reflects your unwavering commitment to excellence, leaving a lasting impression. Your creativity, passion, and keen attention to detail are truly exceptional. Keep raising the bar—you’re making an inspiring and powerful impact!
football is very much liked by many people. even I myself also really like the sport.https://legitsparrow92.wixsite.com/sport72/blog
Your work is truly article , consistently delivering content that not only informs but deeply resonates with the audience. Every piece showcases your dedication to excellence, leaving a lasting impact. Your creativity, passion, and meticulous attention to detail are remarkable. Continue to raise the standard—you’re making an inspiring and significant difference!
Keep up the great work—can’t wait to see what’s coming!
I always look forward to your next Amazing Post and veru egger to read it out!
I get excited every time you post something new because your creativity knows no bounds. Keep up the excellent work!
You’ve nailed it again with another creative and original post. I’m always impressed by what you bring to the table!
rasakan jackpotnya di bambuhoki88 auto cuan
Bambuhoki88
You’ve nailed it again with another creative and original post.
Anda dapat memilih permainan yang memberi Anda peluang menang terbaik Di BAMBUHOKI88
I always look forward to your next Blog and very very egger to read your next fantastic blog!
Ada banyak hal yang disukai dari slot Sweet Bonanza. Meskipun temanya mungkin tidak cocok untuk semua orang, fitur utamanya membuat slot manis ini layak dicoba. Langsung aja click link di bawah ini yabambuhoki88
Anda memenangkan hadiah besar
slot bank dki Namun, penting untuk diingat bahwa perjudian adalah permainan
unikbet slot bank bjb : During the two-year period, the gamecocks of each of the clans have been trained to be ready for the competition.
unikbet
slotbankbtn.net have Free Games scatters appear on reels one to five and four of these unlock the free spins round, with a gamble feature offering the potential for additional spins
Ada banyak hal yang disukai dari slot Sweet Bonanza. Meskipun temanya mungkin tidak cocok untuk semua orang, fitur utamanya membuat slot manis ini layak dicoba. Langsung aja click link di bawah ini ya bambuhoki88
Anda dapat menantikan putaran gratis tanpa batas di mana bom pengganda pelangi khusus dapat mengirimkan pembayaran yang meledak hingga 100x. bambuhoki88
Namun Slot UNIKBET tidak selalu demikian, jika Dwarf & Dragon karya Pragmatic Play menjadi panduan. Dalam slot online ini, kedua entitas tersebut tampaknya akur satu sama lain, karena mereka berhadapan dengan slot yang memberikan simbol terpisah, wild dengan pengali, dan putaran putaran gratis, yang dapat dibeli.
unikbet Game slot Sweet Bonanza memiliki jackpot maxwin sebesar x21100 kali lipat dari bet yang Anda gunakan dan RTP slot sebesar 96,51%.. Jumlah maxwin sebesar ini bukan hanya maxwin terbesar di game slot gacor keluaran pragmatic, tetapi terbesar dari semua game yang ada di Pragmatic Play.
Scatter Pays dari Pragmatic Play yang hadir dengan kemenangan maksimal 21.175 x total taruhan Anda. Sorotan dari slot di situs gacor BAMBUHOKI88 Reels yang mudah dimainkan ini tidak diragukan lagi adalah fitur Putaran Gratis.
cek result data togel sdy terlengkap tahun 2024
Holiday t-shirts are a cheerful way to celebrate various festive occasions throughout the year, combining comfort with playful designs. Holiday T-Shirts These shirts often feature catchy phrases, vibrant graphics, and iconic symbols that reflect the spirit of each holiday—be it whimsical pumpkins for Halloween, jolly Santas for Christmas, or gratitude-themed slogans for Thanksgiving. With options for all ages, these t-shirts make perfect attire for family gatherings, parties, or casual get-togethers, allowing wearers to showcase their holiday cheer. Whether they evoke laughter or sentiment, holiday t-shirts help create a joyful atmosphere, making them a staple in seasonal wardrobes and ensuring everyone can join in the celebration.
Tampilan layar secara keseluruhan sangat mengesankan, dan soundtrack-nya menciptakan suasana yang sempurna.
idebet
I’ve never thought of anything like what you’re experiencing. This site is very interesting slotonlines138
Ada tiga fitur tambahan yang ditawarkan dalam slot ini, dan semuanya jika digabungkan dapat menghasilkan kemenangan yang menggiurkan. Sebagian besar fitur tersebut sudah tidak asing lagi bagi Anda, menggabungkan kemenangan beruntun, putaran gratis, dan pengganda untuk menghasilkan efek yang baik slot bank jago IDEBET.
vozol vista 20000 puff çeşitleri
e sigara juul sigara çeşitleeri
iqos terea heets çeşitleri
I get excited every time you post something new.
I’ve never thought of anything like what you’re experiencing. This site is very interesting slotonlines138
Your article opened my mind about money. This site is profitable iotxslot138
A long time ago in Padang, West Sumatra UNIKBET precisely in Air Manis Beach Village, there was a widow named Mande Rubayah.
Your blog posts are a breath of fresh air—so creative and original.
Dokter Hack Vip
I always look forward to your blog posts because they’re so creative and original. Keep up the great work—can’t wait to see what’s coming!
Portal cheat merupakan link alternatif terkini yang sudah mencuri atensi para gamer di Asia. Dengan bermacam fitur mutahir serta kemudahan akses, portal ini sudah diakui selaku cheat no 1 se- Asia.
I always look forward to your blog posts because they’re so creative and original.
Biang cheat menjadi salah satu rekomendasi aplikasi cheat slot terpercaya saat ini sebab mudah sekali mendapatkan hasil maximum win saat bermain slot pragmatic play.
Cupidbaba offers a variety of adult toys, including vibrators, dildos, penis sleeves, and BDSM accessories. These toys cater to diverse preferences, ensuring enhanced pleasure and intimacy. Discreet packaging and a wide selection make it a trusted platform in India.
Experience heightened pleasure with our butt plug collection at Adultscare. Perfect for beginners and enthusiasts, these plugs offer smooth, body-safe designs for comfortable and enjoyable exploration. Ideal for solo play or couples, they add an extra dimension of excitement to your intimate moments.
https://lumbunguntung.com
Your article opened my mind about money. This site is profitable freeslot138joker
Thus Mande Rubayah loved her son very much UNIKBET On the other hand, Malin also loved his mother very much. When he was an adult, Malin said goodbye to his mother to go abroad. At that time there was indeed a large ship that docked at Air Manis Beach.
Sarang Profit mentioned as a provider of slot game cracking applications and slot cheats, slot hacks, slot engine cheats are combined here to achieve absolute victory for players who often lose.
I love how every one of your posts has its own creative flair! I’m excited to see where your originality takes you next.
Bunda profit has appeared as an easy game cheat to win today’s jackpot when playing online games.
my website https://rajapecahan.com
AniMixPlay Official to watch all anime online in HD quality with DUB and SUB, No Ads 100% FREE.
百家乐游戏|
百家乐平台|
百家乐在线|
百家乐路单下载|
百家乐技巧|
金沙赌场|
金沙赌场网站|
my website https://sembilanpola.com
Excellent post! You covered a lot of valuable information here. Thanks for taking the time to put this together and sharing it with us!
my blog : https://spaceexbot.com
Dina is very good at telling stories UNIKBET So her friends have fun listening
Sigh, my sister Rila is very fussy. Ask for this snack, that snack. “Ask to take you here, take you there, cry for a while,” said Dina
https://pusathackk.com
On such a cold night, I feel so incomplete.unikbet I want to hold your hand so we can sit together and eat. Give me a chance to take you to dinner tonight,unikbet let you and I sit together and mark a beautiful night.”
unikbet
Slot Bank Bsi
I’m excited to see where your originality takes you next.
Admin Hack 23 It appears as an application that online game players dream of because it can help them play games and make big profits more easily.
Thanks for sharing the information your blog is amazing and informative, I want to express my heartfelt gratitude for your exceptional blog. Your dedication to providing insightful content is truly commendable. Each post is a source of inspiration and learning, enriching my understanding and sparking
best nutraceutical manufacturers in india
I truly enjoy your unique and creative posts. Keep up the fantastic work—I’m already looking forward to your next one!
I love your articles and I’ve been looking for your articles all day slot slotonlines138
Get ready to explore the latest and greatest games, all accessible at your fingertips. Join us in 2024 for the best gaming experience and let the fun begin!
I love your articles and I’ve been looking for your articles all day slot iotxslot138
I love your articles and I’ve been looking for your articles all day slot freeslot138joker
Awesome article! You explained everything so well, and I found it really useful. I’m excited to try out some of your suggestions! don’t forget for visit my website https://sarangcheat.com
Boost Your Trading Success with Instant Funding Prop Firm https://instantfundingnow.com/
Harika makale! Her şeyi çok iyi açıklamışsınız
Makalelerinizi seviyorum ve tüm gün makalelerinizi arıyordum
Are you in the market a stylish and durable leather jacket that exudes timeless masculinity? If so, you may be wondfor ering why you should buy a mens leather jacket from NY American Jacket.
สล็อตเว็บตรง ไม่ผ่านเอเย่นต์ API แท้ จากสิงคโปร์ ถูกกฎหมาย สล็อตวอเลท ไม่มีขั้นต่ำ 100%
สล็อตเว็บตรงไม่ผ่านเอเย่นต์ สล็อตทรูวอเลท คุณภาพสูง ได้รับลิขสิทธิ์อย่างถูกต้อง ไม่มีขั่นต่ำ
The luck that players always get on the site continues to flow from their luck https://turboperkalian.com
Bocah cheat 31 known as the most complete Pragmatic Play game cheat which offers various advanced features to increase the chances of bosque in the game.
สล็อตเว็บตรง สล็อตPG เว็บตรง ค่ายใหญ่ ไม่ผ่านเอเย่นต์ แตกง่าย PGSlot แท้ 100%
Keep up the fantastic work—I’m already looking forward to your next one!
Absolutely loved this! Keep up the amazing work—I can’t wait to see what you come up with next!
Your work is absolutely exceptional! Each piece you produce not only educates but profoundly connects with readers. Your creativity, passion, and meticulous attention to detail are evident in every word, showcasing a true dedication to excellence. The impact of your writing lingers long after it’s read, and your relentless pursuit of innovation is deeply inspiring. Keep up the phenomenal work—you’re truly making a remarkable difference!
I can’t wait to see what you come up with next!
플러스카지노에서 진행중인 이벤트 로는 신규가입후 첫충전 10만원 +3만원 추가지급을 하고 있으며 카지노 매일 첫입금보너스 10%와 익일루징 10%를 지급해 드립니다.
Your work is nothing short of exceptional! Each piece not only informs but leaves a profound impact on readers, resonating on a deeper level. Your creativity, passion, and meticulous attention to detail are evident in every word, showcasing your unwavering dedication to excellence. Your drive to innovate and constantly raise the bar is truly inspiring. Keep up the incredible work—you’re making an extraordinary difference!
never hesitate if there is a sense of curiosity for you as a player. you will definitely find a big jackpot https://akunhack66.com/
Your work is truly exceptional! Each piece not only informs but deeply connects with readers, leaving a lasting impression. Your creativity, passion, and flawless attention to detail are evident in every word, showcasing your unwavering dedication to excellence. Your drive for innovation and willingness to push boundaries is incredibly inspiring. Keep up the amazing work—you’re making a significant and meaningful impact!
Absolutely I can’t wait to see what you come up with next!
Modalcheat88 é um site de jogos online fiável que oferece taxas de vitória acima da média através de vários métodos de batota comprovadamente eficazes.
check it out my link guys…
SLOT GACOR
แนะนำ 8 อันดับ เกมสล็อตเว็บตรง จากค่ายใหญ่ Pg Slot แตกง่าย เล่นง่าย รางวัลใหญ่ อันดับ 1
Your work is nothing short of outstanding! Each piece not only informs but resonates deeply with readers, leaving a lasting impact. Your creativity, passion, and meticulous attention to detail shine through in every word, reflecting your unwavering pursuit of excellence. Your drive for innovation and boldness in pushing boundaries is truly inspiring. Keep up the remarkable work—you’re making a profound and meaningful difference
แนะนำ 6 เกมจากสล็อตเว็บตรง ของค่ายเกม PG Slot เว็บสล็อตแตกง่าย อันดับ 1
แนะนำ 8 เกมจากสล็อตเว็บตรงของค่าย PG Slot เว็บสล็อตแตกง่ายอันดับ 1
Hearing his son’s request WIN SLOT the father was happy to grant the request. The child gets a black ball as a birthday present.
harika bir sayfa tebrik ederim
güzel bire sayfa tebrikler
vozol puff çeşitleri vozol adına herşey
juul sigara iqos terea iqos iluma one
Turbo perkalian which is currently viral is the coolest and easiest game cheat link for bosque to get the jackpot this year.
Untungnya kura-kura selamat karena keberadaan tempurung yang paling ia benci.
Your work is truly exceptional! Each piece not only informs but captivates readers, leaving a profound impact. Your creativity, passion, and meticulous attention to detail shine through, showcasing your unwavering dedication to excellence. Your bold, innovative approach is inspiring, pushing boundaries and setting new standards. Keep up the amazing work—you’re making a lasting and meaningful difference!
Looking forward to your next article! Your innovative approach and creative flair are inspiring.
Your work is truly outstanding! Every piece you create not only informs but deeply engages the reader, leaving a lasting impression. Your creativity, passion, and keen attention to detail are remarkable, reflecting your commitment to excellence. The boldness and innovation in your approach are truly inspiring, pushing boundaries and setting new benchmarks. Keep up the incredible work—you’re making a profound and lasting impact!
Thank you for your fantastic blog post! We truly appreciate the insights you’ve shared. It’s packed with valuable approaches and ideas that are sure to inspire and guide readers. We can’t wait to explore all the possibilities you’ve presented
Fantastic job! Your content always impresses me. Liked your content and your blog was very creative. I eagerly await your next piece!
Looking forward to your next article!
Your work is exceptional! Each piece not only informs but captivates readers, leaving a lasting impact. Your creativity, passion, and meticulous attention to detail are extraordinary, demonstrating your unwavering commitment to excellence. Your bold, innovative approach is inspiring, constantly pushing boundaries and setting new standards. Keep up the remarkable work—you’re making a meaningful and enduring difference!
Koicuan is a link to the gacor slot site that is highly recommended today which offers an unmatched playing experience for online slot fans.
Excited to see what you share next! Your content is consistently creative and forward-thinking.
Your innovative approach and creative flair are inspiring.
Your content is consistently creative and forward-thinking.
Raja Kontrol Currently emerging as one of the slot cheat sites that is played very often and attracts the attention of players. With various advanced features and strategies, Raja Kunci makes it easier for players to achieve the jackpot wins they dream of.
Your work is exceptional! Each piece not only informs but creates a lasting connection with readers. Your creativity, passion, and keen attention to detail reveal a deep commitment to excellence, while your bold, innovative approach sets new standards and inspires those around you. Keep up the fantastic work—your impact is truly remarkable!
PG SLOTPARTY เป็นแหล่งรวมเกมสล็อต PG ที่นำเสนอความสนุกและความท้าทายที่ไม่มีที่สิ้นสุด
Easy RV Remodeling Instructions + RV Makeover REVEAL is the best for many of the users who need to learn more and more ideas that are providing us what we need here. If you browse around this site you can see how it is important for us to get the results.
Mobile ceme gambling agent UNIKBET official site for keb gana bank management techniques. Provides exclusive access to various exciting games from the Capsa Susun bookie. Enhance your free time by playing games while still being productive in studying management techniques.
Welcome to Unikbet UNIKBET your Online Slots & Casino of choice
Your work is truly outstanding! Every piece you create does more than inform—it resonates and builds a lasting bond with readers. Your creativity, passion, and meticulous attention to detail showcase a profound dedication to excellence, while your bold, innovative approach sets new benchmarks and inspires everyone around you. Keep up the phenomenal work—your impact is extraordinary and genuinely inspiring!
Your work is article ! Every piece does more than just inform—it truly connects and resonates, leaving a lasting impact on readers. Your creativity, passion, and meticulous attention to detail showcase an incredible dedication to excellence. Your bold, innovative approach continuously raises the standard and inspires those around you. Keep up the amazing work—your influence is both inspiring and extraordinary!
I’m excited for your next update! Your posts are always packed with creativity.
Your work is article ! Every piece you create does more than inform—it engages and leaves a lasting impact on readers. Your creativity and passion shine through, with meticulous attention to detail reflecting an unwavering commitment to excellence. Your bold, innovative approach consistently raises the bar, inspiring and motivating those around you. Keep up the incredible work—your influence is truly inspiring and remarkable!
Looking forward to your next update! Your posts are always so full of creativity and originality.
Your posts are always so full of creativity and originality.
Looking forward to your next update!
Can’t wait to dive into your next post!
Waiting eagerly for your next article!
Your work is nothing short of article ! Every piece you create goes beyond simply informing; it captivates and resonates deeply with readers. Your creativity, passion, and meticulous attention to detail demonstrate an unwavering commitment to excellence. The boldness and innovation in your approach continuously raise the bar, inspiring and motivating everyone around you. Keep up the phenomenal work—your impact is profoundly inspiring and truly extraordinary!
Your work is truly article ! Each piece you create does more than inform—it captivates and deeply resonates with readers. Your creativity, passion, and keen attention to detail reflect a remarkable commitment to excellence. The boldness and innovation in your approach continuously elevate standards, inspiring and motivating everyone around you. Keep up the phenomenal work—your impact is genuinely inspiring and extraordinary!
Your work is article , captivating readers and resonating deeply. With creativity, passion, and attention to detail, you set a high standard, inspiring everyone around you. Keep up the remarkable, impactful work!
Your work is article , engaging readers and leaving a lasting impact. With creativity, passion, and meticulous attention to detail, you set a high standard that inspires those around you. Keep up the incredible, transformative work!
Your creativity and innovative insights are truly remarkable.
Anxiously waiting for your next blog!
I’m excited for your next update!
Excited for what’s next! Your work is always so creative and innovative, I look forward to it.
Your work is always so fresh and innovative.
Outstanding, impactful article that captivates, inspires, and sets a high standard!
Your creativity is inspiring! I’m excited to see what you create next—it’s always a pleasure.
Thrilled to see what’s coming! Your unique, innovative style keeps me hooked.
Your unique, innovative style keeps me hooked.
I’m excited to see what you create next—it’s always a pleasure.
Remarkable article that captivates, inspires, and sets a new standard for excellence!
You always bring such originality and creativity to your work.
I look forward to every piece you share! Your creativity and innovation make each one a joy to read.
Your creativity is inspiring!
This article covers exactly what I needed to read today. I recently published my own insights on this at [zeus toto]. Thanks for putting this out there!
I look forward to every piece you share!
I’m eager for what’s next! Your work is so innovative, and I always enjoy it.
I want to encourage you to definitely continue your great writing, have a nice afternoonneed to examine with you here. Papa4d Which is not something I normally do! I get pleasure from reading
I’m eager for what’s next! Your creativity always brings something new and exciting.
Kenalkan nama robot cheat. alat ini terkenal prabowo kontol
PGSLOT99 เปิดประตูสู่จักรวาลแห่งความบันเทิง สล็อตเว็บตรง ทางเข้าใหม่ล่าสุด มั่นคง 100%
Your creativity and innovation make each one a joy to read. Thrilled to see what’s coming!
Looking forward to your next creation!
Can’t wait for your next update! Your creativity is inspiring!
Your creativity and innovation make every piece a delight to read. Excited to see what’s next!
Valuable information! I’m lucky to have stumbled upon your website by chance, and I’m surprised I didn’t come across it sooner. I’ve bookmarked it!
I’m really looking forward to what you come up with next! Your creativity always amazes me.
Lovely! This was an excellent post. Thank you for sharing such valuable information. Lovely! This was an excellent post. Thank you for sharing such valuable information.
Beautiful! This was an amazing post. Thank you for the information provided.
Looking forward to your next creation! Eagerly awaiting your next piece!
Can’t wait for your next update! Your creativity is inspiring!
I love your articles and I’ve been looking for your articles all day slot ^^ bibir69 slot.
Your article opened my mind about money. This site is profitable ^^ bibir69 slot gacor.
I’ve never thought of anything like what you’re experiencing. This site is very interesting ^^ bibir69 link alternatif.
Your article contains information about how to make money while playing to relieve boredom, as offered by bibir69 rtp live.
I really enjoy reading your articles and I also offer this website so we can have fun together, only at bibir69 slot online.
I’m sure you are doubtful about the many websites that cheat clients and you feel reluctant to play again, but I offer a trusted site for you, namely bocoran rtp bibir69.
Thanks for these tips! I just published a post on this as well [zeustoto link]. It’s always great to see fresh takes.
I’m thrilled to think about what’s coming next! Your creative spark is truly remarkable.
Your creative spark is truly remarkable.
Your creative abilities never fail to leave me in awe.! Eagerly awaiting your next piece!
Anticipating your next masterpiece!
Your ability to create such amazing work always astounds me
I’m always inspired by your work! Excited to see the next creative piece you’ll bring to life.
Neurosurgery conditions in India are a growing concern, with increasing cases of brain and spine disorders. While the country boasts advanced medical facilities and skilled neurosurgeons, access to care remains a challenge in rural areas. Continued investment in healthcare infrastructure and training is essential to meet the rising demand for specialized neurosurgical treatment.
Your ability to create such amazing work always astounds me. Your content is full of creativity and innovation.
Looking ahead to your next creation! You never cease to amaze me with your creativity.
You never cease to amaze me with your creativity.
Thank you for this insightful article! Your well-researched points and engaging writing made it a pleasure to read.
Great article.
Harlequin Great Dane Puppies For Sale near me
Love to read articles like this. keep up the good work
Boxer Puppies for sale
Absolutely stunning makeover! I love how you turned a dated RV into such a chic and cozy living space. Your easy-to-understand remodeling instructions are fantastic—especially for someone like me who’s not very handy but still wants to make their RV feel like home. The layout looks so much more open and airy now. I also appreciate the tips on sourcing materials and how to keep costs manageable. I’m bookmarking this for when I start my own remodel—this post has given me so many great ideas!
Slot games, the most popular game of the year, generate real income. สล็อตเว็บตรง
We open the opportunity to come and play every day. เว็บตรงสล็อต
For anyone who is satisfied with easy-to-make-money slot games and wants to create a side job. สล็อตวอเลท
Online slot websites that all members can play directly สล็อตวอเลทเว็บตรง
are not dangerous, generate real income, no history of cheating. สล็อตเว็บตรงไม่มีขั้นต่ำ
here are also many quality games that you will never get bored of. slot
We are ready to provide a new experience to all Thais. สล็อตออนไลน์
Those who are satisfied want to be able to generate extra income easily สล็อต
do not have to work hard wm787
do not have to use a lot of capital. wm787online
I can’t wait to see what you’ll create next!
Looking forward to your next work! Your imagination never fails to amaze me.
Your imagination never fails to amaze me.
Akunhack66 now there is the newest and coolest game cheat that can help Bossque in playing pragmatic and PGsoft slot games
Sydney303 ialah situs terpercaya dan menawarkan bermacam tipe game slot gacor dengan kesempatan menang besar.
A truly remarkable masterpiece that article the audience, ignites creativity, and establishes a new standard of excellence!
Excited to see what’s next! Your remarkable creativity and fresh ideas are always a delight.
There is no doubt that the direct website of the big companies is the answer. สล็อตเว็บตรง
We have collected the most popular online slot games from big companies today เว็บตรงสล็อต
whether it is a game with modern graphics สล็อตวอเลท
a variety of bonus features สล็อตวอเลทเว็บตรง
easy-to-win combos, and special bonuses or jackpots. สล็อตเว็บตรงไม่มีขั้นต่ำ
Slot games are very popular. You will find everything here. slot
Let me tell you that there is everything in this world. สล็อตออนไลน์
The important thing is that our website is safe สล็อต
secure and has a system that all gamblers accept. 7green
Everyone praises us as number 1. เจ็ดกรีน
Eagerly waiting to see what’s next!
Can’t wait for your next project!
Your originality and creativity never cease to amaze me.
Excited to see what’s next!
An extraordinary article that mesmerizes the audience, fuels boundless creativity, and redefines the pinnacle of excellence!
Your remarkable creativity and fresh ideas are always a delight.
Looking ahead to what’s next!
A article that captivates the audience, inspires limitless creativity, and sets a new benchmark for unparalleled excellence!
Can’t wait for your next work! Nice Article
Your ability to bring unique ideas to life is truly impressive.
Can’t wait for your next work! Your ability to bring unique ideas to life is truly impressive.
Excited for what’s to come! Your creative genius and fresh ideas always leave a mark.
Can’t wait for what’s next! Your creative energy and unique approach are always incredible.
Your creative energy and unique approach are always incredible.
Can’t wait for what’s next!
Brilliant article! [ZEUSBOLA] expands on these ideas.
An article masterpiece that captivates the audience, ignites boundless creativity, and sets an unparalleled benchmark for excellence!
Can’t wait to see what’s ahead! Your unique creativity always leaves a lasting impression.
Your unique creativity always leaves a lasting impression.
Can’t wait to see what’s ahead!
I’m eagerly awaiting your next piece! Your unique creativity and fresh perspective are amazing.
Excitesmate offers a wide range of online sex toys for men and women, including vibrators, dildos, and masturbators. Their discreet packaging ensures privacy while delivering high-quality, body-safe products designed to enhance intimacy and pleasure for every individual.
I’m eagerly awaiting your next piece!
An extraordinary article that mesmerizes the audience, sparks boundless creativity, and sets an unmatched standard of excellence!
Your imaginative ideas and creative spark are unforgettable.
Sydney303 which is a trusted site and offers various types of gacor slot games with a big chance of winning have an exciting and exciting gaming experience
Your ability to create something impactful with fresh ideas is amazing.
An article masterpiece that captivates the audience, inspires limitless creativity, and redefines the pinnacle of excellence!
An extraordinary article that captivates hearts, ignites limitless creativity, and redefines the benchmarks of excellence!
Great info. Lucky me I recently found your website and have found it interesting, will be back soon. I’ve book marked it for later!
The Best Auto detailing in Houston is by far Houston Detailing.
Can’t wait to see your next move! Your creative touch and innovative thinking are always inspiring.
Excited for what’s to come! Your creative genius and fresh. Can’t wait to see your next move!
Your creative touch and innovative thinking are always inspiring.
Excited for the future! Your creativity and fresh ideas leave an unforgettable impression.
An exceptional article that touches hearts, fuels boundless creativity, and sets a new standard for unparalleled excellence!
I appreciate how you invite readers to think critically about this issue. That is much needed in today’s discussion https://overhack88.com/
An extraordinary article that resonates deeply, ignites limitless creativity, and redefines the essence of excellence with unmatched brilliance!
Excited for the future! Your innovative ideas and creative passion never go unnoticed.
Your website, “CGPA to Percentage,” is an exceptional resource! It does more than just provide a calculation—it connects with users by offering clarity and empowering them with crucial academic insights. Your dedication to creating a seamless, user-friendly experience showcases your passion for helping students. The innovative and well-structured approach reflects your commitment to excellence. Learn more and see how it can help you!
Thank you so much for your kind words! I’m really glad you found the content informative and enjoyable.
I appreciate you taking the time to read and share your feedback!
“Thank you for sharing such a valuable and informative post! This article Keywordgreat insights on improving website traffic and rankings. I truly appreciate you taking the time to share it with us!”
An article creation that profoundly inspires, sparks boundless creativity, and sets a new benchmark for unmatched excellence and innovation!
Anticipating your next move!
An article creation that deeply inspires, ignites limitless creativity, and establishes a groundbreaking standard for excellence and innovation!
Your innovative ideas and creative passion never go unnoticed. We are eager to wait for your next Blog!
A truly article masterpiece that deeply inspires, sparks boundless creativity, and sets an unparalleled benchmark for excellence and innovation!
Funny t-shirts are a fun and lighthearted way to express personality through fashion. Featuring witty phrases, clever puns, and humorous graphics, these shirts are designed to make people laugh and grab attention. Perfect for casual outings, parties, or simply adding a dose of humor to your day, funny t-shirts offer an easy way to showcase your sense of humor. Whether it’s a quirky reference to pop culture or an unexpected joke, these shirts add an element of surprise and fun to any wardrobe.
Excited for the future!
An article masterpiece that deeply inspires, fuels boundless creativity, and sets a new, unparalleled benchmark for excellence and innovation!
Can’t wait to see your next creation!
An article creation that deeply inspires, ignites boundless creativity, and sets a revolutionary benchmark for excellence and innovation!
This is a really good site; I like this; Thank you for sharing this wonderful information.
An article masterpiece that deeply inspires, ignites boundless creativity, and sets an unparalleled benchmark for excellence and innovation!
Your fresh perspectives and creative talent are truly remarkable.
An article masterpiece that deeply inspires, ignites boundless creativity, and sets an unmatched standard for excellence and innovation!
Tumaya, Huminga nang Malalim ¨C evolution game Laro ng Kasiyahan at Kilig!
7up gaming
Thrilled for what’s ahead! Your originality and creative touch are always appreciated.
An article masterpiece that profoundly inspires, sparks limitless creativity, and sets a new benchmark for excellence and innovation!
Your originality and creative spark always leave an impact.
Merci pour votre article
Such a valuable post! We cover this too at [ZEUSBOLA].
goooooooooooooood
Your perspectives and creative talent are truly remarkable.
Beautiful article, Thank you!
This is a really good site; Your perspectives and creative talent are truly remarkable.
Your originality and creative touch are always appreciated.
A good blog that contains a lot of information, here you can also learn tricks for playing online lottery so you don’t lose, hopefully this can help
Looking forward to what’s ahead!
An article masterpiece that inspires deeply, ignites limitless creativity, and sets a groundbreaking benchmark for excellence and innovation!
Can’t wait for what’s to come! Your originality and creativity are truly remarkable.
A truly article masterpiece that profoundly inspires, sparks boundless creativity, and establishes a groundbreaking standard for excellence and innovation!
An article masterpiece that profoundly inspires, ignites boundless creativity, and sets a trailblazing standard for innovation and excellence!
Excited to see your next project!
Your article ideas and creative passion never go unnoticed. We are eager to wait for your next Blog!
ROBOT BIRU HACK has established itself as the newest official game provider with the amazing Auto Jackpot feature.
That is extraordinary post with some amazing information. Thanks for sharing
Can’t wait for what’s to come!
Official Website of the Best Academic Information Provider in Indonesia Guaranteed to be the Most Complete
Papa4d
An extraordinary article that deeply inspires, sparks limitless creativity, and establishes a groundbreaking benchmark for innovation and excellence!
Anticipating what’s next with enthusiasm! Your creative touch and originality always leave an impression.
An article masterpiece that profoundly inspires, fuels boundless creativity, and sets a transformative standard for innovation and excellence!
Thank you for this great post,I have a Gaming ORG and currently and I have never seen such an amazing post before. Thank you so much once again
Can’t wait for what’s to come!
Anticipating what’s next with enthusiasm!
Great goods from you, man. I have take into account your stuff
prior to and you’re simply too great.
Looking forward to your future endeavors! Your fresh perspective and creativity are always appreciated.
Anticipating the future with excitement!
Eagerly awaiting your next work! Your originality and creative brilliance are always inspiring.
Your originality and creative brilliance are always inspiring.
Eagerly await your next work!
That is extraordinary post with some article information. Thanks for sharing
Your originality and creativity are truly remarkable. Thrilled for what’s in store!
Thank you for sharing your thoughts. I really appreciate your efforts and I am waiting for your next post thanks once again.
WABAH4D adalah salah situs terbaik dan terpercaya di Indonesia. Disini anda bisa dengan mudah maxwin. untuk itu disini coba bermain dalam situs wabah4d.
하이카지노와 플러스카지노는 온라인 카지노 플랫폼으로, 사용자들에게 다양한 게임과 서비스 옵션을 제공하는 인기 있는 선택지입니다.
Raih kemenangan mudah di Scatter Hitam hari ini! Dengan pola gacor terkini dan RTP tertinggi, peluang cuan besar terbuka lebar hanya dengan modal kecil. Jangan lewatkan momen emas untuk menang sensasional dan bawa pulang jackpot hari ini juga.
Wow, this is really helpful!
Thrilled for what’s in store! Your originality and creativity consistently impress.
ROBOT BIRU HACK has established itself as the newest official game provider with the amazing Auto Jackpot feature. As one of the leading platforms in the online gaming industry, ROBOT BIRU HACK offers a gaming experience that is not only exciting but also has the potential to create big wins.
An article masterpiece that profoundly inspires, ignites limitless creativity, and sets a new benchmark for innovation and excellence.
Sa bawat pag-ikot ng gulong, maranasan ang saya ng klasikong laro nang hindi na kailangang lumabas ng bahay.
roulette wheel game
Your creativity and unique style never fail to inspire.
Your distinctive style and creativity are always a joy to experience. Looking Forward to your next Post.
Your unique style and boundless creativity are truly inspiring! Eagerly await your next work! Your unique style and boundless creativity are truly inspiring.
This was such a valuable read! I really appreciate how you took the time to explain things thoroughly and offer actionable advice. Your tips are both practical and easy to implement, which is exactly what I was hoping for. I particularly liked the section on [specific point], as it gave me a fresh perspective that I hadn’t considered before. Your writing style is engaging and clear, making it easy to follow along without getting lost in too much technical detail. I’ll definitely be referring back to this post, and I’m looking forward to more content from you!
The originality and passion in your work are always a delight to experience.
Your next piece can’t come soon enough! The originality and passion in your work are always a delight to experience.
Your originality always shines through! Looking forward to seeing your next big idea!
Looking forward to seeing your next big idea!
Your originality always shines through!
You never cease to amaze with your originality! Looking forward to what’s next!
Nagasaon Good day! This is my 1st comment here so I just wanted to give
a quick shout out and tell you I truly enjoy reading through your blog posts.
Binjai77 : Situs Gameshop Terpercaya di Indonesia Pulsa Tanpa Potongan
BINJAI77
Secure your Online Cricket Id today with a reliable Betting Exchange ID Provider in India. Contact via WhatsApp!
I’d should verify with you here. Which isn’t something I normally do! I enjoy reading a publish that can make people think. Additionally, thanks for permitting me to comment! LONDON69
Thank you for creating an informative and easy to follow article. I feel like I got a lot of new insights after reading it. The way you organize information and provide real examples really helps me understand the material, I will also share my experiences in the world of entertainment, check the website. LONDON69
I think other site proprietors should take this site as an model, very clean and excellent user friendly style and design, let alone the content. You’re an expert in this topic! LONDON69
I think other site proprietors should take this site as an model, very clean and excellent user friendly style and design, let alone the content. You’re an expert in this topic! LONDON69
دوره فروش و مذاکره مرکز اشتغال و مهارتآموزی ماهان ترکیبی از مباحث پایهای و تکمیلی دوره فروش و دوره مذاکره است که نیاز به آموزشهای پراکنده را برطرف میکند. این دوره با تمرکز بر مذاکره، به شرکتکنندگان کمک میکند جلسات فروش برد-برد ایجاد کرده و ارتباطات مؤثری با مشتریان برقرار کنند. علاوه بر مهارتهای فروش و مذاکره، این دوره شامل آموزش رفتار سازمانی و اتیکت حرفهای است که جایگاه حرفهای شرکتکنندگان را ارتقا میدهد. در پایان، شرکتکنندگان به مهارتهای لازم برای موفقیت در حرفه فروش دست مییابند.
https://mahancs.com/course/sales-and-negotiation/
Good day! This is my 1st comment here so I just wanted to give
a quick shout out and tell you I truly enjoy reading through your blog posts. LONDON69
Your unique style and boundless creativity are truly inspiring! Eagerly await your next work! Your unique style and boundless creativity are truly inspiring. LONDON69
Your next piece can’t come soon enough! The originality and passion in your work are always a delight to experience. LONDON69
This article is very good and creative, I really like the presentation of the content in this blog, I will start to imitate it BROJP
this is a really great blog, the writing and structure makes me want to try to duplicate it on my site BROJP
this is very useful and very helpful information, i will recommend my friends to see this BROJP
Live casino gaming is even more thrilling when you’re equipped with the right tips. Visit this site to gain the upper hand and boost your enjoyment. Live Casino
This site makes learning casino games fun and easy! I’ve gained a lot of useful knowledge. casino games tips
Generally I do not read article on blogs, but I would like to say that this write-up very forced me to try and do it! Your writing style has been surprised me. Thanks, very nice post. BROJP
I think other site proprietors should take this site as an model, very clean and excellent user friendly style and design, let alone the content. You’re an expert in this topic! LONDON69
UNIKBET Pertandinganonline sering ditemukan dalam kehidupan sehari-hari.
UNIKBET Meskipun beberapa orangpercaya bahwa permainan daring adalah tentang komputer.
UNIKBET bukan hanya permainan.bekerja di komputer. Game bisa berupa konsol, perangkat portabel, atau bahkan permainansedang menelepon.
Ensure your equipment’s reliability with the skilled team at Syracuse Biomedical Services.
UNIKBET login sekarang mainkan game pg soft dan pragmatic play gacor hari ini
ZEUSBOLA Bandar Bola Sbobet Terpercaya & Online 24 Jam
Looking forward to what’s next!
I absolutely loved reading this! Your ideas are always so inspiring and thought-provoking. Can’t wait to see what’s coming next—I’m sure your next big idea is going to blow us all away! Keep up the amazing work!
ZEUSBOLA LOGIN Mencari Link Dengan RTP Terbaik di 2025? Hanya Disini
Thrilled for what’s in store! Looking forward to what’s next!
I’m sure your next big idea is going to blow us all away! Keep up the amazing work! Keep it up!
ZEUSBOLA SLOT Situs Deposit QRIS Online 24/7
UNIKBET menghasilkan sekitar $1 miliar per tahun bagi perusahaan dalam penjualan eceran dan biaya berlangganan dari tahun 2007 hingga 2010.
UNIKBET berbeda dari permainan slot lainnya dalam sejumlah hal penting.
UNIKBET Pertama di Indonesia, konektivitas internet merupakan prasyarat untuk semua MMOG,
I sincerely appreciate you taking the time to share this amazing post with us. Your contribution is truly valued, and I am grateful for the opportunity to read such insightful and inspiring content. Thank you once again for your generosity in sharing this wonderful piece with the community
Love this! See how [login zeusbola] aligns with your ideas.
Your creativity knows no bounds! I’m sure your next big idea will amaze us all. Nice Blog And unique.
Thrilled for what’s coming up next. Nice Blog And unique.
SITUS ZEUSBOLA Raih kemenanganmu di permainan Sweet Bonanza CandyLand
برای درخواست انحصار وراثت و دریافت گواهی رسمی از مراجع قضائی، فرد متقاضی باید مدارک لازم برای انحصار وراثت را ارائه دهد که شامل شناسنامه و کارت ملی فرد متوفی، شناسنامه و کارت ملی وراث، گواهی فوت و در صورت لزوم، وصیتنامه یا سایر اسناد مرتبط است. همچنین، در برخی موارد، ارائه مستندات مالی یا ملکی متوفی برای تعیین داراییها و دیون ضروری میباشد. جمعآوری دقیق این مدارک، روند قانونی انحصار وراثت را تسریع میکند
BOMSLOT
IDETOTO
You never cease to amaze with your originality!! Keep those fantastic ideas flowing!
You never cease to amaze with your originality! Keep those fantastic ideas flowing! Nice Blog And unique.
As a t-shirts graphic designer, I love combining creativity with humor to craft funny and unique designs. My collection of funny t-shirts for sale features witty slogans and playful graphics that bring a smile to anyone who sees them. These shirts are not only great conversation starters but also a fun way to express personality and humor through fashion.
Eager to see what’s next! Your creativity consistently leaves an impact.
You always surprise me with your originality! Fantastic blog and truly unique.
Your creativity consistently leaves an impact.
You always surprise me with your originality!
Your originality is truly remarkable.
this blog make me so have full informatif , so great news for me. zeusbola slot online
Fantastic blog and truly unique.
An extraordinary masterpiece that deeply inspires, ignites boundless creativity, and establishes unmatched standards for innovation and excellence.
Succeed! It could be one of the most useful blogs we have ever come across on the subject
Bibir69 Slot Login
An article masterpiece that deeply inspires, ignites boundless creativity, and redefines the standards of innovation and excellence.
Every piece you create is so original! Excited to see what’s in store!
Every piece you is so original!
Excited to see what’s in store!
You never fail to impress with your originality! This blog is both brilliant and one-of-a-kind.
Experience the pinnacle of classic MMO gaming with RevivalRO, ranked among the finest Ragnarok Online private gaming communities in 2025. ragnarok private server
This blog is both brilliant and one-of-a-kind.
You never fail to impress with your originality!
Thank you for your feedback! Have you tried to implement these ideas at home?
I really appreciate how you’ve brought this to Keyword—it’s given me a lot to ponder.
Every piece you create is so original!
Your creativity knows no bounds! Amazing blog post and so unique
A article masterpiece that deeply inspires, sparks boundless creativity, and establishes a revolutionary benchmark for innovation and excellence.
An article masterpiece that profoundly inspires, ignites limitless creativity, and sets a groundbreaking standard for innovation and excellence.
Love this! Such a great Keyword. Keep it up
ufabet มือถือ ที่ออกแบบมาให้ใช้งานง่าย รองรับทั้งระบบ iOS และ Android ช่วยให้คุณสนุกกับการเดิมพันได้ทุกที่ทุกเวลา ufabet
A article masterpiece that deeply inspires, fuels boundless creativity, and establishes a revolutionary benchmark for innovation and excellence.
Amazing blog post and so unique
The blog is detailed and visually appealing.
A article masterpiece that deeply inspires, ignites boundless creativity, and sets a new benchmark for innovation and excellence.
At the heart of every Novelli RIB is a design philosophy that marries aesthetic elegance with practical functionality. https://ipsnews.net/business/2025/01/28/luxury-rigid-inflatable-boats-by-novelli-redefining-boating-excellence/
Your originality is unmatched! Love the way this blog stands out.
A article masterpiece that deeply inspires, ignites boundless creativity, and sets an unparalleled standard for innovation and excellence.
Can’t wait to see what’s next!
You consistently amaze me with your creative take! Such a unique and well-crafted blog.
Excited for your next big breakthrough! You’re consistently doing amazing work—keep it going!
Imagine the possibilities – a friendly “hello” turning into a meaningful bond, or a shared laugh leading to a lasting connection. go/meet
Had to stop Keywordfor this one – pure gold
I love how creative your blog is! Each post is inspiring.
You consistently amaze me with your creative take!
Your uniqueness is always refreshing.
I really liked it too!
Wow, your unique style is incredible! Such a creative and engaging blog post.”
It’s a very interesting project. I will be able to use some things in my interior. Thank you!
Table games are where strategy meets excitement. Whether it’s blackjack, roulette, or poker, every round offers a new thrill. Sharpen your skills and dive into the action! Play the best table games online.
These days, I spend more than three hours perusing the internet, but I haven’t come across any articles as captivating as yours.
It’s beautiful and worth enough to me. If all blogs and web owners produced high-quality stuff like you did, I believe the internet would be far more useful than it is now.
These days, I spend more than three hours perusing the internet, but I haven’t come across any articles as captivating as yours.
It’s beautiful and worth enough to me. If all blogs and web owners produced high-quality stuff like you did, I believe the internet would be far more useful than it is now.xzx
Wow, your unique style is incredible!
These days, I spend more than three hours perusing the internet, but I haven’t come across any articles as captivating as yours.
It’s beautiful and worth enough to me. If all blogs and web owners produced high-quality stuff like you did, I believe the internet would be far more useful than it is now.sad
Our new boiler installations come with everything you need, plus more. gas boiler
Your work leaves such a lasting impression.
Anticipating greatness as always!
Tips for Finding Books That Inspire You Bajak Scatter
In We-talk free online chat & random chat service you can meet new friends,
Your work leaves such a lasting impression. Thrilled to see what’s ahead!
Yet again, your creativity has left me speechless! This blog is truly one of a kind.
Yet again, This blog is truly one of a kind.
Yet again, your creativity has left me speechless!
Brilliant as always! I have no doubt your next big idea will redefine the industry. Keep pushing forward!
have no doubt your next big idea will redefine the industry. Keep pushing forward!
ผู้เล่นสามารถเดิมพันได้อย่างมั่นใจ พร้อมโอกาสในการทำกำไรที่สูงกว่าหลายเว็บไซต์ ความสะดวกในการเข้าถึงเกมต่างๆ ไม่ว่าจะเป็นพนันกีฬา คาสิโนออนไลน์ หรือเกมสล็อต ยูฟ่า365 ทำให้ผู้เล่นสนุกและเพลิดเพลินได้ตลอด 24 ชั่วโมง ufa365
Such a captivating read! I truly appreciate your unique perspective on this topic. Looking forward to more of your Keywordposts
Anticipating greatness as always! Excited to see what’s next!
Can’t wait to see what’s next. Keep pushing boundaries!
ufabet หนึ่งเดียว เพื่อความสะดวกของผู้เล่น และ ยังเป็นเว็บที่คนไทยนิยมใช้งานมากที่สุด เว็บ UFA168 ออกแบบมาเพื่อรองรับการใช้งานทุกระบบบนมือถือ
Every post you write is a source of motivation! Your next idea will surely be a game-changer. Keep going!
You continue to impress with your originality! This blog is absolutely unique.
The Future of Gaming is Here!!….Drop ball
Your work is limitless, and I’m eager to see what comes next. Keep going!
Your next idea will surely be a game-changer. Keep going!
Every time, you raise the bar with your originality! Such a one-of-a-kind blog.
di platform atau mendapatkan komisi dari setiap transaksi yang dilakukan pemain. nagawon login
The blog is detailed and visually appealing.
Looking forward to your next masterpiece!
PAITO SDY LOTTO Raung bagi penacari prediksi paling jitu ada disini.
This was truly thought-provoking! Looking forward to your next brilliant idea. Keep raising the bar!
Your ability to craft such unique and engaging content is remarkable! This blog was a pleasure to read.
Your creativity shines through every piece. Keep up the amazing work!
An article masterpiece that sparks inspiration, unleashes limitless creativity, and redefines the pinnacle of innovation and excellence.
If you’re into games that bring the thrill of jackpots, check out SG8 Casino and experience your own
FB777 moment.
Wondering what that means? Dive into our article to find out!
If you’re into games that bring the thrill of jackpots, check out SG8 Casino and experience your own
jili77 experience.
Wondering what that means? Dive into our article to find out!
Your creativity knows no bounds. Keep up the amazing work!
You never fail to amaze! —keep exploring and inspiring!
Your ability to craft such unique and engaging content is remarkable!
https://gestationalsurrogacyindia.com/which-nation-allow-surrogacy/
Your creativity knows no bounds! This blog is a true reflection of your originality and skill.
This blog is a true reflection of your originality and skill.
Your passion and dedication shine through! Excited to see what’s next. Keep pushing boundaries!
Your creativity knows no bounds—keep exploring and inspiring!
Výborné tipy na výber tých najlepších dresov pre deti. Určite odporúčam každému rodičovi, ktorý hľadá kvalitný dres pre svoje dieťa
Der Artikel ist informativ und gut recherchiert. Besonders spannend war der Teil über das Liverpool Trikot, das nicht nur ein Sportartikel, sondern auch ein Symbol der Gemeinschaft ist.
Such an insightful post! Your imagination and originality are truly remarkable.
Such an informative and well-written overview! It really highlights the essential aspects of appendix surgery in India, from the procedure options to recovery times and costs. I appreciate how you emphasized both the quality of care and affordability available in Indian hospitals. This is definitely helpful for anyone considering medical treatment abroad
Your fresh perspective is truly inspiring! This blog is both unique and exceptionally written.
Keep breaking barriers and inspiring us all!
Keep breaking barriers and inspiring us all! Your work is proof that creativity has no limits! Keep sharing your brilliance with the world!
Every post you create is a masterpiece of originality! This blog was an absolute delight to read.
This blog was an absolute delight to read.
Absolutely loved this! I’m sure your next big thing will be nothing short of amazing. Keep striving!
I’m sure your next big thing will be nothing short of amazing. Keep striving!
I’m sure your next big thing will be nothing short of amazing. Absolutely loved this!
Your creativity shines in every post! That was very Creative work.
Dapatkan game & software favoritmu gratis di kuyhaa.id!
이는 100명 중에 한 두명을 제외한 나머지가 모두 먹튀를 당할 수 있는 위험에 처해있단 것인데요. 먹튀검증커뮤니티
Pushing boundaries like a true visionary!
You continue to redefine creativity with every post!
Oras na para magpakasaya! I-spin mo na!!…War Of Dragons
Website offers a variety of popular slots that cater to players of all levels and preferences. From action-packed shooters to anything in between, has something for everyone.
Downloads ilimitados com IDM Crack – seguro e funcional! ????
Every post you publish is a true work of art! I thoroughly enjoyed reading this blog – so refreshing and insightful!
I thoroughly enjoyed reading this blog – so refreshing and insightful!
Your writing always feels fresh and inspiring! Loved this blog—it was such a joy to read.
Always delivering great insights! Your next idea will make an impact. Keep reaching new heights!
Your next idea will definitely make an impact. Keep reaching new heights!
Join Poseidonhack to get the latest and best slot hacks this year. We offer solutions to increase your chances of playing slots by using the poseidon hack method which has been proven to be effective.
The platform is known for its user-friendly interface, easy-to-understand games, and excellent customer support, making it a top choice among gaming enthusiasts.
Situs mudah menang yang sudah terkenal seperti Pedia4D memang patut dicoba hari ini juga. Semua pemain berhak dapatkan kesempatan dapat jackpot. Jadi tunggu apalagi ada disini link slot gacor paling mudah jackpot dan tentunya langusng menang https://motorexbicycle.com/
Looking forward to more amazing content!
Looking forward to more amazing content! Absolutely loved this! Keep going.
slot bank seabank adalah link game terbaru dan tergacor bulan ini
indoslot link games terbaik dengan pelayanan cepat
Baixe o IDM Crack aqui – sem vírus, 100% seguro! ????
Quer o IDM Crack? Pegue grátis com link direto! ????
MEGA HOKI situs terpercaya siang ini
Your fresh take on things makes your content so special. Keep it up!
BOMSLOT situs terpercaya siang ini
Absolutely loved this post. Can’t wait for more! This was such a fantastic read!
Your voice is what makes your content so captivating. Keep going!
Thank you for sharing your insights! I truly appreciate the time and effort you put into creating such valuable content. Your expertise is inspiring, and I always look forward to your posts. Excited for your next update—it’s always meaningful and informative!
TANGGAL77 ✈️ Daftar Bandar Pkv Games Dan Agen Pkv Resmi Terpercaya
Such detailed and well-organized information! I’m excited to see more posts like Keywordin the future!
I’m always blown away by your unique way of looking at things! Keep up the great work!
I’m always blown away by your unique way of looking at things!
You have a gift for presenting things in such a fresh way! Loved this post. Keep them coming!
You have a gift for presenting things in such a fresh way!
BOMSLOT situs terpercaya siang ini
BOMSLOT link paling gacor seindonesia
kd slot situs terpercaya siang ini
kd slot situs terpercaya malam ini
You have a gift for presenting things in such a fresh way! Loved this post. Keep them coming!
situs Scatter Mahjong Terbaru
This article is extremely helpful and well-detailed! It provides great insights and valuable information. Thank you for sharing such an informative and well-researched piece. Your efforts are truly appreciated!
Wow, this product looks amazing! The features you’ve mentioned seem so practical, and I can already imagine how much it will make my life easier. I can’t wait to try it out!
This was a joy to read! Your voice and perspective are truly special. Keep doing what you do best!
you’re really making an impact! I can’t wait to see what amazing Keywordyou’ll do next!
Your voice and perspective are truly special. Keep doing what you do best
Your fresh take on things makes your content a pleasure to read. Keep it up!
This article is extremely helpful and well-detailed! It provides great insights and valuable information. Thank you for sharing such an informative and well-researched piece. Your efforts are truly appreciated!
Your fresh take on things makes your content a pleasure to read. Keep it up!
Absolutely love how you bring such a unique perspective to everything you write. Your fresh take on things makes your content a pleasure to read.
The features you’ve mentioned seem so practical. Keep doing what you do best!
Absolutely loved this post! Your unique perspective makes it even more engaging. Can’t wait for your next one!
This was such a great read! Your insights always stand out. Can’t wait for more!
Your writing style, infused with humor, and clever analogies, truly animated the topic in my imagination.
I walk away with a new perspective. Keep up the incredible work!
Brilliantly written! Your unique outlook is what makes your content so special. Keep going strong!
Jackpot na! Pindutin at manalo ngayon!….roulette online
The features you’ve highlighted are incredibly practical! Keep up the amazing work, you’re doing great!
I walk away with a new perspective. Every time I read your posts,
I walk away with a new perspective. Every time I read your posts, nice
Your unique outlook is what makes your content so special. Keep going strong!
The features you’ve highlighted are incredibly practical!
I love how practical these features are! You’re truly excelling at what you do. Keep it up!
Brilliantly written! .Keep going strong!
Absolutely brilliant! Your insights and creativity are truly one of a kind. Can’t wait for your next piece! Amazing.
Absolutely love how you bring such a unique perspective to everything you write. Your insights and creativity are truly one of a kind. Absolutely brilliant!
Loved this post—looking forward to more amazing content!
I love how practical these features are! You’re truly excelling at what you do. Keep it up!
Glad I enjoyed the read! If you’re a fan of jackpot thrills, SG8 offers an exciting experience with JILI games. With a wide range of thrilling options, you’ll find plenty of chances to win big.
Want to know more? Check out our article for an in-depth look at SG8 Casino and discover what makes JILI games a top choice for gaming enthusiasts!
It takes me 3 days to read your blog,
JLI Free 100 is a great promo! Perfect for trying out games without risking your own money. ???? Who else is grabbing this bonus?
Ninjabola is an awesome platform! It’s great to see such an innovative approach to gaming and entertainment. Looking forward to seeing more exciting updates and features in the future!”
One of the standout features of Windows 11 Pro is its enhanced security. It includes BitLocker encryption, which protects sensitive data by encrypting the entire drive. Windows Hello provides biometric authentication options such as facial recognition and fingerprint scanning, adding an extra layer of protection. Additionally, Windows 11 Pro supports virtualization-based security (VBS) and Hyper-V, allowing businesses to run virtual machines securely.
I love how practical these features are! Keep it up!
Wow! Your creativity knows no bounds. Loved this post—looking forward to more amazing content!
Loved this post—looking forward to more amazing content!
Windows 11 is the latest operating system from Microsoft, offering a modern user interface, improved performance, and enhanced security features. Unlike previous versions, Windows 11 is available only in a 64-bit architecture, ensuring better efficiency and compatibility with modern hardware. This means 32-bit systems are no longer supported, requiring users to have a 64-bit processor to install and run Windows 11.
Very Informative Post.
Apply for a business loan online to enjoy quick approval, fast disbursal and flexible EMIs without any collateral.
To download Microsoft Word, visit the official Microsoft website or the Microsoft Store for Windows users. macOS users can download it from the Mac App Store. For mobile devices, Word is available on Google Play Store (Android) and Apple App Store (iOS). A Microsoft 365 subscription is required to unlock premium features.
PANENSLOT rtp nya tepat sasaran
I Don’t Need Google T-Shirts are the perfect gift for your loved ones because they combine humor and sentiment in a fun, personal way. Whether it’s your husband, wife, daughter, or grandpa, these shirts celebrate their wisdom with a playful twist. The clever message makes them a thoughtful gift that’s sure to bring smiles, spark conversations, and add a touch of fun to any occasion.
Such a thought-provoking read! Your insights are always so unique. Can’t wait for your next masterpiece!Jemi
Every time I read your work, I’m amazed by your creativity.
You’re really nailing it — keep doing what you do best!
These features are so well thought out and practical. You’re really nailing it — keep doing what you do best!
Such practical and useful features! It’s clear you know what you’re doing. Keep it going!
Such practical and useful features!
What an amazing piece! Your creativity and fresh perspective make your work truly exceptional.
Incredible insights! Keep up the amazing work!
Fresh perspective make your work truly exceptional! What an amazing piece.
Your creativity is unmatched, and I can’t wait for your next masterpiece!
It’s clear you know what you’re doing. Keep it going!
Ocean of Games emerged as a controversial hub for free PC game downloads, providing cracked versions of popular titles. While attracting gamers with its extensive library, the platform faced repeated legal challenges before ultimately being taken offline. This case highlights the ongoing tension between accessibility and intellectual property rights in digital gaming.
Steam Unlocked is a debated website that offers free cracked PC games. While users can download pre-installed games, this is illegal and comes with the risk of malware.
Mind-blowing as always! Your creativity is unmatched, and I can’t wait for your next masterpiece!
Bagas31 adalah situs web yang menyediakan berbagai perangkat lunak, game, dan aplikasi gratis. Dengan antarmuka sederhana, pengguna dapat dengan mudah menemukan serta mengunduh kebutuhan digital mereka secara cepat dan praktis.
Bagas31 is a popular platform providing various software, games, and applications. It ensures easy access to updated programs, offering a seamless experience for users seeking reliable digital content and essential tools.
Unlock terrifying paid horror games for free!
Your creativity is unmatched, and I can’t wait for your next masterpiece!
The features you’ve shared are exactly what people need. Keep up the great work, you’re doing awesome!
Keep up the great work, you’re doing awesome!
Really impressed with how practical these features are. Keep doing your best, you’re on the right track!
You never fail to impress! Looking forward to more!
Mind-blowing as always! Your creativity is unmatched, and I can’t wait for your next masterpiece!
Selain memberikan data yang akurat, macancuan juga memiliki antarmuka yang ramah pengguna, sehingga cocok untuk pemain pemula maupun profesional.
I can see how well these features fit everyday needs. Keep up the excellent work, you’re doing fantastic!
Keep doing your best, you’re on the right track!
I can see how well these features fit everyday needs.
Keep up the excellent work, you’re doing fantastic!
Jogos Torrent é fácil de usar e completamente gratuito.
Ocean of Games offers free PC game downloads, including cracked versions, but using the site can lead to potential security risks.
Kecepatan unduhan super cepat dengan IDM Kuyhaa!
Baixe e jogue sem limites, só no JogosTorrent!
These features seem super practical and well-designed. Keep it up, you’re clearly a pro!
Qualidade e velocidade nos seus downloads de Jogos Torrent.
These features seem super practical and well-designed.
These features seem super practical and well-designed. Keep it up, you’re clearly a pro!
What a practical approach to solving these problems! Keep up the great work, you’re doing fantastic!
Absolutely loved this! The way you highlighted key cosmetology services was pure brilliance. Your creativity and fresh perspective make it so easy to understand.
What a practical approach to solving these problems! Keep up the great work, you’re doing fantastic!
What a practical approach to solving these problems!
This is such a well-explained and insightful post! I really appreciate the clarity and depth you’ve provided. It definitely helped me see the topic from a new perspective. Looking forward to more content like this
you are really a good webmaste ,I write a comment to support you
Untuk yang sedang mencari informasi mengenai dunia apoteker, kami telah merangkumnya di dalam website kami yang akan membantu semua mengenai dunia apoterker. Silahkan kunjungi situs kami disini Pafi.id
heets
What a practical approach to solving these problems! Keep up the great work, you’re doing fantastic!
What a practical approach to solving these problems! Keep up the great work, you’re doing fantastic!
situs slot gacor dengan rtp live tertinggi 95% dapat di temukan di situs slot gacor maxwin cnnslot, dengan rtp yang stabil kemenangan dalam permainan slot online semakin besar.
I really appreciate how practical these features are.
Bagas31 adalah tempat terbaik untuk mengunduh game dan software gratis.
You’re doing an outstanding job — keep it up!
Can’t wait for your next masterpiece!
Get Your Book Published on Amazon with Global eBook Publishers LTD
Ready to share your story with the world? Global eBook Publishers LTD makes it easy to publish your book on Amazon and reach a global audience. Whether you’re an aspiring novelist, a seasoned author, or writing your first children’s book, we guide you through every step of the publishing process—from formatting and cover design to Amazon KDP setup and global distribution.
Why Choose Us?
Expert formatting for Kindle and print
Eye-catching professional cover designs
Complete Amazon KDP setup and optimization
ISBN assignment and copyright guidance
Worldwide eBook and paperback distribution
Dedicated author support
Start your publishing journey today and turn your manuscript into a masterpiece available on Amazon across the globe.
Contact Global eBook Publishers LTD and let’s make your book a success!
The features you’ve highlighted seem so practical and user-friendly. Keep doing what you do best!
Can’t wait for your next masterpiece!
Find the best undergarments brands in Pakistan at Omi Beauty. We offer a variety of lingerie, panties, bras, and maternity wear for the women in Pakistan, made from premium quality fabric.
bacansports
slot toto
Slot toto
toto slot
slot dana
toto slot
slot toto
toto slot
toto slot
Kucing hacker Berharap bisa membantu para gamer suka mencoba bermain kucing, karena emang jelas paling bagus hanya sini. Dengan mencoba kucing hack juga bisa memambah cuan besar setiap gamer mencobanya.
alternatif bermain slot gacor dan toto online cnnslot
This was pure brilliance! Your creativity and fresh perspective make your work truly exceptional.
Keep doing what you do best!
The features you’ve highlighted seem so practical and user-friendly.
This article is extremely helpful and well-detailed! It provides great insights and valuable information. Thank you for sharing such an informative and well-researched piece. Your efforts are truly appreciated!
toto slot
Sepuh cheat hadir sebagai solusi terbaik bagi para pemain game online pc yang ingin meningkatkan pengalaman bermain mereka. Dengan berbagai cheat ringan dan terbaik, kami memberikan cara mudah untuk memaksimalkan potensi dalam setiap permainan.
the info you offer on this website has helped
RUBY8000 emang terbaik dan paling gacor
One of the inmates here hid some videos in the warehouse, movies that got smuggled into the camp. None of the inmates got caught in the act. So nobody got in trouble mega888
The platform’s main attraction lies in its simplicity and accessibility—no downloads or registrations are required to play most games. mega888
Artikel ini membuka wawasan saya, dan ternyata susu4d juga bahas hal serupa.
Ova Games is a popular platform offering free repacked PC games in various genres like action, RPG, adventure, and strategy. The site provides quick and easy access to full versions of games, making it attractive to gamers. However, users should be cautious of potential legal issues, malware, and security risks when downloading from unofficial sources. It’s highly recommended to use trusted antivirus software and ensure that downloads come from reliable and verified sources to maintain the safety of your device.
These are exactly the kind of practical features we need! Keep up the great work, you’re really hitting the mark!
Keep up the great work, you’re really hitting the mark!
These are exactly the kind of practical features we need!
You never fail to impress! Looking forward to more! This was pure brilliance!
Our Premium 100% original Bamboo Memory Pillow blend easy-care fabric with luxury to offer an incredibly soft feel. A durable and exquisite pillow to enhance your bed.
Such practical and thoughtful features! You’re clearly doing something right — keep it up!
Such practical and thoughtful features!
1win online casino est une plateforme de jeu de confiance connue pour son accessibilité mondiale et sa popularité auprès des joueurs canadiens. Les utilisateurs peuvent y profiter d’une grande variété de divertissements : des machines à sous classiques aux casinos en direct avec des croupiers professionnels. La plateforme garantit un haut niveau de sécurité, des paiements rapides et une interface conviviale. 1win
You’re clearly doing something right — keep it up!
The practicality of these features is impressive. You’re really doing your best work here, keep it going!
The practicality of these features is impressive.
You’re really doing your best work here, keep it going!
I love how practical and well-planned these features are. Keep up the excellent work, you’re doing an amazing job!
Situs mpo11 adalah pilihan tepat bermain slot gacor malam ini terpercaya dengan minimal deposit 10k bisa pakai dana dan qris.
Website mpo11 adalah agen resmi sabung ayam SV388 online yang menyediakan live streaming 24 jam setiap hari dari arena terbaik Filipina.
Situs mpo11 merupakan website resmi yang mengedepankan integritas dan keamanan dalam menyediakan layanan agen sabung ayam online 24 jam bagi masyarakat.
Dapatkan bocoran pola olympus terbaru 2025 gratis, klik link untuk info terupdate https://elephantandco.org/
Your expertise is inspiring, and I always look forward to your posts. Excited for your next update—it’s always meaningful and informative!
Your expertise is inspiring, and I always look forward to your posts.
Pembahasannya mendalam tapi tetap ringan, cocok buat temanslot dari berbagai level di situs slot gacor hari ini
daftar cnnslot
MPO11 adalah salah satu platform situs slot mpo gacor 777 paling di rekomendasikan dengan kualitas permainan terbaik dan terpercaya 2025.
MPO11 merupakan website link alternatif slot gacor maxwin gampang menang hari ini terbaik dan terpercaya dengan ribuan pilihan game anti rungkad.
Everything is very open and very clear explanation of issues. was truly information. Your website is very useful. Thanks for sharing.
CDNetworks is one of the world’s largest content delivery network companies. We provide the highest quality services through the synergy of our industry-leading solutions and global network (total number of PoPs: over 2,800 as of April 2025) that covers every corner of the world. hola88
Kuyhaa cocok untuk pelajar dan profesional yang butuh software premium. https://kuyhaaa.com/
I love how practical and well-planned these features are.
Selamat datang di slot maxwin HOLA88 jelas akan mempermudah kalian untuk menacri kemenangan bonus jackpot tanpa batas. Banjir bonus jackpot scatter hitam paling besar setiap saatnya. hola88
Great post! I enjoyed reading your explanation about this subject. If you don’t mind, do you have any recommendations for further reading or tools related to this topic?
Thanks in advance and keep up the good work!
Wow, these features are seriously practical and well-thought-out! Great job, keep up the amazing work, you’re really killing it!
https://donjuanhack123.com/ merupakan salah satu saluran penerbit cheat slot engine terlengkap menghadirkan cheat dan cara bermain slot terbaru gampang jackpot
Wow, these features are seriously practical and well-thought-out!
https://bungacheat.com/ hadir sebagai sebuah situs yang menawarkan beragam panduan lengkap tentang bagaiman cara main game mudah menang untuk kalian gamer sejati di internet Bungacheat33
Great job, keep up the amazing work, you’re really killing it!
These features look incredibly practical! I’m really impressed by the design. How long did it take to put all this together? You’re definitely a pro!
These features look incredibly practical! I’m really impressed by the design.
bunga cheat 33 hadir sebagai sebuah situs yang menawarkan beragam panduan lengkap tentang bagaiman cara main game mudah menang untuk kalian gamer sejati di internet Bungacheat33
bunga cheat 33 hadir sebagai sebuah situs yang menawarkan beragam panduan lengkap tentang bagaiman cara main game mudah menang untuk kalian gamer sejati di internet
Robot Merah Hack Tools Cheat Gacor
How long did it take to put all this together? You’re definitely a pro!
Penjelasannya mantap. Ngomong-ngomong, saya rekomen Slot Gacor RUBY8000 buat yang pengen main aman dan nyaman. Withdraw cepet, tanpa ribet!
Such a great design! These features are super practical and useful. Keep up the fantastic work!
Sensasi bermain slot online paling gacor hanya di Ruby8000.
This article is so inspiring and full of great ideas! The renovation guide is easy to follow, and the resulting makeover is absolutely stunning—proving that even a small space can be stylish and comfortable. Perfect for anyone looking to turn their RV into their dream home on wheels!
Such a great design! Keep up the fantastic work!
bonuscheat33 sudah hadir di sekitar kita salah satu permainan paling menegangkan terbaru besutan bonuscheat33 wajib dicoba.
The blog “Easy RV Remodeling Instructions + RV Makeover REVEAL!” is a delightful and inspiring read for anyone interested in transforming their RV into a personalized, cozy haven on wheels! ????✨
These features are super practical and useful. Keep up the fantastic work!
Love how practical and well-designed everything is here. You’ve really thought this through. Keep it up, you’re doing awesome!
Love how practical and well-designed everything is here.
Link Alternatif CNNSLOT Akses alternatif ke situs
CNN Slot Penyedia informasi slot terbaru
Link Alternatif CNNSLOT Akses alternatif ke situs
CNN Slot Penyedia informasi slot terbaru
Absolutely loved this RV makeover! The transformation is stunning, and your step-by-step instructions make it feel so doable—even for beginners. So inspiring to see how a few thoughtful changes can completely refresh a space. Great work!
This blog is a fantastic resource for RV enthusiasts! The remodeling tips are practical and clearly explained, and the final reveal is both stylish and functional. You’ve shown that comfort and creativity can go hand in hand—even in small spaces.
You’ve really thought this through. Keep it up, you’re doing awesome!
The features you’ve introduced are so practical! It’s clear you’ve put a lot of effort into this. Keep up the great work—you’re definitely on the right track!
Kemudahan dalam bermain game saat ini sudah dapat ditemukan hanya bergabung bersama kembang cheat.
Banyak yang sudah membuktikan, bermain di CNNSLOT bikin nagih karena game-nya lengkap dan gampang menang.
The features you’ve introduced are so practical!
asiacuan303 presenting a site that has become an online game service provider.
ทางเข้าpg Why choose tx168, a famous camp? Modern auto system: Reduce the hassle of transactions Valuable promotions: Refunds and bonuses that meet all game needs Credibility: Guaranteed by real players and excellent reviews tx168 is an online game camp suitable for players of all levels. Whether you are a beginner or a pro, this website has everything you need, from a fast auto deposit-withdrawal system, no minimum bets, great refund promotions, to a variety of fun games.
สมัครสล็อต tx168 is a famous camp that many people love to play online . If you are looking for a complete website in terms of reliability, convenience, and great promotions, I would like to recommend tx168, the hottest online game camp today. With a fast and convenient automatic deposit-withdrawal system, you can bet with no minimum. Even if you have only 10 baht, you can start having fun with games. Most importantly, it also comes with a refund promotion that helps players get value for every bet..
สล็oตพีจี TX168 the best direct website Ranked number 1 Deposit and withdrawal, no minimum international standards Easy to play, real pay, TX168 has all games, 24 hour service, deposits and withdrawals in 1-5 seconds, TX168 is safe, 100% confident
สล็oตพีจี TX168 the best direct website Ranked number 1 Deposit and withdrawal, no minimum international standards Easy to play, real pay, TX168 has all games, 24 hour service, deposits and withdrawals in 1-5 seconds, TX168 is safe, 100% confident
pg tx168 TX168 the best direct website Ranked number 1 Deposit and withdrawal, no minimum international standards Easy to play, real pay, TX168 has all games, 24 hour service, deposits and withdrawals in 1-5 seconds, TX168 is safe, 100% confident TX168 the best direct website Ranked number 1 Deposit and withdrawal, no minimum international standards Easy to play, real pay, TX168 has all games, 24 hour service, deposits and withdrawals in 1-5 seconds, TX168 is safe, 100% confident Number 1 online baccarat right now with great promotions TX168 collects the most exciting new games here in one place. Really easy to play, lots of bonuses big giveaways, fast deposits and withdrawals, no waiting long
https://sydneycuan2.com/ presenting a place for every true gamer to find the best-selling game choices on the internet.
Great article! Thanks for sharing this valuable information.
Great article! Thanks for sharing this valuable information.
Great article! Thanks for sharing this valuable information.
Great article! Thanks for sharing this valuable information.
Great article! Thanks for sharing this valuable information.
Great article! Thanks for sharing this valuable information.
Great article! Thanks for sharing this valuable information.
Great article! Thanks for sharing this valuable information.
Great article! Thanks for sharing this valuable information.
Great article! Thanks for sharing this valuable information.
It’s clear you’ve put a lot of effort into this. Keep up the great work—you’re definitely on the right track!
kali ini situs temanslot tidak main main kalau memberikan cashback yang cukup besar dan bonus mingguan yang tidak kalah besarnya
It’s clear you’ve put a lot of effort into this.
temanslot mengingatkan saya dengan kenangan yang paling terindah
Keep up the great work—you’re definitely on the right track!
These features look super handy, and the design is top-notch! You’re definitely showing your expertise here—keep it up!
The convenience of playing games can now be found just by joining together https://kembangcheat.com/
Topcer88 adalah salah satu situs judi online terpercaya yang menyediakan berbagai macam permainan seperti slot online Topcer88 Login
Dengan aplikasi ini, proses login jadi lebih cepat dan akses ke permainan jadi lebih praktis kapan pun dan di mana pun. Topcer88 Login
These features look super handy, and the design is top-notch!
Merahslot88 gives us a lot of information about how natural laws work
Cari tempat aman main slot? akun terpercaya cnnslot solusinya.
These features look super handy. You’re definitely showing your expertise here—keep it up!
You’re definitely showing your expertise here—keep it up!
Slot paling hoki minggu ini ada di cnnslot toto online terpercaya.
These features look super handy. keep it up!
situs toto
Udah banyak yang buktiin cuannya! Kamu kapan?
???? klik sekarang juga > IDEBET SLOT GACOR
These features are super useful, and the design is so sleek! How do you keep coming up with these ideas? Keep it up, you’re a true pro!
Livechat cnnslot support aktif terus tiap hari, mantap!
امروزه می توان در اکثر سایت هایی که در زمینه شرط بندی و پیش بینی بت فعالیت می نمایند آن را یافت و به شرط بندی و پیش بینی بر روی انواع مسابقات و رخداد های فوتبال پرداخت. بت
همانگونه که در ابتدای مقاله گفته شد، بهترین سایت شرط بندی فوتبال فارسی بایستی دارای ویژگی ها و قابلیت هایی نظیر موارد نام برده شده در زیر را داشته باشد. بت
BAMBUHOKI88 menyediakan banyak bonus yang memberikan keuntungan bagi anda member baru.
Pusatcheat adalah situs terpercaya yang sediakan cheat engine slot auto menang terkini serta sangat jitu. Dengan teknologi mutahir serta sistem terupdate, Pusat cheat 66 menolong para pemain mencapai kemenangan besar secara tidak berubah- ubah di bermacam tipe game slot online.
Pakai link situs resmi cnnslot ini biar gak nyasar ke situs palsu.
CNNSLOT adalah palfrom situs slot dan toto online ditahun 2025 yang dikenal sebagai salah satu situs bento penyedia slot gacor dan puluhan server toto online terbaru
Jadikan hari ini lebih beruntung dengan bermain di Ruby8000.
banyak orang terbantu dengan adanya website ini untuk mengakses link login temanslot
Great content and well-written! I personally relax by visiting ruby8000 and playing some slots.
dengan begini , caranya menjadi mudah untuk mengakses ke sebuah situs yang relefan
Clear explanation! For a relaxing break, I often go to link daftar ruby8000 and have some fun.
Pilihan terbaik untuk pemain slot online Indonesia? Tentu saja CNNSLOT!
Kalau mau gampang menang, coba spin sore di cnnslot login aman.
These features are super useful, and the design is so sleek!
daftar dan login alternatif cnnslot terbaru dengan slot gacor hari ini
Keep it up, you’re a true pro! These features are super useful, and the design is so sleek!
Kembali ke aksi, login cnnslot gacor terbaru sekarang.
ruby8000 update gamenya cepet banget, tiap minggu kayaknya ada yang baru.
Informasi di rtp8000 sangat lengkap, cocok untuk pemula.
Dan login alternatif juga sangat membantu lewat rtp8000 login link alternatif.
Banyak slot game dengan tema unik yang cuma saya temukan di rtp8000 slot.
Link CNNSlot resmi gak pernah down, worth it banget buat main tiap hari.
Saya suka tulisan ini. Tambahan referensi buat yang suka slot, bisa cek CNNSLOT untuk winrate tinggi.
Paling gacor hari ini di url alternatif ruby8000
هواداران دو تیم امیدوارند تا در این شهرآورد تهران شاهد نمایش فوق العاده از ستاره های خود باشند. رکوردهای دربی تهران
Jangan ketinggalan! Update terus di akses terbaru ruby8000
Fantastic article! Your writing style is engaging and easy to follow. Similar quality content can be found slot online with excellent presentation and clarity.
iş ilanları
secereli köpek
มาพร้อมเกมสล็อตคุณภาพเยี่ยมจาก PG Soft (Pocket Games Soft) ที่โดดเด่นด้วยกราฟิกสวยงาม ระบบเสียงสมจริง และฟีเจอร์เกมที่สร้างความตื่นเต้นให้กับผู้เล่นได้อย่างเต็มที่ PGSLOT
ถือเป็นหนึ่งในเว็บไซต์เกมสล็อตออนไลน์ที่มีผู้เล่นจำนวนมากทั้งในประเทศไทยและต่างประเทศ PGSLOT
How do you keep coming up with these ideas? Keep it up, you’re a true pro!
Impressive design! These features are super practical. Keep up the great work!
slot gacor
These features are super practical. Keep up the great work!
Temanslot works well for casual players like me.
I enjoy playing slots on Temanslot daily
Impressive Though and design! Keep up the great work!
slot dana
I love how practical and well-designed these features are! Definitely seems like you know your stuff—can’t wait to see what you come up with next!
I love how practical and well-designed these features are! Definitely seems like.
Our end-to-end d365 implementation Services ensure seamless integration, improved efficiency, and business growth for enterprises of all sizes.
Regina emang ratu sexy girls sih!
Dendeng balado adalah masakan khas Sumatera Barat dibuat dari irisan tipis
Dendeng balado adalah masakan khas Sumatera Barat dibuat dari irisan tipis.00
Definitely seems like you know your stuff—can’t wait to see what you come up with next!
betflik45 เข้าสู่ระบบ เดิมพันกับเว็บที่ดีที่สุดในประเทศไทย สมัครฟรี มีเครดิตให้ทุกยูส รวบรวมเกมสล็อตมากกว่า 2000 เกม จากค่ายคาสิโนชั้นนำของโลกมากมาย
you know your stuff—can’t wait to see what you come up with next!
These features are perfect for real-world use, and the design is flawless. You’re definitely a pro at this—keep going!
Terima kasih infonya sangat bermanfaat!
Mantap, saya suka konten ini!
Bagus sekali, lanjutkan berkarya!
Mantap, saya suka konten ini!
These features are perfect for real-world use, and the design is flawless.
MPO11 jadi andalan gue sekarang. Slot qris yang nggak ribet, tinggal scan langsung bisa main.
You’ve done it again—absolutely mind-blowing! Your creative brilliance never ceases to amaze me. Can’t wait for more!
Kami ingin mendengar pendapat Anda! Kunjungi cnnslot 2025 dan berikan komentar Anda.
Makasih infonya! Sekalian mau share juga, kalau kalian suka platform yang menghadirkan keseruan dan hadiah real, bisa coba IDEBET. Fiturnya lengkap, aksesnya gampang, dan tiap hari ada aja hal baru yang ditawarkan. Kalian bisa langsung kunjungi lewat sini: IDEBET.
MASUK DISINI IDEBET
These features are a game-changer! It’s clear you’ve put a lot of effort into making them practical. Keep up the fantastic work—you’re doing great!
It’s clear you’ve put a lot of effort into making them practical. Keep up the fantastic work—you’re doing great!
Your creative brilliance never ceases to amaze me. Can’t wait for more! This blew me away! Your creativity is in a league of its own.
OvaGames memiliki reputasi yang sangat baik.
These features are a game-changer! Keep up the fantastic work—you’re doing great!
Your creative brilliance never ceases to amaze me.! This blew me away! Your creativity is in a league of its own. Eagerly awaiting your next creation!
I’m impressed by the quality of content you consistently produce. Keep it up! cnnslot
These features are a game-changer!
Unreal talent! Every post you write is a masterpiece. Can’t wait to see what’s coming next!
Taruhan live paling seru ya di IDEBET, real time banget.
MASUK DISINI IDEBET
Unreal talent! Every post you write is a masterpiece.
The Black Blossom Dress by Flairs Studio is here to steal the spotlight! With its rich emerald-black hue, luxurious raw silk fabric black, and intricate maroon tulip embroidery.
The features are exactly what we need—practical and super well-designed. You’re definitely a pro in your field. Keep it up!
Thanks for sharing this topic! I completely agree with your points. If you’re looking to boost your online presence, working with an SEO Company in Bangalore could be a great choice. These experts can help improve your rankings and drive more traffic to your site. Thanks again for the great discussion!
Thanks for bringing up this topic! I totally agree with your insights. If you’re considering building or improving your website, partnering with a Web Development Company in Bangalore could be a smart move. These companies offer expert solutions that can help you create a user-friendly, responsive website that drives results. Thanks again for the great discussion!
A truly exceptional article, packed with meaningful insights and thoughtful perspectives. Incredibly valuable!
Your comment was an excellent addition to the conversation. It was clear, articulate, and brought up some great points I hadn’t considered. I love how you took the time to explore the topic in such detail!CasinoScoreBigBaller
The features are exactly what we need—practical and super well-designed.
You’re definitely a pro in your field. Keep it up!
An outstanding piece—rich with deep insights and thoughtful reflections. Every word adds real value. Truly impressive work!
In fact, LuckySpin is a betting and entertaining game based on the spinning of a wheel of fortune. بازی چرخش شانس
The prizes of this wheel can include multipliers, free recharges, betting bonuses or even instant cash profits. چرخش شانس
I love that flooring! Also the color combo of the Nantucket blue and the white is so clean and stylish. What a beautiful RV makeover!
Tiap hari pantau info slotgacor dari komunitas. Hari ini katanya Sugar Rush enak, dan ternyata bener. Game-nya connect terus, gak kaya biasanya. Bawa modal 200 ribu, pulang bawa 1,2 juta. Ngeri tapi nagih!
SERBU SEKARANG ATAU NYESEL SEUMUR HIDUP! UNIKBET lagi bagi-bagi rezeki, jangan sampe ketinggalan! ????????
Slot Gacor
The features are exactly what we need. You’re definitely a pro in your field. Keep it up!
I really appreciate the depth of research you put into your articles. cnnslot 2025
Practical and super well-designed. You’re definitely a pro in your field. Keep it up!
Link ini cukup membantu untuk tahu mana CNNslot asli: http://165.227.104.234/
Unikbet hadir sebagai login alternatif slot maxwin terbaik pagi ini. Menyediakan akses cepat ke permainan slot online gacor dengan peluang menang jackpot besar setiap hari.
Situs ini menawarkan berbagai jenis permainan mulai dari sportsbook, kasino online, slot, hingga permainan live casino judi bola
Jadi termotivasi nonton ini. Refresh dikit di linktemanslot enak juga.
This RV makeover is amazing—love how the easy Beyond Paint and laminate flooring brought a dose of Digital Dopamine that completely transformed the space! The bright, cozy vibe shows how simple updates can create a fresh, inviting home on wheels.
Cuanhack88 muncul bukan hanya sebagai cheat biasa, tetapi pemecahan ampuh buat kalian yang mau menang slot tanpa wajib tergantung pada hoki semata. Dengan bocoran pola gacor, jam spin terbaik, serta strategi terbukti, Cuanhack88 bantu kalian optimalkan kesempatan maxwin di tiap putaran. Sesuai buat pemain baru ataupun pro yang mau cuan tidak berubah- ubah tanpa ribet.
Biar gak nyesel, coba daftar di IDEBET sekarang!
Seru banget acaranya. Waktu kosong gua isi di temanslot resmi
Hanya bermain game di UNIKBET sudah pasti cuan banget, Silahkan langsung di download saja
Videonya kaya makna. Sama kayak isi saldo gua di temanslot resmi
UNIKBET
bukan hanya soal slot gacor, tapi juga soal pelayanan dan kenyamanan. Saya kerja kantoran dan kadang main slot buat hiburan di malam hari. Situs ini selalu stabil, bahkan di jam-jam sibuk. Provider-nya banyak, loading cepat, dan nggak pernah error. Plus, mereka kasih tips main, update jam gacor, dan promosi yang masuk akal. Nggak heran makin banyak yang pindah ke Unikbet. Recommended banget buat yang pengen main santai tapi tetap berpeluang cuan
Nikmati Pengalaman Bermain Paling Populer dengan Aman. Di UNIKBET, kami memahami bahwa keamanan dan kepercayaan adalah prioritas utama. Oleh karena itu, platform kami dilengkapi dengan teknologi enkripsi canggih untuk melindungi data pribadi dan transaksi finansial Anda.
Unikbet GAME THAILAND & SLOT TERBARU! Anti bosan, bikin dompet makin tebel tiap hari! ????????
Pure genius! You always deliver something extraordinary. Your unmatched creativity keeps me coming back!
Pure genius! You always deliver something extraordinary.
An exceptional piece—brimming with profound insight and crafted with meticulous precision. Every sentence feels intentional, weaving a narrative that’s both compelling and enduring. A truly masterful work that stands out with undeniable brilliance.
ankaranın en güzel escort bayanlarının site adresi ; Ankara Escort
Aku suka Main di RUBY8000 yang responsif dan enak dipakai di semua device.
Banyak yang memberikan ulasan positif tentang situs slot qris ini
Info tentang turnamen slot di artikel ini bikin saya teringat event seru di unikbet
beberapa bulan lalu. Hadiahnya luar biasa, dan walau saya nggak juara, sensasinya beda dibanding main biasa.
Unikbet WD LANCAR, GA ADA BATAS! Mau tarik 1 juta atau 100 juta, prosesnya cuma hitungan detik! ⚡????
Setuju banget kalau musik dan visual slot mempengaruhi mood. Di UNIKBET saya sering pilih game dengan tema santai supaya mainnya lebih lama tanpa stress. Efeknya, malah sering menang karena main lebih tenang.
Agenhack22 menghadirkan satu gerakan awal untuk mencapai kemenangan maksimal. Agen hack 22 melalui sebuah terobosan terbaru kini dengan cepat menjadi pilihan di berbagai kalangan masyarakat yang ingin merasakan keseruan bermain game.
Bioinformatics is an interdisciplinary field that combines biology, computer science, mathematics, and statistics to analyze and interpret complex biological data. It plays a critical role in areas such as genomics, proteomics, and drug discovery by enabling researchers to process large datasets, including DNA and protein sequences. With advancements in high-throughput technologies like next-generation sequencing, bioinformatics has become essential for understanding genetic variations, molecular functions, and disease mechanisms. The field allows for efficient data storage, retrieval, and analysis, providing insights that drive precision medicine and biotechnology innovations.
Compra tenis On Cloud Shoes en México Para correr, caminar o para el día a día Estilos cómodos y ligeros con envío gratis ¡Haz tu pedido hoy!
Unikbet DEPO 25RB BALIK 10JT! Gak percaya? Langsung aja coba, sensasi maxwinnya bikin ketagihan! ????????
เล่นสล็อตเว็บตรง PG SLOT อันดับ 1 ของไทย รวมเกมแตกง่าย โบนัสจัดเต็ม ฝากถอนออโต้ รองรับทรูวอเลท ทดลองเล่นฟรี สมัครเลย!
เล่น สล็อตเว็บตรง PG SLOT อันดับ 1 ของไทย รวมเกมแตกง่าย โบนัสจัดเต็ม ฝากถอนออโต้ รองรับทรูวอเลท ทดลองเล่นฟรี สมัครเลย!
777xk Game APK providing a great opportunity to every individual to earn real cash. This application is used by a number of people in Pakistan.
Info mantap, temanslot nyaman banget, daftar togel online gampang dicari.
สล็อตเว็บตรง PG SLOT ค่ายใหญ่ เว็บแท้ APIจริง แตกง่ายที่สุดในปี 2025 รวมเกมยอดนิยม Fortune Tiger, Lucky Neko พร้อมโปรสุดคุ้ม อันดับ 1 ของไทย
當遇到急需資金的狀況時,找到合法又快速的方式很重要。我最近參考了幾個平台,發現 借錢 的流程相對簡單,申請資料齊全的話,審核速度也非常快,很適合短期周轉。
Hanya butuh sebentar untuk menang di IDEBET
butuh sebentar untuk menang
situs slotgacor dengan bonus new member 100% di awal cnnslot
situs slotgacor dengan bonus new member 100% di awal cnnslot
situs slotgacor dengan bonus new member 100% di awal cnnslot
situs slotgacor dengan bonus new member 100% di awal cnnslot
situs slotgacor dengan bonus new member 100% di awal cnnslot
situs slotgacor dengan bonus new member 100% di awal cnnslot
situs slotgacor dengan bonus new member 100% di awal cnnslot
situs slotgacor dengan bonus new member 100% di awal cnnslot 2025
I am a busy mom to four children, wife to an amazingly supportive husband, & a passionate natural health practitioner
alternatif daftar situs gacor terbaik di tahun 2025 dengan fitur lengkap dan bonus 100% klaim di awal hanya di cnnslot 2025
cnnslot agen situs online dan toto online terpercaya di asia
I am a busy mom to four children, wife to an amazingly supportive husband, & a passionate natural health practitioner
cnnslot agen situs online dan toto online terpercaya di asia
Baru main di CNNSLOT dan langsung merasakan kestabilan server yang sangat stabil. Ga ada lag sama sekali!
Tingkat kemenangan 97% di CNNSLOT itu bukan main-main. Saya sudah membuktikannya sendiri!
Situs terbaik! CNNSLOT menghadirkan permainan toto online terlengkap yang pernah saya temui.
PGSLOT สล็อต PGเว็บตรงแท้ รวมทางเข้าสล็อตและเกมแตกง่าย อันดับ 1 ของไทย ฝากถอนออโต้ ไม่มีขั้นต่ำ รองรับมือถือ ทดลองเล่นฟรี
Unexpected trips do not need to be stressful Business Class Deals allow you to take the pleasure of the luxury travel when making your ticket reservation just before departure. From surprise business meeting trips to impulsive getaways .AskforAirlines helps in grabbing the best deals with premium access, such as lounge, selection of cabins, and food cuisine of your choice. Airlines also sell the ticket at a price when chairs are to fill up so that frequent travellers can profit and save some bucks.
Integrating our expertise on the field of engineering, marketing, design, industry, among others, to provide smart and innovating solutions to every kind of clients, from oil and gas companies to e-commerce companies slot
Artikel ini menambah perspektif baru, qqdewi juga memberi sudut pandang lain.
Cenforce is available in a variety of dosages, including Cenforce 100, Cenforce 150, and Cenforce 200. Cenforce 100
MACANCUAN adalah link game online modern yang dirancang untuk menghadirkan hiburan seru kapan saja dan di mana saja. Dengan akses cepat serta tampilan antarmuka yang ramah pengguna, pemain bisa merasakan pengalaman bermain lebih praktis dan menyenangkan.
Travelo Africa offers unforgettable African travel experiences, connecting explorers with the continent’s rich wildlife, vibrant cultures, and breathtaking landscapes. From thrilling safaris to cultural tours, our expert-curated journeys ensure authenticity, safety, and sustainability. Trusted by travelers worldwide, Travelo Africa is your gateway to explore Africa with purpose and passion.
Meqaat is the designated boundary where pilgrims must enter Ihram for Hajj and Umrah. Understanding Meqaat locations—Dhul Hulayfah, Al-Juhfah, Qarn al-Manazil, Yalamlam, and Dhat Irq—is vital for a valid pilgrimage. Whether traveling by land or air, assuming Ihram before crossing Meqaat is mandatory to fulfill Islamic rites correctly. Proper preparation ensures a smooth, spiritually fulfilling Hajj and Umrah journey, avoiding penalties and enhancing worship experience.
You can access Amerilingua’s ESL lesson plans by visiting the website and signing up for one of the subscription plans. esl worksheets
Yes, each lesson plan typically includes worksheets, speaking activities, and homework assignments that are designed to reinforce learning and engage students in practical exercises. esl worksheets
Awesome post! If you’re interested in more on this topic, I recently wrote about how to optimize content for AI overviews — with actionable tips that help boost visibility in AI-powered search results. Check it out! https://telegra.ph/How-to-Optimize-Content-for-AI-Overviews-Tactics-That-Work-09-24
Mahakal Official Online Book is the official digital platform for advance bookings at the Mahakaleshwar Temple in Ujjain. It provides a convenient way for visitors to secure slots for darshan, aarti, and other services, ensuring better crowd management and a smooth temple experience. All bookings are managed under the supervision of the temple’s official administration to maintain order and authenticity.
painting cabinets and even painting the faux wood cabinets in our camper. I discovered a product called
I’ve been consistently impressed with the accuracy of the rtp cnnslot information, which has become an essential part of my daily gaming strategy and has significantly improved my winning potential over time.
As an experienced online gambler, I can confidently say that this agen resmi slot88 maintains the highest standards of professionalism and fair play that I’ve encountered throughout my years of playing various online casinos.
I make it a crucial part of my routine to check the updated slot gacor hari ini list every morning, as this valuable information has consistently guided me toward the most profitable games available on the platform.=
รวมเกมสล็อตเว็บตรง สล็อตเว็บตรง เว็บใหม่ล่าสุด 2025 เล่นง่าย โบนัสแตกบ่อย ฝากถอนออโต้ ไม่มีขั้นต่ำ รองรับวอเลท สมัครฟรี พร้อมเกมใหม่อัปเดตทุกวัน!
My strategic gaming approach has been completely transformed through adoption of the analytically sophisticated slot gacor hari ini recommendations, which integrate quantitative data with qualitative assessment to identify genuinely valuable gaming opportunities.
Often when you use a Virtual Private Network, whether that be free or paid, the process involves setting up an account specific to you as a user.
The career-defining moment of winning the major jackpot slot88 was managed with such operational precision that it has validated my choice of this platform as my primary gaming destination.
This distinguished situs slot gacor mudah jackpot maintains its competitive advantage through continuous platform enhancement while preserving the fundamental principles of transparency and reliability that form its foundation.
I’ve been searching for a reliable platform and finally found it with cnnslot. The RTP live feature is a game-changer for planning my gameplay.
Great insights! This blog really explains the topic in a simple and detailed way. I found it very helpful and informative. Looking forward to more such valuable content from you!
The “My Favorite” game list on this situs slot gacor mudah menang setiap hari is a convenient feature that saves me time searching.
On Cloud Shoes
Shop official On Cloud shoes online in the UK Discover Cloud 5, Cloudnova and more Swiss engineered men’s and women’s runners built for comfort and speed
I started playing at cnnslot after a friend recommended it, and I’ve been hooked ever since. The RTP feels really fair, and I’ve had several small wins that keep me motivated. What I love most is how smooth the site runs even during busy hours. The bonus system also makes the experience more exciting every day.
cnn slot has been surprisingly consistent when it comes to payouts. I’ve played on a lot of platforms before, but this one stands out because it feels fair and transparent. The slot variety is amazing, and I can always find something that fits my style. Definitely one of the best RTP slot sites in Indonesia.
Your RV makeover sounds amazing! Precision and planning are key in any remodeling project — just like using a flag union calculator helps ensure perfect proportions and alignment. It’s all about getting every detail right!
I’ve been playing on rtp8000 for a while now and I’m impressed with how stable and responsive the platform is. Even when my internet connection isn’t great, the site loads quickly and smoothly. It really feels like one of the most optimized slot platforms available right now.
I’ve been playing on rtp8000 for weeks now, and I love how simple and secure the deposit process is. The minimum deposit of 10 ribu is perfect for casual players like me who still want to experience big wins. The platform feels professional and trustworthy from start to finish.
Якщо вам потрібно знайти хороший магазин квітів, Букетіо – це саме те місце, яке варто відвідати. Я замовляв букет для колеги на день народження, і він виглядав просто чудово. Квіти https://buketio.com.ua/ були свіжі, а доставка точна. Букетіо точно не підведе в важливий момент.
I’ve played on many gambling platforms, but rtp8000 really stands out as a bandar online sports terpercaya. The live betting options for basketball are smooth and easy to access. I feel safe depositing funds and confident that my winnings are handled securely. It’s rare to find a site this trustworthy in the online betting world.
It’s rare to find such well-balanced arguments in online articles these days.
On Cloud Schuhe
Kaufen Sie original On Schuhe in Deutschland Ideal zum Laufen, Gehen oder für den Alltag Stylische On Cloud Shoes mit kostenlosem Versand
Using rtp8000 for daily gaming has completely transformed my experience. With real-time RTP, generous bonuses, fast deposits and withdrawals, and a wide variety of slots, I feel like I’m playing in a premium casino environment at home.
Dikenal dengan sistem transaksi cepat, keamanan berlapis, serta berbagai pilihan permainan populer, HARGATOTO menjadi destinasi utama bagi para pemain yang mencari keseruan, kejujuran, dan kemenangan nyata di dunia slot online dan togel 4D terpercaya. slot online
I went to Ivanafarisei because my short haircut was growing unevenly, and I wanted to fix it before an event. The stylist suggested hair extensions for short hair, and I couldn’t believe how seamless the blend looked. It didn’t feel fake at all, and the color match was perfect. The salon staff treated me with respect and explained every step clearly. Highly recommend https://ivanafarisei.co.uk/short for anyone hesitant to try extensions.
I truly appreciate the effort put into this post. The content is clear, well-structured, and very easy to understand. It provides valuable insights and is extremely helpful viajes a la India
สมัคร สล็อตเว็บตรง ผ่าน M-SMART ระบบยืนยันหมายเลขมือถือรูปแบบใหม่ เข้าเล่นได้ทันทีโดยไม่ต้องรหัสผ่าน
Danamax777 content focuses on the quality of its online slot games, with the highest average content of all the sites.
m.danieljball.co.uk IDEBET
Umrah Deals UK specialises in providing spiritually enriching and expertly coordinated Umrah packages for pilgrims across the UK. With a commitment to excellence, transparency, and Islamic values, we offer tailored itineraries, trusted accommodation near the Haramain, and seamless ground services. Our mission is to make every pilgrim’s journey to Makkah and Madinah peaceful, memorable, and guided with sincerity and Barakah.
Why Choose IPTV Canada for Your Streaming Needs? IPTV Canada
Sydneycuan hadir sebagai situs slot terpercaya dengan peluang menang yang lebih besar di setiap permainan. Dengan sistem yang aman, tampilan modern, serta berbagai pilihan game populer, Sydneycuan menjadi tempat terbaik bagi para pencinta slot online.
non-stop winning wholesale site
LIGAPEDIA is once again a hot topic among players due to its reputation as a Non-Stop Winning Wholesale Site
Enjoy world-class travel with Thai Airways Flights from UK, connecting London Heathrow to top Thai destinations. Known for safety, comfort, and exceptional service, Thai Airways flights from UK makes every journey relaxing and convenient.
Super helpful and easy to follow, really appreciated it. PrimoGaming
Super helpful post, thanks for sharing your knowledge! primocares
Great write-up! This is the kind of content that keeps me coming back. TMT Cash
Discover and download the best productivity tools at getintopc.
Umrah Tour Package offers UK pilgrims spiritually enriching Umrah journeys that run smoothly from start to finish. With honesty, quality, and Islamic values at the heart of our work, we create personalised itineraries, arrange stays close to the Haramain, and manage all ground services with care. Our aim is for every pilgrim to experience a peaceful, memorable, and blessed visit to Makkah and Madinah.
Qatar Airways flights from the UK provide convenient access to destinations worldwide with top-tier service and comfort. Flying from major UK airports, travellers can enjoy flexible schedules, modern aircraft, and premium in-flight experiences. Ideal for both business and leisure trips, Qatar Airways flights from UK ensures smooth long-haul journeys, competitive fares, and a reliable, enjoyable travel experience, making Travel from UK seamless and stress-free for every passenger.
What a brilliant RV makeover guide! The easy-to-follow instructions and inspiring before-and-after photos make transforming a mobile space feel completely doable. Thanks for the creativity and helpful ideas! Visit: Cricket ID Provider Online
Thank you for sharing such helpful info, really appreciated! Primo Gaming 99
I recently arranged my Umrah pilgrimage through the Islamic Travel Agency, and I can’t recommend them highly enough. The entire experience was smooth, well-organised, and truly professional. Their ATOL protection gave me real peace of mind, and their team provided exceptional support, including clear, step-by-step visa guidance. Our accommodation in Makkah was excellent—a spotless, comfortable 5-star hotel located just a short walk from the Haram, which made completing our Umrah so much easier. It was a completely stress-free and spiritually enriching journey from start to finish. If you’re searching for a trustworthy and knowledgeable UK-based Islamic travel agency for Hajj or Umrah, this is the one to choose. JazakAllah Khair!
Travel from UK airports opens the door to destinations worldwide, offering convenience, choice, and affordability. Passengers can find competitive fares and flexible flight options to suit holidays, business trips, or family getaways. From short European escapes to long-haul adventures, Travel from UK ensures smooth connections, comfortable journeys, and modern airport facilities, making global travel from Britain easy, reliable, and enjoyable for all types of travellers.
Buy Premium Quality Research Chemicals Online
High-Quality Research Chemicals for Sale
Buy Premium Quality Research Chemicals Online
Shop High Premium Quality Research Chemicals Online
Herbal Incense & Legal Buds
Shop Europe Strongest Legal Highs
fitness gym equipment
shop research chemicals
shop fitness equipment
research chemicals for sale
Home Gym Fitness
Weight Bench For Sale
Dumbbells For Sale
Functional Trainer
Kettlebell For Sale
Multi-Station Gym
Smith Machines
Weight Plates For Sale
Shop Top-Quality Home Gym Fitness Equipment
I appreciate how well-structured this article is, easy to read and understand! TMT Play
I recently arranged my Umrah pilgrimage through the Islamic Travel Agency, and I can’t recommend them highly enough. The entire experience was smooth, well-organised, and truly professional. Their ATOL protection gave me real peace of mind, and their team provided exceptional support, including clear, step-by-step visa guidance. Our accommodation in Makkah was excellent—a spotless, comfortable 5-star hotel located just a short walk from the Haram, which made completing our Umrah so much easier. It was a completely stress-free and spiritually enriching journey from start to finish. If you’re searching for a trustworthy and knowledgeable UK-based Islamic travel agency for Hajj or Umrah, this is the one to choose. JazakAllah Khair!
2drtmf
This was a very informative article that presented the topic in a clear and engaging way. I learned a lot from it. For more quality content, check out davo88 Keep going!
I arranged my Umrah journey with Ready 2 Travels, and the service exceeded all expectations. From the very beginning, everything was handled with professionalism and care, making the entire process seamless and worry-free. Their ATOL protection provided complete reassurance, and the team guided us clearly through every visa step. Our stay in Makkah was outstanding—a clean, luxurious 5-star hotel just minutes from the Haram, which made performing Umrah incredibly convenient. The trip was peaceful, well-managed, and spiritually uplifting. If you’re looking for a reliable and experienced UK-based agency for Hajj or Umrah, Ready 2 Travels is an excellent choice. JazakAllah Khair.
Helpful and well-organized. Subscribed to your newsletter.
A Trusted Umrah travel agency in UK ensures quality service, transparency, and reliable support. Offering affordable umrah packages 2026 from uk, we help pilgrims focus fully on worship while we manage all travel details professionally.
Your writing style made this article enjoyable and informative. I learned something new today. Readers wanting more content should visit cnnslot
I found this article very useful and clearly written. The explanations were straightforward. For more similar content, check out paris888
This is one of the best articles on the topic I’ve seen recently.
Sydney303 merupakan brand digital kekinian yang dirancang untuk menghadirkan hiburan harian yang seru, kreatif, dan mudah diakses. Platform ini menawarkan beragam konten, aktivitas, dan fitur interaktif yang cocok untuk pengguna muda yang mencari pengalaman online yang simpel namun tetap menarik.
Cashback bola 8%? Udah biasa.
Sekarang saatnya yang lebih keren!
🔥 PASARLIGA hadir dengan Cashback Bola 10%
🎁 Bonus dibagikan 2x dalam 1 minggu
Gaspol tanpa ragu, mantapkan kemenanganmu!
👉 Buruan join ke Pasarliga sekarang juga!
https://rumarumahotels.com/
Buy Now Tenis On Cloud with premium quality and a perfect fit. These shoes are made for both men and women with perfect fit and designs.
https://oncloudsshoes.com.mx/
Buy Now Palm Angels premium streetwear fits with modern design and colors to enhance your daily fashion. Get Up To 30% Off with free delivery.
https://palmangelss.com.mx/
PASARLIGA offers a comfortable playing experience for both beginners and professional bettors. We offer a comprehensive selection of betting markets, from international soccer betting, top European leagues, mix parlays, to various other popular sporting events.
Düzce Egemer Mermer Granit Cimstone tezgah montajı zamanında yapıldı ve ölçü hassasiyeti gerçekten çok iyiydi. https://egemermergranit.com.tr/
Really useful stuff. I’ve bookmarked this page. Hello from Yakutsk! Down for a link exchange?
In the world of game walkthroughs, players are always searching for better experiences, especially when they try to best games 2025 from trusted sources. Many gamers explore different genres such as game patches download or even deep story-based multiplayer online games to discover new entertainment. As the demand grows, the trend of gaming news today continues to shape the gaming community and attract more users every day.
في حالات وجود بقع رطوبة على الجدران، توصية سريعة دائمًا: قم بكشف تسربات المياه قبل أي علاج للحشرات لأن السبب غالباً ما يكون داخلياً. المقال يشرح طرق التشخيص.
Düzce Egemer Mermer Granit’ten yaptırdığımız porselen tezgah hem görünüm hem de kullanım açısından beklentimizin üzerinde oldu.https://egemermergranit.com.tr/
Solid suggestions — would be great to see a downloadable checklist.
Güzel aydınlatıcı makale için teşekkürler daha iyisi samda kayısı umarım faydalı çalışmalarınızın devamı gelir.
Love the site! Saved to bookmarks. Greetings from Yakutia. Link exchange?
This article feels thoughtfully written and clearly aimed at helping readers understand the topic. I explored similar ideas on piala88.
The official online handicap soccer betting site and mix parlay betting agent is a trusted platform that provides complete soccer betting services with a professional and secure system.
The official online handicap soccer betting site and mix parlay soccer betting agent is a trusted platform that provides handicap and mix parlay soccer betting with high odds, fast access, and the best service.
Helpful post! Bookmarking this for later. Hi from Yakutsk. Link exchange?
I planned my Makkah Trip for Umrah with a UK-based travel agency, and the experience exceeded all expectations. From the very beginning, everything was handled with professionalism and care, making the entire journey seamless and stress-free. The ATOL-protected services provided complete peace of mind, and the team guided us clearly through every step of the visa process.Our stay in Makkah was exceptional. We were accommodated in a clean and luxurious 5-star hotel just minutes away from the Haram, which made performing Umrah extremely convenient and spiritually uplifting. The entire Makkah Trip was peaceful, well-organized, and truly rewarding. For anyone looking for a reliable and experienced UK-based agency for Hajj or Umrah, this is an excellent choice.
Thanks a million! Bookmarked. Great site! Greetings from Yakutsk. Link swap?
I very delighted to find this internet site on bing, just what I was searching for as well saved to fav
Thank you for the update. Great site layout. Greetings from Yakutsk! Let’s consider a link exchange.
For the reason that the admin of this site is working, no uncertainty very quickly it will be renowned, due to its quality contents.
Awesome stuff! Saving this. I�m from Yakutia. Would be glad to exchange links!
Can’t believe how good MovieBlast is for watching my favorite films anytime!
I learned a lot from this. Saving it for later!
Great site! So much good info. Saved! From Yakutia with love. Link exchange?
Music was a bit too new-agey for my taste, but the technique was superb. A sonically strange, but skillful ending.
I do not even understand how I ended up here, but I assumed this publish used to be great
Many people today are increasingly interested in subjects like Crypto because of their major influence on global technology and financial systems. At the same time, the rise of markets such as Artificial intelligence attracts individuals who want to explore new opportunities and learn how digital economies operate. Others choose to study areas like Forex to understand long‑term strategies, risk management, and potential growth across different sectors.
In the world of safe websites to download pc games, players are always searching for better experiences, especially when they try to online multiplayer browser games from trusted sources. Many gamers explore different genres such as free full version games or even deep story-based trending games to discover new entertainment. As the demand grows, the trend of game reviews continues to shape the gaming community and attract more users every day.
In the world of best action games for pc, players are always searching for better experiences, especially when they try to download free action games for pc from trusted sources. Many gamers explore different genres such as online multiplayer browser games or even deep story-based game walkthroughs to discover new entertainment. As the demand grows, the trend of free online games continues to shape the gaming community and attract more users every day.
Perfect post-flight recovery. Unknotted all the travel stiffness. A jetlag-beating ending.
They remembered my preference from last time. Excellent customer service. A personalized and familiar ending.
Bahis, çeşitli kullanıcı dostu para yatırma ve çekme yöntemleri sunan bir bahis şirketidir
Sydney303 mengangkat konsep Slot Garansi sebagai sebutan yang selalu muncul dalam diskusi hiburan digital berbasis game.
This is really interesting, You’re a very skilled blogger. I’ve joined your feed and look forward to seeking more of your magnificent post. Also, I’ve shared your site in my social networks!
Explore thoughtfully designed Umrah Packages from Canada with convenient flights, comfortable hotels near Haram, guided support, and flexible dates. Experience a smooth, spiritually fulfilling journey tailored for Canadian pilgrims.
I like the efforts you have put in this, regards for all the great content.
Very well presented. Every quote was awesome and thanks for sharing the content. Keep sharing and keep motivating others.
Awesome! Its genuinely remarkable post, I have got much clear idea regarding from this post
Walked in stressed, walked out floating. The transformation was real. A transformative ending.
You’re so awesome! I don’t believe I have read a single thing like that before. So great to find someone with some original thoughts on this topic. Really.. thank you for starting this up. This website is something that is needed on the internet, someone with a little originality!
Solved my knotty shoulder problem in just one session. Professional and effective. A healing ending.
dxd global | Marka yönetimi Kıbrıs , sosyal medya yönetimi, promosyon ürünleri, Seslendirme Hizmeti , SEO , Dijital pazarlama , Videografi
gerçekten güzel bir yazı olmuş. Yanlış bildiğimiz bir çok konu varmış. Teşekkürler.
Good post! We will be linking to this particularly great post on our site. Keep up the great writing
Su yalıtımı, su izolasyonu, çatı su yalıtımı, banyo su izolasyonu ve sprey poliüretan su yalıtımı projelerinde Yalıtımcı firmasının sunduğu çözümler uzun ömürlü ve güvenli sonuçlar sağlıyor.
โพสต์นี้ อ่านแล้วเข้าใจง่าย ค่ะ
ดิฉัน เคยเห็นเนื้อหาในแนวเดียวกันเกี่ยวกับ ประเด็นที่ใกล้เคียงกัน
ที่คุณสามารถดูได้ที่
pgslot99
สำหรับใครกำลังหาเนื้อหาแบบนี้
มีตัวอย่างประกอบชัดเจน
ขอบคุณที่แชร์ คอนเทนต์ดีๆ นี้
จะรอติดตามเนื้อหาใหม่ๆ ต่อไป
There is definately a lot to find out about this subject. I like all the points you made
Su yalıtımı, asansör su yalıtımı, sürme su yalıtımı, kapalı otopark su yalıtımı ve şeffaf su yalıtımı konularında Yalıtımcı firmasının projeleri hem estetik hem dayanıklı.
Su yalıtımı, asansör su yalıtımı, sürme su yalıtımı, kapalı otopark su yalıtımı ve şeffaf su yalıtımı konularında Yalıtımcı firmasının projeleri hem estetik hem dayanıklı.
Su yalıtımı, asansör su yalıtımı, sürme su yalıtımı, kapalı otopark su yalıtımı ve şeffaf su yalıtımı konularında Yalıtımcı firmasının projeleri hem estetik hem dayanıklı.
Su yalıtımı ve su izolasyon konusunda araştırma yaparken Yalıtımcı firmasının uygulamalarını inceledik. Çatı su yalıtımı, banyo su izolasyonu ve asansör su yalıtımı çözümleri sayesinde hem iç hem dış mekanlarda uzun ömürlü ve güvenli bir koruma sağlanıyor.
Su yalıtımı ve su izolasyon konusunda araştırma yaparken Yalıtımcı firmasının uygulamalarını inceledik. Çatı su yalıtımı, banyo su izolasyonu ve asansör su yalıtımı çözümleri sayesinde hem iç hem dış mekanlarda uzun ömürlü ve güvenli bir koruma sağlanıyor.
🔥 Looking to join the coolest groups out there? Don’t miss out! Click GroupSor to explore exclusive groups where you can connect, share, and grow with like-minded people!
เว็บ PG สล็อตแตกยับ! ทำกำไรได้จริง แค่ปลายนิ้วก็รวยได้!,เบื่อเกมสล็อตยากๆ?
ลอง PGSLOT สิ! สล็อตแตกจริง ทำกำไรเน้นๆ,โอกาสทองมาแล้ว!
PGSLOT ให้ไม่อั้น ทุกคนที่สมัคร,ทุนน้อยก็รวยได้!
PGSLOT สล็อตทุนน้อย กำไรงาม กำไรงาม,สมัคร
PGSLOT เลย! พิชิตแจ็คพอตหลักล้าน ได้เลย,
สุดยอดเกมสล็อตและโบนัสจัดเต็ม
มีแค่ PGSLOT ที่เดียว!,
PGSLOT: คืนยอดเสียสูงสุด!
เล่นเสียก็ยังได้คืน ไม่มีอะไรจะคุ้มไปกว่านี้แล้ว,สมัครวันนี้ รับเลย!
PGSLOT จัดเต็มโบนัสต้อนรับสมาชิกใหม่ ไม่ต้องรอ!,ห้ามพลาดเด็ดขาด!
พีจีสล็อต โปรโมชั่นโดนใจ แจกโบนัสเพียบ,ฝากน้อยได้เยอะกับ
PGSLOT! สิทธิพิเศษมากมาย ไม่อั้น!,พีจีสล็อต แนะนำเพื่อน รับค่าคอมมิชชั่นสูงที่สุดในไทย!,
คุ้มยิ่งกว่าคุ้ม!
เล่น PGSLOT มีแต่ได้กับได้ โบนัสเพียบ โปรแน่น,
สนุกกับ PGSLOT ได้ทุกที่!
ใช้งานง่ายทุกอุปกรณ์
ครบครันในหนึ่งเดียว,
ปลอดภัยหายห่วง! พีจีสล็อต เว็บตรง ไม่ผ่านเอเย่นต์
ระบบออโต้ ฉับไว!,พร้อมดูแลตลอด 24 ชั่วโมง!
ทีมงานคุณภาพ บริการรวดเร็ว,PGSLOT
เว็บสล็อตยอดนิยม มั่นคงและเชื่อถือได้,เข้าเล่น PGSLOT ได้ทันที ไม่ต้องโหลดแอพให้ยุ่งยาก สะดวกสบายสุดๆ,เล่นเกมไม่มีกระตุก!
PGSLOT เล่นมันส์ไม่มีเบื่อ,
ยืนยันจากผู้เล่นจริง!
พีจีสล็อต จ่ายจริงทุกยอด!
เล่นแล้วรวย!,ประทับใจบริการ PGSLOT
มาก ไม่ต้องรอนานเลย ทันใจทุกครั้ง,นี่แหละสล็อตที่ตามหา!
พีจีสล็อต เล่นง่าย ได้เงินจริง ทำกำไรได้เยอะ!,จากใจคนเคยเล่น!
PGSLOT ตรงใจทุกความต้องการ ไม่ผิดหวังแน่นอน,ถ้ายังไม่ลอง PGSLOT คุณพลาดแล้ว!
โอกาสสร้างรายได้ มาคว้าไปเลย!,สุดยอดเว็บสล็อตแห่งปี!
PGSLOT เกมสนุกๆ ให้เลือกเยอะมาก
Su yalıtımı ve su izolasyon konusunda araştırma yaparken Yalıtımcı firmasının uygulamalarını inceledik. Çatı su yalıtımı, banyo su izolasyonu ve asansör su yalıtımı çözümleri sayesinde hem iç hem dış mekanlarda uzun ömürlü ve güvenli bir koruma sağlanıyor.
The transparency in displaying draw histories, RNG certifications, and official licensing on toto8000‘s website fosters a level of trust that is essential for enjoying online lottery play.
naturally like your web site however you need to take a look at the spelling on several of your posts. A number of them are rife with spelling problems and I find it very bothersome to tell the truth on the other hand I will surely come again again.
Su yalıtımı ve su izolasyon konusunda araştırma yaparken Yalıtımcı firmasının uygulamalarını inceledik. Çatı su yalıtımı, banyo su izolasyonu ve asansör su yalıtımı çözümleri sayesinde hem iç hem dış mekanlarda uzun ömürlü ve güvenli bir koruma sağlanıyor.
Celebrate football excellence with the AC Milan Ruben Loftus Varsity Jacket. This premium outerwear piece features a high-quality red wool body paired with sleek black leather sleeves, perfectly representing the iconic colors of the San Siro. With a comfortable rib-knitted collar and a classic button closure, this jacket offers a sharp, athletic fit that allows every fan to display their team pride with a sophisticated, streetwear edge.
Mahadev Book is a rapidly growing online platform that provides cricket-related information and live gaming updates through secure access and a user-friendly interface. Known for its smooth navigation, real-time match coverage, and responsive support, Mahadev Book offers users a streamlined way to explore various sports markets, manage transactions efficiently, and enjoy an interactive digital experience suitable for both new and experienced viewers.
dxd global | Marka yönetimi Kıbrıs , sosyal medya yönetimi, promosyon ürünleri, Seslendirme Hizmeti , SEO , Dijital pazarlama , Videografi
I truly appreciate the effort put into this post. The content is clear, well-structured, and very easy to understand. It provides valuable insights and is extremely helpful
Mahadev Book is a popular platform designed for players who enjoy smooth and engaging online gameplay. The user-friendly Mahadev Book App makes it simple to access a wide range of games in just a few clicks. With secure login, fast performance, and 24/7 support, it ensures a hassle-free experience.
Mahadev Book has become my go-to platform — super fast deposits, smooth live, and really clean app design. Loving the experience! The odds feel fair, and withdrawals come without unnecessary delays. It’s a solid choice for anyone who wants a reliable and hassle-free panel.
FairplayPro delivers one of the smoothest experiences I’ve ever had. The live tables run flawlessly, and the odds update instantly during fast-paced matches. It feels secure, modern, and perfect for both beginners and experienced.
FairplayPro is a premium sports and liveplatform designed for players who want fast markets, smooth gameplay, and trustworthy service. With a user-first interface and reliable payouts, FairplayPro delivers a seamless experience across cricket, football, games.
Reddybook is a modern platform offering simple registration, instant deposits, and a wide range of sports markets. Trusted by thousands of users, Reddybook combines speed, security, and user-friendly features for hassle-free.
Reddybook always impresses with quick odds updates and zero lag during live matches. It’s easily one of the most reliable panels I’ve used. The interface is beginner-friendly, and payments reflect quickly every time. Definitely a trusted platform for daily cricket action.
Laser247Pro is a next-generation platform built for speed, accuracy, and smooth navigation. From live sports markets to top games, Laser247Pro provides a reliable, secure, and enjoyable experience for both new and advanced players.
Cricbet99 is built for true cricket enthusiasts, offering real-time odds, quick settlements, and an easy-to-use environment. Our platform focuses on transparency, fast performance, and providing the best experience for live cricket and T20 league.
This was beautiful Admin. Thank you for your reflections.https://heosexhay.net/
For the reason that the admin of this site is working, no uncertainty very quickly it will be renowned, due to its quality contents.
For the reason that the admin of this site is working, no uncertainty very quickly it will be renowned, due to its quality contents.
Backed by over 15 years of experience in the cannabis industry, our team is dedicated to providing a reliable mail order marijuana service across Canada. low price bud