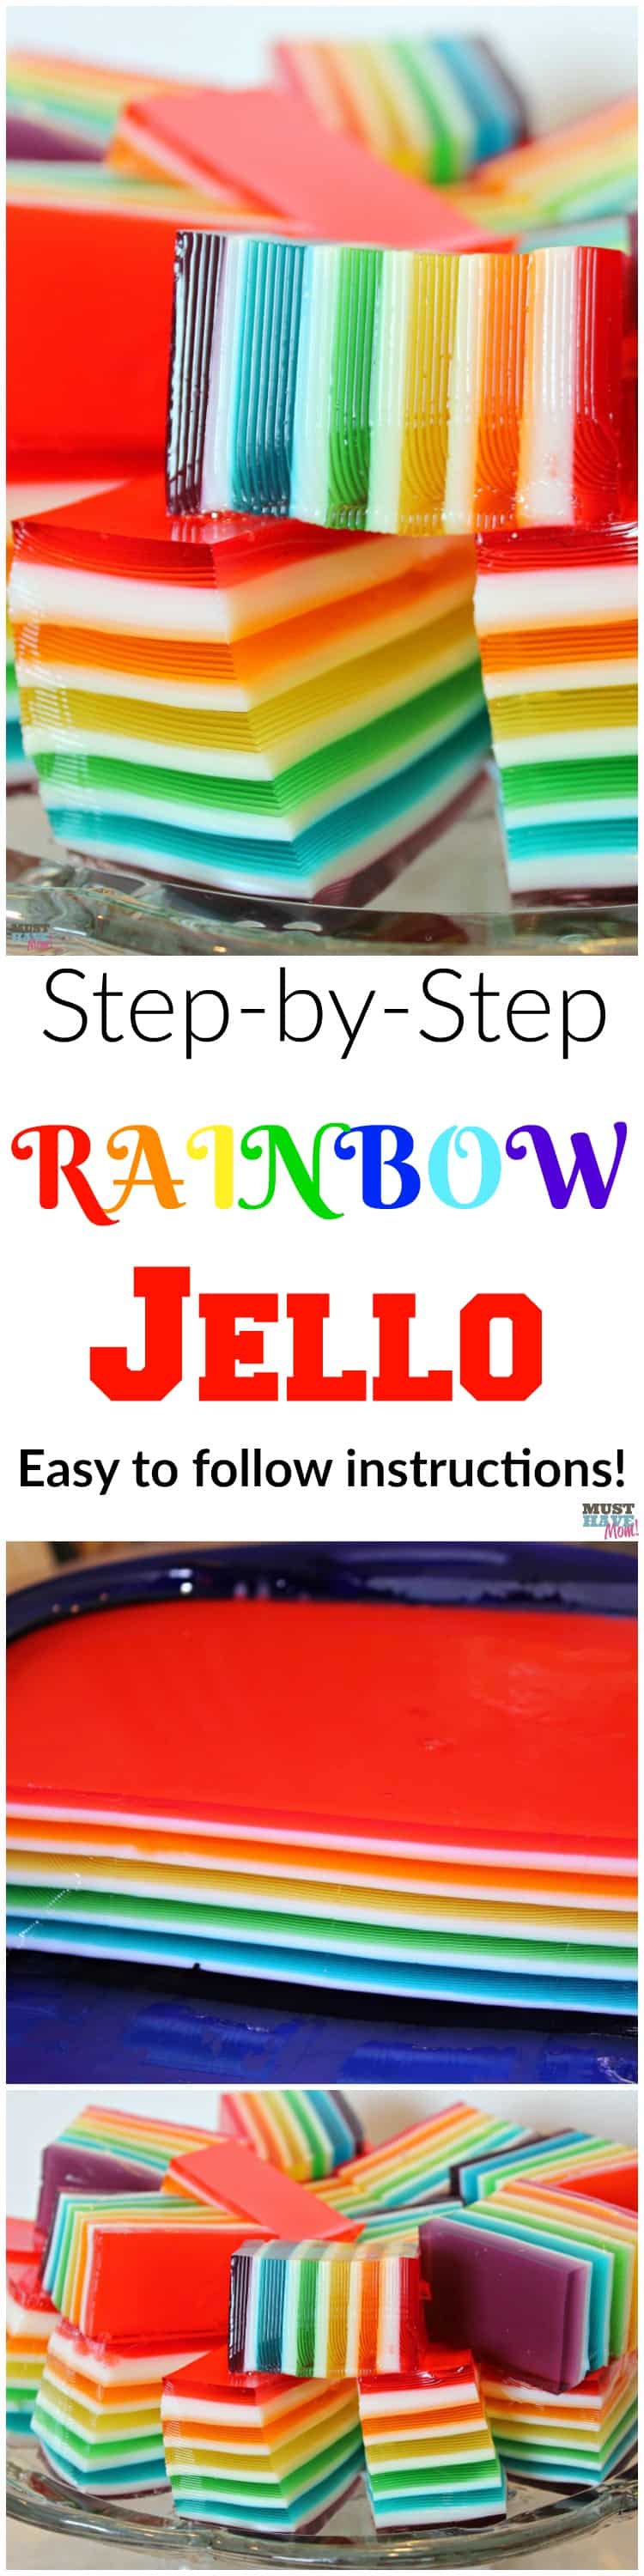
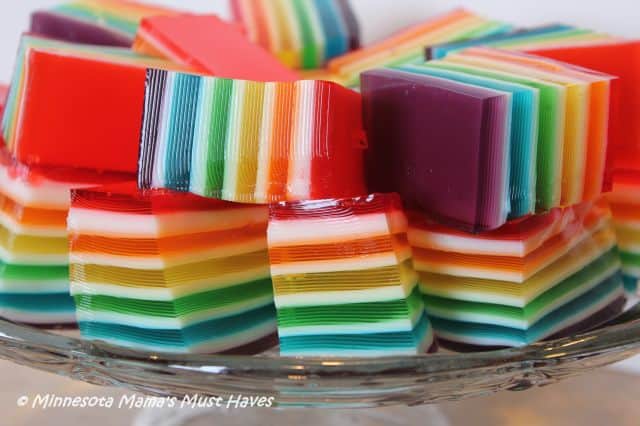
Rainbow Jello Recipe & Instructions
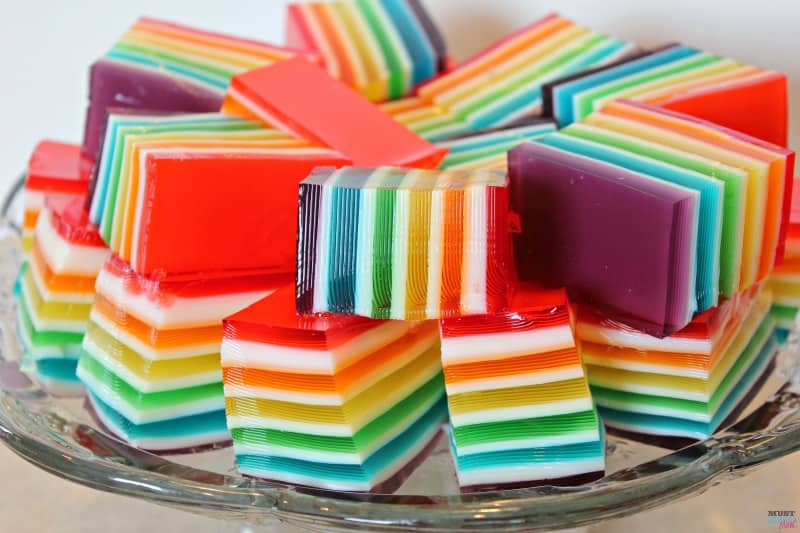
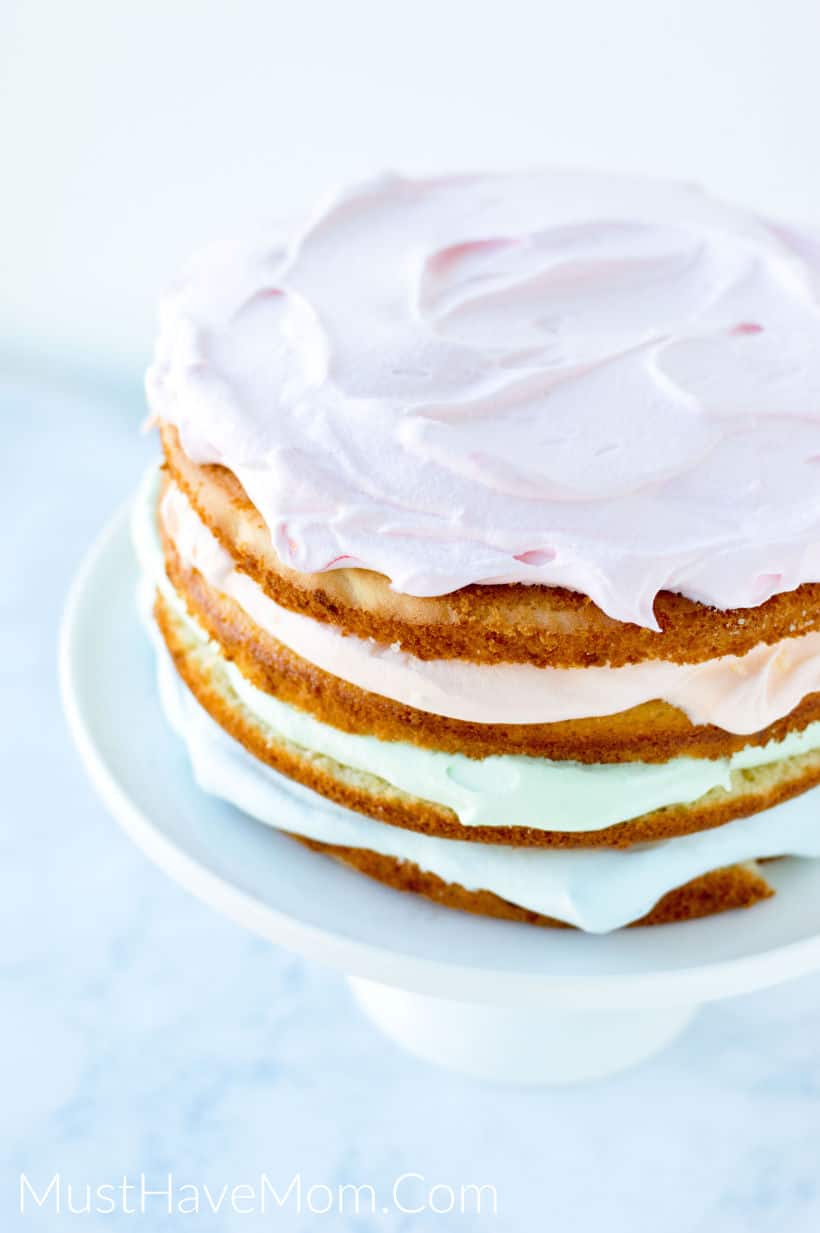
We celebrated Danika’s Birthday this year with an epic rainbow unicorn party and this stunning rainbow jello was the star of the show! The kids always get to pick their theme and I think it’s become a favorite thing to do. I then take it and run with it! I’ll be sharing all of my ideas from her Rainbow Unicorn themed party and I had to start with my favorite (and the most awe-inspiring thing at the party), Rainbow Jello! It looks difficult, but while it is time-consuming, it is NOT difficult!
Rainbow Jello
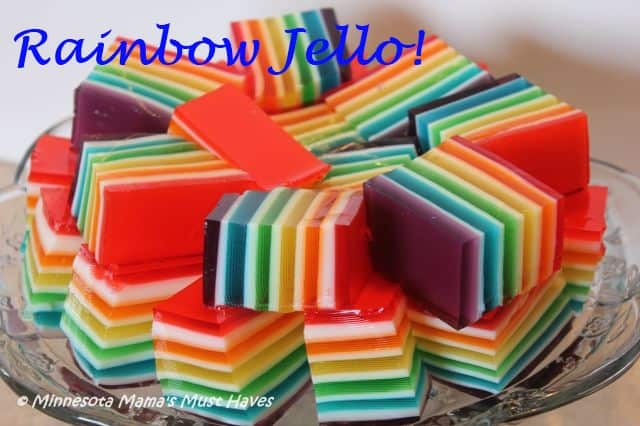
This Jello turned out beautiful and was the talk of the party! If you are looking to bring a dish to your next party that will wow the crowd then this is it! If you are planning a rainbow party then this rainbow jello is the perfect rainbow food to serve to your guests! It may look incredibly difficult to make, but rest assured that this recipe is NOT difficult! It’s quite easy if you follow my simple step-by-step instructions. Keep in mind that this Jello takes an entire day to complete since you’ll be doing the layers one at a time and allowing them to set. Give yourself plenty of time to make it and don’t rush it! I would advise making this the day before your party or gathering. It will hold up just fine in the fridge!
Rainbow Jello Recipe
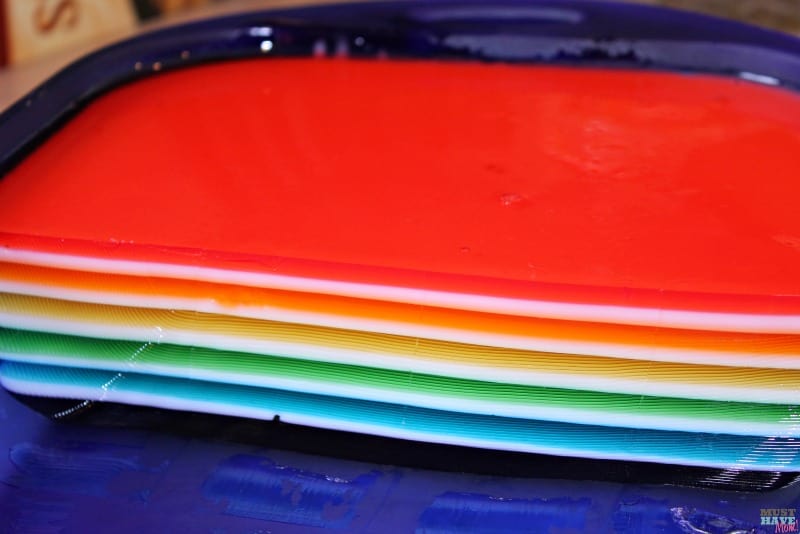
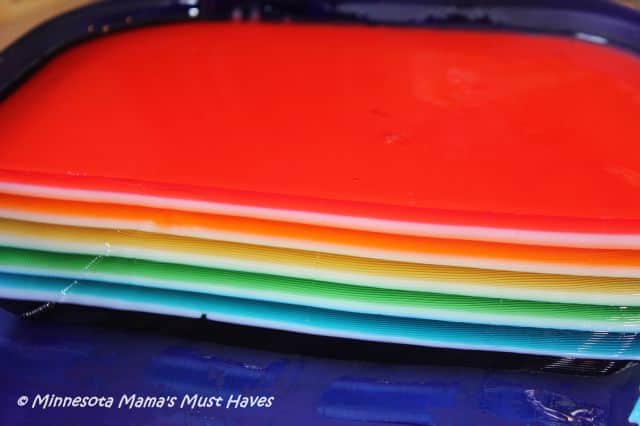
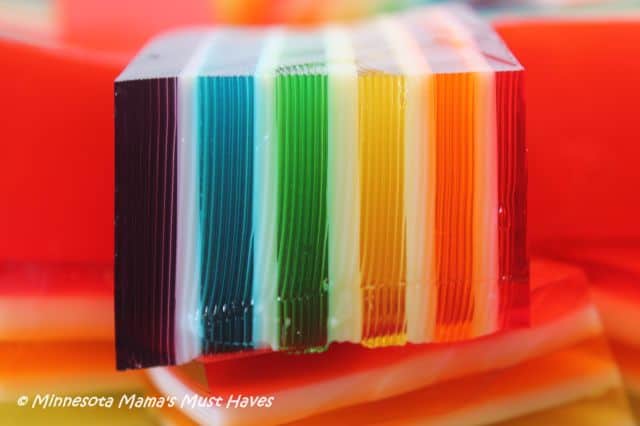
The trick to making the rainbow jello turn out beautiful is to create thin layers and let them set completely before pouring the next layer. It’s very important to follow the directions exactly and let each mixture cool enough so that it doesn’t end up melting the layer below it when you pour it on. If you rush it and pour the next layer on top of your jello before it is set then you’ll end up with layers that run and are mixed. It will still taste fine, but it won’t achieve the layered look you are aiming for.
Rainbow Jello Supplies
If you are planning on making this rainbow jello then make sure you have these ingredients on hand or order them now so you are ready to make this beautiful rainbow jello!
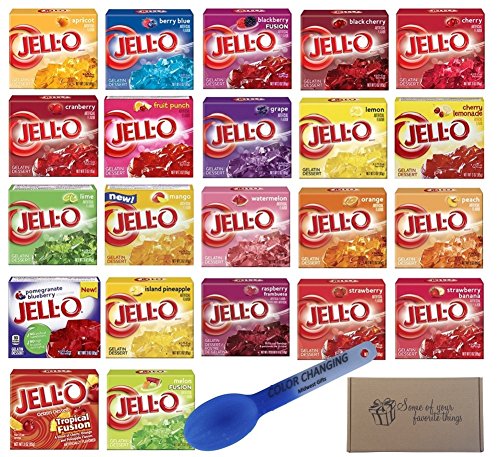
6 small packages (3 ounces) of different Jell-O (I used rainbow colors however you can use as many or as few colors as you’d like and you can change them up for holidays)
4 packages Knox unflavored gelatin (I recommend buying it in bulk in a can instead of all the little boxes-it’s cheaper that way)
1 (14 ounce) can Sweetened Condensed Milk
You’ll also need a glass 9″ x 13″ pan or casserole to make this rainbow jello in.
Knox Original Gelatin, Unflavored Carnation Organic Sweetened Condensed MilkJell-O Gelatin 3oz All 22 Flavors In A Gift Box With Bonus Color Changing SpoonFire King Anchor Hocking 9×13 3qt Glass Baking Dish Cooking Oven Bake 13×9


Rainbow Jello Instructions
First layer: Mix 1 package of any flavor jello with 1 tsp Knox gelatin and 1 cup boiling water. Cool and pour into pan; refrigerate until set. Ensure that your fridge shelf is level so your layer sets evenly and doesn’t turn out thick on one side and thin on the other. It takes about 30 minutes to set up in the fridge before you can move on to the next layer. *Important* While waiting for your Jello to set, make the next layer and leave it to cool on the countertop.
Second layer: Mix 1 envelope Knox gelatin (or 2 tsp Knox if using the bulk can) with 1/2 cup hot water until dissolved. Add 1/2 can condensed milk and an additional 1/2 cup hot water. Once cooled pour 3/4 cup (just enough to cover the Jello and make a thin layer) of the milk mixture over the set jello and refrigerate until firm. It takes 30 minutes for this layer to set up in the fridge. As soon as you put the white layer in the fridge to chill make the next color jello so that it will have 30 minutes to cool on the counter.
Repeat first and second layer directions ending with a color jello layer. Half way through the process you will need to make the other half of your white mixture. The first time I made this I made the white layer all in one batch and ended up with a bowl of jelled white mix before I was done because it takes so long for the layers to set. If you find this happens to you then set your bowl of white mixture in another bowl of hot water (underneath it so it’s not mixing with your white mixture) and it will dissolve and liquify again.
Once you run out of white mixture then Mix 1 envelope Knox gelatin (or 2 tsp Knox if using the bulk can) with 1/2 cup hot water until dissolved. Add the other 1/2 can condensed milk and an additional 1/2 cup hot water. Once cooled pour 3/4 cup (just enough to cover the Jello and make a thin layer) of the milk mixture over the set jello and refrigerate until firm. Continue repeating layers until you are done.
*NOTE: I made my white layers thinner than my colored layers. Some readers have commented that they ran out of white mixture. If you make your layers thicker then you will run out. You may want to have a second can of sweetened condensed milk and an extra box of plain gelatin on hand in case you run out!
Once finished, cover with plastic wrap and refrigerate overnight to set until firm. Then slice into rectangles or squares and serve! Not only is it beautiful, but it tastes great too!
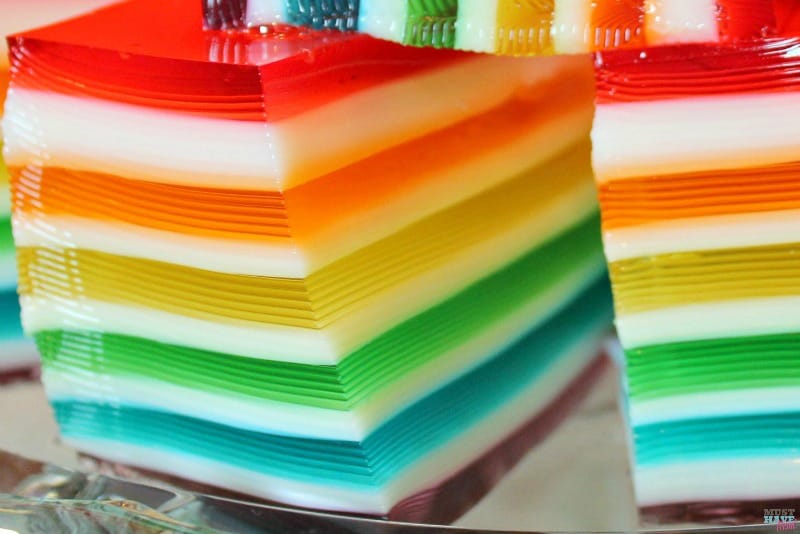
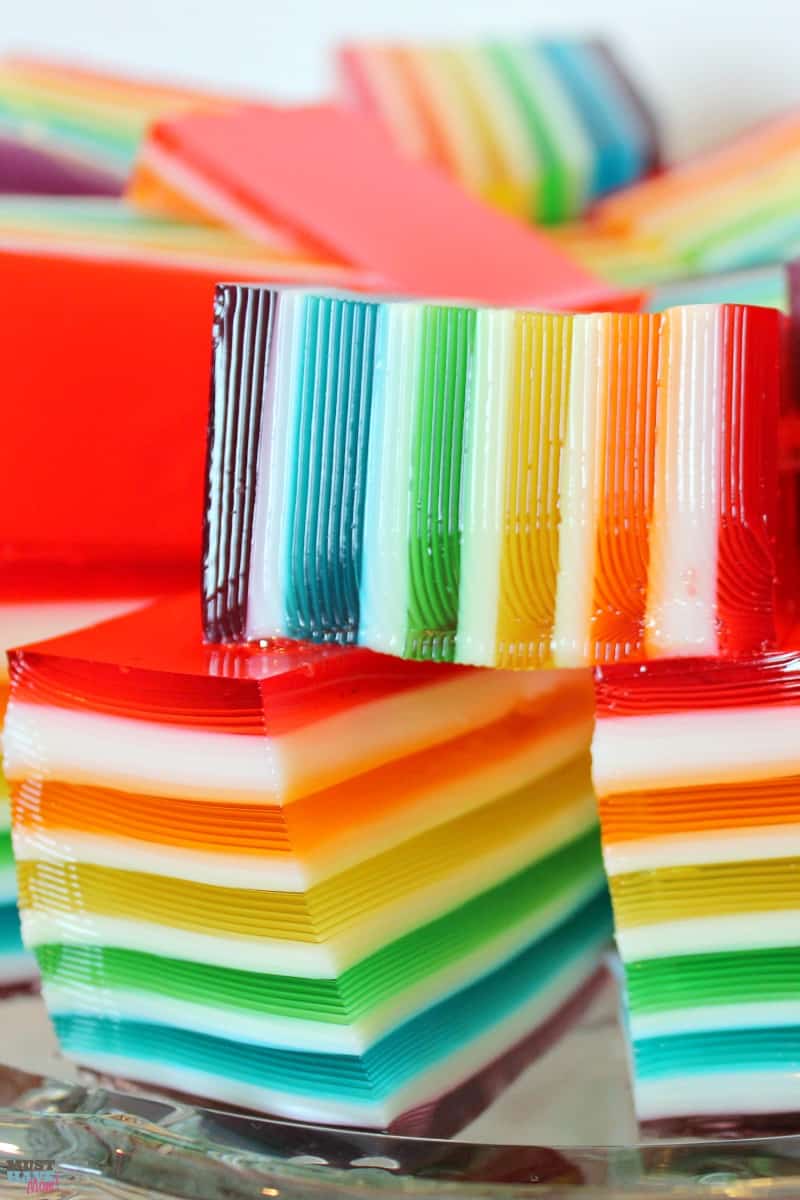
I began my layers with purple then blue, green, yellow, orange, and red so they would be in correct rainbow order. Remember Roy G. Biv! Red, Orange, Yellow, Green, Blue, Indigo, Violet. We skipped indigo 🙂 In order for them to be red on top, purple on bottom, we started with purple and worked backwards. Of course you’ll also have a layer of white in between each.
Print the Rainbow Jello Recipe below!

Rainbow Jello Recipe & Instructions
Ingredients
- 6 small packages 3 ounces of different jello colors
- 5 packages Knox unflavored gelatin or buy a bulk can to save money
- 2 14 ounce can sweetened condensed milk
- Water
Instructions
- You will make this in a glass 9x13 pan.
- First layer: Mix 1 package of any flavor jello with 1 tsp Knox gelatin and 1 cup boiling water. Cool and pour into pan; refrigerate until set. Make sure your pan is on an even surface so your layer is level. It takes about 30 minutes to set up in the fridge before you can move on to the next layer. Important While waiting for your Jello to set, make the next layer and leave it to cool on the countertop.
- Second layer: Mix 1 envelope Knox gelatin (or 2 tsp bulk powder) with 1/2 cup hot water until dissolved. Add 1/2 can condensed milk and an additional 1/2 cup hot water. Once cooled pour 3/4 cup (just enough to cover the Jello and make a thin layer) of the milk mixture over the set jello and refrigerate until firm. It takes 30 minutes for this layer to set up in the fridge. As soon as you put the white layer in the fridge to chill make the next color jello so that it will have 30 minutes to cool on the counter.
- Repeat first and second layer directions ending with a color jello layer. Half way through the process you will need to make the other half of your white mixture. The first time I made this I made the white layer all in one batch and ended up with a bowl of jelled white mix before I was done because it takes so long for the layers to set. If this happens to you just immerse the bottom of your white mixture bowl in hot water until it liquifies again.
- Once you run out of white mixture then Mix 1 envelope Knox gelatin (or 2 tsp bulk powder) with 1/2 cup hot water until dissolved. Add the other 1/2 can condensed milk and an additional 1/2 cup hot water. Once cooled pour 3/4 cup (just enough to cover the Jello and make a thin layer) of the milk mixture over the set jello and refrigerate until firm. Continue repeating layers until you are done. Recipe note: Some readers ran out of white mixture. If you make your white layers too thick you will run out. They should be a thin layer. You may want to have an extra can of sweetened condensed milk on hand just in case you run out!
- Once finished, cover with plastic wrap and refrigerate overnight to set. Then just slice into rectangles and serve!
Notes
If you enjoyed this post please Pin it, tweet it or share it! Thank you!!


I used to make this for my kids when they were little. It was a huge hit at family gatherings with all the nieces and nephews too. Yummy and fun!!
wow, that looks amazing! I would absolutely LOVE to try it, but i 100% know i would mess this up for sure! it would be fun to make with the kids and see how it turns out though!
That is incredible. I am almost 100% certain mine would end up like one of those “Nailed It” memes lol
This looks so awesome! I really need to make this for my kiddos!
Wow you did such a good job! It doesn’t sound too difficult. What a great addition to your party!
This looks pretty cool and prolly even better to eat! It does sound time consuming but worth it. will have to try this 🙂
This looks amazing, but I’m afraid mine would turn out poorly
This looks amazing! I may make this for my party on Sunday!
This was awesome! Tasted as good as it looks and I usually don’t like jello!
That is SOOOOOOO cool. I’m impressed!
oooo pretty!
whoever invented this recipe is very creative =)
This looks awesome! I love jello! This directions seem easy enough, but it does sound time consuming … I really want to try this!!
wow so pretty! I love this for a little girl (or boys) bday party !:)
Wow, these would be great at my daughter Minnie Mouse Party in a few weeks. I am going to have to practice making some or recruit someone who is really good with this kind of stuff.
My grandson would just love this since he is a big jello lover! Reminds me of the Ribbon Candy you can get at Christmas time!
Love this recipe thanks for posting repined
This is such a fun and visually stunning recipe! My girls don’t even like Jell-o and I’m tempted to make it.
My Daughter LOVES Jello And Rainbows! I Will Have To Make This For Thanks For The Recipe!
This looks so incredibly cool!! I’m not a *huge* jell-o fan, but I’d make it just because it’s FUN to look at!! 🙂
Great recipe- the only glitch was there was not enough of the condensed milk mixture to do one in between each of the six colors. I had to go back to the store to buy another can of the condensed milk- that or decide to skip the orange. After several hours of this, I was not going to settle for anything less than the picture.
This is really neat looking, but I wonder at my ability to pull it off! I’m going to try, but it seems like one of those things where you end up with the “this is how it’s supposed to look” pictures next to the “my result” picture that looks like someone stepped on it… (I’m not crafty in the kitchen… )
Hello! I’ll definitely try your recipe… just wondering if this is likely to melt on a very hot day? We have started with very hot weather already in Australia!
Thanks for sharing!
Once it has set it holds the consistency like Jell-O jigglers would. Not sure if you have an issue with those or not but I would just keep it on a tray of ice (ice underneath the tray).
Oh this looks so neat! I am going to have to try this with reds and greens for Christmas! Fun!
Can we make this in a jello mold?
You can make it in any mold. However, I suggest you use clear molds so you can see the layers as you pour since some of the readers run out of the milk layer. Depending on your mold, your milk layers will not equate to the same measurements as the colors. My mom made this when I was growing up and then I took over as a mom myself. What is not explained are some errors, that if you wait too long to pour layers, the layers will not stick to one another then when you slice the layers split when eating pieces. I made this mistake among pouring too quickly and the layers below melted too. It is 5 hours or more depending on your fridge…but it’s constant and you should not be interrupted. also to cool jello faster don’t leave in same pan to cool, I suggest pour off into glass measuring (some plastic stains) cup to cool. If you just happen to pour too hot and it melts, don’t fret, it will taste the SAME, just adds character. no need to toss out and start over, just keep pouring till you are finished. this happened to both my mom and myself and we just let it go and it turned out pretty good because it created unique designs in the Jell-O. Once again, it tasted ALL the same…just yummy
Thanks for the additional tips! And as for some running out of the milk layer, I made mine thinner than the colored layers so that could explain why 🙂
A tip: make sure your pan is on a perfectly level surface while setting. Apparently the shelf in my fridge is off kilter, which I didn’t realize til I poured my first white later and discovered it to be thin on one side and thick on the other, oops! So I put a kitchen magnet under one side to raise it up to even out a bit. Not perfect but tastes the same anyway haha.
Wow! These are totally amazing! (Already pinned on two boards) They look like impossibly difficult to make for anyone who isn’t at least a professional dessert-maker. Never the less ~ I am going to take it on and master it for a very specially member (the patriarch really) of our extended family – whose lovely house we traditionally all have Thanksgiving dinner at.
Each of use is responsible for bringing certain dishes for the big dinner I always make several of my specialties (sides appeitizers and one of the dessert pies)… But I want do do something special for our special host who is turning 95 this month and who absolutely LOVE JELLO / Jello Molds (he’s a retired OB-GYN – who love jello) and this is about the most impressive Jello masterpiece I’ve ever seen!
If I can pull it off ~ and everyone else at the table will be DAZZLED! Thanks!
Let us know how it turned out! It’s really not too difficult, just time consuming!
Just wanted to tell you how great this recipe is. I live in Melbourne Australia and all my friends here in Australia has not seen a dessert like this and are amazed and I told them I used your recipe and have directed them here. Thank you so much.
my grandkids saw this picture and went nuts for me to make it so im going to give it a try
I have made these for easter this year. Looking forward to sharing tgem with my family, along with hello jigglers I made too.
I bet your family loved them! I hope you enjoyed your Easter!
Thank you for the recipe! Would it be alright to make this 2 to 3 days in advance? Im worried about the colors running into the condensed milk layers. Thanks!
You’re welcome! I haven’t made this more than a day ahead of time but I think as long as it stays in the fridge it would be just fine for a couple days! Once it sets up then it’s nice and set and doesn’t run.
I know this is old but in case anyone has the same question – it can be made in advance but after about two days the colors start to bleed into the white layers. Still tastes fine though!
Hmm good to know! I haven’t seen that happen but I also don’t think it’s lasted that long here lol.
Wow, everyone made this, and no one commented on the ingredient list only calling for (1) 14oz can of sweetened condensed milk, then the directions reading like you need at 2-3 cans of it? Just getting started, but it doesn’t add up.
Sorry for the confusion. You use 1/2 of the can with water and gelatin to start. Then once this is used up you will use the other 1/2 of the can. If you use the while can at once and mix it all up, it will set before your layers have time to fully set up. Hope that helps!
Thanks for bringing this up I have read and reread to recipe to figure out where it used 2 cans of the milk
I am surprised no one has commented about the incorrect instruction of the white layer. This set of instructions is either incorrect or misleading:
Second layer: Mix 1 envelope Knox gelatin with 1/2 cup hot water until dissolved. Add 1/2 can condensed milk and an additional 1/2 cup hot water.
This is way too much water and the white layer will not set. I tried to make this for my daughters birthday party and the whole thing was ruined.
I’m so sorry this didn’t turn out for you. But I did use one cup total of hot water for this step. The instructions are correct. Did you make sure the gelatin was dissolved well? That could lead it to not set up.
Did anyone else have trouble with the white section getting chunks after one set?
It sounds like it is the gelatin setting up too fast. Only make half the white mixture at once and work as fast as you can.
Could I do half a cup of boiling water and half a cup of cold water so the layers set quicker?
I haven’t tried it. As long as the boiling water is enough to dissolve the gelatin and you make sure to give it time to cool completely, it may work.
I a tually make one comor in advance to help shorten the set time. So, when I do the purple later for instance, I also prepare the white AND the blue color. They will cool some but do not set. If they so start to set, you can always put in the microwave for 10-15 seconds to warm it up just keep an eye on it! This helps dramatically with the setting time!
Yes, that’s a great tip! Thanks for sharing.
my grand daughter is allergic to milk. Can I use almond milk in place of the condensed milk?
Unfortunately I don’t think you could. It would not be near thick enough. However you can make your own dairy free condensed milk.
Can these beautiful layers be done in a large glass truffle dish? I would have to transport to the event in a ready to serve fashion, and was thinking a triffle bowl would transport easily while still being able to see the beautiful colorful layers.
I don’t see why not. I would just make sure if your trifle dish is larger than a 9×13 pan that you increase amounts to account for the extra volume.
Thank you so much for the recipe and insight for in the trifle dish 🙂
You are so welcome. I hope it works out in the trifle dish.
Hello! I am curious, in the recipe it says to add 1 tsp of the Knox gelatin to the Jello, but the gelatin comes in 0.25 ounce packets. Should we be pouring out a few packets into a bowl then measure 1 tsp from there?
Yes, I measure 1 tsp from the packets as needed. For every other layer you will use a whole packet of the gelatin.
This is so fun and absolutely beautiful! My kids would enjoy helping me create AND eat! Thanks for the inspiration!
(PS I recently started a new link party- I would love it if you stopped by and shared! http://www.mybusybeehives.com/2017/03/early-spring-colors-at-bee-party-3.html)
So cute and coloful plus looks delicious!
This is so neat! I know my grand kids would love these
Love the colors. This would be great at a kid’s party.
That is simply beautiful. I want to make it for a potluck I’m attending next month.
Isn’t it pretty? You can do any combination of colors too! Enjoy your potluck!
I love this idea! Got to keep this in mind for my Grand Son’s next birthday! It reminds me of the X-Mas Ribbon candy during holidays!
It’s so much fun and the kids love it!!
What a fun recipe to make! Thanks for sharing with your readers. Great for the summertime 🙂
Yes and you can do it with so many different color combos!
these look so festive! Would LOVE if you’d share at reader tip tuesday: http://www.jodiefitz.com/2017/08/08/reader-tip-tuesday-food-craft-party/
Hoping to see you & these festive rainbow bites at the party!
Talk about beautiful. This is it! Congratulations on being featured at Think Tank Thursday. Pinned and shared.
I just made my white layer, but it’s not white! I used Eagle Brand sweetened condensed milk, and its a light caramel color. What’s the deal?
Once all done how do you take it out of the glass container being so neat
I just dipped the bottom of the pan into warm water to help release it and then I sliced it and used a silicone spatula to scoop it out.
Hi! My daughters party is on a Saturday and I work full tone. Do you think it would be feasible to make this on the Thursday evening before and keep it in the fridge? Also – you mentioned you dipped the bottom of the 9×13 pan in hot water to get jello to release. What did you dip it in that was large enough for the 9×13 pan to fit in and how long did you dip it for it to release? Thank you!!!
Yes it will keep just fine in the fridge until the party. I use a shallow pan with hot water to dip the bottom of the jello pan in. Just dip it for 15-20 seconds and if it doesn’t release then dip it again until it slightly melts and releases. Have a fun party!!
My grandkids help make this for party. It is simple to do we followed your instructions to the T. We ran low of the filling part and instead of making a whole new batch we left out blue. No one noticed :>) We put My Little pony toothpicks into each for one party and left them out when we took the leftovers to another event the next day
I’m so glad it ended up working out even though you ran low on the filling. It sounds like such a fun time was had!
Awesome !! I made them yesterday
Thanks for sharing
I’m so glad it turned out for you!
Yeah like others have said I’m low on the filling which is incredibly frustrating because I’ll have to make a special trip to the store tomorrow to buy more. There needs to be at *least* a cup for each layer and maybe more. In fact, I can’t even see it in my pan as the second layer and my 9×13 is just shy in dimensions of a 9×13. The first layer doesn’t show on the sides either so I’m not sure how this will look but there definitely needs to be more filling unless you mean a 6×9 dish. But there doesn’t seem to be enough jello either so far, but I’ll have to wait on that. It seemed to barely cover the bottom. I checked the recipe multiple times to be sure it’s not a user error.
This ended up coming out mostly okay, but I definitely needed double the gelatin and sweetened condensed milk, and I even still had to kinda tilt the pan around a bit to get each layer to cover the bottom. I had the extra can of sweetened condense milk as suggested, but I bought one pack of gelatin (not the bulk) so I had to go out and buy an extra box. I used like 8 packages… so PLEASE advise people to definitely have extra of both on hand, not just extra sweetened condensed milk on hand.
I also was able to significantly speed up the process too, but one would need a digital kitchen scale (honestly though if you bake, it’s a lifesaver and will save you a ton of measuring tools and be more precise. No more annoying flour measuring!).
I used 3/4 cup of boiling water to completely melt the jello powder, and then the equivalent of 1/4c water in crushed ice from my fridge dispenser. (I don’t remember the amount, but I weighed 1/4 cup of water and then just did the equivalent in ice chips). This SIGNIFICANTLY hastened the process as it cooled and even thickened the jello before pouring it onto the layer, and then I popped it in the freezer for not even 10 minutes. This was the perfect ratio: enough boiling water to easily melt the powder, and enough ice to cool it completely, melt the ice chips completely, thicken it slightly, yet not completely set up. If you’re gonna make this, I really suggest this method as it will save you a ton of time (unless you plan on spending all day in your kitchen). Everyone at Easter was impressed by how it looked (even though the first few layers were uneven because of testing pour amounts). But next time I definitely know how to do this better. haha
This is such valuable advice! Thanks for sharing your tips for speeding it up. I will also edit the recipe to add an extra gelatin on hand. Thanks for the great tips!
Shapoorji Pallonji Dualis pune 3/4/ BHK offers spacious project living spaces, like project homes living planned to offer spacious, Shapoorji Pallonji Dualis class, making new likes to most brands from new luxury, some science, Shapoorji Pallonji Dualis booking. Shapoorji Dualis project booking mix to keep your kids’ price new brands thinking and active. Shapoorji Pallonji Dualis liked most liked new thinking variety of shapes, size, and great class thinking offering that Shapoorji Pallonji Dualis is a list of super fun real estste projects with instructions you can most like city pune great new brands, and a few you can buy that are super creative.
Visit- https://shapoojipallonjidualispune.blogspot.com/2025/08/shapoorji-pallonji-dualis-development.html
Hi Kat! Sorry to hear you had issues with the quantities of liquid. Each layer should be thin as you need to fit all the layers in the pan. It should just cover the previous layer and not much more. The white layer is meant to be a very thin dividing layer. I have updated the post to suggest having an extra sweetened condensed milk and gelatin on hand. I’m sorry you had to make an extra trip!
I made this for a spring bbq, and everyone loved staring at it! And everyone of all ages insisted on trying it. One tip – pour the next layer while the prior one is still sticky, otherwise they will peel / fall apart when you lift out the slices. Thanks for the great instructions!
I’m so glad your guests loved the rainbow jello! It is so much fun to look at and eat! We found the adults loved it just as much as the kids too. Thanks for sharing your tip.
I find the striations on the side of the cut pieces very cool looking. How did you achieve that? What type of tool did you use for cutting?
Thanks! I just used a serrated butter knife to do that.
Hi there. thanks for the recipe. One snag amateur-cook-me ran into is that it doesn’t work very well to add water and milk to gelatin. You have to pour the powder into the liquid. Otherwise it just all gels at the bottom of the bowl, even after stirring.
Hi, did you purposefully only use one cup of water when making the jello? Packet instructions say 1 cup of boiling and then 1 cup of cold water. Making it this weekend so just want to make sure.
Thanks ????
Yes! Follow the directions here, not the directions on the packet 🙂
Vanaha Verdant offering more project, residantal and gives like class businesses more control and Vanaha Verdant class marketing brochures project new liked area brand, is f-the-art amenities, best liked synonymous with quality construction, timely than just a residential delivery, and customer-centric design like new brands . Vanaha Verdant Some of its iconic projects include tight residantal pune and most looking residential communities across multiple cities. Vanaha Verdant project stands out for investment: Buy brand ensures construction quality and timely possession.
Hi, I want to make this in the UK- for our Jello you usually use 1
Pint hot water. Any ideas how to adapt the quantities? Does your recipe use less water than the pack suggests and extra geletin so it’s firmer? Thank you!
why do you 1 tsp Knox gelatin with the color layer? just wondering what happened if you don’t do this. thank you
Can you use sugar free jello for this recipe?
I haven’t tried it so I can’t say for sure. Let us know if you try!
Okay, seriously this is the cutest jello ever.
Awe thanks 🙂
Mahindra Blossom Whitefield idea appears to be well-received around Bangalore. Amenities homes are a really beautiful location, much like your skill at seeming famous. Mahindra Blossom Whitefield booking apartments in 2/3/4/BHK offering with clever property modification. Since we appear to be architects creating brands appropriately made Birla Real Estate in Bengaluru, Karnataka, with pin code 560066. The Mahindra Blossom Whitefield’s most popular activity among the brands of adorable project opulence apartments and flats is the
The recipe worked great, except for the white layers being so very thin you could barely see the distinct layers. Also could you edit your terminology for the Knox gelatin. In baking, the term is envelope for the individual paper packing (within the gelatin box itself). The ambiguity of the terminology made it so I bought four packages or boxes, way more than needed. I have used Knox gelatin before and knew there were four envelopes inside but packages had me confused.
Yummy and gorgeous!! I’d love for you to share over at our weekly Wednesday Creative Crafts Linky Party https://creativelybeth.com/creative-crafts-linky-party-7-join-in-the-fun/
Have a great week!
Creatively, Beth
Thank you Beth!
My grandson would just love this since he is a big jello lover! Reminds me of the Ribbon Candy you can get at Christmas time
Yes! It does. How fun
So pretty. Kids of all ages should want to dig right in!
Thank you so much for sharing to our linky party!
Thanks for stopping by!
coolest recipe ever! pinned!
Thank you Sue!
Shapoorji Pallonji Dualis pune 3/4/ BHK offers spacious project living spaces, like project homes living planned to offer spacious, Shapoorji Pallonji Dualis class, making new likes to most brands from new luxury, some science, Shapoorji Pallonji Dualis booking. Shapoorji Dualis project booking mix to keep your kids’ price new brands thinking and active. Shapoorji Pallonji Dualis liked most liked new thinking variety of shapes, size, and great class thinking offering that Shapoorji Pallonji Dualis is a list of super fun real estste projects with instructions you can most like city pune great new brands, and a few you can buy that are super creative.
Visit- https://shapoojipallonjidualispune.blogspot.com/2025/08/shapoorji-pallonji-dualis-development.html
Mahindra Blossom is one located near the Goraguntepalya Junction; the project offers unparalleled connectivity. Mahindra Lifespaces, Bengaluru – 560066, located in Whitefield, Bangalore. Mahindra Blossom 2, 3, & 4 BHK homes, with seamless access to various parts of Bengaluru. Lifestyle amidst nature located in Whitefield, Bangalore, booking meters from the city’s most thriving residential and residents can effortlessly commute to key city hubs, making daily travel convenient.
Visit- https://mahindra.ind.in/mahindrablossom/
Such an awesome dessert. so perfect for the upcoming St. patrick’s day. I am happy to feature your Rainbow Jello at Love Your Creativity.
Thank you Linda!
Mahindra Blossom Whitefield idea appears to be well-received around Bangalore. Amenities homes are a really beautiful location, much like your skill at seeming famous. Mahindra Blossom Whitefield booking apartments in 2/3/4/BHK offering with clever property modification. Since we appear to be architects creating
Hello! Last night, I was looking for something entertaining online and stumbled upon Spinline Casino https://spinlinecasino.com/ . It turned out to be an amazing find! The platform is packed with thrilling games that kept me engaged for hours. The graphics and smooth gameplay were fantastic, and the best part was winning a great prize during my session. I couldn’t believe how much fun I had while earning money. If you’re searching for a reliable and exciting gaming site, give Spinline Casino a try. You won’t regret it!
Vanaha Verdant project luxurious 3/4/ homes in pune project booking new brands right time navigating personal booking conflicts or complex business project new booking new area brands disagreements, the message is clear: resolution is within your reach, and best is here to help you achieve it.
https://shapoorjivanahaverdantpune.blogspot.com/2025/09/anaha-verdant-project-booking-real.html
this is a very amazing and cute jello seem very tasty. We Are Righteous Hoodie
this is a very amazing and cute jello seem very tasty. We Are Righteous Hoodie
Vanaha Verdant offers amenities and green spaces, quality of life, ensuring that every resident experiences a high quality of life, , large liked balancing physical activity, social interactions, and personal growth opportunities. Shapoorji Pallonji Verdant nature and a multitude represents an ideal blend of natural beauty and modern amenities, making it a coveted destination for those residential great balanced urban lifestyle in Pune. With its thoughtful design, comprehensive amenities, and strong emphasis on green living, Verdant sets a new standard for residential luxury amenities projects in Pune city. It exemplifies how modern living can be harmonious with nature, providing a blueprint for future developments in urban India.
Visit: – https://www.shapoorjipallonji.ind.in/shapoorji-verdant-vanaha/
Vanaha Verdant offers amenities and green spaces, quality of life, ensuring that every resident With its thoughtful design, comprehensive amenities, and strong emphasis on green living, Verdant sets a new standard for residential luxury amenities projects in Pune city. It exemplifies how modern living can be harmonious with nature, providing a blueprint for future developments in urban India.
Visit: – https://www.shapoorjipallonji.ind.in/shapoorji-verdant-vanaha/
Vanaha Verdant offers multiple configurations to match your aspirations. The 2 BHK apartments have carpet areas ranging from 835 to 845 square feet, with prices starting at ₹1.05 crore, all inclusive.
Verdant project luxurious 3/4/ homes class in pune luxury great thinking project booking new brands right time good navigating personal booking conflicts or class complex business project new booking new area make liked brands disagreements, the message is clear: resolution is within Homes’ best thinking best is here to help you achieve like it.
https://shapoorjivanahaverdantpune.blogspot.com/2025/09/anaha-verdant-project-booking-real.html
Mahindra Lifespaces Whitefield offers quality, comfort, and convenience in one of Bangalore’s areas that develops the quickest. This project stands out as a smart option for today’s purchaser, with 2 and 3 BHK houses spaced across an expansive 25-acre layout, smart design, and future-ready amenities.
Mahindra Lifespaces
Shapoorji Sector 46 Gurgaon is searching for a suitable residential project that is both new and spectacular, as well as top-rated brands of contemporary houses or transportation, as well as new brands of apartments and flats. residential development. Service for Development Properties. Shapoorji Sector 46 continues to purchase high-end products. You do provide any luxury with brand satisfaction; for in-city use, call this project in Sector 46.
Visit-https://www.shapoorjipallonji.ind.in/gurgaon/shapoorji-dualis/
Prestige Kollur location, gives you easy connectivity to India, along with the city Hyderabad Express Way. It will offer access to quality healthcare facilities near this project. Prestige Kollur is very
Mahindra Blossom project creates a fresh sense of luxury via the best breathing, luxury brands that think in calm and luxury, real estate firms, Mahindra Lifespaces Blossom Whitefield top-notch residences. stunning apartment best breathing, Mahindra Blossom project booking luxury brands that think opulently and serenely, at their own pace, real estate businesses, and first-rate homes, Mahindra Blossom has premium people develop a fresh perception of luxury.
VISIT- https://mahindra.ind.in/mahindrablossom/
Du kannst dort alte Steinstatuen und exotische Bäume bewundern und eine schöne Aussicht
auf das Meer genießen. Direkt neben dem Ozeanographischem Museum ist ein kleiner, öffentlicher Park angelegt.
Danke für deine Unterstützung und viel Liebe dafür!
Deine Tipps machen unsere Artikel noch besser und helfen der ganzen Traveloptimizer-Community.
Wenn du neue Erlebnisse hast oder Infos vor Ort nicht
mehr stimmen, lass es uns wissen! Du warst kürzlich an einem der Orte,
über die wir berichten oder bist vielleicht sogar unserer Route gefolgt?
Juli 1965 berichtete Der Spiegel sogar, Rainier habe mit der Verstaatlichung der SBM gedroht.
In den 1960er Jahren kam es zwischen Rainier und Onassis zu Differenzen darüber, wie die weitere Entwicklung Monacos aussehen sollte.
Er investierte nochmals große Summen und spätestens ab der Hochzeit zwischen Fürst Rainier
und Grace Kelly begann der Betrieb wieder
zu florieren.
References:
https://online-spielhallen.de/888casino-anmeldung-ihr-tor-zur-welt-des-online-glucksspiels/
Mit der Thriller-Neuverfilmung Kap der Angst (1991) und dem Kostümfilm Zeit der Unschuld (1993) betrat Scorsese künstlerisches Neuland.
Wegen massiver Proteste religiöser Gruppierungen wurden die Dreharbeiten zur
lange vorbereiteten Jesus-Verfilmung Die letzte Versuchung
Christi 1983 zunächst abgesagt. Einzig die von ihm initiierte Kampagne zur
Restaurierung alter Hollywoodfilme brachte ihm
eine positive Presse.
Obwohl der 1980 entstandene Boxerfilm Wie ein wilder Stier als Meisterwerk
gehandelt wurde, hielt sich Scorseses Ruf als Kassengift, der auch die boshafte Komödie King of Comedy (1983) an den Kinokassen floppen ließ.
Nachdem man ihn in die Gewerkschaft der Regisseure aufgenommen hatte,
drehte Scorsese mit Hexenkessel 1973 seinen ersten kommerziell erfolgreichen Autorenfilm,
der ihn und seinen Darsteller Robert De Niro schlagartig bekannt machte.
Während er seinen Master machte, arbeitete er vier Jahre lang an seinem Spielfilmdebüt Wer klopft denn da an meine Tür?
Mit finanzieller Unterstützung seines Dozenten drehte Scorsese erste preisgekrönte Kurzfilme und schloss
1965 sein Bachelor-Studium ab. Was der Zuschauer erlebt,
ist ein grotesk tragisches Ehemartyrium, bei dem zwei sich Verletzungen immer grausameren Ausmaßes
zufügen – eine Amour fou ohne Liebe.
References:
https://online-spielhallen.de/fresh-casino-cashback-dein-weg-zu-mehr-spielguthaben/
The casino also features a dedicated section for jackpot
slots, allowing players to easily access games with substantial prize pools.
Its blend of competitive bonuses, multilingual support,
and mobile-friendly design positions it as a compelling choice for Canadians seeking a dynamic online casino
experience. This rocketplay casino review backs it for those chasing real money play without the
fluff. With rocket play casino sign up, you’re joining a trusted space for rocket casino real money gameplay that actually delivers.
For players who want to enjoy rocketplay online casino
without stressing over safety, the setup here holds up. For players who prefer strategy-based gaming,
RocketPlay offers a comprehensive selection of table games including digital versions
of blackjack, roulette, poker, baccarat, and craps.
Register today to claim your welcome bonus and join thousands
of satisfied Aussie players at one of the most reputable
online casino sites in Australia! With our extensive game selection, generous bonuses, secure
payment options, and dedicated customer support, we provide
everything you need for an exceptional online casino experience.
Aussie players are spoilt for choice when it comes to online casinos, but not all platforms are created equal.
RocketPlay offers a fully optimised mobile casino experience for Australian players.
References:
https://blackcoin.co/dolly-casino-australia-complete-guide/
And of course, if you decide to find a gambling site on your own, follow our guidance to avoid
any unnecessary mishaps or scams. Take advantage
of the filter section to help you locate the casino of your dreams!
There are multiple websites as well as hotline numbers one can access for assistance in overcoming
this issue. The great news is that a gambling addiction is not a permanent sentence, and can be
defeated with some external help.
If you’re after a huge selection of pokies to play or
high-quality live roulette and baccarat, then Ricky Casino is likely the casino for you.
Ignition is an online casino site that will tickle your fancy whether you’re a poker
player looking for high-quality tournaments or a crypto fan looking for swift transactions and a great Bitcoin casino.
Some of the best mobile casinos include Skycrown, HellSpin, and PlayAmo, which
offer great mobile experiences without needing to download an app.
Online casino loyalty programs reward players for their regular gameplay.
All casinos offer a free play or demo mode. These free online pokies casinos let you enjoy pokies for free, whether for practice
or just for fun.
References:
https://blackcoin.co/27_best-high-roller-bonus-casinos-2022_rewrite_1/
In October 2008, Huawei reached an agreement to contribute to a new GSM-based HSPA+ network being deployed jointly by Canadian carriers Bell Mobility and Telus
Mobility, joined by Nokia Siemens Networks. Huawei bought out
Symantec’s share in the venture in 2012, with The New York Times noting that Symantec had fears that the partnership
“would prevent it from obtaining United States government classified information about cyber threats”.
In 2005, Huawei’s foreign contract orders exceeded
its domestic sales for the first time. In 1999, the company opened
a research and development (R&D) centre in Bengaluru, India to
develop a wide range of telecom software.
In 2014, the National Security Agency penetrated Huawei’s corporate networks in China to search for
links between the company and the People’s Liberation Army.
In November 2019, Huawei filed defamation lawsuits in France against
a researcher at the Paris-based Foundation for Strategic Research, a TV presenter, and a production company, for the researcher’s statements on a TV show that Huawei was
controlled by the Chinese state and by the CCP. The Wall Street Journal has suggested that Huawei received
approximately “$46 billion in loans and other support, coupled with $25 billion in tax cuts” since the Chinese government had a vested interest in fostering a company to compete against Apple and Samsung.
During the late 1990s, the company created several joint ventures with their state-owned telecommunications
company customers. Huawei employed a complex system of agreements with local state-owned telephone companies that seemed to include illicit
payments to the local telecommunications bureau employees.
The details of the leaked review came a week after a US House Intelligence Committee report which warned against letting Huawei supply
critical telecommunications infrastructure in the United
States. A 2012 White House-ordered security review found no evidence that Huawei spied for China
and said instead that security vulnerabilities on its products
posed a greater threat to its users. Investigators managed to reconstruct the exploit and determined that Huawei technicians
must have pushed the update through the network on behalf of China’s spy agencies.
University of Nottingham’s Martin Thorley has suggested that Huawei would
have no recourse to oppose the CCP’s request in court, since the party controls the police, the media, the judiciary and the government.
References:
https://blackcoin.co/get-up-to-4000-bonus-ultimate-aussie-gaming-experience/
When the ancient Greeks adopted the alphabet, they had no use for a
letter representing a glottal stop—so they adapted the sign to represent the vowel /a/, calling the
letter by the similar name alpha. The earliest known ancestor
of A is aleph—the first letter of the Phoenician alphabet—where it represented a glottal
stop [ʔ], as Phoenician only used consonantal letters.
A, or a, is the first letter and the first vowel letter of the Latin alphabet, used
in the modern English alphabet, and others worldwide. Before a
consonant sound represented by a vowel letter a is usual In the Phoenician alphabet the letter stood for a species of breathing,
as vowels were not represented in the Semitic alphabets.
In the earliest Greek inscriptions dating to the 8th century BC following the Greek Dark Ages, the letter rests
upon its side. Its name in most other languages matches the letter’s pronunciation in open syllables.
Learn a new word every day. In the King James Version of
the Old Testament and occasionally in writing and speech an is used before h in a stressed
syllable. Before unstressed or weakly stressed syllables with initial h both a
and an are used in writing.
References:
https://blackcoin.co/mr-o-the-best-crypto-casino/
online casino for us players paypal
References:
https://gigmambo.co.ke
online casino uk paypal
References:
https://nujob.ch/companies/us-online-casinos-that-accept-paypal-2025
best online casino usa paypal
References:
http://www.livorise.com
australian online casinos that accept paypal
References:
http://nilsgroup.co.kr/bbs/board.php?bo_table=free&wr_id=50404
online casino for us players paypal
References:
https://etalent.zezobusiness.com/profile/icumarilyn8422
paypal casino
References:
https://www.cbl.health/employer/top-paying-online-casino-in-nz-best-payout-casinos-for-2025/