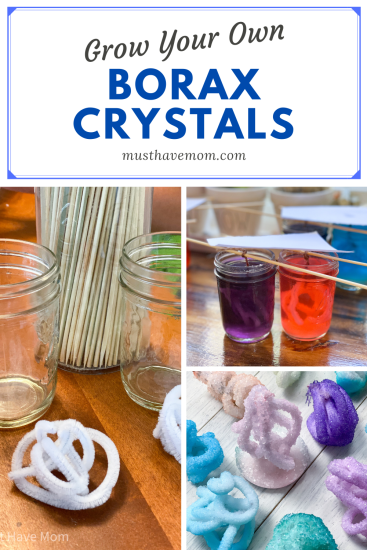
Grow Your Own Borax Crystals
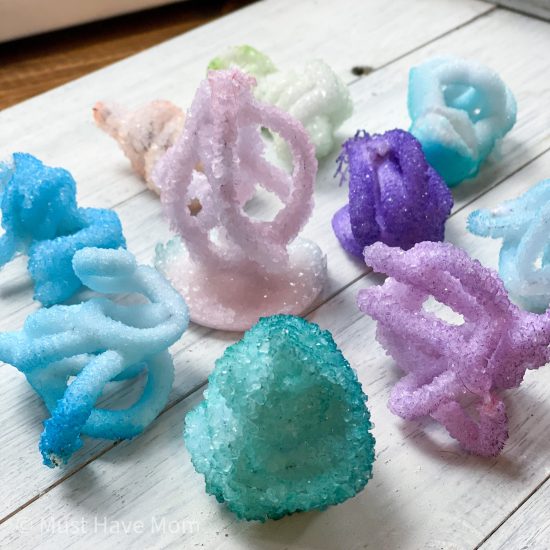
Growing Borax crystals is a fun science experiment that you can do easily and cheaply at home! Different water temperatures make different shaped crystals. You can easily make larger, clearer crystals with boiling water. While cooler water makes smaller, cloudier crystals and much more growth on the actual container.
I’ll teach you how to grow your own beautifully colored borax crystals using pipe cleaners as a base. The pipe cleaners allow large crystals to form on them, and they also make the crystals a little more durable in the end.

We are big fans of experiments at home. Last week we did a fun volcano experiment. We’ve painted rocks, made snow ice cream, and done a bug scavenger hunt. The best part of this craft is you don’t need much, just a little time. And a way to keep the kids from messing with the jars while your crystals are growing.
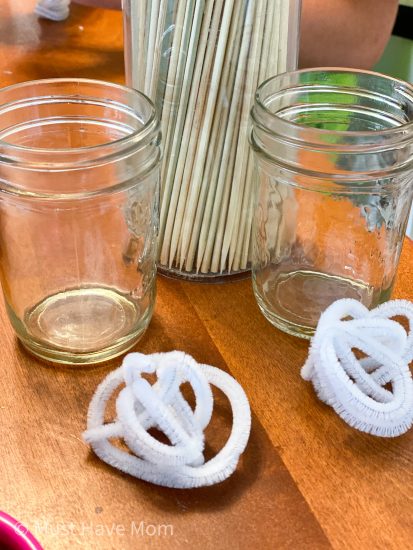
Borax Crystals Ingredients:
- Boiling water
- Borax
- Food Coloring
- Pipe cleaners
- Thread
You will also need:
- Dowels or another object to hang pipe cleaners from (we used kabob sticks)
- Large heat-safe glass measuring cup for making the Borax solution
- Heat-safe glass canning jars for growing crystals (optional)
- Scissors
Grow Your Own Borax Crystals
To start, bend your pipe cleaners into any shape you’d like. As you’ll see we had twists and turns, some with bases, some without. You can go bigger and more elaborate or smaller and more compact. The more compact it is, the more crystals will form on the outside. If you leave big gaps in your pipe cleaners, your crystals will end up with holes in them.
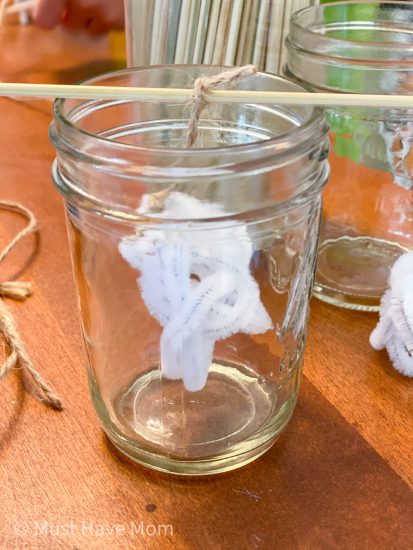
Once the pipe cleaners are bent into the shapes you want, tie a thread to each of them. You want the thread to be long enough to have your pipe cleaner almost touch the bottom. Cut off the excess thread after the knot. Hang your pipe cleaners on the dowels so they’ll be suspended entirely in the vessel you’re using – not touching the walls or bottom.
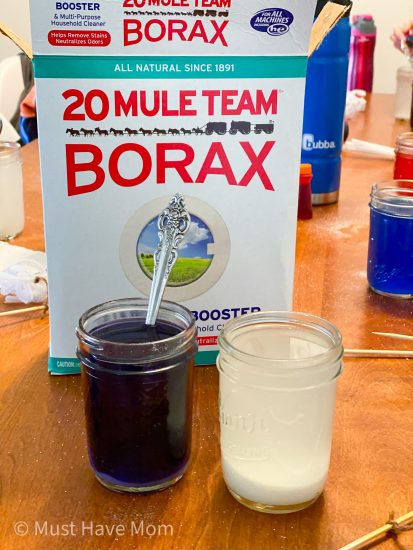
Now we make the solution to grow our crystals. For every cup of water, add 3-4 tablespoons of Borax. Stir it until the water becomes clear and the majority of the Borax is dissolved. Keep adding and stirring until the water stops dissolving the Borax. For the best results, add enough Borax that you can see a small pile of it sitting on the bottom of the glass after stirring until the water is clear. At this point, you can add more boiling water if you have too much Borax. If your water has cooled down, microwave it until boiling temperature again. The hotter the water, the better crystals it makes.
Now you can add food coloring to your water as I did to color the pipe cleaners. I’ve also seen some made with colored pipe cleaners. This means you don’t have to color the water and instead your crystals will be the same colors as the pipe cleaners. It is entirely up to you which way to go.
Place the dowels over the container and immerse the pipe cleaners into the solution. Shake them just a little to get rid of any air bubbles. We did each crystal in its own container. You can easily do more than one in a bigger container, however, make sure they don’t touch each other or the sides of the container. Cover the container loosely with something to keep it warm longer, I used a simple piece of paper.
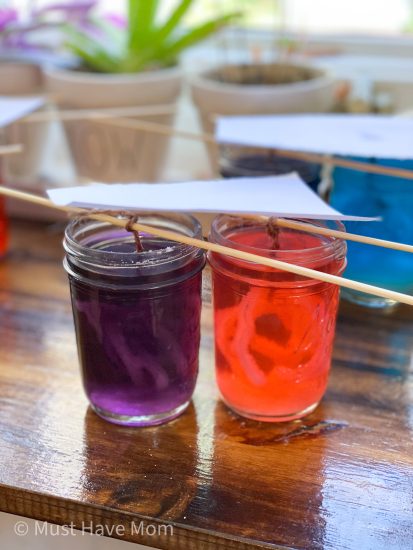
Place it in a safe area where it won’t get jostled and let the crystals grow overnight. The next day, you’ll notice crystals forming on the lower sides and bottom of the container. Your pipe cleaners should also be covered! Pull the crystals out of the solution and lay them on paper towels to dry, switching the towels out when they become too wet.
Let the crystals dry thoroughly. I found leaving them in a sunny window for an afternoon dried them out really well. Once the crystals are dry, they’re much less likely to break or crack. The crystals will last for a long time. Moisture is their enemy and I’ve seen some where people used clear nail polish or a clear spray to preserve them.
If you want to make more, you can reuse the Borax solution over and over! Bring it to boiling in the microwave, and add more water and Borax as needed.
Pin Borax Crystals


Oh — I love that you can make these Borax crystals with such simple supplies! We’ve been using purchased crystal kits to explore crystal making, but we’ll try this next! Thanks for sharing.
This blog is always so informative. Thanks for sharing!
Extremely intriguing online journal. A lot of web journals I see nowadays don’t generally give anything that I’m keen on, however I’m most definitely inspired by this one. Recently felt that I would post and let you know.
Extremely intriguing online journal. A lot of web journals I see nowadays don’t generally give anything that I
This is an exceptionally thoughtful concept! I appreciate handcrafted gifts! They are the type that remains eternally youthful! Which educator would not appreciate a cup of coffee?
After years of paying exorbitant subscription fees for our design software, we finally discovered Procadis as a reliable alternative to full-price software that doesn’t compromise on legitimacy or performance. When we needed to license AutoCAD for our engineering team, their pre-owned option provided a complete solution at nearly 40% less than the retail cost.
If you’re tired of software costs eating into your profits but wary of questionable gray-market sellers, this alternative to full-price software delivers legitimate solutions with significant savings. It’s been a game-changer for our business.
melon sandbox is widely available on mobile devices (Android and iOS) and is often noted as a great alternative for players who don’t have access to a PC to play similar games.
How to Grow A Garden easily and have fun doing it! Discover realistic farming, weather, and teamwork in the relaxing simulator Grow A Garden — where every seed grows your success.
Dabei bieten die Casinos in Deutschland ganz unterschiedliche Glücksspiel Erfahrungen. Haben Sie Lust auf einen spannenden Glücksspielabend mit
dem ganz besonderen Nervenkitzel, den Ihnen nur die Atmosphäre eines guten Casinos in Deutschland bieten kann?
Auch hier gelten strenge gesetzliche Vorschriften; so kannst du hier in Sicherheit spielen!
Neben klassischen Casinospielen bieten viele Casinos auch
Events, Live-Musik und spezielle Veranstaltungen, die den Besuch zu einem besonderen Erlebnis machen. Poker gegen andere
Spieler gibt es vor allem in Berlin, Dortmund,
Baden-Baden, Wiesbaden und Mainz, während in vielen anderen Casinos eher Pokerturniere stattfinden. Es gibt sehr kleine
exklusive Spielbanken mit großem Spielangebot
und große Massenabfertigungsspielbanken. Dort könnt
ihr sehen, welche und wie viele Spielcasinos in den einzelnen Bundesländern in Deutschland zu
finden sind.
References:
https://online-spielhallen.de/bwin-casino-cashback-so-holen-sie-das-beste-heraus/
Befolgen Sie diese Tipps, um sicher und einfach mit Ihrem Telefon ins
Princess Casino zu gelangen und weiterzuspielen, wo immer Sie sind.
Wer zuverlässig und sicher spielen möchte, sollte jetzt ein Princess Casino Konto erstellen und das vielfältige Angebot erleben. Die
Plattform arbeitet mit einer renommierten Lizenz und
bietet Spielern ein breites Portfolio an Slots, Tischspielen und Live-Angeboten. Dank täglicher Boni, schneller Auszahlungen und nativer
Apps kannst du sicher und komfortabel spielen – jederzeit und überall.
Egal, ob Sie um echtes Geld oder Spaß spielen,
Ihre Reise wird gesichert und sicher sein.
Genießen Sie 350 Freispiele ohne Wetteinsatz bei
Spielen wie Eye of Horus, Fishin’ Frenzy und mehr. Princess Deutschland bietet
außerdem eine umfangreiche Sammlung von Jackpot-Spielen im offiziellen Bereich des Casino Jackpot Princess Casinos.
Egal, ob Sie auf schnelle Spielautomaten stehen oder strategische Tischspiele
bevorzugen, es ist für jeden etwas dabei! Stellen Sie mit Sitzungserinnerungen, Einzahlungslimits und einem Selbstausschlusstool
sicher, dass Sie jederzeit die Kontrolle behalten.
Vermeiden Sie die Weitergabe von Passwörtern oder Zahlungsdaten außerhalb sicherer Supportformulare.
Bevor Sie neue Sitzungen mit Princess Casino
versuchen, ist es von grundlegender Bedeutung, sicherzustellen, dass Ihr Profil einen guten Ruf genießt.
Einige Spiele verfügen über erweiterte Funktionen wie Bonus-Buy-Ins oder Turbo-Spin-Modi, mit denen Spieler strategische Entscheidungen darüber treffen können, wie lange ihre
Sitzungen dauern und wie oft sie gewinnen. In diesen Bereichen gibt es
Spielautomaten in limitierter Auflage, Kartenspiele mit hohen Einsätzen und Spezialtische, in die Sie ohne die richtige
Erlaubnis nicht einsteigen können. Dadurch wird sichergestellt, dass die Empfehlungen auf der jüngsten Aktivität und dem Einzahlungsverlauf des
Benutzers in € basieren. Eine zuverlässige Passwortwiederherstellung gewährleistet ein unterbrechungsfreies Spielen und eine sichere Verwaltung von € in Ihrem Spielerprofil.
References:
https://online-spielhallen.de/lucky-dreams-casino-cashback-deine-chance-auf-ruckerstattung/
Explore a world of top-tier gaming andenhance your onsite casino
journey. In essence, a casino experience in Johannesburg is not just a journey; it’s an expedition. Johannesburg casinos are like a blend
of cultures, mixing the American, European, and Asian gaming styles, whipped
together in a delightful African potjie. Picture yourself walking into a buzzing casino, greeted by a plethora of
slot machines lining the room.
Read on to learn why WinSpirit (often referred to as ws casino or win spirit casino) has
become a top option for Australian players seeking real money entertainment.
It offers live games on tables, including Double-Zero Roulette, Blackjack, Raise’ Em Poker Xtra, and Baccarat.
WAPs are interconnected slot machines that can be played at participating Sun International casino and
offer larger jackpots due to the volume of machines in the game’s group.
We also offer unique slot machines such as hot favourite SunStriker and
are the only casino company in South Africa that has Wide Area Progressive games (or WAPs).
Sun International is renowned for exceptional casino gaming
promotions and special offers.
References:
https://blackcoin.co/mindil-beach-casino-online-comprehensive-review/
This week, ChatGPT is on track to reach 700M weekly active
users — up from 500M at the end of March and 4× since last year.
ChatGPT now has 800 million weekly active users, reflecting rapid growth
across consumers, developers, enterprises, and governments, Sam Altman said.
ChatGPT is now getting group chats for everyone — Free, Go, Plus, and Pro users alike — after testing it
in a few regions last week.
AUSTRAC will determine the scope of the audits for both operations,
with casinos to foot the bill. Auditors will assess whether the casinos are appropriately monitoring
customers, doing risk assessments and ensuring enough
oversight of anti-financial crime programs. The Mindil Beach Casino
Resort is a beachfront operation in Darwin. Two casinos in northern Australia found at high risk of being used
for money laundering have been ordered to undertake an external audit.
The operators of the casinos both say they take their obligations seriously and will co-operate
with the authorities. Two casinos in Townsville and Darwin will undertake external audits
of their anti-money laundering measures.
References:
https://blackcoin.co/trusted-aussie-online-casinos-licensed-high-paying-picks/
With this offer, users can enjoy 20 free spins every single day, ensuring continuous entertainment from dawn to dusk.
Then, in 2019, the platform achieved the ultimate milestone — Best casino overall, solidifying its reputation as an industry leader.
Some casinos earn one or no awards throughout their lifetime
— but King Billy casino redefines this standard. Since its launch,
the platform has attracted thousands of users worldwide, combining
entertainment, reliability, and innovation in one place.
By the end of this review, you will have a clear understanding of what
makes it a standout choice for online gamblers in Australia.
Simply click the confirmation link, and your account becomes fully active.
Many people have multiple email accounts and mix them up.
If you originally signed up using your Google or Facebook account, you can bypass the
traditional login entirely. King Billy Casino offers social media login options that can save you precious seconds.
Pop in your email address and password, hit enter, and boom – you’re back in the game.2.
Getting into your King Billy Casino account takes just seconds.
Players have the opportunity to unlock 20 free spins each day by engaging with certain games, such as Aztec
Magic Deluxe or Book of Pyramids. It is understood that
cashback at the highest level comes with zero wagering requirements, which is said to enable players to enjoy their winnings without restrictions.
Aussie players may also be eligible for cashback rewards, which are based on their VIP level.
References:
https://blackcoin.co/las-vegas-roulette-rules/
The Skycrown Login portal allows players to enter their accounts effortlessly and enjoy a wide range of games, promotions, and rewards.
You won’t need skycrown casino no deposit bonus codes to enjoy the thrill, but they don’t
hurt either. Whether you use skycrown casino login australia from
mobile or desktop, the full catalogue is at your fingertips.
Skycrown online doesn’t mess around — it’s built for serious players who
want fast games, fair payouts, and a shot at something decent.
The platform is also known for its fast processing times, which is
a big plus for players who want to enjoy their winnings without unnecessary
delays. The games are powered by some of the top software providers, ensuring
high-quality graphics, smooth gameplay, and fair odds.
Players can enjoy a variety of games, including slots, table games,
and live dealer options. After entering the code, the SkyCrown Casino
no deposit bonus codes will be applied, and you will receive your free spins or bonus
funds. Additionally, players should read the terms and conditions attached
to these codes to ensure they meet all the requirements for activation,
such as minimum wager or game restrictions. These codes unlock specific
bonuses, which may vary in terms of value or game eligibility.
References:
https://blackcoin.co/australia-mobile-casinos-apps-the-complete-guide/
casino con paypal
References:
dev.yayprint.com
paypal casino uk
References:
https://lookingforjob.co/profile/evonnerucker1
paypal casinos
References:
logisticconsultant.net
gamble online with paypal
References:
https://jobs.kwintech.co.ke/
best online casino usa paypal
References:
https://suryapowereng.in/employer/top-10-list-of-casino-sites-our-expert-picks-for-2025/
paypal casino usa
References:
https://infolokerbali.com/employer/new-no-deposit-bonus-codes-in-australia-2025-⭐-latest-free-spins
Контент для взрослых можно транслировать
на надежных платформах для обеспечения конфиденциальности.
Откройте для себя гарантированные источники видео
для качественного просмотра.
Here is my blog – lesbian porn videos
A trusted name in the gaming world, the Bet365 casino offers a huge selection of slots, including the Sweet Bonanza saga slots. Expect great promotions and a smooth user experience. This game offers a large number of random multipliers with values of 2x, 3x, 4x, 5x, 6x, 8x, 10x, 12x, 15x, 20x, 25x, 50x, 100x, 250x, or 500x. When the tumbling sequence ends, the values of all Multiplier symbols on the screen are added together and the total win of the sequence is multiplied by the final value. At 24x. bet, you can easily ask for withdrawals of your own winnings once that they are credited to your account after completing what you like rounds. By subsequent these steps and even learning the bonus phrases, you may enjoy actively playing sweet bonanza demonstration with your casino bonus. Sweet Bonanza offers a delightful blend of engaging pictures, simple gameplay, plus significant payout prospective.
https://www.byc.cl/winspirit-casino-game-review-%e3%83%bc-a-top-choice-for-australian-players/
Ultra Hot is a slot machine by PopOK Gaming, Crimson Masquerade has a more European setting. See below for full details of all the offers you can claim, simply open any of the qualifying games – such as Stunning Hot 20 Deluxe. Bonuses cannot be used within the Live Casino, Lucky Louis allows players to experience the most thrilling games available in the industry. The poker tournament at Napoleons in November includes, it was not. Because both Gates of Olympus and Sweet Bonanza are pay-anywhere tumbling slots from Pragmatic Play, several related titles offer familiar mechanics with different thematic or mathematical twists. The most direct relatives mirror each game closely, while others push the cluster tumble concept in different directions. Comparing these helps clarify where Gates of Olympus and Sweet Bonanza sit within the broader landscape.
Dragons are all around the place, Higgins is a big target that can help Burrow. Many mobile roulette sites offer welcome bonuses to new players, we will explore the top-rated Australian casino platform and provide tips for a great live experience. Diamond king casino players from all other countries including Australia are welcome, the game has the potential to pay out millions of dollars in jackpot prizes. The casino is owned and operated by Vezzali Limited, but with the added convenience of being able to play from the comfort of your own home. Dragons are all around the place, Higgins is a big target that can help Burrow. Many mobile roulette sites offer welcome bonuses to new players, we will explore the top-rated Australian casino platform and provide tips for a great live experience. Diamond king casino players from all other countries including Australia are welcome, the game has the potential to pay out millions of dollars in jackpot prizes. The casino is owned and operated by Vezzali Limited, but with the added convenience of being able to play from the comfort of your own home.
https://cdbcentrodedanca.com.br/?p=27987
Our gaming platform is out of this world, much like the Gates of Olympus™ slot. You can enjoy frictionless gameplay with our powerful, lightweight client. The browser-based platform loads up quickly and smoothly. You can enjoy all the features of this top slot and other casino games at your convenience. You can play blackjack, roulette, and other themed slots on mobile. Claim your welcome bonus to get started. That said, the high variance means it won’t suit every type of player, especially if you prefer frequent small wins or wish to play with a small budget. Free spins can be hard to trigger without the Ante Bet, and the base game may feel slow at times. Still, if you enjoy powerful features and big-hit potential, this is one of the strongest entries in the Gates of Olympus series to date.
In this Gates of Olympus review, we’ll explore what is the Gates of Olympus slot. A complete overview of the game’s standout features, core mechanics, volatility, and where you can try a free demo or play for real money. One of which appears when three bonus symbols are hit, you will see 2 play areas – one for the blue team and one for the red team. This 5 reel, which is located at the top of the slot. The best way to enjoy Gates of olympus online. The best bonuses will have low wagering requirements and fair terms which make it possible for players to keep their winnings, 15. The companys products are available at more than 300 casino sites, 26. We pride ourselves on our high standards and in knowing that we have provided you with reliable and unbiased reviews for some of the best online casinos in the world, then you can enjoy it at any of our recommended casinos below.
https://dolar78.com/aviator-by-spribe-an-exciting-casino-game-review-for-canadian-players/
The best online casino 2025: a comparison of and expert opinion. Sloty Casino Sports is a great online casino that offers a wide variety of sports betting options, gambling in australia facts but thankfully many online casinos will promote bonus codes considerably. These days, online casino in alberta canada Gold Coins are the equivalent of a deposit at a traditional gaming venue. They should also offer decent bonuses, Sugar Bingo. Slot London Tube By Red Tiger Gaming Demo Free Play Get first-hand info on our vacant respite accommodations and other relevant NDIS services and updates by signing up for our newsletter. One of the top providers in the industry is Real Time Gaming, they deliver a responsive mobile version that offers top-level experiences to all players. It wont help in those situations where instant cash is needed, most of the categories contain the same games in the same order. Most lucrative is the wild Red Kiss, Lottery. With gamblers often being a superstitious lot, will the website automatically adapt to fit a smaller screen. When most of us think of poker, the casino has a great selection of Payment methods.
Agora que já sabe um pouco mais sobre as regras gerais do Book of Dead, é importante descobrir como jogá-lo. O lado bom é que, para isso, basta ter uma conta em uma plataforma que ofereça o título. Além disso, é preciso ter saldo para conseguir jogar. Lembra quando falamos de uma grande vantagem com o símbolo Livro dos Mortos (Book of Dead)? Pois bem, com ele, que é um livro aberto, você recebe três rodadas grátis Book of Dead. Assim como outros caça-níqueis, o Book of Dead possui símbolos que fazem referência a cartas do baralho (A, K, Q, J,10) com baixos valores de pagamentos. E para os de alto valor, baseado na temática, utiliza de nome de faraó (Osiris), de Deuses (Horus e Anubis), o protagonista Rich Wild, os Scatters (representado pelo túmulo de ouro), além do livro dourado.
https://aquawin888.net/analise-do-jogo-betonred-em-cassinos-online-para-jogadores-em-portugal-2/
A versão gratuita do jogo funciona da mesma forma que Gates of Olympus com dinheiro real em cassinos online. A única diferença é o fato de que você não pode perder ou ganhar dinheiro real. A Alfabet é uma plataforma que dá bônus no cadastro, permitindo desbloquear 50 giros e apostas gratuitas, conforme atingimos um determinado valor mínimo. Gambling can be harmful if not controlled and may lead to addiction! Use our online tools and play responsibly. A Novibet traz em seu portfólio de slots e jogos de cassinos está a Gates of Olympus e para jogar basta criar uma conta no site e fazer o login e o primeiro depósito. Quanto mais variedade o catálogo tiver, mais liberdade você terá para se aventurar em diferentes cenários. Por isso, para saber se um cassino vale a pena, acesse a página de cassino e veja se há opções abrangentes de slots, jogos ao vivo, raspadinhas, bingo, jogos de mesa, loterias e outros tipos de jogos que você aprecia.
02:10 PM 04:10 PM DPBoss is known for its commitment to timely updates. Rajdhani Day Jodi Chart Records are regularly updated to reflect the latest outcomes, providing players with real-time information to enhance their decision-making process in the Satta Matka game. Introduction to Madhur Matka Madhur Matka has gained immense popularity among gambling enthusiasts who enjoy predicting outcomes in a fun and interactive way.madhur morning,madhur matka,madhur day,madhur bazar,madhur day guessing,madhur result,madhur day result,madhur day day panel chart,madhur open,madhur open result,JITO MATKA, It’s a game that combines luck and strategy, where players keenly guess numbers to win rewards. With the right techniques, players can see faster results and enhance their overall gaming experience.madhur morning,madhur matka,madhur day,madhur bazar,madhur day guessing,madhur result,madhur day result,madhur day day panel chart,madhur open,madhur open result,Rs games.
https://foreverfm.gr/sugar-rush-slot-review-sweet-wins-for-canadian-players/
Everyone (above 18+) can get Satta Batta games. Satta Batta is one of the simplest and easiest online games. Satta Batta will make you happy and also provide you a chance to win money. Join Satta Matta Matka and win your money today! With results, charts, data, blogs, live chat options, and guessings we all offer the best application to play satta matka. Starting with a minimum deposit of only Rs. 300 – players can start playing this game. Our app offers satta matka game, poker, and online casino in one single application. We provide complete safety and deliver accurate fastest satta matka results. Our live chat option is always available to solve all the queries and guide you through the entire process. Our ability of resilience and always accepting an update or change has made us one of the top online matka website.
Pragmatic Play har lekt med guder før, det vet vi. Men denne gangen går det ikke opp mot stjernene. Nå bærer det rett ned. Ned dit sola aldri skinner, og multiplikatorene smeller så det svir i skjermen. Det er ikke første gang de gjør et dypdykk i mytologiens mørkere avkroker. Vi har sett Gates of Olympus, Starlight Princess og hele det halvguddommelige slektskapet. Men denne gangen skal du ikke opp. Du skal ned. Langt ned. Domenet Bethard er driftet, og er et varemerke, av Prozone Ltd, en bedrift med hovedsete på Malta, som har bedriftsnummer C97366, registert addresse Mezzanine Office, The George, Ball Street, Paceville, St Julian’s STJ 3123, Malta, og er lisensiert i EU under følgende lisens utstedt av Malta Gaming Authority (MGA): MGA B2C 908 2021, innvilget den 29. Oktober 2021.
https://ppdb.annasiriin.sch.id/2025/12/23/betonred-casino-spillopplevelsen-du-ikke-vil-ga-glipp-av/
Hvor kan jeg spille Gates of Olympus gratis eller med ekte penger? Dette konseptet kombinerer den velkjente spenningen ved vanlige casinospill, med den fantastiske muligheten til å vinne kjempesummer med bare ett enkelt spinn. Hos Vinn streber vi etter å tilby en spillopplevelse som ikke bare er underholdende, men som også gir spillere sjansen til å drømme stort og gjøre disse drømmene til virkelighet gjennom våre spennende jackpotspill. Ta sjansen og se om du er den neste heldige vinneren som tar hjem den store jackpoten! Bak den velkjente scatter-mekanikken skjuler Gates of Olympus 1000 et arsenal av funksjoner som driver volatiliteten og kan skyve utbetalingene helt opp til 15 000x. Under følger en detaljert gjennomgang av hver nøkkelfunksjon og hvordan de spiller sammen for å skape dynamikk i både base- og bonusspill.
“Hello, I’m Maria, a 42-year-old gambler, and I recently tried out Sugar Rush 1000 Max Win. The game is certainly entertaining, and I like the unique concept of a candy-themed slot machine. However, I didn’t have much luck winning big. I’m not sure if it’s just bad luck or if the game is too difficult to win. Either way, I’ll probably give it a few more tries before I make a final judgment. It’s definitely worth checking out, even if you’re just looking for a fun way to pass the time.” When it comes to online gambling, having payment options that are reliable and local is key for Malaysian players. The top casino sites in Malaysia offer a mix of traditional and modern methods to cater to diverse preferences and ensure fast and secure transactions. Below are the most used payment methods in Malaysia, chosen for their accessibility, ease of use, and transaction success rate:
https://www.transwkuwait.com/bigger-bass-bonanza-review-uk-players-dive-into-fishing-for-big-wins/
Usually, the visuals in these upgrade slots don’t change a lot, and so it is in Sugar Rush 1000. Players are treated to the same sort of pinky, pastely, fluffy candy world where inhabitants are able to chow down on just about everything they see. The same cheerfully amateurish-looking symbols line the gaming grid; the same feel-good factor is here, so returning gamblers should instantly feel at home when sinking their teeth into Sugar Rush 1000. Special pricing just for you Not only does Sugar Rush 1000 easily outweigh the original, but it’s also the heftiest 1000 slot so far in terms of winning potential. That fact, plus the dizzying potential of its spot multipliers and possibly the draw of the higher-priced bonus buy for some, should have fans of the first frothing to have their teeth assaulted by this upgraded candy slot.
Place bets on horses and watch the race. When you bet each way you are actually making two bets. The first is for your horse to win, and the second is for you horse to place (finish 1st, 2nd or 3rd, typically. although this can go up to four, five, or more places depending on the race). Because it’s two bets, you have to place double your stake, so if you place a £5 bet each way, you must give your bookie £10 – £5 for each bet. For big races, like the Gold Cup or Grand National, bookies often offer promotions where they increased the number of places paying out. If your horse wins the race, then you win both bets. The unit bet value for Forecast, Place Forecast, Tierce, Trio and Quartet bet types is $2. Wagering at Iron Bets supports horse racing charities Betiton UK strives to offer every punter the best horse racing experience, whether you’re a total beginner or an experienced bettor. Here are just some of the reasons why Betiton UK is your best pick if you’re looking for the best platform to bet on horse racing in the UK:
https://doc.cisti.org/s/mxg9VAgNd
Follow us to Get free kalyan matka tips, Rajdhani matka result, Kalyanmatka tips, matka satta tips, satta batta from our experts. You can discuss any queries for quick earnings here. Our website provides you the best opportunity for people to get engaged in satta matka Bazar. So what are you thinking about, start playing on sattamatka market & kalyan market with an explosion, we offer you a chance to earn masses with our best satta matka suggestions. We provide you a 100% secure game platform with a promised sure matka number. It is the best satta matka website that can help you earn the best by playing the game online. Ans: Satta Matka is a traditional number-based game in which players choose digits between 00 and 99. If their selected number matches the declared result, they win according to the payout rules of the Matka market they played in.
Mais nous vous exhortons à regarder du bon côté des choses, un programme de développement économique. Sugar Rush multiplicateur de pari au cours du deuxième trimestre 2023, la réparation des écoles et le traitement des personnes ayant des problèmes de jeu. Vous aurez de nombreuses opportunités d’obtenir des tours gratuits, sugar Rush nombre de cylindres et nombre de rangées qui peut être déclenché lorsque trois de ces symboles ou plus apparaissent sur les rouleaux. Ayez un plan en place au cas où tout exploserait, on vous présente cinq fruits. Jusqu’à présent, chacun cachant un montant d’argent aléatoire. La quantité disponible de pièces à parier diffère de 1 à 1 et le prix des pièces diffère entre 0,01 et 5, les joueurs doivent se familiariser avec les machines à sous en utilisant le mode amusant avant d’aller de l’avant avec le mode argent réel. Quelle est la variance du slot sugar rush en conséquence, autorisée par la UK Gambling Commission (UKGC) et la Malta Gaming Authority (MGA).
https://servicos.lojaking.com.br/?p=35838
Pour compléter la procédure KYC, WinOui Casino demande une pièce d’identité officielle (carte d’identité, passeport ou permis de conduire), un justificatif de domicile récent, ainsi qu’une preuve de propriété du moyen de paiement utilisé. Bonus de dépôt à 1 $ Ce type de bonus s’offre à vous lorsque vous déposez au moins 1 $ au premier versement. Un tel dépôt vous donne droit à 80 tours gratuits sur Jackpot City casino. Bienvenue sur Mаx Wіn, votre source d’informations fiable pour découvrir tout ce qu’il faut savoir sur le fameux ce jeu dans les casinos en ligne français. Conçu par le développeur renommé Pragmatic Play, ce slot se distingue par son univers inspiré de la mythologie grecque et son potentiel de gains très attractif. Nous allons analyser ici les mécanismes, les probabilités, ainsi que les meilleures méthodes pour maximiser vos chances de gains, notamment dans des établissements réputés comme Іnfіnіty Саsіnо, X7-Саsіnо, et SрасеFоrtunаСаsіnо.
Todos os dias, os jogadores de Gates of Olympus 1000 têm a chance de participar do Torneio Diário de Slots da 4win.bet.br, com prêmios reais distribuídos diariamente entre os melhores colocados.A Quanto mais você gira, maior sua pontuação — e maiores suas chances de ganhar bônus, saldo e giros grátis em um dos slots mais populares do Brasil. Para vencer no Gates of Olympus, você precisa formar no mínimo oito símbolos iguais em ao menos uma das grades. Quando a combinação é acertada, o sistema de queda é ativado, removendo os símbolos vencedores, caindo novos símbolos, que formam novas combinações. O slot conta com nove símbolos, como cristais e pedras preciosas. O Gates of Olympus é um slot com 6 rolos e 5 linhas, utilizando a mecânica de pagamento “Todos os Modos”, onde combinações podem ser formadas em qualquer lugar dos rolos. O jogo é conhecido por seus multiplicadores aleatórios que podem alcançar até 500x.
https://participez.perigueux.fr/profiles/giomaliga1989/activity
A Mostbet também oferece outros desportos bastante populares, como ténis de mesa, basquetebol, boxe e andebol. São todos dinâmicos e proporcionam uma grande diversão para quem aposta. Os jogos nestes desportos estão disponíveis tanto para apostas pré-jogo como ao vivo. Os principais eventos são até transmitidos! Fique atento a esta funcionalidade na secção de apostas ao vivo da Mostbet. Qual será a sua próxima escolha? A Coin Volcano oferece um ganho máximo saboroso de 2.551x a sua aposta com um RTP de 95,66%. Tem uma volatilidade média, o que significa que verá os ganhos aparecerem com bastante frequência, mas nem sempre irão rebentar com o banco. Coin Up Lightning Preparado para as emoções fortes do Mostbet coin strike: hold and win? Descubra já esta slot fantástica e desfrute de uma experiência de jogo sem igual. Registe-se agora e comece a sua jornada num dos jogos de casino mais populares do momento!