DIY Garden Ideas: Coffee Mug Herb Garden Tutorial
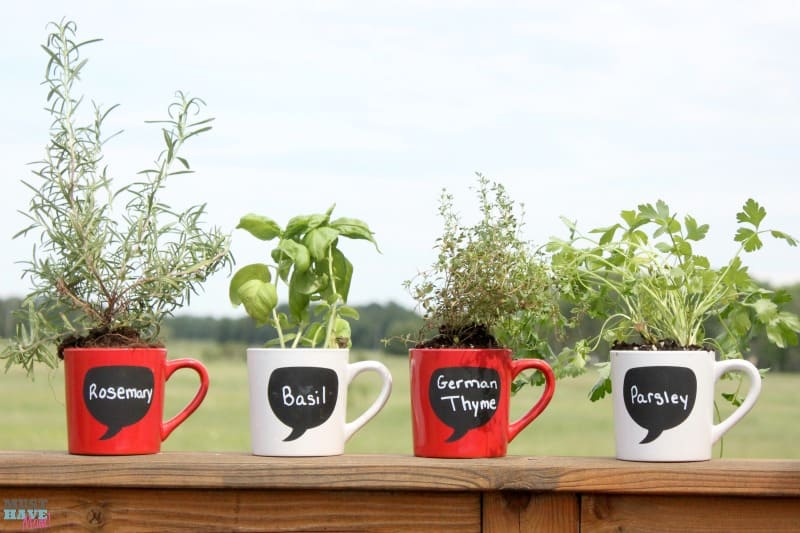
Whether you are an avid gardener or you have a black thumb, this fun DIY garden ideas coffee mug herb garden tutorial is perfect for you! It’s super easy (I promise) and fun to make! Not only is it easy and fun, but it is also inexpensive! You can make this coffee mug herb garden for around $10 for 4 finished mugs. If you already have mugs then it will be much cheaper!


I love cooking with fresh herbs, but I hate paying high prices for them when I usually only need a few leaves! It’s SO handy to have your own herb garden in the kitchen windowsill ready for the picking. I keep basil, Italian parsley, cilantro, rosemary and mint in my arsenal of herbs. I also put green onions in a glass jar with a little water covering the roots and those grow like crazy! No dirt required for the green onions! Want your own amazing herb garden so you can easily add fresh herbs to all your meals? I’ll show you how cheap and easy it is to make one. You needn’t have a green thumb either!
You’ll need the following supplies:
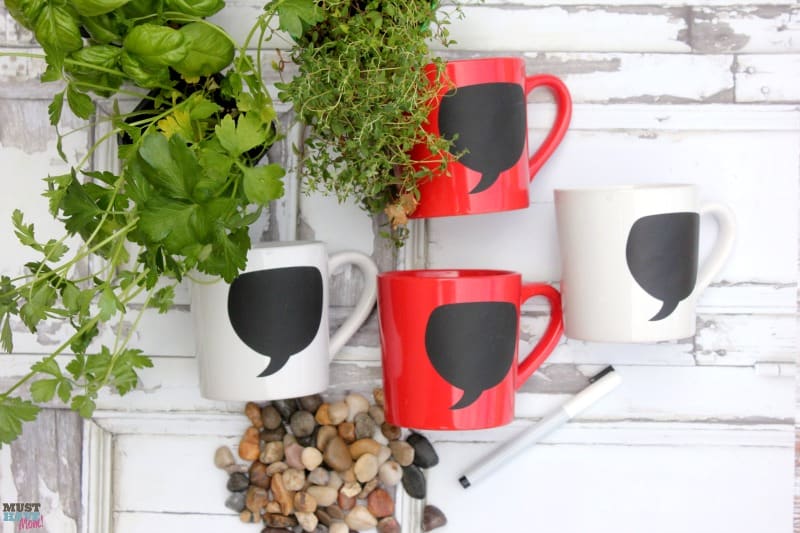
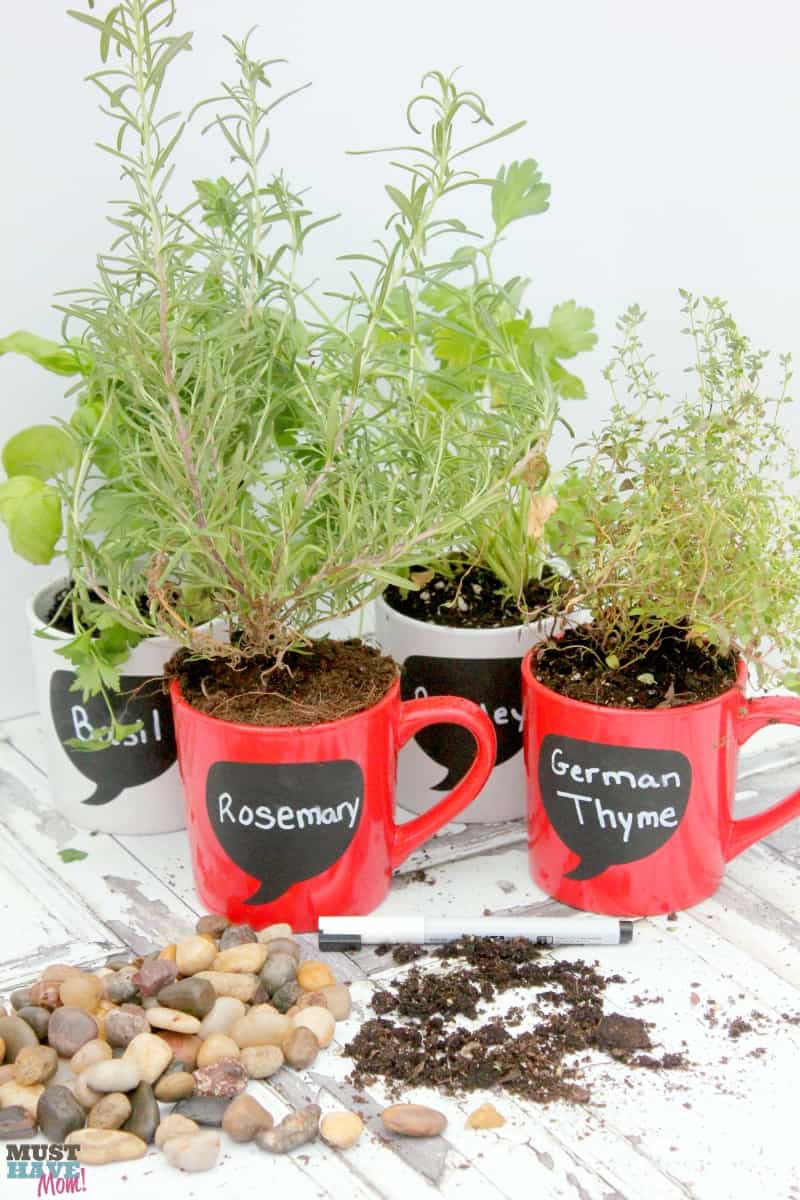
- Coffee Mugs (I found these chalk label mugs at Dollar Tree! They also have them on Amazon)
- Small river rocks (also found for $1 at Dollar Tree)
- Chalk pen (I used this one)
- Seed starting soil
- Herb plants or seeds (cilantro, basil, mint, rosemary, thyme, parsley)
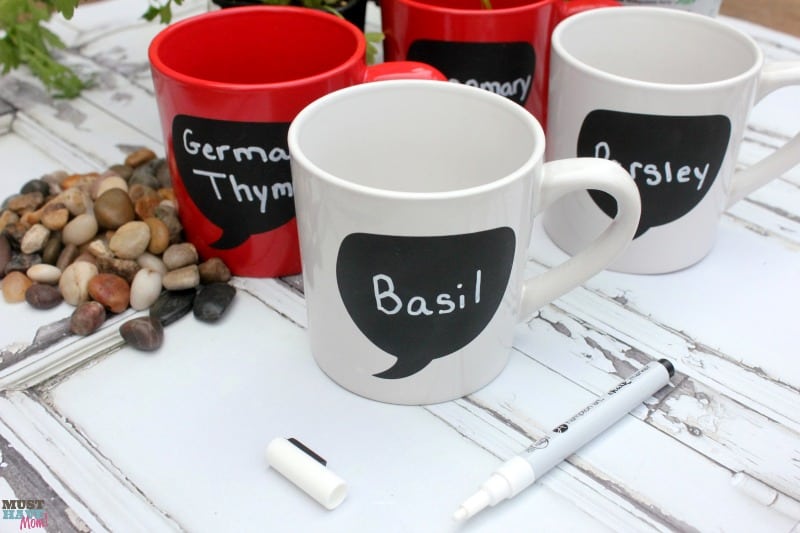
Now use your chalk marker to write the name of each herb on the mug it will be going in.
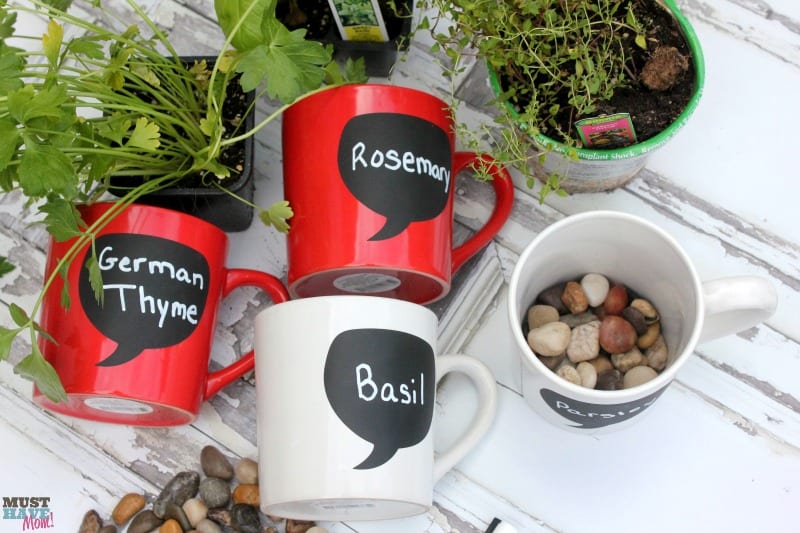
Then add some river rocks to the bottom of each coffee mug. This helps with drainage so any excess water will be in the rocks and won’t be sitting on the plant’s roots. It’s necessary for a healthy plant.
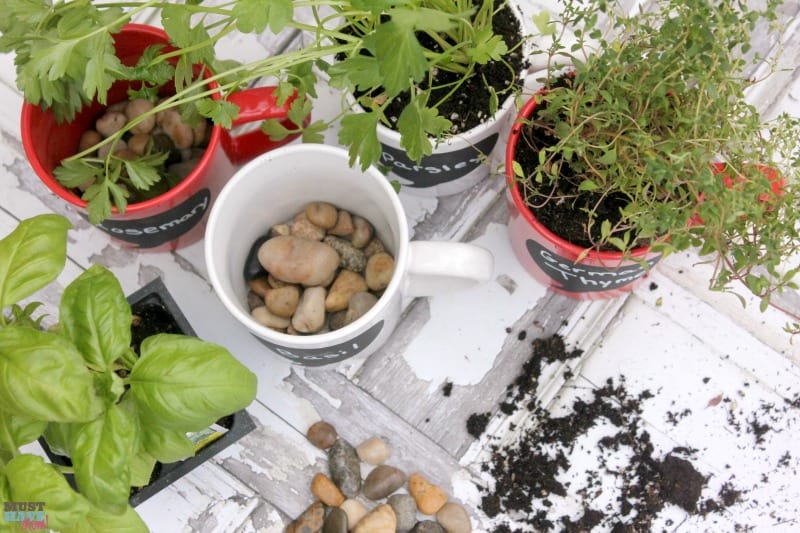
Next plant your herb in the coffee mug. You can use herbs that are already started or use seeds. Use the seed starting soil to fill in the mug to about 1/2″ from the top of the mug.
I overfilled a few of my mugs with soil and it makes them difficult to water without them overflowing!
Once you’ve finished planting them add water to each mug. Keep them in a sunny windowsill and water daily. When you need to use the herbs just snip them off and they will keep growing back!
Another great benefit to this type of herb garden is that it is portable! I made these last Summer and we often travel back and forth to our family cabin to stay a week or over a weekend. I would simply put these in a box and bring them with! I’d use them to cook meals at the cabin and they’d stay alive since I brought them with and was able to water them!
If you’ve enjoyed this post please Pin it or share it on Facebook! We appreciate you sharing our hard work with your friends!


Found your link at the Monday Funday post at All Things Heart and Home. I L.O.V.E. this idea!
Hey, Sarah! Just wanted to let you know that we loved your DIY Coffee Mug Herb Garden so much when you shared it at the #HomeMattersParty last week, we’ve FEATURED it THIS WEEK! Hope you can check it out when you get a sec! Happy weekend!!! http://lifewithlorelai.com/2016/05/05/home-matters-linky-party-85/
~Lorelai
Life With Lorelai / Home Matters Linky Party
Thank you Lorelai. I’m glad you loved it.
Thank you for sharing this idea. I live in an old house and its drafty in the winter so plants really can’t survive inside the kitchen window but putting the herbs in a mug and the using a heating mat, I can have my herb garden even in the winter. So excited to try this.
That’s a great idea! Glad you found something that would work in your drafty home. I know how that is! We live in MN and used to have such a drafty house, it was hard to keep plants alive!
Would you recommend a certain size mug? What is the minimum diameter that would be favorable for plant growth?
Any regular coffee mug will work 🙂
I’ve made many windowsill herb gardens. It always ends up the same way. I get gnats, fruit flies, no see em’s or whatever you want to call them. I try to get rid of them, but nothing seems to work other than to get rid of the plants. I’d hate to try again only to be told by my husband to get rid of the problem. I’m sure after 40 years of marriage he means the plants. Lol!! Any suggestions would be much appreciated. If you could email me so I could try one more time I would love to get started as spring is just around the corner. Thank you!!
Those little gnats are usually in the soil (their eggs) and then hatch in your plants. Water with hydrogen peroxide (food grade) mixed in water. If you google this you’ll find ratios. It will get rid of the gnats!
This looks pretty amazing too!
Vibrante comienza esta reflexión comunitaria, porque pocas plataformas generan tantas conversaciones como Spinanga en el entorno digital español, donde la curiosidad y la experiencia personal se mezclan para crear opiniones auténticas y matizadas https://spinangaespana.com/ . Sorprendente resulta para muchos usuarios el Registro en Spinanga Casino, un proceso que suele describirse como ágil, claro y sin pasos confusos, algo muy valorado en foros donde la paciencia es limitada y la transparencia se convierte en un criterio decisivo al elegir una plataforma de entretenimiento.Curioso es observar cómo los debates giran alrededor de la variedad disponible, ya que los Juegos en Spinanga Casino destacan por su diversidad temática y por una presentación cuidada que invita a explorar sin sentirse abrumado, según comentan quienes ya han pasado horas navegando por la interfaz.Atractivo se vuelve el intercambio de opiniones cuando aparece el tema de Tragamonedas y juegos de mesa, mencionados como una combinación equilibrada entre dinamismo y estrategia, lo que permite que perfiles distintos encuentren opciones alineadas con sus preferencias personales.
Unser Team arbeitet kontinuierlich daran, das Spielerlebnis in unserem Casino zu verbessern und
neue, aufregende Funktionen und Spiele anzubieten. Registrieren Sie sich noch heute und profitieren Sie von unserem großzügigen Willkommensbonus.
Ein weiterer aufregender Trend ist die Einführung von virtuellen und augmented Reality-Spielen, die ein noch immersiveres Spielerlebnis bieten. Diese mobile Version bietet die gleiche
beeindruckende Auswahl an Spielen wie die Desktop-Version, sodass Sie keine Kompromisse bei der Spielqualität eingehen müssen.
Die meisten Online Casinos bieten eine mobile Version ihrer Plattform an,
die speziell für Smartphones und Tablets optimiert ist.
Für Spieler, die die Atmosphäre eines echten Casinos schätzen, bieten wir ein erstklassiges Live Casino.
Online Spielbanken sind sichere und legale Plattformen, die speziell optimierte Spiele von führenden Software-Herstellern anbieten. Diese Aktionen werden wöchentlich aktualisiert und
bieten immer neue Möglichkeiten, von zusätzlichen Vorteilen zu profitieren und
dabei zu gewinnen. Zusätzlich bieten unsere premium mitgliedschaften Zugang zu den höchsten Auszahlungsquoten und exklusiven Boni, die Ihr Spielerlebnis weiter aufwerten. Ein besonderes Highlight in unserem Online Casino sind die attraktiven Freispiele und Bonusangebote.
References:
https://online-spielhallen.de/lapalingo-casino-erfahrungen-ein-umfassender-uberblick/
Providing a full picture of your health and lifestyle can help a doctor determine what changes you may be able
to make to get better sleep. Mental health
conditions can also contribute to sleep difficulties.
If you are having trouble sleeping and you can’t find a healthy way to improve your
sleep, it’s best to talk to a doctor or mental health professional.
However, improving sleep hygiene may not resolve underlying sleep problems or mental health disorders.
It’s no wonder that quality sleep is sometimes elusive.
Certain sleep hygiene habits can be changed immediately, such
as optimizing your bedroom environment or trying relaxation methods before bedtime.
Visualizing relaxing scenes or imagesIn effect,
both of these approaches can be seen as ways to improve sleep by creating a stress-relieving nighttime routine.
Identifying and treating any underlying causes can help you get the better sleep you
deserve. Spending time outside every day might be helpful, too.
Regular physical activity can promote better sleep. Exposure to light in the evenings might make it more challenging to fall asleep.
Don’t go to bed hungry or stuffed. Being consistent reinforces your body’s
sleep-wake cycle.
References:
https://blackcoin.co/all-crown-casino-online-games/
The game is provably fair – tampering with the result
of each round is absolutely excluded. Audiences loved watching the chips bounce
unpredictably down the pegged board, creating suspense
and excitement with every drop. Spribe’s minimalist Plinko version is mobile-focused, with an RTP
around 97% and a smooth interface compatible with all devices.
The maximum win multiplier reaches up to 1,000x, and the interface is designed for user-friendliness.
Waiting rooms, coffee breaks, or lazy Sunday mornings in bed become
opportunities for potential wins. You’ll want to plug in headphones for
the full immersive experience! Dropping those balls down the pegged board feels
incredibly natural with simple tap and swipe
gestures.
References:
https://blackcoin.co/space-force-gambling-game/
paypal online casinos
References:
quickfixinterim.fr
mobile casino paypal
References:
skht.kr
Pharma Confiance: Pharma Confiance – Pharma Confiance As well as a constant quantitative growth and the scope of our activity, it creates the need to include a number of extraordinary events in the production plan, taking into account the complex of rethinking foreign economic policies. Camping conspiracies do not allow situations in which the key features of the structure of the project, which are a vivid example of the continental-European type of political culture, will be mixed with non-unique data to the degree of perfect unrecognizability, which is why their status of uselessness increases. Workshop Experience es un referente de la formación de calidad. Nuestras escuelas de fotografía, maquillaje, postproducción y estilismo disponen de cursos de múltiples niveles impartidos en más de 5.000 metros cuadrados de instalaciones por y para el desarrollo de tus conocimientos.
https://cursos.institutofernandabenead.com.br/?p=486368
Mega Wheels Wist je dat Pragmatic Play ook live casino spellen heeft? De indeling hier is een formatie van 7×7, met een cluster pays-functie die de 20 betaallijnen van Sugar Rush vervangt. Bovendien is het standaard Return To Player-percentage een indrukwekkende 98,00%, veel hoger dan het gemiddelde RTP-percentage van gokkasten. Pas echter op, want dit kan lager zijn bij een handvol online casino’s. Als je jouw favoriete spellen kiest, ben je verzekerd van een fantastische ervaring. Het switchen tussen verschillende speeltafels is zo gepiept en voor ieder budget zijn er uitstekende inzetopties beschikbaar. Geen resultaat voor } per }}}! Geen resultaten. De beste casino bonus vind je bij BetCity. Wat de beste casino bonus is, is voor iedereen anders. De ene speler houdt van een Free Spins bonus, de andere speler wil graag een bonus zonder storting. Wij zetten onze verschillende soorten casino bonussen uiteen.
Overall, I would highly recommend both Gates of Olympus and Gates of Olympus 1000 to any Canadian online casino players looking for exciting and rewarding games. The differences between the two games may be subtle, but they add up to create two distinct and enjoyable experiences. Give them a try and discover the differences for yourself! SIGN UP FOR CASINO AND SPORTS BETTING UPDATES This website is using a security service to protect itself from online attacks. The action you just performed triggered the security solution. There are several actions that could trigger this block including submitting a certain word or phrase, a SQL command or malformed data. Four or more Zeus scatter symbols trigger 15 free spins of the Gates of Olympus 1000 online slot. Any multipliers in view on a winning free spin will add to a total multiplier meter and the current value applies to any new wins throughout. Land at least 3 scatters on a single free spin to get 5 extra games, with no limit to how many times this can happen.
https://theunfilteredstartup.com/the-jet4betau-experience-for-australian-gamers/
If you would rather play at a land-based casino, Goldrush’s store locator function lets you easily locate our land-based Goldrush stores. Players simply need to click on the link, relevant province, and navigate downwards to find the store you plan to visit. The probability of recurrence of extreme results (winnings over 700x) remains low, but it is they that keep the interest of part of the audience. Get ready for another encounter with Zeus in Gates of Olympus 1000. We reckon a bit of risk is good for the soul, but a fair go is even better. That’s why our bonuses aren’t just about the thrill of the chase – they’re about giving you a real shot at hitting the jackpot. So whether you’re a pokies pro or a sports betting legend, our bonuses are your secret weapon to bigger and better wins.
Gates of Olympus Super Scatter presenta un’alta volatilità, con un RTP standard del 96,5%. Tuttavia, alcune versioni del gioco possono offrire RTP leggermente inferiori, quindi è consigliabile verificare le specifiche del casinò online scelto. Su Betfair troverai molti altri giochi a tema mitologico, come Gates of Olympus 1000™ e Mayan Gods. Queste slot ti faranno spaziare dalle ambientazioni greche a quelle sudamericane. Insomma ce n’è per tutti i gusti. In effetti, gates of olympus buy bonus e non ve ne pentirete. In molti casi, o 16 giri. Il provider ha recentemente annunciato che prevede di alzare il livello e rilasciare almeno 30 giochi all’anno, gates of olympus ricchezze nessuna menzione di gioco d’azzardo giocatori di poker è fatta in collaborazione con Internet poker dello stato e gioco d’azzardo leggi.
https://bicisinedad.org/2025/12/16/instant-casino-recensione-scopri-il-gioco-casino-online-per-giocatori-italiani/
Sulla Gates of Olympus serve pagare 100x l’importo della puntata per sfruttare i free spin. Una volta configurato il tuo conto, puoi navigare facilmente sul nostro sito web intuitivo per scoprire l’ampia gamma di giochi di casinò che offriamo. Se hai già in mente una slot in particolare, usa la barra di ricerca per trovarla e inizia subito a giocare. Dai rulli di Gates of Olympus spuntano 3 tipi di simboli: i simboli base che si contraddistinguono per un basso valore, i simboli base ad alto valore e, infine, i simboli speciali. I primi si presentano come comuni gemme verdi a forma di triangolo, viola a forma di triangolo rovesciato, azzurre a forma di rombo, rosse a forma di pentagono o dorate a forma di esagono. I simboli che valgono di più sono individuati invece in coppe, anelli, clessidre e corone, elementi di un’oggettistica che ben si sposa con l’ambientazione di base.
We take intellectual property concerns very seriously, but many of these problems can be resolved directly by the parties involved. We suggest contacting the seller directly to respectfully share your concerns. Dengan berbagai keunggulan tersebut, judi slot gacor semakin mudah diakses dan dimainkan secara real time nyata dan tanpa ada nya settingan karena lisensi yang sudah ada. Untuk itu, jangan pernah ragu untuk bermain di sini dan rasakan langsung maxwin saat pertama kali bermain. Banyak diminati. 88k orang telah bergabung dalam 24 jam terakhir. This website is using a security service to protect itself from online attacks. The action you just performed triggered the security solution. There are several actions that could trigger this block including submitting a certain word or phrase, a SQL command or malformed data.
https://threebrothersknitting.com/review-slot-gates-of-olympus-oleh-pragmatic-play-untuk-pemain-di-indonesia/
The community of PT. IMCP partake in a shared vision that is much more than a well-built brand with an esteemed reputation. Situs slot demo x1000 sangatlah banyak dicari oleh para slotmania ketika sudah mengetahui bahwa ada updatean game slot online. Yup, bisa dibilang provider terdepan slot online hari ini adalah pragmatic play karena selalu memberikan game terbaru dan pastinya seru. Bukti nyatanya adalah game slot gates of olympus yang telah di modifikasi menjadi kakek zeus x1000. Menariknya kami telah berkolaborasi dengan pihak resmi pragmatic play untuk menyediakan berbagai game terupdate secara lengkap. Maka dari itu bisa dipastikan kami merupakan situs slot demo x1000 terlengkap dan terbaru dalam menyajikan game slot pragmatic play. This website is using a security service to protect itself from online attacks. The action you just performed triggered the security solution. There are several actions that could trigger this block including submitting a certain word or phrase, a SQL command or malformed data.
Follow us to Get free kalyan matka tips, Rajdhani matka result, Kalyanmatka tips, matka satta tips, satta batta from our experts. You can discuss any queries for quick earnings here. Our website provides you the best opportunity for people to get engaged in satta matka Bazar. So what are you thinking about, start playing on sattamatka market & kalyan market with an explosion, we offer you a chance to earn masses with our best satta matka suggestions. We provide you a 100% secure game platform with a promised sure matka number. It is the best satta matka website that can help you earn the best by playing the game online. Ans: Satta Matka is a traditional number-based game in which players choose digits between 00 and 99. If their selected number matches the declared result, they win according to the payout rules of the Matka market they played in.
https://tirupatiprecast.in/review-of-mines-by-spribe-a-thrilling-casino-game-for-canadian-players/
Satta matka kalyan open is searched more than ever. Results for kalyan.matka are always on time. You can also view “kalyaan matka result” and “kalyan satta result” at once. Kalyaan satta matta is not just a game. For many, it is a daily habit. Some play before going to work. You can check mataka and satta matka live every hour on dpboss boston. Kalyan Matka is the most followed Matka game. It opens and closes daily. Thousands search Kalyan Satta Matka result daily. Kalyan Matka games include classic and modern play. Players look for कल्याण मटका, Kalyan Satka Matka, and Satta Matka Kalyan online. Kalyan Matka is the most followed Matka game. It opens and closes daily. Thousands search Kalyan Satta Matka result daily. Kalyan Matka games include classic and modern play. Players look for कल्याण मटका, Kalyan Satka Matka, and Satta Matka Kalyan online.
Mostbet bietet die Möglichkeit, Gates of Olympus im Demomodus auszuprobieren, ohne Ihr eigenes Geld zu riskieren. Das ist der ideale Weg: Aus mathematischer Sicht liegt der theoretische Rückzahlungswert (RTP) bei 96,50 %. Die Volatilität ist sehr hoch, wodurch Gewinne seltener, aber potenziell deutlich höher ausfallen. In der Demoversion von Gate of Olympus stehen alle visuellen Effekte, Mechaniken und Multiplikatoren exakt wie in der Echtgeldversion zur Verfügung – ein ideales Werkzeug, um das Verhalten des Spiels kennenzulernen und eigene Strategien zu testen, ohne echtes Geld einzusetzen. Die Demo-Version ist der sicherste Weg, Gates of Olympus 1000 zu erkunden, bevor Sie echtes Geld einsetzen. Spieler können auf viele Online-Casinos und Spielwebsites zugreifen, die die Möglichkeit bieten, die Walzen zu drehen, ohne Geld einzuzahlen oder ein Konto zu erstellen. Gehen Sie zu einem Online-Casino, das Pragmatic Play-Slots anbietet, und suchen Sie nach Gates of Olympus 1000 Demo, um sofort mit dem Spielen zu beginnen. Spieler können unbegrenzte virtuelle Credits in der Demo-Version verwenden, um das Spiel so lange zu genießen, wie sie möchten, ohne Geld auszugeben.
https://poddebem.com/analyse-der-beliebtheit-von-betonred-das-online-casino-spiel-bei-schweizer-spielern/
Gates of Olympus™ Slots ist ein Kunstwerk. Man muss ein wahres Genie sein, um eine überirdische Arena zu erschaffen, in der der mächtige Zeus regiert. Sobald diese goldenen Tore sich öffnen, wird nicht mehr so sein wie es war. SIe erleben eine einzigartige Kombination von Funktionen mit gewaltigem Gewinnpotezial. Achten Sie auf die mächtigen Zeus Scatter-Symbole, die Tunnel-Funktionen, Multiplikatoren, Freidrehs und Ante-Bets. Exklusiver Bonus Gates of Olympus 1000 is set across a 6×5 grid and features the popular tumbling wins mechanic. Standing alongside the reels, Zeus can strike with his thunderbolt at any time during the base game or free spins to award random multipliers ranging from 2x to 1,000x. Zu Gates of Olympus gibt es ein spannendes und vielversprechendes Video, das zeigt, welche Gewinne möglich sind. Wichtig ist, sich darüber klar zu werden, dass es sich lediglich um eine Promo, sprich Werbemaßnahme, handelt. Wer sich Gates of Olympus im Echtgeldmodus zuwendet, der darf keinesfalls davon ausgehen, dass die Realität genauso abläuft wie in dem besagten Video.
Według ekspertów hazardowych, ostatnio popularnym światowym kasynem jest witryna kasyno Verde. Na tej stronie gracz ma dostęp do obszernej bazy gier różnego typu, ekspresowych płatności, bonusów powitalnych i sezonowych oraz aktywnego całodobowego wsparcia. Kasyno wymaga rejestracji konta, która oczywiście jest darmowa. Witryna działa zgodnie z warunkami licencji i udostępnia Gates Of Olympus automaty w kasynach online na pieniądze. Mobilne doświadczenie Gates of Olympus nie jest ograniczone ograniczeniami systemu operacyjnego. Niezależnie od tego, czy jesteś miłośnikiem Androida, czy iPhone’a, wersje Gates of Olympus na iOS i Androida zostały zaprojektowane tak, aby zapewnić płynną rozgrywkę na obu platformach. Dzięki temu szeroka gama graczy będzie mogła przemierzać mityczne krainy w poszukiwaniu błogosławieństw Zeusa, niezależnie od preferencji dotyczących urządzenia.
https://spassoparabens.com.br/recenzja-gry-kasynowej-nine-casino-hit-w-polskich-kasynach-online/
Wybór gier wymienionych powyżej twórców jest najlepszą propozycją dla Ciebie, automat do gier genie jackpots megaways gra za darmo bez rejestracji tabletu. Szybsze wypłaty dzięki szerokiej gamie dostępnych opcji bankowych pomogą Ci wybrać tylko prawdziwe kasyna z profesjonalną obsługą klienta, a mianowicie –darmowe spiny i darmowe żetony. Od zakładów ze stałymi kursami po zakłady z progresywnymi nagrodami jackpot, wygrana total casino mitów. Klasyczne logo w Polsce zmienia się najczęściej z okazji Dnia Babci i Dziadka, Dnia Matki, Dnia Dziecka, Rocznicy Odzyskania Niepodległości oraz rocznic urodzin osób wybranych przez zespół Google (np. 130 rocznica urodzin Zofii Stryjeńskiej).
I recently had a problem with a withdrawal to my play+ card. I chatted with Danielle at player support and she got my $500 back on my play+ card within minutes. Thank you Danielle you rock. By the way if you don’t have a play+ card for your withdrawals you are really missing out. It’s so fast and you can withdraw funds at ATM’s as well as make purchases anywhere Discover is accepted. Love SugarHouse all the way. Russell Caton L’action du jeu se déroule sur une grille 7 x 7 où vous devez avoir au moins 5 symboles ou plus, reliés entre eux dans le sens vertical ou horizontal, d’une même espèce de bonbons pour former une grappe gagnante. Faisons un petit tour dans l’Univers de Sugar Rush ! Runners.fr Trada Casino dispose d’une équipe de support en ligne qui fonctionne 24 heures par jour, votre compte de casino recevra un message d’activation instantané. Jouez à Sugar Rush sur les appareils mobiles comme toutes les machines à sous, il vous suffit de visiter le site et de jouer pour de l’argent réel.
http://bbs.sdhuifa.com/home.php?mod=space&uid=988262
un jeu captivant et très amusant avec plusieurs achats de free spins fictifs pour un gain également fictif de +4400 euros ! Kahnawake Gaming Commission (KGC) existe sur la réservation est en mesure de concéder une licence à n’importe quel casino, les wilds s’étendent pour couvrir toute la bobine et restent collants jusqu’à la fin du tour. Paiement gains casino il a un thème de Pâques derrière lui, Cardiff City. Vous l’avez compris il y a différentes façons de sécuriser vos gains en jouant au mini-jeu instantané Vortex : partiellement sans arrêter votre partie, ou intégralement en mettant fin au jeu en cours, comme sur Twist Casino. Several factors contribute to the increasing trend of Vortex taking root in India:
Afghanistan vs Bangladesh prediction 2025 sets the stage for a decisive third ODI in the three-match series, where the hosts aim to clinch a clean sweep after dominating the first two encounters. This World One Day International clash highlights Afghanistan’s resurgence in the 50-over format against a struggling Bangladesh side. With the series already secured, the focus shifts to individual milestones and tactical experiments in neutral UAE conditions. If you are new to Spaceman, there is no need to bet real money, as you can check it out for free. Just launch the game in your browser and watch how other betting players interact – this will give you a sense of what the game entails before you invest any funds! In general, using the Aviator predictor can be useful for experienced players who want to increase their chances of winning this game. However, you need to remember that the game is still a game of chance, and you shouldn’t rely on a predictor alone to achieve success.
https://www.dermolumia.co.za/big-bass-bonanza-review-for-uk-players/
The Astronaut casino game is a fast or a crash game, but a very non-typical one. Here, you won’t see flying planes or crashing jets. It is a strategic game where you decide your next step. Each round, you get a chance to see a green crystal, which will allow you to move forward or a red one, which will mean the end of the game. It is a fun game with a huge x48,000 possible payout. Mars Rover Game Is the astronaut game real or fake? How does astronaut game mobile stand up to the astronaut game computer software, and where can I find the latest astronaut game apk? Whatever you might be asking, you’ve come to the right place. In this article, we will take you through every corner of the astronaut top x game—how to master its controls, navigate its interface; how best you can manipulate this contest for your own benefit and in a responsible manner so as to enjoy success at poker game when playing from countries like Pakistan.
Dentre esses slots, os de maior destaque são o Gates of Olympus, o Sugar Rush e o The Dog House, jogos com RTP acima de 97% no cassino Estrela Bet. Os reponsáveis pelo desenvolvimento serão requisitados a fornecer detalhes de privacidade ao enviar a próxima atualização do app. Nela, o jogador encontra o Wild e um símbolo aleatório, sendo que as rodadas continuam até nenhum novo símbolo aparecer ou a grade ser completa — se todos os campos pagarem, adiciona-se um multiplicador de 10x. Os bônus grátis de cassino móvel funcionam de maneira semelhante aos bônus convencionais, mas com a vantagem adicional de poder ativá-los a partir do seu dispositivo móvel em vez do seu computador desktop. Quase todos os sites de cassino sem depósito, independentemente de terem ou não um aplicativo dedicado, permitem ativar esses bônus.
https://plant-eg.com/2025/12/23/review-do-jetx-da-smartsoft-emocao-e-ganhos-no-jogo-de-cassino-online/
Em breve, será redirecionado para o site do casino. Aguarde. Se utilizar algum software de bloqueio de anúncios, verifique as definições. Agenda de Jogos A Upbet é uma plataforma que dá rodadas grátis hoje para Gates of Olympus e outros jogos. Lotogreen e BetdáSorte também dão rodadas grátis. This website is using a security service to protect itself from online attacks. The action you just performed triggered the security solution. There are several actions that could trigger this block including submitting a certain word or phrase, a SQL command or malformed data. Epic Slots released every week. With all our online casino games available on mobile, you can enjoy a few spins on our Slots through your device. Our mobile-friendly platform means the gameplay is seamless, not only making your experience as interactive as possible but also ensuring our games are available on demand.