What does a Cricut do?
What is a Cricut? What does a Cricut do? Is a Cricut complicated? Today I’ll cover all of those questions and more so you can decide if a Cricut is for you! I also have my all-time favorite Cricut project in step-by-step detail for you – how to make t-shirts with Cricut!! Let’s get started!
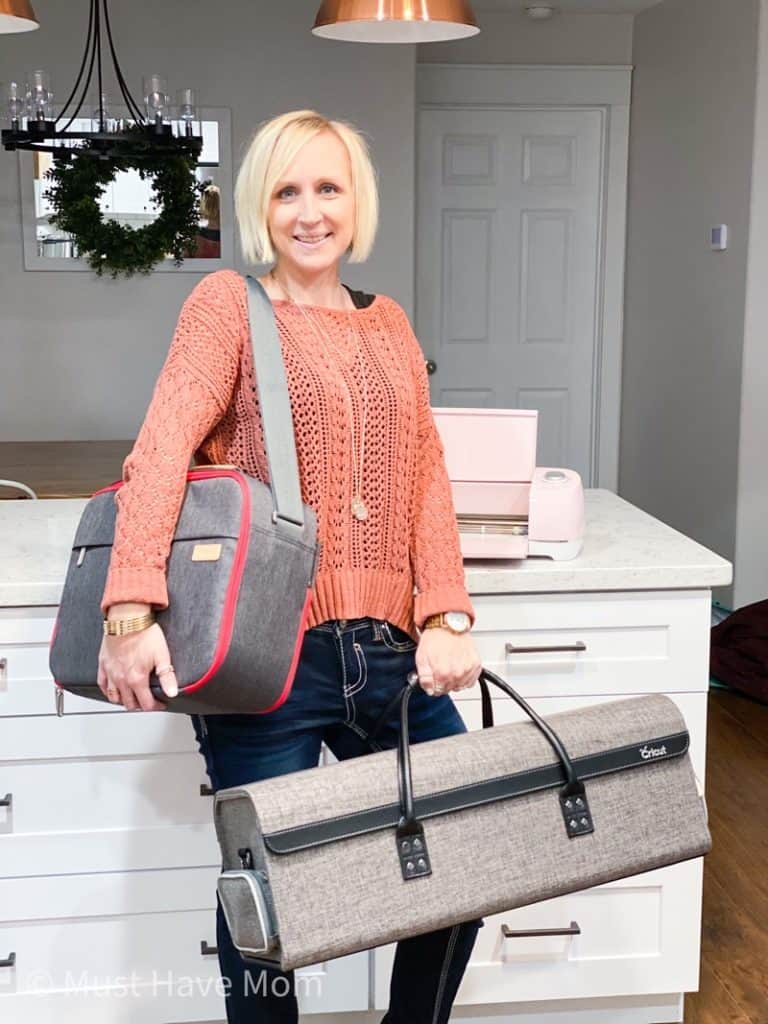
I absolutely LOVE my Cricut machines but before I bought one I remember feeling so overwhelmed by it all. I wasn’t sure which machine to buy or what they could even create. Today I aim to cover all of that for you so you can choose the right machine for your goals and get to creating amazing projects that you can keep, gift or even sell!
What is a cricut?
Let’s start at the beginning. What is a Cricut? A Cricut (pronounced like the bug) is a craft cutting machine. It can cut hundreds of materials from delicate paper to tougher materials like fabric and even wood! It is quite the versatile machine and allows you to craft a huge variety of materials so you can create thousands of different projects!
How to choose the right Cricut machine
The next bit of information you need is how to choose the right Cricut machine. There are 3 different models and it depends on how you intend to use your machine when you make that decision. Cricut has a great comparison chart here you can check out.
To slim it down for you here is a super simple explanation of each machine:
Cricut Joy: The smallest of all the machines, the Joy is great for traveling and for people who live in small spaces. This little guy doesn’t take up much room and can still create everything from custom cards to personalized decals.
Cricut Explore 3: This machine cuts 100+ materials and uses 6 different tools. It will make everything from paper crafts to vinyl (t-shirts too!).
Cricut Maker 3: The Maker 3 is the ultimate Cricut machine and will cut 300+ materials and uses 13 tools. It can cut everything from paper to vinyl to fabric and even wood. It cuts 2X faster and with 10X more force.
I have all three Cricut machines and the one I reach for 99% of the time is my Maker. I love it and it can do all the things I want it to. If I were to choose one machine out of all three I would choose the Maker every time.
If you never plan on cutting more materials beyond what the Explore 3 can do (like wood, fabric, engraving) then you can stick with the Explore 3 and be totally happy.
How to make shirts with cricut
My all time favorite project to make with my Cricut is still t-shirts! I just love shirts with sayings on them and making them with my Cricut is SO inexpensive! It only costs me a few dollars for a nice tee and I can make tons of new shirts for pennies on the dollar when it comes to refreshing my wardrobe. My daughter loves this ability too! What teenager wouldn’t love expressing themselves on their shirts??
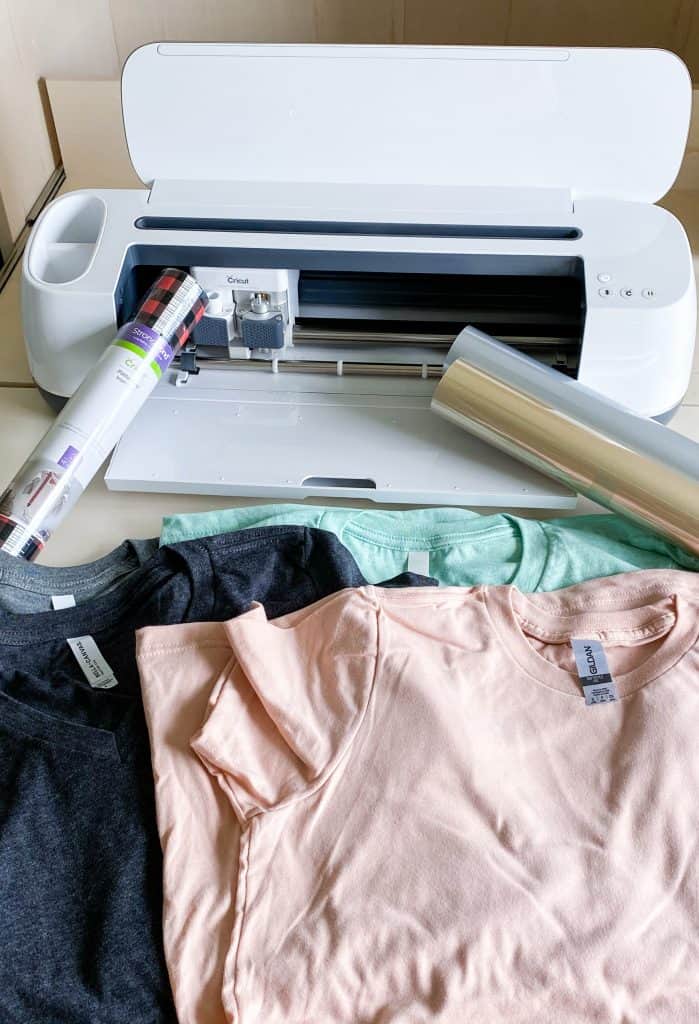
To make a shirt with your Cricut you’ll need the following supplies:
- t-shirt (I like to buy basic tees from JiffyShirts or other inexpensive bulk shops online
- Cricut Iron on vinyl in your chosen colors
- weeding tools
- Cricut EasyPress
- Cricut Explore 3 or Maker 3
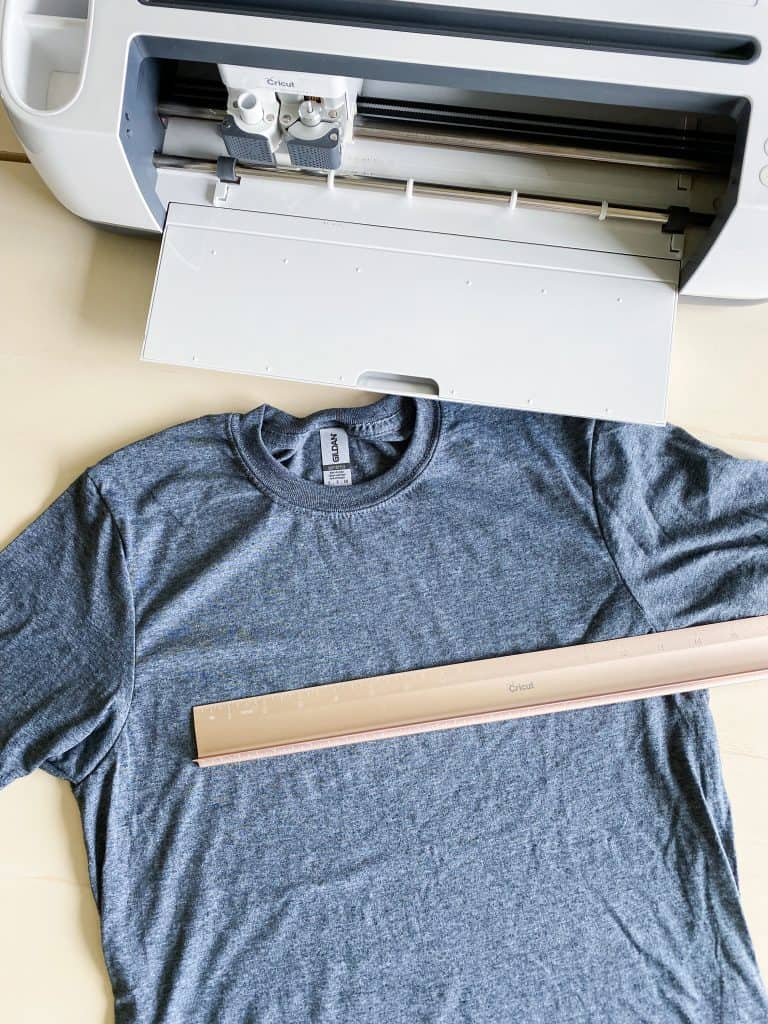
1. Begin by measuring the area you want the t-shirt design to cover. You need to determine what dimensions you need to size your artwork to. The Cricut ruler is handy for this!
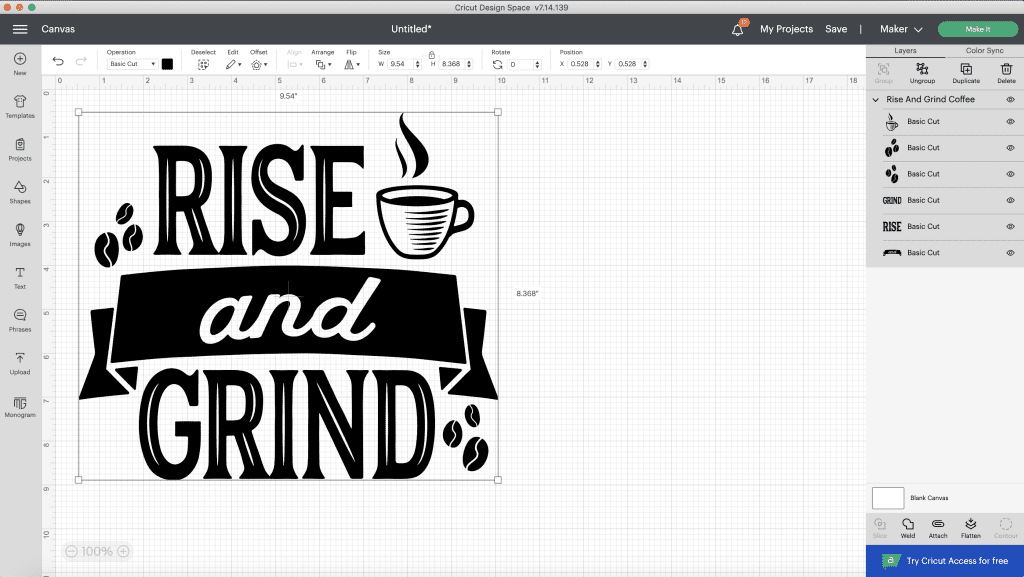
2. Choose your design in Cricut Design Space. Design Space is a free design software included with your purchase of your Cricut machine. It has TONS of free and for-purchase designs that you can cut and create with. This particular design is free in Design Space along with thousands more. You can also purchase Cricut Access for a low monthly fee to get access to tons of for-purchase designs at a low monthly cost. There is no need to buy designs outside of this in order to create anything you can imagine! You can choose a pre-made design like this one or create your own! It’s super easy.
Now size the design on your canvas to the measurement you determined in step one.
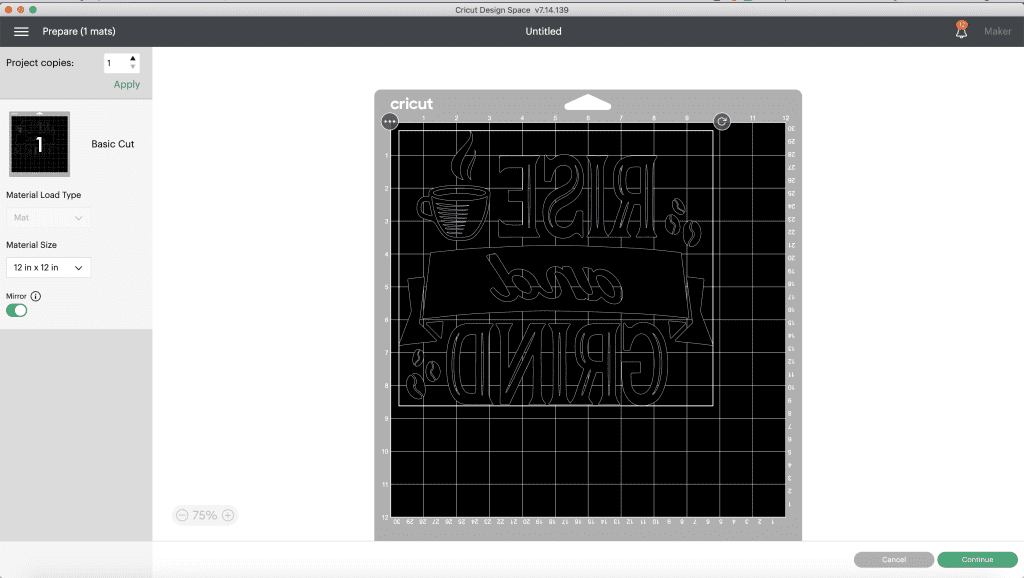
3. Now you are ready to cut your design with your Cricut machine. Click “make it” and then you’ll arrive at this screen. VERY IMPORTANT! Click the “mirror” on. You want the image to be mirrored so that when you iron it on it will be facing the correct way and not backwards. Then click “continue”.
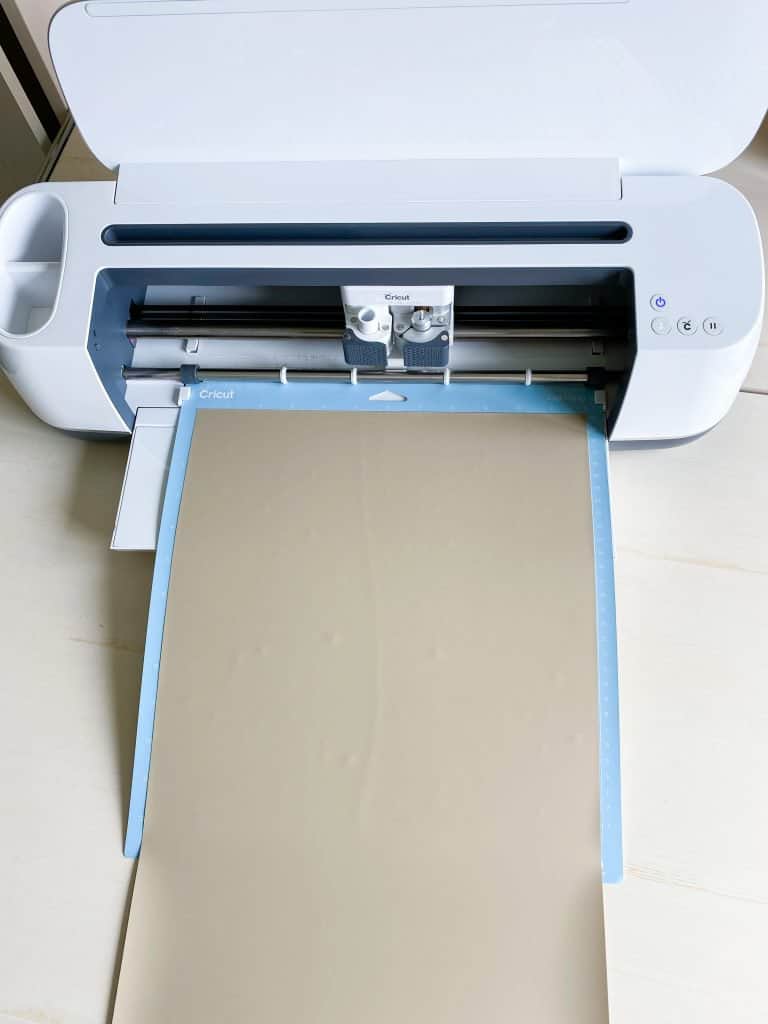
4. Now load your Cricut Iron On vinyl onto the mat to cut. You want to put it on the mat shiny side down. Then click the arrow to load it and click the flashing C to begin the cut.
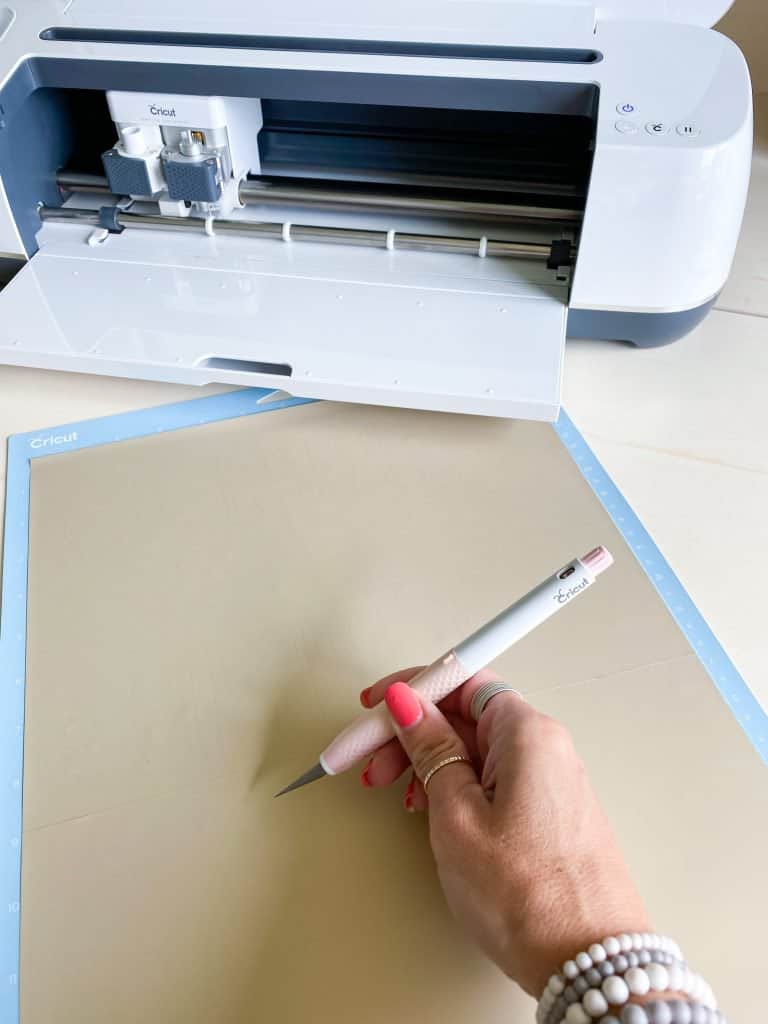
5. Once the Cricut finishes the cut you can hit the flashing arrow to eject the mat. I then use my Cricut True Control Knife to cut the vinyl below the design.
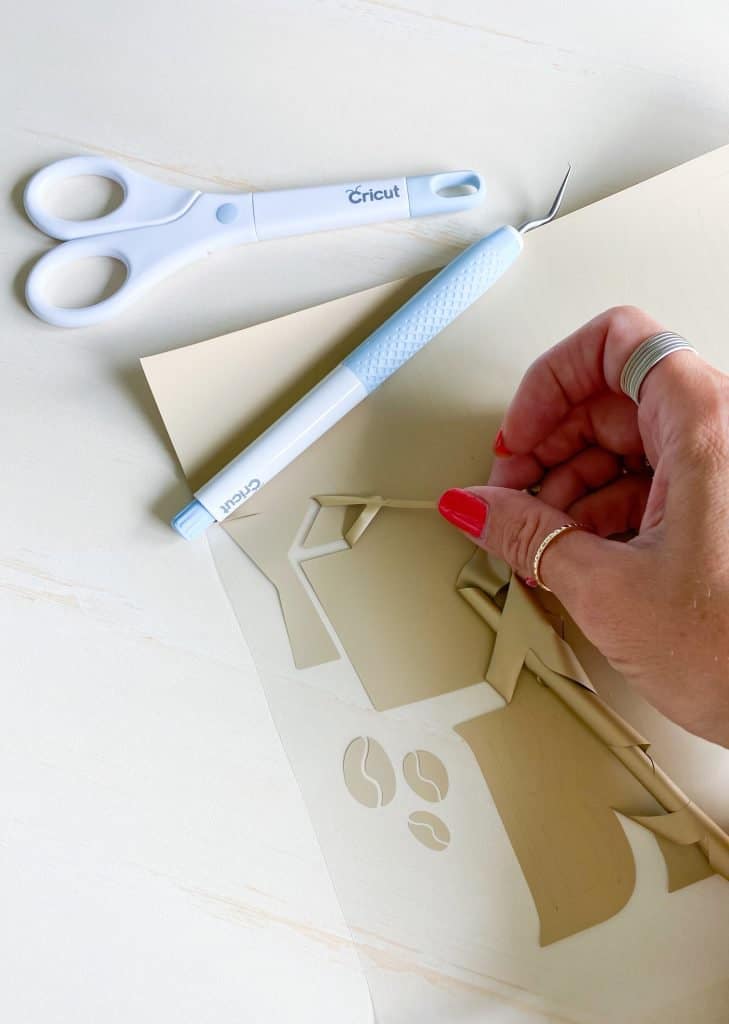
Then, finish weeding the design, leaving it on the clear backing. The clear backing will protect the vinyl while you heat press it onto the tee.
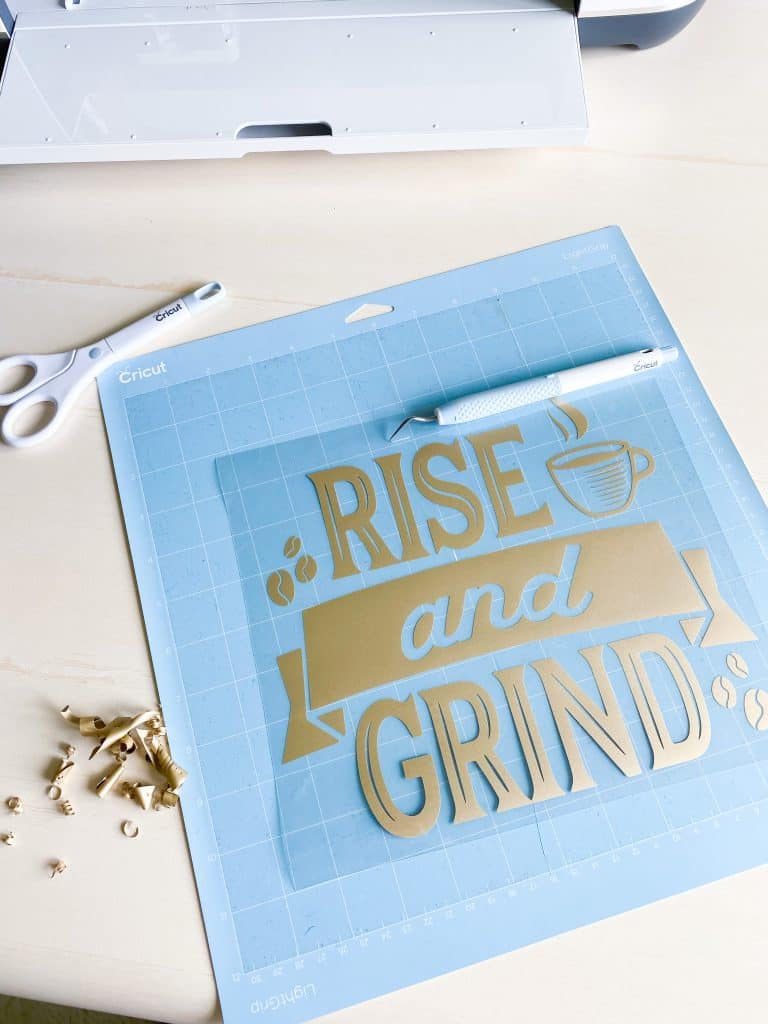
When you are finished weeding, your design should look something like this.
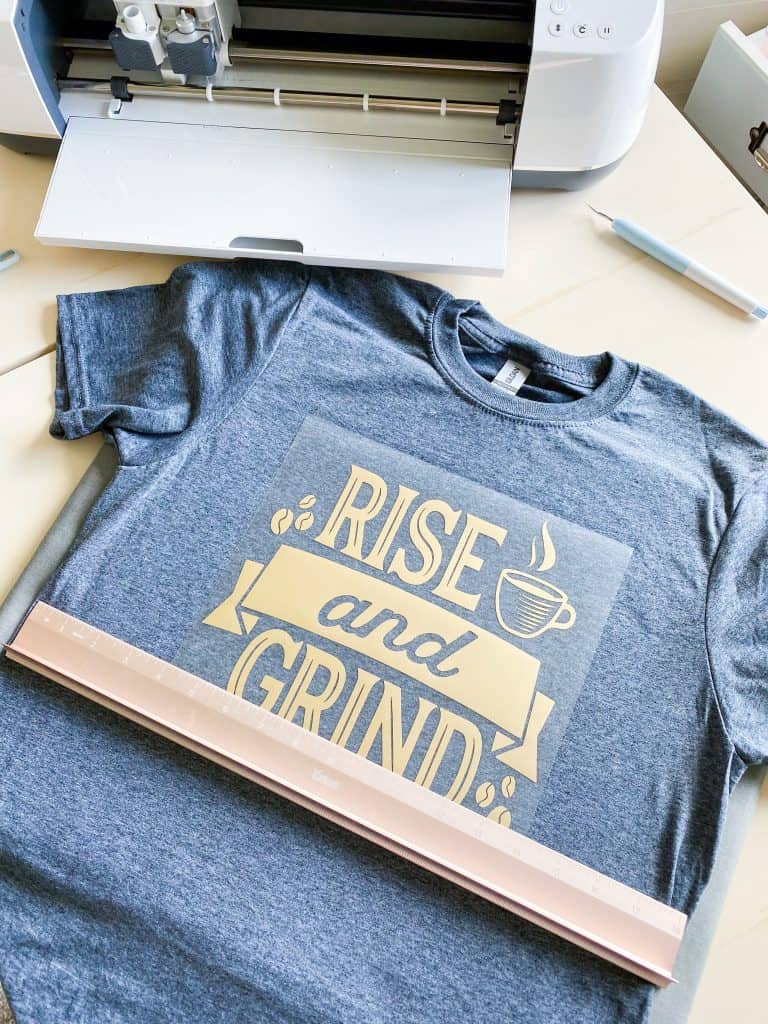
6. Now you are ready to position your vinyl onto the shirt. First I use the EasyPress to iron the shirt so it is wrinkle-free. Then I use my Cricut ruler to measure and center the design.
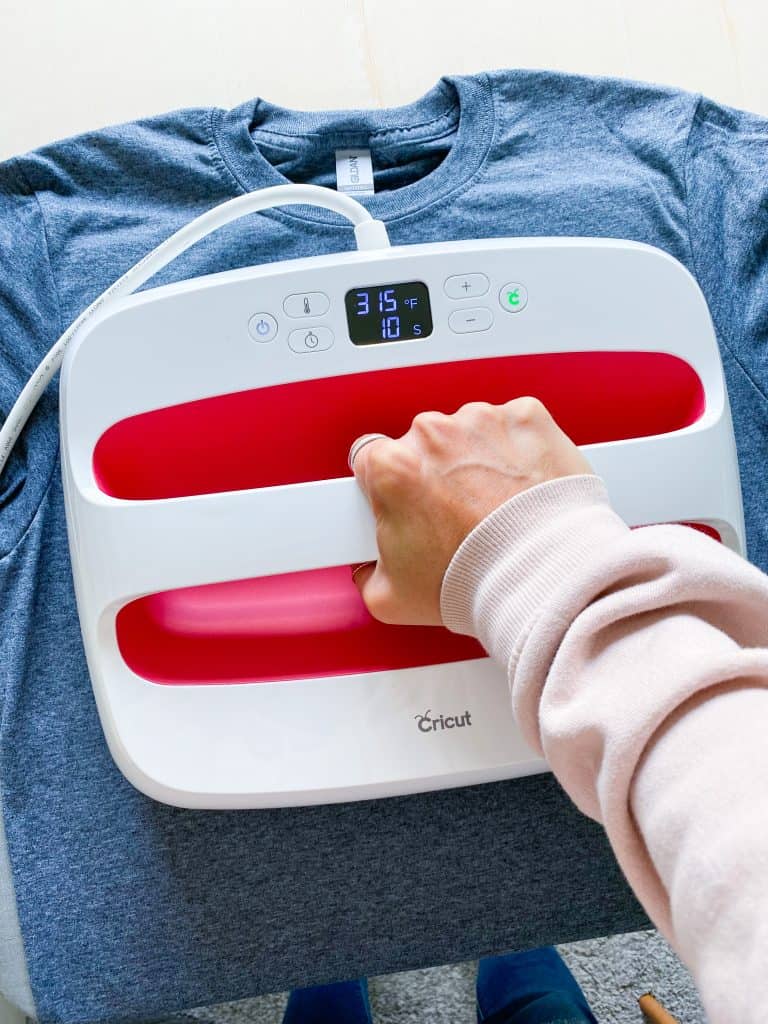
7. Now reference the Cricut Heat Guide to determine the correct temperature and pressing time for your materials. Press down the EasyPress and hit the Cricut button to start the countdown timer.
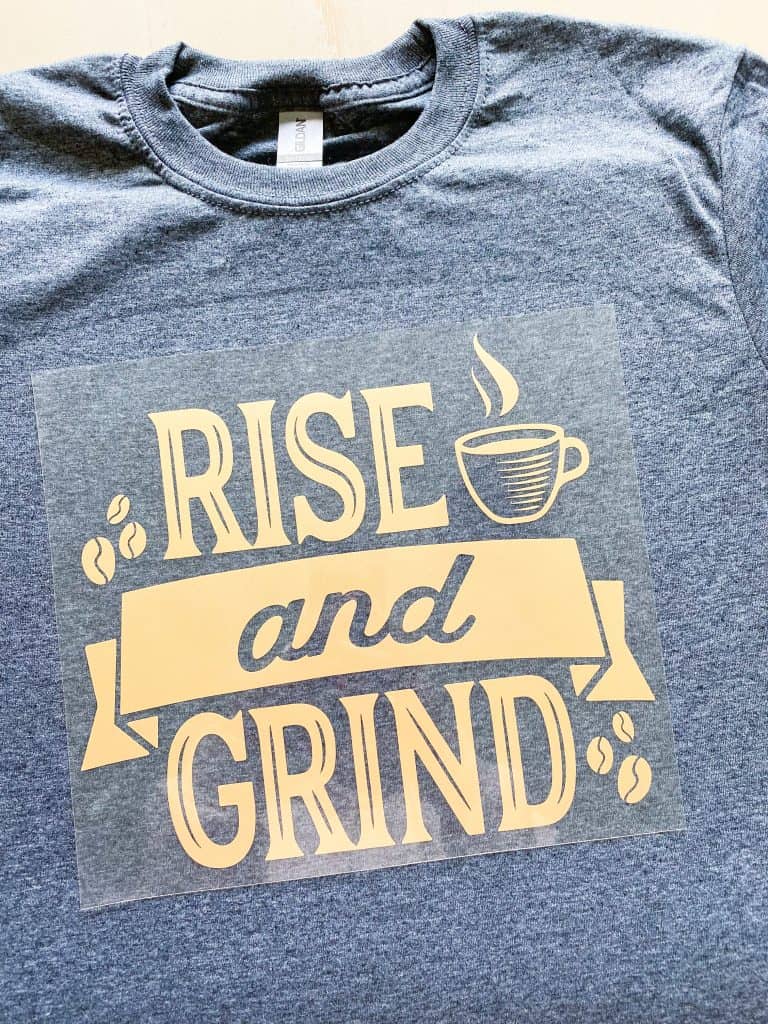
Follow the Heat Guide directions if you need to cool it or peel it while warm. You will then remove the clear backing from the vinyl. If the vinyl pulls away from the shirt at all then you may need to press it for additional time.
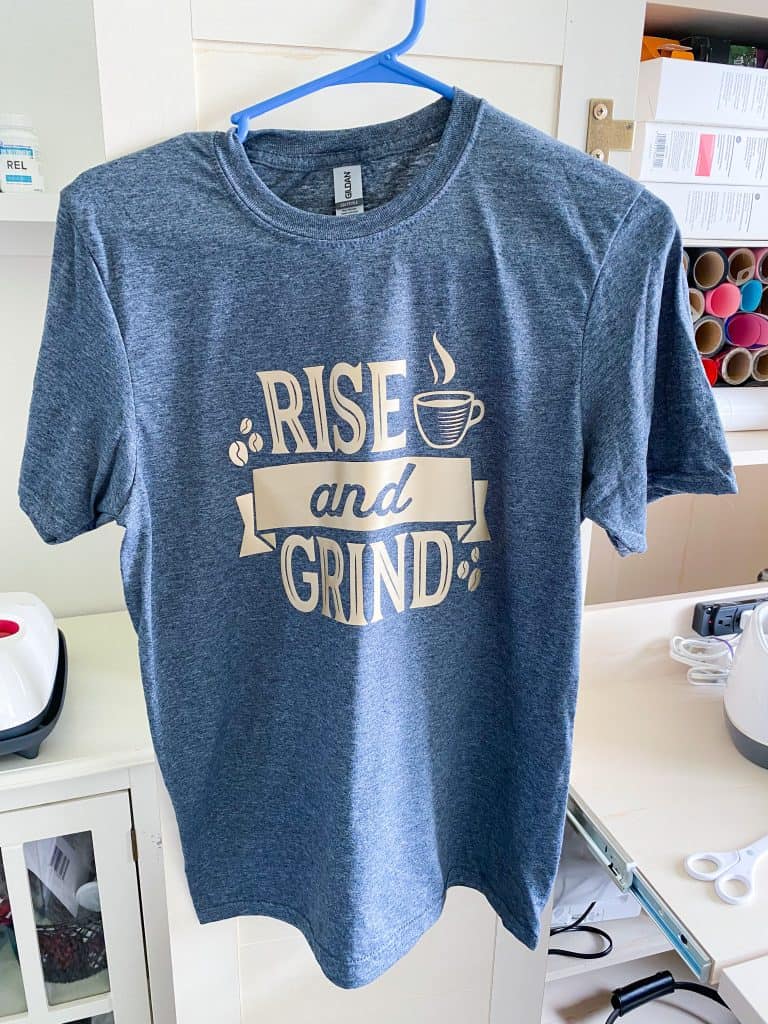
Voila! The finished product looks professionally made and is adorable! I cranked out several shirts in a short amount of time including the next couple photos as well! It is so easy to make them and it gets quite addicting.

I absolutely love this “bee kind” shirt I made too! I am always saying this to my kiddos so it was very appropriate that I just put it on a shirt! This design is available in Design Space as well!

I also made this “Good Vibes Only” shirt that I love! I am all about the good energy surrounding me. It only cost me a few dollars to make the shirt. You can do so much with Cricut!
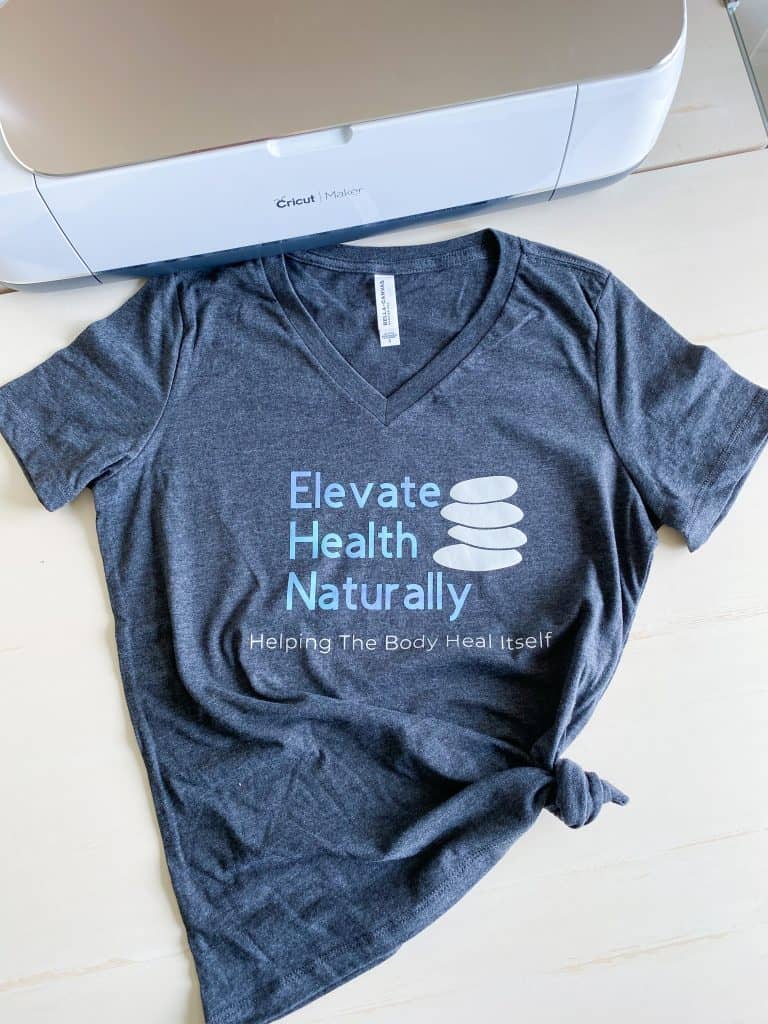
I also want to mention that you can use Design Space to create your own custom shirts as well. I created this custom shirt for my natural health business. The possibilities are endless!!
You can make all sorts of projects with your Cricut. The sky is the limit and your creativity can soar! You can see some of my projects above. You can search through my Cricut projects here on the site and get some inspiration!
You can even use your Cricut to create your own side hustle and bring in some extra income. People love personalized projects and tees with cute sayings on them. Read my post here: most profitable Cricut projects to sell for more insight on that!
Pin this post


Looking forward to seeing more project and skill sharing about Cricut. Thank you for providing these valuable information!
DIY projects not only save costs, but also make each decoration full of personal characteristics, adding a warm feeling to the home.
In addition to saving money, do-it-yourself projects provide each design a unique personality and a cosy sense.
It’s interesting to share detailed information. Not only accumulate knowledge, learn new knowledge and skills with the website. The author builds a really great ecosystem Geometry Dash Lite
This recipe is really impressive.
I really appreciate and admire that.
When ordering clothes from an online store, there is always a chance to get the wrong size or receive the wrong product. It is important that xpluswear customer support responds quickly and without unnecessary bureaucracy, then even an unsuccessful order can be turned into a positive experience, especially when it comes to important events.
Are you in search of an exciting game to unwind after a long day? tag game is the perfect option! Dive into a fun-filled adventure where you chase and tag your friends, enhancing your skills and unlocking cool features along the way. With vibrant graphics and engaging gameplay, this game promises a thrilling entertainment experience. Give it a try today and let us know what you think
Did you know that the online lottery market in India is growing rapidly, with millions participating each year? One great resource that explores this trend is https://www.airbag-moto.net/top-lottery/playing-online-lottery-in-india-is-it-legal-and-how-to-start/ – a site packed with useful tips, explanations, and up-to-date info. It features clear guidance on how to start playing, what’s legal, and how to stay safe. The content is easy to understand, and the articles are full of practical advice. Whether you’re a beginner or just curious, this site makes everything simple and interesting.
Since I normally slept in till noon and didn’t eat breakfast after a long night, I loved lunch buffets.
A Haartransplantatie offers a permanent solution for hair loss. Unlike temporary treatments, the transplanted hairs continue to grow for a lifetime. This makes it a true investment in the future.
Great tips for Cricut beginners! By the way, if you enjoy challenging logic puzzles, you might like Queens Game: https://queensgame.io — it’s a fun and free online puzzle inspired by chess and color strategies.
For patients who are not fully satisfied with the outcome of their first rhinoplasty, Revision Rhinoplasty offers a second opportunity to reach their desired appearance. This complex procedure not only improves the aesthetic proportions of the nose but can also restore normal breathing by reconstructing the internal nasal structures. Each case requires careful planning and precise technique to correct scar tissue, cartilage loss, and structural instability.
Найдите или создайте фото девушки без лица для дизайна, обложек и вдохновения. Идеально подходит для анонимных или минималистичных проектов.
This detailed post about the Cricut is informative and good or us to learn new unique technique that can help us if we need them. You are good to help us with your blog writing. So, I click here to find the best solutions that can help me out and provide great results.
What Cricut does is a nice idea and there are a lot of people looking for the options that are required to deal with to resolve our issues. When I learned more about his services, I got the best results that bring the right results to us.
If you like pc games, try out this website.
bloodmoney: thank u, i like it!
Honestly, it’s just another crafty gadget that makes things easier. But if you’ve got a vision, it’s a game changer. Just don’t fall into the ‘must-have’ trap; it’s not for everyone.
Appreciate your sharing
Thanks for the contribution
Appreciate the details
I appreciate you passing that along
Thank you for offering that
Thanks for bringing that to light
Thanks for the thought
Appreciate you sharing that
Thanks for enlightening me
Much appreciated
I value the information
Thanks for the update
I’m thankful for your input
Thanks for the info
I’ve read countless Bitcoin guides, but they’re often aimed at traders or pure enthusiasts. As a digital entrepreneur, I needed strategies that considered business treasury diversification, long-term holding, and portfolio balance. I finally found an incredibly relevant resource (in French, but it translates beautifully) titled “Acheter Bitcoin: Stratégies pour les Investisseurs Numériques et les Entrepreneurs.” It breaks down approaches for building a position, risk management tailored to business owners, and how to think about Bitcoin not just as a speculator, but as a builder in the digital economy. If you’re an investor or entrepreneur looking for a more strategic perspective, this is a must-read: https://webautop-blog.com/acheter-bitcoin-strategies-pour-les-investisseurs-numeriques-et-les-entrepreneurs/
Die Lizenzierung durch die GGL ist ein Garant für die Legalität und Sicherheit der angebotenen Spiele im online casino in Deutschland.
Auf diesem Slot kann jeder bei NetBet registrierte Spieler neben den üblichen Gewinnen, Boni, Freispielen und
Jackpots gleich doppelt profitieren. Teste die Spiele im Demo-Modus, oder spiele gleich im Echtgeldmodus, um
fantastische Preise zu gewinnen! Von klassischen Tischspielen über aufregende Slot Casino Spiele bis hin zu innovativen Live-Casino-Erfahrungen, gibt es etwas für jeden Geschmack und jedes Interesse.
Diese Spiele sind ein wesentlicher Bestandteil des Angebots in einem best online
casino.
Wenn Sie vor allem an Slotspielen interessiert sind, so können Sie jederzeit gerne unsere spezielle Seiten besuchen, die voller kostenloser Online Spielautomaten sind.
Spielautomaten, auch Slots oder Slotspiele genannt, mögen heutzutage die beliebteste Art von Casinospielen sein –
aber es gibt jede Menge anderer Optionen von Spielen in Casinos, bei denen es sich nicht um Spielautomaten handelt.
Wenn Sie weiterlesen, werden Sie erfahren, wie Sie kostenlose Glücksspiele ohne Registrierung
und ohne Download spielen können, ohne dabei Ihr eigenes Bankkonto zu belasten.
Wenn Sie Casinospiele mögen, aber Ihr eigenes Geld nicht aufs
Spiel setzen möchten, wird dieser Abschnitt unserer Webseite, der voll
mit Online Casinospielen ist, genau das Richtige für Sie
sein. Wir bei Casino Guru haben aber immer schon den Standpunkt
vertreten, dass Sie die Spiele immer zuerst ausprobieren sollten, bevor Sie diese um echtes Geld spielen.
References:
https://online-spielhallen.de/lemon-casino-freispiele-dein-umfassender-guide/
Auf den Webseiten der besten Online Casinos in Deutschland finden Sie auch Links zu Organisationen, wie
Gambler Anonymous oder GamCare, bei denen Sie die Spielsucht anonym ansprechen können.
Auch Selbsthilfegruppen wie die Anonymen Spieler bieten wertvolle
Unterstützung. Falls Sie Unterstützung benötigen, finden Sie bei Spielsucht Hilfe Deutschland oder der Bundeszentrale für
gesundheitliche Aufklärung (BZgA) kompetente Ansprechpartner.
Wenn Sie auf der Suche nach einem Casino mit PayPal sind, werden Sie ein Casino mit
deutscher Lizenz wählen müssen.
Das Wetten im Internet war ausschließlich auf Pferderennen beschränkt, und die Online- Casinospiele waren in allen deutschen Bundesländern bis auf eines
verboten. Dies lag vor allem daran, dass es in den Gesetzen des Landes keine Anerkennung von Online-Glücksspielen als eigenständige
Tätigkeit gab und der deutsche Glücksspielstaatsvertrag aus dem Jahr 2008 fast alle Formen von Online- Glücksspielen verboten hatte.
Nach der Verabschiedung des neuen Glücksspielgesetzes im
Jahr 2021, das auch als „ISTG 21″ bekannt ist, stehen den deutschen Spielerinnen und Spielern mittlerweile viele in Deutschland lizenzierte Online Casinos zur Auswahl.
References:
https://online-spielhallen.de/vollstandige-analyse-der-vegadream-casino-erfahrungen/
I was amazed that the Cricut Maker 3 can cut over 300 materials, and the author uses it 99% of the time – it really shows which machine is the workhorse! While scrolling through this whatsmyname blog during my coffee break, I thought, huh, making custom tees for just a few bucks could totally refresh my wardrobe on a budget, couldn’t it? whatsmyname
Bronze members receive 5% weekly cashback on losses, Silver jumps to 7%, Gold hits 10%, and Diamond
players enjoy 15% cashback plus priority withdrawal processing.
Point accumulation rates favour slot players heavily,
with pokies generating 1 point per $10 wagered compared to table games offering just 1 point per
$50. The multi-tier VIP system offers genuine
value for consistent players, though the entry requirements demand serious commitment.
Smaller withdrawals incur a $5 processing fee, which adds up quickly for casual players making frequent small cashouts.
WinSpirit’s mobile optimization sets the
casino apart from competitors—a full-featured app
with an exclusive 20 free spins bonus and adaptive browser version provide flexibility to play anywhere.
WinSpirit offers 24/7 customer support in multiple languages, providing assistance to Australian players at any time of day.
The casino prioritises smooth deposits, meaning most payments land instantly, particularly Neosurf and PayID — the two most widely used methods among Australian online
casino players.
References:
https://blackcoin.co/no-verification-casinos-in-australia-the-ultimate-guide/
A short drive up the coast from Golden Riviera Beach Resort and you
will find the entertainment venue of Jupiters Casino. The Star Casino
also plays host to a range of entertainment shows throughout the year,
with some of the biggest names in entertainment choosing to perform here.
With seven amazing restaurants; serving cuisines from Italian to Chinese,
there is something for every taste. The Gold Coast has several unique night-time attractions and destinations you’ll love to visit with a partner or a group of friends.
The reason for this is simply that it takes time for
an article to be cited by other articles.
Restaurants, bars, a 24-hour Casino, the beauty of the Gold Coast – what more could Conrad Jupiters offer?
So if you enjoy gambling or watching live entertainment,
you should pay a visit to the Star Casino. Staying near the
Star Casino is also made easy, as there is a 5-star hotel located within its precinct.
It is based on Sentinel-2 satellite time series at a high spatial
resolution (10 metres).The service provides information on the condition of the
forest, such as the proportion of deadwood or open areas that
have developed.
References:
https://blackcoin.co/sign-in-your-gateway-to-online-casino-action/
Winds southerly 15 to 25 km/h tending southeasterly in the middle of the day then becoming light in the late evening.
Winds southerly 15 to 25 km/h tending southeasterly in the middle of the day then becoming light in the
evening. Winds S 15 to 25 km/h tending SE in the middle of the day then becoming light in the late evening.
Winds south to southwesterly 15 to 20 km/h turning southeasterly 15 to 25 km/h during the morning then becoming
light during the evening. Winds south to southwesterly 15 to 20 km/h
tending south to southeasterly 20 to 30 km/h during the morning then becoming light during the evening.
Afternoon showers. ESE winds shifting to SSW at 15
to 25 km/h. NNW winds shifting to E at 15 to
25 km/h. Skies clearing late.
See weather overview Information supplied by Weatherzone based on data provided by the Bureau
of Meteorology (BOM) Personalise your weather experience and unlock powerful new features.
Deadly storm roars into California with flooding rain, intense wind Very warm with low clouds
References:
https://blackcoin.co/fair-go-casino-the-ultimate-review/
You can fine-tune your chatbot in a simple drag-and-drop editor and train it with additional data or add custom answers to specific questions.
Some chatbots utilize Retrieval Augmented Generation (RAG) to overcome the limitations of their pre-programmed responses and access a wider
pool of information. Non-AI chatbots use scripted dialog and
cannot generate any responses that were not pre-programmed
into the chatbot. For example, an e-commerce company could deploy a chatbot to provide browsing customers with more detailed information about the products they’re viewing.
Activate the Search button to allow the AI to browse the internet for real-time data
and events for its answers. Chat bots can proactively initiate conversations with customers,
making them a powerful tool for marketing. It employs Natural Language Processing (NLP) to interpret text and identify intent,
while machine learning allows it to improve its responses over time
based on past interactions.
Add an AI chatbot to your website, LiveChat,
Messenger, or Slack to handle all support cases automatically, 24/7.
ChatBot instantly helps your customers using AI-generated responses.
Based on the output from the application, you can train and fine-tune
a prompt-based AI model, which can be used as an example for other customer
self-service use cases. Build and train Conversational Agents to
answer questions, make recommendations, and handle
concurrent conversations with your end users.
When a user asks a question, a RAG-powered chatbot doesn’t have to just rely on pre-written scripts.
References:
https://blackcoin.co/mega-moolah-reviews-gambling-plays-for-big-wins/
online slot machines paypal
References:
madhurta.in
paypal casino online
References:
careers.cblsolutions.com
paypal casino uk
References:
woorisusan.kr
casinos online paypal
References:
https://rentry.co/78788-die-besten-online-casino-mit-paypal-im-test-2025
online betting with paypal winnersbet
References:
https://glimpsonworld.com/employer/479/home
online slot machines paypal
References:
http://bukgu.net/bbs/board.php?bo_table=free&wr_id=3490
Papas-Arcade: Relive the Classics, Master the Craft.
Marvel Cosmic Lab: Explore the Deep, Decode the Universe.
if you like simulation/life/training&strategy game, try [Reigns]
If you want to know the guide of Dispatch , try [Dispatch Choices]
If you want to know the guide of Where Winds Meet , try [Where Winds Meet]
Explore the Nine Types, Meet Your True Self.
If you want to know the guide of Arc Raiders , try [Arc Raiders Hub]
Your article is a true combination of knowledge and motivation. Thank you for that!