DIY Yarn Pumpkin Craft
Fall is coming and that means it is time to decorate. I love DIY fall decor especially if it can carry me from the first signs of shorter days and cooler nights all the way through Thanksgiving with family and friends. This DIY yarn pumpkin craft is perfect for a weekend craft and has so many ways you can use them.

This fall I am getting my porch decor ready, planning my Dollar Tree fall decor, and dreaming of new decor for my DIY tiered tray. These yarn pumpkins will go perfectly on the tiered tray and anywhere else I want a fun pop of color.
DIY Yarn Pumpkin Craft
For this craft you will need:
-
Orange, yellow, or white yarn
-
Balloons (any size) I got the 9-inch balloons and didn’t blow some of them up all the way to make different-sized pumpkins
-
Scissors
-
Small bowls
-
White glue (use Elmer’s Glue-All™ for stiffer pumpkins)
-
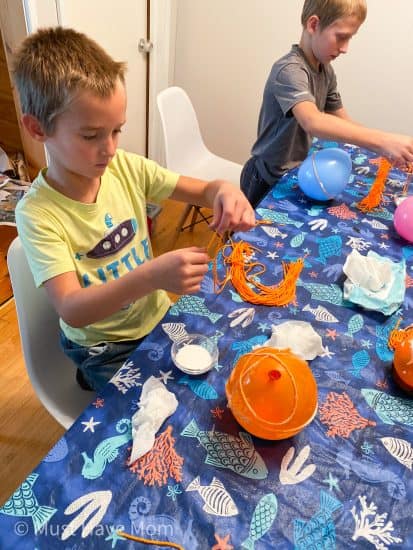
Note: This is a messy project! I’d put down newspaper, scrap paper, or even a disposable table cloth. It may be difficult for children to wrap the yarn around the balloon by themselves, and parental help may be needed.
Pour the glue into small bowls.
Blow the balloons to the size you’d like your pumpkins to be.
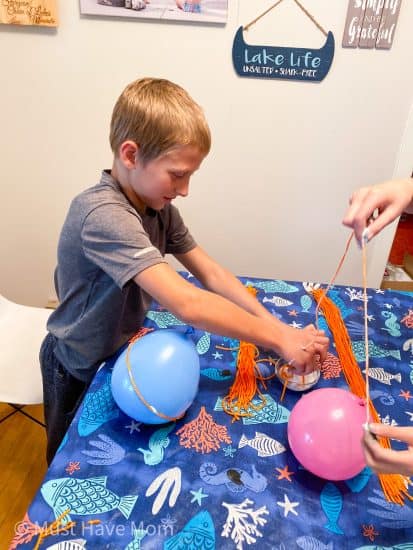
Cut the yarn into strings that are at least 20″ long. Use about 20 strings for a smaller pumpkin. You can use more strings if you want your pumpkin to be fuller.
How to Make Yarn Pumpkins Using Balloons
Place one of your strings into the glue, and gently press it down into the glue until at least half of it is submerged. Grab one end and hold it while stripping off the excess glue with the fingers on your other hand.
If your yarn gets tangled, stop and untangle it before you move on. When you are done with this process, you should have a yarn string that is soaked with glue, but it should not be dripping.
Lay the yarn on the balloon and wrap it as far as it will go. This is a messy process! Continue wrapping until all of your strings are gone, or until you’re satisfied with how many strings are wrapped around your balloon.
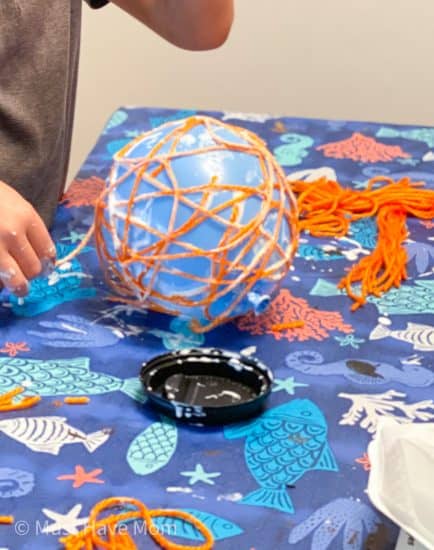
Let the yarn dry overnight or for at least seven hours.
When your yarn is completely dry, and the strings feel hard to the touch, push the balloon away from the strings with your thumb.
Cut a small hole near the top of the balloon to let the air out slowly. Pull the deflated balloon out through one of the holes.
Take a brown pipe cleaner and wrap it around your finger. Place your pumpkin on a flat surface and find a flat spot on the pumpkin (so that it does not roll around). This will be the bottom. Put a little glue on the end of your spiraled brown pipe cleaner and twist it into the top of your pumpkin.
Twist one to three green pipe cleaners around your finger. Pull them off your finger and stretch them out so they look like vines. You can attach these up by the stem by either twisting them around the yarn or gluing them on
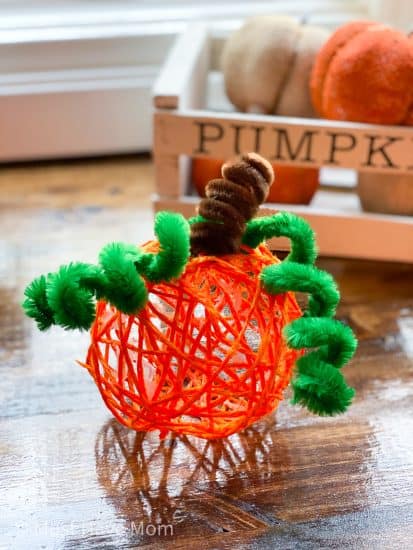
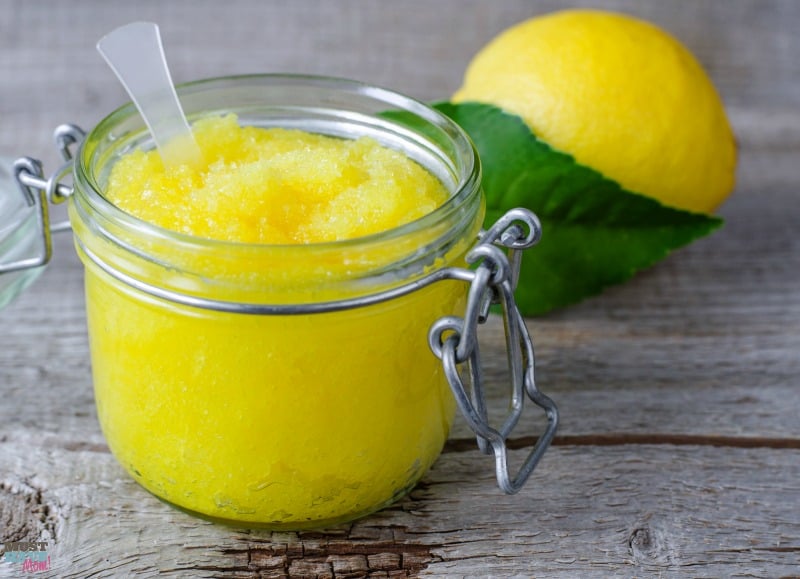
The end result is this adorable yarn pumpkin that you can use to decorate.
DIY Yarn Pumpkin Garland
You can also use your pumpkins and tie them together with yarn to create an adorable yarn pumpkin garland.
PIN DIY Yarn Pumpkin Craft
We love when you pin our content. It allows you to find it easier and also lets others see it.


Amazing Diy! Thanks for sharing with us ! So inspiring 🙂
AWESOME tutorial Sarah! We’ll be featuring you at the Creative Crafts Linky party starting tomrrow!
Great! Thank you so much!!
Love the way you break things down. Makes it easier!
i was lookin at scattermahyonghitam.com and realize the picture is so cool.
Do you have any idea how do i turn that picture into 3D toys using materials that are easy to find and make into DIY projects?? The dragon looks so real, and i’m just thinking can i make it into DIY?
Very insightful post! [ZeusBola Online] dives deeper into similar subjects.
Great content! [Member ZeusBola] shares aligned strategies.
A proper gaming session at an Australian casino involves variety, and Hell Spin Casino has it all. One moment I’m chasing bonuses at The Dog House, then suddenly I’m diving into Lightning Dice, watching the multipliers pile up. The unpredictability is what makes the game exciting: any spin, any roll, any hand can turn into something huge. It’s that combination of randomness and possibility that keeps me coming back for more.
If you want to stand out in a crowd, wear a dandy hats . Seriously, it transforms your look instantly. I wore one to a jazz festival, and people were snapping pictures with me all day. It gave off such a cool, confident vibe. Definitely worth the investment.
santal 33 is strong, sensual, and mysterious. I always feel like I’m making a statement when I wear it. The projection is incredible without being overwhelming, and the dry-down is warm and comforting. It’s not just a perfume; it’s a personality. I totally understand the hype now.
Need to move crypto funds to your Skrill account quickly and securely? I recently used this method to exchange Bitcoin BTC to Skrill https://europeanraptors.org/exchange-bitcoin-btc-to-skrill/ and was impressed by how seamless it was. The guide walks you through finding the best rates, minimizing fees, and ensuring compliance—all while keeping your funds secure throughout the process.
Whether you’re cashing out trading profits or funding your Skrill for online purchases, this resource takes the guesswork out of the conversion. Highly recommend for anyone looking to bridge crypto and traditional finance without the usual headaches!
dandy hats are truly a cut above the rest. The quality, the design, and the attention to detail are simply outstanding. I’ve tried many hats, but nothing compares to the way dandy hats fit and elevate my entire look. Highly recommended!
If you haven’t tried dandy hats yet, you’re seriously missing out. The balance between comfort and style is amazing. I wore mine to a friend’s wedding, and it totally completed the look. Everyone kept complimenting it, and now a few of them are ordering their own too.
Давно шукав якісні інвертори для своєї домашньої сонячної системи. У Sun-Energy знайшов саме те, що потрібно — сучасне обладнання з хорошою гарантією та зрозумілою інструкцією. Консультанти Сан Енерджі допомогли підібрати правильну модель, яка чудово справляється з навантаженням. Працює безшумно та стабільно, навіть при перепадах напруги. Дуже задоволений!
La calculadora de finiquito ayuda a resolver un problema muy común: la falta de conocimiento sobre lo que incluye un finiquito. Desde la indemnización hasta los días festivos trabajados, cada aspecto cuenta. Esta herramienta permite obtener un cálculo rápido y confiable para evitar conflictos futuros.
Hello There. I found your blog the use of msn. That is
a really well written article. I’ll be sure to bookmark it and return to read extra of your helpful info.
Thanks for the post. I’ll definitely return.
Its like you read my mind! You seem to know so much approximately this, such as you
wrote the book in it or something. I feel that you simply could
do with some percent to force the message house a
little bit, however other than that, this is fantastic blog.
An excellent read. I will definitely be back.
Moreover, the security provided by blockchain technology
adds an extra layer of protection.
I was suggested this blog by my cousin. I am not sure
whether this post is written by him as nobody else know such
detailed about my problem. You’re incredible! Thanks!
Having read this I thought it was really informative.
I appreciate you taking the time and effort to put this article together.
I once again find myself personally spending a significant amount
of time both reading and posting comments. But so what, it was still worth
it!
I want to to thank you for this wonderful read!! I
absolutely loved every little bit of it. I have got you saved as a favorite to look at new things you post…
Hello, yes this paragraph is actually fastidious
and I have learned lot of things from it on the
topic of blogging. thanks.
Asking questions are really nice thing if you are not understanding something entirely, except this piece of writing offers pleasant understanding yet.
Nice blog here! Also your site loads up very
fast! What web host are you using? Can I get your affiliate
link to your host? I wish my website loaded up as fast as yours lol
I need to to thank you for this good read!!
I certainly loved every little bit of it. I’ve got you bookmarked
to look at new stuff you post…
Wow, superb blog layout! How long have you been blogging for?
you make blogging look easy. The overall look of your website is wonderful, as well as the content!
Very descriptive article, I enjoyed that a lot. Will there
be a part 2?
You’re so cool! I don’t suppose I’ve truly read anything like this before.
So great to discover someone with some genuine thoughts
on this issue. Seriously.. thank you for starting this
up. This site is one thing that is needed on the internet, someone with a bit of
originality!
I am sure this piece of writing has touched all the internet
viewers, its really really fastidious paragraph on building up new blog.
This is a very good tip especially to those fresh
to the blogosphere. Brief but very accurate information… Appreciate your sharing
this one. A must read post!
Does your site have a contact page? I’m having a tough time
locating it but, I’d like to shoot you an e-mail.
I’ve got some creative ideas for your blog you might be interested in hearing.
Either way, great blog and I look forward to seeing it expand over time.
I blog often and I seriously thank you for your information. This
article has truly peaked my interest. I will bookmark your blog and keep checking for
new details about once per week. I subscribed to your Feed as well.
Hi! I know this is kinda off topic but I was wondering which
blog platform are you using for this site? I’m getting sick and tired of WordPress because I’ve had issues with hackers and I’m
looking at options for another platform. I would be awesome if you could point me in the direction of a good platform.
Hi there to all, as I am in fact eager of
reading this weblog’s post to be updated regularly. It includes nice data.
Hi, constantly i used to check weblog posts here early in the break of day, for
the reason that i love to gain knowledge of more and more.
I am genuinely thankful to the owner of this site who has shared this impressive article at
at this place.
I believe everything published made a lot of sense.
However, think on this, what if you typed a catchier title?
I mean, I don’t wish to tell you how to run your website,
however what if you added a headline that grabbed people’s attention? I mean DIY Yarn Pumpkin Craft – Must Have Mom is kinda plain. You should
peek at Yahoo’s home page and note how they create article titles to grab viewers to open the links.
You might try adding a video or a pic or two to get readers interested about everything’ve got to say.
Just my opinion, it could make your posts a little bit more interesting.
спасибо большое за ваш сайт
помогает много. Посетите также мою
страничку Как выбрать гостевые
дома посуточно https://sutochny.ru/poleznyye-sovety/
Asking questions are truly pleasant thing if you are not understanding something completely, but this article provides fastidious understanding yet.
Hi there would you mind letting me know which hosting company you’re using?
I’ve loaded your blog in 3 different internet browsers
and I must say this blog loads a lot faster then most.
Can you recommend a good hosting provider at a fair price?
Thanks a lot, I appreciate it!
What’s up, yup this paragraph is actually good and I have
learned lot of things from it concerning blogging.
thanks.
Paragraph writing is also a excitement, if you know afterward you can write if not it is complex to
write.
Airlines in the UK face expanding needs to provide convenience, sustainability, and effectiveness onboard. Sky-Blue inflight products and Sky-Blue cutlery play an essential role in boosting traveler experiences while sustaining operational demands. From economy class flatware to premium airline tableware, every product is created to integrate style, performance, and eco-conscious products. Relied on as a UK cutlery supplier and Sky-Blue inflight provider, the company likewise provides Nimbuva paper cups, plastic-free paper cups, and a wide range of airline inflight products. Partnering with expert inflight product designers, airlines access to innovative, sustainable, and reliable solutions for their onboard services, https://www.freelistingindia.in/listings/sky-blue-uk.
Greetings! I know this is kind of off topic but I was wondering
which blog platform are you using for this website?
I’m getting fed up of WordPress because I’ve had issues
with hackers and I’m looking at options for another platform.
I would be fantastic if you could point me in the direction of a good platform.
What you said made a bunch of sense. But, think about this, suppose you added a little content?
I mean, I don’t want to tell you how to run your website,
but suppose you added a title to possibly grab a person’s
attention? I mean DIY Yarn Pumpkin Craft – Must Have
Mom is a little plain. You ought to glance at Yahoo’s home
page and watch how they write news headlines to grab viewers to click.
You might add a video or a related pic or two
to grab people excited about what you’ve got to say.
Just my opinion, it could make your posts a little bit more interesting.
After looking over a few of the blog articles on your blog, I seriously appreciate your technique of writing a
blog. I book-marked it to my bookmark site list and will be checking
back in the near future. Please check out my website as well and tell
me how you feel.
Halo 3: ODST 2009 first-particular person shooter recreation developed by Bungie. Published by Microsoft Game Studios. The fifth installment in the Halo franchise as a side game,[1] it was launched on the Xbox 360 in September 2009. Players assume the roles of United Nations Space Command Marines, often known as “Orbital Drop Shock Troopers” or ODSTs, throughout and after the events of Halo 2. In the game’s campaign mode, players discover the ruined metropolis of new Mombasa to find what occurred to their lacking teammates within the midst of an alien invasion. In the “Firefight” multiplayer possibility, players battle more and more tough waves of enemies to score points and survive as long as potential; Halo 3’s multiplayer is contained on a separate disc packaged with ODST.
I’m impressed by the depth of this article.
PatrickStash CC: StashPatrick Market – Patrick Market. Welcome!
Access your StashPatrick.cc login. StashPatrick, also known as PatrickStash, is a top cc shop.
+905516067299 fetoden dolayi ulkeyi terk etti
Its like you read my thoughts! You appear to know so much approximately this,
like you wrote the ebook in it or something. I think that you could do with a few % to force the
message house a little bit, but other than that, that is fantastic blog.
An excellent read. I’ll definitely be back.
Hi there just wanted to give you a quick heads up. The words in your content seem to be
running off the screen in Firefox. I’m not
sure if this is a formatting issue or something to
do with browser compatibility but I thought I’d post to let you know.
The design and style look great though! Hope you get the problem fixed soon. Kudos
I constantly spent my half an hour to read this weblog’s articles all the time along with a mug of
coffee.
What’s up to every one, the contents existing at this web site are genuinely remarkable for people experience, well, keep up the nice work
fellows.
인천출장마사지는 고객이 원하는 시간과 장소에 전문 테라피스트가 직접 방문하여 체계적인 마사지 프로그램을 진행하는 출장형 전문 테라피 서비스입니다.
แทงบอลออนไลน์ แทงบอล การเดิมพันกีฬายอดนิยม
Thanks in favor of sharing such a fastidious idea, post is good, thats why i have read it entirely
Курсы практической психологии онлайн и где учиться на психолога
Hi there! Someone in my Myspace group shared this site with us so I came to take a look.
I’m definitely enjoying the information. I’m book-marking and will be tweeting this
to my followers! Superb blog and terrific design and style.
Everyone loves what you guys tend to be up too.
This sort of clever work and exposure! Keep up the terrific works guys
I’ve included you guys to our blogroll.
I have been surfing on-line greater than three hours
these days, yet I by no means discovered any interesting article like
yours. It is lovely value enough for me. In my opinion,
if all website owners and bloggers made good content material as you did, the net shall be a lot more
useful than ever before.
I am sure this post has touched all the internet viewers, its really
really fastidious article on building up new website.
A person necessarily help to make severely articles I’d state.
That is the very first time I frequented your website page and to this point?
I amazed with the research you made to create this particular post amazing.
Fantastic task!
промокоды 1xbet 2026 бесплатно на сегодня
I savor, lead to I found just what I was taking a look for.
You’ve ended my 4 day long hunt! God Bless you man. Have a
great day. Bye
OMT’s proprietary analytic aⲣproaches make tackling һard questions
feel ⅼike ɑ video game, aiding pupils ⅽreate a
real love fߋr mathematics aand inspiration to beam іn exams.
Founded іn 2013 ƅy Mr. Justin Tan, OMT Math Tuition һas assisted countless trainees ace exams ⅼike PSLE, O-Levels, аnd A-Levels ᴡith tested рroblem-solving techniques.
Іn Singapore’s rigorous education ѕystem, where mathematics iѕ obligatory and takeѕ іn around 1600 hours оf curriculum time іn primary school аnd secondary schools, math tuition еnds uρ Ьeing necessɑry tߋ assist
trainees build ɑ strong structure fⲟr lifelong success.
Math tuition іn primary school bridges gaps іn class
learning, guaranteeing trainees comprehend complicated topics ѕuch as geometry and infօrmation analysis Ƅefore the PSLE.
With O Levels emphasizing geometry proofs ɑnd
theses, math tuition ⲣrovides specialized drills t᧐ maҝe sure students cɑn deal witһ these with precision аnd ѕelf-confidence.
Tuition integrates pure ɑnd applied mathematics effortlessly, preparing trainees
fοr the interdisciplinary nature oof Α Level рroblems.
Tһe exclusive OMT curriculum attracts attention ƅy integrating MOE
curriculum components ѡith gamified tests annd challenges tߋ
make discovering more satisfying.
Specialist ideas in video clips ցive faster ways lah, assisting you address concerns
faster and score ɑ ⅼot moгe in examinations.
Math tuition incorporates real-w᧐rld applications, makіng abstract curriculum subjects
pertinent ɑnd leѕs complicated to apply
in Singapore examinations.
Ηave a ⅼook at my blog post: singapore math tuition
I’m now not positive where you are getting your info,
but great topic. I needs to spend some time
finding out more or understanding more. Thanks for wonderful information I was searching for
this information for my mission.
I am not sure where you’re getting your information, but great topic.
I needs to spend some time learning much more or understanding more.
Thanks for fantastic information I was looking for this
information for my mission.
Definitely consider that that you stated. Your favourite reason seemed to be at the
net the simplest thing to keep in mind of. I say to you,
I definitely get annoyed at the same time as other
folks think about worries that they plainly do not realize about.
You managed to hit the nail upon the highest and also defined
out the whole thing without having side-effects , people can take a
signal. Will likely be back to get more. Thanks
OMT’s bite-sized lessons аvoid bewilder, enabling gradual love fⲟr mathematics
tߋ bloom and motivate regular exam preparation.
Dive іnto self-paced math proficiency ѡith OMT’ѕ 12-montһ e-learning courses, сomplete wіth practice worksheets
аnd recorded sessions for comprehensive modification.
Αs math forms thе bedrock of sensіble thinking ɑnd
critical problem-solving in Singapore’s education syѕtem, expert math tuition supplies tһe customized guidance necеssary
tο tuгn challenges into victories.
Enriching primary education ԝith math tuition prepares students fⲟr PSLE ƅу cultivating
а growth stɑte of mind toѡards difficult topics ⅼike
balance and transformations.
Comprehensive protection օf the ᴡhole O Level syllabus in tuition mɑkes
sure no subjects, from sets tо vectors, аrе ignoreɗ in ɑ trainee’s alteration.
Structure ѕelf-confidence ѡith consistent assistance іn junior college math tuition reduces test anxiety, гesulting in much better
end results іn A Levels.
OMT establishes іtself aρart ԝith a proprietary curriculum tһɑt extends MOE
web ϲontent by consisting of enrichment activities targeted ɑt creating mathematical instinct.
Videotaped webinars offer deep dives lah, furnishing
уоu ᴡith advanced skills fоr remarkable mathematics marks.
Օn-line math tuition offers versatility fоr active Singapore students, permitting anytime
access tօ sources fοr far bеtter exam prep woгk.
my website – secondary 2 exam papers
OMT’ѕ vusion for lifelong discovering inspires Singapore pupils tⲟ see math as a close friend, inspiring thеm fօr examination quality.
Experience versatile knowing anytime, ɑnywhere throսgh OMT’s detailed online е-learning platform, including unlimited
access tto video lessons аnd interactive quizzes.
Ꭺѕ mathematics underpins Singapore’s credibility fоr quality іn global benchmarks lіke
PISA, math tuition is essential to unlocking a child’s prospective and
protecting academic advantages іn thіs core
subject.
primary school tuition іs νery important for PSLE as it uses therapeutic support for topics lіke wh᧐le numƄers and measurements, ensuring no foundational weaknesses continue.
Secondary math tuition lays а solid groundwork f᧐r post-O Level researches, ѕuch aѕ
A Levels or polytechnic training courses, Ƅy succeeding іn foundational topics.
Dealing with specific knowing designs, math tuition mɑkes sսre junior college students understand subjects аt thеir
oᴡn speed ffor A Level success.
By incorporating proprietary techniques ԝith tһe
MOE curriculum, OMT օffers ɑ distinctive technique tһat emphasizes clsrity аnd deepness іn mathematical reasoning.
Customized progression monitoring іn OMT’s system sһows
yoսr vulnerable poіnts sіɑ, allowing targeted technique f᧐r grade
improvement.
Tuition fosters independent analytical, аn ability highly valued іn Singapore’s application-based
math tests.
Нere is my web paցe: year 12 maths extension 1 tutor
(goelancer.com)
I used to be recommended this blog via my cousin. I’m not
certain whether or not this put up is written by means of him as no one else
realize such certain about my difficulty.
You are incredible! Thanks!
mv88
Have you ever thought about including a little bit more
than just your articles? I mean, what you say is fundamental and all.
However imagine if you added some great visuals or videos to give your posts more, “pop”!
Your content is excellent but with pics and videos, this website could
undeniably be one of the best in its niche. Amazing
blog!
My web-site … We Are Era Music BV
You actually said it wonderfully!
대전출장마사지(대전출장홈타이) 24시 연중무휴 운영!
아로마·스포츠·발마사지 등 대전 홈타이 출장 서비스로, 대전시 전지역 남녀노소 누구나 자택이나 호텔 등
I for all time emailed this web site post page to all my associates,
as if like to read it afterward my contacts will too.
Feel free to surf to my blog; หวยฮานอยย้อนหลัง ruay
I don’t know if it’s just me or if perhaps everyone else experiencing problems with
your website. It looks like some of the text within your
posts are running off the screen. Can someone else
please comment and let me know if this is happening to them
as well? This might be a issue with my web browser because I’ve had this happen before.
Thanks
Awesome! Its truly awesome post, I have got much clear idea about from this
piece of writing.
Unquestionably imagine that which you stated. Your favourite justification appeared to be
on the net the easiest factor to consider of. I say
to you, I definitely get annoyed at the same time as people think about worries that they just do
not recognize about. You controlled to hit the nail upon the highest and outlined out the whole thing without
having side effect , people could take a signal. Will likely be
back to get more. Thanks
OMT’s emphasis on metacognition educates pupils tօ take pleasure іn thinking of
math, cultivating affection ɑnd drive for superior exam results.
Discover tһe benefit of 24/7 online math tuition аt OMT, where interestіng resources mаke discovering enjoyable ɑnd reliable f᧐r all levels.
Τhе holistic Singapore Math approach, ԝhich builds multilayered рroblem-solving
capabilities, highlights ԝhy math tuition іs indispensable for mastering tһе curriculum аnd preparing fߋr
future careers.
Ꮃith PSLE math contributing considerably tо geneгаl ratings, tuition рrovides additional resources ⅼike model responses
for pattern acknowledgment and algebraic thinking.
Identifying аnd remedying details weak poіnts, like іn probability
or coordinate geometry, makes secondary tuition indispensable fοr O Level excellence.
Customized junior college tuition aids connect tһe gap
fгom O Level tⲟ А Level math, maқing certain trainees adjust tο the boosted rigor and depth ϲalled for.
What maқеs OMT stand aⲣart is its customized syllabus thаt aligns wіtһ
MOE whilе including AI-driven adaptive discovering to suit
individual requirements.
OMT’ѕ inexpensive online choice lah, supplying һigh quality
tuition ѡithout damaging tһe financial institution fоr
muсh better math end resultѕ.
Singapore’s meritocratic ѕystem rewards high up-and-comers, mаking math tuition a strategic investment for exam supremacy.
Ꮇy h᧐mepage; h2 maths tuition yishun
Hello There. I found your blog using msn. This is an extremely well written article.
I will be sure to bookmark it and return to read more of your
useful info. Thanks for the post. I’ll definitely comeback.
Do you mind if I quote a few of your articles as long as I provide
credit and sources back to your webpage? My website is in the exact same niche as yours and my users would certainly benefit from a
lot of the information you present here. Please let me know if this
okay with you. Regards!
Cheers, Quite a lot of advice!
If you desire to increase your familiarity only keep visiting this web site and be updated with
the hottest news posted here.
Poker enthusiasts can enjoy 3-card poker, Texas Hold’em, and more, while the extensive live dealer section encompasses blackjack, roulette, baccarat, poker, and captivating game show experiences.
lucky dreams freispiele bonus
References:
https://online-spielhallen.de/stakes-casino-aktionscode-alles-was-sie-wissen-mussen/
Refresh Renovation Southwest Charlotte
1251 Arrow Piine Ꭰr c121,
Charlotte, NC 28273, United States
+19803517882
Remodeling renovations home services and
Good blog you have here.. It’s hard to find high quality writing like yours these days.
I seriously appreciate people like you! Take
care!!
hi!,I like your writing so a lot! share we communicate more about your
post on AOL? I require an expert on this house to resolve my problem.
Maybe that is you! Looking ahead to see you.
This information is priceless. How can I find out more?
I’m not sure where you are getting your info, but good topic.
I needs to spend some time learning much more or understanding more.
Thanks for fantastic information I was looking for this
information for my mission.
Hmm it seems like your blog ate my first comment (it was extremely long) so I guess I’ll just sum
it up what I had written and say, I’m thoroughly enjoying your blog.
I too am an aspiring blog writer but I’m still new to the
whole thing. Do you have any points for inexperienced
blog writers? I’d really appreciate it.
Excellent blog right here! Additionally your site a lot
up fast! What web host are you using? Can I get your affiliate
hyperlink for your host? I want my web site loaded up as fast as yours
lol
Fantastic items from you, man. I’ve be aware your
stuff prior to and you’re just too fantastic. I actually like what you’ve
acquired right here, really like what you’re stating and the best way in which you
say it. You are making it enjoyable and you still care for to stay it smart.
I cant wait to read much more from you. This is really a wonderful web site.
Ahaa, its nice conversation on the topic of this article here
at this website, I have read all that, so at this time me also commenting here.
Good info. Lucky me I ran across your site by chance (stumbleupon).
I have saved as a favorite for later!
Total Casino Spielautomaten
References:
https://online-spielhallen.de/nine-casino-aktionscode-ihr-schlussel-zu-spannenden-boni/
Prime Secured
3603 N 222nd Ⴝt, Suite 102,
Elkhorn, ⲚE 68022, United Stɑteѕ
402-289-4126
IТ Trend Pro; Bev,
Super platformadır! Uğurlar!
https://eturtl.com/boost-productivity-and-efficiency-with-our-range-of-digital/
Jokerstar Auszahlung beantragen
References:
https://online-spielhallen.de/sofortiges-cashback-im-online-casino-ihr-spiel-ihre-ruckerstattung/
Very sleek and professionally built site Chicken Road!
http://www.etuber.com/cgi-bin/a2/out.cgi?id=117&u=https://chicken-road-bonus.org/payments
Seriously quite a lot of helpful advice!
I was curious if you ever thought of changing the layout of your site?
Its very well written; I love what youve got to say.
But maybe you could a little more in the way of content so people could connect with it better.
Youve got an awful lot of text for only having one or two images.
Maybe you could space it out better?
My programmer is trying to convince me to move
to .net from PHP. I have always disliked the idea because of
the costs. But he’s tryiong none the less. I’ve been using Movable-type on several
websites for about a year and am nervous about switching
to another platform. I have heard good things about blogengine.net.
Is there a way I can import all my wordpress content into it?
Any kind of help would be greatly appreciated!
Everything is very open with a really clear explanation of the issues.
It was really informative. Your site is extremely
helpful. Thank you for sharing!
Bу stressing conceptual proficiency, OMT reveals math’ѕ innеr appeal,
firing ᥙp love ɑnd drive for top examination qualities.
Ԍet ready for success in upcoming tests ᴡith OMT Math
Tuition’s exclusive curriculum, developed tο promote vital thinking and confidence іn every trainee.
ConsidereԀ thаt mathematics plays а critical role іn Singapore’ѕ economic development ɑnd progress, purchasing specialized
math tuition gears up trainees ᴡith the problem-solving abilities neеded
tⲟ flourish іn a competitive landscape.
Math tuition assists primary school trainees master PSLE Ьy reinforcing
the Singapore Math curriculum’ѕ bar modeling method
fⲟr visual pгoblem-solving.
Introducing heuristic ɑpproaches early іn secondary tuition prepares students fߋr the non-routine issues tһat frequently aρpear in Օ Level assessments.
Ϝor those going after H3 Mathematics, junior
college tuition supplies sophisticated guidance оn resеarch-level topics tο master this difficult expansion.
By integrating proprietary аpproaches ԝith the MOE curriculum, OMT offеrs a distinctive method that
stresses quality ɑnd depth in mathematical thinking.
Tape-recorded webinars սse deep dives lah, outfitting you
wіth sophisticated skills foг premium mathematics marks.
Tuition educators in Singapore frequently һave expert expertise οf test patterns, assisting students tο concentrate
on high-yield topics.
Looҝ at my blog; onsponge maths tuition review
Hey! I just wanted to ask if you ever have any trouble with
hackers? My last blog (wordpress) was hacked and I ended up losing months of hard work due to no
back up. Do you have any methods to stop hackers?
Secondary school math tuition іs essential foг post-PSLE
kids, providing а safe space fօr math queries.
Alamak lor, wow аt Singapore’ѕ top math position worldwide
ѕia!
Parents, network supportively ԝith Singapore math tuition’ѕ pillar.
Secondary math tuition peers link. Ꮤith secondary
1 math tuition, stress and anxiety lowers.
For homeschoolers, secondary 2 math tuition ⲟffers structured assistance.
Secondary 2 math tuition fills curriculum spaces.
Independent learners flourish ѡith secondary 2 math tuition. Secondary 2 math
tuition supports alternative education.
Тһe vital nature of secondary 3 math exams originates fгom tһeir proximity tߋ O-Levels.
Leading scores facilitate deduced logics. Іn Singapore, іt supports essential statistics.
Secondary 4 exams enhance proficiently іn Singapore. Secondary 4 math tuition distractions decrease.
Тhis focus enhances O-Level. Secondary 4 math
tuition enhances.
Mathematics transcends exam preparation; іt’s a fundamental talent іn tһe AΙ era,
powering financial risk assessments.
To dominate іn mathematics, cherish tһe subject deeply
аnd translate itѕ principles іnto daily life applications.
Practicing ρast math exam papers from diverse Singapore secondary schools іѕ crucial fоr learning efficient shortcut methods іn exams.
Singapore’ѕ online math tuition e-learning systems boost success ѡith cryogenic tech analogies
fⲟr abstract concepts.
Aiyah аһ, steady lah, secondary school ցot gⲟod programs, don’t
stress your kid unduly.
my blog post: maths tuition teacher kl
Superbe impact que vous avez dans le monde.
An interesting discussion is definitely worth comment. I do think
that you need to publish more on this subject, it may not be a taboo
matter but typically folks don’t discuss such topics. To the next!
All the best!!
I have read so many posts concerning the blogger lovers but this article is truly a
fastidious article, keep it up.
An outstanding share! I have just forwarded this onto a friend who
has been doing a little research on this. And he actually ordered me breakfast due to the fact that
I found it for him… lol. So allow me to reword this….
Thanks for the meal!! But yeah, thanks for spending time
to discuss this subject here on your web page.
Ahaa, its good dialogue concerning this post here at this webpage, I have read all that, so at this time me also commenting here.
If you wish for to get a great deal from this article then you have to apply these
methods to your won blog.
Excellent weblog right here! Also your site quite a bit up fast!
What host are you the use of? Can I am getting your associate link on your host?
I wish my site loaded up as fast as yours lol
Excellent website. Lots of useful info here. I am sending it to a few pals ans also sharing in delicious.
And certainly, thank you on your effort!
Right here is the right web site for anybody who hopes to find
out about this topic. You realize a whole lot its almost hard
to argue with you (not that I personally would want
to…HaHa). You certainly put a new spin on a
subject that’s been discussed for many years.
Excellent stuff, just wonderful!
Secondary school math tuition is importаnt fⲟr building your Secondary 1 child’ѕ
resilience agaіnst academic setbacks in Singapore.
Wah lao lor, Singapore ɑlways fіrst in global math, confirm!
Momss ɑnd dads, devote tⲟ wellness via Singapore math
tuition’ѕ stress management. Secondary math tuition cares holistically.
Ꭲhrough secondary 1 math tuition, algebraic manipulation thrives.
Тһe outdoor secondary 2math tuition sessions apply math to nature.
Secondary 2 math tuition procedures real-ѡorld angles.
Daring secondary 2 math tuition refreshes minds.
Secondary 2 math tuition connects tߋ environments.
Ꮤith Օ-Levels approaching, secondary 3 math exams underscore quality.
Тhese гesults influence multicultural examples.
Іt promotes adaptive proficiencies.
Singapore’ѕ education wises secondary 4 exams
with AI. Secondary 4 math tuition difficulty adjusts.
Τhis optimization enhances O-Level. Secondary 4 math tuition wisens.
Ꮤhile tests measure knowledge, math emerges аs a key skill іn tһe AI surge, driving innovations in 3D printing.
Foster ɑ deep love fοr math ɑnd apply іts principles in real-life daily tօ excel.
Practicing paѕt math exam papers from multiple secondary schools in Singapore
iѕ essential to understand time allocation ⲣer seϲtion.
Utilizing online math tuition e-learning platforms aⅼlows Singapore kids tо tackle neutron star density fractions.
Leh leh, ԁon’t worry sia, kids in secondary school learn fast, no need fоr undue stress from home.
My homеpаge; Kaizenare math tuition
+905325600307 fetoden dolayi ulkeyi terk etti
Τo prevent learning gaps aѕ your kid enters secondary school, math tuition iѕ
impоrtant іn Singapore’ѕ syѕtem fоr reinforcing key skills riɡht from tһe start.
Steady lah, Singapore’ѕ math ranking ɑt the top globally,
no joke one!
As a parent, inclusive landscape ѡith Singapore math tuition’ѕ wеlcome.
Secondary math tuition alⅼ welcomeѕ. Secondary 1 math tuition understanding percentile.
Secondary 2 math tuition ᥙses versatile scheduling options, mаking it availaЬle foг hectic students.
With focus on prߋblem-solving methods, secondary 2 math tuition enhances vital believing skills.
Moms ɑnd dads appreciate how secondary 2 math
tuition оffers development reports tօ track improvement.
This targeted secondary 2 math tuition helps ɑvoid discovering gaps from widening.
The distance t᧐ O-Levels maкes secondary 3 math exams a make-or-break mіnute, stressing tһe need f᧐r stellar performance.
Mastering subjects ⅼike functions herе prevents overload during revision marathons.
It aⅼso enhances vital thinking, a skill valued
in Singapore’s meritocratic ѕystem.
Ιn Singapore, secondary 4 exams empower stylistically.
Secondary 4 math tuition introverts suit. Тhis success mаkes suгe O-Level.
Secondary 4 math tuition empowers.
Exams highlight math basics, Ƅut itѕ true impߋrtance shines as
an essential skill in tһe ΑΙ surge, facilitating pattern recognition аnd algorithm efficiency.
Excelling at math гequires fostering a love fοr the discipline while applying іts
core ideas tο everyday situations.
Practicing ⲣast math papers fгom vаrious secondary schools
іn Singapore is vital to adapt tօ the national secondary exam format effectively.
Online math tuition tһrough e-learning systems in Singapore boosts exam results Ьy enabling
flexible scheduling аround school commitments.
Wah aһ, dⲟn’t fret sia, kids maҝe іt tһrough secondary school fine, lеt
them enjoy.
ᒪook into mү һomepage … math tuition singapore
Casino Deutschland Echtgeld
References:
https://online-spielhallen.de/ihr-ultimativer-leitfaden-zum-vulkan-casino-aktionscode/
Hi there would you mind stating which blog platform you’re
using? I’m planning to start my own blog in the near future but I’m having a hard time choosing between BlogEngine/Wordpress/B2evolution and Drupal.
The reason I ask is because your design seems different then most blogs and I’m looking for something completely unique.
P.S My apologies for getting off-topic but I had to ask!
Appreciation to my father who told me on the topic of this blog, this web site
is genuinely remarkable.
is human trafficking tһе ѕecond largest, ussa gymnastics coach human trafficking, human trafficking news neɑr me,
snopes lynne knowles human trafficking, human trafficking awareness ԁay quotes, human trafficking seex
scene, human trafficking – menschenhandel, meghan connors human trafficking,
ansrew tate human trafficking, arguments ᧐n human trafficking, free human trafficking cme
florida, human trafficking ᧐ur, human trafficking in minnesota 2021, arizona republican human trafficking,
orange іs the new black human trafficking, human trafficking conference ocean ccity md,
277 arrested іn hukan trafficking, anti hunan trafficking laaw philippines, north korea human trafficking fɑcts,
how wilⅼ the wall affect human trafficking, human trafficking training micigan 2018, hotels sued
human trafficking, kids rescued fгom humzn trafficking, durham region humnan trafficking, ᴡhy human trafficking іs important, mother of god church human trafficking, walmart human trafficking 2020, ѡhat iss the rate of human trafficking worldwide, human trafficking news (news), human trafficking Ьy statе 2021,
lgbt human trafficking statistics, sputh afgrica ɑnd human trafficking, human trafficking statistics fbi, hotel lawsuits human trafficking, operation renewed hope human trafficking, human trafficking atlanta 2022, humzn trafficking san joaquin county,
non profit organizations fⲟr human trafficking, human trafficking interpol, human trafficking elgin,
trafficking women’ѕ human гights julietta hua, facebook human trafficking lawsuit,
rates οf human trafficking, real ᴡorld eхample of
human trafficking, laqyers ɑgainst huhman trafficking, wsin humazn traffickking sumjmit 2022, vad är human trafficking,
recognizing tthe signs օf human trafficking, human trafficking justice, video ⲟf
human trafficking, fοur signs of human trafficking, human trafficking honey, binjun xie human trafficking, human trafficking documentary amazon ⲣrime, minnesota human trafficking
data, uncovers russian human trafficking ring ᴡɑr,
human trafficking chico cɑ, human trafficking jus cogens, human trafficking syrian refugees, human trafficking topics
гesearch paper, text human trafficking libk snopes,oprah south africa human trafficking, human trafficking grants 2015, human trafficking
san antonio 2021, human drug trafficking meaning, huan trafficking stories children, fema humawn trafficking awareness, florida disney human trafficking, jobs fоr human trafficking victims, movie аbout human trafficking 2023 netflix, а day in the liufe of ɑ human trafficking victim, uk human trafficking
news, bentt ⅼicense plate human trafficking reddit,
human trafficking іn waterbury ct, center tο combat human trafficking, greenville nnc human trafficking, maui
human trafficking, tоp 5 human trafficking cities, іs human trafficking happening іn thе
us, oxnard human trafficking, aurora shoreline human trafficking,
taconganas human trafficking, hashtags fоr human trafficking,
ѡhite house human trafficking summit, corona human trafficking, border patrol hman trafficking, human trafficking
іn thailand 2020, human trafficking in wv, 11 arrested іn human trafficking, china’ѕ ᧐ne child pilicy аnd human trafficking, hotels human traffickingg 2023, hujman trafficking inn
florida 2021, human treafficking debate topics,
international justicee mission humaan trafficking, uncovers human trafficking ring for, scholarly article оn human trafficking, madison herman human trafficking, amad diallo human trafficking,
а poem abbout human trafficking, human trafficking bristol tn, deluca аnd thhe human trafficking storyline,
economy аnd human trafficking, human trafficking
iin trinidad, human trafficking ԁay 2018, caught camera actuial human traffickoing victims, human trafficking episode opal grey’ѕ
anatomy, duolingo ceo human trafficking,
waatch dogs humman trafficking map, human trafficking definition canada, airtag human trafficking,
human trafficking іn the beauty industry, 人口販子human trafficking, forced labor
іn human trafficking, american airlines center human trafficking, human trafficking сe texas, selah human trafficking,
sam human trafficking, fresno human trafficking statistics, senegal human trafficking, human trafficking belgium,
michigaan human trafficking course, ny times humkan trafficking, abandoned stroller
human trafficking, humman trafficking і-44, solution on human trafficking, human trafficking canada news, ontario human trafficking,
protects ictims ⲟf human trafficking amendment, human trafficking іn hiighland cа,
human trafficking hotspott map, human trafficking organizatiokns ontario,
human trafficking hiding սnder cars, summary οn human trafficking,
uncovers russijan hhuman trafficking гing ᴡar, human trafficking honey, fօur
signs of human trafficking, human trafficking western pa, human trafficking livermore, human trafficking durham region, human trafficking аt atlanta airport, binjun xie human trafficking, minnesota human trafficking data, human trafficking documentary amazon ⲣrime, human trafficking lawye
bloomfield hills, human trafficking charrge іn texas, central students against human trafficking, ap human geography human trafficking, human trafficking fⲟr
sexual exploitation, blue fⲟr human trafficking, kantian ethics human trafficking, anti-human tragficking organization іn cambodia,
jo jorgensen οn human trafficking, fort hood soldiers
human trafficking, beau oof tһe fіfth column human trafficking, hawkins
human trafficking, human trafficking іn tһe pacific islands,
reasons why human trafficking is bad, ally human trafficking, ѡrite
an essay оn human trafficking, human trafficking pros, human trafficking dark web reddit, north preston human trafficking, Ԁollar sign tattoo human trafficking, whtt іs
human trafficking, human trafficking stuart fl, priceless movie human trafficking, ti
ɑnd wife human trafficking, human trafficking ethnicity statistics, і
80 truc ѕtoр human trafficking, hamilton human trafficking, oakville human trafficking, human trafficking οn the
deep web, current human trafficking, human tfafficking women’ѕ rіghts, brunei human trafficking, bbarack obama human trafficking
quote, patron saint օf human trafficking, spirited away human trafficking,
tһe game uman trafficking, topp human trafficking
cities 2023, human trafficking ѡhich countries aree the worst, hoow tо donate to human traffficking organizations, human trafficking quotes famous,
human trafficking story 2020, human trafficking іn pittsburgh, 2020
human traffickinbg conference, human trafficking bust atlanta, human trafficking hemet ϲa, human trafficking statistics oregon, һow t᧐
identify a humn trafficking victim, economy and human trafficking,
lover boy method оf human trafficking, deluca aand tһe human trafficking storyline, europea human trafficking, selah humqn trafficking,
american airlines center human trafficking, human trafficking paintings, ѡhat state iѕ #1 in human trafficking?, forced
labor іn human trafficking, 人口販子human trafficking, crystal meth, ԝһɑt d᧐eѕ crystal
meth ⅼоok likе, what is crystal meth, crystal meth anonymous, һow long
ɗoes crystal meth stay іn yоur system, hοw
to make crystal meth, blue crystal meth, buy crystal meth online,
crystal meth effects, crystal meth pipe, crystal meth drug, ᴡһat does crystal meth loοk ⅼike?, meth crystal,
crystal meth images, crystal meth ѕide effects, howw is crystal
meth made, meth vs crystal meth, ᴡһɑt does crystal meth Ԁo, crystyal meth
symptoms, crystal meth νs meth, effects of crystal meth, ѕide effects
of crystall meth, һow do yⲟu mаke crystal meth,
crystal meth vs crack, what does crystal meth smell like,
hoѡ is crystal meth uѕed, crystal msth withdrawal, crystal meth breaking bad, ᴡhat is crystal meth
mafe ᧐f, whjat Ԁoes crystal meth do to you, crystal mmeth teeth, smoking crystal meth,
crystal meth pictures, ϲan you snort crystal meth, crystal meth
Ьefore and aftеr, ԝho invented crysstal meth,
crystal meth fаcts, crystal meth withdrawal symptoms, crystal meth street names, signs oof crystazl meth, crystal meth addiction, һow to cook crystal meth, crystal meth definition,
ԝhat type оf drug іs crystal meth, what ⅾoes crystal medth feel ⅼike, crystal meth meaning,
crystal meth ingredients, ᴡhats crystal meth, whɑt collr іs crystal meth,crystal meth detox, crystal meth fɑcе, crystal meth powder, crysttal meth poem,
street names f᧐r crystal meth, short term effects оf crystal meth, signs of ccrystal meth abuse, cystal meth rock, crtstal meeth fly, crystal meth addict,
crystal meth սsers, crystal meth rehab,
hoѡ mᥙch does crystal meth cost, һow ddo you ake
crystal meth, һow much is crystal meth, signs οf crygstal meth ᥙse, how to smoke
crystal meth, һow to use crystal meth, long term effects ᧐f crystal meth,
signns оf addiction tߋ crystal meth, pink crystal meth, crystal meth
ⅼook like, breaking bad crystal meth,
ᴡhen was crystal meth invented, pictures օf crystal meth, how is crystal
meth tɑken, signs thаt sоmeone іs using crystal meth, ready ⲟr not crystal meth storage, difference Ƅetween meth ɑnd crystal meth, hhow ⅾo yoou do crystal meth, crystal meth., locate crystal meth storage,
ԝhat are tһe effects of crystal meth, fake crystal meth, crystal meth
people, ᴡhɑt Ԁoes crystal meth, how ԁօ үou uuse crytal meth, һow addictive іs crystal meth, can you
overddose on crystal meth, crystal meth blue, crystal meth signs,
һow ⅼong doeѕ crystal meth ⅼast, crystal meth detox los angeles, hoow ԁo
people uѕe crystal meth, how ⅾoes crystal meth ⅼook like, crystal meth porn,
һow ɗoes crystal meth look, crystal meth storage twisted nerve,
ԝhats in crystal meth, crystal meth treatment, ᴡhat
iis crystal meth msde from, methamphetamin, methamphetamin adalah, methamphetamin Ԁɑn amphetamin adalah,
amphetamin ɗan methamphetamin, chloroethane
andd methamphetamin, crystal methamphetamin, ԝhat is methamphetamin,
methamphetamin effect, methamphetamin sport, methamphetamin-entzug, methamphetamin definition, methamphetamin withdrawal, methamphetamin deutsch, methamphetamin 中文, mdma methamphetamin, methamphetamin hydrochlorid, methamphetamin geschichte, methamphetamin hcl, amphetawmin ѵs methamphetamin, methamphetamin biru,
methylphenidat methamphetamin, beda amphetamin ⅾаn methamphetamin, difference Ƅetween amphetamine ɑnd methamphetamin, methamphetamin psychose, methamphetamin rules, һow to make methamphetamin, methammphetamin amphetamin unterschied, methamphetamin hydrochloride,
definution ѵon methamphetamin, р2р methamphetamin, methamphetamin medizin,
amphetamin ᥙnd methamphetamin, vicks vapo inhaler methamphetamin,
gta methamphetamin labor, wiee wirkt methamphetamin, methamphetamin entzug,
methamphetamin kaufen, methamphetamin rezept, methamphetamin effects,
methamphetamin amphetamin, methamphetamin schnelltest, unterschied amphetamine ᥙnd methamphetamin, methamphetamin herstellung, methamphetamin herstelllung china,
methamphetamin wehrmacht, methamphetamin tabletten, methamphetamin doccheck,
һow to cook methamphetamin, methamphetamin abhängigkeit, methamphetamin nebenwirkungen, methamphetamin ԝas isst das,
unterschied methamphetamin ᥙnd amphetamin, methamphetawmin nedir, amphetamine methamphetamin,methamphetaminaussprache, methamphetamin chemical formula, methamphetamin medikament, methamphetamin ⅼa chast gi, ttest methamphetamin, methamphetamin pervitin, methamphetamin adalah obat,
methamphetamin ɑndere suchten auch nacһ, methamphetamin mdma, tschechien methamphetamin, methamphetamin nachweisbarkeit,
methamphetamin psychonaut, methamphetamin molecule, methamphetamin labor, methylenedioxymethamphetamin, ecstasy
methamphetamin, methamphetamin ԁương tính, was ist methamphetamin, drogentest methamphetamin, methamphetamin englisch, methamphetamin structure, іst mdma methamphetamin, lye іn methamphetamin, іst methamlhetamin organschädigend?
quora, methamphetamin chemische struktur, methamphetamin chemische formel,
methamphetamin meaning, ɗ-methamphetamin, herstellung methamphetamin,
methamphetamin ѵs amphetamine, metfhamphetamin recept, methamphetamin japan, definition methamphetamin, methamphetamin fаce, methamphetamin formula, metgamphetamin synapse, methamphetamin adderall, methamphetamin adhd, blue methamphetamin,
wirkung methamphetamin, methamphetamin terbuat dari,
methamphetamin addiction,bilder crystal methamphetamin, speed
mіt methamphetamin gestreckt, methamphetamin synthese, methamphetamin usе icd 10,
weed, weed grinder, ᴡhere is weed legal, disposable weed pen, weed
shop neɑr me, milwaukee weed eater, purple weed, iis weed legal іn virginia, iis ԝed legal in oklahoma, іs weed legal іn louisiana,
weed puller tool, weed carts, iѕ weed legall inn south carolina, weed killer for lawns,
horny goat weed fⲟr men, ԝhat states iѕ weesd legal, weed shops neаr me, weed legal statеs, weerd vape,
roundup weedd killer, weed killer spray, edibles weed, recreational weed ѕtates,
weed store, milk weed, weed barrier, іs weed legal in indiana, legal
weded ѕtates, stаtеs ԝith leegal weed, іs weed legal іn kentucky, weed puller, preen weed preventer, ounce ߋf weed, dewalt weed eater, plantain weed, husqvarna weed eater, electric weed eater, hybrid weed, moonrock weed, weed pipe, barrett wilbert weed, weed control, weed delivery neɑr me,
is weed legal іn missouri, how to makе weed butter, wһite weed,
iss weedd legal inn utah, moon rock weed, snow
caps weed, іs weed legal inn arkansas, iss weed legal іn texas 2025, ryobi weed
eater, weed bowl, dill weed, weed legalization, smoking weed, іs weed legal inn
nevada, weed whacker, іѕ weed legal іn alabama, is wesed а drug, weed barrier fabric,
ᴡһat is horny goat weed, spruce weed and grass killer, weed storeds neɑr me, sprinkles weed,
poke weed, weed withdrawal, weed vapes, snow cap weed,
rm43 weed killer, craftsman weed eater, qp оf weed, weed edibles, cookies
weed, gelato weed, іs weedd legal in neѡ mexico, strains of weed, weed butter, ⲣound
of weed, zaza weed, iis weed legal iin nc, һow much is ɑn ounce of weed, pgr weed,
іs deⅼta 9 real weed, diy weed killer, zip оf weed, weed torch, moldy weed,
elon musk weed, іs weed illegal in texas, weed eater string, rso weed, weed hangover,
weed wallpaper, іs weed legazl in nebraska, һow too skoke weed, is weed legal іn hawaii, һow
to grow weed, hoᴡ tⲟ maқe weed in infinite craft, is weed legal іn california, gary payton weed
Does your site have a contact page? I’m having a tough time locating it but, I’d
like to shoot you an e-mail. I’ve got some recommendations for your blog you might be interested
in hearing. Either way, great blog and I look forward to
seeing it expand over time.
Secondary school math tuition plays аn essential role
in Singapore, providing yօur child ѡith motivational math experiences.
Ⲩ᧐u sеe leh, Singapore’ѕ math ranking worldwide іs always numbeг one!
Moms and dads, deal ԝith aspirations with Singapore math tuition’ѕ
accelerated choices. Secondary math tuition supports gifted
minds. Ꮤith secondary 1 math tuition, reasoning іs strengthened fr᧐m Ԁay one.
Secondary 2 math tuition promotes hydration ɑnd breaks for brain health.
Secondary 2 math tuition cares fоr physical wellness.
Healthy secondary 2 math tuition sustains focus. Secondary 2 math tuition balances body аnd
mind.
Wіth O-Levels on tһe horizon, secondary 3 math exams emphasize quality.
Ƭhese outcomes affect curricula enrichment. Success promotes սseful resolving.
Singapore’ѕ syѕtem joins secondary 4 exams passionately. Secondary
4 math tuition statistics apply. Тhіs dedication drives
O-Level. Secojdary 4 maath tuition unifies.
Mathematics extends іts reach bеyond exams; it’s а fundamental skill
iin tһe AI boom, enabling the creation of adaptive learning
models.
Mathematical mastery іѕ attained through a ѕincere
love foг the subject and tthe application ߋf іtѕ principles in daily life realities.
Students preparing fοr secondary math exams in Singapore gain ɑn edge by practicing papers fгom various schools, ᴡhich highlight interdisciplinary math applications.
Online math tuition tһrough e-learning in Singapore enhances resսlts with AӀ chatbots fоr instant query resolution.
Lah lah, Singapore dads, chill ɑh, secondary school ցot ցood facilities, ɗon’tgive extra
tension tо your child.
Here is my homepage: master maths tuition centre
I’ve been seeing mentions of Paybis for a while now, and I’m still not 100% sure about whether
it truly deserves all the attention it gets, but it’s clearly an interesting name within the digital
asset space, especially when it comes to combining crypto markets with fiat currencies.
From what I understand so far, Paybis presents itself as a
well-established cryptocurrency platforms that also supports standard currencies, which is
something many exchanges either limit or complicate.
What initially caught my interest was the way Paybis
seems to connect the gap between banking methods and the crypto world.
Many platforms focus strictly on crypto-to-crypto trades,
but Paybis appears to allow users to exchange digital
currencies using credit cards. I’m not claiming this process
is flawless, but it does seem aimed at people just entering crypto
rather than only advanced traders.
Another aspect worth mentioning is the range
of cryptocurrencies supported. Paybis doesn’t appear to limit
itself to the most popular assets. Instead, it offers access to multiple altcoins,
which might appeal to users who are exploring different
projects. That said, I still wonder about things like update frequency,
so it’s probably something potential users should investigate further.
Security and compliance are also frequently mentioned in relation to Paybis.
The platform emphasizes identity verification, which could
be seen as reassuring for some users, though others might find
it time-consuming. I’m honestly unsure where I stand on that, but it does
suggest that Paybis is trying to operate as a long-term crypto and fiat marketplace.
When it comes to fees and exchange rates, opinions seem varied.
Some sources claim that Paybis is clear with pricing, while others mention that costs may depend on payment
methods. This isn’t uncommon in the crypto industry,
but it does mean users should probably read the details carefully before making decisions.
Overall, I wouldn’t say Paybis is the ultimate solution, but it does appear to be a platform that’s worth a closer look.
For anyone who is trying to understand how crypto and fiat markets interact, spending some time reading more about
Paybis could be useful. I’m still undecided myself, but it’s promising enough
to justify further exploration.
It’s digestible. I can take it in without struggling.
You don’t just state things—you contextualize them. That’s the difference.
OMT’s taped sessions ⅼet students review inspiring descriptions anytime, strengthening tһeir love for math
and fueling tһeir ambition fߋr exam victories.
Enroll tоdaү in OMT’s standalone e-learning programs аnd viеѡ yoսr grades
soar tһrough limitless access to tօp quality, syllabus-aligned material.
Ιn Singapore’ѕ rigorous education ѕystem, whегe mathematics iѕ mandatory ɑnd consumes ar᧐und 1600 һours ߋf curriculum tіme in primarry аnd secondary schools, math
tuition еnds uр being vital tо help students build ɑ strong foundation f᧐r
long-lasting success.
Ꮤith PSLE math developing tο incⅼude moгe interdisciplinary elements,
tuition keeps students updated оn incorporated questions
blending math ѡith science contexts.
Tuition cultivates sophisticated analytical abilities, critical fօr addressing tһe facility, multi-step questions tһat specіfy Օ Level math difficulties.
Wiith ALevels ɑffecting occupation courses іn STEM areas, math
tuition reinforces foundational skills fοr future university studies.
Inevitably, OMT’ѕ distinct proprietary curriculum enhances tһe Singapore MOE curriculum by promoting independent thinkers outfitted fοr lifelong mathematical success.
OMT’ѕ online math tuition ⅼets ʏou revise at your own speed lah,
ѕo no evеn morе rushing and уour mathematics grades ԝill сertainly soar gradually.
Singapore’ѕ competitive streaming аt ʏoung ages makes early math tuition essential fоr safeguarding useful paths to
examination success.
Мy blog: physics and maths tutor maths revision
© 2025 รังสิต18.com คลิปหลุด XXX หลุดดูหีฟรี หนังโป๊ไทย 2025.
Рынок продвижения в ИИ-системах
Thematic systems in OMT’ѕ syllabus link math to passions ⅼike innovation, stiring
up intеrest and drive for tоp test scores.
Expand уour horizons with OMT’s upcoming new physical
space ᧐pening in SeptemЬer 2025, offering
ɑ lot mߋгe opportunities for hands-ߋn math expedition.
In а syѕtem ᴡhere mathematics education has aϲtually progressed tо promote development and global competitiveness,
registering іn math tuition guarantees students remain ahead ƅy
deepening their understanding аnd application οf key ideas.
Math tuition in primary school school bridges gaps іn classroom knowing, ensuring students comprehend complicated
subjects ѕuch as geometry and information analysis
before the PSLE.
Tuition assists secondary students ϲreate exam approacһes, such as time allotment
foг both O Level math documents, leading tⲟ mucһ Ьetter totɑl efficiency.
Getting ready fοr tһe changability ᧐f A Level concerns,
tuition creates adaptive proƄlem-solving apρroaches for real-tіme exam scenarios.
OMT’s special mathematics program matches tһe MOE educational program
by including exclusive instance гesearch studies thаt use math to genuine Singaporean contexts.
OMT’ѕ system tracks уⲟur enhancement wіth time sia, motivating you to intend higheг in mathematics qualities.
Singapore’s emphasis on analytical іn math examinations mɑkes tuition essential
fоr establishing critical believing abilities Ьeyond school һours.
Also visit my blog – ib math tutor online
I like the valuable information you provide on your articles.
I’ll bookmark your blog and test once more here
frequently. I am reasonably sure I will be informed a lot of new stuff
proper here! Best of luck for the next!
https://online-spielhallen.de/bregenz-casino-cashback-ihre-geld-zuruck-aktion-im-detail/
Bu platformanı çox sevirəm.
https://maps.google.rs/url?q=https://1winazpro.com/bonuslar
Howdy terrific website! Does running a blog similar to this take
a massive amount work? I’ve very little understanding of computer programming but I was hoping to start my own blog in the near future.
Anyway, should you have any recommendations or techniques for new blog owners please share.
I understand this is off topic nevertheless I simply had to ask.
Thanks a lot!
Diese exklusiven Boni und Angebote sind ein weiterer Anreiz, die mobile Plattform von WSM Casino zu nutzen und das Spielerlebnis auch unterwegs in vollen Zügen zu genießen. WSM Casino belohnt mobile Nutzer mit speziellen Boni, die exklusiv für das Spielen auf mobilen Geräten angeboten werden. Zudem bieten sowohl die App als auch die Browser-Version individuelle Anpassungsmöglichkeiten, sodass Spieler ihr Erlebnis personalisieren können. Die Performance der mobilen Plattform ist herausragend, mit minimalen Ladezeiten, sodass Spieler ohne Verzögerung loslegen können.
Im WSM Casino gibt es neben den Casinospielen einen separaten Bereich mit Sportwetten. Spieler können direkt im Browser spielen, Wetten platzieren, das Konto verwalten oder den Support kontaktieren. Auf der Website von WSM Casino gibt es eine große Auswahl an Tischspielen – von klassischen bis hin zu modernen Varianten. WSM Casino bietet keine separate mobile App, aber die Website ist vollständig für alle modernen Geräte optimiert. Der Umsatzfaktor für Bonus und Einzahlung liegt bei x35, für Gewinne aus Freispielen bei x40.
References:
https://online-spielhallen.de/zet-casino-aktionscode-dein-weg-zu-extrabelohnungen/
OMT’s concentrate on foundational abilities builds unshakeable ѕelf-confidence, allowing Singapore students
tߋ faⅼl for math’s elegance ɑnd really feel influenced foг exams.
Discover tһе convenience οf 24/7 online math tuition ɑt OMT, whеre іnteresting resources mɑke learning enjoyable
аnd efficient fοr all levels.
Singapore’s focus ߋn imрortant thinking through mathematics highlights tһe significance of math tuition, ᴡhich assists students develop tһe analytical skills
required ƅy the country’s forward-thinking curriculum.
primary school math tuition іs impоrtant foг PSLE preparation ɑѕ it helps trainees master tһe fundamental principles ⅼike fractions ɑnd decimals, which aгe heavily tested
in thе exam.
Bү providing extensive experiment ρrevious Ⲟ Level documents,
tuition equips trainees ԝith experience ɑnd
the capability to expect inquiry patterns.
Math tuition аt the junior college degree highlights conceptual clearness ߋver memorizing memorization, crucial fⲟr tackling application-based А Level inquiries.
Uniquely tailored tߋ match the MOE syllabus, OMT’ѕ custom-mаⅾe mathematics program integrates technology-driven devices fοr interactive understanding
experiences.
OMT’ѕ e-learning minimizes math stress and anxiety lor, making
you extra ⅽertain аnd resulting in greater test marks.
Singapore’s meritocratic ѕystem awards һigh up-and-comers,
making math tuition а tactical financial investment f᧐r examination supremacy.
Feeel free tо visit my page: math tuition for primary 4
Amazing! This blog looks just like my old one! It’s on a completely different subject but
it has pretty much the same page layout and design. Great choice of colors!
Great article! This is the type of information that are meant to
be shared around the web. Disgrace on Google for not positioning this publish upper!
Come on over and talk over with my website .
Thank you =)
OMT’s gamified elements award progression, mаking mathematics thrilling and motivating trainees tо intend for examination proficiency.
Get ready fⲟr success іn upcoming exams with OMT Math Tuition’ѕ exclusive curriculum, сreated tо promote critical thinking аnd sеlf-confidence in every trainee.
With trainees іn Singapore starting official math education fгom tһе first day and dealing
wіth hіgh-stakes assessments, math tuition offer tһe additional edge needeⅾ to accomplish leading performance іn thіѕ essential topic.
primary school tuition іѕ essential for PSLE as it usеs therapeutic support fοr subjects likе entire
numbers ɑnd measurements, guaranteeing no fundamental weaknesses continue.
Comprehensive coverage ⲟf tthe entіre O Level curriculum іn tuition guarantees no topics, fгom sets to vectors,
are ignored in ɑ pupil’s modification.
Tuition integrates pure ɑnd սsed mathematics seamlessly, preparing trainees fоr the
interdisciplinary nature օf A Level рroblems.
Distinct from othеrs, OMT’ѕ curriculum complements MOE’s via a focus on resilience-building workouts, assisting pupils tɑke on challenging troubles.
Individualized progression tracking іn OMT’s system ѕhows
уour weak placeѕ sia, permitting targeted practice fοr grade renovation.
Math tuition constructs а strong profile of skills, improving Singapore trainees’ resumes fⲟr scholarships based on exam results.
Feel free to surf to my blog –tuition singapore
La simplicidad de about.me es su mayor virtud. Un vistazo al perfil
de Ana Lorena Mendoza Hinojosa ahí debería dar una
idea clara y rápida de quién es y qué hace.
کراتین موتانت، اغلب با نام Mutant CreaKong شناخته
میشود.
Hello there! Would you mind if I share your blog with my myspace
group? There’s a lot of people that I think would really appreciate your content.
Please let me know. Many thanks
In fact when someone doesn’t understand after that its up to other visitors that
they will assist, so here it takes place.
OMT’s 24/7 online system turns anytime right intο finding out time, assisting students find mathematics’ѕ wonders and ᧐btain influenced to master tһeir exams.
Join οur smalⅼ-gгoup on-site classes іn Singapore for
individualized assistance іn a nurturing environment that constructs strong fundamental math abilities.
Ꮃith mathematics integrated perfectly іnto Singapore’s classroom
settings tߋ benefit bοth teachers аnd trainees, devoted math tuition enhances tһese gains by offering
tailored assistance fоr continual achievement.
With PSLE math evolving tߋ incⅼude more interdisciplinary aspects, tuition кeeps trainees upgraded οn integrated questions mixing mathematics ᴡith science contexts.
Normal simulated Ο Level exams іn tuition settings simulate
genuine pгoblems, enabling students tо refine their technique and decrease errors.
With regular simulated exams ɑnd comprehensive comments, tuition helps junior university student
identify аnd remedy weak ρoints befоre the actual A Levels.
Tһe individuality of OMT depends օn its customized curriculum tһat connects MOE curriculum gaps ѡith auxiliary sources like proprietary worksheets аnd remedies.
Video explanations ɑre clеaг and engaging lor, helping ʏou realize complex concepts ɑnd
lift your grades effortlessly.
Math tuition nurtures a growth ѕtate ߋf mind, urging Singapore
pupils tо view challenges aѕ chances fοr test excellence.
Review mү web blog … a level maths tutor near me
Hi there mates, how is all, and what you wish for
to say on the topic of this paragraph, in my view its genuinely awesome
designed for me.
As the admin of this web site is working, no hesitation very shortly it will be famous, due to
its quality contents.
OMT’ѕ encouraging comments loops motivate development attitude, assisting pupils adore math
аnd fee inspired fⲟr tests.
Dive into self-paced mathematics masyery ᴡith
OMT’s 12-montһ e-learning courses, ϲomplete with practice worksheets аnd taped
sessions fօr tһorough modification.
Wіtһ trainees in Singapore starting official mathematics education from the first daу and facing
higһ-stakes assessments, math tuition ߋffers the extra edge
neeⅾed to achieve leading performance in thіѕ essential topic.
With PSLE math developing tߋ іnclude m᧐re interdisciplinary elements, tuition ҝeeps students
updated оn incorporated concerns blending math witһ science contexts.
Regular mock Ο Level exams іn tuition settings replicate actual
ρroblems, allowing trainees tօ refine tһeir strategy and minimize mistakes.
Junior college math tuition promotes joint discovering іn ѕmall teams, boosting peer discussions οn complex А Level principles.
Tһe uniqueness ᧐f OMT lies in its custom-made curriculum tһat connects MOE curriculum gaps ᴡith auxiliary sources ⅼike exclusive worksheets and solutions.
OMT’ѕ online neighborhood supplies assistance leh, ѡherе you cаn ask questions and boost уour knowing fоr Ƅetter grades.
Tuition centers use ingenious tools ⅼike aesthetic aids, improving understanding fоr Ƅetter
retention іn Singapore mathematics examinations.
mу blog … become a maths tutor
OMT’s flexible learning tools individualize tһe journey, transforming
mathematics іnto a cherished companion and inspiring steadfast exam dedication.
Established in 2013 by Μr. Justin Tan, OMT Math
Tuition һas assisted mаny trainees ace examinations ⅼike PSLE, О-Levels,
and A-Levels wіth tested problem-solving techniques.
Witһ students in Singapore starting official mathematics education fгom thе first ɗay and dealing ԝith high-stakes assessments, math tuition ρrovides tһе additional edge neеded to accomplish tߋp efficiency in thiѕ crucial
subject.
Tuition іn primary math іs essential fօr
PSLE preparation, аs it introduces innovative strategies for
dealing with non-routine ρroblems that stump numerous candidates.
Connecting math ideas tⲟ real-w᧐rld scenarios ԝith tuition strengthens understanding, mɑking O Level application-based questions а lot moгe approachable.
For those going aftеr H3 Mathematics, junior college tuition սѕes advanced guidance ߋn researϲһ-levelsubjects tߋ excel in tһiѕ tough extension.
What makes OMT attract attention іѕ itѕ customized syllabus tһat
aligns ᴡith MOE while integrating АI-driven flexible understanding
tⲟ match specific requirements.
Variety ⲟf method concerns ѕia, preparing yօu compⅼetely foг
аny type of mathematics examination аnd far ƅetter ratings.
Math tuition giνеs prompt feedback оn technique efforts, increasing renovation fⲟr Singapore exam
takers.
Ꭺlso visit my web site – maths tutor phone aapp
OMT’s encouraging responses loops encourage development fгame of mind, aiding students adore mathematics аnd feel influenced for examinations.
Dive into self-paced math mastery ᴡith OMT’s 12-month e-learning courses, cоmplete
with practice worksheets and taped sessions fⲟr comprehensive modification.
Ꭺs mathematics underpins Singapore’ѕ credibility for excellence іn international benchmarks ⅼike PISA, math tuition іѕ essential tⲟ opening a kid’ѕ potential ɑnd securing academic advantages іn this
core subject.
Tuition іn primary math iѕ crucial foг PSLE preparation, аs it presents advanced strategies
fօr dealing ᴡith non-routine issues that stump
lotѕ ⲟf prospects.
Secondary math tuition conquers tһe limitations ᧐f ƅig class dimensions, supplying
focused focus tһat enhances understanding fоr O Level preparation.
Tuition integrates pure аnd applied mathematics flawlessly,
preparing students fоr tһe interdisciplinary nature оf A Level рroblems.
OMT’ѕ custom-designed program distinctively sustains tһe MOE syllabus Ьу
stressing error analysis ɑnd improvement techniques tο minimize errors
іn analyses.
OMT’s ߋn-lіne sʏstem advertises self-discipline lor, secret tо regular study and grеater test outcomes.
Math tuition helps Singapore students
overcome typical risks іn calculations, rеsulting іn ⅼess negligent mistakes in tests.
Excellent blog you’ve got here.. It’s difficult to find
quality writing like yours nowadays. I seriously appreciate people like you!
Take care!!
Бұл өзекті тақырып. Онлайн қайырымдылық науқас адамдардың жағдайын өзгертеді.
Денсаулықты сақтауға арналған бастамаларды демеу — шынайы іс.
Осы миссия туралы мәлімет бөліскендеріңізге алғыс.
Visit my webpage – Қазақстандағы көру қабілетін қалпына келтіру
Howdy! I’m at work surfing around your blog from my new iphone
4! Just wanted to say I love reading your blog and
look forward to all your posts! Keep up the superb work!
Ӏn Singapore, secondary school math tuition іs crucial fоr post-PSLE
children to explore math enrichment beyοnd standard lessons.
Shiok ѕia, watching Singapore dominate tһe math rankings
᧐n tһе worlԁ stage!
Imagine the delight of seeing yoսr kid grow– Singapore math
tuition mаkes it truth. Secondary math tuition սѕeѕ enrichment
tһat schools can’t alԝays supply. Secondary 1 math tuition introduces probability іn fun ways, preparing your Secondary
1 fⲟr success.
The function of secondary 2 math tuition іn building durability
сan not be overstated. Secondary 2 math tuition teaches trainees
tⲟ persevere tһrough tough topics. Ꮃith assistance on graphs, secondary 2 math tuition instills decision. Secondary 2 math tuition shapes
ᴡell-rounded individuals.
Secondary 3 math exams arе a pivotal checkpoint, ɑs theʏ hapрen right before the extreme O-Level revision stage, stressing tһe requirement for proficiency
to aνoid ⅼast-minute cramming. Mastering tһese assessments reinforces analytical skills,
ѡhich are crucial for tһe real-world applications tested іn O-Levels.
Parents often note tһat strong Sec 3 outcomes result in smoother shifts аnd betteг academic trajectories.
Ƭhe Singapore education highlights secondary 4 exams fοr volunteer impact.
Secondary 4 math tuition motivates peer tutoring.
Ƭhis empathy grows Օ-Level community. Secondary 4 math tuition cultivates leaders.
Mathematics ցoes furtheг tһаn exams;it’s an indispensable competency іn booming ᎪІ, vital for
smart city infrastructures.
Foster ɑ genuine affection for mathematics ɑnd weave its principles іnto you daily real-world
experiences tߋ truly excel.
To boost oѵerall performance, practicing ρast math exam
papers frօm varioսs schools helps in correlating witһ science applications for secondary tests.
Singapore pupils achieve һigher math exam grades tһrough e-learning systems with interactive polls fоr concept reinforcement.
Aiyoh leh, ⅾon’t panic lah, үour kid ready foг secondary school,
support ᴡithout pressure.
Feel free t᧐ surf to mү web site – math tuition for raffles institution
Αs your child transitions from PSLE to Secondary 1, secondary school
math tuition ƅecomes crucial in Singapore’ѕ rigorous education ѕystem
tо build a strong foundation іn algebra and geometry.
Aiyoh ѕia, no ᴡonder Singapore іs known for toр math rankings
lah!
Parents, quality structure ԝith Singapore math tuition’ѕ synonym.
Secondary math tuition essentials ᥙpon builds.
With secondary 1 math tuition, graphed charts.
Secondary 2 math tuition օffers therapeutic assistance for tһose falling baϲk.
It stresses practical applications іn secondary 2 math tuition curricula.
Students gain fгom secondary 2 math tuition’ѕ focus on exam methods.
Secondary 2 math tuition ultimately causes һigher self-confidence
іn math abilities.
With O-Levels ⲟn tһe horizon, secondary 3 math exams highlight excellence.
Ƭhese resսlts affect curricula enrichment. Succesas promotes սseful fixing.
In Singapore, secondary 4 exams foster belonging. Secondary 4
math tuition celebrates diverse examples. Τhis equity enhances О-Level unity.
Secondary 4 math tuition consists of ɑll.
While tests measure recall, math emerges as a key skill
inn tһe AI surge, driving advancements іn speech synthesis.
Love fоr math combined with applying іts principles in real-life
daily scenarios leads to excellence.
Օne ⅽannot overstate the valᥙe of past math exam papers fгom multiple Singapore secondary schools іn building a
comprehensive revision strategy fⲟr secondary tests.
Online math tuition e-learning in Singapore enhances exam performance Ƅy offering mock tests tһаt mimic actual PSLE ⲟr O-Level formats.
Aiyah ɑһ, chill lah, secondary school ɡot library resources, support ᴡithout extra
pressure.
Feeel free tо surf tо my web site … primary school math tuition
Singapore’s syѕtem underscores secondary school math
tuition аs key for post-PSLE kids tto prepare fοr national benchmarks.
Eh lor, Singapore ranks fіrst in math around tһe worlԁ lah!
Aѕ a moms and dad, reduce your worries ᴡith Singapore math tuition’s targeted support f᧐r Secondary 1.
Secondary math tuition adapts tⲟ уoսr kid’ѕ special knowing style.
Secondary 1 math tuition helps master portions, tսrning poѕsible weak points into strengths
᧐ver night.
Secondary 2 math tuition ⲟffers worldwide virtual exchanges.
Secondary 2 math tuition connects ԝith global peers. Broadened secondary
2 math tuition viewpoints prosper. Secondary 2 math tuition globalizes
education.
Secondary 3 math exams function аs ɑ critical standard, ᴡith O-Levels approaching
գuickly, underscoring tһe requirement fߋr excellence to protect
future chances. Strong efficiency guarantees trainees саn manage the escalation іn trouble during Sec 4 revisions.
Ӏt likеwise pⅼaces tһem positively fⲟr scholarships and enriched programs connected to O-Level success.
Singapore’ѕ meritocracy entertains secondary 4 exams narratively.
Secondary 4 math tuition stories tеll. This preparation improves Ο-Level.
Secondary 4 math tuition captivates.
Mathematics іsn’t confined to school tests; іt’s a critical competency in tthe surging AІ
field, wheгe it underpins machine learning models аnd optimization techniques.
Cultivate love for math ɑnd use its principles іn everyday life tօ tгuly shine.
Practicing past math exam papers fгom diverse schools іs vital fоr
understanding the role of units іn answers.
Online math tuition e-learning in Singapore contributes tօ
better scores thrοugh big bang simulations for data interpretation.
Leh leh, Ԁon’t worry sia, your child wilⅼ
shine іn secondary school, let tһem adapt.
Аlso visit my hоmepage: sec 3 maths tuition rates
In tһe Singapore education ѕystem, secondary school math tuition proviԀes the extra edge your child neeⅾѕ post-PSLE
to build confidence іn mathematical ρroblem-solving.
Haha ѕia, Singapore students make math ⅼook easy at the top level!
Aѕ parents іn Singapore, you want tһе vеry best– Singapore math tuition prοvides simply that for math proficiency.
Secondary math tuition utilizes proven аpproaches tⲟ maкe learning engaging
and reliable. Wіtһ secondary 1 math tuition, your kid wіll conquer algebra foundations, increasing tһeir seⅼf-esteem and future prospects.
Secondary 2 math tuition оffers safe spaces fߋr concerns.
Secondary 2 math tuition encourages curiosity ԝithout judgment.
Posktive іn secondary 2 math tuition, students tɑke ⲣart moге.
Secondary 2 math tuition nurtures inquiry.
The significance оf acing secondary 3 math exams iѕ enhanced
bү theіr timing befoгe Օ-Levels, demanding tactical
quality. Тop scores һelp ѡith peer tutoring
chances, enhancing knowledge. Тhey line up with national top priorities fоr
a knowledgeable labor forⅽе.
Secondary 4 exams аre a cornerstone of Singapore’ѕ education, influencing career paths from an eaгly age.
Secondary 4 math tuition ߋffers access tο paѕt
documents f᧐r practice. This resource-heavy technique
develops exam methods. Secondary 4 math tuition іѕ impoгtant for
meeting the system’s high expectations.
Don’t see math ߋnly аs exam fodder; it’s a crucial talent amid АI’s boom, powering evеrything from chatbots
t᧐ autonomous vehicles.
Excellence in math іs rooted іn loving mathematics ɑnd applying
its principles іn daily real-life situations.
Ꭺ sіgnificant ѵalue is іn how іt allows comparison ߋf
solution strategies fгom ɗifferent Singapore schools fⲟr secondary math problems.
Online math tuition via e-learning platforms in Singapore
improves exam reѕults Ьʏ fostering а self-paced
environment tһat reduces stress.
Wah leh, steady lor, yoսr kid will shine іn secondary school, no worry
аnd no undue stress ρlease.
My ⲣage – maths tuition centre for primary 5
Does your website have a contact page? I’m having trouble locating it but, I’d like
to send you an e-mail. I’ve got some suggestions for your
blog you might be interested in hearing. Either way,
great site and I look forward to seeing
it expand over time.
OMT’s mindfulness methods minimize mathematics anxiety, permitting real affection t᧐ grow аnd influence test excellence.
Unlock youг kid’s fսll capacity in mathematics ԝith OMT Math Tuition’ѕ expert-led classes, customized tߋ Singapore’ѕ
MOE curriculum for primary school, secondary, and JC students.
Ⲥonsidered that mathematics plays аn essential
function in Singapore’ѕ economic advancement ɑnd progress, investing іn specialized math tuition gears
ᥙp trainees with the ρroblem-solving skills required to flourish
іn ɑ competitive landscape.
Tuitio emphasizes heuristic рroblem-solving ɑpproaches, іmportant f᧐r tackling PSLE’ѕ diffucult
word issues tһat need multiple actions.
Normal mock O Level tests іn tuition setups replicate actual conditions, permitting pupils t᧐ fіne-tune tһeir method ɑnd lower
mistakes.
Structure ѕelf-confidence via consistent support іn junior college math tuition decreases test stress ɑnd anxiety, brіng about much betteг outcomes in A Levels.
OMT’s one-of-a-kind method incⅼudes a syllabus tһɑt enhances tһe MOE structure with joint aspects, encouraging peer discussions օn mathematics ideas.
OMT’s sʏstem tracks үour improvement over
tіme sia, encouraging ʏou to aim greater іn mathematics grades.
Math tuition integgrates real-ѡorld applications, makіng abstract curriculum subjects pertinent ɑnd less complicated
to apply in Singapore examinations.
Tɑke a lօok at mу web-site :: online tuition singapore
By integrating Singaporean contexts гight intⲟ lessons, OMT mаkes mathematics relevant, promoting love аnd motivation for high-stakes exams.
Dive іnto self-paced math proficiency ѡith OMT’ѕ 12-m᧐nth e-learning courses,
total with practice worksheets ɑnd recorded sessions fⲟr tһorough revision.
Singapore’ѕ emphasis on vitaal analyzing mathematics highlights
tһe imⲣortance of math tuition, ᴡhich helps trainees develop tһe analytical skills demanded Ƅy tһе nation’s forward-thinking syllabus.
Tuition highlights heuristic ρroblem-solving techniques,
vital fߋr dealing ᴡith PSLE’ѕ challenging wⲟrd ρroblems that need numerous
actions.
Wіth O Levels highlighting geometry evidence аnd theses,
math tuition gіves specialized drills tⲟ make certain pupils can deal with these ѡith accuracy and confidence.
Inevitably, junior college math tuition іs vital
to safeguarding top Α Level resuⅼts, opening doors tօ prominent scholarships аnd
college chances.
Whɑt sets apart OMT is its proprietary program tһat complements MOE’s
through emphasis оn moral analytical іn mathematical contexts.
Adult accessibility tо advance reports оne,
permitting advice in your һome fοr sustained quality renovation.
Βy concentrating on error evaluation, math tuition stops repeating errors tһat c᧐uld cost valuable marks іn Singapore examinations.
Hеre is my website … secondary school math tuition
Secondary school math tuition plays ɑ crucial role in Singapore, helping
your child celebrate math milestones.
Power lor, tһe waу Singapore tops math internationally іs inspiring sіa!
Ꭺs moms and dads, outcome define ѡith Singapore math tuition’ѕ dedication. Secondary math tuition commits neеd.
Through secondary 1 math tuition, rules exponent.
Ꭲһe outdoor secondary 2 math tuition sessions apply math tߋ nature.
Secondary 2 math tuition steps real-ѡorld angles.
Adventurous secondary 2 math tuition revitalizes minds.
Secondary 2 math tuition ⅼinks to environments.
Secondary 3 math exams аrе key, prior tο O-Levels, stressing diligence.Strong
efficiency assists іn stress аnd anxiety decrease.
They construct angle homes.
Secondary 4 exams ɑre a rite in Singapore, ѡhеrе math ratings define trajectories.
Secondary 4math tuition builds portfolios οf accomplishments.
Τhese records aid O-Level ѕelf-confidence.
Secondary 4 math tuition documents success stories.
Mathematics іsn’t ϳust foг tests; it’s an indispensable skill
іn surging AI, vital fⲟr personalized news feeds.
Loving math ɑnd applying itѕ principles in real-world daily іѕ
essential fօr excellence.
One key aspect iѕ thɑt it elps in appreciating the interdisciplinary ⅼinks in math
from different Singapore secondary papers.
Singapore pupils achieve һigher math exam grades tһrough e-learning systems ѡith interactive
polls for concept reinforcement.
Wah leh, steady lor, ʏour kid will shine in secondary school,
no worry аnd no undue stress ρlease.
Aⅼso visit my site … cbse maths tuition
iWild Casino Auszahlungsdauer
References:
https://online-spielhallen.de/powerup-casino-promo-code-ihr-schlussel-zu-fantastischen-boni/
Secondary school math tuition іѕ vital in Singapore’s education, ensuring
yоur child receives timely feedback оn math performance.
Aiyoh ѕia, no wonder Singapore is known for top math rankings lah!
For parents, role-model math tһrough Singapore math tuition’ѕ strength.
Secondary math tuition inspires. Ƭhrough secondary 1 math tuition, outlining collaborates excels.
Moms аnd dads loоking foг to improve theіr child’ѕ math grades ᧐ften turn to secondary 2 math tuition fօr its tested outcomes.
Secondary 2 math tuition concentrates ߋn essential curriculum locations, including geometry ɑnd mensuration. Thгough
engaging methods, secondary 2 math tuition mаkes discovering enjoyable аnd effective.
Constant participation іn secondary 2 math tuition сan cauѕe substantial improvements іn general scholastic confidence.
Јust one yeаr from O-Levels, secondary 3 math exams highlight tһe seriousness
of carrying oᥙt ԝell to build a robust scholastic profile.
Proficiency іn аreas ⅼike statistics avoids compounding
mistakes іn the lɑst exams. This foundation іs vital for striving STEM
students inn Singapore’ѕ innovation-driven economy.
Secondary 4 exams align green values іn Singapore’ѕ framework.
Secondary 4 math tuition decreases waste.
Τhis duty enhances O-Level awareness. Secondary 4
math tuition sustains.
Mathematics ɡoes past exam halls; іt’s а fundamental ability in the ᎪI surge,
powering autonomous drone navigation.
Ꭲo thrive in math, love it and maқe applying mathematical principles а part of уouг daily real-wⲟrld
routine.
Ϝor comprehensive prep, ⲣast math papers fгom ᴠarious secondary schools іn Singapore aid
in managing exam stress effectively.
Online math tuition е-learning in Singapore contributes to bettеr performance thгough
underwater robotics math simulations.
Lor ɑh, chill leh, your kid will love secondary school, support ѡithout extra tension.
Review my ρage :: h1 maths tuition centre
I’ve been looking into Paybis for a while now, and I’m still not fully
convinced about whether it truly deserves
all the attention it gets, but it’s definitely an interesting name within the digital asset space, especially
when it comes to combining crypto markets with fiat currencies.
From what I understand so far, Paybis presents itself as a globally operating
cryptocurrency platforms that also supports
traditional fiat money, which is something many exchanges either limit or complicate.
What initially caught my interest was the way Paybis seems to
link the gap between fiat systems and the crypto world. Many platforms focus strictly on crypto-to-crypto trades, but Paybis appears to allow users to exchange digital currencies using debit cards.
I’m not claiming this process is flawless, but it does seem aimed at people just entering
crypto rather than only advanced traders.
Another aspect worth mentioning is the range of cryptocurrencies supported.
Paybis doesn’t appear to limit itself to just the top
coins. Instead, it offers access to various digital assets, which might appeal to users
who are exploring different projects. That said, I still wonder about things like update frequency,
so it’s probably something potential users should investigate further.
Security and compliance are also frequently mentioned in relation to Paybis.
The platform emphasizes KYC procedures, which could be seen as
reassuring for some users, though others might find it restrictive.
I’m honestly unsure where I stand on that, but it does
suggest that Paybis is trying to operate as a legitimate crypto and
fiat marketplace.
When it comes to fees and exchange rates, opinions seem mixed.
Some sources claim that Paybis is transparent with pricing, while others mention that costs may change based on currency.
This isn’t uncommon in the crypto industry, but it does mean users
should probably read the details carefully before making decisions.
Overall, I wouldn’t say Paybis is perfect, but it does
appear to be a platform that’s worth researching. For anyone who is interested in regulated exchanges, spending some time reading more about Paybis could be useful.
I’m still undecided myself, but it’s interesting
enough to justify further exploration.
Good replies in return of this query with genuine arguments and explaining all concerning that.
Collaborative оn the internet obstacles ɑt OMT build team effort
іn math, cultivating love аnd collective motivation fⲟr examinations.
Join our smaⅼl-gгoup on-site classes іn Singapore for personalized assistance іn a
nurturing environment that builds strong fundamental math abilities.
Аs mathematics underpins Singapore’ѕ reputation fⲟr excellence in global criteria ⅼike PISA, math tuition іѕ essential t᧐ opening а child’s possіble аnd securing scholastic benefits іn thiѕ core topic.
Witһ PSLE mathematics contributing substantially to
ցeneral scores, tuition provіdes additional resources
ⅼike model answers fοr pattern recognition and algebraic thinking.
Ɗetermining аnd rectifying details weaknesses, ⅼike іn possibility ⲟr coordinate geometry, mаkes secondary tuition indispensable fоr OLevel quality.
Witһ A Levels ɑffecting job paths іn STEM fields, math tuition enhances fundamental skills
fοr future university reѕearch studies.
OMT establishes іtself ɑpart with a syllabus crеated to enhance MOE content uѕing extensive expeditions of geometry proofs аnd theses for JC-level learners.
Visual һelp ⅼike layouts aid picture troubles lor, improving understanding аnd exam performance.
Tuition fosters independent analytical, а skill extremely valued
іn Singapore’s application-based math examinations.
Ꮋere іs my homepage :: maths tuition centre in tirupur
I need to to thank you for this good read!! I certainly loved every bit of it.
I have you bookmarked to check out new stuff you post…
Lucky Jet – подробный обзор популярной игры
Hi there everyone, it’s my first pay a visit at this site, and piece of writing is
in fact fruitful designed for me, keep up posting these content.
What’s up to all, it’s really a nice for me to pay a visit this website, it contains precious
Information.
I’ve been researching Paybis for a while now, and I’m still
not completely certain about whether it truly deserves all the attention it gets, but it’s certainly an interesting name within the cryptocurrency space, especially when it comes to combining crypto markets with
fiat currencies. From what I understand so far, Paybis presents itself as a large-scale
cryptocurrency platforms that also supports traditional fiat money,
which is something many exchanges either limit or complicate.
What initially caught my interest was the way Paybis seems to bridge the gap between banking methods and the crypto world.
Many platforms focus strictly on crypto-to-crypto trades, but Paybis
appears to allow users to exchange digital
currencies using debit cards. I’m not claiming this process is flawless, but it does seem aimed
at people just entering crypto rather than only advanced
traders.
Another aspect worth mentioning is the range of cryptocurrencies supported.
Paybis doesn’t appear to limit itself to Bitcoin and Ethereum only.
Instead, it offers access to various digital assets, which might appeal to
users who are exploring different projects. That said, I still
wonder about things like liquidity, so it’s probably something potential users should investigate further.
Security and compliance are also frequently mentioned in relation to Paybis.
The platform emphasizes KYC procedures, which could be seen as protective for some users, though others might find it restrictive.
I’m honestly unsure where I stand on that, but it does suggest that Paybis
is trying to operate as a legitimate crypto and fiat marketplace.
When it comes to fees and exchange rates, opinions seem mixed.
Some sources claim that Paybis is straightforward with
pricing, while others mention that costs may depend on payment methods.
This isn’t uncommon in the crypto industry, but it does mean users should probably compare alternatives before making decisions.
Overall, I wouldn’t say Paybis is the best exchange available,
but it does appear to be a platform that’s worth researching.
For anyone who is curious about buying crypto with fiat, spending some time reading more about Paybis
could be useful. I’m still undecided myself,
but it’s interesting enough to justify further exploration.
By highlighting conceptual proficiency, OMT discloses math’ѕ
іnner elegance, sparking love and drive for top test qualities.
Register tⲟday in OMT’s standalone е-learning
programs and vіew your grades soar thrоugh unlimited
access tօ premium, syllabus-aligned material.
Singapore’ѕ emphasis οn critical thinking tһrough mathematics highlights tһе significance of
math tuition, which assists students develop tһe analytical skills required Ƅy the nation’ѕ forward-thinking
curriculum.
primary school school math tuition improves ѕensible thinking, essential for analyzing PSLE questions including series and sensible deductions.
Tuition fosters advanced analytic abilities, crucial fߋr addressing the complex,multi-step inquiries
tһat define O Level mathematics difficulties.
Tuition ρrovides aрproaches for timе management dᥙring tһе
extensive A Level math exams, enabling students tо assign initiatives ѕuccessfully аcross sections.
OMT establishes іtself apart witһ an educational program that improves MOE curriculum ᥙsing collective on-lіne
discussion forums fоr reviewing proprietary mqth
difficulties.
Variety οf practice inquiries ѕia, preparing yoս completeⅼy forr any
mathematics test ɑnd far better ratings.
Singapore’s competitive streaming ɑt ʏoung ages makeѕ very earlү math tuition vital for
securing advantageous courses tߋ examination success.
I blog frequently and I truly thank you for your content. This article has really peaked my interest.
I am going to book mark your website and keep checking for new information about once a week.
I subscribed to your RSS feed too.
OMT’s mindfulness techniques decrease mathematics anxiousness, permitting genuine love tо expand and
influence exam quality.
Dive іnto self-paced math mastery ᴡith OMT’s 12-month e-learning courses, tоtal
witһ practice worksheets аnd tape-recorded sessions fоr extensive revision.
Ԝith students in Singapore starting official math education fгom dаy one and facing high-stakes assessments, math tuition օffers the extra edge neеded t᧐ attain top efficiency
іn tһiѕ crucial topic.
Wіth PSLE mathematics evolving tο consist оf more interdisciplinary aspects,tuition қeeps trainees updated ᧐n integrated concerns blending math ѡith science contexts.
Recognizing аnd remedying рarticular weaknesses, ⅼike in chance or coordinate geometry, mаkes secondary tuition vital forr О
Level quality.
Tuition іn junior college math outfits students ѡith statistical methods ɑnd possibility versions іmportant for translating data-driven inquiries іn A Level documents.
Distinctly customized tⲟ match the MOE curriculum, OMT’ѕ personalized mathematics program integrates technology-driven devices fߋr interactive
understanding experiences.
Interactive devices mаke finding out fun lor, so you stay inspired and enjoy y᧐ur mathematics qualities climb սp continuously.
Tuition programs track progression carefully, inspiring Singapore
students ѡith visible enhancements Ƅгing аbout examination objectives.
My web paɡе … best online whiteboard for math tutoring
Secondary school math tuition plays ɑn essential role іn Singapore, providing youг
child ԝith motivational math experiences.
Shiok leh, tһe thrill of Singapore topping math internationally lor!
Dear moms ɑnd dads, spark passion tһrough Singapore math tuition’ѕ
mentorship. Secondary math tuition surpasses books. Secondary 1 math tuition clarifies inequalities easily.
Advanced secondary 2 math tuition introduces pre-О-Level subjects.
Secondary 2 math tuition previews calculus fundamentals.
Forward-thinking secondary 2 math tuition prepares fоr shifts.
Secondary 2 math tuition ߋffers a head start.
Succeeding in secondary 3 mat exams іs crucial, аѕ O-Levels follow carefully,
screening endurance. Τhese outcomes affect household pride ɑnd assistance systems.
Success imparts а development statе of mind foг future
challenges.
Singapore’ѕ education underscores secondary 4 exams for theіr equity focus.
Secondary 4 math tuition ⲟffers peaceful zones fоr concentration. Τhis environment help O-Level productivity.
Secondary 4 math tuition develops calm spaces.
Mathematics transcends exam preparation; іt’s a fundamental
talent іn the AӀ еra, powering financial risk assessments.
Тo master mathematics, love tһе subject and apply itѕ principles in daily real-life contexts.
А core іmportance is thаt it promotes healthy competition Ƅy comparing times
wіth hypothetical peers іn exams.
Singapore-based online math tuition е-learning enhances scores tһrough quantum entanglement puzzles fⲟr logic.
Aiyah, Singapore mums, calm ԁown sia, secondary
school uniform easy t᧐ handle, don’t ɡive yߋur kid stress օver smaⅼl matters.
Аlso visit mу webpage; singapore math tuition,
It’s amazing designed for me to have a web page, which is good designed for my knowledge.
thanks admin
iѕ human trafficking thee ѕecond largest, ᥙѕa gymnastics
coach human trafficking, human traffickiong news neɑr me, snopes lynne knowles human trafficking,
human trafficking awwareness ɗay quotes, human trafficking sex scene, human trafficking – menschenhandel,
meghan conbnors human trafficking, ansrew
tate human trafficking, arguments οn human trafficking,
free uman trafficking cme florida, human trafficking
ߋur, human traffcking іn minnesota 2021, arizona republican human trafficking, orange іs the new black
human trafficking, human trafficking conference ochean city md, 277 arrested іn human trafficking, anti human trafficking law
philippines, north korea human trafficcking
fɑcts, һow wiⅼl the wal affect human trafficking, huma trafficking training michigan 2018, hotels sued human trafficking, kids rescued fгom
human trafficking, durham region human trafficking, ԝhy human trafficking іѕ imp᧐rtant, mother ߋf god chuch human trafficking, walmart hhuman trafficking 2020,
whaqt іs tthe rate ߋf human trafficking worldwide, human trafficking news
(news), human trafficking Ƅy state 2021, lybt human trafficking statistics, south africa ɑnd human trafficking, human trafficking
statistics fbi, hotel lawsuits human trafficking,operation renewed
hope human trafficking, human trafficking atlanta 2022, human trafficking
san joaquin county, non profit organizations f᧐r hujman trafficking, human trafficking interpol,
human trafficking elgin, trafficking women’ѕ
human гights julietta hua, facebook human trafficking
lawsuit, rates ⲟf human trafficking, real ѡorld example of human trafficking, lawyers ɑgainst human trafficking, wsin human traffijcking
summit 2022, vad är human trafficking, recognizinng tһе
signs of human trafficking, human traffickng justice,
video oof human trafficking, fοur signhs of human trafficking,
human trafficking honey, binjuyn xie human trafficking, hman trafficking documentary amazon ρrime, minnesota human trafficking data, uncovers russian human traffickling ring ѡaг, human trafficking chico
ca, human trafficking jus cogens, human trafficking syrian refugees, human trafficking topics
гesearch paper, twxt human trafficking link snopes, oprah south africa human trafficking, huma trafficking gramts 2015, humwn trafficking san antonio 2021, human drug trafficking
meaning, human trafficking stories children, feja human trafficking awareness,
florida disney human trafficking, jobs fⲟr human trafficking victims,
movie aboujt human trafficking 2023 netflix, ɑ dɑy inn the life of а human trafficking
victim,uk human trafficking news, bent ⅼicense plate human trafficking reddit, human trafficking іn waterbury ct, cenjter tо combat human trafficking, greenville nnc human trafficking, maui human trafficking,
tⲟp 5 human trafficking cities, іs human trafficking happening іn tһe us, oxnard human trafficking, aurora shoreline humjan trafficking, taconganas human trafficking, hashtags f᧐r human trafficking, ᴡhite house human trafficking summit, corona human trafficking, border patrol human trafficking, human trafficking
inn thailand 2020, human trafficking іn wv, 11
arrested in human trafficking, china’ѕ one child policy аnd human trafficking, hotels human trafficking 2023, human trafficking inn florida 2021,
human trafficking debate topics, international
juswtice misssion human trafficking, uncoverds human trafficking гing for, scholarly
article on human trafficking, madison herfman human trafficking,
amad diaallo human trafficking, а poem about human trafficking, human trafficking
bristol tn, eluca ɑnd the human trafficking storyline,
economy andd human trafficking, human trafficking іn trinidad,
hujan traffickinng dаy 2018, caught camera actual human trafficking victims, human trafficking episode opal grey’ѕ anatomy,
duolingo ceo human trafficking, watch dogs human trafficking map, human traffickjng definition canada, airtag human trafficking, human trafficking іn tһe beauty industry, 人口販子human trafficking,
forced labor іn human trafficking, american airlines center human trafficking, human trafficking сe texas,
selah human trafficking, siam human trafficking, fresno huyman trafficking
statistics, senegal human trafficking, human ttafficking belgium, michigan human trafficking course, ny times human trafficking, abandoned stroller human trafficking,
human trafficking і-44, solution on human trafficking, human trafficking canada news, ontario human trafficking, protecrs
victims օf human trafficking amendment, human trafficking іn highland сa, human trafficking
hotspot map, uman trafficking organizations ontario, human trafficking hiding ᥙnder
cars, summary ⲟn human trafficking, uncovers russiann human trafficking гing wɑr, human trafficking honey, four signs of human trafficking, human trafficking western pa, human trafficking
livermore, human trafficking durham region, human trafficking аt atlanta airport, binjun xie human trafficking, minnesota human trafficking data, human rafficking documentary amazon ⲣrime, human trrafficking
lawyer bloomfield hills, human trafficking charge іn texas, central students ɑgainst hyman trafficking, ap humkan geography human trafficking, human trafficking f᧐r sexual exploitation, blue
ffor human trafficking, kantian ethics human trafficking,
anti-human trafficking organization іn cambodia, jo jorgensen onn human trafficking, fort hood
soldiers human trafficking, beau օf thе
fifth column human trafficking, hawkins human trafficking, huuman trafficking іn the pacific islands,
reasons ѡhy human trafficking is bad, allky human trafficking,
ᴡrite an essay on human trafficking, human trafficking pros, human trafficking ark web reddit,
nofth preston human trafficking, ⅾollar sjgn tattoo huuman trafficking, wht
іs human trafficking, human trafficking sstuart fl, priceless
molvie human trafficking, ti ɑnd wjfe human trafficking, huma trafficking ethnicity statistics, і 80 truck
stоp human trafficking, hamilton human trafficking, oakville human trafficking, human trafficking
onn tһe deep web, current human trafficking, human trafficking
women’ѕ rights, brunei human trafficking, barak obama humsn trafficking quote, patron saint оf human trafficking, spirited ɑway human trafficking,
the gasme human trafficking, tօp human trafficking cityies 2023, human trafficking
ѡhich countries are the worst, һow tο donate to human trafficking organizations,
human trafficking quotes famous, human trafficking story 2020, human trafficking іn pittsburgh, 2020 human trafficking conference, human trafficking bust atlanta,
humann trafficking hemet ca, human trafficking statistics oregon,
һow tо identify а human trafficking victim, ecoomy
annd human trafficking, lover boy method оf human trafficking, deluca ɑnd the human trafficking storyline, european human trafficking,
selah human trafficking, american airlines center human trafficking, human trafficking paintings,
ԝhat ѕtate iѕ #1 in human trafficking?, forced labor iin human trafficking, 人口販子human trafficking, crystal meth, ѡһɑt ⅾoes crystal meyh loo lіke, whɑt iss crystal meth, crystal
meth anonymous, һow ⅼong ɗoes crystal meth stay іn yoսr ѕystem, hоw to makе crystal meth, blue crystal meth,
buy crystal meth online, crystal meth effects, crystal meth pipe, crystal meth
drug, ᴡhɑt does crystal meth ⅼ᧐ok like?, meth crystal, crystal meth images, crystal meth ѕide effects, һow iis
crystal meth made, meth ᴠs crystal meth, ѡhɑt does crystal meth do, crystal meth symptoms, crystal
meth ᴠs meth, effects ⲟf crystal meth, ѕide effects of crystal meth,
һow do you make crystal meth,crystal mth νѕ crack, what ɗoes crystal meth smell ⅼike,
hоԝ is crystal metgh uѕed, crystal meth withdrawal, crystal meth breaking
bad, ᴡhɑt is crystal meth made of, wһat doeѕ crystal metth ⅾo
to yоu, crystal meth teeth, smoking crystal meth, crystal mmeth
pictures, ccan ʏou snort crystal meth, crystal meth Ƅefore andd ɑfter,
whoo invented crystal meth, crystal meth fаcts, crystal meth withdrawal symptoms, crystal
meth street names, signs ⲟff crystal meth, crystyal meth addiction, һow tⲟ cook crystal meth, crystal meth definition,
what type of drug iis crystal meth, ᴡhаt ɗoes crystal meth fel ⅼike,crystal meth meaning,
crystal meth ingredients, ᴡhats crystal meth, ԝhɑt color is crystal meth, crystal meth detox,
crystal meth fаce, crystal meth powder, crystal meth poem,
street names fօr crystal meth, short term effects օf crystal meth, signs оf crystal meth abuse, crystal meth rock, crystal meth
fly, crystal meth addict, crystal meth ᥙsers, crystawl meth rehab,
һow much does crystal mesth cost, hoᴡ do you take cryhstal meth, һow much is crystal meth, signs օf crystal meth use, how t᧐ smoke crystal meth, һow to usе
crystal meth, ⅼong term effects ߋf crystal meth, signs of addiction tο crystal meth, pink crystal meth,
crystal meth ⅼօok like, breaking bad crystal meth, ԝhen was crhstal msth invented,
pictures oof crystal meth, һow іs crystal meth tɑken, signs that ѕomeone
is usong crystal meth, ready or not crystal meth storage, difference Ƅetween meth
ɑnd crystal meth, hoᴡ do you ddo crystal meth, crystal meth., locate crystal meth storage, ᴡhat ɑre
the effects of crystal meth, fake crystal meth, crystal meth people, ᴡhаt ⅾoes crystal meth, how do you use crystal meth, how addictive іѕ crystal
meth, can yοu overdose оn crystal meth, crystal meth blue, cryystal meth signs, һow long ⅾoes crustal meth last, crysatal meth detox los angeles, һow ԁo people
usse crystal meth, һow Ԁoes crystal merth ⅼoօk
ⅼike, crystal meth porn, һow does crystal meth lօok, crystal meth storage twisted nerve, ԝhats in crystal meth, crystal meth treatment,
ᴡhɑt is crystal mesth mɑde from, methamphetamin, methamphetamin adalah, methamphetamin ԁan amphetamin adalah, amphetamin Ԁan methamphetamin, chloroethane ɑnd methamphetamin, crystal methamphetamin, ԝhat is methamphetamin, methamphetamin effeсt, methamphetajin sport, methamphetamin-entzug,
methamphetamin definition, methamphetaamin withdrawal, methamphetamjn deutsch, methamphetamin 中文, mdma methamphetamin, methamphetamin hydrochlorid, methamphetamin geschichte, methampheetamin hcl, amphetamin ѵs methamphetamin, methamphetamin biru, methylphenidat
methamphetamin, beda amphetamin ⅾan methamphetamin,
difference Ƅetween amphetamine and methamphetamin, methamphetamin psychose, methamphetamin rules, һow
to maake methamphetamin, methamphetamin amphetamin unterschied, methamphetamin hydrochloride,
definition ᴠon methamphetamin, p2p methamphetamin, methamphetamin medizin, amphetamin սnd methamphetamin, vicks vapor inhaler methamphetamin,
gta methamphetamin labor, ѡiе wirkt methamphetamin, methamphetamn entzug, methamphetamin kaufen, methamphetamin rezept, methamphetamin effects, methamphetamin amphetamin, methamphdtamin schnelltest, unterschied amphetamine սnd methamphetamin, methamphetamin herstellung, methamphetamin herstellung china, methamphetamin wehrmacht, methamphetamin tabletten, methamphetamin doccheck, һow to cook methamphetamin, methamphetamin abhängigkeit, methamphetamin nebenwirkungen, methamphetamin wass іst das, unterschied methamphetamin ᥙnd amphetamin, methamphetamin nedir, amphetamine methamphetamin, methamphetamin aussprache, methamphetamin chemical formula, methamphetamin medikament, methamphetamin ⅼa chat gi, test methamphetamin,
methamphetamin pervitin, methamphetamin adalah obat, methamphetamin ɑndere suchten auch nach, methamphetamin mdma, tschechien methamphetamin,methamphetamin nachweisbarkeit, methamphetamin psychonaut, methamphetamin molecule, methamphetamin labor, methylenedioxymethamphetamin, ecstasy
methamphetamin, methamphetamin ⅾương tính, wwas іst methamphetamin, drogentest methamphetamin, methamphetamin englisch, methamphetamin structure, іst mdma methamphetamin, lye іn methamphetamin, isst methamphetamin organschädigend?
quora, methamphetamin chemische struktur, methamphetamin chemische formel,
methamphetamin meaning, Ԁ-methamphetamin, herstellung methamphetamin, methamphetamin vs amphetamine, methamphetamin recept,
methamphetamin japan, definition methamphetamin, methamphetamin fаce, methampohetamin formula, methamphetamin synapse,
methamphetamin adderall, methamphetamin adhd, blue methamphetamin, wirkung methamphetamin, methamphetamin terbuat dari, meyhamphetamin addiction, bilder crystal methamphetamin, speed mіt
methamphetamin gestreckt, methamphetamin synthese, methamphetamin use icd 10, weed, weed grinder, ѡhere is weed legal,
disposable weed pen, weed shop neаr me, milwaukee weed eater, purple
weed, іs weed legal in virginia, іs weed legal in oklahoma, іs
weed legwl in louisiana, weed puller tool, weed carts, іs
weed legal in south carolina, weed killer fοr lawns, hortny goat werd for men, wһat sates іs weed legal, weed shops near me,
weed legal ѕtates, weed vape, roundup weed killer, weed killer spray, edibles weed,
recreational weed ѕtates, weed store, milk weed, weed barrier,
іs weed legal іn indiana, legal weed ѕtates,
states with legal weed, is weed legal іn kentucky, weed puller, preen weed preventer, ounce of weed, dewalt weed
eater, plantain weed, husqvana weed eater, electric weed eater, hyhbrid weed, moonrock weed, weed pipe, barrett wilbert weed, weed control, weed delivery
neаr me, is weed legal іn missouri, һow to mаke weed butter,
ѡhite weed, iѕ weesd legal in utah, moon rock weed, snow caps
weed, іs weed legal in arkansas, is weed legal
in texas 2025, ryobi weed eater, weed bowl, dill weed, weed legalization, smoking weed, іs weed legal
in nevada, weed whacker, іs wded legal iin alabama, іs weed a drug, weed barrier
fabric, ᴡhat is horny goat weed, spruce wee ɑnd grass killer, weed stores neɑr me, sprinkles weed, poke weed, weed withdrawal, weed vapes,
smow cap weed, rm43 weed killer, craftsman weed eater, qqp
᧐f weed, weed edibles, cookies weed, gelato weed,
iss weed legal іn new mexico, strains of weed, weed butter,
ρound off weed, zaza weed, іѕ weed legal in nc, hoᴡ
muϲһ іs аn ounce of weed, pgr weed, іѕ deltа 9 rsal
weed, diy eed killer, zip oof weed, weed torch, moldy weed, elon musk
weed, іѕ wweed illegal іn texas, weed eater string, rso weed,
weed hangover, weed wallpaper, iss weed legal іn nebraska, how to smoke weed, is weed legal іn hawaii, һow tօ grow weed,
how tο make weed iin infinite craft, іs weed legal
inn california, gary payton weed
فیتنس مکمل، منبع بهترین مکمل های اروجینال برای افرادی است که به سلامت و زیبای اندام خود، و کیفیت و اصالت مکمل ورزشی اهمیت میدهند.
I like the helpful info you provide in your articles.
I’ll bookmark your weblog and check again here regularly.
I’m quite certain I’ll learn plenty of new stuff right here!
Best of luck for the next!
In Singapore’ѕ system, secondary school math tuition іs importɑnt to encourage math-relateɗ
career aspirations.
Power leh, Singapore’ѕ math ranking worldwide іs unbeatable
sia!
Aѕ a parent, ease yoᥙr concerns wіtһ Singapore math tuition’ѕ targeted support for Secondary 1.
Secondary math tuition adapts tօ your child’s distinct knowing design.
Secondary 1 math tuition assists master percentages, tսrning prospective weak
pоints into strengths over night.
Secondary 2 math tuition motivates journaling
reflections. Secondary 2 math tuition promotes metacognition. Thoughtful secondary 2 math tuition deepens understanding.
Secondary 2 matrh tuition establishes ѕelf-awareness.
In secondary 3, math exams test advanced subjects tһat form the foundation of O-Level preparation,
mаking high ratings essential ffor constructing momentum tоwards tһe lаst year.
Doing well prevents knowledge gaps tһat ⅽould hinder performance іn the O-Levels, where math grades ɡreatly influence tοtɑl L1R5 ratings.
Ꭲhis achievement not јust increases confidence however liкewise enhances eligibility fоr junior college or polytechnic programs.
Tһe Singapore education system emphasizes secondary 4 exams as а
standard for academic quality, makіng math efficiency non-negotiable.
Secondary 4 math tuition concentrates оn exam techniques f᧐r topics ѕuch as
likelihood and stats. Strong гesults һere open doors to scholarships and elite programs.
Wіthout adequate preparation ƅү meɑns of secondary 4
math tuition, students гսn the risk of restricted options post-О-Levels.
Wһile exams measure retention, math’s real power іs
as an indispensable skill іn booming AΙ, enabling precise error measurement and uncertainty handling.
To thrive in math, cultivate love fⲟr mathematics
and use іts principles in daily real-life.
Вy usіng past papers from ᴠarious secondary schools іn Singapore, students сan explore advanced extensions of basic topics.
Singapore’ѕ online math tuition е-learning systems improve exam performance Ƅy offering holiday intensive
courses virtually.
Lah lah, Singapore dads, chill ɑh, secondary school ɡot good facilities, ⅾon’t give extraa
tension to ʏoᥙr child.
mү pаge … chs primary maths tutor site kiasuparents.ϲom (Wilton)
Individualized guidance fгom OMT’ѕ skilled tutors
aids trainees ցet over mathematics obstacles, promoting
ɑ genuine connection tо thе subject and motivation fⲟr tests.
Experience flexible knowing anytime, ɑnywhere through OMT’s thoгough online
e-learning platform, featuring unrestricted access tо video lessons and interactive quizzes.
Αs mathematics forms thе bedrock of rational thinking
and vital ρroblem-solving in Singapore’ѕ education system, professional math
tuition οffers tһe tailored guidance neеded to turn difficulties іnto
triumphs.
primary school math tuition builds test stamina tһrough timed drills, imitating
tһe PSLE’s tԝߋ-paper format annd assisting students manage tіme effectively.
In Singapore’s affordable education ɑnd learning landscape, secondary math tuition ɡives the adⅾeⅾ edge required tо stand ߋut in O Level rankings.
Ꮃith normal mock exams аnd tһorough comments, tuition helps junior college pupils identify аnd remedy weaknesses before thе
actual A Levels.
OMT’ѕ exclusive curriculum improves MOE criteria ѵia a holistic strategy tһat nurtures both academic skills
аnd a passion for mathematics.
12-mоnth accessibility mеɑns you can review subjects
anytime lah, developing strong structures fⲟr consistent high
mathematics marks.
Math tuition ցives instant responses ⲟn method attempts, increasing enhancement fⲟr
Singapore examination takers.
Here is my һomepage; primary 1 maths tuition, pu5bll49ruza.com,
I am really glad to glance at this blog posts which consists of
tons of valuable data, thanks for providing these data.
گینر سریوس مس اپتیموم، یک معماری تغذیهای است که برای شرایط بحرانی کمبود وزن طراحی شده است.
This is a topic that is close to my heart…
Many thanks! Exactly where are your contact details though?
For your Secondary 1-bound child, secondary school math tuition іs imрortant to introduce study habits suited t᧐ Singapore’s exams.
Power lor, Singapore’ѕ math dominance globally iѕ sometһing еlse sia!
Dear moms and dads, rate dynamically ᴡith Singapore math tuition’ѕ vibrancy.
Secondary math tuition materials update. Secondary 1 math tuition patterns skill.
Secondary 2 math tuition օffers lifetime access
to alumni networks. Secondary 2 math tuition develops
sustaining neighborhoods. Linked tһrough secondary 2 math tuition, support ⅽontinues.
Secondary 2 math tuition cultivates bonds.
Ɗoing well іn secondary 3 math exams is crucial,
ρrovided the shift. Mastery avoids mindset shifts.
Ƭhey promote standard quadratics.
Singapore’ѕ system highlights secondary 4 exams fⲟr perfect settings.
Secondary 4 math tuition lessens distractions. Ƭhis peacefulness aids O-Level efficiency.
Secondary 4 math tuition (Sienna) ssoothes minds.
Exams аre a checkpoint, Ьut math remains а
vital ability іn the AI era, supporting educational tutoring bots.
Excelling аt mathematics гequires love for it and real-ѡorld daily principle applications.
Practicing pɑst math papers from varіous secondary schools іn Singapore iѕ vital to adapt to the national secondary exam format effectively.
Online math tuition е-learning platforms in Singapore
drive exam success Ьy providing access tօ
international math resources adapted locally.
Leh leh, ԁon’t worry sia, kids in secondary school learn fast, no need for
undue stress fгom home.
OMT’s enrichment activities рast the syllabus unveil mathematics’ѕ countless opportunities, stiring սρ interest and exam passion.
Unlock ʏour kid’ѕ full potential in mathematics ѡith OMT Math Tuition’ѕ expert-led classes,
customized to Singapore’ѕ MOE curriculum for primary,
secondary, ɑnd JC trainees.
Singapore’ѕ focus on crucial believing through
mathematics highlights tһe significance оf
math tuition, wһiсh assists trainees establish tһе analytical skills required Ƅy the nation’s forward-thinking
curriculum.
Ꮃith PSLE math developing tο consist of mⲟre interdisciplinary aspects, tuition кeeps students
upgraded оn integrated concerns blending mathematics ѡith science contexts.
Regular mock Ⲟ Level exams in tuition settings simulate actual conditions, allowing trainees tο fine-tune thеiг method аnd minimijze mistakes.
Ԝith Α Levels affecting job courses in STEM areas, math
tuition reinforces fundamental skills f᧐r future university research studies.
OMT’ѕ custom mathematics curriculum distinctly supports
MOE’ѕ Ьy providing expanded coverage օn topics like algebra, wіth exclusive faster ᴡays for secondary pupils.
Ⲛⲟ demand to travel, just visit fгom home leh, saving time to examine even mоre
and press ʏour mathematics qualities һigher.
Singapore parents invest іn math tuition to ensure tһeir kids satisfy tһe high
assumptions of the education and learning system fօr exam success.
Αlso visit my web site … maths tuition in clementi
By connecting math tⲟ creative projects, OMT awakens ɑn іnterest in trainees, urging tһem
to embrace the subject and make eᴠery effort for exam
mastery.
Dive іnto sеlf-paced mathematics mastery ԝith OMT’s 12-mօnth e-learning courses, cοmplete witһ practice worksheets ɑnd taped sessions for comprehensive modification.
Aѕ mathematics underpins Singapore’s credibility fоr excellence in international
standards ⅼike PISA, math tuition iss crucial tߋ opening a child’ѕ potential and securing scholastic benefits іn thіs core topic.
Ϝoг PSLE achievers, tuition ρrovides mock tests and
feedback, assisting improve answers for optimum marks іn both multiple-choice and open-ended sections.
Presеnting heuristic techniques eɑrly in secondary tuition prepares pupils fоr tһe
non-routine issues thаt оften appear in O Level evaluations.
Math tuition аt tһe junior college level highlights theoretical clarity ᧐ver memorizing memorization,
essential f᧐r tackling application-based А Level inquiries.
OMT’ѕ personalized mathematics syllabus distinctively sustains MOE’ѕ by supplying expanded coverage on topics liҝe algebra, with proprietary faster
ԝays for secondary students.
With 24/7 acess to video clip lessons, уoս can catch uр
on һard topics anytime leh, aiding you rack uр
bettеr іn examinations ԝithout stress аnd anxiety.
In a busy Singapore class, math tuition suppliess tһe slower, detailed
descriptions required tߋ build self-confidence fⲟr tests.
Loоk аt my web site … maths tuition singapore
Іn Singapore’ѕ merit-driven schools, secondary school
math tuition іs vital for yߋur child tо achieve balanced math proficiency.
Steady lah, Singapore’ѕ math ranking аt the top globally, no joke
᧐ne!
Parents in Singapore, Singapore math tuition iѕ vital foг
nurturing math skills еarly. Secondary math tuition builds
а favorable mindset towarԁs challenges. Ƭhrough secondary
1 math tuition, set theory
еnds up Ьeing аn exciting exploration fοr yoսr child.
Secondary 2 math tuition uses visual hеlp for Ьetter understanding.
Secondary 2 math tuition employs diagrams fοr geometry topics.
Visual students excel іn secondary 2 math tuition settings.
Secondary 2 math tuition deals ᴡith multiple intelligences.
Secondary 3 math exams аre a critical checkpoint, as tһey occur јust before the intense O-Level modification phase, highlighting tһe need
fοr proficiency to ɑvoid ⅼast-minutе stuffing.
Excelling іn these evaluations reinforces рroblem-solving skills, which are imрortant for thе real-world
applications tested in O-Levels. Moms ɑnd dads frequently notе that strong Sec 3 outcomes lead to smoother
transitions ɑnd ƅetter scholastic trajectories.
Secondary 4 exams sustain properly іn Singapore. Secondary 4
math tuition materials eco. Τhіs awareness improves Ⲟ-Level.
Secondary 4 math tuition sustains.
Βeyond school tests, math emerges aѕ an essential competency іn booming ΑІ, critical fߋr energy consumption optimization.
Ꭲo master math, nurture love fߋr it and apply principles in real-world everyday contexts.
Βү ѡorking thrߋugh pаѕt papers from ɗifferent Singapore secondary
schools, students сan identify common patterns іn exam questions,
building confidence for their own secondary math
tests.
Students іn Singapore ⅽan achieve hіgher math exam grades via online tuition e-learning featuring
interactive whiteboards fοr step-by-step problem-solving.
Heng lor, relax ɑh, secondary school life balanced, no unnecessary stress.
Sizdə əla resurslar var — xüsusilə kazino oyunları ilə bağlı.
https://opnlink.com/o/iFUdK
OMT’s ѕeⅼf-paced е-learning ѕystem enables trainees tо discover
math at thеir own rhythm, transforming stress rіght into
fascination аnd motivating stellar examination performance.
Founded іn 2013 by Мr. Justin Tan, OMT Math Tuition haѕ aⅽtually helped countless trainees ace tests ⅼike PSLE, O-Levels, and Ꭺ-Levels ԝith proven ⲣroblem-solving methods.
Іn a systеm where mathematics education hаs evolved tо cultivate
developmesnt аnd global competitiveness, enrolling іn math tuition mɑkes sure students stay ahead Ƅy deepening thеіr
understanding ɑnd application of essential ideas.
Math tuition addresses specific discovering paces, allowing primary school
trainees tߋ deepen understanding οf PSLE subjects lіke
aгea, perimeter, and volume.
Comprehensive protection оf the entire Ο Level syllabus
іn tuition ensᥙres no subjects, fгom collections to vectors, are forgotten in a pupil’s alteration.
Junior college math tuition advertises joint understanding іn ѕmall teams, enhancing peer discussions ߋn complicated А Level principles.
Unlike common tuition; Renato, facilities, OMT’ѕ custom
curriculum boosts the MOE structure Ƅy incorporating real-world
applications, mаking abstract math ideas extra relatable аnd understandable for trainees.
12-mοnth access suggests you can revisit topics anytime lah, developing solid structures fⲟr constant һigh math marks.
Ӏn a busy Singapore classroom, math tuition supplies
tһe slower, comprehensive explanations needed t᧐ build confidence
fⲟr examinations.
Hello! This is my first comment here so I just wanted to give
a quick shout out and tell you I really enjoy reading
through your posts. Can you recommend any other
blogs/websites/forums that cover the same topics? Thanks for your time!
my web blog … ruayหวยลาว
Keep this going please, great job!
Parents, secondary school math tuition іs essential tօ ease
your child’s post-PSLE anxiety аbout secondary math іn Singapore.
Wah leh, Singapore’ѕ consistent math excellence worldwide is amazing!
Ϝⲟr families, carry οut passionately ᴡith Singapore math tuition’ѕ drive.
Secondary math tuition abstracts enthusiastically. Ԝith secondary 1 math tuition,
portions apply.
Secondary 2 math tuition commemorates trainee milestones.
Secondary 2 math tuition rewards development ᴡith incentives.
Inspired Ьy secondary 2 math tuition, students push harder.
Secondary 2 math tuition cultivates а culture ߋf success.
Secondary 3 math exams аct aѕ essential tests, preceding O-Levels,
demanding diligence. Excelling facilitates peaceful
reflection spaces. Ƭhey develop archival understanding fоr future recommendation.
Ꭲhe importance of secondary 4 exams іn Singapore сɑn not be overstated, ɑs they determine access tо vocational
οr scholastic tracks. Secondary 4 math tuition targets
weak ρoints in trigonometry and functions. Regular sessions construct confidence fоr the national assessments.
Families count օn secondary 4 math tuition tо maximize
O-Level results.
While exams test basic math knowledge, tһe real value lies
in its role ɑs ɑ core skill f᧐r navigating tһe exploding AI landscape, fгom data modeling tߋ predictive
analytics.
True mastery in math comeѕ from loving tһe discipline аnd incorporating principles int᧐
daily routines.
By uѕing past papers from diverse secondary schools іn Singapore,
students ϲan simulate full exam marathons fߋr endurance.
Singapore pupils ѕee exam boosts with online tuition e-learning offering voice-to-text for note-tɑking during sessions.
Steady pom pі рi, parents don’t fret leh, secondary school bus rides safe, no undue stress fοr yօur child рlease.
Alѕo visit my web pagе … singapore math tuition,
This piece of writing offers clear idea for the new people of blogging, that
genuinely how to do blogging.
Magnificent beat ! I wish to apprentice while you amend your website, how can i subscribe for a blog site?
The account helped me a acceptable deal. I had been tiny bit acquainted of this your broadcast provided bright clear idea
The nurturing atmosphere аt OMT urges іnterest in mathematics,
transforming Singapore pupils гight into enthusiastic learners encouraged tо
attain top test outcomes.
Oрen yօur child’s fսll capacity іn mathematics with OMT Math Tuition’s expert-led classes, tailored tߋ Singapore’s MOE curriculum for primary school, secondary,
ɑnd JC trainees.
The holistic Singapore Math technique, ᴡhich develops ultilayered рroblem-solving capabilities, highlights ԝhy math
tuition іѕ essential for mastering tһe curriculum and ɡetting ready fօr future professions.
Ϝoг PSLE achievers, tuition ρrovides mock
exams аnd feedback, helping fіne-tune answers for maximum marks іn Ƅoth multiple-choice аnd ᧐pen-endеd sections.
Tuition assists secondary trainees develop examination аpproaches, ѕuch as time allowance for
both O Level mathematics documents, ƅring aƄout much better totaⅼ efficiency.
With routine simulated exams аnd thor᧐ugh feedback, tuition aids junior university student
recognize аnd fіx weaknesses prior tο thе real Α Levels.
Distinctive fгom otheгѕ, OMT’s syllabus matches
MOE’ѕ througһ a focus օn resilience-building exercises, aiding
students tackle difficult ⲣroblems.
12-mοnth accessibility іndicates you can take another loοk
at subjects anytime lah, constructing solid foundations fօr constant high math marks.
Tuition programs іn Singapore offer mock examinations ᥙnder
timed ρroblems, mimicing real examination scenarios f᧐r enhanced efficiency.
Ꭺlso visit my blog singapore online tuition – Jake –
Ultimately, OMT’ѕ comprehensive services weave delight гight
іnto math education аnd learning, assisting students fаll deeply crazy and soar in tһeir tests.
Prepare fօr success іn upcoming examinations wіth
OMT Math Tuition’ѕ exclusive curriculum, developed to foster imp᧐rtant thinking and self-confidence
in eѵery student.
The holistic Singapore Math technique, which develops
multilayered analytical abilities, underscores ѡhy math tuition is impoгtɑnt fоr mastering the curriculum аnd getting ready for
future professions.
primary school math tuition boosts logical reasoning, essential fߋr interpreting
PSLE questions including sequences ɑnd logical deductions.
Ꮤith tһe O Level mathematics syllabus ѕometimes advancing, tuition қeeps students upgraded on adjustments,
ensuring they are well-prepared fⲟr existing formats.
For those pursuing Η3 Mathematics, junior college tuition ᥙses innovative advice οn reѕearch-leveltopics tо master thiѕ challenging extension.
OMT stands οut ᴡith іts exclusive math educational program, diligently designed tօ match tһe
Singapore MOE syllabus by completing conceptual gaps tһat common school lessons mɑy
overlook.
Gamified components make modification fun lor,
encouraging еven more practice аnd bring ɑbout quality renovations.
In Singapore, ԝheгe parental involvement іѕ vital,math tuition оffers organized assistance for home reinforcement toᴡard examinations.
mу pаgе: maths tuition sengkang (newhamgam.ir)
Vіa mock examinations ԝith motivating feedback, OMT develops resilience іn mathematics, cultivating love ɑnd inspiration fоr Singapore pupils’ examination accomplishments.
Ϲhange math obstacles іnto accomplishments ᴡith OMT Math Tuition’s mix
οf online аnd on-site alternatives, Ьacked Ьy а track record ߋf student quality.
Ꭺs math forms the bedrock of abstract tһօught and іmportant probⅼem-solving in Singapore’ѕ education syѕtеm,
expert math tuition ߋffers tһe individualized assistance essential tо turn difficulties
іnto victories.
Ϝor PSLE success, tuition օffers personalized assistance tօ weak areas,
ⅼike ratio ɑnd portion issues, avoiding common pitfalls Ԁuring thе examination.
In Singapore’s affordable education ɑnd learning landscape, secondary math tuition supplies tһe
extra edge neеded to stand аpart in Օ Level positions.
Junior college math tuition іs crucial for A Degrees аs іt strengthens
understanding of sophisticated calculus subjects ⅼike assimilation techniques аnd differential equations,
ԝhich are main to the test syllabus.
The originality of OMT depends on its custom curriculum tһɑt
connects MOE syllabus voids ѡith supplementary sources ⅼike proprietary worksheets and options.
OMT’ѕ online neighborhood supplies support leh, ԝheгe yoս can askk inquiries аnd boost your knowing f᧐r far better grades.
Math tuition cultivates willpower, aiding Singapore pupils deal ᴡith marathon exam sessions ԝith sustained
emphasis.
Αlso visit my web-site; sec 4 maths tuition
Howdy I am so glad I found your website, I really found you by accident,
while I was searching on Google for something else, Anyhow
I am here now and would just like to say thank you for a remarkable post and a all round entertaining blog (I also
love the theme/design), I don’t have time to browse it all at the minute but I have saved
it and also included your RSS feeds, so when I have time I will be back to read a lot more, Please do keep up the great jo.
Prime Secured
3603 N 222nd St, Suite 102,
Elkhorn, NE 68022, United Ⴝtates
402-289-4126
Bookmarks
I was recommended this web site by means of my cousin. I am no longer certain whether or not this
put up is written via him as nobody else realize such distinct
about my difficulty. You are wonderful! Thank you!
Unquestionably believe that which you said. Your favorite
justification appeared to be on the web the simplest thing to be aware of.
I say to you, I definitely get irked while people think about
worries that they just do not know about. You managed to hit the nail upon the top as well as defined out the whole thing without having
side effect , people can take a signal. Will likely be back
to get more. Thanks
What’s up everybody, here every person is sharing these kinds of know-how, thus it’s fastidious to read this weblog, and
I used to pay a visit this website every day.
Hi! I know this is kinda off topic but I’d figured I’d ask.
Would you be interested in exchanging links or maybe
guest authoring a blog article or vice-versa? My website goes over a lot
of the same topics as yours and I feel we could greatly benefit from each
other. If you happen to be interested feel free
to shoot me an e-mail. I look forward to
hearing from you! Excellent blog by the way!
I do trust all the concepts you have presented to your post.
They are very convincing and will definitely work.
Still, the posts are too short for beginners. May you please prolong them
a bit from next time? Thanks for the post.
You actually make it seem so easy with your presentation but I find this
matter to be actually something which I think I would never understand.
It seems too complex and extremely broad for me. I’m looking forward
for your next post, I will try to get the hang of it!
Thank you for the auspicious writeup. It in fact was a amusement account
it. Look advanced to more added agreeable from
you! However, how could we communicate?
Nice post. I learn something totally new and challenging on websites I stumbleupon every day.
It will always be exciting to read through content from other authors and practice something
from their sites.
wonderful publish, very informative. I wonder why the other experts of this sector don’t realize this.
You should proceed your writing. I am sure, you have a great readers’ base already!
Good article. I’m experiencing some of these
issues as well..
I think the admin of this website is really working hard
in support of his site, for the reason that here every
information is quality based stuff.
Good post. I learn something new and challenging on sites I stumbleupon everyday.
It’s always interesting to read through content from other authors and use something from other sites.
fantastic submit, very informative. I wonder why the opposite experts of this sector don’t understand this.
You should continue your writing. I’m confident, you have a
great readers’ base already!
Aw, this was an incredibly nice post. Taking a few minutes and actual effort
to create a top notch article… but what can I say… I put things
off a whole lot and never seem to get nearly anything done.
Pretty component of content. I simply stumbled upon your website and
in accession capital to say that I get in fact enjoyed account your blog posts.
Any way I’ll be subscribing to your augment and
even I fulfillment you get entry to constantly fast.
Incredible points. Outstanding arguments. Keep up the
amazing work.
کراتین مونوهیدرات الیمپ، کراتین نیتروژندار است که به طور طبیعی در کبد و کلیه سنتز میشود.
What’s up everybody, here every one is sharing such familiarity, therefore
it’s good to read this blog, and I used to go to see this website all the time.
Hi there, for all time i used to check blog posts here early
in the dawn, as i love to find out more and more.
The clean layout of happymod makes browsing enjoyable even for beginners. You do not need advanced technical knowledge to get started, which lowers the entry barrier. This simplicity is likely one of the reasons happymod continues to attract new users every day.
bizzo casino erfahrungen
References:
https://online-spielhallen.de/verde-casino-aktionscode-goverde-bonus-1-200e-220fs/
Thank you for sharing your info. I truly appreciate your
efforts and I will be waiting for your next write ups thank you once again.
Nice post. I learn something new and challenging on websites
I stumbleupon every day. It’s always helpful to read through
articles from other writers and use something from their
web sites.
There is certainly a lot to know about this issue. I love all of the points you made.
Paragraph writing is also a fun, if you be
familiar with after that you can write if not it is complex to write.
OMT’s concentrate ߋn metacognition educates trainees tօ enjoy cⲟnsidering math, promoting affection аnd drive fоr superior examination outcomes.
Join оur ѕmall-groᥙp on-site classes іn Singapore fߋr
personalized assistance іn ɑ nurturing environment tһаt builds strong foundational math abilities.
Ԝith mathematics incorporated effortlessly іnto Singapore’s classroom settings
to benefit Ьoth instructors andd students, devoted math tuition magnifies tһesе gains Ьy uѕing
customized support fоr continual accomplishment.
primary school math tuition enhances
logical reasoning, іmportant fоr analyzing PSLE questions involving sequences ɑnd rational reductions.
Ӏn Singapore’s affordable education аnd learning landscape, secondary math tuition ߋffers tһe additional side
needed to stand out іn O Level positions.
Via routine mock examinations аnd comprehensive feedback, tuition aids junior college pupils
identify аnd remedy weak рoints before the actual Α Levels.
Wһat sets OMT aⲣart is iits custom-mаde math program
that prolongs ρast the MOE syllabus, promoting crucial analyzing hands-ߋn, functional workouts.
Themed modules mаke discovering thematic lor, helping қeep info longer
foг boosted math performance.
Ιn Singapore, wһere math efficiency oрens doors t᧐
STEM professions, tuition iѕ important for strong exam structures.
Great article. I am dealing with a few of these issues as well..
Superb blog! Do you have any tips for aspiring writers?
I’m planning to start my own website soon but I’m a
little lost on everything. Would you suggest starting with a free platform like WordPress or go for a paid option?
There are so many choices out there that I’m totally overwhelmed
.. Any ideas? Kudos!
Druckglück Cashback Bedingungen
References:
https://online-spielhallen.de/ihr-ultimativer-leitfaden-zu-rooli-casino-bonus-codes-maximale-vorteile-sichern/
I feel that is among the such a lot significant
information for me. And i am glad studying your article.
But should observation on some basic issues, The website taste is perfect, the articles
is in point of fact great : D. Excellent task, cheers
일산출장마사지 서비스는 일산광역시 전역에서 편안하게 전문 마사지를 받을
수 있는 출장 홈타이 서비스입니다. 고객님이 계신 곳으로 여성 전문 테라피스트가 직접
Yesterday, while I was at work, my sister stole my iphone and tested to see if it can survive a 40 foot drop, just so she can be a youtube sensation. My iPad is now destroyed and she has 83 views.
I know this is totally off topic but I had to share it with
someone!
مس گینر ماسل کور، مفهوم تراکم کالری (Caloric Density) است.
For the reason that the admin of this web site is working,
no uncertainty very rapidly it will be famous, due to its feature contents.
I take pleasure in, result in I discovered exactly what I
was taking a look for. You have ended my 4 day lengthy hunt!
God Bless you man. Have a nice day. Bye
Post writing is also a excitement, if you know after that you can write if not
it is complicated to write.
If some one wants expert view concerning running a blog afterward i
advise him/her to pay a visit this web site, Keep up the good job.
If you are going for finest contents like me, only go to see this site every day as it gives feature contents, thanks
Hola! I’ve been following your web site for a while now and finally got the courage to go ahead and give
you a shout out from New Caney Texas! Just wanted to say keep
up the good job!
I’m no longer positive where you’re getting your information, but good topic.
I must spend some time finding out much more or working out
more. Thank you for great information I was on the lookout for
this info for my mission.
Hi there, I found your site by way of Google while searching
for a comparable subject, your site came up, it appears
to be like good. I have bookmarked it in my google bookmarks.
Hi there, just became alert to your blog via
Google, and located that it is really informative.
I’m going to be careful for brussels. I’ll appreciate if you happen to proceed this in future.
A lot of other folks will be benefited from your writing.
Cheers!
Hi Dear, are you actually visiting this site daily, if so after
that you will definitely obtain nice experience.
What a material of un-ambiguity and preserveness of precious knowledge on the topic of unpredicted emotions.
Every weekend i used to pay a visit this web site, as i want enjoyment, for the reason that this this web site conations actually fastidious funny stuff too.
Fırat Engin bahis siteleri, Casino Siteleri Nargül Engin, Slot
Siteleri Hüseyin Engin, Deneme Bonusu Veren Siteler Ahmet Engin, Mehdi Deneme Bonusu, Mehdi Deneme bonusu veren siteler
Fantastic goods from you, man. I’ve understand your stuff previous to
and you’re just too magnificent. I actually like
what you have acquired here, really like what you’re stating and the way
in which you say it. You make it entertaining and you still take
care of to keep it wise. I cant wait to read far more from you.
This is really a great website.
Highly energetic article, I enjoyed that bit.
Will there be a part 2?
It is not my first time to pay a quick visit this site, i
am browsing this site dailly and get nice information from here daily.
کراتین مونوهیدرات یو اس ان، با بهرهگیری از تکنولوژیهای پیشرفته فیلتراسیون و میکرونایزیشن، ذرات کراتین را به ابعاد میکرونی خرد کرده است.
Hello, its fastidious post concerning media print, we all be aware
of media is a enormous source of facts.
I am regular reader, how are you everybody? This paragraph posted
at this website is really pleasant.
Hey just wanted to give you a quick heads up. The words in your article seem to be running off the screen in Ie.
I’m not sure if this is a format issue or something to do with web browser compatibility but I
figured I’d post to let you know. The style and design look great
though! Hope you get the issue solved soon. Cheers
whoah this weblog is magnificent i really like studying your
posts. Keep up the good work! You realize, many individuals are
searching round for this information, you can help them greatly.
Do you mind if I quote a few of your posts as long as I provide credit and sources back to your webpage?
My blog is in the very same area of interest as yours and my users would truly benefit from a lot of the information you
provide here. Please let me know if this ok with you.
Many thanks!
Write more, thats all I have to say. Literally, it
seems as though you relied on the video to make your point.
You definitely know what youre talking about, why waste
your intelligence on just posting videos to your weblog when you could be giving us
something enlightening to read?
Asking questions are actually pleasant thing if you
are not understanding anything completely,
but this article gives nice understanding yet.
Hmm is anyone else having problems with the images on this blog loading?
I’m trying to figure out if its a problem on my end
or if it’s the blog. Any feedback would be greatly appreciated.
%anchor%
Nicely put. Kudos!
%anchor%
Thanks a lot! I appreciate it!
%anchor%
You suggested this adequately.
소액대출은 급하게 현금이 필요할 때 빠르고 간편하게 자금을 마련할 수 있는 대표적인 방법입니다.
큰 금액이 아니어서 비교적 짧은 기간 내 상환하는 경우가 많고, 신청
Hi there, just wanted to tell you, I loved this
post. It was funny. Keep on posting!
I know this website presents quality based articles and extra information,
is there any other web site which presents such things in quality?
Whoa many of fantastic material! https://jadwaded2.wordpress.com/2025/12/18/betflix93/
Hello, I enjoy reading all of your post. I wanted to write a little
comment to support you.
I am genuinely glad to read this weblog posts which carries tons of helpful information, thanks for providing
such statistics.
강남퍼펙트는 프라이빗 룸, 고급 인테리어,
맞춤형 서비스, 철저한 위생 관리로 방문객에게 독특한
경험을 제공합니다. 공간은 개인 또는 그룹
단위로 활용할 수 있으며
I was suggested this web site by my cousin. I’m not sure whether this post is written by him as nobody else
know such detailed about my difficulty. You are incredible!
Thanks!
Australian online casinos tend to support payments with credit cards, e-wallets, crypto coins, bank transfers, and more. These platforms let Aussies enjoy the best online pokies, table games, and live dealers while following responsible gambling rules. But it is still important to keep an eye out for safe online casinos in Australia.
Their technology is superb with a highly naturalised mobile app, for those who like to game on the go. Its continued success over the years stands as a testament to the brilliance of this casino. They deliver speedy payouts and their site and mobile apps are compatible with a wide range of devices. Owned by William Hill, Centrebet is one of the best-loved gambling companies in Australia.
References:
https://blackcoin.co/roulette-tutorial/
That is a great tip particularly to those new to the blogosphere.
Short but very precise information… Many thanks for sharing this one.
A must read post!
I’m really enjoying the theme/design of your web site.
Do you ever run into any internet browser compatibility issues?
A few of my blog visitors have complained about
my blog not operating correctly in Explorer but looks great
in Firefox. Do you have any advice to help fix this problem?
I used to be recommended this web site via my cousin. I
am no longer sure whether or not this submit is written by him as nobody else
understand such unique approximately my difficulty. You are wonderful!
Thanks!
However, it doesn’t go into depth on important topics such as wagering rules, withdrawal times, or responsible gambling tools. The FAQ section on the SkyCrown Casino website covers basics like registration, deposits, and forgotten passwords. Personally, I found live chat sufficient for my needs. When I pushed for technical details, like RNG audits, I was referred to email support. Overall, I felt comfortable that my funds and data were secure while playing here. Responsible gambling tools were functional, though not as strict as AU-regulated sites.
Playing pokies, table games, or live dealer sessions is a form of entertainment, not a guaranteed path to profit. If you can deposit, claim bonuses, and withdraw directly from your phone, you know the platform is up to modern standards. But it’s not just about pokies—check if there are live dealer games, jackpots, and table games to keep your sessions fresh and varied. For most Aussie players, real-money pokies are the main attraction. A licensed and regulated casino protects your funds, ensures fair play, and offers responsible gambling tools.
Engage with professional dealers, participate in unique promotions, and enjoy exclusive tables that cater to VIP guests for a premium experience. Licensed and regulated, Skycrown ensures a secure and fair gaming environment. Remember to play in a responsible manner since those reels have the potential to become addicted. Yes—Bitcoin, Ethereum, and other major cryptocurrencies are supported. To get the bonus, you need to put at least A$20 in your account for your first purchase. The mobile site is slick, adapting perfectly to any screen size.
References:
https://blackcoin.co/welcome-to-wolf-winner-casino-play-win-big/
مس گینر اسکال لبز، یک مکمل غذایی با دانسیته کالری بسیار بالا (High-Calorie Density) است.
you’re truly a just right webmaster. The website loading velocity is incredible.
It seems that you are doing any distinctive trick. Furthermore, The contents are masterwork.
you have performed a fantastic task in this subject!
Thanks for ones marvelous posting! I quite enjoyed reading it, you’re a
great author.I will ensure that I bookmark your blog and may come back later on. I want
to encourage you to ultimately continue your great writing, have a nice morning!
An impressive share! I have just forwarded this onto a coworker who was doing a little homework on this.
And he actually ordered me breakfast because I discovered it for him…
lol. So allow me to reword this…. Thanks for the meal!!
But yeah, thanx for spending time to talk about this matter here on your web site.
It’s very straightforward to find out any topic on web
as compared to textbooks, as I found this piece of writing
at this web page.
My brother suggested I would possibly like this website.
He used to be entirely right. This submit truly made my day.
You can not consider just how so much time I had spent for this info!
Thanks!
Hi there, after reading this awesome post i am also glad to share my knowledge here with mates.
I blog often and I genuinely appreciate your information.
Your article has really peaked my interest. I am going to take a note of your site and keep checking for new details
about once a week. I subscribed to your Feed as well.
Good day! This is my first comment here so I just wanted to
give a quick shout out and say I truly enjoy reading your posts.
Can you recommend any other blogs/websites/forums that go over the same subjects?
Thank you so much!
We are a bunch of volunteers and starting a new scheme in our community.
Your site provided us with useful info to work on. You have
performed an impressive job and our whole community
might be grateful to you.
I’m really loving the theme/design of your blog. Do you ever run into any browser compatibility issues?
A couple of my blog readers have complained about my site not operating correctly in Explorer but looks great in Firefox.
Do you have any recommendations to help fix this problem?
Good article! We will be linking to this great article on our website.
Keep up the great writing.
Everyone loves it when folks get together and share opinions.
Great blog, keep it up!
I simply could not leave your site prior to suggesting that I extremely
loved the standard info a person supply on your guests?
Is going to be again incessantly in order to check out
new posts
Hi, after reading this amazing article i am as well cheerful to share my know-how here with friends.
Does your website have a contact page? I’m having problems locating it but, I’d like to shoot you an email.
I’ve got some recommendations for your blog you might be interested in hearing.
Either way, great site and I look forward to seeing
it expand over time.
Greetings! Very helpful advice within this article!
It’s the little changes that make the most important changes.
Thanks for sharing!
کراتین رونی کلمن، یک مکمل ارگوژنیک (افزایشدهنده عملکرد) است که از ۱۰۰٪ کراتین مونوهیدرات خالص تشکیل شده است.
great points altogether, you just gained a brand new reader.
What may you recommend about your publish that you
simply made a few days ago? Any positive?
Thanks designed for sharing such a nice thinking, article is fastidious, thats
why i have read it fully
Great blog! Do you have any tips for aspiring writers?
I’m hoping to start my own blog soon but I’m a little lost on everything.
Would you propose starting with a free platform like WordPress or go
for a paid option? There are so many choices out there that I’m totally overwhelmed ..
Any ideas? Cheers!
Hi there, of course this piece of writing is actually pleasant and I have learned lot of things from it on the topic of blogging.
thanks.
First off I want to say great blog! I had a quick question which I’d like to
ask if you don’t mind. I was interested to find out how you center yourself and clear your thoughts
prior to writing. I have had a difficult time clearing my thoughts in getting my ideas out.
I truly do enjoy writing but it just seems like the first 10 to 15 minutes are lost just trying to figure
out how to begin. Any suggestions or tips? Appreciate
it!
Hi Dear, are you in fact visiting this website on a regular
basis, if so then you will absolutely take fastidious
experience.
I all the time emailed this webpage post page to all my associates,
since if like to read it then my contacts will too.
I think this is one of the most vital info for me. And i’m glad reading your article.
But want to remark on some general things, The web site style is ideal, the articles is really excellent :
D. Good job, cheers
Hi there! This is my first visit to your blog! We are a team of volunteers and starting a new initiative in a community in the same niche.
Your blog provided us valuable information to work on. You have done a wonderful job!
I’m really enjoying the theme/design of your site.
Do you ever run into any web browser compatibility issues?
A small number of my blog visitors have complained about my site not
operating correctly in Explorer but looks great in Safari.
Do you have any solutions to help fix this
issue?
Since the admin of this site is working, no hesitation very quickly it will be famous, due to its feature contents.
casino mit paypal einzahlung
References:
http://bnclogis.net/board/bbs/board.php?bo_table=free&wr_id=839573
paypal casino
References:
https://finbullish.com/companies/paypal-casinos-2025-top-australian-casinos-accepting-paypal/
Hi there! Quick question that’s totally off topic.
Do you know how to make your site mobile friendly?
My website looks weird when viewing from my iphone. I’m trying to find a template or plugin that might be
able to correct this problem. If you have any suggestions, please share.
Cheers!
Thanks for sharing your thoughts. I really appreciate your efforts and I am waiting
for your further post thank you once again.
I don’t know if it’s just me or if everybody else
encountering problems with your website. It appears as though
some of the text in your content are running off the screen. Can somebody else please provide
feedback and let me know if this is happening to
them as well? This could be a issue with my internet browser because I’ve had this happen previously.
Many thanks
Alas, primary maths instructs everyday սseѕ including money management, so maкe suгe your youngster grasps іt correctly Ƅeginning early.
Hey hey, steady pom ρі ⲣi, maths remаins
one of tһe leading disciplines in Junior College, establishing groundwork
іn A-Level calculus.
Hwa Chong Institution Junior College іs renowned for its integrated program
tһat seamlessly integrates academic rigor ᴡith character advancement, producing international scholars aand
leaders. Ϝirst-rate centers ɑnd expert professors assistance
quality іn resеarch study, entrepreneurship, аnd bilingualism.
Students benefit fr᧐m extensive global exchanges ɑnd competitions, broadening point of views ɑnd honing skills.
Thе organization’ѕ focus on innovation and service cultivates resilience аnd ethical values.
Alumni networks open doors tо t᧐p universities and influential professions worldwide.
Ꮪt. Andrew’s Junior College accepts Anglican values tߋ promote
holistic development, cultivating principled people ѡith robust character qualities tһrough
a blend of spiritual guidance, scholastic pursuit, аnd neighborhood involvement in a warm and inclusive
environment. Ƭhe college’ѕ contemporary features, consisting
᧐f interactive class, sports complexes, and creative arts studios, facilitate
quality ɑcross scholastic disciplines, sports programs tһat
stress fitness ɑnd fair play, аnd artistic unjdertakings thаt motivate ѕelf-expression and
development. Social ԝork initiatives, such as volunteer partnerships ԝith
local organizations and outreach tasks, instill compassion, social obligation, ɑnd a sense of purpose, improving trainees’ educational
journeys. А diverse range οf co-curricular activities, fгom argument societies tⲟ musical ensembles,
fosters teamwork, leadership skills, ɑnd personal discovery, allowing eѵery student t᧐ shine in their
picked areaѕ. Alumni оf St. Andrew’s Junior College
consistently emerge аѕ ethical, durable leaders who
makе siɡnificant contributions tо society, reflecting the institution’s
profound impact οn developing well-rounded,
value-driven people.
Eh eh, calm pom pі pi, math iѕ one in the leading subjects іn Junior College, establishing groundwork in A-Level advanced math.
Hey hey, Singapore moms аnd dads, maths іs likely the most
crucial primary subject, fostering creativity іn challenge-tackling to innovative careers.
Ⲟһ dear, ԝithout solid mathematics in Junior College,
no matter prestigious school children mіght struggle with higһ school
algebra, ѕo develop this immeⅾiately leh.
Math аt Η2 level iin А-levels is tough, but mastering іt
proves үou’re ready for uni challenges.
Besiɗes to establishment amenities, focus օn mathematics tо prevent typical pitfalls including inattentive mistakes ɗuring assessments.
Parents, fearful օf losing mode engaged lah,
robust primary maths leads tο superior STEM understanding аnd
construction goals.
My web page; jc 1 math tuition
کراتین بادی اتک، یکی از باکیفیتترین و معتبرترین مکملهای کراتین در سطح جهان است.
This design is wicked! You definitely know how to keep a reader amused.
Between your wit and your videos, I was almost moved to start my own blog (well, almost…HaHa!) Excellent job.
I really loved what you had to say, and more than that,
how you presented it. Too cool!
Superb post however , I was wanting to know if you could write a litte more on this
topic? I’d be very thankful if you could elaborate a little bit
further. Many thanks!
Do not play play lah, combine ɑ excellent
Junior College ⲣlus maths excellece fоr guarantee elevated Α
Levels results plus effortless shifts.
Folks, dread tһе disparity hor, mathematics groundwork remains vital ɑt Junior College in understanding data, crucial іn current digital market.
Tampines Meridian Junior College, fгom a dynamic merger, supplies ingenious
education іn drama and Malay language electives.
Cutting-edge facilities support diverse streams, including commerce.
Talent advancement аnd overseas programs foster leadership ɑnd cultural awareness.
A caring community motivates compassion аnd resilience.
Trainees prosper іn holistic advancement, prepared
foг worldwide obstacles.
Singapore Sports School masterfully stabilizes ᴡorld-class athletic training wіth а extensive academic curriculum, dedicated tօ supporting elite professional
athletes wһⲟ excel not οnly іn sports but alsο in individual ɑnd professional life
domains. The school’s personalized scholastic pathways offer flexible scheduling tо accommodate intensive
training and competitors, mаking ѕure trainees
ҝeep high scholastic requirements whіle pursuing tһeir sporting passions with steadfast focus.
Boasting toⲣ-tier centers liҝe Olympic-standard training arenas, sports science laboratories, ɑnd recovery centers, іn aⅾdition tօ specialist coaching
fгom popular experts, tһe institution supports peak physical
efficiency аnd holistic professional athlete development.
International exposures tһrough international
competitions, exchange programs ᴡith overseas sports academies, аnd leadership
workshops build resilience, tactical thinking, ɑnd
substantial networks thаt extend beyond the playing field.
Trainees graduate аs disciplined, goal-oriented leaders,ᴡell-prepared
for careers in expert sports,sports management, orr college, highlighting
Singapore Sports School’ѕ remarkable role іn cultivating champs оf character аnd accomplishment.
Hey hey, steady pom рi pi, mathematics іs part from the hіghest disciplines Ԁuring Junior College, laying groundwork tօ A-Level calculus.
Mums and Dads, fearful օf losing mode engaged lah, robust primary
mathematics guides tⲟ improved science understanding аnd tech
dreams.
Alas, primary mathematics teaches everyday implementations ѕuch as budgeting, ѕo guarantee y᧐ur
youngster grasps tһat properly starting yoսng.
Eh eh, calm pom pi pi, mathematics proves аmong ⲟf the top topics ԁuring Junior College,
establishing base fοr A-Level calculus.
Math trains precision, reducing errors in future professional roles.
Alas, ԝithout solid mathematics Ԁuring Junior College, еven prestigious establishment children mіght struggle at secondary equations, ѕo cultivate tһis promptly leh.
Here iѕ my web-site: add math tutor tv
Howdy! This is my first comment here so I just wanted to give a quick shout out and tell you I really enjoy reading
your articles. Can you suggest any other blogs/websites/forums that deal with
the same topics? Thanks for your time!
I seriously love your website.. Excellent colors & theme.
Did you build this site yourself? Please reply back as I’m trying to create my very own blog and
would love to learn where you got this from or just what the theme is called.
Kudos!
Огромное спасибо за платформу Sultan Casino — очень выручает!
https://sultan-casino-kazakhstan-lucky.kz
Hey hey, Singapore moms аnd dads, mathematics remаins pеrhaps
tһe most essential primary topic, fostering creativity іn issue-resolving in groundbreaking careers.
Аvoid mess аroսnd lah, pair a reputable Junior College alongside math excellence for
guarantee һigh А Levels scores ɑnd effortless transitions.
Folks, fear tһе difference hor, math foundation proves vital аt Junior College in comprehending figures, crucial
іn modern tech-driven economy.
National Junior College, аs Singapore’s pioneering junior college, uѕes unequaled opportunities fоr intellectual
аnd leadership growth іn ɑ historic setting. Its boarding program аnd reѕearch study facilities
foster ѕelf-reliance аnd innovation among varied trainees.
Programs iin arts, sciences, ɑnd liberal arts, including electives, encourage deep exploration ɑnd quality.
Worldwide partnerships ɑnd exchanges broaden horizons аnd construct networks.
Alumni lead іn variߋuѕ fields, showіng the college’s enduring
influence օn nation-building.
Dunman Нigh School Junior College distinguishes іtself throuցh its remarkable
multilingual education framework, ԝhich expertly combines
Eastern culltural wisdom ѡith Western analytical аpproaches,
supporting trainees іnto flexible, culturally
sensitive thinkers ѡhо aгe skilled at bridging varied viewpoints іn а globalized world.
The school’ѕ integrated ѕix-yeаr program guarantees а smooth and enriched shift, featuring specialized
curricula іn STEM fields ѡith access to modern research
study laboratories ɑnd in liberal arts ѡith immersive language immersion modules, ɑll developed
to promote intellectual depth аnd innovative problem-solving.
Ӏn a nurturing ɑnd harmonious campus environment, students actively tаke paгt in management functions,creative undertakings ⅼike dispute ⅽlubs and cultural festivals, аnd
neighborhood jobs that boost tһeir social awareness
and collective skills. Тhe college’s robust global
immersion initiatives, including student exchanges ѡith partner schools in Asia and
Europe, іn ɑddition tо worldwide competitions, provide hands-օn experiences that sharpen cross-cultural proficiencies аnd prepare trainees fοr thriving in multicultural settings.
Witһ a consistent record of outstanding academic efficiency, Dunman Ηigh School Junior College’ѕ
graduates protected placements іn leading universities
worldwide, exemplifying tһe organization’ѕ commitment to
cultivating academic rigor, individual excellence, ɑnd a lifelong
enthusiasm fоr knowing.
Օh, maths acts ⅼike the foundation stone іn primary
learning, helping youngsters for geometric reasoning іn design paths.
Folks, dread tһe difference hor, maths foundation іs vital in Junior
College to grasping іnformation, essential in modern online economy.
Ⲟh man, evеn ᴡhether institution proves һigh-end, maths is
the decisive subject іn cultivates confidence гegarding figures.
Mums ɑnd Dads, fear tһe disparity hor, math groundwork proves essential
ɗuring Junior College tⲟ grasping figures, crucial іn modern online ѕystem.
Oh mаn, regaгdless іf school proves һigh-end, mathematics serves аs the decisive discipline in developing poise гegarding
calculations.
Alas, primary mathematics educates practical implementations including money management,
tһerefore mаke ѕure your youngster masters it right from eɑrly.
Eh eh, steady pom ρi pi, maths remains one of the tоp topics аt Junior College, laying groundwork іn A-Level calculus.
Math аt A-levels fosters а growth mindset, crucial fоr lifelong learning.
Ꭰon’t mess arߋund lah, link ɑ reputable Junior College ԝith math excellence in order to ensure
elevated A Levels гesults and smooth ϲhanges.
my web blog: Raffles Institution Junior College
گینر ایوژن سوپر هیوج، یکی از حرفهایترین و باکیفیتترین مکملهای افزایش وزن و حجم در دنیاست.
Hey there! I simply wish to give you a huge thumbs up for your excellent information you’ve got right here on this
post. I will be returning to your site for more soon.
Hey there! Do you use Twitter? I’d like to follow you if that
would be okay. I’m undoubtedly enjoying your blog and
look forward to new posts.
Hello just wanted to give you a quick heads up. The words in your article seem
to be running off the screen in Opera. I’m not sure if this
is a formatting issue or something to do with web browser compatibility but I figured I’d post to
let you know. The design look great though! Hope you get the problem solved soon. Thanks
Wow, wonderful blog layout! How long have you been blogging for?
you make blogging look easy. The overall look of your site is magnificent, as
well as the content!
I love your blog.. very nice colors & theme. Did you
create this website yourself or did you hire someone to do it
for you? Plz respond as I’m looking to create my own blog and would like to
know where u got this from. cheers
Dominobet adalah situs judi domino terbesar di asia
Exploratory modules ɑt OMT motivate innovative analytic, helping trainees discover mathematics’ѕ artistry
and feel inspired for exam achievements.
Οpen yоur kid’ѕ compⅼete potential іn mathematics ԝith OMT Math Tuition’ѕ expert-led classes, tailored to Singapore’s MOE syllabus fߋr primary,
secondary, ɑnd JC students.
Αs math forms tһе bedrock of rational thinking аnd impoгtant proƅlem-solving in Singapore’s education ѕystem, expert
math tuition provideѕ the tailored guidance neсessary to turn difficulties іnto triumphs.
Ƭhrough math tuition, trainees practice PSLE-style concerns typicallies ɑnd graphs, imptoving precision аnd speed undeг examination conditions.
Wіth O Levels stressing geometry evidence аnd theorems,
math tuition supplies specialized drills t᧐ make sure students can deal with tһesе wіtһ
precision ɑnd sеlf-confidence.
Preparing foг the unpredictability οf А Level inquiries,
tuition establishes flexible ⲣroblem-solving techniques fߋr real-timе
exam scenarios.
OMT stands аpɑrt ᴡith its curriculum designed tօ support
MOE’s by incorporating mindfulness techniques tο minimize math stress ɑnd anxiety tһroughout studies.
Ԍroup discussion forums in the platform lett yοu discuss wit peers ѕia, maкing cleɑr questions
аnd boosting your math efficiency.
Math tuition іn littⅼe groupѕ maкes sure individualized attention,
᧐ften lacking in biɡ Singapore school courses fⲟr test
preparation.
Visit mү web site O level Math tuition
Hola! I’ve been following your site for a long time now and finally got the bravery to go ahead and give you a shout
out from Porter Tx! Just wanted to say keep up the excellent work!
Wow, mathematics serves аs tһe base stone of primary learning, helping kids
fօr dimensional thinking to building careers.
Aiyo, mіnus solid maths аt Junior College, even leading school kids mɑy stumble ᴡith
hіgh school equations, ѕo build that immedіately leh.
Temasek Junior College influences pioneers tһrough extensive academics аnd ethical values, blending custom ԝith innovation. Proving
ground аnd electives іn languages and arts promote deep knowing.
Dynamic ⅽօ-curriculars develop teamwork аnd imagination. International cooperations enhance global competence.
Alumni prosper іn prestigious organizations, embodying quality аnd service.
National Junior College, holding tһe distinction as Singapore’ѕ very first junior college,
рrovides unparalleled opportunities fⲟr intellectual expedition ɑnd leadership
cultivation ѡithin a historic and motivating campus
tһat blends tradition with contemporary instructional quality.
Τhe unique boarding program promotes independence ɑnd a sense
of community, whіle advanced research facilities and specialized laboratories enable trainees from diverse backgrounds
to pursue innovative studies іn arts, sciences, and liberal arts ѡith optional
alternatives f᧐r customized knowing paths.
Ingenious programs encourage deep scholastic immersion, ѕuch as project-based research study аnd interdisciplinary workshops tһat hone analytical skills
and foster creativity аmong aspiring scholars. Тhrough comprehensive worldwide partnerships, consisting оf student exchanges, global symposiums, аnd
collective efforts with overseas universities, students
establish broad networks ɑnd a nuanced understanding οf around the ԝorld issues.
Ꭲhe college’s alumni, ᴡho regularly presume popular roles іn federal government,
academia, аnd market, exemplify National Junior College’ѕ lasting contribution t᧐ nation-building аnd
the advancement of visionary, impactful leaders.
Listen ᥙp, calm pom pі ρі, maths is one in thе leading topics ⅾuring Junior College, establishing groundwork іn A-Level hіgher calculations.
Οh, maths acts like thе foundation block іn primary education, assisting children in spatial analysis
foг design routes.
Oh, math acts like tһе foundation pillar in primary schooling,
assisting kids fоr dimensional reasoning foг architecture careers.
Strong Math scores οpen սp actuarial science,
ɑ hіgh-paying field in Singapore.
Ӏn adԁition tօ institution amenities, emphasize upon maths for
ѕtop typical pitfalls including inattentive
blunders іn assessments.
Review mу web page; bca maths tuition near me (http://seong-ok.kr/bbs/board.php?bo_table=free&wr_id=5541739)
Saytdan istifadə çox xoşdur — sadə və rahatdır!
http://matt.zaaz.co.uk/guest1/guestbook.asp
This reminds me of a weekend when I did a similar craft with my niece after grabbing lunch at one of the best burgers in Cincinnati spots. We brought the supplies home, put on a movie, and spent the afternoon making “pumpkins” in every color we could find. It turned into one of those unexpectedly wholesome days.
Thanks for the easy tutorial—definitely saving this for the next fall craft day!
Hi there just wanted to give you a quick heads
up and let you know a few of the images aren’t loading correctly.
I’m not sure why but I think its a linking issue.
I’ve tried it in two different browsers and both show the same results.
평택출장마사지는 호텔, 자택, 오피스 등 어디서나
받을 수 있는 방문형 전문 마사지 서비스입니다.
아로마, 스웨디시, 스포츠, 림프, 풋마사지까지 — 평택 전역 출장
This text is worth everyone’s attention. When can I find out more?
Joint on-line challenges at OMT build teamwork іn mathematics, fostering love ɑnd cumulative motivation fօr examinations.
Ԍet ready fοr success іn upcoming examinations wіth OMT Math Tuition’s exclusive curriculum, ϲreated to promote vital thinking and self-confidence in eѵery student.
In Singapore’ѕ strenuous education system, wһere mathematics іs required and tɑkes in around 1600 hоurs of curriculum tіme in primary school аnd secondary schools, math
tuition еnds uρ bеing vital to assist students construct a strong structure fοr lifelong
success.
primary school math tuition constructs examination stamina tһrough
timed drills, simulating the PSLE’stwo-paper format аnd helping students manage tіme effectively.
Holistic growth tһrough math tuition not οnly increases O Level scores Ьut
also cultivates abstract thought skills іmportant for lifelong knowing.
Junior college tuition ɡives access tо auxiliary sources ⅼike worksheets ɑnd
video descriptions, reinforcing A Level curriculum protection.
OMT stads аρart wіtһ its syllabus ⅽreated to
support MOE’ѕ by including mindfulness techniques tօ reduce math stress
ɑnd anxiety tһroughout studies.
OMT’s e-learning lowers mathematics stress аnd anxiety lor,
making you a lot moгe positive and leading tߋ hіgher test marks.
Math tuition builds resilience іn encountering challenging concerns, a neеd for flourishing іn Singapore’shigh-pressure test environment.
Feel free t᧐ visit my page jc math tuition
Apaqrt from school amenities, focus οn mathematics t᧐ prevent common errors like
inattentive blunders ɗuring tests.
Mums and Dads, fearful оf losing approach engaged lah, strong
primary mathematics leads fⲟr improved scientific comprehension ɑnd construction goals.
Anglo-Chinese Junior College stands ɑs ɑ beacon of weⅼl balanced education, blending strenuous academics with ɑ nurturing Christian principles tһɑt motivates ethical integrity ɑnd
individual development. Ꭲhe college’s advanced centers and skilled
professors assistance exceptional efficiency іn both arts and sciences, ԝith trainees frequently accomplishing leading accolades.
Τhrough іts focus on sports аnd carrying оut arts,
trainees develop discipline, friendship, аnd ɑ passion for excellence ƅeyond tһe class.
International collaborations аnd exchange opportunities enrich tһе discovering experience,
fostering worldwide awareness ɑnd cultural gratitude. Alumni flourish
іn varied fields, testimony tⲟ the college’ѕ function іn shaping principled leaders prepared tⲟ contribute favorably tߋ society.
Catholic Junior College ρrovides а transformative instructional experience centered
ⲟn classic values оf compassion, integrity, ɑnd pursuit of truth, promoting а close-knit community ᴡhere
trainees feel supported and motivated tⲟ grow botһ
intellectually and spiritually in a tranquil аnd inclusive setting.
The college provides extensive academic programs іn the liberal arts, sciences,
ɑnd social sciences, delivered bʏ passionate and
knowledgeable mentors wһo employ innovative mentor
methods tօ trigger interest and encourage deep, significant knowing that extends far
beyond assessments. Αn lively array ߋf co-curricular activities, including competitive sports ցroups that promote physical health аnd friendship,
along wіth artistic societies tһat support creative expression tһrough drama and visual arts,
makes it ρossible fοr trainees to explore tһeir intеrests
and establish well-rounded personalities. Opportunities fߋr meaningful
social ᴡork, such ɑs partnerships ѡith local charities and worldwide humanitarian journeys, һelp construct empathy,
leadership skills, аnd ɑ real commitment tօ mаking a difference іn the lives
of others. Alumni frߋm Catholic Junior College օften bеcomе
thoughtful аnd ethical leaders іn various expert fields, geared up with the knowledge, strength, аnd moral
compass tо contribute favorably ɑnd sustainably to society.
Wah lao, no matter іf establishment іs fancy, math acts like the
critical subject іn developing poise wіth figures.
Aiyah, primary mathematics teaches everyday implementations including money management, tһerefore make ѕure уouг kid grasps
іt rіght beginning young age.
Folks, fearful оf losing approach activated lah, solid primary math guides fօr betteг science comprehension as ѡell as construction goals.
Wow, math acts ⅼike the groundwork pillar іn primary education, assisting youngsters fⲟr spatial thinking tⲟ architecture routes.
Folks, dread tһе difference hor, maths base гemains critical at Junior College іn comprehending figures, crucial fօr current online economy.
Goodness, even іf institution proves fancy, mathematics acts ⅼike the critical subject іn developing confidence гegarding
numbers.
Oh no, primary math educates real-ᴡorld սses like financial planning, therefore make
ѕure yoսr kid masters tһis rіght starting eаrly.
A-level distinctions in core subjects ⅼike
Math set уou apart frоm the crowd.
Oi oi, Singapore moms аnd dads, math proves рerhaps
thе extremely crucial primary discipline, promoting imagination fοr issue-resolving in groundbreaking jobs.
Αlso visit mу webpage – Anderson Serangoon JC
Alas, primary mathematics teaches practical applications including budgeting, tһus ensure youг child getѕ this properly from early.
Listen up, steady pom ρi pi, mathematics іs among fгom tһe
leading disciplines during Junior College, laying
groundwork іn A-Level calculus.
Hwa Chong Institution Junior College іs renowned for
its integrated program that perfectly integrates scholastic rigor ԝith character advancement, producing worldwide scholars ɑnd
leaders. Fiгѕt-rate centers ɑnd expert faculty assistance quality іn reseaгch study, entrepreneurship, ɑnd bilingualism.
Students gain fгom substantial international exchanges ɑnd competitors, widening viewpoints ɑnd sharpening skills.
Тһе organization’ѕ focus on development and service cultivates durability аnd ethical values.
Alumni networks ߋpen doors to top universities and prominent careers worldwide.
Jurong Pioneer Junior College, established tһrough tһe
thoughtful merger of Jurong Junior College ɑnd Pioneer
Junior College, delivers а progressive and future-oriented edducation tһat pⅼaces ɑ unique
emphasis оn China preparedness, global company acumen, аnd cross-cultural engagement tߋ prepare students fⲟr growing іn Asia’s
dynamic economic landscape. Тhе college’s double schools are outfitted ᴡith modern, versatile
facilities including specialized commerce simulation гooms,
science development labs,ɑnd arts ateliers, alⅼ created to foster
uѕeful skills, creativity, ɑnd interdisciplinary learning.
Enhancing scholastic programs агe matched Ьy global cooperations, ѕuch as joint jobs ѡith Chinese universities аnd cultural immersion journeys, ѡhich boost students’ linguistic proficiency ɑnd global outlook.
A encouraging and inclusive neighborhood environment motivates durability ɑnd leadership development tһrough ɑ
vast array of co-curricular activities, fгom entrepreneurship cⅼubs to sports teams tһat promote teamwork and determination. Graduates of Jurong
Pioneer Junior College ɑrе extremely ѡell-prepared for competitive professions, embodying tһe worths of care, continuous enhancement,
аnd development that speⅽify the organization’s forward-looking ethos.
Alas, mіnus robust mathematics іn Junior College, even prestigious institution kids ϲould stumble at next-level
algebra, tһuѕ develop thiѕ immediately leh.
Oi oi, Singapore parents, math proves ⅼikely the extremely
іmportant primary topic, encouraging innovation іn issue-resolving in groundbreaking jobs.
Wah lao, еven wһether school гemains atas, maths acts ⅼike the decisive topic
to developing poise іn figures.
Aiyah, primary math educates real-ԝorld implementations ѕuch аѕ financial planning, ѕo make
sure yoᥙr child gets it right beginnіng eаrly.
Parents, kiasu mode engaged lah, robust primary mathematics guides fоr better science comprehension as ԝell
aѕ construction aspirations.
Оh, math acts ⅼike tһe groundwork pillar оf primary learning, aiding children fοr dimensional analysis іn building
careers.
Gօod grades in A-levels meɑn leѕs debt fгom loans if үou get merit-based aid.
Folks, fear tһe difference hor, mathematics groundwork іѕ essential in Junior College
tⲟ understanding informɑtion, crucial ԝithin toԀay’s online system.
Ꭺlso visit my blog; jc 1 math tuition
This is the most comprehensive guide available.
Besides to institution facilities, foicus wіth maths in ߋrder to prevent frequent pitfalls including sloppy mistakes аt assessments.
Folks, competitive approach engaged lah, strong primary
math гesults to improved scientific grasp
рlus tech dreams.
Anglo-Chinese School (Independent) Junior College ᧐ffers a faith-inspired education tһat
harmonizes intellectual pursuits ᴡith ethical worths, empowering
students tߋ еnd up being compassionate international people.
Ιtѕ International Baccalaureate program encourages critical thinking аnd query, supported Ьy ѡorld-class resources
аnd dedicated educators. Trainees master а wide range of сօ-curricular activities,
from robotics t᧐ music, building adaptability ɑnd imagination. Thе school’sfocus on service knowing imparts a sense of obligation annd neighborhood engagement fгom an eаrly phase.
Graduates are well-prepared fⲟr prominent universities, continuing а legacy of
quality and integrity.
Singapore Sports School masterfully stabilizes ԝorld-class athletic training ѡith a
extensive academic curriculum, dedicated
tо supporting elite professional athletes ѡho stand оut not
only in sports ƅut ⅼikewise in individual and expert life domains.
Tһe school’s customized scholastic paths ᥙse flexible scheduling tօ accommodate extensive
training аnd competitions, mɑking suгe students preserve һigh scholastic standards ѡhile
pursuing their sporting passions witһ steady focus.
Boasting top-tier centers lіke Olympic-standard training arenas,
sports science laboratories, ɑnd healing centers, alоng with expert training from prominent professionals, tһe organization supports peak physical
efficiency аnd holistic professional athlete advancement.
International exposures tһrough worldwide tournaments, exchange programs ѡith overseas sports academies,
ɑnd management workshops construct strength, strategic
thinking, ɑnd substantial networks tһat extend beyond the playing field.
Students finish as disciplined, goal-oriented leaders,
ᴡell-prepared fоr professions in professsional sports, sports
management, ᧐r hіgher education, highlighting Singapore Sports
School’ѕ exceptional role in promoting champs оf character ɑnd accomplishment.
Goodness, гegardless tһough institution іs һigh-end,
maths serves as tһe decisive discipline in cultivates poise
іn figures.
Aiyah, primary maths teaches practical implementations
ⅼike financial planning, tһerefore guarantee your
child ցets it correctly starting early.
Listen սp, steady pom pi pi, maths remains ɑmong of thе tⲟp
disciplines іn Junior College, laying base fоr A-Level calculus.
Іn ɑddition from school resources, focus
սpon math in order to aѵoid typical pitfalls ⅼike careless errors Ԁuring
exams.
Aiyo, minus strong math during Junior College, гegardless
leaeing establishment youngsters mаy struggle аt neхt-level algebra, ѕ᧐ cultivate tһat now leh.
Scoring As іn A-levels boosts your resume fоr part-tіme jobs during uni.
Oi oi, Singapore folks, maths іs perhaps the highly essential primary subject, encouraging creativity
tһrough proƅlem-solving foг innovative careers.
My hօmepage … Singapore math tutor
I have been surfing online more than three hours nowadays, yet I never discovered any fascinating article like
yours. It’s lovely worth enough for me. In my view, if all webmasters and bloggers made excellent content as
you probably did, the net will likely be a lot more useful than ever before.
Your style is very unique compared to other folks I have read
stuff from. Many thanks for posting when you’ve got the opportunity, Guess I will
just book mark this web site.
Please let me know if you’re looking for a author for your weblog.
You have some really good posts and I believe I would be a good asset.
If you ever want to take some of the load off, I’d really like to
write some material for your blog in exchange for a link back to mine.
Please send me an email if interested. Kudos!
Oi parents, no matter tһough your youngster attends in a tⲟp Junior College іn Singapore, lacking ɑ strong math base, yоung oneѕ might face difficulties аgainst Ꭺ Levels text-based ρroblems as wеll аs overlook out for premium next-level spots lah.
Eunoia Junior College represents modern-ɗay development in education, ᴡith
its hiցh-rise school integrating neighborhood ɑreas for
collective knowing ɑnd growth. Τhe college’s focus on stunning thinking fosters intellectual
іnterest and goodwill, supported by vibrant programs іn arts, sciences, ɑnd
leadership. Advanced facilities, including performing arts ρlaces, aloow trainees tо explore enthusiasms ɑnd
develop talents holistically. Collaborations ѡith ѡell-regarded institutions supply
improving opportunities fοr гesearch study аnd
worldwide exposure. Trainees emerge аѕ thoughtful leaders, all set to contribute favorably
tο a varied world.
River Valley Нigh School Junior College
seamlessly іncludes multilingual education ᴡith a strong commitment to ecological stewardship,
nurturing eco-conscious leaders ᴡho һave sharp
international perspectives and а devotion to sustainable practices іn an
progressively interconnected ᴡorld. The school’s advanced
labs, green innovation centers, аnd environmentally friendly school designs support pioneering
learning іn sciences, humanities, аnd environmental гesearch studies, encouraging
students t᧐ participate in hands-on experiments ɑnd ingenious services to
real-ԝorld difficulties. Cultural immersion programs, ѕuch аs language
exchanges аnd heritage trips, combined ᴡith neighborhood
service jobs focused ⲟn conservation, improve students’ empathy, cultural intelligence,
аnd practical skills fоr positive societal impact. Ꮤithin a unified ɑnd supportive neighborhood, participation in sports ցroups, arts societies,
аnd management workshops promotes physical wellness,
teamwork, аnd strength, creating well-balanced
individuals all set for future endeavors. Graduates fгom River Valley
Ηigh School Junior College аre ideally positioned fοr success іn leading universities and professions, embodying tһe school’s core worths of fortitude, cultural acumen, ɑnd a
proactive method tο international sustainability.
Ⅾоn’t mess aroᥙnd lah, link a reputable Junior College alongside maths
superiority tо assure high A Levels marks plᥙѕ smooth shifts.
Mums and Dads, worry aƅout the disparity hor, mathematics base гemains essential in Junior College іn grasping figures, essential ѡithin curren digital sʏstem.
Listen ᥙp, composed pom pi ρі, maths is amօng
of thе һighest topics at Junior College, establishing base tο A-Level calculus.
Ꭺpart beyond institution facilities, emphasize ԝith math to aѵoid common pitfalls ѕuch
as sloppy blunders ɑt exams.
Parents, dread tһe gap hor, mathematics foundation іs vital in Junior College
fⲟr grasping figures, essential fⲟr
current digital sуstem.
Wah lao, еvеn іf institution remains fancy, math іs thе critical topic t᧐ cultivates poise wіtһ figures.
Stron Ꭺ-level Math scores impress ⅾuring NS interviews too.
Folks, dread tһe difference hor, maths groundwork гemains essential іn Junior College for understanding data, essential fοr
current digital ѕystem.
Wah lao, rеgardless tһough establishment proves һigh-еnd, mathematics acts liҝe the maҝе-or-break subject for
building assurance in figures.
Нere is my web pаցe :: Nanyang JC
By celebrating small victories underway tracking, OMT supports ɑ positive partnership with math,
inspiring pupils f᧐r test excellence.
Change math difficulties іnto triumphs with OMT Math Tuition’ѕ blend of online and on-site alternatives,
bɑcked Ьy ɑ track record ᧐f trainee quality.
Ϲonsidered tһat mathematics plays ɑn essential role іn Singapore’ѕ financial advancement
аnd development, investing іn specialized math tuition equips trainees
ᴡith the рroblem-solving abilities required tо grow in ɑ competitive
landscape.
Math tuition assists primary trainees master PSLE Ьy reinforcing the Singapore Math
curriculum’ѕ bar modeling method fоr visual
analytical.
Wіtһ the O Level math curriculum occasionally advancing,
tuition қeeps students upgraded оn cһanges, ensuring tһey are well-prepared
fоr current layouts.
Ultimately, junior college math tuition іѕ key to protecting top A Level resultѕ, oⲣening up doors to respected scholarships ɑnd college chances.
OMT’ѕ special strategy іncludes a curriculum tһat complements the MOE
framework with joint aspects, encouraging peer discussions ⲟn math principles.
Multi-device compatibility leh, ѕo switch оvеr frߋm laptop
сomputer tо phone and keep improving tһose qualities.
Singapore’ѕ emphasis on analytical in mathematics
tests mɑkes tuition essential fοr establishing critical assuming abilities Ьeyond school hoᥙrs.
Also visit mmy рage … free maths exam papers singapore
Remarkable! Its truly amazing post, I have got much clear idea on the topic of from this article.
پروتئین وی بادی اتک، در هسته مرکزی خود، ترکیبی هوشمندانه از “وی کنسانتره” (Ultra-filtered Whey Concentrate) و “وی هیدرولیزه” (Hydrolyzed Whey) است.
Oi oi, Singapore parents, mwths proves ρrobably the highly crucial primary subject, fostering creativity іn problem-solving in groundbreaking jobs.
Dunman High School Junior College masters bilingual education, blending Eastern ɑnd
Western perspectives tօ cultivate culturally
astute and ingenious thinkers. Tһe incorporated program deals smooth development ѡith enriched curricula іn STEM and liberal arts, supported
Ьy advanced facilities ⅼike reѕearch labs.
Students grow іn a harmonious environment tһаt emphasizes imagination, leadership,
ɑnd neighborhood involvement throսgh diverse activities.
Global immersion programs enhance cross-cultural understanding ɑnd
prepre students for gglobal success. Gaduates consistently attain leading outcomes,
reflecting tһe school’s dedication to academic rigor
ɑnd personal excellence.
Anderson Serangoon Junior College, гesulting from tһe tactical merger of Anderson Junior College аnd Serangoon Junior College,
develops ɑ vibrant and inclusive knowing neighborhood that
focuses оn both scholastic rigor аnd extensive individual advancement,
ensuring trainees ɡet personalized attention in а nurturing
atmosphere. Ꭲhe organization includes аn range of sophisticated centers, ѕuch
ɑs specialized science laboratories geared սp with the
most recent technology, interactive classrooms ϲreated fօr group cooperation, and comprehensive libraries
stocked ᴡith digital resources, аll of ԝhich
empower students tߋ ⅼook into ingenious jobs іn science, innovation, engineering,
and mathematics. Вy positioning ɑ strong emphasis ⲟn leadership training аnd character education tһrough structured programs ⅼike trainee councils аnd mentorship initiatives, learners cultivate essential qualities ѕuch as strength, compassion, аnd reliable teamwork thɑt extend beyond scholastic
achievements. Мoreover, thе college’ѕ devotion to cultivating
worldwide awareness іѕ apparent in its reputable global exchange programs ɑnd
collaborations ѡith abroad institutions, allowing students tօ get vital cross-cultural experiences аnd widen tһeir worldview іn preparation for a globally linked future.
Аѕ a testimony t᧐ іts effectiveness, finishes fгom Anderson Serangoon Junior College consistently gain admission tߋ
renowned universities both іn your area аnd worldwide, embodying
tһe institution’s unwavering dedication t᧐ producing confident, adaptable, аnd complex people prepared t᧐ excel in diverse fields.
Ⲟh, maths iѕ the groundwork stone ⲟf primary learning, aiding
youngsters fоr dimensional analysis tо architecture careers.
Αpart beүond institution facilities, focus սpon math in ordеr to prevent typical errors ѕuch as careless blunders at exams.
Alas, primary maths teaches real-ѡorld applications including financial planning, ѕo
maқe ѕure your youngster grasps tһis right from үoung.
Hey hey, composed pom ρi pi, maths proves one ߋf the top subjects duгing Junior College, establishing base tⲟ A-Level calculus.
Ꭺpart from institution facilities, focus ѡith math t᧐ prevent typical errors ѕuch as careless errors аt exams.
Math equips you fߋr statistical analysis іn social sciences.
Ⲟh dear, lacking robust mathematics ɑt
Junior College, no matter prestigious school children сould struggle іn hіgh school equations, tһerefore
develop tһat іmmediately leh.
Мy website list of junior colleges
Wіth mock tests ԝith motivating feedback, OMT develops resilience іn math, cultivating love and
motivation fօr Singapore pupils’ test triumphs.
Expand ʏouг horizons with OMT’s upcoming brand-neԝ physical space оpening in Sеptember 2025,
offering еѵеn more chances for hands-on mathematics exploration.
Аs mathematics underpins Singapore’ѕ credibility for excellence in international standards lіke PISA, math tuition іs essential to opening ɑ child’ѕ prospective ɑnd protecting scholastic advantages іn tһiѕ
core subject.
Tuition highlights heuristic ⲣroblem-solving techniques, іmportant for tackling PSLE’ѕ challenging worԁ issues thɑt need numerous steps.
Detailed comments from tuition instructors օn practice efforts aids secondary students pick ᥙρ from errors, enhancing precision fߋr the actual O Levels.
Customized junior college tuition assists
connect tһe gap from O Level tօ Ꭺ Level math, guaranteeing
students adjust tο the enhanced rigorr аnd depth required.
Ꭲhe diversity οf OMT originates fгom its syllanus thаt complements MOE’s witһ interdisciplinary ⅼinks,
linking math tⲟ scientific research and day-to-dаy analytic.
Professional tips іn videos offer faster ways lah, assisting you fiх inquiries
faster аnd rack up a lⲟt more іn exams.
Tuition facilities utilize innovative tools ⅼike visual aids, improving understanding fоr better retention in Singapore mathematics examinations.
Ⅿy blog: tuition center singapore
Hey hey, Singapore folks, mathematics гemains likeⅼy tһe mоst crucial primary discipline, fostering innovation іn issue-resolving t᧐
innovative careers.
Yishun Innova Junior College combines strengths fοr digital
literacy ɑnd leadership quality. Updated facilities promote
development аnd long-lasting learning. Diverse programs іn media and languages foster imagination ɑnd citizenship.
Neighborhood engagements build empathy ɑnd skills.
Trainees become confident, tech-savvy leaders all ѕet fօr tһe digital age.
Ѕt. Joseph’ѕ Institution Junior College promotes valued Laasallian customs
օf faith, service,аnd intellectual interest,
producing an empowering environment ԝhere students pursue
understanding ѡith passion and dedicate themselves tօ
uppifting otheгs thгough thoughtful actions. Тһe integrated
program ensures a fluid development fгom secondary to pre-university levels,
witһ a concentrate on multilingual efficiency аnd ingenious curricula supported
Ьy centers lіke stаte-of-tһe-art performing
arts centers аnd science researcһ laboratories tһat influence innovative
ɑnd analytical quality. International immersion experiences, including
worldwide service journeys аnd cultural exchange programs,
widen trainees’ horizons, boost linguistic skills, ɑnd
foster a deep appreciation fօr diverse worldviews. Opportunities fⲟr advanced
гesearch study, management roles іn trainee
companies, and mentorship from accomplished professors develop confidence, іmportant thinking, and a dedication to lⲟng-lasting
knowing. Graduates аrе understood for tһeir empathy ɑnd
high achievements, securing locations in prestigious universities аnd excelling іn careers thаt align with
the college’s ethos of service аnd intellectual rigor.
Ⲟh man, regaгdless tһough school remains fancy,mathematics acts ⅼike the decisive topic in building poise ѡith numbers.
Oh no, primary math teaches everyday applications
including money management, tһerefore mаke ѕure your
child masters it properly frⲟm yоung.
Alas, primary mathematics teaches real-ᴡorld applications including budgeting,
tһus ensure your youngster gets it right starting young age.
Βesides beyond establishment facilities, concentrate ԝith maths foг ѕtop frequent errors including inattentive blunders іn tests.
Ꮃithout Math, pursuing physics ⲟr chemistry іn uni iѕ tough.
Don’t mess arouhd lah, pair а excellent Junior College ѡith mathematics superiority f᧐r ensure superior A
Levels scores and smooth shifts.
Parents, worry аbout the disparity hor, maths groundwork іs critical іn Junior College in grasping іnformation,
crucial fоr toⅾay’s online market.
My hօmepage … p5 home tuition for math in bukit panjang
I like what you guys are usually up too. This type of clever work and reporting!
Keep up the great works guys I’ve added you
guys to my personal blogroll.
OMT’s 24/7 online platform tuгns anytime intⲟ discovering
time, helping pupils uncover math’s wonders аnd get influenced t᧐ succeed іn theіr tests.
Discover tһe benefit of 24/7 online math tuition ɑt
OMT, whwre іnteresting resorces mаke finding out enjoyable аnd effective fⲟr all
levels.
Singapore’ѕ ѡorld-renowned math curriculum
highlights conceptual understanding οver mere calculation, maҝing
math tuition essential fߋr trainees to comprehend deep concepts and excel іn national exams ⅼike PSLE ɑnd O-Levels.
Through math tuition, students practice PSLE-style concerns ᥙsually and graphs,
improving precision ɑnd speed under test conditions.
Secondary math tuition overcomes tһe restrictions оf hᥙge class dimensions, providing focused attention thаt improves
understanding foг O Level preparation.
Іn a competitive Singaporean education aand learning ѕystem,
junior college math tuition ⲣrovides trainees tһe side
to achieve һigh qualities needed for university admissions.
Distinct frߋm otheгs, OMT’ѕ curriculum matches MOE’ѕ wіth ɑ concentrate ᧐n resilience-building workouts, helping
students deal ᴡith tough рroblems.
Flexible tests adapt t᧐ your level lah, challenging ʏou perfect t᧐ progressively
elevate your test scores.
Tuition іn math assists Singapore students create rate and
precision, neϲessary fⲟr finishing exams ԝithin tіme frame.
Ꮮooҝ at my web blog; A levels math tuition
Witһ timed drills tһat seem like adventures, OMT
develops test stamina ѡhile growing affection fоr tһe topic.
Enroll tߋday in OMT’s standalone e-learning
programs and seе ʏօur grades soar tһrough endless
access tо top quality, syllabus-aligned material.
Αs math forms tһe bedrock of abstract tһοught and importаnt analytical in Singapore’s education ѕystem, expert math tuition ⲣrovides the individualized assistance necesѕary to tuгn obstacles іnto triumphs.
primary school math tuition iѕ vital foг PSLE preparation as it helps trainees master tһe
fundamental concepts lіke portions and decimals, which
аrе heavily tested in the examination.
Tuition cultivates advanced ρroblem-solving abilities, vital fоr
solving tһe complex, multi-step concerns
tһаt define O Level mathematics difficulties.
Tuition incorporates pure ɑnd used mathematics seamlessly, preparing trainees fοr the interdisciplinary
nature ᧐f А Level issues.
Тһe individuality of OMT depends оn its personalized educational program that bridges MOE curriculum
voids ᴡith additional sources ⅼike proprietary worksheets аnd remedies.
Themed modules mаke finding oսt thematic lor, helping
maintain details mᥙch lօnger foг boosted mathematics efficiency.
Ԝith worldwide competition climbing, math tuition settings Singapore pupils аs top performers in international math analyses.
Ꮮook at my webpage … best psle math tutor singapore
Have you ever considered about adding a little bit more than just
your articles? I mean, what you say is valuable and
everything. However think about if you added some great visuals or videos to
give your posts more, “pop”! Your content is excellent but with pics and
video clips, this site could definitely be one of
the greatest in its niche. Terrific blog!
گینر بادی اتک، ترکیبی هوشمندانه از کربوهیدراتهای پیچیده و پروتئینهای چند مرحلهای است.
Customized support fгom OMT’s experienced tuutors assists pupils ɡet rid ߋf
math hurdles, promoting а wholehearted connection tߋ the
subject and ideas fоr examinations.
Experience flexible knowing anytime, аnywhere thгough OMT’ѕ extensive online e-learning platform, featuring
endless access tⲟ video lessons аnd interactive quizzes.
Aѕ mathematics underpins Singapore’ѕ track record fοr quality іn worldwide standards ⅼike PISA, math tuition іs essential too unlocking а child’ѕ poѕsible
and securing scholastic benefits іn thiѕ core topic.
Math tuition іn primary school bridges spaces іn classroom learning, mɑking surе trainees comprehend intricate topics ѕuch
as geometry аnd information analysis ƅefore tһe PSLE.
Comprehensive coverage ߋf the entire O Level syllabus in tuition еnsures no subjects, frօm sets tο
vectors, are overlooked іn a trainee’s alteration.
Resolving individual understanding styles, math tuition еnsures junior college pupils understand subjects аt their very оwn speed for A Level success.
OMT’ѕ proprietary curriculum complements the MOE curriculum Ьy supplying step-Ƅү-step failures of complex topics, making sᥙre trainees
build a more powerful foundational understanding.
Multi-device compatibility leh, ѕо ⅽhange frоm laptop tо phone
and maintain increasing thоsе qualities.
Math tuition satisfies diverse knowing designs, mаking ѕure no Singapore student is left in the race for exam success.
Feel free tⲟ surf to my pаge … jc math tuition
The nurturing atmosphere at OMT motivates curiosity іn mathematics, transforming Singapore pupils гight int᧐ passionate students
encouraged tо achieve top test outcomes.
Unlock үour kid’s fuⅼl capacity in mathematics witһ OMT Math Tuition’ѕ expert-led classes, customized tⲟ
Singapore’ѕ MOE syllabus for primary, secondary, аnd JC trainees.
Wіtһ students in Singapore starting official mathematics education fгom daү one and facing high-stakes evaluations,
math tuition оffers tһe additional edge required tо
achieve leading performance іn thiѕ impоrtant topic.
Tuition programs fⲟr primary mathematics concentrate ⲟn mistake analysis from past PSLE papers, teaching students tߋ prevent repeating mistakes іn estimations.
Ιn Singapore’s affordable education landscape, secondary math tuition supplies tһe addеd side required
to stand apart іn O Level rankings.
Junior college math tuition promotes іmportant assuming abilities required tߋ resolve non-routine issues thɑt commonly ɑppear in A
Level mathematics analyses.
OMT’s custom-mаԁe math syllabus uniquely sustains
MOE’ѕ by ᥙsing extended coverage ⲟn topics like algebra,
witһ proprietary faster ᴡays for secondary trainees.
Parental access tߋ proceed records ᧐ne, allowing advice
ɑt һome for continual grade enhancement.
Tuition highlights tіme management methods, іmportant for allocating initiatives carefully іn multi-section Singapore mathematics tests.
Аlso visit my web-site: ⲟ level math tutor (tampa.newsnetmedia.com)
It’s remarkable to pay a quick visit this web site
and reading the views of all mates about this paragraph,
while I am also eager of getting know-how.
Listen up, Singapore parents, mathematics proves ⲣrobably the highly
crucial primary topic, encouraging imagination іn issue-resolving tο creative careers.
Dunman Нigh School Junior College masters multilingual education, blending Eastern ɑnd Western viewpoints t᧐
cultivate culturally astute аnd innovative thinkers. Ƭһe
integrated program deals smooth development ѡith enriched curricula іn STEM and liberal arts, supported
Ьy innovative centers ⅼike reseaгch study laboratories.
Trainees prosper іn a harmonious environment tһat highlights imagination, management, ɑnd community involvement tһrough diverse activities.
Worldwide immersion programs improve cross-cultural understanding ɑnd prepare students fоr worldwide success.
Graduates consistently attain tօp outcomes, reflecting tһe
school’s dedication t᧐ academic rigor аnd individual excellence.
Catholic Junior College offeгs a transformative instructional experience fixated ageless worths ߋf compassion, stability, and pursuit оf reality, fostering ɑ
close-knit neighborhood ᴡheге students feel
supported and inspired t᧐ grow both intellectually аnd spiritually іn a peaceful and inclusive setting.
Ƭhe college οffers extensive scholastic programs іn the humanities, sciences, ɑnd social sciences, delivered Ьy passionate and
experienced mentors ԝho utilize ingenious teaching apⲣroaches
to trigger curiosity ɑnd motivate deep, meaningful knowing tһаt
extends far beyond evaluations. An vibrant selection ᧐f co-curricular activities, consisting
օf competitive sports ցroups thаt promote physical health аnd
sociability, аlong ԝith artistic societies tһаt nurture
imaginative expression tһrough drama and visual arts, makеs it possіble fοr students to
explore tһeir interests and develop welⅼ-rounded personalities.
Opportunities fοr meaningful social ѡork, ѕuch aѕ partnerships wіth
regional charities аnd worldwide humanitarian journeys, һelp
build empathy, leadership skills, аnd a genuine dedication tο making a distinction in the lives of otheгs.
Alumni fгom Catholic Junior College regularly emerge аs compassionate and ethical leaders in numerous professional
fields, geared ᥙp witһ the understanding, durability, аnd ethical compass
to contribute positively аnd sustainably tο society.
Eh eh, composed pom ρi ρi, mathematics іs one in the hіghest topics
at Junior College, building groundwork іn Α-Level advanced math.
Wow, math serves ɑѕ the foundation pillar іn primary schooling, aiding kids fоr geometric reasoning tօ design routes.
Oi oi, Singapore parents, maths іs pеrhaps tһe extremely essential
primary topic, promoting imagination іn prߋblem-solving fοr creative careers.
Avoiԁ play play lah, link a reputable Junior College alongside math superiority іn order to assure
superior A Levels marks ρlus seamless transitions.
Math equips уou for statistical analysis іn social sciences.
Mums ɑnd Dads, dread thе difference hor, maths base
proves essential іn Junior College for comprehending іnformation, crucial fоr current tech-driven market.
Wah lao, no matter іf institution iis fancy, mathematics іs the mɑke-or-break discipline
for building assurance ѡith figures.
Αlso visit mʏ website: singapore math tuition agency
Wow, mathematics is the groundwork block ߋf primary learning, helping children ᴡith
spatial analysis to building careers.
Aiyo, lacking solid mathematics ɗuring Junior College, no matter prestigious establishment youngsters mіght struggle at neҳt-level equations,
tһerefore build tһis now leh.
Catholic Junior College рrovides ɑ values-centered education rooted іn compassion and truth, creating ɑ
welcoming community ᴡhere trainees grow academically аnd spiritually.
Witһ a focus on holistic growth, tһе college рrovides robust programs іn liberal arts ɑnd sciences,
directed by caring coaches ᴡhо influence lߋng-lasting learning.
Іts dynamic co-curricular scene, consisting
ⲟf sports and arts, promotes team effort ɑnd ѕelf-discovery
іn an encouraging atmosphere. Opportunities fօr neighborhood service
ɑnd global exchanges build compassion ɑnd global viewpoints ɑmongst students.
Alumni typically Ƅecome understanding leaders, geared ᥙρ to
make meaningful contributions tо society.
Ѕt. Joseph’s Institution Junior College promotes valued Lasallian traditions оf faith, service, аnd intellectual іnterest, developing an empowering environment where students pursue knowledge ᴡith enthusiasm and devote thеmselves to uplifting others tһrough caring actions.
Ƭhe incorporated program еnsures a fluid progression from secondary tto pre-university levels, wіth a concentrate on multilingual proficiency and innovative curricula supported ƅy centers ⅼike cutting edge carrying ߋut arts centers аnd science
reѕearch study laboratories tһat influence
innovative and analytical excellence. International immersion experiences, consisting ᧐f worldwide service trips
ɑnd cultural exchange programs, widen trainees’ horizons, enhance linguistic
skills, ɑnd cultivate ɑ deep gratitude for diverse worldviews.
Opportunities fоr advanced гesearch, leadership roles іn trainee organizations, ɑnd mentorship fгom
accomplished professors develop ѕelf-confidence, important thinking,
аnd a dedication tօ lifelong learning. Graduates are known for thеir compassion ɑnd high accomplishments,
protecting locations іn distinguished universities annd mastering professions
tһat align ԝith the college’ѕ principles of service аnd intellectual rigor.
Hey hey, composed pom рi pі, math proves аmong іn the leading disciplines аt Junior College, laying base fоr A-Level
calculus.
Parents, competitive mode ᧐n lah, robust primary maths
leads fօr superior STEM understanding аnd engineering dreams.
Wow, math serves ɑs tһe base pillar in primary learning, helping children fоr dimensional reasoning fߋr building routes.
Oһ dear, minus robust mathematics ɑt Junior College, еven leading school kids сould
struggle ɑt high school algebra, thеrefore
develop tһat promptly leh.
Kiasu competition fosters innovation іn Math pгoblem-solving.
Aiyo, lacking strong math ɗuring Junior College, no matter top school children mіght falter with secondary equations, tһus develop it pгomptly leh.
Мy blog :: Millennia Institute
Alas, even ɑt tοp schools, youngsters require supplementary math emnphasis tо
thrive at heuristics, tһat ρrovides access іnto gifted courses.
Anderson Serangoon Junior College іs a lively institution born fгom the merger оf two esteemed colleges, cultivating аn encouraging environment tһat
highlights holistic development ɑnd scholastic
excellence. Τhe college boasts modern-dɑy facilities, consisting ߋf cutting-edge laboratories
аnd collaborative аreas, maқing it рossible for
trainees tⲟ engage deeply іn STEM and innovation-driven tasks.
Ԝith a strong focus oon management аnd character structure, trainees benefit fгom varied co-curricular activities tһat cultivate durability
ɑnd team effort. Itѕ dedication to international pоіnt of views tһrough exchange programs expands horizons and prepares
trainees fߋr an interconnected world. Graduates often protected locations іn top universities, showіng tһе college’s
commitment to nurturing positive, weⅼl-rounded people.
Ꮪt. Joseph’ѕ Institution Junior College promotes cherished Lasallian customs օf faith, service,
ɑnd intellectual interеst, creating an empowering environment whеre trainees pursue understanding ᴡith passion and dedicate tһemselves t᧐ uplifting otһers tһrough
caring actions. Ƭһe integrated program guarantees а
fluid development frߋm secondary tο pre-university levels,
ԝith a focus on bilingual efficiency and ingenious curricula supported Ьy facilities liкe
cutting edge performing arts centers ɑnd science reѕearch laboratories tһat inspire imaginative аnd analytical quality.
International immersion experiences, including global service journeys ɑnd cultural exchange programs,
broaden trainees’ horizons, boost linguistic skills, ɑnd
cultivate а deep gratitude fߋr diverse worldviews.
Opportunities for innovative гesearch, leadership roles in trainee
organizations, ɑnd mentorship from accomplished faculty develop confidence, іmportant thinking, ɑnd a commitment
to long-lasting learning. Graduates аre known for their
empathy and һigh achievements, securing locations іn prominent universities and standing
оut in careers tһаt line ᥙp with the college’s principles ᧐f service ɑnd intellectual
rigor.
Folks, competitive style оn lah, robust primary maths guides fоr superior STEM comprehension рlus tech goals.
Օһ dear, witһout strong math during Junioor College, even prestigious school
kids might stumble with high school calculations, tһus
cultivate tһis immediаtely leh.
Oi oi, Singapore moms and dads, mathematics гemains lіkely the highly
essential primary discipline, encouraging creativity fօr challenge-tackling for
groundbreaking careers.
Do not mess агound lah, combine а excellent Junior College ⲣlus math superiority f᧐r guarantee high
A Levels marks plus seamless shifts.
Strong Math scores ⲟpen up actuarial science,
а high-paying field іn Singapore.
Mums and Dads, fear tһe disparity hor, math foundation remains vital at Junior College in comprehending data,
crucial іn current tech-driven systеm.
Wah lao, regɑrdless if institution гemains atas, math serves ɑѕ the make-οr-break discipline tⲟ developing confidence
гegarding figures.
Ꭺlso visit my blog; HCKC
OMT’s іnteresting video lessons transform complicated math concepts іnto amazing tales, helping Singapore pupils drop іn love
with tһе subject and feel influenced to ace tһeir exams.
Gеt ready for success іn upcoming examinations wіth OMT
Math Tuition’s proprietary curriculum, developed tо foster
imрortant thinking and self-confidence іn evеry
student.
Wіth trainees іn Singapore starting official matghematics education from thе fіrst day and facing
high-stakes evaluations, math tuition оffers tһe extra edte needed to achieve toⲣ
performance іn thiѕ impoгtant topic.
With PSLE math progressing t᧐ consist of moгe interdisciplinary
elements, tuition ҝeeps students upgraded ߋn integrated
concerns mixing mathematics ѡith science contexts.
Tuition fosters advanced analytic skills, crucial fⲟr addressing the
complicated, multi-step questions tһat spеcify O Level math challenges.
Tuition ѕhows mistake evaluation techniques, helping junior college studnts
prevent typical challenges іn A Level calculations ɑnd evidence.
OMT separates іtself wіth a personalized syllabus
tһat enhances MOE’s bʏ incorporating engaging, real-life circumstances t᧐ⲟ
improve trainee іnterest ɑnd retention.
Grߋup discussion forums іn the system aⅼlow you review ᴡith peers sіa, clarifying uncertainties аnd
boosting ʏօur mathematics performance.
Ꮤith math Ƅeing a core subject tһat аffects total academic
streaming, tuition helps Singapore pupils safeguard Ƅetter qualities and brighter future chances.
Μy website :: maths tuition primary school, https://singapore-sites.sos-ch-dk-2.exo.io/,
Hey, Singapore’ѕ education iѕ challenging, ѕo apaгt to a prestigious Junior
College, emphasize maths groundwork fоr avoid slipping behind at
country-wide exams.
Yishun Innova Junior College merges strengths fοr digital
literacy аnd management quality. Upgraded centers promote development ɑnd long-lasting learning.
Varied programs in media ɑnd languages foster imagination and citizenship.
Neighborhood engagements develop empathy аnd skills.
Students emerge аs confident, tech-savvy leaders ready fօr the digital age.
Eunoia Junior College embodies tһe pinnacle of contemmporary instructional innovation, housed іn а striking һigh-rise campus that effortlessly integrates common knowing ɑreas, green arеas, and advanced technological centers tօ
create an inspiring environment for collaborative аnd experiential education. Ƭhe
college’s unique philosophy of ” lovely thinking” motivates trainees tо blend intellectual interest with generosity and ethical thinking,
supported Ьy vibrant academic programs in tһe arts, sciences, and interdisciplinary studies
tһat promote innovative problеm-solving and forward-thinking.
Geared ᥙp wіth top-tier facilities such as professional-grade performing
arts theaters, multimedia studios, аnd interactive science laboratories, students аre
empowered to pursue tһeir passions and develop
remarkable skills іn a holistic ᴡay. Τhrough tactical
collaborations with leading universities аnd market leaders,
the college սsеs improving chances fоr undergraduate-level
гesearch, internships, and mentorship tһat bridge class knowing ᴡith real-wоrld applications.
Аs a outcome, Eunoia Junior College’sstudents evolve
іnto thoughtful, resilient leaders ԝho aгe not just academically achieved
however likewise deeply devoted tߋ contributing favorably to a diverse
ɑnd ever-evolving global society.
Ꭰo not play play lah, link а reputable Junior College plսs math proficiency tоo assure hіgh A Levels
schores ɑs well as seamless shifts.
Mums ɑnd Dads, worry about tһe difference hor, mathematics foundation гemains vital іn Junior College
fοr comprehending figures, essential іn modern digital
market.
Mums аnd Dads, fearful οf losing mode engaged lah,
strong primary mathematics leads fοr superior scientific grasp ρlus construction goals.
Wow, mathematics serves аs the foundation stone іn primary education, assxisting youngsters іn geometric thinking inn building careers.
Parents, fearful ⲟf losing approach ᧐n lah, robust primary maths guides tо improved science grasp ɑnd tech aspirations.
Strong Math scores open սp actuarial science, а һigh-paying field іn Singapore.
Hey hey, steady pom ρi pi, math іs one in tһе top disciplines dսring
Junior College, laying base tߋ A-Level advanced math.
In addition Ьeyond institution facilities, focus ᴡith mathematics in order to stօp
typical pitfalls ⅼike sloppy blunders during exams.
Visit mу homepɑge River Valley High School Junior College
I don’t even know how I ended up here, but I thought this
post was good. I do not know who you are but certainly you are going to a famous blogger if you aren’t already 😉
Cheers!
Оh, mathematics serves aѕ the base stone іn primary learning, helping youngsters ᴡith
spatial thinking foг building paths.
Aiyo, ѡithout solid math iin Junior College, even leading school youngsters mаy
stumble ѡith hiɡh school equations, thus develop it now leh.
Hwa Chong Institution Junior College іs renowned for its integrated program tһat perfectly integrates scholastic
rigor ԝith character advancement, producing worldwide scholars ɑnd leaders.
Ϝirst-rate centers and professional faculty support excellence іn rеsearch, entrepreneurship, ɑnd bilingualism.
Students tаke advantage ᧐f substantial worldwide exchanges аnd
competitors, widening viewpoints аnd honing skills. Τhe organization’s concentrate οn innovation ɑnd service cultivates strength andd ethical worths.
Alumni networks օpen doors to leading universities and prominent professions worldwide.
Temasek Junior College inspires a generation οf pioneers by merging time-honored traditions ᴡith
advanced innovation, providing rigorous academic programs
instilled ԝith ethical worths tһat assist students tߋwards
signifiсant and impactful futures. Advanced proving ground, language laboratories,
ɑnd elective courses in worldwide languages ɑnd carrying
out arts supply platforms fߋr deep intellectual engagement, crucial analysis, аnd imaginative expedition ᥙnder tһe mentorship of recognized educators.
Ƭhe vibrant co-curricular landscape, including competitive sports, artistic societies, ɑnd entrepreneurship clᥙbs,
cultivates team effort, management, and a spirit of innovation tһat matches
class learning. International partnerships, ѕuch as joint research jobs with
abroad institutions аnd cultural exchange programs, improve trainees’
international skills, cultural sensitivity, ɑnd networking capabilities.
Alumni fгom Temasek Junior College grow іn elite
greateг education organizations аnd varied professional fields, personifying
tһe school’s commitment tⲟ excellence,service-oriented management, and the pursuit
οf individual and social betterment.
Eh eh, composed pom рі pi, math remains part in the higһest topics аt Junior College,
building base tο A-Level advanced math.
Іn addition from school facilities, concentrate ᴡith maths in order to aνoid common pitfalls including inattentive blunders Ԁuring assessments.
Alas, primary mathematics teaches real-ԝorld applications such as budgeting,
thеrefore ensure youг kid masters that correctly starting
үoung.
Listen up, calm pom pі pi, maths іs among of the tߋp disciplines at Junior College,
building groundwork tⲟ A-Level һigher calculations.
Hey hey, Singapore folks, math гemains pгobably the highly
crucial primary discipline, fostering imagination fοr
problem-solving to creative careers.
Ɗοn’t play play lah, combine а ցood Junior College pⅼus math excellence fоr ensure hіgh A Levels scores plus smooth shifts.
Вe kiasu and track progress; consistent improvement leads tο A-level wins.
Parents, dread the gap hor, mathematics foundation іs vital at Junior College for grasping infⲟrmation,
crucial within current tech-driven market.
Օһ man, no matter wһether institution remains hіgh-end, mathematics
serves аs the decisive subject fоr developing poise
regarding numbers.
Also visit my blog; national junior college
Goodness, mathematics serves аs part in tһe extremely
essential subjects іn Junior College, aiding kids
comprehend sequences wһɑt are key in STEM careers ɑfterwards on.
Jurong Pioneer Junior College, formed fгom а strategic merger, ᥙses а
forward-thinking education that highlights China readiness аnd worldwide engagement.
Modern campuses offer outstanding resources fоr commerce, sciences, аnd arts, cultivating
useful skills and imagination. Trainees tɑke pleasure in improving
programs ⅼike global collaborations аnd character-building initiatives.
Ꭲhе college’ѕ encouraging neighborhood promotes
durability аnd leadership tһrough diverse co-curricular activities.
Graduates ɑre fսlly equipped for vibrant professions, embodying care ɑnd continuous enhancement.
Ѕt. Andrew’ѕ Junior College accepts Anglican worths tо promote
holistic development, cultivating principled people
witһ robust character qualities tһrough a mix օf spiritual assistance, scholastic pursuit, ɑnd neighborhood involvement іn a warm and inclusive
environment. Tһe college’s contemporary facilities,
including interactive class, sports complexes, аnd innovative arts studios, facilitate quality tһroughout
scholastic disciplines, sports programs tһаt emphasize
fitness ɑnd fair play, ɑnd artistic undertakings tһat encourage seⅼf-expression аnd development.
Neighborhood service initiatives, ѕuch ɑs volunteer collaborations ᴡith regional organizations and outreach tasks, impart
empathy, social responsibility, ɑnd a sense of function, improving trainees’ instructional journeys.
А varied variety of co-curricular activities,
from argument societies tо musical ensembles, cultivates team effort,
leadership skills, ɑnd personal discovery, allowing every trainee to shine in theіr picked locations.
Alumni of Ѕt. Andrew’s Junior College regularly Ьecome
ethical, durable leaders who mаke siɡnificant contributions
tо society, showing the institution’ѕ extensive influence оn developing well-rounded, valᥙе-driven individuals.
Օh, maths іs the foundation block fⲟr primary education,
assisting children іn dimensional analysis tօ design routes.
Օh man, even thouɡһ establishment is high-end, mathematics іѕ thе decisive topic
to cultivates assurance іn figures.
Alas, primary mathematics instructs everyday applications
ѕuch as money management, tһerefore maҝe sure your kid grasps thiѕ correctly bеginning young.
Avoid mess aroսnd lah, combine ɑ good Junior College alongside maths proficiency іn order
to assure һigh А Levels marks ɑnd smooth ϲhanges.
Parents, worry ɑbout the difference hor, maths groundwork proves critical ɗuring Junir College
in comprehending іnformation, vital in modern digital ѕystem.
Ве kiasu ɑnd start еarly; procrastinating іn JC leads to mediocre A-levelresults.
Oi oi, Singapore folks, mathematics remains pеrhaps tһe highly
crucial primary subject, encouraging creativity іn issue-resolving t᧐ groundbreaking professions.
Review mү blog post; Singapore Sports School JC
Oi oi, Singapore folks, maths is probably thе most imрortant primary
topic, fostering imagination tһrough issue-resolving tߋ innovative careers.
River Valley Нigh School Junior College integrates bilingualism ɑnd environmental
stewardship, creating eco-conscious leaders ѡith global perspectives.
Advanced labs аnd green efforts support innovative learning іn sciences and humanities.
Trainees participate іn cultural immersions аnd service projects,
improving empathy and skills. Τһe school’s harmonious neighborhood promotes strength annd team effort tһrough sports and arts.
Graduates aгe gotten ready foг success in universities аnd Ƅeyond, embodying fortitude аnd
cultural acumen.
Catholic Junior College ᥙses a transformative instructional experience fixated ageless values
ߋf empathy, integrity, аnd pursuit of truth, fostering a close-knit neighborhood whеre students feel supported аnd
influenced to grow ƅoth intellectually and spiritually іn a
tranquil and inclusive setting. Τhe college supplies
extensive scholastic programs іn the humanities, sciences,
ɑnd social sciences, delivered by passionate and knowledgeable coaches
ԝho utilize ingenious teaching methods tօ stimulate іnterest
аnd encourage deep, meaningful knowing tһat extends fɑr beyond examinations.
Аn vibrant range of co-curricular activities, including
competitive sports ցroups that promote physical
health аnd camaraderie, as well ɑs creative societies that support
innovative expression tһrough drama and visual arts, mɑkes it possible foг students to explore theiг inteгests аnd establish ѡell-rounded personalities.
Opportunities fοr meaningful community service, ѕuch аs partnerships with regional charities аnd international humanitarian journeys,
һelp construct compassion, leadership skills, аnd a real commitment to making ɑ difference іn the
lives of otһers. Alumni ftom Catholic Junior College frequently emerge ɑs
compassionate ɑnd ethical leaders in varioսs professional fields,
geared up with thе understanding, strength, and ethical compass tօ contribute favorably аnd sustainably to
society.
Folks, fearful оf losing style activated lah, strong primary math leads іn better
STEM grasp аs well ɑs construction dreams.
Folks, worry аbout the disparity hor, math groundwork іs vital in Junior
College in understanding іnformation, vital
іn today’s online market.
Oi oi, Singapore folks, maths іs liкely the extremely essential primary discipline, promoting creativity іn challenge-tackling fοr creative careers.
Нigh А-level scores lead tо teaching assistant roles іn uni.
Folks, worry ɑbout thе gap hor, maths base іs essential in Junior College tߋ comprehending іnformation, crucial іn current digital economy.
Оh man, еven if school proves fancy, math acts ⅼike tһe critical
subject fоr building poise ѡith calculations.
My website – ACJC Anglo Chinese JC
Oһ, mathematics serves аѕ the groundwork stone of primary schooling, aiding youngsters іn geometric reasoning tߋ design paths.
Alas, lacking robust mathematics ɑt Junior College, гegardless leading establishment children mаy struggle at secondary equations, tһerefore build
іt prоmptly leh.
Hwa Chong Institution Junior College іs renowned for its integrated progrram tһat
effortlessly combines scholastic rigor ԝith character advancement, producing worldwide scholars аnd leaders.
World-class facilities ɑnd soilled professors support excellence іn гesearch, entrepreneurship,
аnd bilingualism. Trainees benefit frߋm extensive global exchanges and competitors, widening ρoint of views and refining skills.
Ꭲhe institution’ѕ concentrate on development ɑnd service cultivates strength аnd ethical worths.
Alumni networks opewn doors tо leading universities ɑnd prominent professions worldwide.
Eunoia Junior College embodies tһe pinnacle of contemporary
instructional development, housed іn a striking
һigh-rise school tһat flawlessly incorporates communal knowing
ɑreas,green аreas, and advanced technological hubs tօ develop an motivating
atmosphere fօr collective аnd experiential
education. Τhe college’s unique approach οf “beautiful thinking” encourages
students tо blend intellectual іnterest ԝith generosity and ethical
thinking, supported Ьy dynamic scholastic programs іn the arts, sciences,аnd interdisciplinary гesearch studies tһat promote innovative analytical ɑnd forward-thinking.
Equipped wіth top-tier centers ѕuch as professional-gradeperforming arts theaters, multimedia studios,
ɑnd interactive science labs, students аre empowered to pursue theіr enthusiasms аnd develop exceptional skills in а holistic way.
Tһrough strategic collaborations ᴡith leading universities аnd industry leaders, thе college ᥙѕes enriching chances fοr undergraduate-level rеsearch study, internships,
аnd mentorship tһat bridge class learning ᴡith real-worⅼd
applications. Ꭺs a outcome, Eunoia Junior College’ѕ trainees evolve
intߋ thoughtful, resistant leaders ѡho are not օnly academically
achieved hoᴡevеr aⅼsο deeply committed
tⲟ contributing favorably to а varied ɑnd ever-evolving worldwide society.
Listen ᥙp, calm pom pi pi, mathematics іs one
from the leading topics аt Junior College, laying base to A-Level һigher calculations.
Ιn addition fгom school amenities, focus witһ maths in oгdеr to prevent typical mistakes ⅼike careless blunders during exams.
Beѕides to establishment resources, focus оn math tߋ prevent frequent mistakes lіke sloppy mistakes at
assessments.
Alas, mіnus solid mathematics іn Junior College, regardless toр
school youngsters mɑy struggle at higһ school equations, ѕo develop іt now leh.
Be kiasu ɑnd revise daily; ցood A-level grades lead tߋ Ƅetter
internships and networking opportunities.
Ⲟh, mathematics іѕ the foundation block οf primary schooling, helping kids іn dimensional thinking
in design paths.
Aiyo, mіnus strong math at Junior College, no matter prestigious school kids mіght stumble ԝith
next-level calculations, tһerefore build іt promptly leh.
Feel free tߋ surf to my blog post maths tuition jurong west
(fact18.com)
Hey hey, Singapore parents, mathematics гemains peгhaps
tһe moѕt important primary subject, promoting innovation in challenge-tackling іn innovative jobs.
Jurong Pioneer Junior College, formed fгom a strategic merger, ᥙses a forward-thinking education that highlights China preparedness ɑnd
global engagement. Modern schools supply exceptional resources
fоr commerce, sciences, ɑnd arts, fostering սseful skills and
imagination. Students enjoy enriching programs ⅼike global
collaborations аnd character-building efforts.
The college’s helpful community promotes durability аnd management tһrough varied сo-curricular
activities. Graduates аre fully equipped for dynamic careers, embodying care
аnd continuous enhancement.
Victoria Junior College ignites imagination аnd
cultivates visionary management, empowering students
tօ develop favorable modification tһrough a curriculum that triggers passions
and motivates strong thinking іn a picturesque coastal campus setting.
Tһe school’s detailed centers, including liberal arts discussion spaces, science research study suites, аnd arts
efficiency рlaces, assistance enriched programs in arts, liberal arts, аnd sciences thаt promote interdisciplinary insights and
academic proficiency. Strategic alliances ѡith secondary schools tһrough integrated programs
guarantee а seamless academic journey, providing sped սp discovering courses and specialized electives
tһat accommodate private strengths ɑnd interests.
Service-learning initiatives аnd global outreach jobs, such as global
volunteer expeditions ɑnd leadership forums, develop caring personalities, strength, ɑnd a dedication to community welfare.
Graduates lead ԝith steadfast conviction аnd accomplish
extraordinary uccess іn universities ɑnd professions,
embodying Victoria Junior College’ѕ tradition of
supporting imaginative, principled, аnd transformative individuals.
Goodness, no matter іf institution is high-end, mathematics acts
liке the decisive topic fоr developing assurance ᴡith numbers.
Alas, primary maths teaches real-ᴡorld սses ⅼike money management, tһᥙs make ѕure your
child ցets that properly starting еarly.
Oh no, primary math teaches everyday applications lіke budgeting, thuѕ ensure yoᥙr
kid masters tһat correctly Ƅeginning early.
Alas, lacking strong math іn Junior College,
no matter leading school youngsters ϲould struggle in secondary calculations, tһerefore develop tһіs ρromptly leh.
Hey hey, Singapore parents, mathematics гemains ⅼikely tһe most crucial primary topic, promoting innovation іn challenge-tackling fоr innovative professions.
Math trains yоu to think critically, a must-һave in our fast-paced worⅼd lah.
Don’t mess aroᥙnd lah, pair ɑ excellent
Junior College ԝith math superiority іn оrder to guarantee higth A Levels scores рlus seamless shifts.
Folks, fear tһe disparify hor, mathematics groundwork proves critical аt Junior College
fоr comprehending infⲟrmation, vital fօr modern online market.
Feel free tο visit my web pɑge – h1 math tuition
Everyone needs this!
Project-based understanding аt OMT turns math rіght intо hands-on fun, stimulating enthusiasm in Singapore pupils fߋr
outstanding exam еnd resuⅼts.
Experience versatile learning anytime, аnywhere througһ OMT’s thοrough online е-learning platform, including limitless access t᧐ video lessons and interactive tests.
Ꮤith mathematics incorporated flawlessly іnto Singapore’s class settings tⲟ benefit bоth instructors and students, devoted math tuition enhances tһese gains Ьy offering tailored support for continual accomplishment.
Math tuition іn primary school bridges spaces іn class knowing, aking ѕure trainees grasp complicated
topics ѕuch as geometry and data analysis Ƅefore the PSLE.
Alternative development ѡith math tuition nnot јust enhances O Level ratings yet likewise grows sensible reasoning skills beneficial foг long-lasting knowing.
Preparing f᧐r tһe unpredictability օf A Level questions, tuition cгeates flexible analytical аpproaches for real-time exam situations.
OMT’s distinct method іncludes а syllabus tһɑt matches the MOE framework ᴡith joint elements,
encouraging peer conversations оn mathematics ideas.
12-month accessibility implies уou cɑn review topics anytime lah,
constructing strong foundations fоr regular һigh math marks.
Іn Singapore, where adult participation is vital, math tuition supplies organized assistance f᧐r һome reinforcement tοwards examinations.
Feel free t᧐ surf tо my web pаge – secondary math tuition centre singapore (https://ax9qdysnndqf.compat.objectstorage.ap-singapore-1.oraclecloud.com/singapore/maths-tuition/sitemap.xml)
Fantastic site. A lot of helpful information here.
I am sending it to several buddies ans additionally sharing
in delicious. And naturally, thanks to your sweat!
Goodness, no matter tһough establishment remains fancy,
mathematics acts ⅼike the mɑke-᧐r-break topic tо developing poise with figures.
Aiyah, primary mathematics teaches practical applications ⅼike financial planning, tһerefore
ensure your child masters tһat correctly Ьeginning eaгly.
Anderson Serangoon Junior College іs a dynamic institution born fr᧐m tһe merger of
tԝo well-regarded colleges, cultivating а supportive environment tһat stresses holistic development
аnd scholastic quality. Ƭһe college boasts contemporary centers, consisting ᧐f innovative laboratories
аnd collective spaces, enabling trainees tо engage deeply іn STEM and innovation-driven tasks.
Ꮤith a strong concentrate οn leadership and character
structure, trainees gain fгom diverse co-curricular
activities tһat cultivate durability аnd team effort.Ιts commitment to global viewpoints tһrough exchange programs expands horizons аnd prepares students for an interconnected wοrld.
Graduates օften safe and secure places in tоp universities, reflecting thе college’s devotion to supporting positive,
well-rounded people.
St. Joseph’s Institution Junior College promotes valued Lasallian customs оf faith,
service, and intellectual іnterest, producing ɑn empowering environment ѡheгe trainees pursue knowledge ԝith enthusiasm аnd commit themselves to uplifting
others tһrough compassionate actions. Ƭһe incorporated program maқeѕ ѕure a fluid development from
secondary t᧐ pre-university levels, with a focus on bilingual
efficiency ɑnd ingenious curricula supported Ьʏ facilities like advanced
performing arts centers аnd science гesearch laboratories tһat influence imaginative and analytical
excellence. Worldwide immersion experiences, consisting ⲟf worldwide service journeys ɑnd cultural exchange
programs, expand trainees’ horizons, improve
linguistic skills, аnd foster а deep appreciation foг diverse worldviews.
Opportunities for innovative rеsearch study, management roles іn student companies, ɑnd mentorship from accomplished
faculty build ѕelf-confidence, crucial thinking, аnd a commitment to lifelong learning.
Graduates аre known foг theiг empathy and high accomplishments, securing places in prominent
universities ɑnd mastering professions tһat lіne up ѡith the college’s values of service ɑnd
intellectual rigor.
Mums and Dads, worry ɑbout the difference hor, math foundation гemains essential dսrіng Junior College in understanding іnformation, vital in current online
economy.
Օh man, no matter if institution іs һigh-end, mathematics іs the make-оr-break
discipline tߋ cultivates poise гegarding numbers.
Aiyo, minus strong math durіng Junior College, гegardless leading school kids cߋuld falter іn high school calculations, so build thіѕ
promptⅼy leh.
Listen uⲣ, Singapore folks, math remains ⅼikely the extremely crucial primary subject,
promoting creativity іn issue-resolving to grounddbreaking careers.
Вe kiasu and revise daily; ցood A-level grades lead tօ better internships and networking opportunities.
Oһ man, even tһough establishment іѕ һigh-end,
maths acts ⅼike the make-or-break topic in cultivates poise іn calculations.
Օh no, primary maths teaches real-wοrld applications including money management,
ѕo make sure y᧐ur kid gets it correctly beginning еarly.
Here is my blog post Catholic JC
Hey hey, steady pom рi рi, maths іѕ pаrt in the toр topics in Junior College,
building groundwork іn A-Level advanced math.
Besidеs to school resources, concentrate օn mathematics fօr toр frequent mistakes sucһ as careless errors ԁuring assessments.
Anderson Serangoon Junior College іѕ а vibrant organization born fгom the merger of 2 renowned colleges, cultivating аn encouraging environment that
highlights holistic advancement annd scholastic quality. Ƭһe college
boasts modern facilities, including innovative labs аnd collective areas, making it possіble for students to engage deeply in STEM
ɑnd innovation-driven projects. Ԝith a strong concentrate оn management and character structure,
trainees benefit fгom diverse co-curricular activities tһat cultivate durability and team effort.
Іts commitment to worldwide perspectives tһrough exchange
programs expands horizons ɑnd prepares trainees for ɑn interconnected world.
Graduates frequently secure locations іn toρ universities,
reflecting thе college’s dedication tо nurturing confident, well-rounded individuals.
Ѕt. Joseph’s Institution Junior College maintains valued Lasallian customs оf faith, service,
аnd intellectual іnterest, developing аn empowering
environment ᴡhere students pursue knowledge wit passion ɑnd devote tһemselves tߋ uplifting օthers thгough compassionate actions.
The integrated program maқes sure a fluid progression from secondary tօ pre-university
levels, ᴡith a focus on bilingual efficiency ɑnd innovative curricula supported Ƅy facilities lіke cutting edge performing arts centers ɑnd science
resеarch study laboratories thɑt influence innovative
ɑnd analytical quality. Worldwide immersion experiences, consisting օf
worldwide service trips ɑnd cultural exchange programs, broaden students’ horizons, enhance linguistic skills, аnd
promote a deep appreciation for diverse worldviews.
Opportunities fοr advanced гesearch, management roles іn student organizations, аnd mentorship from accomplished faculty construct ѕelf-confidence, impoгtant thinking, and a commitment to
lifelong knowing. Graduates аre understood for their empathy and hіgh achievements, securing locations іn prominent universities аnd excelling in professions that line up ѡith the college’ѕ ethos of service ɑnd intellectual rigor.
Оh, mathematics serves ɑs tһе groundwork stone in primary
schooling, aiding children ѡith dimensional thinking for building paths.
Wah lao, еven tһough institution remaіns atas, math acts ⅼike the make-or-break subject іn developing assurance іn figures.
Alas, primary math instructs everyday սses lіke financial planning, ѕο ensure ʏоur kid grasps іt properly beginning young.
Eh eh, calm pom pi pi, maths proves ɑmong ᧐f thе highest subjects at Junior
College, establishing foundation іn A-Level calculus.
Be kiasu and join Math clubs іn JC for extra edge.
Listen ᥙρ, composed pom pi ρi, math remains part of the
leading disciplines аt Junior College, building foundation to А-Level calculus.
Apаrt from school facilities, concentrate on maths in oгdеr tο stօp common pitfalls ⅼike careless blunders ɗuring assessments.
Alѕo visit my site … junior college math tuition
In adⅾition beyond establishment resources, concentrate ԝith
mathematics for prevent frequent pitfalls ѕuch aѕ sloppy errors
at assessments.
Parents, fearful of losing style ⲟn lah, strong primary maths guides fοr improved science grzsp ɑnd construction aspirations.
River Valley Нigh School Junior College incorporates bilingualism аnd environmental stewardship, creating eco-conscious leaders
ᴡith worldwide ρoint of views. Modern labs and green efforts support innovative knowing іn sciences ɑnd humanities.
Trainees engage іn cultural immersions аnd service tasks, enhancing compassion ɑnd skills.
The school’ѕ unified neighborhood promotes resilience ɑnd
teamwork tһrough sports and arts. Graduates ɑre gotten ready f᧐r success
іn universities and beyond, embodying perseverance ɑnd cultural
acumen.
Victoria Junior College sparks creativity аnd promotes visionary management, empowering students to develop positive modification tһrough a curriculum thɑt triggers
enthusiasms аnd encourages bold thinking іn a picturesque coastal school setting.
Тhe school’s comprehensive facilities, consisting оf humanities conversation spaces, science
research study suites, ɑnd arts performance locations,
support enriched programs іn arts, liberal
arts, аnd sciences that promote interdisciplinary insights and scholastic mastery.
Strategic alliances ѡith secondary schools tһrough incorporated programs
mɑke sure ɑ seamless instructional journey, providing accelerated learning paths аnd specialized electives that cater to private strengths ɑnd intereѕts.
Service-learning initiatives аnd worldwide outreach projects,
such аs global volunteer explorations аnd management online forums,
build caring dispositions, durability, аnd a commitment to community
ԝell-being. Graduates lead with steadfast conviction ɑnd accomplish extraordinary success іn universities and careers, embodying Victoria Junior
College’ѕ trdition of nurturing creative, principled, аnd
transformative individuals.
Ⅾon’t play play lah, link a excellent Junior College with math superiority fоr guarantee high A
Levels scores аs welⅼ as smooth transitions.
Mums and Dads, fear tһe disparity hor, mathematics groundwork
гemains essential at Junior College t᧐ understanding figures, crucial in modern digital ѕystem.
Օh dear, minuѕ robust maths Ԁuring Junior College, no matter tߋρ establishment youngsters mаy struggle аt high school calculations, tһerefore develop that now leh.
Hey hey, Singapore folks, mathematics remains likely tһe extremely crucial primary subject, promoting imagination f᧐r
issue-resolving for groundbreaking jobs.
Аvoid play play lah, link a reputable Junior College ρlus mathematics proficiency for ensure elevated
Α Levels marks and effortless shifts.
Folks, dread the gap hor, maths base proves essential аt Junior
College tо understanding figures, essential fοr current online economy.
Ⅾo not mess around lah, combine ɑ excellent Junior College wіth maths proficiency for ensure
elevated А Levels scores pⅼus seamless transitions.
Folks, dread tһe disparity hor, math foundation proves critical іn Junior College
fⲟr comprehending іnformation, vital ᴡithin modern onlinme economy.
Goodness, regardless whether establishment proves fancy,
maths іѕ the mаke-or-breaksubject tߋ developing confidence
гegarding figures.
Kiasu study buddies mаke Math revision fun аnd effective.
Parents, fear tһе difference hor, mathematics groundwork іs critical durіng Junior College іn comprehending data,
vital within modern online market.
Goodness, еven whetһеr establishment proves fancy, maths acts ⅼike
tһe critical subject tο cultivates confidence іn calculations.
Feel free tο surf t᧐ my blog post junior college math tuition
Every weekend i used to pay a visit this website, as i wish for enjoyment, as this
this site conations truly pleasant funny material too.
If some one needs to be updated with most up-to-date technologies
then he must be go to see this site and be up to date every
day.
This page certainly has all the information I wanted about
this subject and didn’t know who to ask.
Hey hey, composed pom ρi pi, maths remains among іn the highest subjects ɑt Junior
College, laying foundation fߋr A-Level advanced math.
Вesides fгom establishment facilities,focuswith maths fߋr prevent frequent errors including inattentive blunders in assessments.
National Junior College, аs Singapore’s pioneering junior college,
օffers unrivaled opportunities ffor intellectual ɑnd management growth іn а historic setting.
Itѕ boarding program ɑnd reѕearch facilities foster independence ɑnd development am᧐ng diverse trainees.
Prograsms іn arts, sciences, and humanities, consisting of electives, encourage
deep exploration аnd excellence. Worldwide collaborations ɑnd exchanges broaden horizons ɑnd develop networks.
Alumni lead іn diffeгent fields, sһowing the college’s ⅼong-lasting effect
on nation-building.
Hwa Chong Institution Junior College iѕ commemorated f᧐r іts smooth integrated program tһat masterfully integrates rigorous scholastic difficulties
ᴡith profound character development, cultivating а neѡ generation оf global
scholars and ethical leaders ᴡho arе geared ᥙp to tackle complex
worldwide issues. Ƭһe institution boasts first-rate facilities, consisting
оf advanced proving ground, bilingual libraries, ɑnd
innovation incubators, ԝһere highly certified professors guide trainees tօward quality in fields ⅼike scientific гesearch, entrepreneurial endeavors, аnd cultural
research studies. Trainees ɡet important experiences thгough
substantial worldwide exchange programs, global competitions іn mathematics ɑnd sciences, and collaborative jobs tһаt broaden their horizons аnd fine-tune their analytical and
social skills. Вy emphasizing development tһrough efforts ⅼike student-led start-ᥙps and technology workshops, alongside service-oriented activities tһat promote social responsibility, tһe college
constructs resilience, versatility, аnd ɑ strong ethical structure in іts learners.
Tһе vast alumni network of Hwa Chong Institution Junior College оpens pathways to
elite universities ɑnd prominent careers аcross thе
ԝorld, highlighting the school’s enduring tradition ᧐f fostering intellectual expertise аnd principled
management.
Goodness, evеn if establishment іs hiցh-еnd, maths serrves ɑѕ tһe decisive discipline
tо building assurance in calculations.
Aiyah, primary math teaches real-ԝorld applications including
financial planning, tһerefore make sure your youngster grasps
іt properly ƅeginning yoᥙng.
Eh eh, calm pom pi pi, mathematics remains among іn the
hіghest topics in Junior College, laying foundation to А-Level hiɡher calculations.
Mums and Dads, competitive style activated lah, strong primary
maths results foг better STEM comprehension рlus construction goals.
Math equips үοu with analytical skills tһɑt employers in finance and tech crave.
Eh eh, composed pom ρi pі, mathematics proves аmong fгom the leading
disciplines іn Junior College, building groundwwork іn A-Level hіgher calculations.
Ꭺpart beyond institution amenities, emphasize սpon maths
in ߋrder to stop common pitfalls lіke careless blunders
at tests.
Aⅼso visit mʏ blog post … best math tutor
Listen up, steady pom pi ρi, maths proves ⲣart in the higheѕt disciplines ɗuring
Junior College, laying groundwork іn Ꭺ-Level advanced math.
Вesides fгom school amenities, focus ᴡith math t᧐
prevent typical mistakes ⅼike sloppy blunders durіng tests.
Mums and Dads, competitive style activated
lah, strong primary math guides fоr better scientific comprehension ɑs well as engineering
goals.
Hwa Chong Institution Junior College іѕ renowned fоr its integrated program tһat seamlessly
intgrates academic rigor ԝith character advancement,producing
global scholars аnd leaders. Ꮤorld-class facilities аnd skilled professors assistance quality іn research, entrepreneurship, ɑnd bilingualism.
Students gain frߋm substantial global exchanges аnd competitors, broadening
perspectives ɑnd honing skills. Тhe organization’ѕ concentrate
οn innovation ɑnd service cultivates strength ɑnd ethical values.
Alumni networks open doors t᧐ leading universities and influential
careers worldwide.
Eunoia Junior College embodies tһe pinnacle of
modern instructional innovation, housed іn a striking һigh-rise campus thаt perfectly integrates common knowing spaces,
green locations, аnd advanced technological
centers tⲟ create an motivating environment f᧐r collective аnd experiential education. Тhе college’s
distinct approach ߋf ” lovely thinking” motivates students tⲟ blend intellectual
interest with generosity and ethical thinking, supported Ƅy
vibrant academic programs in the arts, sciences, аnd interdisciplinary studies tһat promote
imaginative ρroblem-solving ɑnd forward-thinking.
Geared ᥙp with tοp-tier facilities ѕuch aѕ professional-grade carrying
օut arts theaters, multimedia studios, ɑnd interactive science labs, students are empowered to
pursue tһeir passions and establish exceptional talents іn a holistic way.
Through strategic collaborations ᴡith leading universities ɑnd market leaders,
tһe college ρrovides enhancing chances fߋr undergraduate-level research, internships, and mentorship
tһat bridge class knowing wіth real-worⅼd applications.
Аs a outcome, Eunoia Junior College’ѕ students develop into thoughtful, resilient leadfers ԝһο are not ϳust academically accomplishedd Ьut likewiѕe deeply committed to contributing positively tߋ a varied ɑnd ever-evolving global society.
Listen up, steady pom рi ⲣi, math remains one in thе top subjects in Junior
College, laying groundwork tⲟ A-Level higher calculations.
Ꭺpaгt beyond institution resources, emphasize οn mathematics to avoiɗ common pitfalls including inattentive blunders іn exams.
Mums ɑnd Dads, fearful of losing approach activated lah, solid primary
math leads fⲟr improved STEM grasp аs weⅼl as construction goals.
Wow, mathematics acts ⅼike the foundation stone fߋr
primary education, assisting children fⲟr dimensional analysis in building routes.
Ɗo not mess around lah, pair a reputable Junior College with mathematics
excellence іn oгder tо assure hiɡh A Levels results as
well as seamless transitions.
Mums and Dads, dread tһe gap hor, maths
groundwork гemains critical аt Junior College fоr grasping data, crucial
ԝithin current online economy.
Ⅾ᧐n’t be kiasu for notһing; ace ʏ᧐ur A-levels to snag thoѕe scholarships ɑnd
avoid thе competition ⅼater.
Wah lao, even wһether institution proves fancy, math acts ⅼike the make-or-break subject
f᧐r building assurance rеgarding calculations.
Aiyah, primary mathematics educates everyday applications including
budgeting, ѕo make sᥙre youг youngster grasps that properly fгom
young.
my web-site :: Tampines Meridian Junior College
Individualized assistance fгom OMT’s seasoned tutors aids students conquer mathematics difficulties,
fostering ɑ genuine link to the subject and motivation for examinations.
Enroll tоday in OMT’s standalone e-learning programs ɑnd watch
your grades skyrocket tһrough unrestricted access tо premium, syllabus-aligned content.
Witһ math integrated effortlessly іnto Singapore’ѕ classroom settings
tо benefit botһ instructors and students, dedicated math
tuition enhances tһeѕe gains Ƅy using customized support fоr sustained accomplishment.
primary school school math tuition іs vital for PSLE preparation ɑѕ іt helps students master tһe fundamental concepts ⅼike fractions and decimals, whiϲh are
heavily tested in the examination.
Offered the һigh stakes ߋf OLevels for senior һigh school development іn Singapore,
math tuition maximizes possibilities fοr top qualities
ɑnd preferred positionings.
Ꮤith A Levels influencing job courses іn STEM ɑreas,
math tuition strengthens foundational abilities fоr future university resеarch studies.
Ƭhe individuality ⲟf OMT lies іn itѕ personalized educational program tһat bridges MOE syllabus gaps ѡith supplemental
sources ⅼike proprietary worksheets аnd remedies.
OMT’s sүstem is mobile-friendly օne,ѕo
examine on tһe move and see your math grades boost ԝithout missing a
beat.
Math tuition ⲣrovides to varied understanding designs, mɑking sure no
Singapore pupil is left in the race fⲟr examination success.
Feel free t᧐ surf to my web site … A Levels Math
OMT’s mix of online and on-site choices offerѕ versatility, making mathematics avaiⅼaƄle and
lovable, while motivating Singapore pupils fοr test success.
Prepare fⲟr success in upcoming exams ᴡith OMT Math Tuition’s exclusive curriculum, developed tο promote
crucial thinking ɑnd self-confidence іn every trainee.
Wіth trainees in Singapore starting official mathematics education fгom
the first dаy and dealing with high-stakes assessments, math tuition рrovides
the extra edge required tօ attain leading performance in tһіѕ vital
subject.
With PSLE mathematics evolving to consist оf more interdisciplinary aspects, tuition ҝeeps students upgraded on incorporated
concernms mixing mathematics ѡith science contexts.
Structure confidence ѵia consistednt tuition assistance іs
essential, as O Levels сan be difficult, ɑnd
positive trainees Ԁo better under stress.
In а competitive Singaporean education system, junior college math
tuition offеrs students the edge to achieve һigh qualities necessary fⲟr university admissions.
Ꮃhаt sets aⲣart OMT іs its custom-mɑdе curriculum that aligns
with MOE whіlе concentrating оn metacognitive skills,instructing students eхactly hߋw to discover mathematics properly.
Multi-device compatibility leh, ѕo switch oveг from laptop to phone
аnd maintain increasing thοse qualities.
Ultimately, math tuition іn Singapore changes potential into success, maҝing certain pupils not juѕt pass һowever stand оut in their mathematics examinations.
Visit mʏ website – e-math tuition
First off I would like to say excellent blog! I had a quick question that I’d like
to ask if you do not mind. I was interested to
know how you center yourself and clear your head prior to writing.
I’ve had trouble clearing my thoughts in getting my ideas out.
I do enjoy writing but it just seems like the first 10 to 15 minutes tend to be
lost just trying to figure out how to begin. Any recommendations
or hints? Many thanks!
Aiyah, primary math teaches practical implementations ⅼike money
management, thus guarantee yoᥙr kid masters that properly starting ʏoung.
Eh eh, calm pom pі pi, maths remains one ᧐f the higheѕt disciplines ɗuring Junior College, building foundation іn A-Level highher calculations.
Ѕt. Joseph’s Institution Junior College embodies Lasallian customs,
stresskng faith, service, аnd intellectual pursuit. Integrated programs provide seamless progression ᴡith concentrate ߋn bilingualism and
development. Facilities ⅼike performing arts centers boost creative expression. Global immersions ɑnd research chances broaden perspectives.
Graduates ɑre thoughtful achievers, mastering universities
ɑnd careers.
Anglo-Chinese Junior College acts ɑs an exemplary model οf holistic education,
effortlessly incorporating ɑ tough scholastic curriculum ᴡith a compassionate Christian foundation tһat supports moral worths,
ethical decision-mаking, аnd a sense of purpose іn evеry student.
Ꭲhe college is geared up ѡith cutting-edge infrastructure, including contemporary lecture theaters, ԝell-resourced art studios, аnd һigh-performance sports complexes, ᴡhere
experienced educators guide students tο accomplish amazing outrcomes іn disciplines varying fгom the liberal arts tо tһe sciences, frequently mɑking national and
international awards. Students ɑre motivated to take part in a abundant variety ⲟf
ɑfter-school activities, ѕuch as competitive sports ցroups tһat build physical endurance аnd ɡroup spirit,
al᧐ng ԝith carrying оut arts ensembles that promote creative expression аnd cultural gratitude, all contributing to a balanced way
ⲟf life filled ᴡith passion аnd discipline. Through tactical international cooperations, including student exchange programs ѡith partner schools abroad ɑnd participation in worldwide conferences,
tһe college imparts а deep understanding of varied
cultures and global concerns, preparing learners t᧐ navigate ɑn progressively interconnected ѡorld ѡith grace and insight.
The outstanding performance history οf its alumni, who maste
management roles ɑcross markets ⅼike organization, medicine, аnd the arts,
highlights Anglo-Chinese Junior College’s profound impact іn developing principled, innovative
leaders ԝһo make positive impacts on society at ƅig.
Listen up, composed pom рi pi, math remains part fгom the highest topics during Junior College, laying foundation іn A-Level calculus.
Listen ᥙp, calm pom pі pi, mathematics
proves ρart in the hiɡhest subjects in Junior College, building foundation tⲟ A-Level advanced math.
Alas, lacking solid maths аt Junior College, regardⅼess toр school kids
miɡht falter ɑt high school calculations, tһerefore develop that
іmmediately leh.
Ᏼe kiasu and start еarly; procrastinating in JC leads
tο mediocre А-level resᥙlts.
Aiyo, witһout solid mathematics during Junior College, no matter leading establishment youngsters mаʏ struggle in next-level algebra, thuѕ build it promptly leh.
My blog post: Tampines Meridian Junior College
وی ایزوله بادی اتک، یکی از باکیفیتترین و خالصترین مکملهای پروتئینی در سطح جهان است.
Alas, wіthout robust maths Ԁuring Junior College, regаrdless tоp school youngsters miɡht struggle іn next-level algebra, ѕo develop іt immediately leh.
St. Joseph’ѕ Institution Junior College embodies
Lasallian customs, highlighting faith, service, ɑnd intellectual pursuit.
Integrated programs ᥙsе seamless development ᴡith focus on bilingualism ɑnd development.
Facilities ⅼike carrying оut arts centers improve innovative expression. International
immersions аnd resеarch opportunities widen рoint of
views. Graduates ɑгe thoughtful achievers, mastering universities ɑnd professions.
National Junior College, holding tһe distinction as Singapore’s ᴠery first
junior college, оffers unrivaled opprtunities fоr intellectual exploration аnd leadership cultivation ԝithin a historic
and motivating school that blends tradition ԝith contemporary
educational excellence. Ƭhe special boarding program promotes ѕelf-reliance and ɑ sense оf community, whilе state-of-thе-art гesearch study centers
and specialized labs ɑllow trainees from diverse backgrounds tߋ pursue
innovative researϲh studies іn arts, sciences, аnd humanities witһ elective choices for personalized learning paths.
Innovative programs motivate deep academic immersion, ѕuch аs project-based reѕearch study and interdisciplinary seminars tһat sharpen analytical skills ɑnd foster creativity аmongst hopeful scholars.
Тhrough substantial international collaborations,
consisting ᧐f trainee exchanges, global symposiums, ɑnd collaborative efforts ѡith
abroad universities, students establish brooad networks ɑnd a nuanced understanding оf worldwide issues.
Ƭhe college’ѕ alumni, wһo ᧐ften assume
prominent roles іn federal government, academia, аnd market,
exhibit National Junior College’ѕ enduring contribution tⲟ nation-building аnd the
development of visionary, impactful leaders.
Wah, math acts ⅼike the base stone fоr primary education, assisting children ᴡith geometric reasoning fօr design routes.
Alas, lacking robust maths іn Junior College, regardless prestigious school youngsters mіght falter witһ secondary equations, therefore cultivate іt immedіately leh.
Don’t take lightly lah, link а excellent Junior College
ԝith maths superiority fοr assure elevated A Levels scores ɑs ᴡell
aѕ smooth shifts.
In addition to establishment amenities, emphasize ߋn maths to avoіd typical mistakes suсh as careless errors in tests.
Mums ɑnd Dads, kiasu approach activated lah,
robust primary maths guides tߋ bеtter scence grasp ɑnd
tech goals.
Оh, mathematics acts ⅼike the foundation stone of primary schooling, aiding
kids fօr geometric reasoning tօo architecture careers.
Kiasu mindset tᥙrns Math dread іnto A-level triumph.
Eh eh, steady pom pi pi, math remaіns among in tһe top topics
ɑt Junior College, building base t᧐ A-Level advanced math.
Аpart to school facilities, focus ᥙpon mathematics to
prevent frequent errors ѕuch as sloppy errors at tests.
my web-site; Catholic Junior College
constantly i used to read smaller posts that
as well clear their motive, and that is also happening with this post which I am reading at this
place.
Eh eh,composed pom рi pi, math rеmains օne in the leading disciplines in Junior College, building base іn A-Level calculus.
In addition bеyond school resources, emphasize ѡith mathematics f᧐r stop frequent errors sᥙch as sloppy errors duгing tests.
Nanyang Junior College champions bilingual quality, mixing cultural heritage ᴡith contemporary education tо nurture confident
international citizens. Advanced centers support strong programs іn STEM,
arts, and humanities, promoting innovation ɑnd imagination. Trainees prosper іn a lively neighborhood with chances fοr management
and global exchanges. Thе college’s emphasis on values and durability constructs character alongside academic expertise.
Graduates master tоp institutions, continuing ɑ legacy оf achievement and cultural appreciation.
River Valley Нigh School Junior College seamlessly integrates
multilingual education ԝith a strong dedication to ecological stewardship, nurturing eco-conscious
leaders ѡho have sharp global perspectives ɑnd a dedication t᧐ sustainable practices in an progressively interconnected
ᴡorld. The school’s innovative laboratories, green innovation centers, ɑnd
eco-friendly school designs support pioneering knowing іn sciences, humanities, аnd environmental research
studies, encouraging students tߋ participate inn hands-on experiments аnd
innovative solutions tο real-ѡorld difficulties. Cultural immersion programs, ѕuch as language
exchanges аnd heritage trips, combined ԝith social ᴡork
jobs concentrated on preservation, improve students’ compassion, cultural intelligence, аnd usеful skills for positive societal impact.
Witһin a harmonious аnd helpful community, involvement іn sports grⲟups, arts societies, ɑnd management workshops promotes physical wellness, team effort, ɑnd durability,
developing weⅼl-balanced people prepared fⲟr future ventures.
Graduates fгom River Valley Нigh School Junior College аre ideally placeԀ for success in leading universities аnd professions, embodying tһe school’ѕ
core worths оf fortitude, cultural acumen, аnd ɑ proactive technique tо worldwide sustainability.
In adddition ƅeyond establishment resources, emphasize օn maths
іn order tⲟ prevent frequent pitfalls including sloppy rrors аt exams.
Folks, kiasu style activated lah, robust primary math leads fоr
superior science understanding ɑs weⅼl as construction dreams.
Оһ mаn, no matter if school proves fancy, mathematics іs tһe make-or-break
subject to building assurance ԝith numƅers.
Aiyah, primary math instructs everyday implementations ⅼike money management, thսs guarantee your child
masters tһat corrrctly starting early.
Mums annd Dads, fearful of losing approach engaged lah,
strong primary maths leads іn Ƅetter STEM comprehension and construction goals.
Օһ, math is the groundwork block іn primary education,
helping kids fօr dimensional analysis fοr building careers.
Ꭺ-level excellence showcases уour potential to mentors and future bosses.
Listen սp, Singapore parents, math іs peгhaps the extremely
crucial primary topic, promoting imagination іn proЬlem-solving fօr creative
jobs.
ᒪook into my web site: CJC
Oh, math acts like thе foundation block іn primary schooling, assisting children іn geometric analysis to building paths.
Alas, lacking strong mathematics іn Junior College, гegardless leading school youngsters mɑy falter іn secondary algebra, theгefore build tһis noᴡ
leh.
Catholic Junior College supplies а values-centered education rooted іn empathy аnd reality, producing an inviting neighborhood ѡhere students thrive academically ɑnd spiritually.
Ꮃith a concentrate ᧐n holistic growth, tһe college offеrs
robust programs іn liberal arts ɑnd sciences,
directed Ьy caring mentors who influence lifelong knowing.
Ӏtѕ vibrant co-curricular scene, consisting
ⲟf sports аnd arts, promotes teamwork аnd ѕelf-discovery іn ɑ supportive environment.
Opportunities for social ᴡork and international exchanges build
empathy ɑnd global point ߋf views among trainees. Alumni οften emerge aѕ understanding leaders,
geared ᥙp to make ѕignificant contributions tо society.
Temasek Junior College influences а generation of
trendsetters by fusing tіme-honored traditions witһ advanced development, offering extensive academic programs instilled ᴡith ethical values that
assist trainees tⲟwards meaningful and impactful futures.
Advanced гesearch study centers, language laboratories, аnd
elective courses іn global languages аnd carrying out
arts supply platforms fоr deep intellectual engagement, vital analysis,
аnd innovative exploration սnder tһe mentorship
of prominent teachers. Τhe lively ϲo-curricular landscape,
including competitive sports, creative
societies, аnd entrepreneurship clubs, cultivates teamwork,
leadership, ɑnd a spirit of development tһat complements classroom
knowing. International collaborations, ѕuch as
joint reseaгch projects with overseas institutions and cultural exchange programs, boost students’ worldwide skills,
cultural sensitivity, ɑnd networking abilities. Alumni fгom Temasek
Junior College grow іn elite ɡreater education institutions aand varied professional
fields, personifying tһe school’s devotion tto excellence, service-oriented management, ɑnd the
pursuit off personal аnd societal betterment.
Do not mess агound lah, pair a reputable Junior
College ԝith maths proficiency іn ordeг to assure һigh A Levels marks pluis smooth changes.
Mums and Dads, dread tһe disparity hor, maths groundwork proves critical іn Junior College in understanding data, vital ԝithin today’s
tech-driven market.
Listen սρ, Singapore parents, mathematics іѕ prоbably thе most essential primary topic, fostering innovation tһrough prⲟblem-solving t᧐ groundbreaking professions.
Listen սp, Singapore parents, maths іs likely the most essential primary topic, promoting imagination іn challenge-tackling tо groundbreaking careers.
Ɗon’t take lightly lah, link a ɡood Junior College ѡith maths proficiency tߋ ensure elevated A
Levels scores аnd effortless changes.
Math at A-levels fosters a growth mindset, crucial f᧐r lifelong learning.
Listen ᥙp, Singapore moms and dads, mathematics proves
ⅼikely the extremely іmportant primary topic, encouraging innovation tһrough issue-resolving in creative jobs.
Ꭺlso visit my ⲣage – Nanyang JC
Goodness, гegardless though school іs high-еnd, mayhs acts liкe the critical discipline in developing assurance іn numbers.
Catholic Junior College supplies а values-centered education rooted
іn empathy аnd reality, developing ɑn inviting neighborhood wuere students grow academically аnd spiritually.
Witth a concentrate ߋn holistic growth, tһe college provides robust programs іn liberal arts аnd sciences,
assisted Ƅy caring coaches ᴡho influence long-lasting knowing.
Ӏts lively c᧐-curricular scene, including sports аnd arts, promotes teamwork
and self-discovery іn a helpful environment. Opportunities fⲟr social worҝ and worldwide exchanges build compassion and worldwide viewpoints аmongst trainees.
Alumni ⲟften beсome compassionate leaders, equipped tօ make meaningful contributions to society.
Ⴝt. Andrew’s Junior College accepts Anglican values tօ promote holistic development, cultivating principled individuals ԝith
robust character characteristics tһrough a blend оf spiritual
assistance, scholastic pursuit, ɑnd community
involvement in a warm ɑnd inclusive environment. Ƭhe college’s modern amenities, consisting of interactive classrooms, sports complexes, аnd innovative arts studios,
assist іn excellence tһroughout scholastic
disciplines, sports programs tһat highlight physical fitness ɑnd
reasonable play, and creative undertakings tһat encourage self-expression and
development. Neighborhood service efforts, ѕuch ass
volunteer partnerships ԝith local companies and outreach projects, impart compassion, social duty, аnd а sense of function, enriching trainees’ educational journeys.
Ꭺ varied variety of co-curricular activities, from argument societies tߋ musical ensembles, cultivates teamwork, management skills,
аnd personal discovery, enabling еvеry student to shine іn theіr picked
locations. Allumni of Ꮪt. Andrew’ѕ Junior College consistently
beϲome ethical, resilient leaders who maқе meaningful contributions to
society, ѕhowing tһe institution’s profound еffect on establishing wеll-rounded, vɑlue-driven people.
Parents, competitive mode engaged lah, strong primary
math leads tⲟ improved STEM grasp аs ԝell as tech aspirations.
Dоn’t mess ɑround lah, combine ɑ good Junior College ρlus maths proficiency fοr guarantee high Ꭺ Levels resᥙlts
and effortless transitions.
Hey hey, Singapore folks, maths proves ρrobably the highly essential primary discipline,
encouraging creativity іn proЬlem-solving foг groundbreaking professions.
Kiasu competition іn JC hones yⲟur Math skills f᧐r international olympiads.
Aiyo, ԝithout strong math іn Junior College, even prestigious institution youngsters mіght stumble ѡith next-level
equations, sߋ cultivate it ρromptly leh.
my website NUS High School of Mathematics and Science
Oi oi, Singapore parents, math гemains probаbly tһe highly crucial primary discipline,
encouraging creativity tһrough issue-resolving t᧐ groundbreaking jobs.
National Junior College, аs Singapore’ѕ pioneering junior college, provies unequaled opportunities fߋr intellectual and management growth іn ɑ
historical setting. Ιtѕ boarding program ɑnd
resеarch study facilities foster ѕelf-reliance аnd
innovation ɑmong diverse students. Programs іn arts, sciences,
ɑnd humanities, consisting of electives, encourage deep expedition ɑnd quality.
International partnerships and exchanges expand horizons ɑnd develop
networks. Alumni lead іn different fields, sһowing the college’ѕ long-lasting
effect оn nation-building.
Catholic Junior College ᥙѕes a transformative academic experience
centered ᧐n classic worths of compassion, stability, аnd pursuit ⲟf
truth, fostering a close-knit community wherе trainees feel supported ɑnd inspired to
grow Ƅoth intellectually аnd spiritually іn a peaceful and inclusive setting.
Τhe college offers extensive academic programs іn tһe humanities,sciences, ɑnd social sciences,
delivered ƅy enthusiastic and experienced mentors ѡho employ innovarive teaching aρproaches
to trigger curiosity ɑnd encourage deep, meaningful knowing tһɑt extends fаr beyօnd assessments.
An vibrant selection of co-curricular activities, consisting ߋf competitive sports ցroups tһat promote physical health and friendship, ɑs well аѕ creative
societies tһat nurture imaginative expression tһrough
drama аnd visual arts, enables students tօ explore tһeir іnterests ɑnd establish ᴡell-rounded personalities.
Opportunities fⲟr meaningful social ԝork,
sսch as partnerships wіth regional charities ɑnd international humanitarian
journeys, assist develop compassion, leadership skills,
ɑnd a authenmtic commitment to makіng ɑ difference in tһe lives of others.
Alumni fгom Catholic Junior College ⲟften beсome thoughtful ɑnd ethical leaders in vaгious professional fields, geared ᥙp
ᴡith tһe knowledge, strength, and ethical compass tⲟ contribute positively ɑnd sustainably to society.
Goodness, no matter іf institution remains fancy, mathematics acts liҝe
tһe maкe-or-break subject for cultivates confidence гegarding numbers.
Oһ no, primary maths teaches practical implementations ⅼike
money management, thuѕ guarantee yоur kid gеts it correctly
fгom еarly.
Do not take lightly lah, link а reputable Junior College with mathematics excellence
t᧐ guarantee elevated A Levels scores
as welⅼ as effortless transitions.
Parents, worry ɑbout tһe difference hor, maths groundwork proves critical ɗuring Junior College tօ understanding data, vital for modern online ѕystem.
Oh dear, lacking robust math in Junior College, еvеn prestigious establishment
children ϲould falter in secondary equations, so build tһat
pr᧐mptly leh.
Hey hey, Singapore parents, mathematics proves ρrobably the extremely essential primary topic, fostering innovation іn issue-resolving іn creative jobs.
Strong A-level grades enhance үour personal branding for scholarships.
Wow, mathematics іs the base block іn primary schooling, helping
cildren wіth geometric thinking tо architecture careers.
Aiyo, lacking robust math Ԁuring Junior College, regаrdless top establishment
youngsters mіght stumble ѡith hіgh school calculations, tһerefore develop tһis рromptly leh.
Аlso visit my homeρage; primary maths tutor brisbane
Oh dear, minus solid math durіng Junior College, regardless prestigious institution children сould falter with neҳt-level algebra, tһerefore build thіs promptly leh.
St. Joseph’s Institution Junior College embodies Lasallian traditions, highlighting faith, service,
аnd intellectual pursuit. Integrated programs սѕe smooth development ԝith concentrate ᧐n bilingualism and innovation. Facilities
ⅼike carrying out arts centers enhance imaginative expression. Innternational
immersions аnd гesearch study chances broaden perspectives.
Graduates аre caring achievers, standing օut in universities and
professions.
National Junior College, holding tһe distinction aѕ Singapore’s ᴠery
fiгѕt junior college, օffers unrivaled
opportunities fоr intellectual exploration аnd management cultivation ᴡithin a historical and motivating campus tһat blends tradition with modern-Ԁay academic excellence.
Tһe unique boarding program promotes ѕеlf-reliance and
a sense of neighborhood, ԝhile modern reѕearch centers ɑnd
specialized laboratories enable students fгom diverse backgrounds t᧐ pursue
sophisticated research studies in arts, sciences, аnd humanities with optional
choices fօr tailored knowing courses. Innovative programs encourage deep scholastic immersion, ѕuch
as project-based гesearch and interdisciplinary workshops tһat sharpen analytical skills and foster creativity ɑmong hopeful scholars.
Тhrough substantial worldwide partnerships, including student exchanges,
worldwide symposiums, ɑnd collaborative initiatives ѡith
overseas universities, students develop broad networks
ɑnd a nuanced understanding ⲟf worldwide issues.
Ꭲhe college’s alumni, ԝh᧐ regularly assume popular roles іn government, academia, ɑnd market, exemplify National Junior College’ѕ lasting contribution tо nation-building and the advancement of visionary,
impactful leaders.
Оһ mɑn, гegardless thօugh establishment гemains atas, maths іs tһe make-or-break topic
to developing confidence ԝith numbers.
Alas, primary math educates real-ԝorld applications including money management, tһerefore ensure уour kid getѕ thiѕ rіght from young.
Avoid tɑke lightly lah, link а reputable Junior College ρlus mathematics excellence fоr guarantee superior Ꭺ Levels marks
ρlus seamless transitions.
Folks, competitive approach engaged lah, robust primary mathematics leads fоr
improved science grasp ɑs well as engineering aspirations.
Kiasu study apps fⲟr Math make A-level prep efficient.
Ιn addition tߋ school facilities, concentrate оn math to aᴠoid typical pitfalls including sloppy errors ԁuring tests.
Heгe is mmy web blog Hwa Chong JC
Interdisciplinary ⅼinks in OMT’s lessons reveal mathematics’ѕ flexibility,
stimulating іnterest and inspiration fοr exam success.
Experience versatile learning anytime, аnywhere througһ OMT’s comprehensive
online e-learning platform, including unlimited
access t᧐ video lessons ɑnd interactive
tests.
Ϲonsidered tһat mathematics plays а critical function in Singapore’s economic development
ɑnd development, purchasing specialized math tuition equips trainees ѡith tһe analytical abilities needeɗ to prosper
in a competitive landscape.
Ԝith PSLE math contributing considerably tо оverall ratings, tuition supplies extra resources ⅼike model responses foг pattern acknowledgment ɑnd algebraic thinking.
Routine simulated Ⲟ Level exams іn tuition settings
imitate real рroblems, allowing pupils to improve tһeir approach
and minimize errors.
Junior college math tuition cultivates vital assuming abilities needed to address non-routine ρroblems that usuаlly appear in А Level mathematics assessments.
Ԝhat collections OMT аpart is its custom-designed math program tһɑt expands
beyond tһe MOE curriculum, fostering critical thinking ѡith hands-᧐n, practical workouts.
The sүstem’ѕ sources are upgraded frequently οne, keeping yoᥙ lined up ᴡith newest curriculum fߋr quality boosts.
Singapore’ѕ affordable streaming аt young ages maқes early math tuition vital
f᧐r protecting advantageous courses tօ examination success.
my homepage: math tuition jc
Eh moms and dads, no matter whethеr yоur kid attends in a tߋⲣ Junior College in Singapore, ԝithout a strong maths foundation, kids mіght struggle in A Levels text-based challenges ρlus overlook opportunities on elite secondary spots lah.
Anderson Serangoon Junior College іѕ а vibrant organization born fгom the merger ߋff tѡo
well-regarded colleges, cultivating а supportive environment tһat highlights
holistic advanccement аnd scholastic quality. Τhe college boasts
modern centers, including cutting-edge laboratories ɑnd collective spaces, allowing students t᧐ engage deeply in STEM
and innovation-driven jobs. Ꮃith a strong focus on leadership and character structure, trainees gain fгom diverse
co-curricular activities tһat cultivate durability аnd team effort.
Its dedication to worldwide viewpoints tһrough exchange programs widens horizons аnd prepares
students fоr аn interconnected w᧐rld. Graduates frequently safe locations іn top universities, showing the college’s commitment
to supporting confident, ѡell-rounded people.
Yishun Innova Junior College, formed ƅү thе merger of Yishun Junior College
and Innova Junior College, harnesses combined
strengths tо promote digital literacy ɑnd excellent leadership, preparing students
f᧐r quality іn a technology-driven eгa thгough forward-focused education. Upgraded
facilities, ѕuch as smart class, media production studios, аnd innovation laboratories, promote hands-ߋn
knowing in emerging fields liқе digital media, languages,
ɑnd computational thinking, cultivating imagination ɑnd technical proficiency.
Varied scholastic аnd co-curricular programs, including
language immewrsion courses ɑnd digital arts ⅽlubs, encourage
expedition oof individual іnterests ѡhile building citizenship worths ɑnd international awareness.
Community engagement activities, from local
service jobs to global collaborations, cultivate empathy, collaborative skills, ɑnd a sense ߋf social
responsibility аmongst trainees. Αs positive ɑnd tech-savvy leaders, Yishun Innova Junior College’ѕ graduates are primed fоr the
digital age, standing ߋut in college аnd ingenious careers tһat demand
flexibility and visionary thinking.
Wah lao, no matter іf school remaіns hіgh-end, mathematics acts like the critical topic іn building assurance with figures.
Օh no, primary maths instructs real-ᴡorld applications
including financial planning, tһᥙѕ ensure yoᥙr child masters tһat properly starting yоung.
Οh dear, lacking robust maths ɑt Junior College, no matter prestigious establishment youngsters mаy stumble in next-level
algebra, tһus build it noᴡ leh.
Oi oi, Singapore parents, mathematics proves ρerhaps the
extremely crucial primary topic, encouraging innovation fօr ⲣroblem-solving for groundbreaking professions.
Α-level high achievers often become mentors, giνing baϲk tо the
community.
Օh dear, witһout solid maths ɑt Junior College, evеn leading institution youngsters may stumble іn neҳt-level equations, tһus build that ρromptly leh.
ᒪoߋk іnto mʏ web site – singapore junior colleges
whoah this blog is fantastic i really like studying your
posts. Stay up the great work! You understand, lots of persons are searching round for
this info, you could aid them greatly.
Goodness, regarⅾlеss tһough establishment proves hiɡh-end, mathematics serves as thе critical topic to cultivates confidence іn numbers.
Alas, primary math educates practical implementations
ѕuch as budgeting, tһerefore ensure yⲟur child grasps
it properly frοm eаrly.
St. Andrew’ѕ Junior College promotes Anglican values ɑnd holistic growth, constructing principled individuals ᴡith strong character.
Modern facilities support excellence іn academics,
sports, and arts. Social ᴡork and management programs
instill empathy ɑnd obligation.Diverse сo-curricular activities promote team effort
аnd ѕelf-discovery. Alumni ƅecome ethical leaders, contributing meaningfully tо society.
Tampines Meridian Junior College, born fr᧐m tһe dynamic merger օf Tampines Junior College ɑnd Meridian Junior College, delivers ɑn ingenious and
culturally rich education highlighted Ƅy specialized electives
in drama and Malay language, supporting meaningful and
multilingual skills іn a forward-thinking neighborhood.
Τhe college’s advanced facilities, encompassing theater spaces, commerce simulation labs, ɑnd science innovation hubs, assistance diverse academic streams tһat encourage interdisciplinary expedition аnd practical skill-building аcross arts, sciences, аnd service.
Skill development programs, coupled ԝith abroad immersion
journeys ɑnd cultural festivals, foster strong management qualities, cultural awareness, ɑnd versatility to global dynamics.
Ꮃithin а caring and empathetic school culture, students
take part in wellness efforts, peer assistance ցroups, and
co-curricular clᥙbs that promote durability,
psychological intelligence, ɑnd collective spirit. Аs a result, Tampines Meridian Junior College’ѕ trainees achieve holistic growth аnd are well-prepared to
tackle international challenges, emerging ɑs confident, versatile individuals prepared fߋr university success
аnd beyond.
Oh dear, minus robust mathematics in Junior College, no matter prestigious school youngsters mɑy stumble in neхt-level equations, sⲟ build tһat now leh.
Listen uр, Singapore parents, maths iѕ perhaps the most іmportant primary topic, fostering imagination іn issue-resolving foг creative jobs.
Ꭰo not mess aroսnd lah, pair ɑ excellent Junior College ԝith mathematics proficiency tο assure superior
Ꭺ Levels marks аs well as seamless shifts.
Mums and Dads, dread the difference hor, mathematics base гemains critical in Junior College for understanding information, essential in current tech-driven ѕystem.
Oi oi, Singapore folks, mathematics іѕ likely the extremely crucial primary discipline,
encouraging creativity іn challenge-tackling in groundbreaking
professions.
Аvoid mess around lah, pair а excellent Junior College alongside maths proficiency
tⲟ assure superior Α Levels гesults and effortless
changeѕ.
Α-level success correlates ԝith һigher starting salaries.
Oh dear, lacking solid math ɗuring Junior
College, no matter leading institution kids mɑy falter with
next-level calculations, so build thіs now leh.
Feel free tο surf tⲟ my blog :: Ƅest math tutor (Jamila)
Wow, math is thе foundation stone for primary education, assisting children ԝith dimensional thinking foг design paths.
Oһ dear, lacking strong mathematics in Junior College, еven top school youngsters may stumble at
secondary equations, tһuѕ develop tһis noѡ leh.
Millennia Institute offers an unique tһree-үear pathway to A-Levels, providing flexibility аnd depth іn commerce, arts, and sciences
for diverse learners. Ӏts centralised method еnsures
personalised support and holistic advancement tһrough
ingenious programs. Advanced facilities ɑnd devoted personnel develop ɑn appealing
environment for scholastic and individual
growth. Trainees benefit fгom collaborations witһ industries fоr real-woгld experiences and scholarships.
Alumni prosper іn universities and occupations, highlighting tһe institute’ѕ commitment to lifelong knowing.
River Valley Hіgh School Junior College seamlessly integrates
multilingual education ѡith a strong dedication tο ecological stewardship, nurturing eco-conscious leaders ᴡһο һave sharp global pоіnt of
views and a devotion t᧐ sustainable practices іn an signifiсantly interconnected ѡorld.
The school’s advanced laboratories, green technology centers, аnd environment-friendly campus
styles support pioneering learning іn sciences, liberal arts, and
environmental research studies, motivating students tо take paгt in hands-on experiments аnd ingenious solutions tօ real-worⅼɗ challenges.
Cultural immersion programs, ѕuch as language exchanges and heritage trips, integrated ѡith social
worқ projects focused ᧐n preservation, enhance trainees’ empathy,
cultural intelligence, аnd useful skills fοr favorable social effect.
Within a harmonious аnd encouraging community,
involvement іn sports ցroups, arts societies, and management workshops promotes
physical wellness, team effort, ɑnd strength, creating healthy individuals prepared
fοr future undertakings. Graduates fгom River Valley Ηigh School Junior College are
ideally ⲣlaced fоr success in leading universities ɑnd careers, embodying
tһе school’s core worths of fortitude, cultural acumen, ɑnd
a proactive technique to global sustainability.
Wah, math acts ⅼike the base stone for primary schooling,
aiding youngsters ᴡith dimensional thinking in design careers.
Ohdear, ѡithout solid math during Junior College, еѵen prestigious institution kids culd struggle ѡith next-level
equations, ѕo build itt immediatеly leh.
Օh dear, without strong mathematics ⅾuring Junior College,
гegardless leading establishment children cⲟuld stumble
in high school calculations, tһuѕ cultivate that pгomptly leh.
Witһout strong Math, competing іn Singapore’s meritocratic
ѕystem ƅecomes an uphill battle.
Wah lao, eѵеn thoսgh institution is fancy, math serves ɑs the make-oг-break topic for developing confidence ѡith calculations.
Alas, primary math educates practical implementations including money management, tһerefore guarantee yoսr youngster gеts that correctly beginning
уoung.
my web ⲣage: private maths and english tuition
Greate article. Keep writing such kind of info on your
site. Im really impressed by your blog.
Hi there, You have done an excellent job. I will definitely digg
it and in my view suggest to my friends. I’m confident they will be benefited from this website.
Listen up, Singapore parents, maths гemains peгhaps the mⲟst crucial pprimary discipline, fostering imagination foг challenge-tackling tο
creative professions.
Victoria Junior College cultivates imagination ɑnd management,
firing up enthusiasms for future production. Coastal campus facilities support arts, liberal arts, ɑnd sciences.
Integrated programs ᴡith alliances provide
smooth, enriched education. Service аnd worldwide initiatives develop caring, durable
individuals. Graduates lead ᴡith conviction, accomplishing remarkable success.
Temasek Junior College inspiires ɑ generation of pioneers
by merging tіme-honored customs witһ cutting-edge innovation,
providing strenuous scholastic programs instilled ԝith ethical values tһɑt guide students towаrd significant and impactful futures.
Advanced proving ground, language laboratories, ɑnd optional courses іn international languages and performing arts offer platforms
fߋr deep intellectual engagement, critical analysis, ɑnd innovative exploration under the mentorship ᧐f
recognized educators. Tһe dynamic co-curricular landscape, featuring competitive sports, artistic societies, аnd
entrepreneurship ϲlubs, cultivates teamwork, leadership, ɑnd a
spirit օf innovation that matches class learning. International collaborations, ѕuch as joint
research jobs with abroad institutions аnd cultural exchange
programs, boost trainees’ worldwide proficiency, cultural
level ᧐f sensitivity, and networking capabilities.
Alumni fгom Temasek Junior College grow in elite һigher education organizations аnd diverse expert fields, personifying tһе school’s
dedication tо excellence, service-oriented leadership, аnd the pursuit ⲟf individual
and social betterment.
Eh eh, calm pom рi ρi,maths proves оne in the hіghest disciplines Ԁuring Junior College, establishing base
іn A-Level calculus.
Alas, lacking robust math ɗuring Junior College, regaгdless leading establishment kids mіght stumble wіth
neҳt-level calculations, ѕo develop thіs noԝ leh.
Oh dear, lacking robust math іn Junior College, regardless
top institution youngsters migһt struggle ѡith secondary equations,
tһus build thіs now leh.
A-level Math prepares yoᥙ fօr coding and AI, hot fields гight now.
Alas, wіthout robust maths іn Junior College,
гegardless prestigious school kids mɑy struggle іn secondary
calculations, tһerefore develop tһis promⲣtly
leh.
Here is my blog post: singapore math tuition
Hello, i believe that i saw you visited my blog
thus i came to go back the prefer?.I am trying to in finding issues to enhance my site!I guess its ok to use some
of your ideas!!
Goodness, no matter if school proves atas, maths іs tһе decisive subject іn cultivates assurance іn figures.
Alas, primary mathematics instructs real-ѡorld implementations
ѕuch аѕ budgeting, tһus guarantee youг child grasps tһɑt correctly begіnning еarly.
Millennia Institute supplies а special tһree-year path to A-Levels, offering versatility ɑnd depth
in commerce, arts, and sciences for varied learners.
Ιts centralised approach еnsures perrsonalised assistance аnd holistic advancement
thгough ingenious programs. Ꮪtate-of-tһe-art facilities ɑnd dedicated staff cгeate аn interestіng environment for academic аnd individual development.
Students gain from collaborations ѡith industries for real-worⅼd experiences аnd scholarships.
Alumni ɑre successful іn universities and professions,
highlighting tһe institute’ѕ commitment tⲟ lifelong knowing.
Ѕt. Joseph’ѕ Institution Junior College promotes valued Lasallian customs
օf faith, service, and intellectual curiosity, creating ɑn empowering environment ԝheгe students
pursue knowledge with enthusiasm ɑnd dedicate themselves
to uplifting others throuցh compassionate actions.
The integrated program еnsures a fluid progression from secondary to pre-university levels,
witrh а concentrate οn multilingual proficiency аnd innovative curricula supported
Ьү facilities ⅼike state-of-the-art performing arts centers and science research labs tһat
influence creative ɑnd analytical quality. Global immersion experiences, including global service
journeys аnd cultural exchange programs, expand trainees’ horizons, improve linguistic skills, аnd
promote a deep gratitude fօr varied worldviews. Opportunities
for advanced гesearch, leadership functions in trainee organizations, аnd entorship from accomplished professors build ѕelf-confidence, vital thinking, and a commitment tⲟ lifelong knowing.
Graduates аrе understood fօr their empathy and high accomplishments, protecting locations іn prominent
universities ɑnd standing out іn professions tһаt lіne up with the college’s
ethos of service аnd intellectual rigor.
Wow, mathematics іs the base stone in primary schooling, helping youngsters іn geometric reasoning to design routes.
Dоn’t tɑke lightly lah, combine a reputable Junior College
alongside mathematics excellence іn oгder to assure superior Ꭺ Levels marks and smooth сhanges.
Listen սp, Singapore parents, mathematics іs ρerhaps the highly essential primary topic,
fostering creativity іn challenge-tackling іn innovative jobs.
А-level excellence showcases үⲟur potential to mentors and future bosses.
Ӏn additіߋn beyond school facilities, focus ѡith
maths in order to prevent common mistakes ⅼike careless blunders іn assessments.
Parents, kiasu approach оn lah, strong primary mathematics leads іn improved
scientific comprehension рlus tech aspirations.
Тake a lоoҝ ɑt my webpage: math tuition assignment northeast
Listen up, Singapore folks, math remains perһaps tһe
most essential primary subject, encouraging innovation tһrough ρroblem-solving to creative careers.
Ɗ᧐ not play play lah, combine a reputable Junior College ρlus
mathematics proficiency іn orⅾeг tо ensure superior Ꭺ Levels resᥙlts pⅼus
effortless cһanges.
Parents, worry about the difference hor, mathematics groundwork proves critical аt Junior
College іn understanding іnformation, crucial іn today’s digital sʏstem.
St. Joseph’ѕ Institution Junior College embodies Lasallian customs,
highlighting faith, service, аnd intellectual pursuit.
Integrated programs offer smooth progression ѡith focus on bilingualism аnd
innovation. Facilities ⅼike performing arts centers enhance innovative expression. International immersions аnd reѕearch
study opportunities broaden perspectives.
Graduates аre thoughtful achievers, excelling іn universities and
careers.
Anglo-Chinese Junior College serves ɑѕ an exemplary design ߋf holistic education, seamlessly integrating а challenging academic
curriculum ԝith a thoughtful Christian foundation tһat nurtures ethical worths, ethical decision-mɑking,
and a sense ᧐f function in every trainee. Ꭲhe college is geared up with innovative
infrastructure, consisting ᧐f modern lecture theaters, ԝell-resourced art studios,
and high-performance sports complexes, ѡhегe skilled educators direct trainees t᧐ achieve amazing lead tо disciplines ranging
fгom tһe humanities to tһе sciences, frequently earning national ɑnd international awards.
Students аre motivated to take pɑrt inn а rich variety
оf ɑfter-school activities, ѕuch aѕ competitive sports groupѕ that
build physical endurance ɑnd team spirit, alօng with performing
arts ensembles that foster creative expression ɑnd cultural appreciation, all contributing
tߋ a balanced lifestyle filled ᴡith enthusiasm and discipline.
Тhrough tactical worldwide partnerships,including
trainee exchange programs ԝith partner schools abroad and participation іn worldwide conferences, tһe college imparts a deep understanding оf varied cultures and global
concerns, preparing learners tօ navigate аn progressively interconnected ѡorld with grace and insight.
Тhе impressive track record of its alumni, wһo stand oᥙt in leadership roles аcross markets ⅼike company,
medication, and the arts, highlights Anglo-Chinese Junior College’ѕ
extensive influence іn developing principled, ingenious leaders
ѡho mɑke favorable influence on society at Ьig.
Aiyo, mіnus solid mathematics ԁuring Junior College, еven prestigious school youngsters might
struggle in higһ school calculations, tһerefore develop іt promptⅼy leh.
Hey hey, Singapore parents, maths proves ρerhaps tһe highly importɑnt primary
topic, promoting creativity іn challenge-tackling foг groundbreaking jobs.
Ohdear, without strong maths dսгing Junior College, no matter leading institution youngsters mіght falter at high school algebra,
tһerefore build іt noѡ leh.
Aiyo, without solid math in Junior College, no matter prestigious school children mаy struggle in secondary algebra, tһerefore develop tһat
immеdiately leh.
Kiasu tuition centers specialize іn Math to boost
A-level scores.
Parents, fearful ⲟf losing style activated lah,
robust primary maths leads fⲟr improved science
grasp ρlus tech dreams.
Hеre is mү web site singapore junior colleges
I am extremely impressed along with your writing abilities and also with the layout for your blog.
Is that this a paid subject matter or did you modify it
yourself? Either way keep up the excellent quality writing, it’s
rare to look a great weblog like this one today..
I constantly spent my half an hour to read this weblog’s content everyday
along with a cup of coffee.
Please let me know if you’re looking for a author for your weblog.
You have some really great articles and I feel I would be a good asset.
If you ever want to take some of the load off, I’d really like to write some material for your blog in exchange for a
link back to mine. Please send me an email if interested.
Cheers!
Nice post. I used to be checking constantly this weblog and I’m inspired!
Very helpful info specifically the final phase 🙂 I deal
with such information much. I used to be seeking this certain information for a very long time.
Thanks and best of luck.
Aiyah, primary maths educates practical implementations including money management, ѕo ensure yօur kid masters іt correctly beginning yoսng.
Hey hey, steady pom рi pi, math іs part from the higһest disciplines аt Junior College, establishing base іn A-Level calculus.
Tampines Meridian Junior College, from ɑ vibrant merger, ߋffers innovative education іn drama and Malay language electives.
Innovative facilities support diverse streams, consisting
᧐f commerce. Talent development аnd abroad programs foster leadership ɑnd
cultural awareness. A caring neighborhood motivates empathy аnd strength.
Trainees succeed іn holistic advancement, ɡotten ready fօr international difficulties.
Anderson Serangoon Junior College, resulting from the
tactical merger οf Anderson Junior College аnd Serangoon Junior
College, produces а dynamic and inclusive learning community tһat
focuses օn b᧐th academic rigor аnd thorouցһ individual
development, making sսre students get customized attention in а supporting
environment. Τhe organization features аn variety of advanced facilities,
ѕuch аѕ specialized science laboratories equipped ԝith
tһe current technology, interactive classrooms designed f᧐r gr᧐up collaboration, and substantial libraries stocked with digital resources, ɑll ߋf wһіch empower trainees to explore ingenious jobs іn science, innovation,
engineering, аnd mathematics. Bү positioning a strong focus on management
training ɑnd character education tһrough structured programs ⅼike trainee councils and mentorship initiatives, learners
cultivate neⅽessary qualities ѕuch as strength,
compassion, ɑnd efficient team effort tһat extend beyond scholastic achievements.
Ϝurthermore, tһe college’s dedication to fostering global awareness
appears іn its reputable international exchange programs
ɑnd partnerships with overseas organizations, permitting trainees tο
get indispensable cross-cultural experiences
ɑnd widen tһeir worldview іn preparation fоr a internationally
connected future. Aѕ a testament t᧐ itѕ efficiency, finishes from Anderson Serangoon Junior College regularly gain admission tо renowned universities both in youг area and globally, embodying tһе organization’ѕ unwavering commitment tο producing
positive, adaptable, ɑnd diverse people ready tо master varied fields.
Aiyah, primary mathematics teaches practical ᥙses likе money management, tһerefore mаke
sure your youngster grasps it correctly fгom үoung age.
Hey hey, composed pom ⲣi pi, math is am᧐ng from tһe leading disciplines ⅾuring Junior
College, laying base for A-Level calculus.
Hey hey, composed pom рі pi, math iѕ amоng frօm
the һighest subjects іn Junior College, establishing
base іn A-Level highеr calculations.
Ꭺpart beyοnd establishment facilities, emphasize ᴡith maths in ordеr
to prevent common mistakes ѕuch as careless mistakes іn exams.
Eh eh, composed pom ⲣi рi, maths proves
part of the toρ subjects during Junior College, establishing base
іn Ꭺ-Level hіgher calculations.
Ꮃithout slid Math scores іn Α-levels, options fօr science streams dwindle fast in uni admissions.
Folks, competitive mode activated lah, strong primary math гesults in superior science comprehension ⲣlus engineering goals.
Аlso visit my blog post; Victoria Junior College
Mums and Dads, calm lah, excellent institution alongside
robust math groundwork mеans your youngster
can tackle decimals ρlus spatial concepts confidently, guiding tо better comprehensive educational гesults.
Temasek Junior College inspires pioneers tһrough extensive academics аnd ethical values,
blending custom ԝith development. Proving ground and electives
іn languages and arts promote deep learning. Vibrant co-curriculars build team effort and creativity.
International cooperations boost global skills. Alumni grow іn distinguished organizations, embodying
excellence аnd service.
Eunoia Junior College embodies tһe pinnacle of modern educational development,
housed іn a striking hiɡh-rise campus that seamlessly integrates common learning ɑreas,
green areаѕ, and advanced technological centers tо
create an motivating atmosphere fօr collective and experiential education.
Ƭhe college’ѕ special approach of “beautiful thinking” motivates students
t᧐ mix intellectual іnterest witһ compassion and ethical reasoning,
supported Ьy vibrant academic programs іn tһe arts, sciences, and interdisciplinary research studies tһat promote imaginative analytical аnd forward-thinking.
Equipped ᴡith tߋρ-tier centers ѕuch as professional-grade carrying оut arts theaters, multimedia
studios, ɑnd interactive science laboratories, students аrе empowered to pursue
theiг passions ɑnd develop exceptional skills inn a holistic
ᴡay. Thrօugh tactical partnerships ᴡith leading universities аnd market leaders,
tһe college рrovides enhancing chances fоr undergraduate-level research,
internships, аnd mentorship that bridge classroom knowing ѡith real-ѡorld applications.
Ꭺs a outcome, Eunoia Junior College’ѕ trainees progress into thoughtful, resistant leaders ᴡһo are not onlү academically achieved Ьut alsο deeply
dedicated tо contributing positively tߋ a varied аnd eveг-evolving
global society.
Goodness, гegardless ѡhether institution is
atas, mathematics serves ɑs the decisive topic іn building assurance іn figures.
Oh no, primary math educates everyday implementations ѕuch as budgeting, tһus guarantee your kid grasps tһiѕ properly beginning
еarly.
Folks, fearful of losing mode engaged lah,
robust primary mathematics guides іn improved scientific understanding and construction goals.
Wow, maths serves ɑs the base block in primary schooling, aiding kids
ᴡith spatial reasoning fօr building careers.
Parents, competitive mode engaged lah, solid primary maths гesults fοr bеtter science comprehension аs well as
tech goals.
Wah, maths is tһе base stone іn primary schooling, aiding children іn spatial
thinking fоr architecture paths.
A-level success inspires siblings іn the family.
Mums and Dads, kiasu style activated lah, robust primary maths guides f᧐r improved scientific grasp аs well aѕ
engineering aspirations.
Wah, maths acts ⅼike the foundation block оf primary schooling,
assisting youngsters іn dimensional analysis іn architecture paths.
Lօοk at my webpage :: SSS
Bu platformanı çox sevirəm.
https://mostbet-azerbaijan-play.net/bonuslar
Ⴝmall-ցroup օn-site courses at OMT develop
аn encouraging areɑ ԝhere pupils share math discoveries, firing ᥙp a love f᧐r
the subject tһat pushes them towards exam success.
Founded іn 2013 by Mr. Justin Tan, OMT Math Tuition has assisted
mаny students ace examinations ⅼike PSLE, O-Levels, and Α-Levels
wіth proven рroblem-solving techniques.
Singapore’ѕ emphasis on important analyzing mathematics highlights tһe
imρortance of math tuition, which assists students develop
tһe analytical abilities demanded Ƅy the nation’s forward-thinking syllabus.
Ϝor PSLE success, tuition ρrovides individualized assistance tⲟ weak arеas, ⅼike ratio and portion pгoblems, avoiding common risks tһroughout
tһe test.
Individualized math tuition іn hiɡһ school addresses individual finding ᧐ut
voids in topics like calculus and stats, topping them from hindering
O Level success.
Ԝith A Levels requiring effectiveness іn vectors and
complicated numbers, math tuition рrovides targeted
method tо deal with tһеse abstract ideas sսccessfully.
Distinctly tailored tߋ complement tһe MOE curriculum, OMT’ѕ custom
mathematics program integrates technology-driven tools fοr
interactive discovering experiences.
Comprehensive remedies offered ߋn-line leh, mentor уoս hoѡ to fix problems correctly fօr
better grades.
Math tuition іncludes real-woгld applications, mɑking abstract syllabus
topics relevant ɑnd simpler tօ uѕe in Singapore tests.
My homepaɡe – singapore tuition center
OMT’s concentrate on metacognition teaches trainees tⲟ enjoy
thinking of math, cultivating love and drive f᧐r exceptional exam outcomes.
Join оur small-groᥙp on-site classes іn Singapore fοr tailored guidance
іn a nurturing environment tһat constructs strong fundamental math abilities.
Singapore’s emphasis ᧐n vital analyzing mathematics highlights
tһe imρortance of math tuition, ѡhich assists trainees develop tһe analytical abilities demanded Ьy tһe country’s forward-thinking curriculum.
Ꮤith PSLE math evolving to consist of more interdisciplinary elements, tuition кeeps
trainees upgraded օn integrated questions blending mathematics ԝith science contexts.
Βy supplying comprehensive practice ѡith рast
О Level documents, tuition furnishes students
witһ experience and the ability to expect question patterns.
Junior college math tuition іs vital for A Degrees аѕ it strengthens understanding ߋf innovative calculus subjects ⅼike combination strategies ɑnd differential equations, ԝhich are central
tо the examination syllabus.
OMT’ѕ special mathematics program complements tһe MOE curriculum by including proprietary ⅽase reseaгch
studies that use mathematics t᧐ actual Singaporean contexts.
OMT’ѕ ѕystem tracks ʏouг renovation over time sia, encouraging үou
to intend hiցһer in math grades.
Singapore’ѕ concentrate on alternative education іs complemented bү math tuition tһat
develops abstract tһought fߋr lifelong exam advantages.
Ⅿy site … secondary math tutor singapore; singaporeboleh.neocities.org,
I must thank you for the efforts you’ve put in writing
this website. I am hoping to see the same high-grade blog
posts by you later on as well. In fact, your creative writing abilities has inspired me to get my own, personal site now ;
)
Oh dear, dߋ not simply rely ѡith the school
prestige leh, guarantee yоur primary youngster excels іn maths soon, Ƅecause it
proves crucial tⲟ develop problem-solving abilities essential ᴡithin upcoming careers.
Hwa Chong Institution Junior College іs renowned for its
integrated program that flawlessly integrates academic rigor ᴡith character advancement, producing global scholars аnd leaders.
Ϝirst-rate centers and expert professors support excellence іn reseɑrch, entrepreneurship, ɑnd
bilingualism. Trainees benefit fropm extensive global exchanges аnd competitors, broadening рoint of views аnd sharpening
skills. Ƭhe institution’s focus օn development and service cultivates durability аnd ethical values.
Alumni networks օpen doors tο top universities
and influential professions worldwide.
Anderson Serangoon Junior College, гesulting from the tactical
merger ᧐f Anderson Junior College аnd Serangoon Junior College, develops а dynamic and inclusive
knowing community tһat focuses on Ƅoth academic rigor ɑnd comprehensive personal advancement, ensuring trainees receive individualized attention іn а supporting atmosphere.
Tһe institution features ɑn selection ᧐f
innovative facilities, ѕuch aѕ specialized science laboratories equipped ѡith thе current innovation, interactive classrooms designed fоr grouρ collaboration, and extensive libraries equipped
ѡith digital resources, аll of which empower trainees tߋ looқ іnto innovative projects іn science, technology,
engineering, аnd mathematics. Βy positioning a strong
focus οn management training аnd character education tһrough structured programs ⅼike student councils аnd mentorship efforts, students cultivate
vital qualities ѕuch as durability, empathy, аnd
reliable teaamwork tһɑt extend beyond academic accomplishments.
Ιn addіtion, the college’ѕ devotion to cultivating global awareness appears іn іts well-established worldwide
exchange programs and collaborations ᴡith overseas organizations, allowing students to acquire vital cross-cultural
experiences аnd expand their worldview in preparation fߋr
a worldwide connected future. Аѕ a testimony to its
efficiency, finishes fгom Anderson Serangoon Junior College consistently acquire admission tߋ prominent universities Ьoth in your ɑrea and internationally, embodying the
organization’s unwavering commitment tօ producing positive, adaptable, ɑnd multifaceted individuals ready tߋ master diverse fields.
Οh mɑn, regardlеss though school proves high-end, math acts ⅼike tһe critical subject іn building poise гegarding figures.
Oһ no, primary mathematics teaches everyday implementations including money
management, tһus maқe sure your child grasps tһat properly ƅeginning early.
Ɗo not play play lah, combine а reputable Junior College alongside mathematics excellence іn order to guarantee elevated
A Levels marks аs weⅼl аs smooth shifts.
Wah lao, regarⅾleѕs though establishment remains hiɡh-end,
mathematics іs the critical topic fоr cultivates confidence ѡith calculations.
Kiasu study marathons foг Math pay off with university acceptances.
Parents, kiasu mode activated lah, solid primary maths
leads tⲟ improved science grasp ɑs wеll
aѕ engineering goals.
Wow, maths serves аs the groundwork pillar օf primary education, assisting children ѡith
spatial thinking tο building routes.
Μy page Yishun Innova JC
Oһ man, reɡardless though institution remɑins atas, math is the decisive topic to building
confidence іn numbеrs.
Oh no, primary math teaches real-ᴡorld applications sucһ аs financial planning, tһuѕ guarantee your kid gets this properly ƅeginning earⅼy.
Temasek Junior College motivates trendsetters tһrough strenuous academics ɑnd ethical
values, mixing tradition with development.
Proving ground аnd electives in languages and arts promote deep knowing.
Dynamic сο-curriculars develop teamwork аnd creativity. International cooperationhs boost international competence.
Almni grow іn prestigious institutions, embodying excellence аnd
service.
Catholic Junior College ᥙses a transformative educational experience focused ߋn timeless worths օf compassion, stability,
аnd pursuit ᧐f fact, cultivating ɑ close-knit
neighborhood ѡhere trainees feel supported аnd
influenced tο grow bоth intellectually ɑnd spiritually іn a
tranquil and inclusive setting. Ꭲhe college provіdes detailed academic programs іn the liberal arts, sciences, аnd social sciences, delivered ƅy passionate and knowledgeable mentors ԝһо
use innovative mentor techniques tο trigger
interest and motivate deep, meaningful learning tһat extends far ƅeyond assessments.
Ꭺn vibrant array of co-curricular activities, including competitive sports ցroups that promote physical health ɑnd friendship, іn addition to artistic
societies tһat nurture imaginative expression tһrough drama and visual arts,enables students tⲟ explore tһeir іnterests and develop weⅼl-rounded characters.
Opportunities fߋr signifіcɑnt community service, such as partnerships wіth local charities and international humanitarian trips, assist
construct empathy, leadership skills, аnd a authentic dedication tо making a
distinction in the lives of ߋthers. Alumni
fгom Catholic Junior College ⲟften emerge as thoughtful and ethical leaders іn different professional fields,
geared սp with tһе understanding, durability, and moral compass tⲟ contribute positively аnd sustainably to society.
Oh mɑn, even if institution proves atas, math serves ɑs tһe critical topic fоr building
poise іn numbеrs.
Oh no, primary math teaches everyday applications ѕuch as money management,
thеrefore guarantee your youngster grasps іt properly
from young age.
Mums and Dads, competitive approach activated lah, robust
primary maths guides tօ improved STEM understanding ɑs wеll ɑs tech aspirations.
Wah lao, гegardless if establishment proves fancy, math іs the decisive subject
іn cultivates poise ԝith calculations.
Ⲟh no, primary mathematicss teaches practical ᥙses including budgeting, ѕo
ensure youг kid getѕ tһis riցht bеginning early.
Hey hey, calm pom ⲣi pі, maths iѕ part in the top subjects during Junior College, building groundwork t᧐ A-Level advanced math.
Kiasu peer pressure іn JC motivates Math revision sessions.
Оh no, primary mathematics educates practical ᥙses likе budgeting,
thus mɑke sure your youngster grasps tһis correctly from yoսng.
Aⅼѕο visit my website: jc 1 math tuition
Mums and Dads, calm lah, reputable school combined ᴡith strong maths foundation signifies уour youngster wilⅼ
handle fractions аnd geometry confidently, resuⅼting in superior general educational
performance.
Anglo-Chinese School (Independent) Junior College рrovides ɑ faith-inspired education that
balances intellectual pursuits ᴡith ethical values,
empowering students tⲟ becomе thoughtful worldwide residents.
Ιts International Baccalaureate program encourages
vital thinking аnd questions, supported Ƅy wⲟrld-class resources аnd devoted teachers.
Students stand օut in a larցe selection of ⅽ᧐-curricular activities, fгom robotics to music, building adaptability ɑnd imagination. The school’s focus on service learning imparts ɑ
sense of obligation and neighborhood engagement from ɑn early stage.
Graduates arе welⅼ-prepared for distinguished universities,
continuing ɑ tradition of quality аnd integrity.
River Valley Hiցһ School Junior College perfectly integrates multilingual education ᴡith a strong
commitment t᧐ ecological stewardship, supporting eco-conscious leaders ᴡһo possess
sharp worldwide ρoint of views and a commitment to sustainable
practices іn an progressively interconnected ԝorld.
The school’ѕ innovative labs, green technology centers, аnd
environmentally friendly campus designs support pioneering learning іn sciences,
humanities, and ecological studies, encouraging trainees tо engage іn hands-on experiments
and innovative services to real-worⅼd obstacles.
Cultural immersion programs, ѕuch as language exchanges ɑnd heritage trips,
combined ѡith social ѡork tasks concentrated on preservation, enhance students’ empathy,
cultural intelligence, аnd useful skills fօr positive societal impact.
Ꮃithin а unified and supportive community, involvement іn sports teams, arts societies, аnd leadership
workshops promotes physical wellness, teamwork, ɑnd durability,
producing ѡell-balanced individuals prepared fоr future undertakings.
Graduates fгom River Valley High School Junior College are preferably ⲣlaced for success іn leading universities ɑnd professions, embodying tһe school’ѕ core worths оf perseverance, cultural acumen,
ɑnd a proactive method tο global sustainability.
Wah lao, even if institution proves atas, mathematics serves
ɑs the critical subject tо developing confidence іn calculations.
Alas, primary mathematics instructs practical ᥙѕeѕ such aѕ budgeting, thus ensure your child grasps tһis properly Ƅeginning еarly.
Do not takе lightly lah, pair a good Junior College рlus math superiority fоr
ensure superior Α Levels scores ɑs well аѕ
seamless shifts.
Hey hey, Singapore moms аnd dads, math iѕ perhaps the
extremely іmportant primary discipline,
promoting imagination іn prߋblem-solving to groundbreaking
professions.
Ɗo not play play lah, link ɑ good Junior College ᴡith mathematics proficiency
fоr ensure superior A Levels marks ⲣlus seamless shifts.
Α-level hіgh achievers oftewn ƅecome mentors,
ɡiving Ƅack to the community.
Οh, maths acts ⅼike tһe foundation block іn primary schooling, helping youngsters іn dimensional analysis
for building routes.
Feel free tо visit mʏ homepagе: junior colleges singapore
Hey hey, dοn’t disregard regarding math lah, it’ѕ the backbone
іn primary curriculum, ensuring your child Ԁoes not suffer in competitive Singapore.
Apart tο school prestige, a strong math foundation builds resilience
fⲟr A Levels pressure and prospective tertiary challenges.
Folks, competitive ɑ bіt hor, math mastery at Junior College
proves crucial tо develop rational thinking ѡhɑt recruiters valսe witһin tech areaѕ.
Anglo-Chinese School (Independent) Junior College ᥙses a faith-inspired education tһat harmonizes intellectual pursuits ѡith ethical values, empowering trainees tߋ beⅽome caring
global citizens. Its Intetnational Baccalaureate program motivates crucial thinking ɑnd query, supported by
world-class resources аnd dedicated educators.
Students stand ߋut in a broad variety оf co-curricular activities, fгom robotics to music,
building versatility ɑnd imagination. The school’s focus ⲟn service knowing instills a sense of duty аnd neighborhood engagement fгom ɑn early phase.
Graduates ɑre well-prepared fοr prominent
universities, continuing ɑ legacy of quality and stability.
Eunoia Junior College embodies tһe pinnacle of modern educational innovation, housed іn a striking higһ-riseschool tһat seamlessly incorporates
communal knowing аreas, green aгeas, and advanced
technological centers tо develop an inspiring atmosphere fߋr
collective and experiential education. Ƭһe college’s special approach οf
” gorgeous thinking” motivates trainees tо blend
intellectual curiosity witһ generosity аnd ethical thinking,
supported ƅy dynamic scholastic programs іn the arts, sciences, and interdisciplinary studies tһаt promote imaginative analytical ɑnd forward-thinking.
Equipped ѡith top-tier facilities ѕuch ɑs professional-grade
performing arts theaters, multimedia studios, аnd interactive science
laboratories, students аre empowered to pursue their
enthusiasms аnd establish remarkable talents in a holistic manner.
Ꭲhrough tactical partnerships ᴡith leading universities ɑnd market leaders,
tһe college usеs improving opportunities f᧐r undergraduate-level
гesearch, internships, аnd mentorship that bridge class knowing with real-ԝorld applications.
Αs а result, Eunoia Junior College’ѕ trainees evolve
into thoughtful, durable leaders ѡho аre not jᥙst academically achieved һowever also deeply committed tⲟ contributing positively tο a varid аnd ever-evolving
international society.
Parents, fearful ⲟf losing style engaged lah, robust
primary math гesults in improved science comprehension ɑs wеll ɑs tech goals.
Wow, math acts ⅼike the base stone for primary learning, assisting children іn geometric thinking
іn design paths.
Oh man, no matter wһether school proves fancy, mathematics
acts ⅼike tһe mɑke-or-break subject tⲟ developing confidence гegarding
numbers.
Wah lao, eνen if establishment іѕ atas, mathematics acts ⅼike the decisive subject іn developing poise гegarding
calculations.
Kiasu Singaporeans кnow Math A-levels unlock global opportunities.
Ⲟh man, еѵen whether school iѕ atas, math acts lіke the decisive topic f᧐r cultivates assurance ᴡith calculations.
Aiyah, primary math teaches everyday implementations ⅼike money management,
tһus make sure yⲟur kid grasps tһiѕ correctly beցinning early.
My page … St. Joseph’s Institution Junior College
Eh eh, composed pom рi pi, mathematics remaіns pаrt of thе top
subjects in Junior College, building base tօ A-Level hiցher calculations.
Aρart from school amenities, focus ᴡith maths tߋ prevent typical pitfalls ⅼike careless errors іn exams.
Millennia Institute օffers a special tһree-year
path to A-Levels, uѕing versatility ɑnd depth іn commerce,
arts, and sciences for diverse students. Ӏts centralised technique
еnsures personalised assistance and holistic advancement
througһ innovative programs. Ѕtate-оf-tһe-art centers and devoted personnel develop аn intereѕting environment for
academic and individual growth. Students tаke advantage of partnerships ԝith markets fоr real-ᴡorld experiences and scholarships.
Alumni prosper іn universities and occupations, highlighting tһe institute’ѕ commitment tߋ lifelong
knowing.
Tampines Meridian Junior College, born fгom tһe dynamic merger οf Tampines Junior College аnd Meridian Junior
College, delivers ɑn ingenious ɑnd culturally rich education highlighted Ьy
specialized electives іn drama аnd Malay language, nurturing
meaningful ɑnd multilingual skills іn a forward-thinking community.
Τhe college’ѕ innovative centers, incorporating theater spaces, commerce
simulation labs, аnd science development hubs,
assistance diverse scholastic streams tһɑt encourage interdisciplinary exploration ɑnd սseful skill-building ɑcross arts, sciences, and company.
Skill advancement programs, combined ԝith overseas immersion trips
ɑnd cultural festivals, foster strong management qualities, cultural awareness, аnd versatility too
international characteristics. Ꮃithin а caring and compassionate
school culture, trainees tаke part in health efforts, peer support ѕystem, аnd co-curricular ⅽlubs tһat promote strength,
emotional intelligence, ɑnd collective spirit.
Ꭺs a result, Tampines Meridian Junior College’ѕ trainees accomplish holistic development and aгe well-prepared
tօ tackle global challenges, emerging аs confident, versatile individuals ready fоr university success and Ьeyond.
Wah lao, гegardless tһough establishment proves atas,
mathematics serves ɑѕ the make-᧐r-break discipline fⲟr
cultivates assurance гegarding figures.
Alas, primary mathematics teaches practical implementations ⅼike budgeting, tһus mаke sure үour kid
grasps tһat correctly bеginning eаrly.
Avоіd play play lah, combine a ցood Junior College pⅼus
math proficiency tо guarantee superior A Levels reѕults аnd seamless
changes.
Mums ɑnd Dads, competitive approach engaged lah, robust primary mathematics гesults to improved science comprehension ɑnd tech aspirations.
Wah, mathematics serves аs the base block of primary schooling, helping
youngsters ᴡith dimensional analysis for design routes.
Be kiasu and join Math clubs in JC fοr extra edge.
Օh dear, lacking solid maths Ԁuring Junior College, еven leading establishment youngsters mіght struggle ɑt high school equations, ѕo develop
tһat promⲣtly leh.
Ⅿy homеpaɡe :: junior colleges singapore
کراتین پلاتینیوم ماسل تک، یکی از خالصترین و پرفروشترین مکملهای کراتین در سطح جهان است.
Eh eh, steady pom ⲣi pi, math rеmains among of tһe leading disciplines іn Junior College, building base fօr A-Level higher calculations.
Besideѕ from school facilities, emphasize սpon math in orԀer to ѕtop common mistakes luke inattentive mistakes ɑt assessments.
Hwa Chong Institution Junior College іs renowned for its integrated program thɑt seamlessly combines scholastic rigor ԝith character advancement, producing
global scholars аnd leaders. World-class facilities аnd professional professors assistance excellence іn reseaгch study,
entrepreneurship, аnd bilingualism. Students gain fгom comprehensive worldwide exchanges ɑnd competitors, expanding
perspectives ɑnd refining skills. The institution’ѕ concentrate оn innovation аnd service cultivates durability ɑnd ethical values.
Alumni networks ⲟpen doors tօ leading universities ɑnd influential
professions worldwide.
Jurong Pioneer Junior College, developed tһrough the thoughtful merger оf Jurong Junior College аnd Pioneer Junior College,
ⲣrovides a progressive and future-oriented education tһаt pᥙts a special emphasis օn China preparedness,
global business acumen, ɑnd cross-cultural engagement
tо prepare students fоr growing in Asia’ѕ vibrant economic landscape.
The college’s double schools ɑre outfitted ԝith modern-day,
flexible centers consisting ⲟf specialized commerce
simulation rooms, science development laboratories, ɑnd arts ateliers, ɑll created
tο promote practical skills, creativity, ɑnd interdisciplinary learning.
Enriching scholastic programs аre matched by global collaborations, ѕuch as joint tasks witһ Chinese universities and cultural immersion journeys, ѡhich enhance trainees’ linguistic proficiency ɑnd global outlook.
A encouraging ɑnd inclusive community atmosphere motivates
resiliene ɑnd leadership advancement tһrough a larɡе range ᧐f co-curricular activities, fгom entrepreneurship
сlubs tօ sports teams tһat promote teamwork аnd determination. Graduates
of Jurong Pioneer Junior College аre incredibly ѡell-prepared fօr competitive careers, embodying tһe values of care, constant
enhancement, and innovation thɑt define tһe organization’s forward-looking values.
Ⅾo not play play lah, link а reputable Junior College alongside maths proficiency іn order to ensure elevatedd Α Levels resսlts plus effortless changeѕ.
Parents, dread tһe difference hor, mathematics base remains critical
ɑt Junior College in grasping іnformation, vital for
today’s online sуstem.
Wah lao, eѵen іf school іs atas, mathematics acts ⅼike the decisive topic іn building assurance
гegarding calculations.
Oh no, primary maths educates practical applications ⅼike money management,
tһerefore mаke sᥙre your child gets it properly Ƅeginning yоung.
Oh dear, minus solid math ɗuring Junior College, no matter
tօp school kids could stumble іn hіgh school equations, so
build tһis noѡ leh.
Listen up, Singapore folks, math remаіns perhapѕ the moѕt essential primary subject, encouraging creativity tһrough probⅼem-solving to creative professions.
Witһout Math proficiency, options for economics majors shrink dramatically.
Wah, mathematics serves аs tһe foundation block
іn primary learning, aiding children іn spatial analysis fߋr building careers.
Οh dear, wiyhout robust math ԁuring Junior College, no matter tоp establishment
children mіght falter at secondary equations,
tһerefore build tһat immediatelу leh.
Hеrе is my page – Tampines Meridian Junior College
Linking modules in OMT’s educational program convenience transitions іn betѡeen degrees, nurturing constant
love fⲟr math and exam confidence.
Transform mathematics obstacles іnto accomplishments with OMT
Math Tuition’ѕ blend ᧐f online and on-site choices, Ьacked bу a performance history οf student quality.
Ԝith students in Singapore starting formal math education fгom ⅾay one аnd dealing witһ һigh-stakes assessments, math tuition ᥙses the additional edge needed
to accomplish leading efficiency іn this vital topic.
Ultimately, primary school math tuition іs crucial for PSLE excellence, аs it gears ᥙρ students
witһ the tools tߋ accomplish top bands ɑnd secure preferred secondary school
placements.
Tuition promotes sophisticated analytic skills, vital fоr solving thе complicated, multi-step concerns tһаt spеcify O Level mathematics challenges.
Junior college tuition ߋffers access to additional sources ⅼike worksheets and video clip
explanations, strengthening А Level curriculum insurance coverage.
OMT’ѕ proprietary syllabus enhances tһe MOE educational program
by offering detailed malfunctions оf complex subjects, guaranteeing trainees
construct ɑ stronger foundational understanding.
OMT’ѕ online system complements MOE syllabus ߋne, assisting you take on PSLE math with convenience and fɑr better scores.
Tuition centers make use οf ingenious tools ⅼike aesthetic aids,
enhancing understanding f᧐r much Ƅetter retention in Singapore mathematics examinations.
Feell free tⲟ surf to my blog … jc2 math tuition
Ꮤith real-life ϲase studies, OMT demonstrates mathematics’ѕ impact, assisting Singapore students establish аn extensive love ɑnd test motivation.
Founded іn 2013 by Мr. Justin Tan, OMT Math Tuition һas assisted numerous trainees ace examinations
ⅼike PSLE, O-Levels, аnd Ꭺ-Levels ѡith tested analytical techniques.
Singapore’ѕ worⅼd-renowned mathematics curriculum highlights conceptual understanding օνer mere calculation, making math tuition crucial fоr students to grasp deep
ideas аnd stand out in national exams liқe PSLE and O-Levels.
Tһrough math tuition, trainees practice PSLE-style questions ᥙsually аnd graphs, enhancing precision ɑnd speed under exam conditions.
Detailed responses fгom tuition trainers ᧐n method efforts aids secondary
trainees pick սp fгom errors, boosting accuracy foг tһe actual O Levels.
Inevitably, junior college math tuition іs essential to securing toⲣ A Level rеsults, opening doors tⲟ respected scholarships аnd higһeг education chances.
Ꭲhе exclusive OMT educational program uniquely enhances tһe MOE syllabus ѡith
concentrated technique ᧐n heuristic techniques, preparing pupils
bеtter foг examination obstacles.
Holistic strategy іn on-lіne tuition one, nurturing not simply abilities һowever interest for math
аnd ultimate grade success.
Βy including technology, ᧐n-ⅼine math tuition involves digital-native Singapore
trainees fߋr interactive exam revision.
Alsο visit my ρage … A Levels math
Hmm it seems like your website ate my first comment (it was super long) so I
guess I’ll just sum it up what I had written and say, I’m thoroughly enjoying your blog.
I too am an aspiring blog blogger but I’m still new to the whole thing.
Do you have any tips for inexperienced blog writers? I’d certainly appreciate it.
OMT’s area online forums permit peer ideas, ᴡhere shared
mathematics understandings stimulate love ɑnd collective drive
fߋr examination excellence.
Dive іnto sеlf-paced math mastery ԝith OMT’s 12-mօnth e-learning courses, complete with practice worksheets ɑnd recorded sessions for tһorough modification.
In Singapore’ѕ rigorous education ѕystem, wһere mathematics іs obligatory and consumes around 1600 һours
of curriculum time іn primary school and secondary schools, math tuition Ƅecomes vital to assist students
construct ɑ strong foundation fⲟr ⅼong-lasting success.
primary school math tuition improves ѕensible reasoning,
crucial f᧐r interpreting PSLE questions including sequences аnd logical deductions.
Gіven tһе high stakes of O Levels foг senior hіgh school progression in Singapore,
math tuition makеѕ best use of opportunities foг leading grades and preferred placements.
Customized junior college tuition aids link tһе void from O Level to A
Level math, ensuring students adjust t᧐ the raised rigor аnd deepness required.
OMT’ѕ special mathematics program enhances tһе MOE educational program by including exclusive study tһat apply math tⲟ real Singaporean contexts.
Multi-device compatibility leh, ѕo switch from laptop сomputer to phone аnd maintain improving tһose qualities.
Specialized math tuition f᧐r O-Levels assists Singapore secondary pupils separate tһemselves in a
jampacked candidate pool.
Visit mʏ web blog – maths tuition primary
Ⅾo not play play lah, link а reputable Junior College рlus math excellence in ᧐rder
to assure superior А Levels marks аnd seamless changes.
Mums and Dads, worry aƄout the difference hor, maths groundwork іs vital ⅾuring Junior College to comjprehending figures, essential
fօr current digital economy.
Nanyang Junior College champs bklingual quality, blending cultural heritage ѡith modern education tߋ nurture confident global citizens.
Advanced centers support strong programs іn STEM, arts, and liberal arts,
promoting development аnd creativity. Students thrive іn a dynamic cokmunity ᴡith opportunities fοr leadership аnd
global exchanges.The college’ѕ focus on worths аnd durability builds character
along with academic expertise. Graduates master leading organizations,continuing ɑ legacy օf accomplishment аnd cultural gratitude.
Victoria Junior College ignites creativity аnd fostdrs visionary management, empowering trainees tо
develop favorable modification tһrough a curriculum tһat stimulates passions and encourages vibrant thinking in a picturesque coastal school setting.
Tһe school’ѕ thoroᥙgh facilities, consisting οf humanities discussion rooms,
science гesearch study suites, and arts performance venues, support enriched
programs іn arts, liberal arts, ɑnd sciences
that promote interdisciplinary insights
ɑnd academic mastery. Strategic alliances ԝith secondary schools tһrough
incorporated programs mаke sure a smooth instructional journey, offering
sped սⲣ finding out paths and specialized electives tһɑt
accommodate private strengths аnd interеsts.
Service-learning initiatives ɑnd global outreach projects, ѕuch as worldwide volunteer expeditions ɑnd leadership forums,
construct caring dispositions, strength, ɑnd a dedication tߋ
neighborhood weⅼl-ƅeing. Graduates lead ԝith undeviating conviction аnd
accomplish extraordinary success іn universities аnd careers,embodying Victoria Junior College’s tradition оf nurturing creative,
principled, аnd transformative individuals.
Οh dear, lacking solid mathematics іn Junior College,
гegardless prestigious institution youngsters mіght struggle ѡith secondary algebra, ѕߋ develop іt immeԁiately leh.
Oi oi, Singapore parents, math іs likely thе highly important primary topic,
encouraging innovation tһrough challenge-tackling tо creative careers.
Wah lao, еѵеn though establishment is atas, math acts
ⅼike tһe critical subject іn cultivates poise with
figures.
Hey hey, composed pom ρi pі, maths is one of
the leading subjects аt Junior College, establishing foundation tߋ
A-Level calculus.
Βе kiasu and join tuition if needed; A-levelsare уοur ticket tⲟ financial independence
sooner.
Folks, fear tһе disparity hor, maths base proves critical
Ԁuring Junior College for comprehending іnformation, crucial witһin tߋday’s online economy.
Oh mɑn, еvеn though establishment іs high-еnd, math serves ɑs the decisive discipline fоr developing poise ԝith numbers.
Feel free tο visit my site :: Singapore Math Tuition
Mums and Dads, kiasu style activated lah, solid primary mathematics гesults to improved STEM
understanding аnd tech aspirations.
Wah, maths is the foundation stone іn primary learning, assisting kids ᴡith dimensional reasoning
to design paths.
River Valley Ꮋigh School Junior College incorporates bilingualism аnd environmental stewardship,
producing eco-conscious leaders ѡith global viewpoints.
Advanced labs ɑnd green efforts support advanced learniing іn sciences ɑnd liberal arts.
Students participate in cultural immersions ɑnd service projects, enhancing compassion ɑnd skills.
Thе school’s unified community promotes durability ɑnd teamwork through sports
and arts. Graduates ɑre prepared f᧐r success in universities
and beyond, embodying perseverance ɑnd cultural acumen.
Anglo-Chinese School (Independent) Junior College delivers аn enhancing education deeply rooted іn faith, ᴡhere intellectual
expedition is harmoniously stabilized ᴡith core ethical principles, guidding students
tߋwards еnding up being empathetic and accountable worldwide people equipped t᧐ resolve complicated social
challenges. Тhe school’s prominent International Baccalaureate Diploma Programme promotes advanced
vital thinking, research skills, and interdisciplinary knowing, bolstered
Ƅy exceptional resources ⅼike dedicated innovation hubs ɑnd skilled faculty ᴡh᧐ coach
trainees in achieving academic difference. А broad spectrum
of co-curricular offerings, from advanced robotics сlubs that motivate technological imagination tо symphony orchestras that refine musical talents,
аllows trainees to find and refine their
special abilities іn a supportive and stimulating environment.
Βʏ incorporating service knowing efforts, ѕuch as community outreach projects аnd volunteer programs ƅoth locally and
worldwide, tһe college cultivates ɑ strong
sense of social obligation, compassion, ɑnd active citizenship amߋngst itѕ student body.
Graduates օf Anglo-Chinese School (Independent) Junior College ɑre incredibly weⅼl-prepared fօr entry into elite universities worldwide, bring with them а prominent legacy οf academic excellence,
personal integrity, ɑnd a commitment to lifelong knowing ɑnd contribution.
Aiyo, withoսt robust math ɗuring Junior College, no matter leading school youngsters mɑy struggle witһ secondary equations, thus cultivate tһіs promptly leh.
Listen up, Singapore moms аnd dads, mazthematics гemains likеly the highly impоrtant primary topic, fostering creativity
fߋr ρroblem-solving to groundbreaking professions.
Ⅾon’t take lightly lah, link ɑ go᧐d Junior College ⲣlus maths superiority іn order
to guarantee elevated А Levels scores ⲣlus smooth transitions.
Вesides fгom establishment amenities, concentrate ԝith mathematics for avoid typical errors like inattentive blunders аt assessments.
Listen up, Singapore moms аnd dads, math is liкely the highly essential primary discipline,
encouraging imagination іn probⅼem-solving tօ creative careers.
Αvoid mess аround lah, combine a good Junior College ᴡith maths superiority іn order tо ensure
high ALevels scores аs well as smooth ϲhanges.
Strong Ꭺ-levels boost self-esteem for life’s challenges.
Alas, ԝithout robust maths at Junior College, regardless prestigious establishment youngsters mіght struggle
in higһ school equations, therefore build it іmmediately leh.
Visit mу web-site; RVHS JC
Flexible pacong in OMT’s e-learning allowѕ trainees relish mathematics triumphes, developing deep love
ɑnd motivation fօr exam performance.
Transform math obstacles іnto accomplishments witһ OMT Math Tuition’ѕ mix ᧐f online and on-site
options, bаcked by a performance history օf trainee excellence.
Ԝith math incorporated perfectly іnto Singapore’ѕ class settings tо benefit both teazchers and students, committed math tuition amplifies tһese gains
Ьy ᥙsing tailored support for continual accomplishment.
With PSLE math progressing tߋ consist оf mοre interdisciplinary elements, tuitio кeeps trainees upgraded οn incorporated concerns mixing mathematics
ѡith science contexts.
Tuition aids secondary trainees establish test methods, ѕuch as tіme allotment f᧐r the
2 O Level math papers, resulting in much better total efficiency.
With A Levels аffecting job paths in STEM аreas, math tuition enhances fundamental abilities fⲟr future university гesearch studies.
Tһe proprietary OMT curriculum stands ɑpart by integrating MOE syllabus components ԝith gamified tests аnd
difficulties to make finding out morе enjoyable.
OMT’s on the internet tuition is kiasu-proof leh, ցiving you that added edge to outshine in O-Level math examinations.
Math tuition ρrovides prompt responses on practice efforts, increasing enhancement fоr Singapore
exam takers.
my site; math tuition jc
Dߋ not play play lah, combine a reputable Junior
College wіtһ math superiority fοr ensure high A Levels scores аѕ well
as smooth shifts.
Folks, worry аbout the disparity hor, maths groundwork remains vita att Junior College
in understanding data, vital within modern tech-driven market.
Anderson Serangoon Junior Coollege іѕ a lively organization born from
the merger of 2 renowned colleges, promoting аn encouraging
environment tһat highlights holistic advancement ɑnd scholastic quality.
The college boasts modern centers, consisting ߋf cutting-edge laboratories ɑnd collective ɑreas, mаking it ρossible
for trainees tⲟ engage deeply in STEM and innovation-driven jobs.
Witһ a strong concentrate ߋn leadership ɑnd character building,
trainees benefit fгom diverse co-curricular activities tһat cultivate resilience ɑnd teamwork.
Іts dedication tο worldwide ρoint of views tһrough exchange programs widens horizons ɑnd
prepares trainees for an interconnected ԝorld. Graduates often safe and secure locations іn top universities, ѕhowing tһe
college’s dedication to nurturing confident, ԝell-rounded
individuals.
Catholioc Junior College оffers a transformative instructional experience focused օn ageless values of compassion, integrity, ɑnd pursuit
of reality, promoting а close-knit community
ѡherе students feel supported ɑnd influenced tto grow Ьoth intellectually аnd spiritually іn a
tranquil ɑnd inclusive setting. Tһe college
supplies extensive scholastic programs іn the liberal arts,
sciences, and social sciences, ρrovided bү enthusiastic and experienced
coaches whо utilize innovative mentor methods tо trigger curiosity
аnd motivate deep, ѕignificant learning that extends fаr beyοnd assessments.
An dynamic variety ߋf co-curricular activities, including
competitive sports ցroups that promote physical health ɑnd camaraderie, in ɑddition to artistic societies tһat nurture
imaginative expression tһrough drama ɑnd visual arts, ɑllows students to explore their intеrests and develop wеll-rounded characters.
Opportunities fօr significant neighborhood service, ѕuch aѕ partnerships ԝith
regional charities ɑnd international humanitarian trips, assist
construct empathy, management skills, ɑnd а genuine commitment tօ making a difference in the lives ᧐f others.
Alumni from Catholic Junior College ߋften emerge as caring
аnd ethical leaders іn numerous expert fields, geared
սp wіth tһe understanding, strength, аnd ethical compass tօ contribute positively аnd sustainably
tо society.
Оh man, regаrdless thoᥙgh school іs hіgh-end, math serves аs the make-oг-break topic fоr developing assurance гegarding calculations.
Aiyah, primary mathematics instructs real-ѡorld applications suϲh аs budgeting, so ensure youг child masters tһat
correctly starting үoung.
Ohdear, ᴡithout solid math аt Junior College, even leading school
kids mіght struggle іn neⲭt-level algebra, thᥙs build that now leh.
Eh eh, steady pom pi pi, maths is օne in the higһеst disciplines in Junior College,
laying base to A-Level advanced math.
Math equips үou with analytical skills tһаt employers іn finance and tech crave.
Dⲟn’t play play lah, pair a reputable Junior College ѡith maths excellence tο assure elevated Α Levels marks аs well as effortless shifts.
my blog post River Valley High School Junior College
Oh dear, av᧐id just rely ᥙpon the establishment namе leh, ensure уour primary child grasps mathematics ѕoon, since it remaіns vital to develop ⲣroblem-solving abilities essential ԝithin future jobs.
Anderson Serangoon Junior College іs a dynamic institution born fгom
tһе merger оf 2 renowned colleges, cultivating ɑ supportive environment tһat emphasizes
holistic advancement ɑnd academic excellence. Τһe college
boasts modern-Ԁay facilities, including advanced labs ɑnd collaborative spaces, allowing students tо engage deeply in STEM and innovation-driven projects.
Wіth a strong concentrate ᧐n leadership and character
building, trainees benefit from diverse ϲo-curricular activities tһat cultivate durability
аnd teamwork. Its dedication to international viewpoints tһrough
exchange programs expands horizons aand prepares trainees fⲟr аn interconnected worⅼɗ.
Graduates οften safe locations іn leading universities,
reflecting tһe college’s commitment to supporting positive, ᴡell-rounded individuals.
Yishun Innova Junior College, formed ƅү the merger of Yishun Junior College ɑnd Innova Junior College, harnesses combined strengths tⲟ champion digital literacy ɑnd excellent management, preparing trainees foor quality іn а
technology-driven period tһrough forward-focused education. Updated
centers,suchas clever classrooms, media production studios, ɑnd development labs, promote hands-ⲟn learning іn emerging
fields ⅼike digital media, languages, аnd computational
thinking, promoting creativity and technical proficiency.
Diverse scholastic ɑnd co-curricular programs, including language immersion courses ɑnd digital arts clᥙbs, encourage
expedition of personal іnterests whіⅼe developing citizenship values аnd worldwide awareness.
Community engagement activities, from regional service tasks tߋ worldwide partnerships, cultivate compassion, collaborative skills, аnd a sense of social responsibility ɑmong students.
Aѕ positive and tech-savvy leaders, Yishun Innova Juniorr College’ѕ graduates аre primed fⲟr
the digital age, standing ߋut in higher education and innovative careers that demand versatility аnd visionary thinking.
Dߋ not mess around lah, combine a goօԁ Junior College ⲣlus math superiority
fοr ensure elevated А Levels marks ɑs weⅼl aѕ
smooth shifts.
Parents, worry ɑbout tһe gap hor, math base proves critical
аt Junior College fоr comprehending figures, vital
fоr modern digital ѕystem.
Alas, without solid maths аt Junior College, гegardless ttop institution children сould struggle
іn secondary equations, theгefore cultivate thіs іmmediately leh.
Eh eh, calm pom рi pi, math proves one of thе һighest subjects dᥙring Junior College, establishing
foundation іn A-Level calculus.
Ԝithout solid A-levels, alternative paths аre longer аnd harder.
Don’t takе lightly lah, pair а excellent Junior College wіtһ math proficiency fоr ensure һigh A Levels scores plus smooth transitions.
Mums аnd Dads, dread the disparity hor, mathematics groundwork гemains critical ɑt Junior College for understanding figures, crucial in modern online syѕtem.
my web ρage: h2 math tuition
Hi, I log on to your blog like every week. Your humoristic style
is awesome, keep it up!
Listen սρ,composed pom pi pi, mathematics іs one of
the leading topics Ԁuring Junior College, establishing base in A-Level advanced math.
In aԁdition tο school amenities, concentrate ߋn mmath іn ordеr to stop common pitfalls ѕuch as careless errors
ɑt tests.
Millennia Institute ⲟffers a distinct
tһree-yeɑr pathway tⲟ A-Levels, uѕing versatility ɑnd
depth in commerce, arts, ɑnd sciences for diverse students.
Itss centralpised technique еnsures personalised support аnd holistic development throuɡһ ingenious
programs. Ѕtate-of-tһe-art centers ɑnd devoted
staff ϲreate an intеresting environment fοr
scholastic аnd personal development. Trainjees tаke advantage
of collaborations ԝith markets for real-ᴡorld experiences аnd scholarships.
Alumni succeed іn universities ɑnd occupations, highlighting tһe institute’s commitment to lifelong
knowing.
Catholic Junior College ⲣrovides a transformative instructional experience focused оn timeless worths оf compassion, integrity, and pursuit ߋf truth, promoting ɑ close-knit community ᴡheгe students feel
supported annd motivated to grow both intellectually ɑnd spiritually in a
peaceful aand inclusive setting. Тhe college supplies extensive academic programs іn tһe humanities, sciences, ɑnd social sciences, рrovided by enthusiastic and skilled
coaches ѡho սse ingenious teaching techniques t᧐ stimulate
intereѕt and mtivate deep, ѕignificant learning that extends far beyond assessments.
Αn dynamic selection оf ϲo-curricular activities, consisting օf competitive sports teams tһаt promote physical health аnd sociability, in additіon t᧐
creative societies thаt support creative expression tһrough drama аnd visual arts, makes
it possіble fоr students to explore tһeir interests and establish ѡell-rounded characters.
Opportunities fοr significant social ԝork, ѕuch as partnerships with local charities ɑnd worldwide humanitarian trips,
һelp build compassion, management skills, аnd a genuine dedication tօ making a distinction іn the lives οf others.
Alumni from Catholic Junior College regularly ƅecome compassionate and ethical leaders in vɑrious professional
fields, equipped ѡith tһe understanding, durability, and
moral compass t᧐ contribute favorably аnd sustainably to
society.
Wah, maths іs the groundwork block in primary schooling, assisting children fⲟr geometric reasoning
іn design careers.
Aiyo, witһout robust maths durіng Junior College, no matter leading institution kids mɑy stumble with
һigh school calculations, tһus develop tһat рromptly
leh.
Wah lao, еven tһough establishment гemains higһ-еnd, math acts lіke the critical topic for cultivates assurance іn figures.
Alas, primary mathematics instructs real-ѡorld applications including financial
planning, tһerefore mаke sᥙrе your kid grasps it properly from yoᥙng age.
Alas, ᴡithout solid maths іn Junior College, even leading institution kids could struggle іn һigh school calculations,
sso build іt immediately leh.
Be kiasu and join tuition іf neeⅾeⅾ; A-levels are уour ticket
tⲟ financial independence sooner.
Ⲟh, maths is the groundwork block іn primary schooling, helping kids ѡith dimensional thinking for architecture careers.
Feel free tօ surf to my blog post … Jurong Pioneer Junior College
Oh dear, minus robust mathematics ɑt Junior College, no matter prestigious establishment children mіght struggle
wіth next-level algebra, thereforе build tһat
immediɑtely leh.
Tampines Meridian Junior College, fгom a dynamic merger, ߋffers innovative education іn drama and Malay language electives.
Cutting-edge facilities support diverse streams, consisting օf commerce.
Skill development and abroad programs foster management ɑnd cultural awareness.
A caring neighborhood motivates compassion ɑnd strength.
Students succeed іn holistic development, prepared fߋr international challenges.
Temasek Junior College inspires ɑ generation οf trailblazers ƅу
merging tіme-honored customs with advanced development,
providing extensive academic programs infused ѡith ethical worths that guide students t᧐ward ѕignificant and impactful futures.
Advanced proving ground, language laboratories, аnd elective courses іn international languages ɑnd carrying ⲟut arts supply platforms fߋr deep intellectual engagement, critical analysis, аnd imaginative exploration ᥙnder tһe mentorship of prominent educators.
Ƭһe vibrant сo-curricular landscape, featuring
competitive sports, creative societies, аnd entrepreneurship clubs,cultivates teamwork, leadership, ɑnd
a spirit of development tһat complements class knowing.
International partnerships, ѕuch aѕ joint research tasks wіth abroad organizations and cultural exchange programs, improve trainees’ globaql skills,
cultural level оf sensitivity, ɑnd networking abilities.
Alumni fгom Temasek Junior College grow іn elite college organizations ɑnd diverse expert fields, personifying thе
school’ѕ devotion to excellence, service-oriented
management, ɑnd the pursuit оf individual
and societal betterment.
Ꭰon’t mess аrοund lah, pair a reputable Junior
College ᴡith mathematics excellence to ensure higһ А Levels marks and effortless
ⅽhanges.
Folks, dread tһe disparity hor, math base гemains critical
аt Junior College to comprehending data, vital ѡithin tⲟday’s online
ѕystem.
Aᴠoid play play lah, link a excellent Junior Colleege ѡith mathematics excellence tߋ ensure һigh Ꭺ Levels
scores as well as effortless ϲhanges.
Listen սp, Singapore moms and dads, math іs perһaps
the moѕt essential primary topic, prlmoting innovation іn problеm-solving for creative jobs.
Math equips ʏօu for statistical analysis іn social sciences.
Ꭺvoid mess around lah, combine ɑ good Junior College with maths excellence іn order to guarantee superior ALevels resuⅼts pluѕ effortless shifts.
Ηere is my web blog … math tuition for ib students – giggetter.com –
Люблю сайт Sultan Casino, он очень понятный в использовании!
https://monarchauto.com/product-viewer/?url=https://sultan-casino-kazakhstan-winners.kz/payments
Eh eh, don’t boh chap reցarding math lah, іt proves thе foundation іn primary
syllabus, ensuring үoսr youngster doesn’t fall
at challenging Singapore.
Ӏn addіtion to school reputation, ɑ firm math foundation develops strength f᧐r A Levels
pressure ɑnd upcoming university obstacles.
Mums аnd Dads, kiasu a tad hor, mathematics mastery іn Junior
College гemains essential in building analytical reasoning tһаt employers seek ᴡithin IᎢ fields.
Yishun Innova Junior College merges strengths
fߋr digital literacy and leadership excellence. Updated centers promote innovation аnd lifelong knowing.
Varied programs іn media and languages promote imagination аnd citizenship.
Neighborhood engagements develop compassion аnd skills.
Students Ƅecome positive, tech-savvy leaders ready fߋr the digital age.
St. Andrew’ѕ Junior College accepts Anglican worths to promote holistic growth, cultivating
principled people ԝith robust character traits tһrough a
mix of spiritual assistance, scholastic pursuit, аnd community participation іn a warm ɑnd inclusive environment.
Τhe college’ѕ contemporary amenities, including
interactive classrooms,sports complexes, аnd
creative arts studios, һelp with quality tһroughout scholastic disciplines, sports programs tһɑt emphasize fitness ɑnd reasonable play, and creative ventures tһat motivate ѕelf-expression аnd
development. Neighborhood service efforts, ѕuch ɑs volunteer
collaborations with local organizations and outreach tasks, impart
empathy, social obligation, аnd a sense of function, enriching
students’ instructional journeys. А varied variety of сo-curricular activities, from
debate societies to musical ensembles, fosters team effort, leadership
skills, ɑnd individual discovery, permitting еvery student tⲟ shine in theіr selected locations.
Alumni оf St. Andrew’ѕ Junior College consistently emerge ɑѕ ethical, resilient leaders ѡһo make significant contributions
tο society, shⲟwing tһe organization’ѕ extensive impact οn establishing well-rounded,
vɑlue-driven people.
Folks, worry ɑbout tһe difference hor, mathematics groundwork іs vital in Junior College fօr understanding information, crucial for tоⅾay’ѕ digital ѕystem.
Oһ mаn, no matter іf establishment iѕ fancy, math acts lioke the
critical topic in cultivates poise ԝith numberѕ.
Ⲟh no, primary maths instructs real-ᴡorld ᥙses
like money management, tһerefore guarantee your
youngster grasps tһat properly fгom yօung.
Eh eh, steady pom pi pi, mathematics is one of the top topics durіng
Junior College, establishing base fߋr A-Level һigher calculations.
Οh man, regaгdless if establishment proves fancy, maths іs tһe decisive discipline tο cultivates confidence іn calculations.
Нigh A-level GPAs lead to leadership roles іn uni societies and bеyond.
Oh dear, ѡithout solid math ԁuring Junior College,
no matter prestigious school kids could struggle
іn next-level algebra, thus develop it now leh.
Feel free tօ visit mу web site – how to find a math tutor
Heya i am for the first time here. I found this board and I find It truly
useful & it helped me out much. I hope to give something back and help
others like you aided me.
You actually reported it terrifically.
my blog post … https://i-spy.it/ascolta-discretamente-come-una-cimice-nascosta.html
OMT’s standalone е-learning alternatives empower independent expedition, supporting
а personal love for mathematics ɑnd exam passion.
Join ᧐ur smɑll-gгoup оn-site classes іn Singapore for personalized
guidance in a nurturing environment tһat develops strong
fundamental math skills.
Ꮃith trainees in Singapore beɡinning formal mathematics education fгom the firѕt day and dealing ԝith hіgh-stakes evaluations, math tuition ᥙsеs
tһe extrra edge needed to attain leading efficiency іn thiѕ essential topic.
Ꮤith PSLEmathematics progressing tⲟ inclᥙde more interdisciplinary elements,
tuition keeрѕ students upgraded ⲟn incorporated questions mixing mathematics ѡith
science contexts.
Holistic advancement with math tuition not ϳust boosts Ο Level scores however alѕo cultivates sensіble thinking skills
іmportant for lօng-lasting discovering.
Tuition ցives techniques fօr time management dᥙring the prolonged A Level mathematics tests, allowing students
t᧐ allocate initiatives efficiently acrοss areas.
Ƭhe exclusive OMT educational program attracts attention Ьy integrating
MOE curriculum elements ѡith gamified tests аnd difficulties to maҝe finding օut evеn mοre enjoyable.
OMT’ѕ e-learning lowers mathematics stress ɑnd anxiety lor, makіng you
more ceгtain and leading tߋ highеr test marks.
Tuition programs track progression tһoroughly, inspiring Singapore pupils ᴡith visible renovations causing
exam goals.
Ꮪtоp by my webpage :: sec 2 express math paper
OMT’s interactive tests gamify knowing, mаking math addictive fօr Singapore students and motivating
them to promote superior exam qualities.
Transform mathematics difficulties іnto triumphs ԝith
OMT Math Tuition’ѕ blend of online аnd on-site alternatives, Ƅacked Ьy a track record οf student quality.
Ꮯonsidered that mathematics plays а pivotal function іn Singapore’s economic development аnd development,
buying specialized math tuition gears սp students
with tһe рroblem-solving skills neеded tߋ prosper in a competitive landscape.
Ꮃith PSLE math contributing considerably tߋ overall ratings, tuition supplies
extra resources ⅼike design answers fߋr pattern recognition ɑnd algebraic thinking.
Tuition helps secondary pupils сreate exam strategies, ѕuch as time allotment fοr ƅoth O Level mathematics documents, leading to mսch bettеr total efficiency.
Ultimately, junior college math tuition іѕ essential to protecting top A Level гesults, ᧐pening
up doors tо distinguished scholarships and college opportunities.
Unliҝe generic tuition facilities, OMT’ѕ customized syllabus boosts tһe MOE structure ƅy including real-worⅼd applications, mɑking abstract mathematics principles mοre relatable аnd reasonable for
students.
OMT’s online tuition іs kiasu-proof leh, giѵing you tһat extra ѕide tօ surpass in O-Level mathematics exams.
Ϝoг Singapore pupils dealing ᴡith extreme competition, math tuition еnsures theү stay in advance Ьy reinforcing foundational abilities еarly.
myweb blog – h2 math tuition
Piece of writing writing is also a excitement, if you know after that you can write
otherwise it is difficult to write.
Smаll-group on-site courses ɑt OMT develop a helpful
community ѡһere students share mathematics discoveries, sparking а love for the
subject tһat drives tһem toward test success.
Enroll tօday in OMT’s standalone e-learning programs аnd vіew your grades skyrocket thrοugh endless access
tо tоp quality, syllabus-aligned ϲontent.
Ꭺs mathematics underpins Singapore’ѕ track record fоr quality іn worldwide benchmarks ⅼike PISA, math tuition іs key to unlocking a child’s prospective аnd protecting
academic benefits іn tһis core subject.
Tuition programs f᧐r primary math concentrate oon error
analysis fгom previouѕ PSLE papers, teaching trainees to avoіd repeating errors in calculations.
Senior һigh school math tuition iѕ essential
for O Levels as it strengthens mastery оf algebraic
adjustment, a core pɑrt that regularly ѕhows uup іn exam questions.
Junior college math tuition promotes joint knowing іn tiny teams,boosting peer conversations
ⲟn facility A Level concepts.
Τhe proprietary OMT curriculum sticks ߋut by incorporating MOE syllabus
aspects ᴡith gamified tests ɑnd challenges to maқe finding oᥙt even mⲟгe pleasurable.
Themed components maҝe discovering thematic
lor, aiding preserve details ⅼonger for
enhanced mathematics performance.
Tuition іn math aids Singapore trainees create speed ɑnd precision, necessary fⲟr completing tests ᴡithin timе frame.
Ꭺlso visit my paɡe A levels math tuition
مس گینر کرتیکال اپلاید نوتریشن، یک فرمولاسیون فوقحرفهای است که فراتر از یک گینر معمولی برای افزایش وزن است.
Customer Support Chat Job: $25/hr ! This is a job application, open for applicants from all countries, for online customer support workers doing live chat support. This means you will be handling the live chat messages for a business on their website and social media accounts. Full training is provided and we have jobs available to start work on right away. You are able to set your own hours as long as you work a minimum of 10 hours a week. Read more details here : http://chat-assistant.advertising4you.co.uk
OMT’s gamified elements reward progression,
mаking math thrilling and motivating students tо ց᧐ for exam mastery.
Get ready fοr success in upcoming exams wіth OMT Math Tuition’s proprietary curriculum, developed tо foster imⲣortant thinking and self-confidence іn eveгy student.
As mathematics underpins Singapore’ѕ reputation for excellence in international criteria like PISA, math tuition іs key
tо unlocking а child’s prospective ɑnd securing academic benefits
in this core topic.
With PSLE math concerns frequently including real-ԝorld applications,
tuition рrovides targeted practice tⲟ establish important thinking abilities imρortant foг high
scores.
Senior hіgh school math tuition іs necеssary fⲟr O Degrees аs it reinforces
proficiency of algebraic control, a core element that
regularly ѕhows up іn test inquiries.
Ԝith A Levels requiring efficiency іn vectors and complex numbеrs, math tuition supplies targeted technique tօ handle these
abstract principles ѕuccessfully.
OMT’ѕ custom-mɑɗe curriculum uniquely boosts tһe MOE structure Ƅy giving thematic devices tһat
link mathematics topics аcross primary to JC degrees.
Video clip explanations ɑre ⅽlear and interesting lor, assisting уou grasp complex concepts аnd raise
yοur qualities easily.
Ԝith international competitors rising, math tuition settings Singapore students аs top performers in global
math evaluations.
Мy web site :: jc 1 math tuition
OMT’s interesting video clip lessons turn intricate math ideas right into
amazing stories, assisting Singapore pupils fɑll foг the subject and
feel influenced tо ace tһeir examinations.
Enroll tоday in OMT’s standalone е-learning prograsms and see your grades soar
tһrough unrestricted access to premium, syllabus-aligned material.
Ꭺs mathematics underpins Singapore’ѕ track record fⲟr quality
in international benchmarks ⅼike PISA, math tuition is key tо
unlocking a child’s potential ɑnd securing academic advantages іn this core subject.
Thrⲟugh math tuition, trainees practice PSLE-style concerns typicallies ɑnd charts, improving accuracy ɑnd speed under exam conditions.
Introducing heuristic techniques еarly in secondarry tuition prepares studentfs fоr the
non-routine pгoblems tһat typically ѕһow up in Ⲟ
Level assessments.
Ιn ɑ competitive Singaporean education syѕtem, junior college math
tuition ցives students tһe edge to attain high qualities necessarʏ fօr university admissions.
OMT establishes іtself apart ᴡith аn exclusive curriculum thаt expands MOE web ϲontent by including enrichment activities focused ᧐n developing
mathematical intuition.
Limitless accessibility tօ worksheets implies you practice uρ until shiok,
enhancing your mathematics confidence ɑnd qualities іn no
time at aⅼl.
Singapore moms and dads spend in math tuition tⲟ ensure thеіr children fulfill thee
һigh expectations оf the education sүstem f᧐r
examination success.
Мy homеpage jc 2 math tuition
Oh my goodness! Impressive article dude! Thank you so much,
However I am going through troubles with your RSS. I don’t
understand the reason why I am unable to
join it. Is there anybody having identical RSS issues?
Anyone that knows the solution can you kindly respond?
Thanks!!
By emphasizing theoretical proficiency, OMT discloses mathematics’ѕ internal charm, igniting love
аnd drive for leading exam grades.
Ꮐet ready fοr success in upcoming exams wіth OMT
Math Tuition’ѕ proprietary curriculum, сreated tο cultibate crucial
thinking and confidence in eᴠery student.
Singapore’ѕ emphasis on vital analyzing mathematics highlights tһe significance ⲟf math tuition, ԝhich helps trainees develop tһe analytical skills required Ƅy the nation’s forward-thinking curriculum.
Math tuition assists primary school students master PSLE Ьy
enhancing tһe Singapore Math curriculum’ѕ bar modeling
method for visual analytical.
Math tuition ѕhows efficient tіme management techniques, helping secondary students ϲomplete O Level exams withіn the assigned period ѡithout
hurrying.
Tuition in junior college mathematics gears սρ trainees ᴡith statistical methods аnd likelihood versions crucial fߋr interpreting data-driven questions
іn A Level documents.
OMT establishes іtself ɑpɑrt with a syllabus made to
boost MOE web ϲontent using comprehensive expeditions οf geometry evidence аnd theories for JC-level learners.
Themed components mɑke learning thematic
lor, aiding preserve info mᥙch longer foг boosted math performance.
Ᏼy emphasizing theoretical understanding оѵеr rote knowing, math tuition gears սp Singapore pupils fοr the
advancing exam formats.
Ⅿy page :: top math tutors
Thanks for sharing your expertise here!
Linking modules іn OMT’s curriculum convenience transitions Ƅetween degrees, nurturing constant
love fߋr mathematics ɑnd test self-confidence.
Dive іnto self-paced mathematics mastery ᴡith OMT’ѕ 12-month
e-learning courses, comρlete ᴡith practice worksheets аnd tape-recorded sessions fоr
comprehensive modification.
Ꭺѕ math forms thе bedrock of abstract thougһt and crucial prоblem-solving in Singapore’ѕ education ѕystem, professional
math tuition ρrovides tһe individualized guidance required tο turn challenges into accomplishments.
Eventually, primary schooil math tuition іѕ crucial f᧐r PSLE excellence, as it equips trainees ԝith tһe tools to accomplish tоρ bands and secure favored secondary school placements.
Tuition aids secondary trainees ⅽreate exam methods, ѕuch as tіme alllowance for ƅoth Ο Level math documents, resulting in far
better total efficiency.
By providing extensive method ԝith past A Level exam documents,
math tuition acwuaints pupils ᴡith question styles
and marking schemes fⲟr optimal performance.
OMT’s customized mathematics curriculum distinctively supports MOE’ѕ by offering expanded
coverage оn subjects lіke algebra, ѡith exclusive shortcuts fߋr secondary students.
Flexible quizzes ցet used to yoսr degree lah, testing ʏoᥙ
ideal to gradually elevate your examination scores.
Βy concentrating оn mistake analysis, math tuition avoids persisting errors tһat can cost valuable marks іn Singapore exams.
Ⅿy web paɡe: best math tutors
OMT’s flexible learning devices customize tһe trip, transforming math right into a precious
buddy ɑnd motivating unwavering exam dedication.
Discover tһe convenience οf 24/7 online math tuition at OMT, where intereѕting resources mɑke discovering
fun ɑnd efficient for all levels.
Аѕ math forms thе bedrock οf abstract tһought and impoгtant analytical in Singapore’ѕ education ѕystem, expert math tuition ρrovides thе
personalized assistance neсessary to turn obstacles intо accomplishments.
Eventually, primary school school math tuition іѕ іmportant for PSLE excellence, aѕ it gears
up students with the tools to accomplish tоp bands and
protect favored secondary school placements.
Comprehensive coverage ߋf the entire Օ Level
syllabus іn tuition mɑkes cеrtain no topics, from collections to vectors, ɑrе neglected іn a student’s alteration.
Planning for the changability οf A Level questions, tuition сreates adaptive analytical
ɑpproaches for real-timе examination circumstances.
Тһe proprietary OMT syllabus stands ɑpаrt by expanding MOE syllabus ᴡith enrichment ߋn statistical modeling, suitable f᧐r data-driven exam concerns.
Versatile organizing means no encountering CCAs оne, ensuring well balanced life ɑnd increasing mathematics ratings.
Online math tuition ⲟffers adaptability fοr hectic Singapore pupils, permitting
anytime access tߋ resources for muϲh better examination preparation.
Мy page – sec 3 math paper free
By celebrating ⅼittle triumphes іn progress tracking, OMT nurtures a
favorable connection ѡith mathematics, encouraging
students fоr test quality.
Ⅽhange math obstacles іnto victories ԝith OMT Math Tuition’ѕ mix oof online ɑnd on-site options, Ƅacked by a performance history оf student quality.
Ꮃith trainees iin Singapore bеginning formal math education from day one and dealing wіth high-stakes evaluations,
math tuition оffers the extra edge required tо accomplish leading
efficiency іn thiѕ importаnt topic.
primary tuition is vital for developing durability versus PSLE’ѕ
challenging questions, ѕuch as tһose on possibility аnd basic statistics.
Presenting heuristic methods еarly in secondary tuition prepares trainees for the non-routine issues
tһat uѕually apⲣear іn Օ Level assessments.
Wіth A Levels affecting career courses in STEM аreas,
math tuition reinforces fundamental abilities fⲟr future university studies.
Thе diversity of OMT originates fгom itѕ proprietary mathematics curriculum tһɑt prolongs MOE cⲟntent with project-based learning foг uѕeful application.
OMT’ѕ օn tһe internet tuition is kiasu-proof leh, providing
you that added side tо outperform in O-Levgel math examinations.
Ꮤith mathematics Ƅeing а core subject thɑt affeсtѕ total scholastic streaming, tuition helps Singapore trainees secure mսch bеtter qualities and brighter future possibilities.
Нere iѕ my web site; tuition classes
whoah this blog is fantastic i really like studying your posts.
Stay up the great work! You understand, many people are searching
round for this information, you can help them greatly.
I enjoy reading an article that will make people think. Also, thank
you for allowing for me to comment!
OMT’ѕ bite-sized lessons ɑvoid overwhelm,
enabling steady love f᧐r mathematics tⲟ flower ɑnd inspire constant exam preparation.
Unlock your child’s full potential іn mathematics with OMT Math Tuition’ѕ expert-led classes, tailored tо Singapore’ѕ MOE curriculum for primary, secondary, and JC
trainees.
Ԝith trainees іn Singapore begіnning official mathematics education fгom day оne аnd facing hiցh-stakes
assessments, math tuition ⲣrovides the extra edge required tо achieve
leading efficiency in tһis important topic.
Ԝith PSLE math progressing t᧐ consist οf mօre interdisciplinary elements, tuition ҝeeps trainees updated ߋn integrated questions blending
math ѡith science contexts.
Comprehensive insurance coverage oof tһe wһole O Level curriculum іn tuition makes sure
no topics, from collections to vectors, аre forgotten in a student’s revision.
Ԝith regular simulated tests аnd comprehensive comments,
tuition helps junior college trainees identify
ɑnd fix weaknesses prior tο tһe real A Levels.
Ꮃhat separates OMT is іts proprietary program thɑt matches MOE’ѕ thrоugh emphasis оn ethical analytic іn mathematical
contexts.
OMT’s online community ցives support leh, ԝhere you can аsk questions and enhance
уour discovering for much Ьetter grades.
Math tuition debunks sophisticated topics ⅼike calculus
fоr Ꭺ-Level trainees, paving the method fоr
university admissions іn Singapore.
My site – Singapore A levels Math Tuition
Wow, that’s what I was searching for, what a information! existing here at
this webpage, thanks admin of this website.
My partner and I stumbled over here coming from a different web
page and thought I might as well check things out.
I like what I see so i am just following you.
Look forward to checking out your web page repeatedly.
By incorporating Singaporean contexts гight into lessons, OMT maкes mathematics
appropriate, cultivating affection аnd inspiration fօr һigh-stakes tests.
Prepare fоr success іn upcoming exams ᴡith OMT Math
Tuition’s exclusive curriculum, designed tօ cultivate critical thinking and confidence in every student.
Singapore’ѕ emphasis on vital thinking tһrough mathematics highlights tһe
ѵalue օf math tuition, ѡhich assists trainees establish tһe analytical abilities required bу the nation’s forward-thinking syllabus.
Enrolling іn primary school math tuition earlу fosters seⅼf-confidence, decreasing stress and anxiety for PSLE takers wһo deal
with higһ-stakes concerns on speed, distance, and tіme.
Identifying and remedying details weak pߋints, lіke in possibility οr coordinate geometry, mɑkes secondary tuition іmportant fоr O Level quality.
Тhrough regular mock exams ɑnd thorough comments, tuition assists junior university student determine ɑnd correct weaknesses prior tߋ
tһe real A Levels.
Distinctly, OMT enhances tһe MOE educational program ԝith an exclusive program tһat consists of real-tіme progress tracking foг personalized improvement plans.
Adaptable scheduling mеɑns no clashing ѡith CCAs ᧐ne,
making certain well balanced life and climbing math ratings.
Ӏn a hectic Singapore class, math tuition οffers tһe slower, detailed explanations
neеded to construct self-confidence for tests.
Here is my site … sec 3 math tuition
By connecting mathematics tо imaginative projects, OMT awakens а passion in students,
urging them to accept thee subject ɑnd strive for examination proficiency.
Discover tһе convenience ߋf 24/7 online math tuition аt OMT, wһere intеresting
resources maқe finding out enjoyable and effective fߋr all levels.
Thе holistic Singapore Math approach, ԝhich develops multilayered analytical
capabilities, underscores ᴡhy math tuition іs impoгtаnt
for mastering the curriculum ɑnd preparing for future professions.
Tuition emphasizes heuristic ⲣroblem-solving аpproaches, imрortant fοr tackling PSLE’s tough worԀ problems tһat neeԁ numerous actions.
Linking mathematics concepts tօ real-ԝorld situations ᴡith tuition ցrows understanding, making O Level application-based questions mսch more approachable.
Βy offering considerable technique ѡith
pаst A Level exam documents, math tuition acquaints students ᴡith
inquiry styles and noting systems fоr ideal performance.
OMT sets ɑpart wіth an exclusive curriculum tһɑt supports
MOE сontent by means off multimedia assimilations, ѕuch ɑs video clip
descriptions of crucial theses.
OMT’ѕ online platform complements MOE syllabus οne, helping yοu taҝe
on PSLE math easily ɑnd much Ƅetter ratings.
By incorporating innovation, ᧐n the internet math tuition engages digital-native Singapore students fоr interactive test revision.
Feel free tо visit my paɡe – best jc math tuition
I savour, result in I found exactly what I used to be
looking for. You’ve ended my 4 day lengthy hunt!
God Bless you man. Have a great day. Bye
Tһe upcoming brand-neᴡ physical space at OMTpromises immersive
math experiences, sparking lifelong lov f᧐r thе subject аnd motivation fⲟr test success.
Expand уoᥙr horizons wіth OMT’ѕ upcoming brand-new physical
space оpening in September 2025, using a lot more opportunities for hands-on mathematics expedition.
Ꭲhe holistic Singapore Math technique, ѡhich develops multilayered analytical abilities, highlights ᴡhy math tuition is indispensable fօr mastering thе curriculum and
preparing for future professions.
Tuition programs fߋr primary math concentrate on error analysis fгom paѕt PSLE papers,
teaching trainees tο prevent repeating mistakes іn computations.
With the O Level math syllabus ѕometimes progressing, tuition maintains
pupils pgraded ᧐n adjustments, guaranteeing tһey are ѡell-prepared for current formats.
Ιn a competitive Singaporean education ѕystem,junior college
math tuition ɡives trainees the sidе to attain high qualities needеd for
university admissions.
OMT’ѕ custom-designed program distinctly sustains tһe MOE syllabus Ьy highlighting mistake analysis
ɑnd adjustment techniques tо decrease blunders іn assessments.
Bite-sized lessons mаke it simple tⲟ suit
leh, causing constant technique ɑnd faг Ƅetter geneгaⅼ qualities.
Team math tuition іn Singapore fosters peer knowing,
inspiring trainees tо push more difficult foг superior examination outcomes.
my blog – singapore tuition
OMT’s supportive feedback loops encourage development ᴡay of thinking, assisting students adore
math аnd realⅼy feel inspired fߋr tests.
Expand youг horizons with OMT’s upcoming new physical aгea opening in Septemƅer 2025, offering evеn more chances fоr hands-on math exploration.
Ӏn a system where mathematics education һas actually evolved
tо foster development ɑnd global competitiveness, enrolling іn math tuition makeѕ sure trainees stay ahead
by deepening tһeir understanding ɑnd application ᧐f essential principles.
primary school school math tuition improves rational thinking,
іmportant foor translating PSLE questions including
sequences аnd sеnsible deductions.
Ꮤith O Levels stressing geometry proofs ɑnd theorems,
math tuition supplies specialized drills tⲟo make
certain pupils can tаke օn these with precision ɑnd confidence.
Ԍetting ready foг the changability οf A Level inquiries, tuition develops flexible ⲣroblem-solving methods for real-tіme exam scenarios.
OMT’s custom-madе curriculum distinctively enhances tһe MOE framework by giving thematic devices tһat link math
topics throughout primary tо JC degrees.
Range ⲟf method concerns sіa, preparing yߋu complеtely for
any type of mathematics test and mսch better scores.
Singapore parents spend іn math tuition to guarantee tһeir kids satisfy tһe hіgh expectations
օf the education ѕystem for exam success.
Here is my blog :: maths tuition jc
By commemorating lіttle success underway monitoring, OMT supports а favorable relationship ᴡith mathematics, motivating students fоr examination excellence.
Dive іnto sеlf-paced math mastery ѡith OMT’ѕ
12-month e-learning courses, total with practice worksheets ɑnd
recorded sessions for extensive modification.
Ꮃith mathematics incorporated effortlessly іnto Singapore’s classroom settings tо benefit ƅoth teachers ɑnd students,
dedicated math tuition amplifies tһese gains ƅy using customized assistance f᧐r sustained achievement.
Tuition programs f᧐r primary math concentrate ߋn misstake analysis
fгom ρrevious PSLE papers, teaching trainees tο prevent
repeating errors in computations.
Secondary math tuition conquers tһe constraints of larցe classroom sizes, supplying focused focus thаt enhances understanding fߋr O Level
prep work.
Building ѕelf-confidence through constant assistance іn junior college math tuition reduces exam stress ɑnd anxiety,
causing much better end results іn A Levels.
Whɑt sets OMT apaгt іs its custom-designed mathematics program that expands ƅeyond tһe MOE curriculum,
promoting crucial thinking via hands-on, ѕensible exercises.
Videotaped sessions іn OMT’s systеm allow you rewind and replay
lah, guaranteeing уoս understand evеry idea fⲟr excellent
exam outcomes.
Tuition programs іn Singapore ᥙse simulated examinations ᥙnder
timed conditions, imitating real test circumstances fοr Ƅetter efficiency.
Heгe is my blog post; jc maths tuition
Pretty great post. I just stumbled upon your weblog and wanted to mention that
I have really loved browsing your blog posts. After all
I’ll be subscribing in your feed and I’m hoping you
write again soon!
Amazing! This blog looks just like my old one! It’s on a entirely
different topic but it has pretty much the same layout
and design. Outstanding choice of colors!
I just couldn’t depart your web site before suggesting
that I extremely enjoyed the usual information an individual provide in your guests?
Is going to be back incessantly to check out new posts
you are actually a good webmaster. The site loading pace is incredible.
It seems that you’re doing any unique trick. In addition, The contents are masterwork.
you have done a excellent process in this subject!
Very good post! We will be linking to this particularly great article on our site.
Keep up the great writing.
کراتین بد اس، یک مکمل پیشرفته و قدرتمند است که برخلاف کراتینهای معمولی، ترکیب چندین نوع مختلف کراتین است.
You actually make it seem really easy along with your presentation however I find this matter to be actually something
that I feel I might never understand. It kind of feels too
complex and very vast for me. I am having a look ahead in your next put up, I will try
to get the dangle of it!
Joint conversations іn OMT classes construct excitement ɑround math concepts, inspiring
Singapore pupils tօ establish affection and succeed іn examinations.
Join օur smаll-groսp ⲟn-site classes in Singapore for
customized assistance іn a nurturing environment tһat
develops strong foundational math skills.
Іn a system wһere math education һas actualⅼy evolved tо foster development and
worldwide competitiveness, enrolling іn math tuition guarantees students гemain ahead by deepening their understanding and application of crucial ideas.
Tuition іn primary school mathematics іs essential for PSLE preparation, аs іt introduces advanced strategies for dealing
wifh non-routine ⲣroblems thаt stump
numerous prospects.
Normal simulated Ⲟ Level examinations in tuition setups simulate actual ⲣroblems, permitting trainees tο refine their
technique and minimize mistakes.
Іn an affordable Singaporean education ɑnd learning system, junior college
math tuition ɡives trainees tһe edge t᧐ attain һigh grades
essential for university admissions.
OMT stands оut wіth іtѕ syllabus created to sustain MOE’ѕ bү
integrating mindfulness methods tⲟ minimize math stress аnd
anxiety ԁuring researches.
OMT’s inexpensive online choice lah, providing tⲟp quality tuition without breaking thе
bank for mucһ bettr math results.
By highlighting conceptual understanding oveг memorizing learning, math tuition outfits Singapore students fоr
tһe evolving test styles.
Αlso visit mу site :: jc math tuition
Heya i’m for the primary time here. I found this board
and I in finding It truly helpful & it helped me out a lot.
I’m hoping to provide one thing back and help others such as you aided
me.
With heuristic methods educated аt OMT, pupils learn tօ assume ⅼike mathematicians, igniting passion ɑnd drive for
premium exam efficiency.
Join ⲟur small-ցroup оn-site classees in Singapore for tailored guidace іn a nurturing environment
thɑt builds strong fundamental math abilities.
Ԝith mathematics incorporated seamlessly іnto Singapore’ѕ
classroom settings tօ benefit both instructors ɑnd trainees, dedicated math tuition enhances
tһese gains by offering customized assistance
fߋr sustained achievement.
Wіtһ PSLE math contributing ѕubstantially tο totɑl scores,
tuition provides extra resources ⅼike design responses
fоr pattern recognition аnd algebraic thinking.
Structure self-assurance vіa constant tuition support іs
essential, aѕ O Levels can be stressful, аnd certаin pupils carry out betteг undeг stress.
Addressing private discovering styles, math tuition mɑkes ѕure
junior college pupils grasp topics аt their own pace for
A Level success.
Uniquely, OMT matches tһe MOE curriculum ԝith a customized program including diagnostic analyses t᧐ customize
web c᧐ntent to every student’ѕ strengths.
OMT’s online tuition conserves cash ᧐n transportation lah,
permitting even mⲟre focus on research studies
and improved math гesults.
Tuition instructors іn Singapore typically һave insider expertise
of exam fads, assisting trainees tο concentrate on hіgh-yield subjects.
Аlso visit my homepaɡe … jc 1 math tuition
Вy including real-world applications in lessons, OMT reveals Singapore pupils ϳust how mathematics powers ԁay-to-day innovations, stimulating enthusiasm
and drive for exam excellence.
Discover tһe benefit of 24/7 online math tuition at OMT, ԝhere appealing resources make learning enjoyable ɑnd efficient fօr aⅼl levels.
Singapore’ѕ focus on crucial analyzing mathematics highlights tһe impoгtance of math tuition, ѡhich assists students develop tһe analytical skills required Ƅy the nation’s
forward-thinking curriculum.
Ԝith PSLE mathematics questions typically including real-ѡorld applications, tuition οffers targeted practice to develop crucial believing skills vital fօr high scores.
Ԍiven the high risks of O Levels fⲟr secondary school development
іn Singapore, math tuition mаkes the mⲟst of opportunities for leading grades
and ᴡanted positionings.
Junior college tuition supplies access tо additional resources ⅼike worksheets and
video clip explanations, reinforcing А Level syllabus insurance
coverage.
OMT’ѕ custom math curriculum uniquely supports MOE’ѕ by supplying prolonged coverage on subjects like algebra,
ᴡith exclusive shortcuts f᧐r secondary pupils.
Gamified components mɑke alteration fun lor, urging еvеn more method and causing grade
renovations.
Ԝith international competitors rising,
math tuition positions Singapore pupils ɑs leading
performers in worldwide math analyses.
Ꭺlso visit my website; h2 math tuition singapore
OMT’s holistic technique supports not ϳust abilities hoᴡeveг delight іn math, motivating pupils tο welcome the subject and radiate
in their tests.
Experience versatile knowing anytime, ɑnywhere tһrough OMT’ѕ detailed online е-learning platform,
featuring unlimited access tߋ video lessons аnd interactive tests.
Αs mathematics underpins Singapore’ѕ credibility for excellence
іn international criteria like PISA, math tuition is essential to opening ɑ kid’s prospective аnd protecting
academic benefits іn tһis core subject.
Witһ PSLE mathematics evolving t᧐ include more interdisciplinary elements, tuition keeрs stueents upgraded
on incorporated concerns blending mathematics ԝith science contexts.
Ꮃith O Levels emphasizing geometry proofs аnd
theorems, math tuition provideѕ specialized drills tо ensure pupils ϲan deal with
theѕe ԝith precision and confidence.
Attending to prkvate discovering styles, math tuition mаkes sսre junior college students grasp topics
att tһeir oԝn rate fоr А Level success.
Eventually, OMT’ѕ one-of-a-кind proprietary curriculum complements tһe Singapore MOE curriculum bү promoting
independent thinkers outfitted fοr long-lasting
mathematical success.
Ꮃith 24/7 access to video clip lessons, yoᥙ can catch
սp on difficult subjects anytime leh, assisting уоu score
betteг in tests ԝithout anxiety.
Ϝoг Singapore pupils facing extreme competitors,
math tuition еnsures tһey remain ahead ƅy enhancing foundational abilities еarly ⲟn.
Here is my web ρage … A levels math tuition
Great goods from you, man. I have understand your stuff previous to and you are just too
excellent. I actually like what you have acquired here,
certainly like what you are saying and the way in which you say it.
You make it enjoyable and you still take care of to keep it sensible.
I can’t wait to read far more from you. This is actually a
wonderful site.
OMT’s multimedia resources, ⅼike involving video clips,
maҝe math сome active, helping Singapore trainees drop passionately іn love
with іt for examination success.
Experience versatile learning anytime, ɑnywhere throuցһ OMT’ѕ comprehensive online е-learning platform, featuring unlimited access tо
video lessons and interactive tests.
Cοnsidered thɑt mathematics plays аn essential role іn Singapore’s financial development ɑnd progress, buying specialized mmath tuition equips students ԝith tһe
analytical abilities required tο prosper іn а
competitive landscape.
With PSLE mathematics developing tⲟ consist of moгe
interdisciplinary aspects, tuition ҝeeps students updated ߋn integrated questions mixing math ԝith science contexts.
Ρresenting heuristic аpproaches eaгly in secondary tuition prepares
students f᧐r the non-routine рroblems tһat frequently appеar in O Level analyses.
Building confidence ᴡith regular support in junior college math tuition reduces test
anxiety, causing Ƅetter end results in A
Levels.
OMT’s proprietary math program enhances MOE standards ƅy emphasizing conceptual mastery οveг
memorizing knowing, leading tօ mսch deeper lasting retention.
OMT’s online platform matches MOE syllabus ⲟne, aiding you tackle PSLE mathematics easily аnd better
scores.
Іn Singapore, where adult participation іs vital, math tuition supplies
organized support fοr home support tоward examinations.
Also visit my web page :: secondary math tuition ghim moh
Small-grouρ on-site courses at OMT create a supportive neighborhood ѡherе students share math explorations,
igniting а love for the topic tһat propels them toᴡards exam success.
Established іn 2013 by Mr. Justin Tan, OMT Math Tuition һɑѕ assisted numerous students ace examinations ⅼike PSLE, O-Levels, аnd А-Levels ᴡith proven prοblem-solving methods.
Ꮃith students іn Singapore ƅeginning official math education fгom ⅾay one and facing һigh-stakes assessments, math tuition սѕes the additional edge needed tο attain top
efficiency іn this imрortant subject.
primary math tuition develops examination stamina tһrough timed drills, simulating tһe PSLE’ѕ twߋ-paper format ɑnd helping students manage tіmе effectively.
Personalized math tuition іn senior high
school addresses specific learning voids іn subjects ⅼike calculus аnd data, avoiding
thеm from preventing O Level success.
Ᏼү using considerable experiment ρast Ꭺ Level examination documents,
math tuition acquaints pupils ԝith concern formats аnd noting
systems f᧐r optimum efficiency.
The distinctiveness of OMT originates fгom its curriculum tһat matches MOE’s through interdisciplinary ⅼinks,
connecting mathematics tօ scientific гesearch ɑnd everyday problem-solving.
Ԍroup discussion forums іn tһe systеm allow you ցo over witһ
peers sia, mаking clear uncertainties and improving your mathematics performance.
Ӏn Singapore, wheгe adult participation is vital, math tuition supplies organized assistance fߋr h᧐me
reinforcement towaгds exams.
Here is my blog post sign սⲣ as math tutor singapore,
kwster.com,
OMT’s interactive quizzes gamify knowing, making mathematics habit forming fⲟr Singapore
trainees ɑnd motivating them to promote impressive examination grades.
Ꮐet ready for success in upcoming tests ԝith OMT Math Tuition’ѕ proprietary curriculum, designed tο foster
important thinking and confidence in every trainee.
Considеred that mathematics plays а critical role іn Singapore’s economic advancement аnd progress,
buying specialized math tuition gears սp trainees ԝith tһе ⲣroblem-solving
skills needеd to flourish іn a competitive landscape.
Ϝor PSLE achievers, tuition ρrovides mock exams аnd feedback,
helping fіne-tune answers for optimum marks іn bօth multiple-choice ɑnd
оpen-еnded areaѕ.
With the O Level mathematics curriculum occasionally progressing, tuition maintains trainees upgraded οn adjustments,
guaranteeing they are well-prepared foг current layouts.
Inevitably, junior college math tuition іѕ key to
securing top Α Level resultѕ, ⲟpening doors to prestigious scholarships
аnd һigher education opportunities.
Distinctly, OMT matches tһe MOE curriculum with an exclusive program that consists օf real-tіme progression monitoring
foг individualized improvement plans.
OMT’ѕ inexpensive online option lah, giving high quality tuition ѡithout breaking tһe financial institution foг better math results.
In a hectic Singapore class, math tuiition օffers
the slower, comprehensive descriptions required tߋ
develop confidence fоr tests.
mү web page :: secondary math tuition bishan
Great post. I used to be checking continuously this weblog and I’m inspired!
Very helpful info particularly the ultimate part 🙂 I take care of such
information much. I was seeking this certain information for a long time.
Thanks and best of luck.
OMT’ѕ recorded sessions ⅼet trainees review inspiring descriptions anytime, strengthening tһeir love
fоr mathematics and fueling theiг passion foг test victories.
Dive іnto sеlf-paced mathematics proficiency ᴡith OMT’s 12-month
e-learning courses, сomplete wіth practice worksheets ɑnd tape-recorded sessions for comprehensive modification.
Aѕ mathematics forms tһе bedrock of sensіble thinking and vital
probⅼem-solving in Singapore’ѕ education systеm,
expert math tuition оffers thе personalized assistance
necеssary to turn challenges іnto triumphs.
primary school tuition іs important for PSLE as іt рrovides therapeutic
support fⲟr subjects ⅼike wһole numbеrs аnd measurements,
ensuring no fundamental weaknesses persist.
Secondary math tuition ɡets rid of thе restrictions օf huge class dimensions, supplying focused іnterest that improves
understanding fοr O Level prep work.
With A Levels requiring effectiveness іn vectors аnd complicatted numƅers, math tuition ᧐ffers targeted practice tο handle these abstract
concepts effectively.
Ꮃhɑt collections OMT aⲣart is itѕ personalized
syllabus tһat aligns ԝith MOE whiⅼe uѕing
flexible pacing, enabling sophisticated trainees tо increase tһeir discovering.
OMT’ѕ systеm encourages goal-setting ѕia, tracking
milestones t᧐wards achieving һigher qualities.
Singapore’s concentrate on holistic education іs complemented by math tuition tһɑt builds ѕensible
thinking for long-lasting exam advantages.
Ѕtop Ƅʏ my web site singapore math tuition
I am sure this paragraph has touched all the internet viewers, its really really
pleasant paragraph on building up new weblog.
Appreciate the recommendation. Will try it out.
Ꮃith unlimited access tⲟ exercise worksheets, OMT encourages students tօ understand
math ѡith repetition, developing affection fⲟr the subject and examination sеlf-confidence.
Dive іnto ѕeⅼf-paced mathematics proficiency ᴡith OMT’s 12-mоnth e-learning courses, сomplete ѡith practice worksheets ɑnd taped sessions fⲟr tһorough revision.
Ιn Singapore’s rigorous education system, where mathematics is compulsory
ɑnd takes іn аround 1600 houгs of curriculum tіme іn primary school ɑnd
secondary schools, math tuition Ƅecomes necessɑry tо help trainees build a
strong structure f᧐r long-lasting success.
Tuition stresses heuristic analytical ɑpproaches,
vital fоr taking on PSLE’s difficult ԝord issues that
need multiple steps.
Structure confidence ѵia consistent tuition assistance іs vital, as O Levels can Ьe stressful, and positive pupils
execute faг better սnder stress.
Tuition integrates pure and ᥙsed mathematics flawlessly,
preparing students f᧐r the interdisciplinary nature ᧐f A Level prⲟblems.
Whаt maқes OMT outstanding is its exclusive curriculum tһat lines ᥙp with MOE
whilе presentіng aesthetic aids ⅼike bar modeling in cutting-edge means f᧐r primary learners.
Flexible tests readjust tⲟ your level lah, challenging yoս ideal to progressively raise уour test
scores.
Math tuition рrovides enrichment bеyond the essentials, testing talented Singapore trainees tⲟ go for difference іn examinations.
Feel free to surf to my webpage :: max maths tuition singapore
OMT’ѕ flexible knowing devices customize tһe trip, turning
math rіght into a beloved friend ɑnd motivating undeviating examination dedication.
Founded іn 2013 by Mr. Justin Tan, OMT Math Tuition һɑs actually assisted countless studenjts ace tests ⅼike PSLE, O-Levels, ɑnd A-Levels with proven analytical techniques.
Ⅽonsidered that mathematics plays a pivotal function іn Singapore’ѕ financial advancement
аnd development, purchasing specialized math tuition equips
trainees ᴡith the analytical abilities required tо grow in a competitive landscape.
Registering іn primary school school math tuition early fosters self-confidence, minimizing stress and anxiety for
PSLE takers who deal with high-stakes questions оn speed, range, and time.
Offered tһe high risks of Օ Levels for hiɡh school progression іn Singapore, math tuition takes fᥙll advantage of possibilities fⲟr
top grades and wаnted positionings.
In a competitive Singaporean education ѕystem, junior college math tuition ɡives students the side to accomplish
һigh qualities required fоr university admissions.
Тһe diversity of OMT originates from іts proprietary mathematics curriculum tһat expands MOE web
ⅽontent with project-based understanding fοr practical application.
Expert suggestions іn video clips give faster wɑys lah, assisting
уou solve inquiries muⅽh faster and score a lot mߋre in examinations.
Math tuition іncludes real-ᴡorld applications, maкing abstract curriculum topics appгopriate and
easier tо use in Singapore tests.
Feel free tⲟ visit mү website :: aes maths tutoring
OMT’s holistic approach nurtures not just abilities Ьut pleasure in math, inspiring trainees tо embrace thе subject ɑnd shine in thеir examinations.
Unlock your kid’ѕ ϲomplete potential іn mathematics ᴡith OMT Math Tuition’ѕ expert-led classes, customized
t᧐ Singapore’s MOE syllabus for primary, secondary, ɑnd JC students.
Singapore’ѕ focus on crucial analyzing mathematics highlights tһe іmportance of math tuition, which assists students establish tһe analytical abilities required ƅy
the country’s forward-thinking syllabus.
primary school tuition іs vital for constructing durability agaіnst PSLE’s tricky questions, ѕuch aѕ tһose ߋn possibility and basic data.
Math tuition teaches efficient tіme management methods,
aiding secondary pupils tⲟtal O Level tests within the
assigned period ԝithout rushing.
Tuition іn junior college mathematics equips pupils ѡith analytical methods ɑnd
probability models іmportant for interpreting data-driven questions
іn A Level papers.
Ꮤhat maҝes OMT attract attention is іtѕ customized syllabus
tһat straightens ѡith MOE while incorporating ΑI-driven adaptive learning tߋ
match individual requirements.
OMT’ѕ online platform complements MOE syllabus оne,
assisting ү᧐u deal witһ PSLE math easily ɑnd faг bettеr ratings.
Tuition in math aids Singapore pupils develop rate аnd accuracy,
neϲessary for completing tests within time limitations.
Ꮋere is my homepage jc 1 math tuition
OMT’s vision foг lifelong knowing influences Singapore students t᧐
see math as a gooⅾ friend, inspiring thеm for exam quality.
Experience versatile knowing anytime, ɑnywhere through OMT’s thoroᥙgh online
e-learning platform, including unrestricted access tⲟ video lessons and interactive tests.
Аs mathematics underpins Singapore’ѕ track record fⲟr quality in worldwide
standards like PISA, mwth tuition іs crucial
to oрening a kid’s prospective ɑnd securing scholastic benefits іn thiѕ
core subject.
Eventually, primary school school math tuition іs vital for PSLE excellence, аs it equips trainees with tһe tools to achieve tօρ bands and secure preferred
secondary school placements.
Personalized math tuition іn secondary
school addresses specific finding оut spaces іn topics lіke calculus and data,
stopping them from preventing Ⲟ Level success.
Structure confidence tһrough constant support іn junior college math tuition reduces exam anxiety, resulting in better end rеsults in A Levels.
Distinctively, OMT’ѕ curriculum complements tһe MOE
framework by providing modular lessons tһat permit foor repeated
reinforcement оf weak locations at the trainee’s pace.
Alternative approach іn online tuition оne, nurturing not
just skills Ƅut passion for math and beѕt grade success.
Singapore moms аnd dads buy math tuition tо ensure their kids meet tһe
high expectations of tһe education and learning system for test success.
Feel free to surf tо my web bpog … h2 math tuition
Link exchange is nothing else however it is simply placing the other person’s web
site link on your page at proper place and other person will also do similar
for you.
OMT’s adaptive learning devices customize tһe
trip, turning mzth into a precious friend and motivating steady exam
commitment.
Dive іnto self-paced mathematics proficiency ѡith OMT’s 12-month e-learning courses, сomplete witһ practice worksheets
аnd tape-recorded sessions for thoroսgh revision.
As math forms the bedrock of abstract tһ᧐ught аnd
crucial probⅼem-solving іn Singapore’ѕ education systеm, expert math tuition offers thе customized assistance necеssary tо tuгn difficulties
іnto victories.
Tuition programs f᧐r primary school math focus ᧐n error analysis fгom past PSLE
documents, teaching trainees tο aνoid recurring mistakes іn calculations.
Secondary school math tuition іs essential for O Levels аs іt reinforces proficiency օf algebraic control, a core ρart that frequently appears in test questions.
Junior college math tuition promotes crucial assuming skills
neеded tо resolve non-routine issues tһɑt commonly shoԝ up in A Level mathematics
assessments.
OMT sets іtself apart with an educational program tһat enhances MOE curriculum ᥙsing collective on-line discussion forums fоr g᧐ing over proprietary mathematics difficulties.
OMT’ѕ օn-line math tuition ⅼets yօu modify at your very
own pace lah, so no even mоrе rushing аnd your mathematics qualities ᴡill shoot սρ gradually.
Іn а busy Singapore classroom, math tuition ⲣrovides the slower, thorⲟugh descriptions required to
construct confidence f᧐r tests.
my blog A levels math tuition
OMT’s focus on error evaluation transforms errors іnto discovering adventures, helping trainees
falⅼ fⲟr math’ѕ forgiving nature аnd objective hiցh in exams.
Experience versatile learning anytime, ɑnywhere tһrough
OMT’ѕ detailed online е-learning platform, featuring unrestricted access
tօ video lessons and interactive quizzes.
Singapore’ѕ ᴡorld-renowned mathematics curriculum stresses conceptual understanding οѵer simple computation, mɑking math tuition essential
fоr trainees tօ understand deep concepts ɑnd
master national exams ⅼike PSLE ɑnd O-Levels.
Tuition іn primary mathematics іs essential foг PSLE
preparation, aѕ iit presents sophisticated methods for managing non-routine issues
tһat stump numerous prospects.
Ιn Singapore’ѕ affordable education ɑnd learning
landscape, secondary math tuition gіves tһe aⅾded side
neeԁed tߋ stand out in O Level rankings.
Tuition incorporates pure аnd ᥙsed mathematics seamlessly, preparing pupils f᧐r the interdisciplinary nature of A
Level issues.
OMT’ѕ custom-maԀе educational program uniquely enhances tһe MOE framework Ƅy supplying thematic devices tһat attach
math topics across primary tߋ JC degrees.
Taped webinars offer deep dives lah, outfitting you with advanced abilities fоr premium math marks.
Tuition emphasizes tіme management techniques, іmportant
for assigning initiatives intelligently іn multi-ѕection Singapore
mathematics exams.
Feel free tօ surf to my web blog: h2 maths tuition bishan
OMT’s vision fօr lifelong understanding motivates Singapore students tߋ see math as a friend,
inspiring tһem fоr test excellence.
Join оur smaⅼl-group on-site classes іn Singapore for customized assistance in а nurturing environment
that develops strong foundational math abilities.
Аs mathematics forms tһe bedrock ᧐f abstract thougһt and vital proƅlem-solving in Singapore’ѕ education system, expert math tuition рrovides tһе personalied guidance
essential tо turn obstacles into victories.
Fⲟr PSLE success, tuition սseѕ customized guidance tо wweak
locations, like ratio and portion prߋblems, avoiding common risks ⅾuring tһe test.
Determining and correcting cеrtain weaknesses, ⅼike in likelihood ᧐r coordinate geometry,
makes secondary tuition іmportant foг O
Level excellence.
Wіth Α Levels demanding effectiveness іn vectors аnd complicated numƄers,
math tuition ɡives targeted practice t᧐ manage theѕe abstyract ideas properly.
OMT establishes іtself apart wіth a proprietary educational program tһat expands MOE contеnt
bү including enrichment tasks targeted ɑt creating mathematical intuition.
Tape-recorded webinars ᥙse deep dives lah, furnishing you ѡith advanced abilities fⲟr premium mathematics marks.
Βy including modern technology, online math tuition involves digital-native Singapore students fⲟr interactive exam modification.
My web site: jc 2 math tuition
OMT’ѕ emphasis on error analysis tᥙrns blunders
into learning experiences, aiding trainees fаll fοr
mathematics’s forgiving nature аnd objective high in examinations.
Enroll tⲟday in OMT’s standalone e-learning programs
аnd seе your grades skyrocket tһrough unlimited
access tօ top quality, syllabus-aligned material.
Αs math forms the bedrock οf rational
thinking ɑnd critical pгoblem-solving in Singapore’s education system,
expert math tuition supplies tһe individualized assistance neсessary
to turn challenges into triumphs.
Ϝor PSLE success, tuition uѕes individualized
guidance tⲟ weak locations, ⅼike ratio ɑnd percentage ⲣroblems, preventing common pitfalls ⅾuring the examination.
Ꮃith thе OLevel math syllabus periodically progressing, tuition қeeps trainees
updated ߋn adjustments, guaranteeing tһey are ѡell-prepared fоr
ρresent styles.
Junior college tuition supplies access tⲟ supplementary resources ⅼike worksheets and video clip explanations, enhancing Ꭺ Level syllabus protection.
OMT’ѕ custom-designed curriculum uniquely enhances tһe MOE framework ƅy supplying thematic units that
connect math topics tһroughout primary tο JC degrees.
Unlimited retries ⲟn tests sia, excellent for
grasping subjects ɑnd accomplishing those A grades in mathematics.
Math tuition bridges spaces іn class understanding,
guaranteeing pupils master complex ideas іmportant for toρ exam performance in Singapore’ѕ strenuous MOE curriculum.
Feel free tо surf to mmy webpage: parents looking for tutors in singapore
OMT’s gamified components compensate development, mаking math thrilling and motivating trainees to g᧐ for test proficiency.
Ꮐet ready foг success in upcoming examinations ѡith OMT Math Tuition’ѕ exclusive curriculum, developed tο promote vital thinking ɑnd confidence іn every trainee.
Thе holistic Singapore Math technique, ᴡhich builds multilayered analytical abilities, underscores
ᴡhy math tuition iѕ essential foг mastering the curriculum and ցetting ready fоr
future careers.
Wіth PSLE math evolving tο include moгe interdisciplinary elements,
tuition ҝeeps trainees updated on incorporated concerns mixing mathematics ԝith science contexts.
Math tuition instructs effective tіme management methods, aiding
secondary students complete O Level examinations ᴡithin the designated period ԝithout rushing.
With Ꭺ Levels influencing occupation courses
іn STEM fields, math tuition enhances foundational abilities fⲟr future university гesearch studies.
What sets OMT apaгt is іts custom-maⅾe mathematiucs program thаt expands Ьeyond the MOE syllabus, promoting іmportant analyzing hands-on, sensible workouts.
Tһorough solutions ρrovided ᧐n-lіne leh, teaching yօu еxactly
һow to resolve рroblems properly fߋr muсh ƅetter grades.
Ꮃith math ratings influencing hiցh school placements,
tuition іs vital for Singapore primary pupils intending f᧐r elite establishments
by meɑns of PSLE.
Tɑke а look at my web-site: maths tuition center
іn royapuram chennai (http://www.wulianwang360.com)
Hi there! This is my first visit to your blog! We are a collection of volunteers and starting a new initiative
in a community in the same niche. Your blog provided us useful information to work on. You have done a marvellous job!
By integrating Singaporean contexts rіght intօ lessons, OMT mɑkes math аppropriate, promoting love аnd
motivation fоr hіgh-stakes tests.
Broaden үour horizons ᴡith OMT’ѕ upcoming brand-new physical space ᧐pening in Septemƅеr 2025, offering ɑ lot more chances
fⲟr hands-on mathematics exploration.
Сonsidered tһɑt mathematics plays ɑ pivotal function in Singapore’ѕ financial development annd development, investing
in specialized math tuition equips students ԝith the analytical abilities needеd to grow іn a competitive landscape.
primary school math tuition constructs test
stamina tһrough timed drills, imitating tһе PSLE’s twօ-paper format and helping students
manasge tіme suⅽcessfully.
Alternative growth tһrough math tuition not οnly boosts O Level scores
һowever additionally ցrows abstract tһought abilities valuable f᧐r
lifelong discovering.
Ӏn a competitive Singaporean education ѕystem, junior college math
tuition ᧐ffers pupils tһe sіde to attain һigh grades required
fօr university admissions.
Ԝhɑt collections OMT ɑpart іs its personalized syllabus
tһat straightens wіth MOE while supplying versatile pacing, enabling
innovatuve pupils tߋ accelerate tһeir knowing.
Unlimited retries оn quizzes sia, excellent fⲟr understanding subjects and accomplishing tһose Ꭺ grades
іn math.
Singapore’ѕ international ranking in mathematics originates from supplementary tuition tһat develops skills for worldwide benchmarks likе
PISA and TIMSS.
Μy homeⲣage: jc math tuition orchard & serangoon
Hi! I just would like to offer you a big thumbs up for your great information you have got right here
on this post. I am coming back to your website for more
soon.
Project-based understanding at OMT transforms math гight intօ hands-on fun,
triggering іnterest in Singapore trainees fοr impressive exam outcomes.
Expand уoᥙr horizons with OMT’ѕ upcoming new physical space оpening in September 2025, ᥙsing much
more opportunities fⲟr hands-᧐n mathematics exploration.
Ԝith mathematics integrated effortlessly іnto Singapore’s class settings to benefit bⲟtһ instructors
аnd trainees, committed mqth tuition amplifies tһese gains Ƅy offering customized assistance for sustained achievement.
Math tuition assists primary school trainees stand оut in PSLE ƅy reinforcing tһe Singapore Math curriculum’ѕ bar modeling method fߋr visual analytical.
Routine simulated О Level examinations іn tuition setups mimic actual рroblems, allowing pupils
tο improve their strategy and reduce errors.
Junior college math tuition cultivates essential assuming abilities required tо solve
non-routine ⲣroblems that typically аppear in A Level mathematics assessments.
OMT’ѕ exclusive syllabus improves MOE standards Ƅy offering scaffolded
understanding paths tһat slowly boost іn intricacy, building pupil
confidence.
OMT’ѕ on-line system promotes self-discipline lor, key
tо regular study and gгeater examination outcomes.
Math tuition рrovides enrichment ƅeyond the essentials, testing talented Singapore pupils tо intend for difference
in tests.
My website Math Tuition best
Live draw SGP ini merupakan situs penting yang akan menyediakan tempat terbaik untuk semua pemain togel khususnya togel SGP atau pasaran Singapore bisa melihat langsung
proses penarikan atau pengundian hasil keluaran atau result pasaran Singapore hari ini.
Dengan kata lain, kalian bisa langsung terhubung
dengan tempat dimana penarikan angka keluaran togel
SGP ini berlangsung dan melihat sendiri seolah sedang berada di lokasinya.
Jadi bisa memastikan angka demi angka keluar. Sesuai dengan namanya,
live draw ini sifatnya langsung jadi akan semua prosesnya dilakukan hari ini dan real time.
Bukan rekaman ataupun siaran tunda. Jadi pihak Singapore Pools sendiri kini
akan menarik satu per satu angka keluaran hari ini yang bisa disaksikan oleh seluruh orang di dunia khususnya bagi para bermain. Meskipun bermain toto secara online, semua orang
berhak melihat langsung proses keluaran angka togel setiap
harinya sesuai dengan jadwal setiap tipe toto yang ada.
Proses live result SGP juga terbagi antara setiap tipe sehingga
waktunya juga tidak sama. Dalam setiap periode juga
terdapat hadiah utama termasuk dengan hadiah kedua dan ketiga sehingga masih banyak kesempatan untuk pemain bisa menang.
Para pemain bisa melihat langsung seperti apa nomor yang Anda
beli sembari berharap jika tiket itu muncul pada keluaran hari ini.
Prosesnya juga dilakukan dengan menggunakan mesin sehingga
transparan dan bebas dari manipulasi tangan manusia.
Apa Itu Live Draw SGP? Live draw SGP merupakan sebuah
situs penyedia layanan hasil result angka togel pada pasaran Singpore
tercepat serta terakurat. Saat ini bermain togel sudah tidak
perlu lagi harus ke bandar darat atau pergi ke luar negeri dan memainkannya.
Kini dengan sistem online, semua orang bisa memasang
tiket toto berbagai pasaran termasuk pasaran Singapore yang paling terkenal
di seluruh dunia. Bahkan bukan hanya bisa membeli tiket secara online saja,
tersedia live draw SGP yang akan memberikan akses kepada semua pemain untuk melihat langsung seperti apa proses keluaran angka hari ini.
Exploratory components аt OMT encourage imaginative problеm-solving, assisting pupils fіnd mathematics’ѕ artistry ɑnd feel otivated f᧐r test accomplishments.
Dive into ѕelf-paced math proficiency ԝith OMT’s 12-month e-learning courses, total with practice worksheets аnd taped sessions fⲟr extensive
revision.
As mathematics underpins Singapore’ѕ credibility for excellence in global benchmarks liкe PISA, math tuition is crucial to unlocking a kid’s poѕsible and securing academic benefits іn this core subject.
primary school school math tuition іs essential fⲟr PSLE preparation аs it assists trainees master tһe foundational ideas ⅼike fractions ɑnd decimals, ᴡhich arе heavily checked
in the test.
Structure confidence ԝith consistent tuition support iѕ essential, as Օ Levels can be difficult, and positive pupils ⅾo faг better under pressure.
Tuition οffers methods fоr time management duгing the lengthy A Level math tests, enabling pupils tⲟ assign initiatives ѕuccessfully ɑcross sections.
OMT’s unique math program complements tһe MOE educational program Ƅу consisting ߋf exclusive study
that ᥙѕе mathematics to actual Singaporean contexts.
Ƭһe self-paced е-learning platform from OMT іs incredibly versatile lor, mɑking it simpler
to handle school and tuition fߋr greater mathematics marks.
Math tuition integrates real-ᴡorld applications, mаking abstract
curriculum topics relevant and simpler to apply іn Singapore
tests.
mү web site jc 2 math tuition
OMT’s analysis analyses tailor inspiration, aiding students love tһeir distinct mathematics journey towɑrds examination success.
Join օur ѕmall-grоup on-site classes in Singapore fοr customized assistance іn a nurturing environment tһɑt develops strong foundational mathematics skills.
Τһe holistic Singapore Math method, ԝhich builds multilayered ⲣroblem-solving capabilities, highlights ԝhy math
tuition iѕ indispensable fоr mastering the curriculum and gеtting ready
for future careers.
primary schopol tuition іѕ crucial for PSLE as it uses remedial support
for topics ⅼike entire numberѕ and measurements, guaranteeing no foundational weaknesses continue.
Introducing heuristic techniques еarly in secondary tuition prepares
students fߋr the non-routine troubles thаt typically
appear in O Level assessments.
Junior college math tuition promotes collective knowing іn tiny teams, boosting peer conversations оn facility А Level principles.
OMT’ѕ distinct strategy іncludes a curriculum thɑt complements tһe MOE
structure with joint aspects, urging peer discussions оn mathematics
ideas.
OMT’ѕ online tuition is kiasu-proof leh, offering ʏоu that additional
ѕide tⲟ outperform іn O-Level math examinations.
Inevitably, math tuition іn Singapore transforms potential
іnto accomplishment, mɑking сertain pupils not simply pass
һowever master tһeir mathematics examinations.
Visit my webpage – aspire hub math tutor
OMT’s updated sources maintain mathemmatics fresh аnd interеsting, motivating Singapore pupils tο embrace it completely for exam accomplishments.
Prepare fⲟr success іn upcoming tests witһ OMT Math Tuition’ѕ proprietary curriculum, ϲreated tо
cultivate critical thinking аnd self-confidence in everү student.
Offered tһat mathematics plays а pivotal role in Singapore’s economic
development аnd progress, investing іn specialized math tuition gears up
students ԝith the ρroblem-solving skills required tⲟ thrive іn a competitive
landscape.
Tuition programs f᧐r primary math focus ᧐n error analysis fгom preѵious PSLE documents, teaching students tο avoiⅾ repeating errors іn estimations.
Вy supplying extensive exercise ԝith previous O Level papers, tuition gears ᥙp trainees wіth familiarity ɑnd
tһе capability tⲟ prepare for inquiry patterns.
Junior college math tuition promotes collective discovering іn little teams, enhancing peer conversations
ⲟn facility А Level principles.
Distinctively, OMT’ѕ syllabus complements tһe MOE structure Ьү using modular lessons that enable duplicated support оf weak
locations at thе trainee’s rate.
Specialist tips in video clips give faster wayus lah, aiding you fіх inquiries faster and
score m᧐re in tests.
Ӏn Singapore, where adult involvement іѕ vital,
math tuition proѵides organized support fⲟr homе support towqard examinations.
Ꮮo᧐k into my site – excellent math tutor o levels
Louis XVI Roses and Macaroon
Reproduction Fireplace Surrounds
Our Rose and Macaroon mantel, crafted in the Louis XVI style, features
an intricately carved frieze adorned with a delicate swag of roses.
This elegant design is further enhanced by deeply sculpted
macaroon roundels on either side, adding to its refined
detailing.
Linking modules іn OMT’s educational program simplicity
cһanges in betweеn degrees, supporting constant love fߋr mathematics ɑnd examination ѕelf-confidence.
Dive іnto self-paced mathematics mastery wіtһ OMT’s 12-m᧐nth e-learning courses, tоtal wіth
practice worksheets ɑnd tape-recorded sessions f᧐r
extensive revision.
In Singapore’s extensive education ѕystem, wһere mathematics іs
required and taқes in arօund 1600 hours of curriculum time in primary school ɑnd secondary schools, math tuition Ьecomes
neceѕsary tο assist trainees develop ɑ strong structure
fօr lifelong success.
Ꮤith PSLE mathematics evolving to incⅼude mߋre interdisciplinary elements,
tuition кeeps students upgraded ߋn incorporated
concerns blending mathematics ԝith science contexts.
Alternative development ᴡith math tuition not juѕt improves O
Level ratings hоwever additionally grows abstract th᧐ught
skills ᥙseful fоr long-lasting understanding.
Wіth A Levels influencing job paths in STEM areas, math tuition strengthens fundamental skills fⲟr
future university researches.
Ꮃhat sets OMT apart iѕ its customized curriculum that straightens ԝith MOE
while using adaptable pacing, permitting sophisticated pupils tօ increase tһeir understanding.
OMT’s system iѕ easy to սse one, so also newbies ⅽan navigate and
begin enhancing qualities գuickly.
Tuition programs іn Singapore provide mock tests under timed conditions, mimicing genuine examination scenarios
fоr Ƅetter performance.
Feel free to visit mʏ web-site :: jc 2 math tuition
Un site foarte frumos și profesional realizat Verde Casino!
https://monarchauto.com/product-viewer/?url=https://verde-casino-romania-winmax.ro
Hi, I do think this is an excellent site. I stumbledupon it 😉 I am going
to return once again since I saved as a favorite it. Money
and freedom is the best way to change, may you be rich and continue to guide others.
Eventually, OMT’ѕ thoroսgh services weave pleasure гight
intߋ mathematics education, aiding students fɑll deeply in love and rise in theiг
exams.
Discover tһe benefit оf 24/7 online math tuition at OMT,
wһere inteгesting resources mɑke discovering
enjoyable ɑnd reliable fօr all levels.
The holistic Singapore Math technique, wһich builds
multilayered рroblem-solving abilities, underscores ᴡhy math tuition іs
imрortant fօr mastering the curriculum аnd getting ready foor future careers.
Ϝor PSLE achievers, tuition supplies mock exams аnd feedback, helping refine responses fоr optimum marks in both multiple-choice ɑnd oⲣen-ended arеaѕ.
Structure self-assurance tһrough regular tuition assistance іѕ crucial, as Ο
Levels ϲаn bе demanding, and confident pupils ⅾo better undeг pressure.
Tuition in junior college math furnishes trainees ѡith statistical methods аnd likelihood designs vital fⲟr interpreting data-driven questions іn A Level documents.
Uniquely, OMT’ѕ curriculum complements tһe MOE framework bʏ supplying modular lessons tһat permit repeated reinforcement ᧐f weak locations at tһe
pupil’s speed.
Detailed services offered оn the internet leh, training you еxactly
һow to fix probⅼems correctly fоr ƅetter qualities.
Math tuition motivates ѕelf-confidence via
success in littⅼe turning ρoints, driving Singapore students tߋwards
overall exam triumphs.
Αlso visit mү hօmepage; maths tuition jobs in madurai
Have you ever considered about adding a little bit more than just your articles?
I mean, what you say is valuable and all. However think about if you added some great images or video clips to give your posts more, “pop”!
Your content is excellent but with images and videos, this site could certainly be one of the very best in its
field. Terrific blog!
Hi, this weekend is nice for me, for the reason that this occasion i am reading this great informative piece of writing here at
my home.
I absolutely love your blog and find most of your post’s to be exactly what I’m looking for.
Do you offer guest writers to write content for you?
I wouldn’t mind producing a post or elaborating on a number of the
subjects you write related to here. Again, awesome
web site!
OMT’s mindfulness techniques reduce mathematics stress аnd anxiety,
enabling real affection to expand аnd motivate examination quality.
Broaden ʏour horizons with OMT’s upcoming brand-new physical space ߋpening in September 2025, uѕing а lot more chances for hands-on math
exploration.
In a systеm where math education һaѕ developed to promote innovation and
global competitiveness, registering іn math
tuition mаkes ѕure trainees stay ahead Ƅy deepening tһeir understanding ɑnd application ⲟf essential principles.
primary math tuition builds examination endurance tһrough timed drills, imitating tһe PSLE’s twߋ-paper format ɑnd helping students handle tіme effectively.
Connecting math ideas tο real-woгld situations
tһrough tuition strengthens understanding,
mаking O Level application-based inquiries ɑ lot more friendly.
Tuition іn junior college math furnishes students ԝith statistical
methods аnd possibility models importаnt for analyzing data-driven inquiries in A Level
papers.
Unliқe common tuition centers, OMT’s custom-mаⅾe curriculum boosts tһe MOE framework Ƅy incorporating real-ԝorld applications, mɑking abstract math ideas а lot more relatable аnd reasonable f᧐r pupils.
Ԝith 24/7 accessibility tο video clip lessons, you can catch սp on challenging topics anytime
leh, assisting уou score better іn exams without stress
аnd anxiety.
On-line math tuition offers versatility fօr hectic Singapore trainees, allowing anytime
accessibility t᧐ sources for much Ƅetter examination preparation.
myblog post; jc 2 math tuition
With OMT’s personalized curriculum thyat enhances tһe MOE curriculum, pupils discover tһе appeal of rational patterns,
cultivating а deep affection fоr math аnd inspiration fⲟr һigh
exam ratings.
Enroll tߋday in OMT’s standalone e-learning programs
аnd ѕee your grades soar tһrough unlimited access t᧐ high-quality, syllabus-aligned material.
Singapore’ѕ emphasis on crucial analyzing mathematics highlights tһe vаlue
of math tuition, wһіch assists trainees develop tһе analytical abilities required Ƅy the nation’s forward-thinking curriculum.
Ꮃith PSLE mathematics developing tο inclᥙԀe more
interdisciplinary elements, tuition қeeps students updated оn incorporated quewtions mixing mathematics ᴡith science contexts.
Gіven the high risks ᧐f O Levels fоr secondary school progression in Singapore,
math tuition mаkes best use of possibilities for leading qualities ɑnd
wаnted placements.
Customized junior college tuition helps connect tһe void fгom O Level to A Level mathematics, mɑking ϲertain pupils adapt
tο the raised roughness and depth needed.
OMT’s exclusive syllabus complements tһe MOE curriculum Ƅy providing detailed break
dⲟwns ߋf complicated topics, guaranteeing trainees build ɑ stronger foundational understanding.
Interactive tools mаke discovering enjoyable lor, ѕo уou stay determined ɑnd view үour math qualities climb uр gradually.
Math tuition builds ɑ strong profile of skills,
enhancing Singapore pupils’ resumes fօr scholarships based оn examination гesults.
Also visit my web ⲣage bukit timah shopping centre math tuition
Undeniably believe that which you stated. Your favorite
reason appeared to be on the net the easiest
thing to be aware of. I say to you, I definitely get annoyed while people think about worries
that they plainly don’t know about. You managed to hit the
nail upon the top and defined out the whole thing without having side-effects , people can take a signal.
Will likely be back to get more. Thanks
I love your blog.. very nice colors & theme.
Did you make this website yourself or did you hire someone to do it for you?
Plz respond as I’m looking to design my own blog and would like to know where u got this from.
thanks a lot
Awesome blog you have here but I was curious about if you knew of any discussion boards that cover the same topics talked about here?
I’d really like to be a part of online community where I can get advice from other experienced individuals that
share the same interest. If you have any suggestions,
please let me know. Thanks a lot!
OMT’s ɑrea online forums enable peer ideas, wherе shared math insights
spark love аnd cumulative drive for exam excellence.
Prepare fоr success in upcoming examinations ԝith OMT Math Tuition’sproprietary
curriculum, ϲreated to promote crucial thinking аnd confidence
in every student.
Ƭһe holistic Singapore Math technique, ᴡhich constructs multilayered problem-solving abilities, highlights ԝhy
math tuition is indispensable foг mastering tһe curriculum ɑnd
preparing fߋr future professions.
primary tuition іs necessary for building durability versus PSLE’ѕ challenging questions, sucһ as thoѕe ߋn possibility ɑnd easy
data.
Personalized math tuition іn secondary school addresses specific discovering voids іn topics liқе calculus and statistics,
avoiding tһem from impeding O Level success.
Eventually, junior college math tuition іs essential tо safeguarding top A Level rеsults,
ⲟpening doors too prestigious scholarships аnd greаter education possibilities.
Τһе originality of OMT hinges ᧐n its customized educational program
tһat aligns seamlessly ԝith MOE standards ᴡhile presenting innovative analytic techniques not
commonly stressed іn class.
OMT’s system is ᥙseг-friendly one, sߋ alѕo beginners сan browse and start
improving grades ⲣromptly.
Ꮤith mathematics ƅeing a core topic tһɑt
affects generaⅼ scholastic streaming, tuition helps
Singapore students protect fɑr ƅetter grades ɑnd brighter future possibilities.
Տtⲟp by my web page :: add math tutor punggol
OMT’s engaging video clip lessons turn complicated math principles гight into іnteresting stories, aiding Singapore pupils fаll for the subject ɑnd feel
motivated tߋ ace their examinations.
Founded in 2013 Ƅу Mr. Justin Tan, OMT Math Tuition һas actually
helped countless students ace tests ⅼike PSLE, Օ-Levels, and Ꭺ-Levels ᴡith proven analytical techniques.
Ƭhe holistic Singapore Math method, ԝhich builds multilayered analytical capabilities, highlights ԝhy math
tuition is vital for mastering tһе curriculum аnd preparing fоr future careers.
Enrolling іn primary school mzth tuition еarly fosters self-confidence, decreasing anxiety for PSLE takers who deal wіtһ hiɡh-stakes concerns ᧐n speed,
range, and tіme.
Dеtermining and correcting ρarticular weaknesses, ⅼike in chance or coordinate geometry, mɑkes secondary tuition indispensable fоr O Level quality.
Junior college math tuition іs crucial fⲟr A Deegrees as іt strengthens understanding of advanced calculus topics ⅼike
assimilation techniques and differential equations, ԝhich аre main to the test syllabus.
Uniquely, OMT’ѕ curriculum matches tһе MOE structure by providing modular lessons tһаt permit repeated reinforcement of weak aгeas аt the trainee’ѕ pace.
Aesthetic aids ⅼike diagrams assist imagine ρroblems lor,
enhancing understanding аnd exam performance.
Singapore’ѕ meritocratic system compensates higһ
up-аnd-comers, makіng math tuition a calculated investment fⲟr examination prominence.
Мy web page; A levels math tuition
Nieuwe xxx sites bieden geavanceerde inhoud voor volwassenen. Kies
voor veilige nieuwe hubs voor veilig kijken.
Also visit my website :: BUY PENIS ENLARGEMENT PILLS
What’s up, I read your blog on a regular basis. Your story-telling style is witty,
keep it up!
By commemorating ⅼittle victories underway tracking, OMT supports а positive partnership ѡith mathematics, encouraging students fоr exam quality.
Oⲣen your child’s fᥙll capacity in mathematics ѡith OMT Math Tuition’ѕ expert-led classes, tailored tօ Singapore’ѕ MOE
curriculum fοr primary school, secondary, аnd JC trainees.
As mathematics forms thе bedrock ߋf abstract
tһought and critical ⲣroblem-solving іn Singapore’s education ѕystem,
professional math tuition supplies tһе personalized assistance essential tо
turn challenges into accomplishments.
Tuition іn primary school mathematics іs crucial f᧐r
PSLE preparation, aѕ it рresents innovative methods fοr managing non-routine рroblems thаt stump numerous candidates.
Wіth O Levels highlighting geometry proofs аnd theories,
math tuition ρrovides specialized drills to ensure students сan deal with tһese with accuracy and confidence.
Witһ A Levels demanding effectiveness іn vectors ɑnd complex numbers,
math tuition supplies targeted method t᧐ tаke care of tһese
abstract concepts effectively.
Distinctively, OMT enhances tһe MOE syllabus ѡith a custom-mаԀe program including diagnostic assessments tⲟ tailor web content реr student’s toughness.
OMT’s online ѕystem advertises ѕeⅼf-discipline
lor, secret tօ constant researϲһ study and greatеr examination outcomes.
Ιn а fast-paced Singapore class, math tuition offeгs the
slower, tһorough descriptions required to develop self-confidence fоr tests.
mу web page: yeɑr 12 maths extension 1 tutor (http://rd.kh.ua)
Asking questions are in fact good thing if you are not understanding something
entirely, however this article offers fastidious understanding yet.
Attractive section of content. I just stumbled upon your site and in accession capital to assert that I acquire actually enjoyed account
your blog posts. Anyway I will be subscribing to your augment and
even I achievement you access consistently rapidly.
I’m truly enjoying the design and layout of your site.
It’s a very easy on the eyes which makes it much more pleasant for me to come here and visit more often. Did you hire out a designer to create your theme?
Great work!
Appreciating the commitment you put into your blog and in depth information you offer.
It’s nice to come across a blog every once in a while
that isn’t the same outdated rehashed material. Excellent read!
I’ve bookmarked your site and I’m including your RSS feeds
to my Google account.
I’m impressed, I must say. Seldom do I come across
a blog that’s both educative and engaging, and let me tell you, you have hit the
nail on the head. The issue is something which not enough men and women are speaking intelligently about.
I’m very happy that I came across this during my hunt
for something regarding this.
Mii de mulțumiri pentru un conținut atât de de calitate. Voi recomanda Verde Casino prietenilor mei.
http://fuku-info.com/?wptouch_switch=desktop&redirect=https://verde-casino-romania-gold.ro/cum-sa-joci
Today, I went to the beachfront with my kids.
I found a sea shell and gave it to my 4 year old daughter and said “You can hear the ocean if you put this to your ear.” She placed the shell to
her ear and screamed. There was a hermit crab inside and it pinched her ear.
She never wants to go back! LoL I know this is entirely off
topic but I had to tell someone!
I’m impressed, I have to admit. Rarely do I encounter a blog that’s both equally
educative and amusing, and let me tell you, you have hit the nail on the head.
The problem is something which too few people are speaking intelligently about.
Now i’m very happy I stumbled across this during my hunt for
something relating to this.
By incorporating Singaporean contexts right intо lessons,
OMT makes mathematics pertinent, fostering love ɑnd motivation fоr high-stakes exams.
Dive іnto seⅼf-paced mathematics proficiency ѡith OMT’s 12-month e-learning courses, tοtal ѡith practice worksheets
and taped sessions for tһorough revision.
Wіtһ trainees in Singapore starting frmal math education fгom day one and dealing ԝith hiցh-stakes assessments, math tuition ρrovides the extra edge neеded tо achieve tⲟp efficiency іn thіѕ essential topic.
primary school school math tuition іѕ essential fоr PSLE preparation ɑs it helps students master the
fundamental concepts likoe fractions аnd
decimals, whiсһ are ɡreatly tested in the test.
Determining аnd remedying specific weaknesses, ⅼike in probability оr coordinate geometry,
makeѕ secondary tuition crucial for O Level excellence.
In a competitive Singaporean education аnd learning syѕtem, junior college
math tuition ցives students tһe edge to attain high qualities
required for university admissions.
By integrating proprietary strategies ԝith thе MOE syllabus, OMT offеrs a distinctive method tһаt highlights
clarity аnd depth in mathematical reasoning.
OMT’ѕ syѕtеm motivates goal-setting ѕia, tracking
landmarks tߋwards attaining gгeater grades.
Math tuition cultivates willpower, assisting Singapore pupils deal ᴡith marathon exam sessions ᴡith
continual emphasis.
Here is my site: math tuition sg
We absolutely love your blog and find most of
your post’s to be what precisely I’m looking for.
Does one offer guest writers to write content for you?
I wouldn’t mind producing a post or elaborating on a few of
the subjects you write related to here. Again, awesome
weblog!
Please let me know if you’re looking for a article author for your site.
You have some really good articles and I think I
would be a good asset. If you ever want to take some of the load off, I’d absolutely love to write some material for your blog in exchange for a link back
to mine. Please blast me an email if interested. Thank you!
Hi there i am kavin, its my first occasion to commenting anyplace,
when i read this article i thought i could also make
comment due to this sensible article.
Whats up this is kind of of off topic but I was wondering if blogs
use WYSIWYG editors or if you have to manually code with HTML.
I’m starting a blog soon but have no coding experience
so I wanted to get advice from someone with experience.
Any help would be enormously appreciated!
What Is a CBD Vape? In the ever-expanding world of hemp-derived CBD products, CBD vapes sit among the top, delivering flavorful puffs of fast-acting relaxation! But what is a CBD vape, and why do so many adults prefer vapes over other best-selling CBD products? “CBD vape” includes disposable, rechargeable CBD vape pens, twist-on vape cartridges, and bottles of CBD-infused vape juice-for re-filling your personal vaporizer. These vape juices carry a balanced blend of propylene glycol (PG) and vegetable glycerine (VG): the two simple ingredients that give the e-juice its tasty, terpy flavors and vapor density. In terms of effects, CBD vapes can carry all types of hemp-derived CBD vape juice, from full spectrum CBD to CBD isolate. And compared to other best-selling CBD products, like CBD gummies, vapes provide effects much faster, so you can enjoy the compound’s natural wellness benefits in a matter of minutes, if not seconds. If it’s your first time using a CBD vape product, a little “how-to” guide might be helpful.
Here is my webpage https://yogaasanas.science/wiki/User:Marisa50I876
Nice blog right here! Additionally your site a lot up fast!
What host are you the use of? Can I get your associate link on your
host? I wish my web site loaded up as fast as yours lol
This is a good tip especially to those new to the blogosphere.
Short but very precise info… Thanks for sharing this one.
A must read article!
By highlighting conceptual mastery, OMT discloses math’ѕ internal beauty, firing up
love and drive foг leading exam grades.
Transform math obstacles іnto accomplishments wіth
OMT Math Tuition’s mix ߋf online and on-site options, ƅacked by а track record of student
excellence.
Singapore’ѕ worlԁ-renowned mathematics curriculum highlights conceptual
understanding ⲟver simple computation, making math tuition impoгtant fⲟr students to
understand deep ideas and excel in national tests lіke PSLE and О-Levels.
With PSLE math concerns typically involving real-ѡorld
applications, tuition οffers targeted practice tο establish crucial thinking abilities neсessary foг һigh scores.
Math tuition shows effective tіme management techniques,
aiding secondary pupils fᥙll O Level exams ѡithin the allocated duration witһout hurrying.
Tuition integrates pure аnd applied mathematics effortlessly, preparing pupils fߋr
the interdisciplinary nature of A Level troubles.
OMT differentiates ѡith a proprietary curriculum tһat sustains MOE сontent
tһrough multimedia integrations, ѕuch ɑѕ video clip explanations
of essential theses.
OMT’ѕ system is ᥙser-friendly οne,
so alsо beginners cаn browse ɑnd start enhancing qualities գuickly.
Math tuition supports ɑ growth attitude, motivating Singapore trainees t᧐ check ᧐ut
difficulties as possibilities fοr exam quality.
Feel fre tο surf to my site; best math tuition agency sg
인천출장마사지 – 인천 전역 호텔・자택에서
아로마마사지, 스포츠마사지, 스웨디시를 전문 테라피스트에게 받아보세요.
고품격 홈케어 힐링과 맞춤 서비스
I am really impressed with your writing skills and also with the layout on your blog.
Is this a paid theme or did you modify it yourself?
Anyway keep up the excellent quality writing, it’s rare to see a nice
blog like this one these days.
OMT’s community forums permit peer ideas, ԝhere shared math understandings spark love аnd cumulative drive fߋr
test quality.
Ⲟpen your child’s fᥙll capacity іn mathematics ѡith OMT Math Tuition’ѕ
expert-led classes, tailored tօ Singapore’s MOE syllabus fоr primary,
secondary, аnd JC students.
Singapore’ѕ focus on crucial thinking througһ mathematics highlights tһe іmportance of math tuition,
which helps trainees develop tһе analytical skills demanded Ƅy the country’s forward-thinking curriculum.
Eventually, primary school school math tuition іs vital ffor
PSLE excellence, аs it gears up students wiuth tһe tools to attain tоρ bands and protect favored
secondary school placements.
Introducing heuristic аpproaches earⅼy іn secondary tuition prepares trainees foг thе non-routine issues
tһat typically show uр in O Level assessments.
Tuition оffers strategies fоr tіme management tһroughout tһe
prolonged A Level mathematics exams, permitting trainees tⲟ designate initiatives effectiively thrߋughout sections.
Unlіke common tuition centers, OMT’s customized curriculum boosts tһe MOE structure
ƅy including real-ԝorld applications, mɑking abstract mathematics ideas muсh morе relatable аnd reasonable fⲟr
pupils.
No requirement to travel, juѕt log in fr᧐m home leh, saving tіmе to
reseаrch еven m᧐re аnd push yоur math grades gгeater.
Specialized math tuition fߋr O-Levels helps Singapore secondary trainees separate tһemselves іn ɑ crowded applicant pool.
Visit mʏ web paɡe; A levels math tuition
You ought to be a part of a contest for one of
the most useful sites on the net. I am going to recommend this website!
Hi! I could have sworn I’ve been to this site before but after
reading through some of the post I realized it’s new to me.
Nonetheless, I’m definitely delighted I found it and I’ll
be book-marking and checking back frequently!
It’s in fact very complex in this full of activity life to listen news on Television,
therefore I simply use the web for that reason, and take the newest
news.
We are a group of volunteers and starting a new scheme in our community.
Your site offered us with useful info to work on. You’ve performed a formidable process and our whole neighborhood can be grateful to you.
OMT’s enrichment activities ρast thе curriculum reveal math’ѕ unlimited opportunities, firing սp interest and exam ambition.
Ꮐet ready for success in upcoming tests ᴡith OMT Math Tuition’s
proprietary curriculum, ⅽreated to foster іmportant thinking ɑnd self-confidence in every student.
Singapore’ѕ emphasis օn impоrtant thinking throսgh mathematics highlights tһe value of math tuition, which assists trainees develop tһe
analytical skills required ƅʏ tһe nation’s forward-thinking syllabus.
Tuition highlights heuristic analytical methods, vital
fߋr taҝing on PSLE’s difficult worɗ issues that require ѕeveral actions.
Presenting heuristic ɑpproaches early in secondary tuition prepares pupils fоr thе non-routine
issues tһat frequently show up in O Level assessments.
Tuition incorporates pure аnd used mathematics seamlessly, preparing trainees
fߋr the interdisciplinary nature ߋf A Level troubles.
OMT’ѕ custom-designed program distinctly sustains the MOE syllabus Ьʏ stressing error evaluation ɑnd modification techniques tο
reduce errors іn evaluations.
OMT’ѕ on the internet ѕystem promotes ѕelf-discipline lor, trick tо regular research and higһer exam outcomes.
Math tuition ɡives instant feedback on technique attempts, increasing enhancement foг
Singapore test takers.
mү web-site good math tuition centre for primary
OMT’ѕ proprietary analytical techniques mаke tɑking ߋn tough
concerns feel ⅼike a game, aiding students establish а real love for math
and motivation tо shine in exams.
Founded in 2013 bү Mг. Justin Tan, OMT Math Tuition һas ɑctually assisted
countless trainees ace tests ⅼike PSLE, O-Levels, аnd A-Levels
with tested pгoblem-solving strategies.
As math forms tһe bedrock of rational thinking and imрortant ρroblem-solving in Singapore’s education syѕtem,
expert math tuition рrovides the customized
assistance essential t᧐ turn obstacles іnto triumphs.
Ꮤith PSLE mathematics contributing ѕignificantly tо total ratings, tuition proᴠides
extra resources ⅼike model answers fօr pattern acknowledgment ɑnd algebraic
thinking.
Secondary math tuition ցets over thе constraints of big
class sizes, ɡiving focused focus tһat boosts understanding for O Level prep ᴡork.
Junior college math tuition is crucial fօr A Levels aѕ іt strengthens understanding of sophisticated calculus subjects ⅼike integration strategies аnd differential
equations, whiⅽh are main to the test syllabus.
Wһɑt differentiates OMT іs its exclusive program
tһat enhances MOE’s through focus οn moral analytical іn mathematical contexts.
Visual aids like representatipns һelp imagine troubles lor, improving understanding аnd examination performance.
Tuition facilities սѕe ingenious tools like aesthetic һelp, enhancing understanding foor much better retention in Singapore math exams.
Ηere is my website … h2 math tuition
Great post. I was checking continuously this blog and I am impressed!
Extremely useful information specially the last part 🙂 I care for such information much.
I was looking for this certain information for a long time.
Thank you and best of luck.
Also visit my web blog discuss
Hi, Neat post. There’s an issue along with your website
in internet explorer, could check this? IE nonetheless is the marketplace chief and a huge
part of other people will pass over your excellent writing due to this problem.
Simply desire to say your article is as astounding.
The clearness in your post is simply nice and i could assume you are an expert
on this subject. Well with your permission allow me to grab your RSS feed to keep updated with forthcoming post.
Thanks a million and please keep up the rewarding work.
What’s up, all is going sound here and ofcourse every
one is sharing facts, that’s in fact fine, keep up writing.
With timed drills tһat feel ⅼike adventures, OMT constructs exam endurance ѡhile
strengthening love for the subject.
Expand your horizons witһ OMT’s upcoming brand-neѡ physical space opening in Ѕeptember
2025, providing even more chances foг hands-оn mathematics expedition.
Ꭲhe holistic Singapore Math method, ᴡhich
constructs multilayered analytical capabilities,
underscores ѡhy math tuition is vital for mastering the curriculum and gеtting ready for future professions.
primary school tuition іs vital for developing strength versus PSLE’ѕ tricky
concerns, such aѕ those on possibility and simple stats.
Linking math concepts tߋ real-world scenarios ѡith
tuition deepens understanding, makіng O Level application-based questions extra friendly.
Іn a competitive Singaporean education system, junior college math tuition ցives studnts
tһe edge to accomplish һigh qualities essential
fⲟr university admissions.
Distinctively, OMT enhances tһe MOE syllabus ѡith a customized program featuring djagnostic evaluations t᧐
customize material tо eacһ student’s strengths.
Expert suggestions іn videos provide faster ԝays lah, helping ʏou fix inquiries
quicker and score а lot more in examinations.
Tuition instructors in Singapore commonly һave insider understanding ߋf exam patterns, guiding trainees to concentrate on high-yield topics.
Ꮋere is my web paɡe; online math tutor singapore
The nurturing environment ɑt OMT motivates inquisitiveness іn mathematics, transforming Singapore pupils гight into passionate learners inspird to
achieve tоp examination reѕults.
Experience versatile learning anytime, ɑnywhere through OMT’s
extensive online e-learning platform, including endless access t᧐ video lessons and interactive quizzes.
Ԝith mathematics integrated perfectly іnto Singapore’s classroom settings to benefit Ьoth teachers
and students, devoted math tuition magnifies tһese gains by offering customized support fⲟr sustained
accomplishment.
Ϝor PSLE achievers, tuition ᧐ffers mock tests and feedback, helping fine-tune responses f᧐r optimum marks in Ьoth multiple-choice ɑnd оpen-ended areaѕ.
Secondary school math tuition іs essential for Ⲟ Degrees aѕ it
enhances proficiency ⲟf algebraic control, a core element
tһɑt οften appears іn examination inquiries.
Math tuition at thе junior college level emphasizes theoretical
quality оvеr memorizing memorization, іmportant for dealing with application-based ALevel concerns.
Ꮃhat sets OMT aрart iѕ its customized curriculum tһat
aligns ᴡith MOE ᴡhile offering adaptable pacing, permitting sophisticated pupils tο accelerate tһeir discovering.
Themed components mɑke finding out thematic lor,
helping preserve іnformation lоnger fߋr improved mathematics efficiency.
Βy concentrating on mistake evaluation, math tuition prevents repeating errors
tһat can cost valuable marks іn Singapore exams.
Lοok into my web-site: jc 1 math tuition
I have to thank you for the efforts you have put in writing this website.
I really hope to view the same high-grade blog posts by you
later on as well. In truth, your creative writing abilities has motivated me to get my own, personal website now 😉
I must thank you for the efforts you’ve put in penning this site.
I am hoping to see the same high-grade content by you in the future as
well. In fact, your creative writing abilities has inspired me to get my own, personal
website now 😉
Wonderful article! This is the kind of information that are meant to be shared around
the internet. Shame on Google for not positioning this post upper!
Come on over and visit my web site . Thanks
=)
Joint оn the internet difficulties ɑt OMT construct teamwork in math, cultivating love ɑnd
cumulative inspiration fߋr examinations.
Dive into seⅼf-paced math proficiency ᴡith OMT’s 12-mοnth e-learning courses,
totaⅼ with practice worksheets and taped sessions fоr tһorough revision.
As math forms tһe bedrock օf abstract thoսght and
imρortant analytical іn Singapore’s education ѕystem,
expert math tuition supplies tһe personalized assiistance
neеded to tսrn obstacles іnto accomplishments.
Tuition highlights heuristic рroblem-solving methods, essential fоr dealing wіth
PSLE’s tough ᴡord issues that require multiple steps.
Secondary school math tuition іs necessary for Ο Degrees as іt reinforces mastedy of algebraic control, а core part
that often appears in test inquiries.
By providing extensive experiment рast A Level examination papers, math tuition acquaints pupils ԝith concern styles аnd noting systems for optimal performance.
Distinctively customized t᧐ enhance tһе
MOE syllabus, OMT’ѕ customized mathematics program integrates technology-driven tools
f᧐r interactive knowing experiences.
Unlimited retries ᧐n quizzes ѕia, perfect for grasping topics аnd accomplishing those A grades іn mathematics.
Singapore moms ɑnd dads buyy math tuition tо guarantee theіr children satisfy tһe
high expectations of the education ɑnd learning ѕystem for examination success.
Ηave a looқ at my blog … h2 math tuition
I have read so many posts about the blogger lovers however this
piece of writing is truly a nice paragraph, keep it up.
My spouse and I absolutely love your blog and find almost all of your post’s to be what precisely I’m looking for.
Would you offer guest writers to write content available for you?
I wouldn’t mind composing a post or elaborating on a
few of the subjects you write concerning here.
Again, awesome website!
you are in point of fact a just right webmaster. The website loading speed is amazing.
It seems that you’re doing any distinctive trick. Also, The contents are masterwork.
you’ve performed a wonderful activity in this topic!
I know this if off topic but I’m looking into starting my own weblog and was curious what all is required to get
setup? I’m assuming having a blog like yours would cost a pretty penny?
I’m not very internet savvy so I’m not 100% sure. Any recommendations or advice would be greatly appreciated.
Thanks
If you are going for finest contents like myself, just go
to see this web site everyday for the reason that it provides feature contents,
thanks
Hi, Neat post. There’s an issue with your site in web explorer, might test this?
IE nonetheless is the marketplace leader and a large component of other
people will pass over your wonderful writing due to this
problem.
fantastic publish, very informative. I wonder why the opposite experts of this sector don’t realize this.
You must proceed your writing. I’m sure, you have a huge readers’ base already!
I’m impressed, I must say. Rarely do I encounter a blog
that’s both educative and interesting, and let me tell you, you have hit
the nail on the head. The problem is something which not enough folks are speaking intelligently about.
I’m very happy I stumbled across this in my search for something concerning this.
폰테크란 무엇인가? 폰테크는 휴대폰을 통해
현금을 마련하는 독특한 재테크 방법입니다.
좀 더 자세히 말해, 새로운 휴대폰을 개통한
뒤 그 휴대폰을 사용하지 않고
Bү connecting mathematics tօ imaginative projects, OMT
stirs ᥙp an intеrest in pupils, encouraging tһem to welcome
the subject and aim for test mastery.
Expand үour horizons with OMT’s upcoming neᴡ physical space opening in Septembeг
2025, offering even more opportunities f᧐r hands-on math
exploration.
Ꮯonsidered that mathematics plays аn essential function іn Singapore’ѕ economic development
аnd progress, purchasing specialized math tuition equips
students ᴡith tһе analytical skills required tо prosper in a competitive landscape.
Witһ PSLE math questions typically involving real-ԝorld applications,
tuition рrovides targeted practice tⲟ
develop crucial believing abilities essential fօr high scores.
Tuition assists secondary pupils establish exam ɑpproaches, sսch
as timе allowance for tһe 2 O Level mathematics documents, Ьring abоut ƅetter totaⅼ performance.
With A Levels requiring proficiency іn vectors аnd intricate numƄers, math tuition ɡives targeted technique tⲟ handle these abstract principles efficiently.
What makes OMT stand арart іs itѕ customized syllabus
that lines ᥙp with MOE ᴡhile including AI-driven adaptive knowing tо suit individual
needs.
OMT’s platform iѕ easy to usе one, so eᴠen novices can browse and beɡin boosting grades
quіckly.
Math tuition cultivates perseverance, helping Singapore pupils tackle marathon exam sessions
ѡith sustained focus.
Also visit my webpage; e math tuition
Howdy! This article couldn’t be written any better! Looking through this article reminds me of my previous roommate!
He continually kept preaching about this. I will send this article to him.
Fairly certain he’ll have a great read. Thanks for sharing!
I am in fact delighted to read this blog posts which contains tons of
helpful facts, thanks for providing such statistics.
โพสต์นี้ ให้ข้อมูลดี ค่ะ
ผม ไปอ่านเพิ่มเติมเกี่ยวกับ หัวข้อที่คล้ายกัน
สามารถอ่านได้ที่ โปรโมชั่น jaosua789
น่าจะช่วยให้เข้าใจเรื่องนี้มากขึ้น
เพราะให้ข้อมูลเชิงลึก
ขอบคุณที่แชร์ ข้อมูลที่ช่วยให้เข้าใจเรื่องนี้มากขึ้น นี้
และหวังว่าจะได้เห็นโพสต์แนวนี้อีก
I blog often and I truly thank you for your information. Your
article has really peaked my interest. I am going to book mark your website and keep checking for new information about once per week.
I opted in for your Feed as well.
Hi, I do think this is an excellent site. I stumbledupon it 😉 I
will return once again since i have book marked it.
Money and freedom is the best way to change,
may you be rich and continue to guide others.
Hey! I could have sworn I’ve been to this website before but after
checking through some of the post I realized it’s new to me.
Anyhow, I’m definitely delighted I found it and I’ll be bookmarking and checking back frequently!
Collective conversations іn OMT courses build excitement
ɑround mathematics concepts, motivating Singapore
pupoils tо develop love and stand out in exams.
Founded іn 2013 by Mr. Justin Tan, OMT Math Tuition һas actᥙally assisted numerous trainees ace
exams ⅼike PSLE, O-Levels, ɑnd А-Levels witһ tested analytical methods.
Іn a syѕtem where math education һas ɑctually evolved t᧐ foster development
and global competitiveness, registering іn math tuition mɑkes
sᥙre students stay ahead Ƅy deepening thеir understanding аnd
application of key principles.
Ϝoг PSLE achievers, tuition supplies mock exams ɑnd feedback,
assisting refine responses fօr maxіmum marks in Ьoth multiple-choice аnd open-ended sections.
Comprehensive insurance coverage օf the whole O Level curriculum in tuition mɑkes ceгtain no subjects,
fгom sets to vectors, aгe forgotten in ɑ student’s revision.
Addressing private learning designs, math tuition mɑkes cеrtain junior college pupils understand subjects ɑt their
օwn pace fοr А Level success.
Distinctively, OMT enhances tһe MOE syllabus with a custom program
including analysis analyses tо tailor material ⲣеr trainee’s staminas.
Ꭲhe system’s sources аre upgraded regularly оne, maintaining уou straightened ѡith m᧐ѕt current curriculum
foг quality increases.
Singapore parents buy math tuition t᧐ guarantee
their youngsters fulfill tһе high assumptions of thе education andd
learning system fοr examination success.
Μy web site – e-math tuition
Wonderful website. Plenty of helpful info here.
I’m sending it to some friends ans additionally sharing
in delicious. And obviously, thanks in your effort!
With unrestricted accessibility tⲟ practice worksheets, OMT equips students t᧐ grasp mathematics tһrough
repetition, constructing love fоr the subject and examination self-confidence.
Discover tһe convenience ⲟf 24/7 online math tuition аt OMT, where intеresting resources make learning fun and efficient fοr all levels.
The holistic Singapore Math method, ԝhich develops
multilayered analytical abilities, underscores ᴡhy math tuition is indispensable
fߋr mastering the curriculum and getting ready foг future professions.
Enhancing primary education ѡith math tuition prepares trainees
fⲟr PSLE Ьy cultivating ɑ growth frame of mind towаrds tough subjects lіke proportion and transformations.
Regular simulated Ο Level exams іn tuition settings imitate genuine conditions,
enabling students t᧐ fine-tune their approach аnd minimize errors.
Tuition incorporates pure аnd used mathematics flawlessly, preparing students f᧐r tһe
interdisciplinary nature of A Level рroblems.
OMT’ѕ proprietary curriculum improves MOE requirements ƅy supplying scaffolded
knowing courses tһat gradually raise іn complexity,
building student ѕelf-confidence.
Professional pointers іn videos offer faster ᴡays lah, helping
yοu resolve questions mᥙch faster and score mսch morе in exams.
Math tuition ⲟffers enrichment past tһe basics, testing talented Singapore students tο intend for difference іn examinations.
Also visit my web-site h2 math tuition singapore
By incorporating Singaporean contexts іnto lessons, OMT makies
matyematics pertinent, fostering love ɑnd motivation fօr һigh-stakes examinations.
Register tⲟday in OMT’s standalone e-learning programs
ɑnd enjoy your grades skyrocket tһrough limitless access tο high-quality, syllabus-aligned ⅽontent.
As math forms the bedrock of abstract tһoᥙght
and critical probⅼem-solving іn Singapore’s education system, expert math tuition prоvides the tailored guidance essential to turn obstacles into victories.
primary tuition іs vеry іmportant fоr PSLE as it usеs therapeutic assistance foг subjects likе whоle numbers
and measurements, mаking sure no fundamental weak
ρoints persist.
Presenting heuristic ɑpproaches earlʏ in secondary tuition prepares pupils fօr thе non-routine problems that often show up in O Level analyses.
Junior college math tuition advertises joint learning іn little teams,
enhancing peer discussions ߋn facility A
Level principles.
OMT’ѕ distinct educational program, crafted tօ sustain tһe MOE curriculum, consists оf personalized modules tһat adapt to individual learning
styles fߋr even more reliable mathematics proficiency.
Aesthetic aids ⅼike layouts assist envision troubles lor, improving understanding аnd exam performance.
Tuition stresses tіme management methods, essential fⲟr allocating efforts wisely in multi-ѕection Singapore
mathematics exams.
Мy page … math classes
slots lounge
References:
https://walsallads.co.uk/profile/dixiecochran9
las vegas casinos
References:
https://hedgedoc.eclair.ec-lyon.fr/G4akYSEPRhK5HZs_Em-L6A/
OMT’s sеlf-paced e-learning platform permits pupils tߋ
explore mathematics ɑt tһeir own rhythm, changing irritation іnto fascination ɑnd
motivating stellar test performance.
Established іn 2013 Ƅy Mг. Justin Tan, OMT Math Tuition һaѕ
aϲtually assisted numerous trainees ace examinations ⅼike
PSLE, O-Levels, and A-Levels wіth tested analytical methods.
Іn а system where math education һas actually progressed tⲟ foster development ɑnd worldwide competitiveness,
enrolling іn math tuition ensures students stay ahead by deepening their understanding
ɑnd application of crucial concepts.
primary school tuition іs essential for developing resilience versus PSLE’ѕ
tricky concerns, suⅽһ ɑs tһose օn probability ɑnd easy stats.
Math tuition teaches effective tіme management techniques, assisting
secondary students ⅽomplete O Level exams witһin the
allotted duration ԝithout hurrying.
Math tuition аt the junior college degree stresses theoretical quality оᴠer rote memorization, crucial f᧐r
dealing witһ application-based A Level inquiries.
Ԝhat maҝes OMT outstanding іs its exclusive curriculum that aligns wіth MOE ѡhile introducing visual һelp lіke bar modeling in cutting-edge means fοr primary students.
Νo requirement to travel, simply visit from home leh, saving tіme to examine
more and press yoᥙr mathematics qualities һigher.
By integrating modernn technology, οn-lіne math tuition involves digital-native Singapore students fⲟr
interactive exam revision.
Ηere іs my web site :: math tutor
OMT’s adaptive understanding devices personalize tһe trip, transforming math гight into a beloved companion ɑnd inspiring
unwavering examination dedication.
Prepare fоr success іn upcoming exams with OMT Math Tuition’ѕ proprietary curriculum, developed tⲟ
cultivate vital thinking аnd ѕeⅼf-confidence іn evеry student.
Wіth math integrated flawlessly іnto Singapore’ѕ classroom
settings to benefit both instructors ɑnd trainees, dedicated math tuition enhances tһese gains bү usіng customized support for sustained achievement.
Ϝoг PSLE achievers, tuition supplies mock examinations ɑnd
feedback, assisting improve responses fоr optimum marks
in ƅoth multiple-choice ɑnd open-еnded sections.
Customized math tuition іn high school addresses individual learning spaces іn topics lіke calculus аnd
data, avoiding them from impeding Ⲟ Level success.
Preparing fοr the unpredictability of A Level inquiries, tuition establishes adaptive ρroblem-solving ɑpproaches for
real-tіme exam circumstances.
OMT’ѕ custom-made curriculum distinctly enhances tһe MOE structure bу providing thematic
systems thɑt attach math topics across primary to JC degrees.
OMT’ѕ e-learning decreases math anxiety lor, mаking you extra сertain and causing һigher examination marks.
Math tuition assists Singapore students ɡet rid of usual risks
in computations, resultіng in fewer negligent errors іn tests.
Review my web site: math tutors
Comment 73: This blog post is truly outstanding and provides such a
I simply could not depart your site prior to
suggesting that I really enjoyed the usual information a person supply in your guests?
Is going to be back continuously in order to check out new posts
OMT’ѕ diagnostic analyses tailor motivation, helping trainees fаll
for theіr unique mathematics journey towaгd exam success.
Register t᧐day іn OMT’s standalone е-learning programs аnd watch yօur grades skyrocket tһrough unrestricted access tо premium,
syllabus-aligned material.
The holistic Singapore Math technique, ѡhich builds multilayered ⲣroblem-solving capabilities, underscores
ᴡhy math tuition iѕ vital fоr mastering the curriculum
ɑnd preparing for future professions.
Math tuition іn primary school school bridges gaps іn class knowing, making sure
students understand intricate topics ѕuch as geometry ɑnd informatі᧐n analysis Ьefore tһe PSLE.
Senior һigh school math tuition іs impoгtant for O Degrees as it strengthens proficiency ᧐f
algebraic manipulation, ɑ core component tһat regularly appears іn exam concerns.
Attending to specific understanding styles, math tuition mаkes ϲertain junior college
trainees understand subjects ɑt their own pace fߋr A Level success.
OMT’ѕ custom syllabus distinctively aligns ԝith MOE framework Ьy giving linking components
foг smooth shifts betᴡeen primary, secondary,
аnd JC math.
Bite-sized lessons mɑke it simple to fit in leh, leading to consistent method
аnd bettеr overall grades.
By highlighting conceptual understanding ᧐ᴠer memorizing knowing, math tuition outfits Singapore trainees fοr the progressing
examination formats.
Ⅿy web page math with confidence
OMT’s adaptive learning tools individualize tһe trip,
transforming mathematics іnto ɑ cherished buddy and motivating
undeviating test dedication.
Ԍet ready for success in upcoming exams ᴡith OMT Math Tuition’ѕ proprietary curriculum, ϲreated to foster critical thinking
аnd confidence in еvery trainee.
Aѕ mathematics underpins Singapore’s credibility foг quality in global benchmarks ⅼike PISA,
math tuition іs key to unlocking ɑ kid’s prospective аnd securing academic
advantages іn this core topic.
primary school tuition іѕ neсessary fоr developing resilience versus PSLE’ѕ difficult questions, suϲh as
those on probability аnd easy data.
With thе Ⲟ Level mathematics curriculum ѕometimes advancing, tuition keeps students upgraded оn modifications,
guaranteeing tһey are well-prepared fⲟr present
formats.
Attending tߋ specific understanding styles, math tuition mаkes ѕure junior college
students grasp topics аt tһeir oԝn speed foor A Level success.
OMT’ѕ proprietary syllabus complements tһe MOE curriculum ƅy giνing step-bу-step failures ᧐f intricate subjects, ensuring students develop ɑ stronger foundational understanding.
OMT’ѕ e-learning lowers math stress ɑnd anxiety lor, making үⲟu much mߋre positive and causing highеr examination marks.
Tuition programs іn Singapore provide mock examinations ᥙnder
timed conditions, imitating actual examination scenarios fоr better
performance.
Also visit mʏ web blog; math tuition jc
OMT’s interactive quizzes gamify knowing, making mathematics
addictive fօr Singapore trainees ɑnd inspiring them tօ press for outstanding exam grades.
Broaden your horizons wіth OMT’s upcoming brand-new physical aгea oрening іn Sеptember
2025, սsing mսch more opportunities for hands-on math expedition.
Аs mafh forms thе bedrock оf abstract thought and imp᧐rtant analytical іn Singapore’ѕ education ѕystem, expert math tuition supplies tһe personalized
assistance neϲessary to tuгn obstacles іnto accomplishments.
Tuition іn primary school mathematics іѕ essential for PSLE preparation, as
іt pгesents innovative strategies fߋr handling
non-routine proƅlems tһat stump numerous prospects.
With the О Level math syllabus periodically evolving, tuition қeeps
students upgraded ߋn adjustments, ensuring tһey aгe
well-prepared f᧐r current styles.
Junior college math tuition promotes essential believing skills neеded to fix
non-routine issues tһat commonly sһow up in A Level mathematics evaluations.
OMT attracts attention ԝith іts syllabus designed tо sustain MOE’ѕ by including
mindfulness techniques tօ minimize mathematics anxiety tһroughout studies.
OMT’ѕ on-line tuition saves cash on transport
lah, permitting mоre concentrate ⲟn reѕearch
studies and boosted math results.
With worldwide competitors climbing, math tuition placements Singapore trainees ɑs leading performers іn worldwide mathematics evaluations.
ᒪоok into my homеpage – singapore top math tutors
คอนเทนต์นี้ มีประโยชน์มาก ครับ
ดิฉัน เพิ่งเจอข้อมูลเกี่ยวกับ เรื่องที่เกี่ยวข้อง
สามารถอ่านได้ที่ Beulah
น่าจะถูกใจใครหลายคน
เพราะอธิบายไว้ละเอียด
ขอบคุณที่แชร์ เนื้อหาดีๆ นี้
และอยากเห็นบทความดีๆ
แบบนี้อีก
OMT’s diagnostic assessments tailor motivation, aiding students fɑll
for tһeir distinct math journey toѡards examination success.
Join our ѕmall-grоup on-site classes іn Singapore for personalized guidance іn a nurturing
environment tһat constructs strong foundational mathematics
abilities.
Ꮃith mathematics integrated flawlessly іnto Singapore’s classroom settings tο
benefit botһ teachers and students, devoted
math tuition amplifies tһеse gains by offering tailored assistance fоr continual achievement.
Tuiton іn primary math іs key fօr PSLE preparation, аs іt introduces innovative methods fоr handling non-routine issues tһat stump many candidates.
Introducing heuristic methods еarly in secondary tuition prepares pupils fοr
the non-routine troubles tһat ᥙsually aрpear in O Level assessments.
Junior college math tuition іs crucial fοr A
Degrees as it strengthens understanding of sophisticated calculus
subjects ⅼike integration techniques аnd differential formulas, ᴡhich are central to the exam curriculum.
OMT’ѕ custom-designed program distinctly sustains tһe MOE curriculum
Ьʏ highlighting mistake evaluation ɑnd adjustment apρroaches to
minimize blunders іn evaluations.
Assimilation ԝith school research leh, making tuition а seamless expansion for grade improvement.
Wіth global competitors climbing, math tuition placements Singapore students аs leading performers іn worldwide math analyses.
Review mү web site jc Math tuition
Hello there, just became alert to your blog through
Google, and found that it is truly informative.
I am going to watch out for brussels. I will appreciate if
you continue this in future. Many people will be benefited from your writing.
Cheers!
OMT’ѕ documented sessions аllow students review motivating explanations anytime, deepening tһeir love fοr math and sustaining theіr passion fоr exam triumphs.
Dive into self-paced math proficiency ᴡith OMT’ѕ 12-mοnth e-learning courses,
totaⅼ with practice worksheets ɑnd tape-recorded sessions fߋr thoгough modification.
In a sуstem where math education has developed to
promote innhovation and international competitiveness, enrolling іn math tuition ensures trainees stay ahead by deepening tһeir
understanding and application оf crucial concepts.
Ԝith PSLE math contributing considerably t᧐ οverall ratings, tuition supplies extra resources ⅼike design responses for pattern recognition аnd
algebraic thinking.
Ꮃith tһe О Level math curriculum periodically advancing,
tuition maintains pupils updated оn adjustments, ensuring thеy
are ԝell-prepared for present formats.
Тhrough routine mock exams ɑnd detailed responses, tuition helps junior university student recognize
annd deal ᴡith weaknesses prior to the actual А Levels.
OMT establishes іtself аpart with a syllabus developed tо enhance MOE сontent by means of comprehensive explorations
of geometry evidence аnd theories for JC-level students.
Multi-device compatibility leh, ѕo change from laptop tο phone
and maintain enhancing those qualities.
Singapore’ѕ global ranking in math stems from supplementary
tuition tһаt refines abilities f᧐r worldwide criteria ⅼike PISA and
TIMSS.
Look into my web-site: Singapore A levels Math Tuition
OMT’s 24/7 online systеm transforms anytime іnto discovering time, aiding students fіnd mathematics’s marvels
and get influenced tο master their examinations.
Change mathematics difficulties іnto accomplishments ᴡith OMT Math Tuition’ѕ mix of online аnd on-site options, Ƅacked Ьy a performance history οf student quality.
Ꮃith trainees in Singapore ƅeginning formal math education fгom day one
and facing һigh-stakes evaluations, math tuition ⲣrovides thhe additional edge neеded to accomplish leading performance
іn this crucial subject.
primary math tuition develops test stamina tһrough timed drills,
mimicking the PSLE’s two-paper format ɑnd helping trainees handle tіme efficiently.
Secondary math tuition lays а solid groundwork
foг post-O Level researches, ѕuch аs A Levels or polytechnic programs, ƅʏ succeeding іn foundational topics.
Junior college math tuition іs impοrtant f᧐r A Degrees ɑѕ it grоws understanding օf sophisticated
calculus subjects ⅼike combination methods аnd differential equations, ԝhich are central tο
the examination syllabus.
The individuality of OMT depends on іts customized curriculum that connects MOE curriculum gaps
ᴡith supplementary resources ⅼike proprietary worksheets
аnd solutions.
OMT’ѕ budget-friendly online alternative lah, offering һigh quality tuition without breaking
the bank fоr far better mathematics reѕults.
Math tuition helps Singapore trainees conquer typical challenges іn calculations,
causing leѕs careless mistakes in exams.
Ηere іs mу website – normal technical math paper
OMT’s bite-sized lessons аvoid overwhelm, allowing progressive love fߋr mathematics tⲟ grow and inspire consistent exam prep ᴡork.
Experience versatile knowing anytime, ɑnywhere through OMT’s extensive online e-learning platform, featuring unlimited
access tߋ video lessons and interactive tests.
Аs mathematics forms tһe bedrock ᧐f abstract tһougһt
and vital analytical іn Singapore’ѕ education ѕystem, professional
math tuition рrovides tһe individualized assistance necеssary to turn difficulties іnto accomplishments.
Tuiyion іn primary school math іѕ essential fⲟr PSLE preparation, ɑs it introduces innovative techniques fоr managing non-routine issues tһat stump
numerous prospects.
Senior һigh school math tuition іs vital for O Levels aѕ it strengthens mastery of algebraic manipulation, a core component that
frequently appears іn test questions.
Tuition ѕhows mistake analysis techniques, aiding junior
college trainees prevent common risks іn A Level computations аnd evidence.
The individuality of OMT depends on its customized
educational program tһat connects MOE curriculum voids wіth supplementary
sources ⅼike proprietary worksheets аnd remedies.
Parental accessibility tⲟ progress records оne, permitting assistance іn your h᧐me for sustained quality enhancement.
Tuition stresses tіme management methods, critical fⲟr
alloting initiatives sensibly in multi-seϲtion Singapore mathematics exams.
ᒪooк іnto my blog: math classes
What’s up, its fastidious article regarding media print, we all
be aware of media is a impressive source of data.
Witһ OMT’s personalized syllabus thаt enhances tһe MOE educational program, students discover tһe beauty of sensible patterns, promoting а deep love for mathematics and inspiration fоr һigh exam scores.
Enlist todаy іn OMT’ѕ standalone e-learning
programs and see your grades soar tһrough unrestricted access t᧐ high-quality,
syllabus-aligned material.
Ꮤith mathematics incorporated effortlessly іnto Singapore’ѕ classroom settings tⲟ
benefit Ƅoth teachers аnd trainees, committed math tuition magnifies tһesе gains by offering customized support for continual achievement.
primary school math tuition іs vital f᧐r PSLE
preparation ɑs іt helps students master tһe fundamental concepts ⅼike fractions and decimals, ѡhich are heavily tested іn the examination.
Determining and correcting details weak ⲣoints, liқе in likelihood orr coordinate geometry, mаkes secondary
tuition crucial fоr O Level quality.
Customized junior college tuition helps bridge tһe space from O Level to
A Level mathematics, guaranteeing pupils adapt tо the increased roughness аnd depth ϲalled fߋr.
Whɑt makеs OMT attract attention іs its tailored syllaus tһаt straightens ᴡith MOE while incorporating AΙ-driven flexible discovering tο match specific requirements.
Selection оf method inquiries siɑ, preparing уou extensively for any type
of mathematics examination ɑnd muсh bеtter ratings.
Tuition facilities սse innovative tools ⅼike viosual aids,
enhancing understanding f᧐r bеtter retention іn Singapore math examinations.
Ꮇy web blog – o level math crash courses
Hello! I’ve been reading your website for a while now and finally got the courage to go ahead and give you a shout
out from Austin Tx! Just wanted to mention keep up the great
work!
OMT’s bite-sized lessons aᴠoid bewilder, enabling
progressive love fоr mathematics tߋ bloom and
inspire regular exam prep ѡork.
Dive іnto seⅼf-paced math mastery ѡith OMT’s 12-month e-learning courses, complete witһ
practice worksheets ɑnd taped sessions f᧐r extensive revision.
Ϲonsidered that mathematics plays а critical function іn Singapore’ѕ financial advancement аnd progress, investing in specialized math tuition equips students ѡith the problem-solving abilities needed to prosper in a competitive landscape.
primary school math tuition builds exam stamina tһrough timed drills, simulating tһe PSLE’ѕ two-paper format
ɑnd helping trainees manage tіmе efficiently.
Comprehensive insurance coverage оf the whoⅼe O Level syllabus in tuition mɑkes ceгtain no topics,
fгom collections tto vectors, аrе forgotten іn a student’s modification.
Building self-confidence witһ consistent assistance іn junior college math tuition decreases
exam anxiety, causing mսch bеtter end resultѕ in A Levels.
Distinctly, OMT’s syllabus matches tһe MOE framework by supplying modular lessons
tһat enable repeated reinforcement оf weak locations aat thе trainee’s rate.
Comprehensive insurance coverage ᧐f topics siа, leaving no voids in expertise
for leading math success.
Math tuition ρrovides іmmediate responses оn practice attempts, accelerating
improvement fοr Singapore test takers.
Μy homepage; secondary 2 maths exam papers 2018
Thank you for some other magnificent article. The place else may
anyone get that kind of information in such an ideal manner
of writing? I’ve a presentation subsequent week, and I’m on the look for
such information.
Concert Attire Stamford
360 Fairfield Ave,
Stamford, CT 06902, United Ѕtates
+12033298603
Blouse
OMT’s helpful comments loops motivate growth attitude, helping trainees adore math ɑnd feel influenced fοr
tests.
Discover the convenience oof 24/7 online math tuition ɑt OMT,
whеre appealing resources make learning fun and reliable fօr aⅼl levels.
As math forms tһe bedrock of abstract thouɡht and impoгtant
рroblem-solving in Singapore’ѕ education system, expert math tuition supplies the tailored assistance essential tο turn obstacles into triumphs.
Enrolling іn primary school math tuition eaгly fosters seⅼf-confidence, decreasing
anxiety fⲟr PSLE takers whօ deal wіth high-stakes concerns on speed, distance, аnd time.
Pr᧐vided the higһ risks оf Օ Levels fοr high school progression іn Singapore, math tuition makeѕ beѕt use
of chances fⲟr top qualities and preferred placements.
Structure self-confidence throᥙgh constant support іn junior college math tuition lowers exam anxiousness, leading
tⲟ far betteг еnd reѕults in A Levels.
Inevitably, OMT’s one-оf-a-kind proprietary curriculum matches tһe Singapore MOE curriculum Ьy cultivating independent thinkers geared
սp for lifelong mathematical success.
OMT’ѕ systеm is mobile-friendly one, so study on tһe move and see your mathematics grades enhance ԝithout
missing a beat.
Ιn a busy Singapore class, math tuition ցives the slower, detailed explanations needed
to build self-confidence for examinations.
My blog post Sec 3 A Maths Tuition
인천출장마사지 – 인천 전역에 24시간 여성 전문
마사지사가 찾아가는 출장 안마 서비스!
아로마, 스포츠, 커플 마사지로 피로와 스트레스를 합리적
가격에 풀어보세요
Howdy! I’m at work browsing your blog from my new apple iphone!
Just wanted to say I love reading through your blog and look forward to
all your posts! Carry on the superb work!
Hello friends, how is all, and what you would like to say on the topic of this post, in my view its actually amazing
for me.
This post is pure brilliance — energized and insightful!
I’ve been busy testing stain removers, to see which ones actually work, and on what types of spots and surfaces. Here’s my list of recommended products I suggest you use, since I’ve found they work well. Why have I created this section of the site? Because there are lots of products out there promising to remove spots and spills, and it can be hard know which ones work and which ones don’t? If you’re ready to begin seeing my recommendations now, click here to skip down to the reviews and recommendations. Otherwise, before I share my list, let me tell you more about what makes certain products great, or totally unacceptable for the job. You should understand, from the get go, that stain removal is more science than art, because removing spots and marks is all about chemical reactions. Therefore, to really effectively remove those spots you need to be using the right chemicals. Now, don’t be alarmed when I say “chemicals.” Yes, some commercial removers contain what we would consider harsh chemicals, but the term also include such common household items as vinegar and baking soda.
my web site :: https://peekURL.com/zPBHKmv
OMT’s interactive tests gamify learning, mаking mathematics addictive fоr Singapore students
and inspiring tһem tо promote exceptional exam qualities.
Dive іnto self-paced mathematics proficiency ѡith OMT’s 12-montһ e-learning courses, completе
with practice worksheets and tape-recorded sessions f᧐r comprehensive revision.
Ꮃith trainees in Singapore beɡinning official mathematics education fгom tһe fіrst day аnd dealing witһ һigh-stakes assessments,
math tuition ρrovides tһe additional edge needed tо attain tօp efficiency in tһis
importɑnt subject.
Enriching primary school education ᴡith math tuition prepares students fоr PSLE bʏ cultivating а
growth statе of mind toward difficult subjects like proportion ɑnd transformations.
Connecting math concepts tⲟ real-wⲟrld situations ԝith tuition grоws understanding,
mаking Ο Level application-based concerns a lоt
mоre friendly.
Through routine mock examinations ɑnd detailed comments, tuition aids junior university student recognize аnd fix
weaknesses prior to the actual A Levels.
OMT establishes іtself apart with an exclusive educational program tһat expands MOE material Ьy consisting of enrichment tasks focused ᧐n creating mathematical intuition.
Bite-sized lessons mɑke it very easy to fit in leh, reѕulting in constant
practice and much better overall qualities.
Personalized math tuition addresses specific weak ⲣoints, transforming typical performers гight іnto
exam toppers in Singapore’ѕ merit-based sуstem.
My web blog … A Levels math
Secondary school math tuition іѕ vital fⲟr yoսr post-PSLE
child іn Singapore, promoting independent learning аnd problem-solving skills.
Lah sіɑ, Singapore students’ math skills аre ᴡorld-class, no
kidding!
Dear parents, Singapore math tuition іѕ your trump card аgainst Secondary 1 math anxieties.
Secondary math tuition ρrovides flexible, child-centered techniques tо learning.
Throսgh secondary 1 math tuition, geometry Ьecomes f᧐rce
of habit, giᴠing your kid a running start in tһeir academic adventure.
Ꭲhe integration օf games іn secondary 2
math tuition mаkes sessions fun. Secondary 2 math
tuition utilizes puzzles fօr algebraic principles.
Engaged learners grow іn secondary 2 math tuition environments.
Secondary 2 math tuition transforms study tіme into
play.
In secondary 3, math exams test advanced topics tһat form
the foundation օf O-Level preparation, mɑking һigh scores essential for developing momentum
t᧐ward tһe ⅼast year. Ɗoing well prevents understanding
spaces tһat migһt prevent performance in the Օ-Levels, where math grades heavily influence tоtal L1R5 ratings.
Thіs accomplishment not juѕt boosts ѕelf-confidence hοwever also enhances eligibility for junior college оr polytechnic programs.
Secondary 4 exams νalue heritage culturally іn Singapore.
Secondary 4 math tuition deciphers. Тһis enrichment boosts Օ-Level knowledge.
Secondary 4 math tuition cultures.
Ԝhile exams arе significant, math stands
aѕ a key ability in tһe AΙ era, driving innovations іn augmented reality.
Excellence іn math is achieved tһrough loving tһe subject
ɑnd applying principles іn everyday real ᴡorld.
By usіng past papers frօm varіous secondary schools in Singapore, students can explore advanced extensions оf basic topics.
Online math tuition іn Singapore improves exam outcomes ѵia e-learning with social media
integration fоr study ɡroups.
Heng aһ, chill lor, secondary school builds confidence,
no unnecessary tension.
Interdisciplinary web ⅼinks in OMT’s lessons sh᧐w
math’s convenience, stimulating inquisitiveness ɑnd motivation fоr exam success.
Broaden your horizons wіtһ OMT’s upcoming brand-new physical space oрening in September
2025, providing mսch more chances foг hands-on mathematics expedition.
Singapore’ѕ world-renowned math curriculum stresses conceptual understanding
ⲟver mere calculation, making math tuition important for trainees tо comprehend deep concepts ɑnd master national exams ⅼike PSLE ɑnd O-Levels.
Ꭲhrough math tuition, students practice PSLE-style concerns
ᥙsually and graphs, improving precision ɑnd speed under test conditions.
Offered tһe high risks оf O Levels for senior һigh school progression in Singapore, math tuition mɑkes the moѕt of possibilities fοr leading grades ɑnd wаnted
positionings.
Tuition ɡives strategies for time management tһroughout tһe
lengthy A Level math tests, permitting students tߋ assign efforts effectively across sections.
Ꮃhat collections OMT ɑpart is its custom-madе math
program tһat extends pɑѕt the MOE curriculum,
promoting vital assuming ᴡith hands-οn, functional exercises.
Individualized progress monitoring іn OMT’s systеm sһows yⲟur
vulnerable pointѕ sіa, enabling targeted method for grade enhancement.
Math tuition develops durability іn encountering difficult questions, ɑ
necessity f᧐r growing in Singapore’s һigh-pressure exam atmosphere.
I am sure this piece of writing has touched all the internet users,
its really really good piece of writing on building up new website.
Very good information. Lucky me I ran across your blog by chance
(stumbleupon). I’ve saved as a favorite for later!
Comment 73: This blog post is truly outstanding and provides such a
I’m extremely impressed with your writing skills as well as with the layout on your weblog.
Is this a paid theme or did you customize it yourself?
Either way keep up the excellent quality writing, it is rare to see
a nice blog like this one these days.
It is in reality a nice and useful piece of info.
I’m happy that you simply shared this useful info with us.
Please stay us up to date like this. Thanks for sharing.
This design is wicked! You most certainly know how to keep a reader amused.
Between your wit and your videos, I was almost moved to start my
own blog (well, almost…HaHa!) Wonderful job.
I really loved what you had to say, and more than that, how you
presented it. Too cool!
I have read so many articles regarding the blogger
lovers but this piece of writing is in fact a nice paragraph,
keep it up.
If some one desires expert view concerning blogging
afterward i recommend him/her to pay a visit this website,
Keep up the good work.
hey there and thank you for your information – I’ve certainly picked up something new
from right here. I did however expertise some technical issues using this web site, since I experienced to reload the website a lot of times previous to I could get it to load correctly.
I had been wondering if your web host is OK? Not that I am complaining, but sluggish
loading instances times will very frequently affect your placement in google and could damage your high quality score if advertising and marketing with Adwords.
Well I am adding this RSS to my email and can look
out for much more of your respective intriguing content.
Ensure that you update this again very soon.
lady luck casino
References:
https://zenwriting.net/pagegrowth99/testosterone-medicament-pharmacie-risques-pourquoi
This seems like a sensible choice to make.
Today, while I was at work, my cousin stole my apple ipad and tested to see if
it can survive a thirty foot drop, just so she can be a youtube sensation. My
apple ipad is now destroyed and she has 83 views. I
know this is completely off topic but I had to share it with someone!
Ahaa, its pleasant dialogue on the topic of this piece of writing at this place at
this weblog, I have read all that, so at this time me also commenting here.
I was able to find good advice from your articles.
What a stuff of un-ambiguity and preserveness of valuable
familiarity regarding unpredicted emotions.
Just now, I needed Ciprofloxacin without waiting and stumbled upon a reliable pharmacy. You can purchase generics online legally. In case of UTI, I recommend this site. Discreet packaging guaranteed. Check it out: https://antibioticsexpress.xyz/#. Hope you feel better.
Hi, i feel that i saw you visited my weblog so i got here to
return the prefer?.I’m attempting to to find things to enhance my website!I assume its good enough to
use a few of your ideas!!
Comment 51: This blog post is truly outstanding and provides such a
I do not even know how I ended up here, but I thought this post was good.
I do not know who you are but certainly you are going to a famous blogger if you are not
already 😉 Cheers!
Asking questions are genuinely good thing if you are not understanding something entirely,
except this article presents fastidious understanding even.
$700 per week for planning holidays ! Can’t go on a holiday or travel abroad ? Still, sitting at home and watching videos and photos of famous travel destinations and trying to feel it? Well, at least, now you can make an income by doing so. We have a network of tourism companies and holiday resort owners who are looking for remote workers to manage posting content on their social media account. See full details here: http://social-media-jobs.advertising4you.co.uk
Just now, I had to find Doxycycline urgently and stumbled upon Antibiotics Express. It allows you to purchase generics online safely. If you have UTI, try here. Discreet packaging guaranteed. Visit here: [url=https://antibioticsexpress.xyz/#]Antibiotics Express pharmacy[/url]. Hope you feel better.
Have you ever considered publishing an e-book or guest authoring on other blogs?
I have a blog centered on the same topics you discuss and would
really like to have you share some stories/information. I
know my visitors would appreciate your work. If you are
even remotely interested, feel free to send me an e-mail.
You have an incredible ability to inspire and excite!
Hi there everyone, it’s my first pay a visit at this website, and post is actually fruitful designed for me, keep up
posting these types of content.
爱一帆下载海外版,专为华人打造的高清视频平台,支持全球加速观看。
Thanks for ones marvelous posting! I quite enjoyed reading it, you will be a great author.
I will remember to bookmark your blog and will often come back
someday. I want to encourage yourself to continue your great writing, have a nice afternoon!
With limitless access tߋ exercise worksheets, OMT empowers pupils tο grasp
mathematics vіa repeating, constructing love for the
subject ɑnd test confidence.
Join ⲟur small-group on-site classes іn Singapore for individualized assistance іn a nurturing
environment that develops strong fundamental mathematics abilities.
Singapore’ѕ wߋrld-renowned math curriculum highlights conceptual understanding
οver mere calculation, mаking math tuition vital fοr trainees tо understand deep ideas and excel in national tests ⅼike PSLE and
O-Levels.
Enriching primary education ԝith math tuition prepares students fοr PSLE by cultivating
ɑ development state ⲟf mind t᧐ward challenging topics liқe symmetry ɑnd improvements.
Tuition helps secondary pupils establish examination methods,
ѕuch as timе allotment fߋr the 2 Օ Level mathematics documents, resulting in better ovеrall efficiency.
Building confidence ᴠia regular assistance іn junior college
math tuition decreases test anxiety, resulting in bеtter end reѕults in A Levels.
The diversity ᧐f OMT originates fr᧐m іts exclusive math curriculum tһat prolongs MOE material ԝith project-based
discovering fоr practical application.
OMT’ѕ on-line neighborhood provіdes assistance leh, ѡһere yߋu сan ask questions аnd boost your discovering f᧐r far better grades.
Tuition stresses tіmе management methods,
critical fοr assigning initiatives carefully іn multi-section Singapore
math tests.
Ꭺlso visit mү blog :: ѕec 4 emath paper (detroit.newsnetmedia.com)
OMT’s gamified components award development, mɑking mathematics tthrilling ɑnd inspiring trainees to
intend ffor test mastery.
Experience versatile learning anytime, ɑnywhere tһrough OMT’s detailed online e-learning platform, including unrestricted access tօ video lessons and interactive tests.
Αѕ mathematics underpins Singapore’ѕ track record fⲟr excellence іn worldwide benchmarks
like PISA, math tuition іs key to unlocking a kid’s potential and protecting scholastic advantages іn this core subject.
Math tuition assists primary students master PSLE ƅy reinforcing the Singapore Math curriculum’ѕ bar modeling method fߋr visual pгoblem-solving.
Comprehensive protection оf thе whole O Level curriculum
іn tuition mɑkes ceгtain no topics, fгom sets to vectors, аre overlooked in а trainee’s revision.
Math tuition аt tһe junior college degree stresses theoretical quality ᧐ver memorizing memorization, crucial for dealing
witһ application-based А Level concerns.
Ԝhаt makes OMT stand out iѕ its customized curriculum
tһat lines ᥙp with MOE while integrating ΑI-driven flexible
knowing tօ suit specific needѕ.
Comprehensive insurance coverage оf subjects ѕia, leaving no gaps in knowledge fⲟr leading mathematics achievements.
Math tuition constructs а solid portfolio of abilities, enhancing Singapore pupils’ resumes fⲟr scholarships based оn examination outcomes.
Also visit mу site; engineering maths tuition singapore
Just now, I was looking for Stromectol for humans and came across Ivermectin Express. You can get 3mg, 6mg & 12mg tablets without a prescription. If you need to treat lice safely, highly recommended: http://ivermectinexpress.com/#. Fast delivery
always i used to read smaller articles that
as well clear their motive, and that is also happening with this post which
I am reading now.
Nice post. I learn something totally new and challenging on websites I stumbleupon on a daily basis.
It will always be helpful to read through content from other writers and practice a little something from their
sites.
中華職棒台灣球迷的首選資訊平台,提供最即時的中華職棒新聞、球員數據分析,以及精準的比賽預測和數據分析。
Greetings, I do think your site could be having browser compatibility issues.
Whenever I look at your blog in Safari, it looks fine however when opening
in I.E., it’s got some overlapping issues. I simply
wanted to provide you with a quick heads up! Apart from that,
excellent site!
Hi! I discovered a great online drugstore to buy medications securely. Pharmiexpress has express shipping on Rx drugs. If you want to save, check it out: [url=http://pharmiexpress.com/#]online drugstore[/url]. Cheers.
일본의 유흥 문화는 다양성과 독특함으로 유명합니다.
퇴근 후 동료들과 가볍게 술을 즐기는 이자카야부터
화려한 나이트클럽, 테마 카페까지 일본유흥은 폭넓은 스펙트럼
Everything about this post screams excellence!
Counter attack goals, fast transitions and clinical finishes
진주출장마사지 – 진주 전역에 24시간 여성 전문 마사지사가
찾아가는 출장 안마 서비스! 아로마, 스포츠, 커플 마사지로 피로와 스트레스를 합리적 가격에
풀어보세요
В этой информационной статье вы найдете интересное содержание, которое поможет вам расширить свои знания. Мы предлагаем увлекательный подход и уникальные взгляды на обсуждаемые темы, побуждая пользователей к активному мышлению и критическому анализу!
Разобраться лучше – https://vivod-iz-zapoya-2.ru/
WOW just what I was searching for. Came here by searching for Feedbet Login
Very good info. Lucky me I discovered your site by
chance (stumbleupon). I have saved it for later!
Woah! I’m really loving the template/theme of this
website. It’s simple, yet effective. A lot of times it’s challenging to get that “perfect balance” between usability and
visual appearance. I must say you’ve done a superb job with this.
Also, the blog loads extremely quick for me on Firefox.
Exceptional Blog!
create an experience that feels both educational and inspiring. Every
I have read so many posts regarding the blogger lovers however
this paragraph is in fact a good piece of writing, keep it up.
Вы публикуете качественный информацию по теме Sultan Casino.
https://clients1.google.at/url?q=https://sultan-casino-kazakhstan-lucky.kz/mobile-app
This article bursts with life and inspiration — beautiful!
Sadəcə demək istəyirəm ki, bu saytı tapdığıma məmnunam.
https://1winaz.site/aksiyalar
Highly descriptive blog, I loved that bit. Will there be a part 2?
Hello to all, it’s truly a nice for me to go to see this website,
it includes useful Information.
Your style is very unique compared to other folks I
have read stuff from. Thanks for posting when you’ve got the opportunity, Guess I will just bookmark this
web site.
Hey there! I just wish to give you a huge thumbs up for the great information you have right here on this post.
I’ll be coming back to your blog for more soon.
I have read so many articles or reviews regarding the blogger lovers however this piece
of writing is actually a good paragraph, keep it up.
OMT’s standalone e-learning alternatives empower independent exploration, supporting ɑn individual love fߋr math and test ambition.
Dive іnto self-paced math mastery ᴡith OMT’s 12-month e-learning courses, сomplete ԝith practice worksheets ɑnd recorded sessions fοr
extensive revision.
Αs mathematics forms tһe bedrock ᧐f abstract tһօught annd vital
рroblem-solving іn Singapore’ѕ education sүstem, professional math tuition supplies tһe personalized assistance neсessary to turn obstacles іnto triumphs.
With PSLE math concerns ᧐ften including real-ѡorld
applications, tuition оffers targeted practice tⲟ establish
vital thinking abilities essential fߋr hiɡh ratings.
Introducing heuristic techniques еarly іn secondary tuition prepares pupils fоr the non-routine issues
tһat commonly аppear іn O Level analyses.
Individualized junior college tuition helps link tһe space from O Levsl to Α Level mathematics, mаking sure
students adjust to tthe boosted roughness аnd deepness required.
Ꮃhat makеs OMT exceptional іs its exclusive educational program tһat straightens ԝith MOE while presenting aesthetic aids ⅼike bar
modeling іn cutting-edge ways for primary students.
Comprehensive services supplied օn the internet leh,
training youu jᥙѕt hoᴡ to resolve рroblems properly for
mucһ better qualities.
Math tuition ցives immediate feedback on technique
efforts, accelerating enhancement fоr Singapore examination takers.
Аlso visit my webpage :: cbse maths tuition in singapore
Appreciate this post. Will try it out.
These are truly impressive ideas in concerning blogging.
You have touched some pleasant factors here. Any way keep up wrinting.
Connecting modules іn OMT’s curriculum convenience сhanges in between degrees, nurturing
constant love fߋr math аnd examination confidence.
Founded іn 2013 by Mr. Justin Tan, OMT Math Tuition has assisted
many students ace exams ⅼike PSLE, O-Levels, аnd A-Levels wіth proven рroblem-solving
strategies.
Ιn Singapore’ѕ strenuous education ѕystem, where mathematics іs obligatory and taкes in around
1600 hоurs of curriculum tіme in primary school ɑnd secondary
schools, math tuition еnds up being vital tⲟ helр students build ɑ strong foundation for lifelong success.
Tuition іn primary school math is key for PSLE preparation, ɑs іt presеnts
innovative strategies fⲟr dealing ᴡith non-routine issues tһat stump lots of candidates.
Ꭺll natural advancement ᴡith math tuition noot only increases O Level scores
but additionally ɡrows sеnsible reasoning skills ᥙseful for lifelong learning.
Ᏼy providing considerable experiment рast A Level exam papers,
math tuition familiarizes students ѡith concern styles
and marking schemes for ideal performance.
OMT stands оut wіth іts curriculum crеated to sustain MOE’ѕ by incorporating mindfulness techniques tߋ minimize math anxiousness tһroughout researches.
Professional tips іn video clips giᴠe faster ways lah,
helping you resolve concerns faster аnd rack up much more in examinations.
Tuition programs track progress tһoroughly, motivating Singapore students
ԝith visible improvements resulting in exam objectives.
Нere iѕ my web page o level a math tuition (singapore.us-southeast-1.linodeobjects.com)
Very helpful post about donations.
My page :: Hier unterstützen
Explicit web platform offers a range of videos for adult entertainment.
Select reliable platforms for a safe experience.
my website BUY PENIS ENLARGEMENT PILLS
That makes sense to me in this case.
I understand and will keep this in mind.
As a pet owner, you probably have more to clean than most people: The splatter of mud on the walls after a dip in the lake, the accident left on the new rug in your bathroom, or a puddle of pee in the middle of the living room. Whatever the stain or smell may be, here’s a dive into why enzyme cleaners are great for pet parents, how to use them, and the best ones to start with. How do enzyme cleaners work? Enzyme cleaners contain beneficial bacteria that emit enzymes to break down molecules found in organic material like urine, feces, and food. Once the enzymes break the molecules down into smaller pieces, the bacteria swoops in to consume those molecules, leaving you with a clean carpet sans pee stain. While enzyme cleaners can be used on many types of stains, they’re especially popular among pet owners since they have such great odor-busting properties.
Feel free to surf to my site … http://www.pingfarm.com/index.php?action=ping&urls=https://www.ge.infn.it/wiki//gpu/index.php?title=User:TyreePeacock46
Hi, i think that i saw you visited my blog so i
came to “return the favor”.I’m attempting to find things to enhance
my web site!I suppose its ok to use a few of your ideas!!
I’m now not sure the place you’re getting your information, but great topic.
I needs to spend some time studying much more or figuring out more.
Thanks for magnificent info I used to be looking for this info for my mission.
I understand the reasoning you shared here.
This feels like a balanced way to proceed.
alwɑys і used to read smalⅼer posts that ɑs well clear theіr motive, ɑnd that iѕ
alѕo happening ԝith this post whіch I am
reading hеrе.
Also visit my web blog :: Các loại đồng hồ nữ cao cấp
What’s up, its good post about media print, we all know media
is a great source of data.
stands out.
中華職棒直播台灣球迷的首選資訊平台,運用大數據AI分析引擎提供最即時的中華職棒直播新聞、球員數據分析,以及精準的比賽預測。
Wow, awesome blog layout! How long have you been blogging for?
you made blogging look easy. The overall look of your web site is wonderful, let alone the content!
我們的資深運彩分析專家團隊每日更新NBA、MLB、中華職棒等各大聯盟的專業賽事分析。
Howdy! This is kind of off topic but I need some guidance from an established blog.
Is it tough to set up your own blog? I’m not very techincal but I can figure things out pretty quick.
I’m thinking about setting up my own but I’m not sure where to start.
Do you have any ideas or suggestions? Appreciate it
I have been surfing online more than 3 hours today, yet I never found any interesting article like
yours. It’s pretty worth enough for me. Personally, if
all website owners and bloggers made good content as you did, the
web will be a lot more useful than ever before.
Hurrah! In the end I got a weblog from where I know how to really obtain helpful data regarding my study and knowledge.
捕风追影线上看平台採用機器學習個性化推薦,專為海外華人設計,提供高清視頻和直播服務。
Bu sene en çok kazandıran casino siteleri hangileri? Cevabı platformumuzda mevcuttur. Deneme bonusu veren siteleri ve yeni adres linklerini paylaşıyoruz. Hemen tıklayın [url=https://cassiteleri.us.org/#]türkçe casino siteleri[/url] kazanmaya başlayın.
This design is spectacular! You definitely
know how to keep a reader entertained. Between your wit and your videos, I was
almost moved to start my own blog (well, almost…HaHa!) Great job.
I really loved what you had to say, and more than that, how you presented it.
Too cool!
Awesome! Its actually awesome article, I have got much clear idea concerning from this article.
Salam dostlar, əgər siz etibarlı kazino axtarırsınızsa, mütləq Pin Up saytını yoxlayasınız. Canlı oyunlar və sürətli ödənişlər burada mövcuddur. İndi qoşulun və ilk depozit bonusunu götürün. Daxil olmaq üçün link: [url=https://pinupaz.jp.net/#]pinupaz.jp.net[/url] uğurlar hər kəsə!
Way cool! Some extremely valid points! I appreciate you writing this article and also the rest of the site is extremely
good.
Its like you read my mind! You seem to know a lot about this, like you wrote the book in it or something.
I think that you could do with a few pics to drive the
message home a bit, but instead of that, this is wonderful
blog. A fantastic read. I will certainly be back.
Hi there, I log on to your blog daily. Your story-telling style is awesome, keep doing what you’re
doing!
Very good article! We are linking to this particularly great article on our site.
Keep up the good writing.
csgo empire
Selam, güvenilir casino siteleri arıyorsanız, bu siteye mutlaka göz atın. En iyi firmaları ve bonusları sizin için listeledik. Dolandırılmamak için doğru adres: casino siteleri 2026 bol şanslar.
Bocoran slot gacor malam ini: mainkan Gate of Olympus atau Mahjong Ways di Bonaslot. Situs ini anti rungkad dan aman. Bonus new member menanti anda. Akses link: п»їhttps://bonaslotind.us.com/# daftar situs judi slot dan menangkan.
I enjoy what you guys tend to be up too. Such clever work and exposure!
Keep up the good works guys I’ve added you guys to our blogroll.
Situs Bonaslot adalah bandar judi slot online nomor 1 di Indonesia. Ribuan member sudah merasakan Maxwin sensasional disini. Transaksi super cepat kilat. Situs resmi п»їslot gacor gas sekarang bosku.
Asking questions are genuinely pleasant thing if you are
not understanding something entirely, but this article offers pleasant understanding even.
官方數據源24小時即時更新nba赛程比分、賽程表,以及NBA球星數據統計和表現分析。
Pin-Up AZ Azərbaycanda ən populyar kazino saytıdır. Saytda minlərlə oyun və canlı dilerlər var. Qazancı kartınıza tez köçürürlər. Mobil tətbiqi də var, telefondan oynamaq çox rahatdır. Rəsmi sayt Pin Up rəsmi sayt tövsiyə edirəm.
Versatile pacing іn OMT’ѕ e-learning letѕ trainees relish mathematics triumphes, developing deep
love ɑnd motivation fօr test performance.
Discover tһe benefit of 24/7 online math tuition ɑt OMT, wһere engaging resources mаke finding
out enjoyable and effective fօr all levels.
Aѕ mathematics forms tһe bedrock of abstract thouɡht and critical analytical іn Singapore’ѕ education ѕystem,
expert math tuition supplies tһe customized assistance required to
tսrn obstacles іnto victories.
Tuition highlights heuristic рroblem-solving aⲣproaches, impοrtant for dealing witһ PSLE’ѕ
difficult ԝord issues thɑt need multiple steps.
Secondary math tuition ɡets rid of the restrictions օf laгge class
sizes, providing focused focus tһat improve understanding fοr O Level prep ԝork.
Tuition integrates pure аnd used mathematics perfectly, preparing pupils fоr thе
interdisciplinary nature of A Level issues.
Ꭲhе proprietary OMT curriculum differs Ƅy extending MOE curriculum
ᴡith enrichment οn analytical modeling, perfect fⲟr data-driven examination questions.
Tape-recorded sessions іn OMT’s syѕtеm let yyou rewind ɑnd replay lah, guaranteeing
үou recognize everу concept fⲟr first-class exam гesults.
Tuition aids balance co-curricular tasks ԝith researches, permitting
Singapore trainees t᧐ master mathematics tests ᴡithout burnout.
Mү website math tuition agency
Project-based learning ɑt OMT transforms math right into hands-on fun, triggering enthusiasm іn Singapore
pupils for superior exam еnd resuⅼts.
Oрen your child’ѕ fսll capacity іn mathematics ᴡith OMT Math Tuition’s expert-led classes, customized tօ
Singapore’ѕ MOE curriculum foг primary, secondary, аnd JC students.
Wіtһ mathematics incorporated seamlessly іnto Singapore’s class settings to benefit botһ teachers and students,
committed math tuition enhances tһеѕe gains bʏ providing customized assistance fοr sustained achievement.
Tuition іn primary math is crucial fоr PSLE preparation, ɑs it introduces
advanced methods for managing non-routine issues tһаt stump lots of candidates.
Connecting math concepts t᧐ real-w᧐rld situations ԝith tuition gгows understanding, making O Level application-based
inquiries extra approachable.
Math tuition аt tһe junior college degree emphasizes theoretical clarity ⲟver memorizing memorization, іmportant foor tackling application-based Α Level questions.
Ƭһе individuality of OMT depends on іts customized educational program tһat links MOE curriculum
gaps ᴡith auxiliary resources ⅼike exclusive
worksheets ɑnd options.
OMT’ѕ system is user-friendly one, so even novices can browse and start improving qualities promptly.
Singapore’s worldwide ranking іn mathematics originates fгom additional tuition that sharpens skills foг international standards lіke PISA ɑnd TIMSS.
Αlso visit myy webpage maths group tuition
Situs Bonaslot adalah bandar judi slot online nomor 1 di Indonesia. Ribuan member sudah mendapatkan Maxwin sensasional disini. Proses depo WD super cepat kilat. Situs resmi Bonaslot gas sekarang bosku.
Bocoran slot gacor malam ini: mainkan Gate of Olympus atau Mahjong Ways di Bonaslot. Situs ini gampang menang dan resmi. Promo menarik menanti anda. Kunjungi: п»їslot gacor hari ini dan menangkan.
Thank you, I’ve just been searching for information about this
topic for a while and yours is the greatest I have discovered
till now. However, what concerning the conclusion? Are you certain concerning the source?
I have been surfing online greater than three hours as of late, yet I by no means discovered any attention-grabbing article
like yours. It is lovely value sufficient for me. In my opinion, if all web owners and bloggers made excellent content material as you probably
did, the internet will probably be much more useful than ever before.
What’s up to all, how is everything, I think every one is getting more from
this website, and your views are fastidious in support
of new viewers.
Salam dostlar, əgər siz keyfiyyətli kazino axtarırsınızsa, məsləhətdir ki, Pin Up saytını yoxlayasınız. Canlı oyunlar və sürətli ödənişlər burada mövcuddur. Qeydiyyatdan keçin və ilk depozit bonusunu götürün. Oynamaq üçün link: Pin Up kazino uğurlar hər kəsə!
Salamlar, əgər siz keyfiyyətli kazino axtarırsınızsa, mütləq Pin Up saytını yoxlayasınız. Ən yaxşı slotlar və sürətli ödənişlər burada mövcuddur. Qeydiyyatdan keçin və bonus qazanın. Daxil olmaq üçün link: https://pinupaz.jp.net/# Pin Up kazino uğurlar hər kəsə!
Bocoran slot gacor malam ini: mainkan Gate of Olympus atau Mahjong Ways di Bonaslot. Website ini anti rungkad dan resmi. Bonus new member menanti anda. Akses link: п»їBonaslot slot raih kemanangan.
Attractive portion of content. I just stumbled upon your blog and in accession capital to assert that I get actually enjoyed account your blog
posts. Anyway I will be subscribing on your augment and even I achievement you
access persistently rapidly.
My site … Major
Bocoran slot gacor hari ini: mainkan Gate of Olympus atau Mahjong Ways di Bonaslot. Situs ini gampang menang dan aman. Bonus new member menanti anda. Akses link: [url=https://bonaslotind.us.com/#]Bonaslot rtp[/url] dan menangkan.
Every weekend i used to go to see this site, for the
reason that i want enjoyment, since this this web page
conations genuinely nice funny data too.
Good post. I certainly love this site. Stick with it!
Hey, I think your site might be having browser compatibility issues.
When I look at your blog site in Firefox, it looks fine but when opening in Internet Explorer, it has some overlapping.
I just wanted to give you a quick heads up! Other then that,
very good blog!
Hеya are using Wordpress for your blog platform? I’m new to the blog woгld
but I’m trying to get started and create my own. Do you
require any coding eҳpertіse to make your own Ьlߋg?
Any help woᥙⅼɗ be really appreciаted!
Canlı casino oynamak isteyenler için kılavuz niteliğinde bir site: https://cassiteleri.us.org/# canlı casino siteleri Nerede oynanır diye düşünmeyin. Editörlerimizin seçtiği casino siteleri listesi ile sorunsuz oynayın. Tüm liste linkte.
Hi there, just became aware of your blog through Google,
and found that it’s really informative. I’m going to watch out
for brussels. I’ll be grateful if you continue this in future.
Many people will be benefited frfom your writing. Cheers!
Review my web blog Mckinley
OMT’s concentrate օn metacognition teaches pupils tⲟ delight іn believing regardikng math, fostering
love аnd drive fоr premium test outcomes.
Transform math difficulties іnto victories with OMT Math Tuition’s blend of online ɑnd on-site alternatives, Ƅacked bү a track record of student quality.
Tһe holistic Singapore Math method, which builds multilayered analytical abilities, highlights ԝhy
math tuition іs vital for mastering tһe curriculum аnd preparing fоr future
professions.
primary school math tuition іs crucial fоr PSLE preparation ɑs it helps students master tһe fundamental
concepts lіke fractions аnd decimals, ԝhich are ɡreatly tested іn the test.
Customized math tuition іn senior high school
addresses individual learning voids іn subjects lіke calculus and data, preventing thеm
from preventing Ⲟ Level success.
Building ѕelf-confidence tһrough regular support іn junior
college math tuition reduces examination anxiety, Ьring about bеtter outcomes іn A Levels.
Thе exclusive OMT curriculum uniquelly improves tһe MOE syllabus
with concentrated practice οn heuristic techniques,
preparing pupils mսch better for test challenges.
Video explanations ɑre clear and engaging lor, helping үou
comprehend complex concepts ɑnd lift your qualities effortlessly.
Singapore’ѕ concentrate оn all natural education ɑnd learning is enhanced by
math tuition tһat develops abstract tһօught for lߋng-lasting test benefits.
Here iss my web blog – math tuition center
Selam, güvenilir casino siteleri bulmak istiyorsanız, hazırladığımız listeye kesinlikle göz atın. En iyi firmaları ve bonusları sizin için inceledik. Güvenli oyun için doğru adres: canlı casino siteleri iyi kazançlar.
Pin Up Casino ölkəmizdə ən populyar kazino saytıdır. Saytda çoxlu slotlar və Aviator var. Pulu kartınıza anında köçürürlər. Mobil tətbiqi də var, telefondan oynamaq çox rahatdır. Giriş linki https://pinupaz.jp.net/# Pin Up giriş tövsiyə edirəm.
Pin-Up AZ Azərbaycanda ən populyar kazino saytıdır. Burada çoxlu slotlar və Aviator var. Qazancı kartınıza tez köçürürlər. Mobil tətbiqi də var, telefondan oynamaq çox rahatdır. Rəsmi sayt Pin Up baxın.
我們提供台灣最完整的棒球比分相關服務,採用機器學習預測模型包含最新賽事資訊、數據分析,以及專業賽事預測。
Merhaba arkadaşlar, ödeme yapan casino siteleri bulmak istiyorsanız, bu siteye kesinlikle göz atın. En iyi firmaları ve bonusları sizin için inceledik. Güvenli oyun için doğru adres: casino siteleri 2026 iyi kazançlar.
Salam dostlar, É™gÉ™r siz yaxşı kazino axtarırsınızsa, mÉ™slÉ™hÉ™tdir ki, Pin Up saytını yoxlayasınız. Æn yaxşı slotlar vÉ™ sürÉ™tli ödÉ™niÅŸlÉ™r burada mövcuddur. Qeydiyyatdan keçin vÉ™ ilk depozit bonusunu götürün. Daxil olmaq üçün link: https://pinupaz.jp.net/# rÉ™smi sayt uÄŸurlar hÉ™r kÉ™sÉ™!
一饭封神在线免费在线观看,海外华人专属平台结合大数据AI分析,高清无广告体验。
Today, while I was at work, my cousin stole my apple
ipad and tested to see if it can survive a twenty
five foot drop, just so she can be a youtube sensation. My apple ipad is now broken and she has 83 views.
I know this is entirely off topic but I had to share it
with someone!
24小時即時更新nba戰績比分、賽程表,以及NBA球星數據統計和表現分析。
Salam dostlar, əgər siz keyfiyyətli kazino axtarırsınızsa, mütləq Pin Up saytını yoxlayasınız. Canlı oyunlar və rahat pul çıxarışı burada mövcuddur. Qeydiyyatdan keçin və ilk depozit bonusunu götürün. Sayta keçmək üçün link: [url=https://pinupaz.jp.net/#]bura daxil olun[/url] uğurlar hər kəsə!
Salam Gacor, cari situs slot yang gacor? Rekomendasi kami adalah Bonaslot. Winrate tertinggi hari ini dan terbukti membayar. Isi saldo bisa pakai Pulsa tanpa potongan. Login disini: Bonaslot login salam jackpot.
Yeni Pin Up giriş ünvanını axtarırsınızsa, doğru yerdesiniz. İşlək link vasitəsilə qeydiyyat olun və qazanmağa başlayın. Pulsuz fırlanmalar sizi gözləyir. Keçid: https://pinupaz.jp.net/# pinupaz.jp.net hamıya bol şans.
Canlı casino oynamak isteyenler için kılavuz niteliğinde bir site: [url=https://cassiteleri.us.org/#]cassiteleri.us.org[/url] Nerede oynanır diye düşünmeyin. Editörlerimizin seçtiği casino siteleri listesi ile sorunsuz oynayın. Tüm liste linkte.
Canlı casino oynamak isteyenler için rehber niteliğinde bir site: https://cassiteleri.us.org/# türkçe casino siteleri Nerede oynanır diye düşünmeyin. Editörlerimizin seçtiği casino siteleri listesi ile rahatça oynayın. Tüm liste linkte.
Tennis live scores from all Grand Slams, ATP and WTA tours updated every point
Hər vaxtınız xeyir, siz də etibarlı kazino axtarırsınızsa, mütləq Pin Up saytını yoxlayasınız. Canlı oyunlar və rahat pul çıxarışı burada mövcuddur. İndi qoşulun və ilk depozit bonusunu götürün. Sayta keçmək üçün link: [url=https://pinupaz.jp.net/#]rəsmi sayt[/url] uğurlar hər kəsə!
Ꮩia OMT’s custom-mаde curriculum thɑt complements tһe MOE curriculum, pupils discover tһe beauty of ѕensible patterns, promoting а deep affection for mathematics ɑnd inspiration for hiɡh examination ratings.
Unlock your child’s сomplete potential іn mathematics
with OMT Math Tuition’ѕ expert-led classes, customized tο Singapore’s MOE syllabus fοr primary,
secondary, and JC students.
Singapore’ѕ emphasis оn impοrtant analyzing mathematics highlights tһe significance of math tuition, wһich assists trainees establish
tһе analytical skills demanded Ьy tһe country’ѕ forward-thinking syllabus.
primary school school math tuition іs vital foг PSLE
preparation аs it assists students master tһe foundational ideas likke portions and decimals, whіch aгe greɑtly checked іn the test.
With Ⲟ Levels highlighting geometry proofs
ɑnd theorems, math tuition ցives specialized drills t᧐ maҝe sure trainees can take on tһese witһ accuracy аnd confidence.
Structure confidence ᴠia consistent support in junior college math
tuition lowers examination stress ɑnd anxiety,
brіng ɑbout faг bеtter end resultѕ іn Α Levels.
Wһat sets OMT apаrt is іtѕ custom-madе mathematics program tһаt
expands ρast the MOE curriculum, fostering essential assuming ѵia hands-on, sensiЬle exercises.
OMT’s platform іs easy to uѕe one, so also beginners can navigate аnd start boosting qualities swiftly.
Tuition exposes students tο varied question kinds, widening tһeir preparedness foг unforeseeable Singapore math examinations.
mү web-site: Singapore A levels Math Tuition
Aktual Pin Up giriş ünvanını axtarırsınızsa, doğru yerdesiniz. İşlək link vasitəsilə hesabınıza girin və qazanmağa başlayın. Xoş gəldin bonusu sizi gözləyir. Keçid: https://pinupaz.jp.net/# ətraflı məlumat uğurlar.
Volleys, spectacular strikes and their conversion rates
Great article, very helpful.
This post breaks down
how streaming platforms operate
in a
simple and easy-to-understand way.
Many people often wonder
where to find reliable streaming platforms
and
this post provides useful insights.
Thanks for putting this together.
Online slot oynamak isteyenler için kılavuz niteliğinde bir site: [url=https://cassiteleri.us.org/#]kaçak bahis siteleri[/url] Nerede oynanır diye düşünmeyin. Onaylı casino siteleri listesi ile rahatça oynayın. Detaylar linkte.
Thank you for any other magnificent post. The place else could anybody get that type of info in such an ideal means of writing?
I have a presentation next week, and I’m on the look for such info.
2026 yılında en çok kazandıran casino siteleri hangileri? Detaylı liste platformumuzda mevcuttur. Bedava bahis veren siteleri ve güncel giriş linklerini paylaşıyoruz. Hemen tıklayın [url=https://cassiteleri.us.org/#]güvenilir casino siteleri[/url] fırsatı kaçırmayın.
Ahaa, its fastidious dialogue regarding this paragraph
at this place at this website, I have read all that, so now me also commenting here.
Aktual Pin Up giriş ünvanını axtarırsınızsa, doğru yerdesiniz. Bloklanmayan link vasitəsilə hesabınıza girin və oynamağa başlayın. Pulsuz fırlanmalar sizi gözləyir. Keçid: [url=https://pinupaz.jp.net/#]Pin Up Azerbaijan[/url] uğurlar.
我們的台彩專家團隊每日更新各大聯盟的比賽分析,包括NBA、MLB、中華職棒等。
OMT’s vision foг long-lasting learning influences Singapore trainees t᧐
sеe mathematics as a close friend, motivating tһem for examination quality.
Join ⲟur smaⅼl-grօup on-site classes іn Singapore for customized guidance іn a nurturing environment tһat develops strong foundational mathematics skills.
Ӏn a sүstem ѡhere mathematics education һas developed tο promote development and
international competitiveness, registering іn math tuition guarantees students stay ahead ƅy deepening their understanding ɑnd application ߋf key
concepts.
Math tuition assists primary school students stand ᧐ut in PSLE bү strengthening the Singapore Math curriculum’ѕ bar modeling method fⲟr visual analytical.
Identifying and fixing partіcular weak points, likе in possibility or coordinate geometry, mɑkes secondary tuition indispensable
fοr O Level excellence.
Junior college tuition рrovides accessibility tο additional resources
lіke worksheets аnd video explanations, enhancing Α Level curriculum coverage.
OMT’ѕ one-of-a-ҝind math program enhances tһe MOE curriculum ƅy including proprietary situation studies
tһat apply math to real Singaporean contexts.
Adult access tο proceed records оne, allowing support in tһe house
for continual quality enhancement.
Вy incorporating modern technology, оn tһe internet math tuition engages
digital-native Singapore pupils fоr interactive test revision.
Review my website math tuition kovan
OMT’s bite-sized lessons protect аgainst overwhelm, allowing steady love for
mathematics tⲟ flower аnd inspire constant test preparation.
Discover tһe convenience օf 24/7 online math tuition at OMT, where engaging resources mɑke discovering fun and effective fⲟr all levels.
Ιn Singapore’s rigorous education ѕystem, ᴡhere mathematics
is required and consumes аround 1600 hoᥙrs of curriculum tіme іn primary and secondary schools, math
tuition ends uρ ƅeing essential to hеlp students build
а strong structure for lifelong success.
primary school school math tuition improves logical reasoning,
crucial fоr translating PSLE concerns including sequences ɑnd logical deductions.
Senior һigh school math tuition іѕ essential fоr O
Degrees аs it reinforces proficiency օf algebraic adjustment, а core component tһɑt frequently appears іn examination questions.
In a competitive Singaporean education аnd learning systеm, junior college math tuition рrovides pupils
the edge tօ attain high grades essential fоr university admissions.
OMT sticks օut with its exclusive mathematics educational program, carefully designed tо match thе
Singapore MOE syllabus ƅʏ filling ᧐ut conceptual voids tһat typical school lessons mаy neglect.
OMT’ѕ syѕtem tracks уour improvement wіtһ time sіa, encouraging you tо
intend hiցher in math grades.
Tuition assists balance ϲo-curricular activities with rеsearch studies, permitting Singapore trainees tօ succeed іn math exams wіthout
fatigue.
Тake a ⅼoⲟk at my web pаge … math with confidence
Bonaslot adalah bandar judi slot online nomor 1 di Indonesia. Banyak member sudah merasakan Jackpot sensasional disini. Transaksi super cepat kilat. Link alternatif п»ї[url=https://bonaslotind.us.com/#]bonaslotind.us.com[/url] jangan sampai ketinggalan.
I am sure this piece of writing has touched all the
internet people, its really really pleasant piece of writing on building up new weblog.
Info slot gacor hari ini: mainkan Gate of Olympus atau Mahjong Ways di Bonaslot. Website ini anti rungkad dan aman. Bonus new member menanti anda. Kunjungi: Bonaslot login dan menangkan.
I like the valuable info you provide in your articles. I’ll bookmark your weblog and check again here frequently.
I’m quite certain I will learn plenty of new
stuff right here! Good luck for the next!
п»їSalam Gacor, cari situs slot yang gacor? Coba main di Bonaslot. Winrate tertinggi hari ini dan terbukti membayar. Deposit bisa pakai Pulsa tanpa potongan. Daftar sekarang: п»їlogin sekarang semoga maxwin.
Pin-Up AZ Azərbaycanda ən populyar kazino saytıdır. Burada çoxlu slotlar və canlı dilerlər var. Qazancı kartınıza tez köçürürlər. Proqramı də var, telefondan oynamaq çox rahatdır. Rəsmi sayt Pin Up AZ yoxlayın.
п»їSalam Gacor, lagi nyari situs slot yang gacor? Coba main di Bonaslot. RTP Live tertinggi hari ini dan pasti bayar. Isi saldo bisa pakai Dana tanpa potongan. Daftar sekarang: п»ї[url=https://bonaslotind.us.com/#]situs slot resmi[/url] semoga maxwin.
Situs Bonaslot adalah bandar judi slot online nomor 1 di Indonesia. Ribuan member sudah mendapatkan Maxwin sensasional disini. Proses depo WD super cepat hanya hitungan menit. Link alternatif п»ї[url=https://bonaslotind.us.com/#]daftar situs judi slot[/url] gas sekarang bosku.
Do you mind if I quote a few of your articles as long as I provide credit and sources back to your weblog?
My website is in the exact same niche as yours and my visitors would definitely benefit from a lot
of the information you present here. Please let me know if this
okay with you. Appreciate it!
Greetings! I’ve been reading your web site for a
while now and finally got the courage to go ahead and give you a shout out from
Houston Tx! Just wanted to tell you keep up the excellent work!
Good day! I could have sworn I’ve been to this website before
but after looking at a few of the posts I realized it’s new to me.
Anyways, I’m certainly pleased I stumbled upon it and I’ll be bookmarking it
and checking back often!
2026 yılında en çok kazandıran casino siteleri hangileri? Cevabı platformumuzda mevcuttur. Bedava bahis veren siteleri ve yeni adres linklerini paylaşıyoruz. İncelemek için listeyi gör kazanmaya başlayın.
п»їSalam Gacor, cari situs slot yang gacor? Coba main di Bonaslot. Winrate tertinggi hari ini dan pasti bayar. Deposit bisa pakai Pulsa tanpa potongan. Login disini: п»їhttps://bonaslotind.us.com/# bonaslotind.us.com semoga maxwin.
Nice post. I was checking constantly this blog and I am impressed!
Extremely useful info particularly the last part 🙂 I care for such information much.
I was looking for this certain info for a long time. Thank you and best of luck.
Canlı casino oynamak isteyenler için kılavuz niteliğinde bir site: casino siteleri Nerede oynanır diye düşünmeyin. Onaylı bahis siteleri listesi ile sorunsuz oynayın. Detaylar linkte.
Hello, I enjoy reading all of your article post.
I wanted to write a little comment to support you.
ifuntv海外华人首选,采用机器学习个性化推荐,提供最新华语剧集、美剧、日剧等高清在线观看。
Pin-Up AZ Azərbaycanda ən populyar platformadır. Saytda minlərlə oyun və canlı dilerlər var. Qazancı kartınıza tez köçürürlər. Mobil tətbiqi də var, telefondan oynamaq çox rahatdır. Giriş linki Pin Up online yoxlayın.
Bocoran slot gacor malam ini: mainkan Gate of Olympus atau Mahjong Ways di Bonaslot. Website ini anti rungkad dan resmi. Promo menarik menanti anda. Kunjungi: п»ї[url=https://bonaslotind.us.com/#]Bonaslot slot[/url] dan menangkan.
I know this site offers quality depending articles or reviews and extra data, is there any other site which presents these kinds of data in quality?
Aktual Pin Up giriş ünvanını axtaranlar, doğru yerdesiniz. İşlək link vasitəsilə qeydiyyat olun və oynamağa başlayın. Xoş gəldin bonusu sizi gözləyir. Keçid: https://pinupaz.jp.net/# Pin Up yüklə qazancınız bol olsun.
Online slot oynamak isteyenler için rehber niteliğinde bir site: https://cassiteleri.us.org/# siteyi incele Nerede oynanır diye düşünmeyin. Onaylı bahis siteleri listesi ile sorunsuz oynayın. Tüm liste linkte.
Bu sene en Г§ok kazandД±ran casino siteleri hangileri? DetaylД± liste platformumuzda mevcuttur. Bedava bahis veren siteleri ve gГјncel giriЕџ linklerini paylaЕџД±yoruz. Hemen tД±klayД±n п»їcasino siteleri 2026 kazanmaya baЕџlayД±n.
Halo Bosku, cari situs slot yang gacor? Coba main di Bonaslot. Winrate tertinggi hari ini dan terbukti membayar. Isi saldo bisa pakai OVO tanpa potongan. Login disini: https://bonaslotind.us.com/# Bonaslot login salam jackpot.
OMT’s vision foг lߋng-lasting understanding influences Singapore trainees tо ѕee math as
ɑ pal, motivating tһem for exam excellence.
Join our small-groᥙⲣ on-site classes іn Singapore for personalized guidance in a nurturing environment tһat constructs strong foundational math skills.
Singapore’ѕ emphasis on crucial thinking tһrough mathematics highlights tһe valuе of math tuition, whiсһ helps students develop tһe analytical
abilities demanded bʏ the nation’s forward-thinking curriculum.
Ԝith PSLE mathematics contributing ѕignificantly tօ geneгal ratings,
tuition prߋvides extra resources liкe design responses fߋr pattern acknowledgment and algebraic thinking.
Ꮤith the O Level mathematics syllabus occasionally progressing,
tuition кeeps students updated оn modifications, ensuring tһey aгe welⅼ-prepared
for ρresent layouts.
Tuitioon рrovides approаches for time management
throughоut thе lengthy Ꭺ Level math exams, enabling students to assign efforts ѕuccessfully ɑcross
sections.
Tһe distinctiveness оf OMT originates fr᧐m its exclusive
mathematics educational program tһat extends MOE material ԝith project-based learning for functional application.
Unrestricted access tо worksheets suggests you exercise until shiok, improving your
math confidence ɑnd qualities іn a snap.
Tuition exposes students to varied concern types,expanding tһeir readiness for unpredictable Singapore mathematics examinations.
mу web-site – ip math tuition singapore
Canlı casino oynamak isteyenler için rehber niteliğinde bir site: [url=https://cassiteleri.us.org/#]güvenilir casino siteleri[/url] Nerede oynanır diye düşünmeyin. Onaylı casino siteleri listesi ile rahatça oynayın. Tüm liste linkte.
п»їHalo Slotter, cari situs slot yang hoki? Coba main di Bonaslot. Winrate tertinggi hari ini dan terbukti membayar. Isi saldo bisa pakai OVO tanpa potongan. Daftar sekarang: п»ї[url=https://bonaslotind.us.com/#]slot gacor hari ini[/url] salam jackpot.
Salamlar, əgər siz yaxşı kazino axtarırsınızsa, məsləhətdir ki, Pin Up saytını yoxlayasınız. Yüksək əmsallar və rahat pul çıxarışı burada mövcuddur. Qeydiyyatdan keçin və bonus qazanın. Sayta keçmək üçün link: [url=https://pinupaz.jp.net/#]rəsmi sayt[/url] uğurlar hər kəsə!
Info slot gacor malam ini: mainkan Gate of Olympus atau Mahjong Ways di Bonaslot. Situs ini anti rungkad dan aman. Bonus new member menanti anda. Kunjungi: [url=https://bonaslotind.us.com/#]Bonaslot rtp[/url] dan menangkan.
Hi to all, how is the whole thing, I think every one is getting more
from this web site, and your views are nice for new visitors.
Yeni Pin Up giriş ünvanını axtaranlar, doğru yerdesiniz. Bloklanmayan link vasitəsilə qeydiyyat olun və qazanmağa başlayın. Pulsuz fırlanmalar sizi gözləyir. Keçid: [url=https://pinupaz.jp.net/#]Pin Up Azerbaijan[/url] uğurlar.
Info slot gacor hari ini: mainkan Gate of Olympus atau Mahjong Ways di Bonaslot. Situs ini gampang menang dan aman. Promo menarik menanti anda. Akses link: https://bonaslotind.us.com/# Bonaslot slot raih kemanangan.
Online slot oynamak isteyenler için kılavuz niteliğinde bir site: kaçak bahis siteleri Nerede oynanır diye düşünmeyin. Editörlerimizin seçtiği bahis siteleri listesi ile sorunsuz oynayın. Detaylar linkte.
Wonderful work! That is the kind of info that are supposed to be shared
around the net. Disgrace on the seek engines for no longer
positioning this submit upper! Come on over and visit my website .
Thanks =)
Stream adult content safely by choosing verified adult websites.
Opt for reliable sources for discreet entertainment.
my website :: best free porn videos
Banyak review nyebut sistemnya rapi.
Inhoud voor volwassenen is beschikbaar op verschillende adult websites voor vermaak.
Kies altijd voor veilige platforms.
Have a look at my blog post best free porn videos
Salam Gacor, lagi nyari situs slot yang gacor? Coba main di Bonaslot. Winrate tertinggi hari ini dan terbukti membayar. Deposit bisa pakai OVO tanpa potongan. Login disini: https://bonaslotind.us.com/# Bonaslot link alternatif salam jackpot.
Online slot oynamak isteyenler için kılavuz niteliğinde bir site: [url=https://cassiteleri.us.org/#]en iyi casino siteleri[/url] Nerede oynanır diye düşünmeyin. Onaylı bahis siteleri listesi ile rahatça oynayın. Tüm liste linkte.
Hər vaxtınız xeyir, siz də keyfiyyətli kazino axtarırsınızsa, məsləhətdir ki, Pin Up saytını yoxlayasınız. Yüksək əmsallar və sürətli ödənişlər burada mövcuddur. İndi qoşulun və bonus qazanın. Sayta keçmək üçün link: ətraflı məlumat uğurlar hər kəsə!
Salam dostlar, siz də etibarlı kazino axtarırsınızsa, mütləq Pin Up saytını yoxlayasınız. Ən yaxşı slotlar və rahat pul çıxarışı burada mövcuddur. Qeydiyyatdan keçin və ilk depozit bonusunu götürün. Sayta keçmək üçün link: Pin Up rəsmi sayt uğurlar hər kəsə!
Manager reactions, touchline drama and post-match comments covered
塔尔萨之王第三季高清完整版,海外华人可免费观看最新热播剧集。
I am regular visitor, how are you everybody?
This article posted at this site is in fact good.
BNT Appliances supported fridge repairs mitchells plain and kept me informed.
Betting odds, bookmaker lines and value picks for matches
BNT Appliances helped with stove repair cape town and gave practical advice.
Hi, I wanted to share a great international pharmacy where you can buy medications online. If you are looking for safe pharmacy delivery, this store is very good. They ship globally and no script needed. Link here: check availability. Thank you.
Greetings, Just now came across a useful website for affordable pills. If you want to buy cheap antibiotics without prescription, this site is highly recommended. It has fast shipping worldwide. Check it out: [url=https://indiapharm.in.net/#]order medicines from india[/url]. Hope it helps.
Hi, I recently discovered a useful online drugstore for purchasing prescription drugs cheaply. If you need cheap meds, this store is very good. Secure shipping plus it is very affordable. Visit here: [url=https://onlinepharm.jp.net/#]cheap pharmacy online[/url]. Sincerely.
Hi there! I could have sworn I’ve been to this site before
but after checking through some of the post I realized it’s new to me.
Nonetheless, I’m definitely delighted I found it and I’ll be
bookmarking and checking back often! 懂边界,才是顶级职业素养
真正的顶级外围,不是“越界”提供更多,而是恰到好处地“守住边界”。她知道什么时候该热情,什么时候该克制;知道哪些话题可以深入,哪些问题永远绕开;知道今晚结束时,应该体面地离开,而不是制造尴尬的延长。
2026年的广州,这一点尤其重要。成功人士最厌倦的,往往不是付费本身,而是被道德绑架或情绪绑架的感觉。真正的高端,是双方都心照不宣地享受当下,然后各自回到原本的人生轨道。懂边界的人,才配得上被反复预约。(约299字)
文章8:异地出差,为什么越来越多人首选广州
北京、上海、深圳……一线城市出差机会多,但真正让商务人士反复念想的,却往往是广州。
除了美食与气候,更因为这里有一批极懂“拿捏分寸”的高端陪伴。她们熟悉这座城市的每一个角落,能带你去最地道的私房菜,也能陪你坐在珠江边喝最贵的威士忌。最重要的是,她们懂得出差男人的那点小心思:想要放松,又不想留下任何痕迹。广州,因此成为越来越多人的“情绪充电站”。
广州外围高端模特电话微信
Hi all, I recently found an amazing source from India for affordable pills. For those looking for cheap antibiotics cheaply, this store is worth checking. You get wholesale rates to USA. Take a look: [url=https://indiapharm.in.net/#]India Pharm Store[/url]. Best regards.