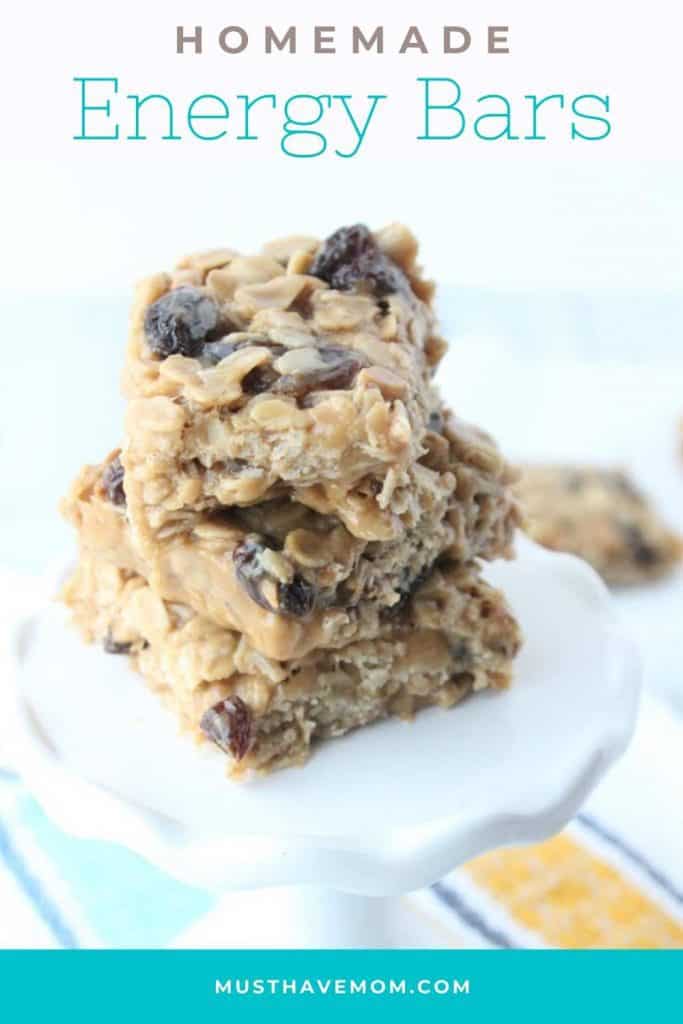
Energy Bar Recipe
This energy bar recipe was given to me by my mother-in-law and they are SO tasty! The perfect homemade energy bars to bring along on a road trip or outing with the kids. The whole family loves them!
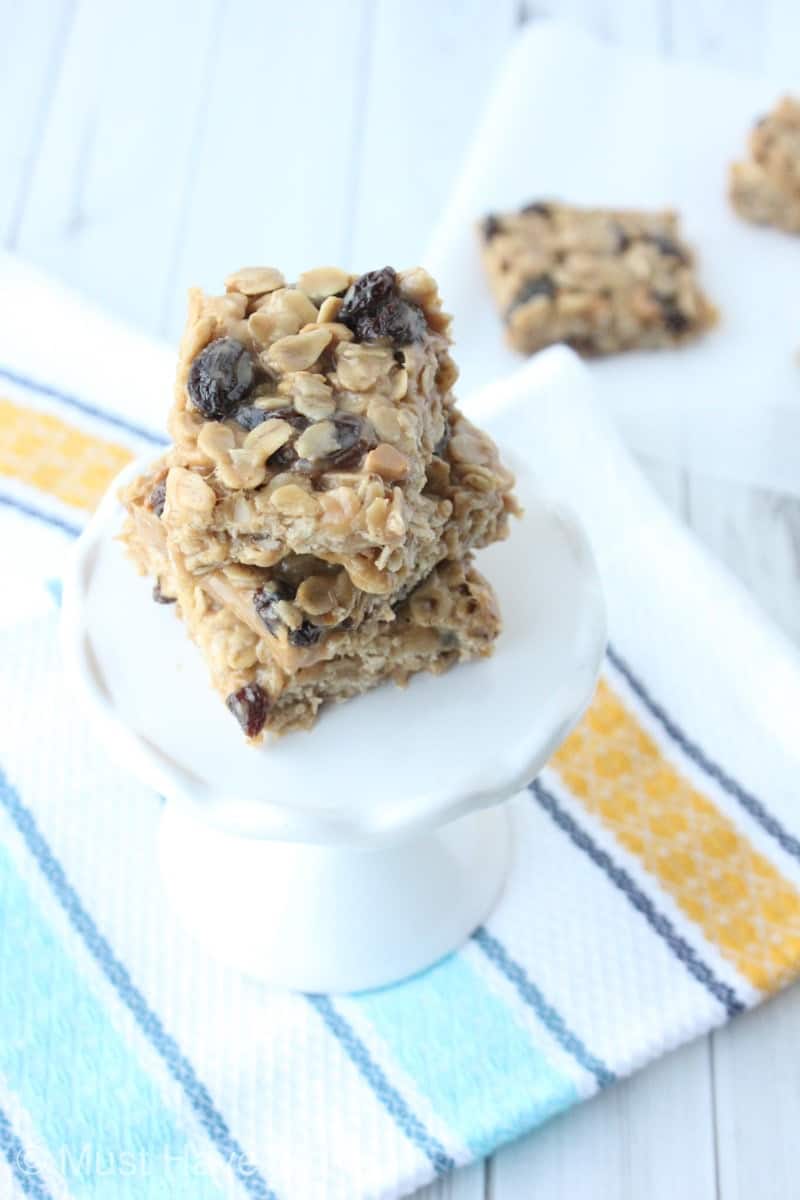
We love easy homemade snacks! We whip up a batch of these energy bars along with our favorite homemade cheese cracker recipe and we feel so spoiled! These don’t take long to make and I find they also don’t last long in our house. If you aren’t fast the whole family will eat them all before you get one!
Energy Bar Recipe
I find the biggest expense in our grocery bill tends to be snacks, especially in the summertime or back to school. With four kids, we go through a lot of snacks. Making them yourself not only delivers better ingredients but also cost savings when it comes time to checkout at the grocery store.
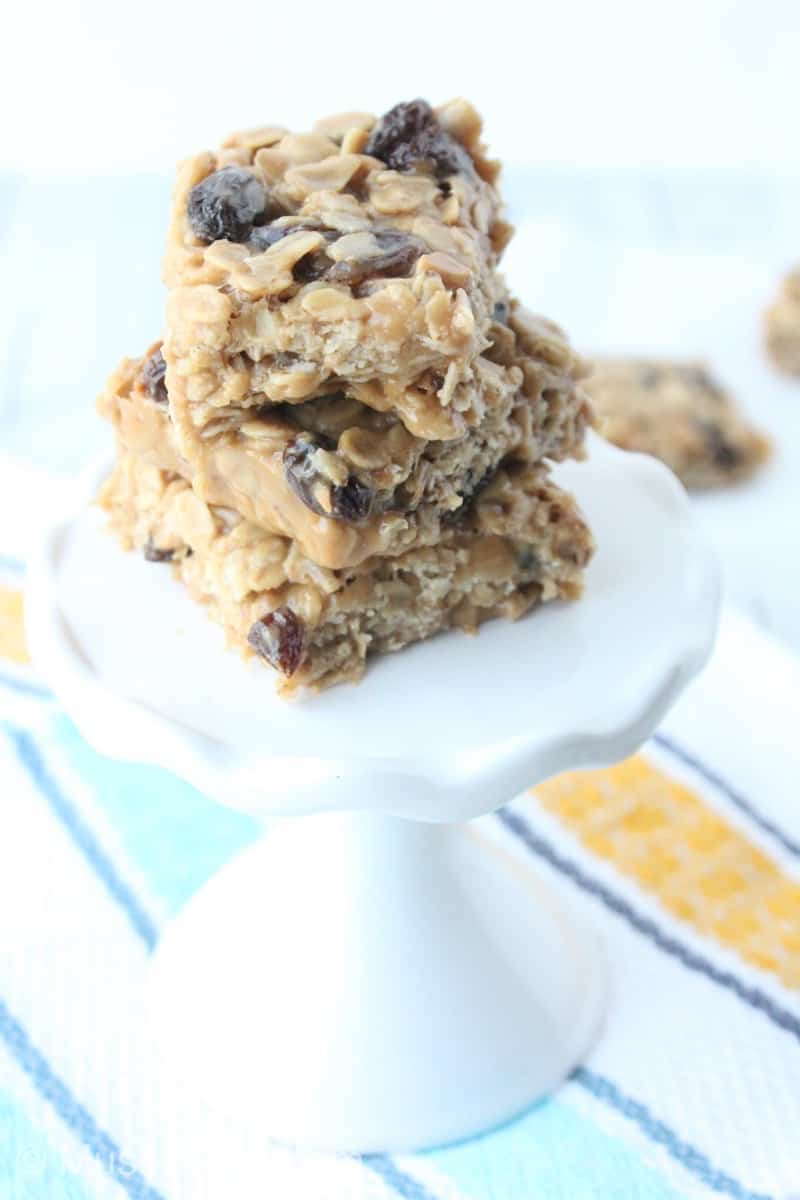
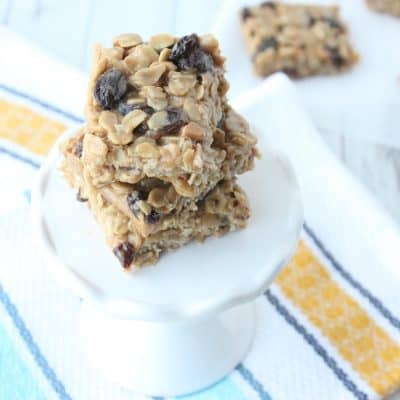
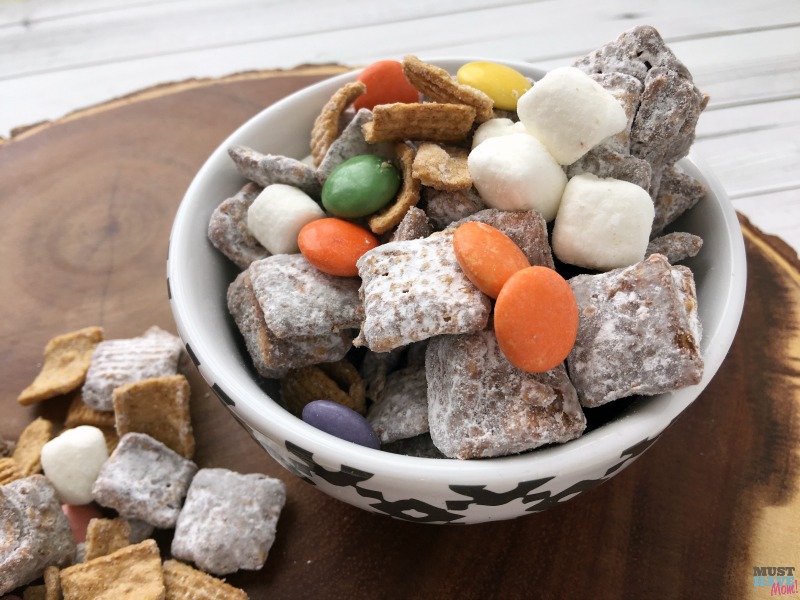
This energy bar recipe has been a favorite in our family for at least a decade. My mother-in-law first made them for us and they are SO good that kids and adults love them. They are a great snack to bring along on a road trip, day on the lake or picnic. They are also great for school lunches and grab and go snacks.
This is a no bake energy bars recipe and comes together quickly so it’s no sweat to whip up a batch.
I’ll show you step by step how to make these delicious, gooey bars of goodness!
How To Make Homemade Energy Bars
Making these homemade energy bars is SUPER simple! I’ll show you every step!
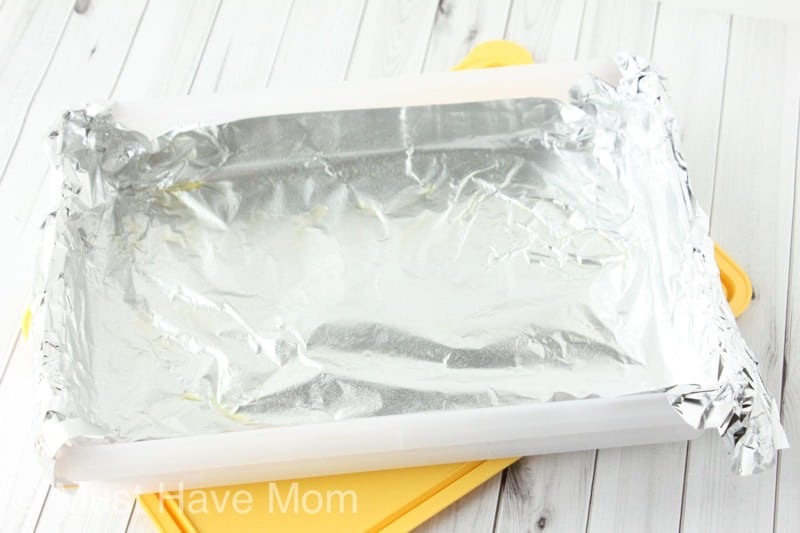
Start by lining a 9″ x 13″ pan with foil and grease it. I use olive oil spray to grease mine. The foil helps be able to lift the bars out of the pan and slice them up easily.
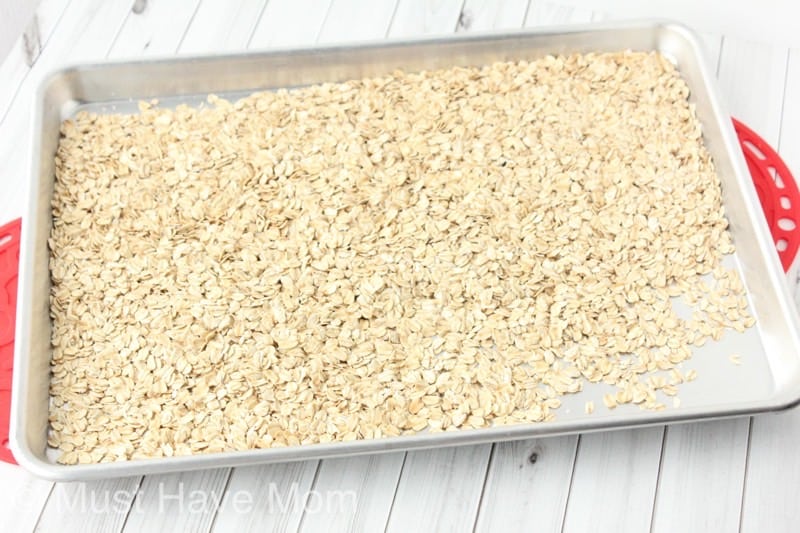
Then, you need to toast the oats. To do this simply put the measured oats on a shallow baking sheet and toast them in a preheated oven until they start to turn golden brown.
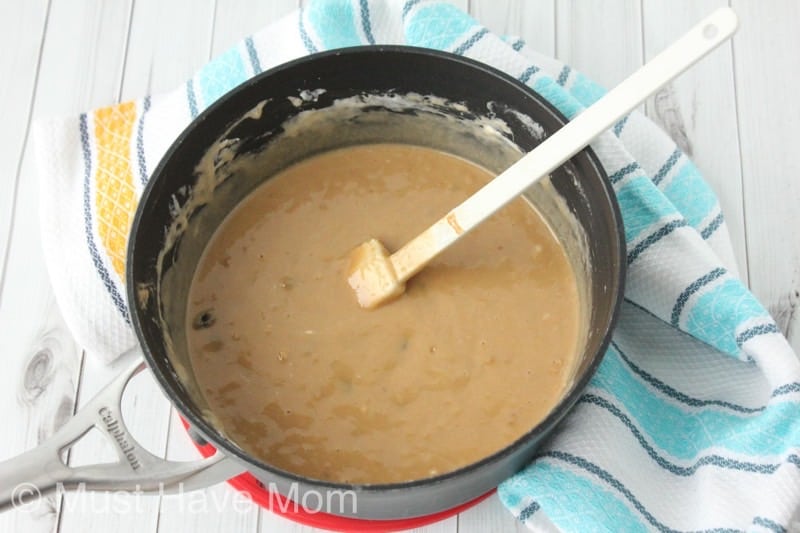
While the oats are toasting I begin melting together the ingredients. In a saucepan over LOW heat melt together the remaining ingredients, except the raisins until it looks like the photo above and is all melted together.

Then add in the oats and raisins and mix together well.
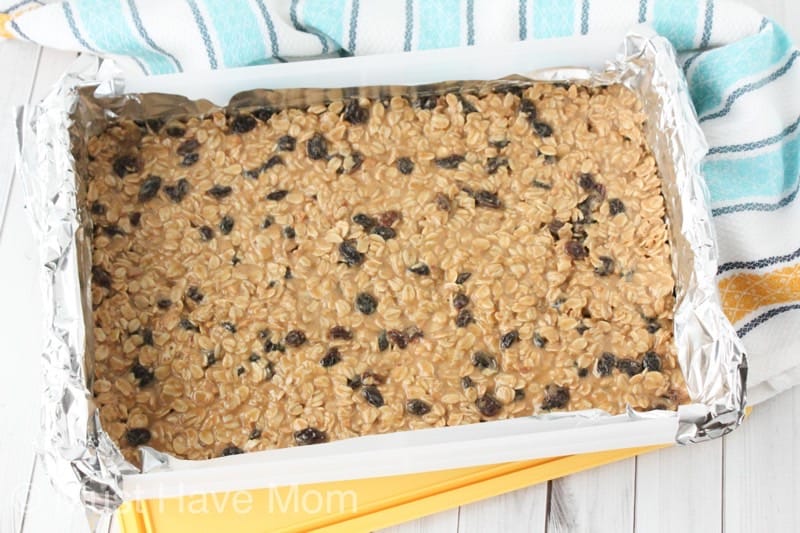
Next, press the mixture into your greased pan. Use a piece of saran wrap or parchment paper to press the mixture down into the pan firmly so it is packed together.
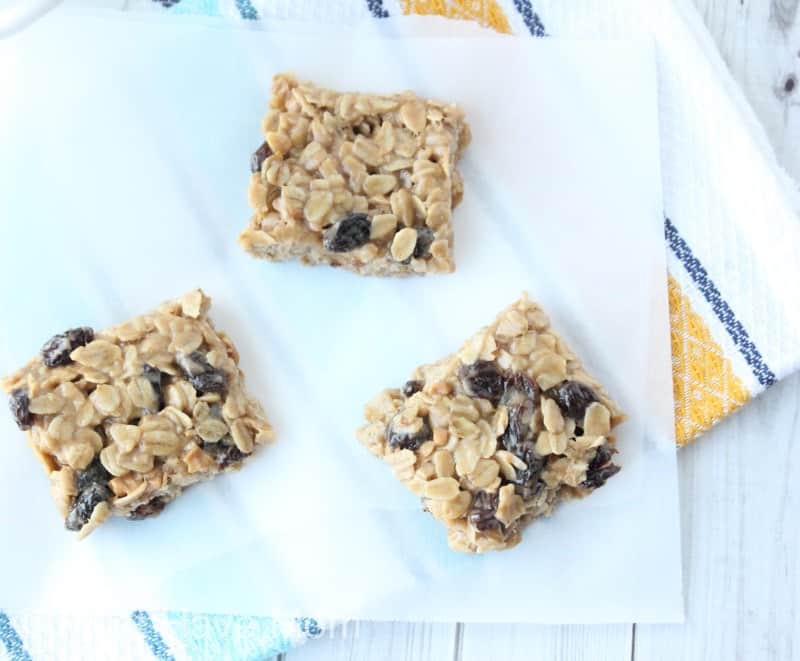
Allow the mixture to cool completely and then slice the energy bars into squares.
Store the energy bars in a cool place in a covered container. They do not need to be refrigerated.
Energy Bar Recipe
Print the energy bar recipe below.
Energy Bar Recipe
Ingredients
- 4 cups old fashioned oats uncooked
- 6 cups mini marshmallows
- 1 cup chunky peanut butter
- 1/2 cup honey
- 6 tbsp butter
- 2 cups raisins
Instructions
- Toast oats in a shallow baking pan in a preheated 350 degree F oven for 15 minutes or until golden brown. Remove from oven and allow to cool.
- Line a 9" x 13" pan with foil and grease the foil. Set aside.
- In a medium saucepan over low heat melt together mini marshmallows, peanut butter, honey and butter.
- Once mixture is completely melted, add toasted oats and raisins and mix together. Pour mixture into prepared pan and use parchment or plastic wrap to push down on the top and tightly pack the mixture into the pan. Allow to fully cool.
- Slice into squares. Store in a covered container in a cool area.
Pin Energy Bars Recipe
gonna try this recipe soon as we love to take little snacks that offer burst of energy with us on road trips
thanks for sharing come see us at http://shopannies.blogspot.com
Reducing food waste while getting fresh groceries delivered to your door is an easy way to stretch your budget and help the planet at the same time. Misfit veggies and slightly odd-shaped fruits taste just as good, and creative pantry staples keep meals interesting. If a box goes missing or an item isn’t right, many customers don’t hesitate to contact misfits market for fast help tweaking an order or setting up a refund.
You’re so right—snack costs can really add up, especially with kids around! Making your own is a great way to save money and ensure better ingredients. If you’re into DIY snacks and want a convenient way to explore more recipes and ideas, check out this helpful Android APP
that offers inspiration and easy solutions right from your phone!
This homemade energy bar recipe is a great way to keep snacks both healthy and tasty, especially for busy days. If you’re also looking for easy access to useful apps and downloads, APKVOLO is a reliable place to explore.
Love how simple and family-friendly this energy bar recipe is! It’s the kind of healthy snack that fits perfectly into a busy lifestyle without compromising taste. Just like optimizing performance using a bottleneck checker, it’s all about balancing the right ingredients for smooth results. Definitely trying this one for my next hike or workday snack prep!
Spotify Lite MOD APK is a powerful music streaming app offering premium features for free. With ad-free playback, offline access, unlimited skips, and high-quality audio, it ensures a smooth, personalized, and uninterrupted listening experience for music enthusiasts worldwide.
CapCut MOD APK is a feature-rich video editing app designed for both beginners and professionals. It provides all premium features for free, including watermark-free videos, ad-free editing, and advanced AI tools. With options like background removal, auto-captions, and multi-layer editing, users can create high-quality videos effortlessly. Its creative filters, templates, and 4K export support make it an essential tool for vloggers, influencers, and video creators seeking professional results on mobile.
CapCut MOD APK is an outstanding app for seamless video editing. It unlocks premium features like watermark-free exports, ad-free interface, and smart AI tools. With options for transitions, effects, and background removal, it lets users craft professional-quality videos easily. Ideal for influencers, vloggers, and anyone passionate about creative video production.
This energy bar recipe looks amazing—perfect for a quick and healthy snack before workouts or busy mornings. For those who enjoy discovering useful mobile apps related to health, fitness, and cooking, NEXTAPK is a great place to find the latest app versions safely.
You’re so right—snack costs can really add up, especially with kids around! Making your own is a great way to save money and ensure better ingredients. If you’re into DIY snacks and want a convenient way to explore more recipes and ideas, check out this helpful Android app that offers inspiration and easy solutions right from your phone!
Printed materials can look stunning, but the space where they’re displayed also matters more than people realize.
If you’re designing for exhibitions or indoor events, sound quality can affect how people experience the visuals.
You can try calculating reverberation time to better plan acoustics and ensure the environment complements your printed work perfectly.
Superb update! Really appreciate the improvements. For AI photo lovers, https://remineiapk.com/ is worth checking out — it refreshes faded photos and makes them look brand new instantly!
Your journey is so inspiring! As a creative mom myself, I love using PicsArt Premium APK to capture and beautifully edit family moments while balancing life’s chaos. Keep shining and sharing your story!
This energy bar recipe looks amazing! Snacks like these are perfect for long days, especially when you’re busy gaming or on the go. I often play Rope Hero, and having quick homemade energy bars is actually super helpful — keeps you fueled during those long missions and open-world action moments.
https://ropeheroapkdl.com/
Definitely trying this recipe next time I need a boost before jumping back into Rope Hero!
This Energy Bar Recipe looks fantastic — simple ingredients, wholesome flavors, and perfect for a quick boost during a busy day. I love how customizable it is, especially for people who want healthier snack options without all the processed stuff.
By the way, tools like this text generator really help when you’re organizing or styling content for recipe blogs, labels, or digital notes. It’s a small addition, but it makes creating neat, eye-catching text much easier.
Energy bars are a great homemade snack, packed with nutrients and perfect for on-the-go fuel. Making your own lets you control the ingredients and customize flavors to your liking.
Just like crafting the perfect recipe, ensuring your PC components work well together is essential for peak performance. This bottleneck calculator helps you check hardware compatibility easily and efficiently.
These energy bars sound perfect for busy days and family outings—simple, wholesome, and kid-approved is always a win. I love recipes that don’t require much time but still feel homemade and nourishing. Definitely the kind of snack summertime saga pc download that disappears fast once everyone finds out about it. Thanks for sharing a tried-and-true family favorite!
Also spiele auch du kalkuliert und mit smarten Twist-Einsätzen, damit du dich mit etwas Glück umso mehr
freuen kannst! Oftmals versprechen Online Slots
mit Früchten einfaches Spielvergnügen, und viele dieser Slot Machines
ermöglichen mit etwas Glück Freispiele oder auch
einen Jackpot. Bitte spiele verantwortungsvoll, da Glücksspiel süchtig machen kann und versichere dich, dass die Online Casinos deiner Wahl sicher und lizenzierte Anbieter sind.
Doch auch für Liebhaber verschiedener Tisch- und Kartenspiele kommen auf ihre Kosten. Es gibt eine große Auswahl der besten Novoline Spiele wie Book of Ra, Sizzling Hot Deluxe und Dolphins Pearls bei Gametwist.
Es ist schließlich eine reine Spielgeldplattform – hier gibt es kein Konto wie bei Online Casinos und das wird auch so kommuniziert.
GameTwist ist kein Online Casino, sondern eine Plattform, auf der mit Spielgeld gespielt
wird. Book of Ra ist mit Abstand das bekannteste und beliebteste Spiel aus der Novoline Reihe und hält auch Free Spins für euch bereit.
Einer der beliebtesten angebotenen Slots beim Anbieter
ist Book of Ra. Rund 400 Slots stehen zur Auswahl, darunter der weltbekannte Automat Book of Ra,
die beliebten Spiele Lord of the Ocean und Faust oder der Klassiker
Sizzling Hot deluxe. Im Diamond Rang – dem höchsten Level – werden Spielern beispielsweise jeweils
am 20.
Gametwist wurde von der Funstage GmbH, einem Unternehmen der Novomatic-Gruppe,
ins Leben gerufen. Das Gametwist Casino ist schon lange kein Geheimtipp mehr.
Und im Freispiel-Feature gibt’s noch mehr charmante Bonus-Features in der Hit-Zone.
Auf die traditionelle weiße Toga wird hier verzichtet – stattdessen trägt der amerikanische Amor Latzhose und Baseballkappe.
Wie wäre es etwa mit dem kultigen Spielautomaten Book of Ra oder einer
anderen Slot Machine aus unserer vielfältigen Spielothek?
Wenn du Book of Ra bereits perfekt beherrscht, hast du in unserem Casino die Möglichkeit, zahlreiche andere Spiele zu testen!
References:
https://online-spielhallen.de/1-go-casino-bonus-sicherheit-spiele-2025/
These no-bake energy bars look perfect for busy families simple, wholesome, and great for road trips. In El Salvador, we have our own quick grab-and-go classics like *tostadas con miel* or *semita*, proving that homemade snacks always hit different. https://allthingselsalvador.com/el-salvador-food
Loved the tip about balancing complex carbs with healthy fats to keep energy steady instead of spiking. I’ve noticed that when I pair homemade energy bars with better sleep timing, recovery and focus improve a lot—tools like Click here can be helpful for figuring out optimal sleep windows around training or busy days.
Energy bars are a great example of how the right fuel can improve performance and endurance. That same idea applies to the Hill Climb Racing game, where smart upgrades and balance help you go farther on tough tracks. It’s interesting how preparation—whether in real life or gaming—plays such a big role in success.
Discover the secrets of 999,999,999,999,999,999,999 with our full breakdown of its prime factors,
divisors, and mathematical properties… This visualization shows the relative proportions of its 7
prime factors (outer circle), plus the relationship
between these and its 256 divisors. You could say that a number
is made or ‘composed’ of its prime factors. Its factors,
divisors, and base properties can show some
interesting behavior.
It has a total of two hundred fifty-six divisors.
It is composed of seven distinct prime numbers multiplied together.
References:
https://blackcoin.co/2_top-5-high-roller-online-casinos_rewrite_1/
Perhaps most importantly, Aussie punters appreciate clarity around
deposit and withdrawal processes. Moreover, there’s a sense of
community here—some tournaments and promotional events allow players to see where they stand on leaderboards, reminiscent of a friendly competition among mates.
Whether you love high-volatility games or just a quick spin on classic three-reel
slots, you’re likely to find a title that sparks joy.
If you’ve ever yearned for the buzz of a physical casino—flashing lights, the clack of chips, the
hum of conversation—live dealer games come pretty close.
Many king billy casino login pages will feature a cashier
section with estimated time frames for different payment routes, so you can gauge which method suits your needs best.
King Billy casino reigns supreme as a premier destination for Australian players seeking exceptional gaming in 2025.
This diversity delivers over 2,000 online pokies Australia
players love, spanning classic slots, megaways mechanics,
progressive jackpots, and innovative features.
The first deposit bonus delivers 100% up to AU$500 plus 200 spins on Book of Dead, with subsequent deposits offering reload bonuses
that boost your bankroll substantially.
online betting with paypal winnersbet
References:
https://ajira-hr.com/employer/best-real-money-online-pokies-in-australia-for-december-2025/
australian online casinos that accept paypal
References:
dodo00.dothome.co.kr
These homemade energy bars sound perfect for busy days and family trips—simple ingredients and quick prep are always a win. I like recipes that are flexible and actually get eaten, not ones that sit around forever. Making snacks at home also makes it easier to balance taste and nutrition. It’s similar to how I approach performance cpu bottleneck calculator planning on —keep things simple, efficient, and well-balanced so nothing slows you down unnecessarily. Definitely saving this idea for a road trip snack. Thanks for sharing such a practical recipe!
These energy bars sound absolutely perfect for busy days! I love that they’re no-bake and made with simple ingredients—huge win for families, especially during summer and back-to-school season. Toasting the oats first is such a great tip for extra flavor, and I can totally see why they don’t last long in your house 😄 They seem ideal for road trips, school lunches, or quick grab-and-go snacks.
I also appreciate how cost-effective homemade snacks like this can be compared to store-bought bars. Definitely adding this recipe to my regular rotation.
For those moments when you finally sit down with a snack and need to unwind, I’ve been enjoying story-driven apps like Summertime Saga on iOS as a fun way to relax:
https://summertimesagasdl.com/summertime-saga-ios/
Thanks for sharing such a family-friendly recipe—this one’s a keeper!
Mobile access is extremely important for me. bc game in works отлично on smartphones, with fast loading and intuitive controls. I can play anytime without losing functionality compared to desktop. For users in different regions of India, where mobile gaming is very popular, this flexibility makes the platform especially convenient.
Love the positive message about attracting love in 2026! 💖 Self‑care is an important part of that journey, whether it’s nurturing your mind or treating yourself. Knowing McDonald’s ice cream costs https://mcdonalds-menu.co.za/ ahead of time can help you plan small, affordable indulgences (like a classic cone after a walk with someone special) without stress.
Love the uplifting message about attracting love and embracing connection in 2026! 💖 And part of showing up fully for yourself and others can be enjoying little moments of joy — like checking Llaollao menu prices in Indonesia https://llaollao-menu.com/llaollao-menu-prices-indonesia/ so you can plan a fun, refreshing frozen yogurt treat with someone you care about.
Love the inspiring message about attracting love and connection in 2026! 💖 Part of building meaningful moments can be sharing good food together — like planning a cozy outing over Tim Hortons meals, https://timhorton-menu.co.uk/ whether it’s breakfast sandwiches, hearty lunch options, or a comforting coffee date.