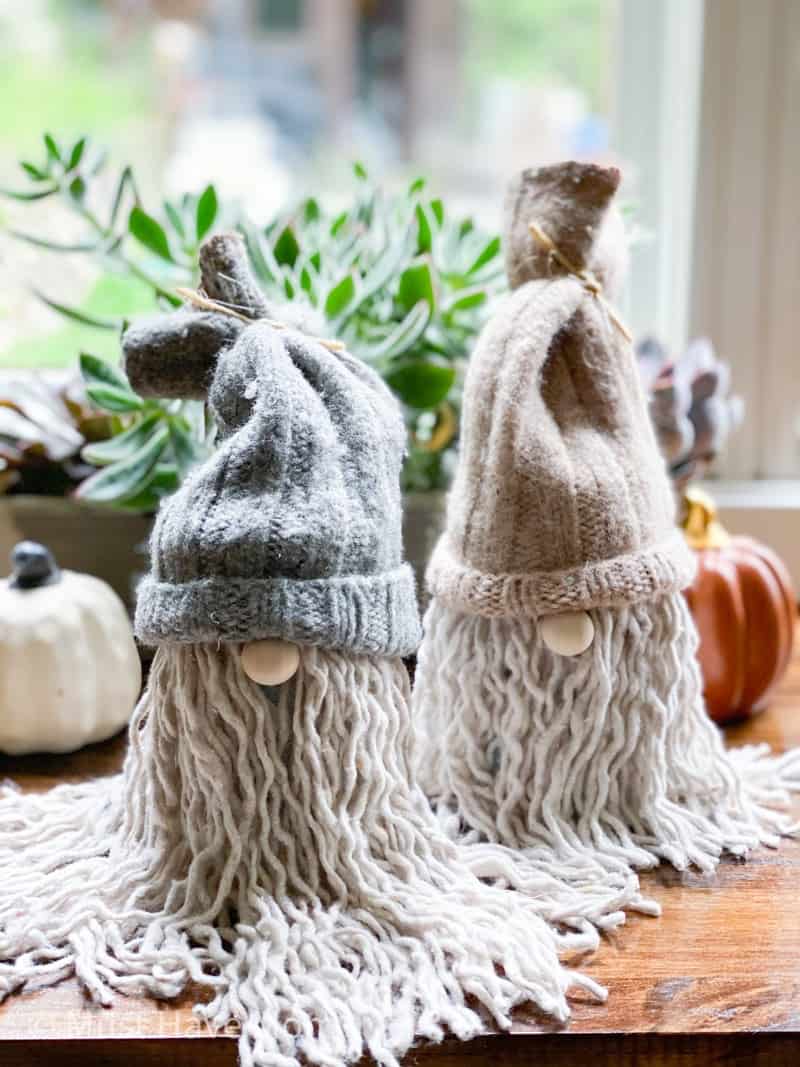
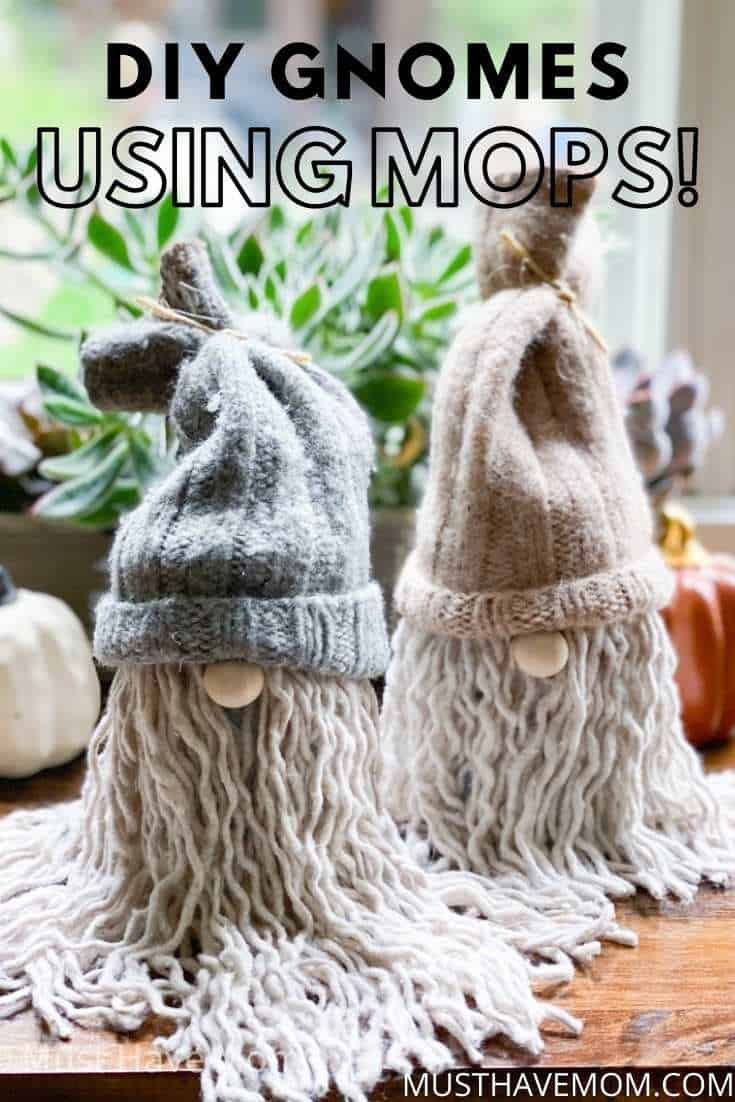
DIY Gnome
Make an adorable DIY gnome using supplies from Dollar Tree! These Dollar Tree gnomes are inexpensive but look high end! Plus, they are SO easy to make.
I love inexpensive dollar store crafts that look high end. It allows me to decorate my home on a dime and no one ever knows the difference between my inexpensive crafts and the expensive decor at boutique stores. In fact, I usually get more comments on my crafts because they are unique and unlike the products everyone else is buying! I love these dollar store farmhouse signs I made and this farmhouse sink caddy is a favorite too!
How To Make A Gnome
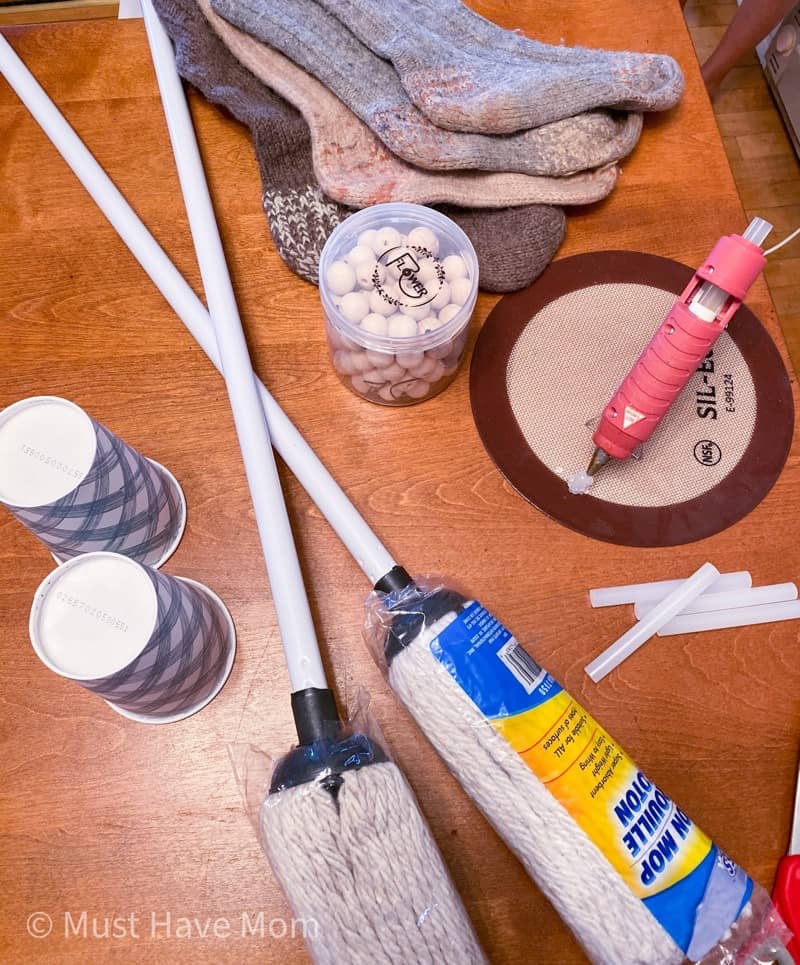
These gnomes are SO easy to make and super inexpensive too! Here are the supplies you’ll need to make your gnome:
- mop (cleaning aisle at Dollar Tree)
- foam cylinder or tall paper cup
- glue gun and hot glue sticks
- wood bead (I used these)
- wool sock
- twine
- scissors
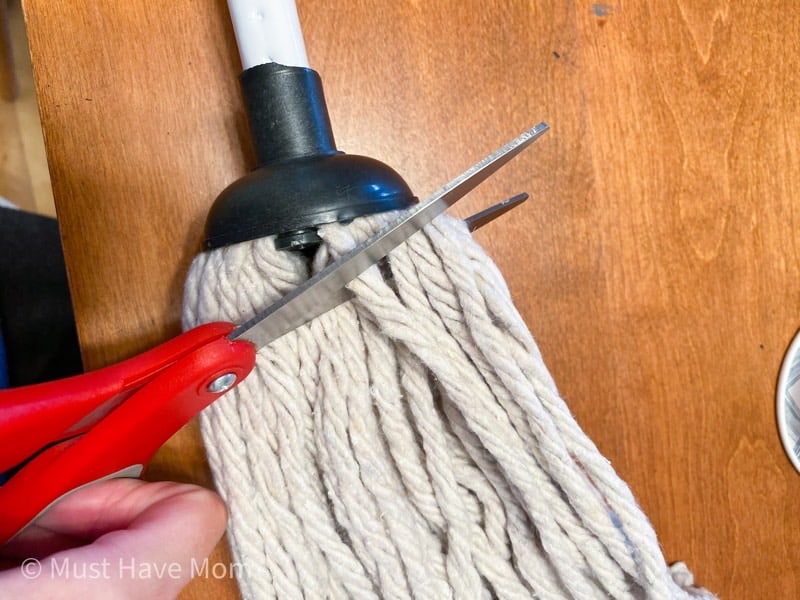
Begin by cutting the mop strings off the mop as close to the top as possible. Cut all the strings off. You can toss (or repurpose) the mop handle, we do not need it for this craft.

Next, use your glue gun to glue the mop strings around the top of your foam cylinder or paper cup (turned upside down). Continue all the way around the cylinder/cup.

Put an extra bead of glue across the top of the strings as well. This helps hold them in place when we unwind them.
Now unravel each string so they are each an individual string. They will start looking more like a gnome beard now!
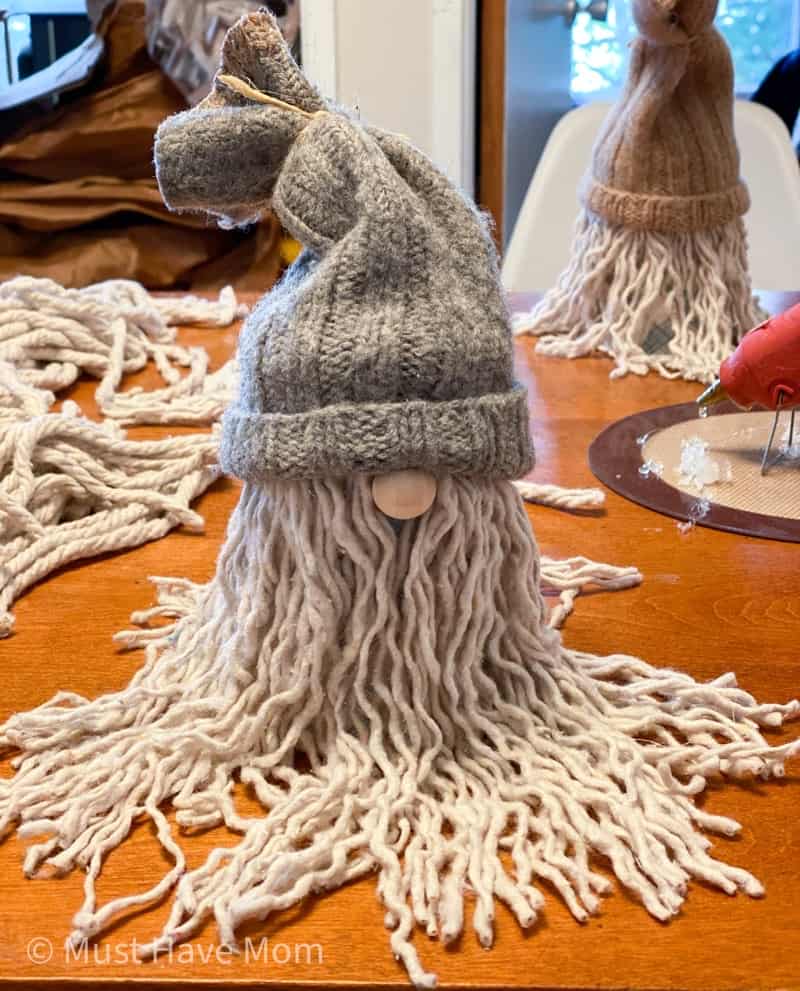
Next, use the hot glue gun to glue the wood bead on near the upper half of the gnome. Leave enough space to put his hat on so it will rest on the nose. My wood beads had a hole in them so I faced the hole so it was up and down instead of side to side so you can’t see it (the hat covers it and the bottom doesn’t show). Arrange the beard around the nose.
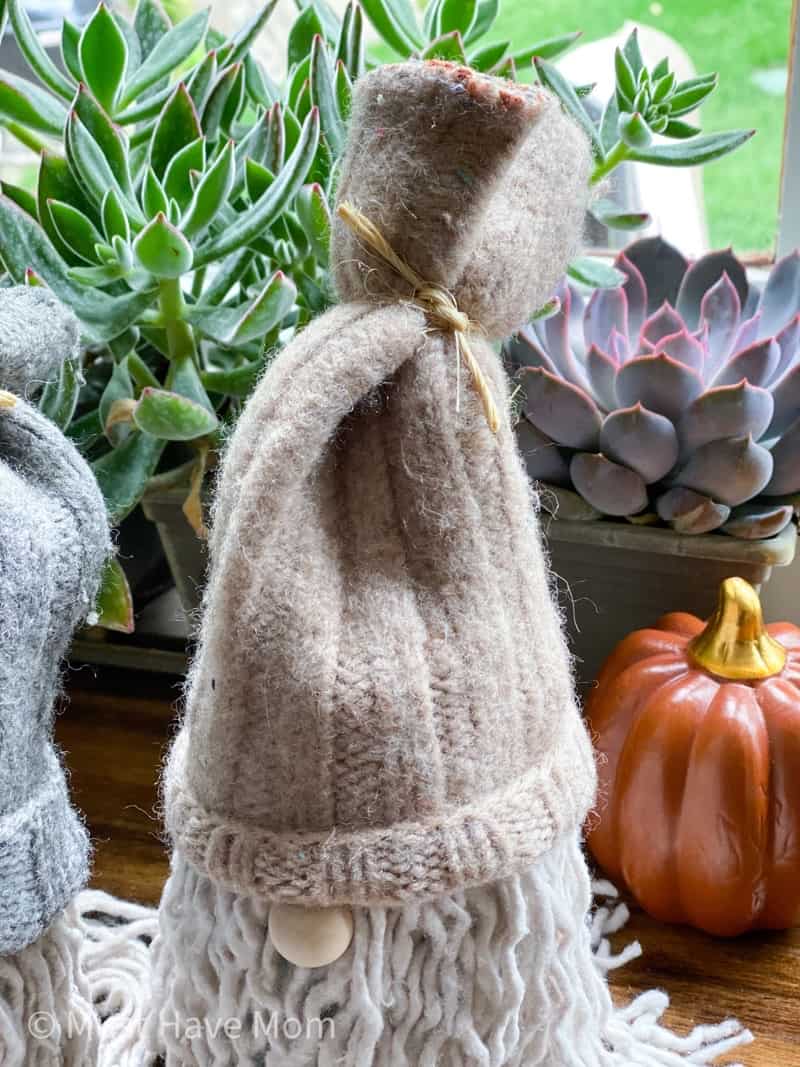
We scored a box of old wool socks at a garage sale for free so we used those for our gnome hats. Cut the sock in half at the heel. Turn one side up to form the hat’s brim. Place the hat on the gnome.
Use your twine to tie the top of the hat.
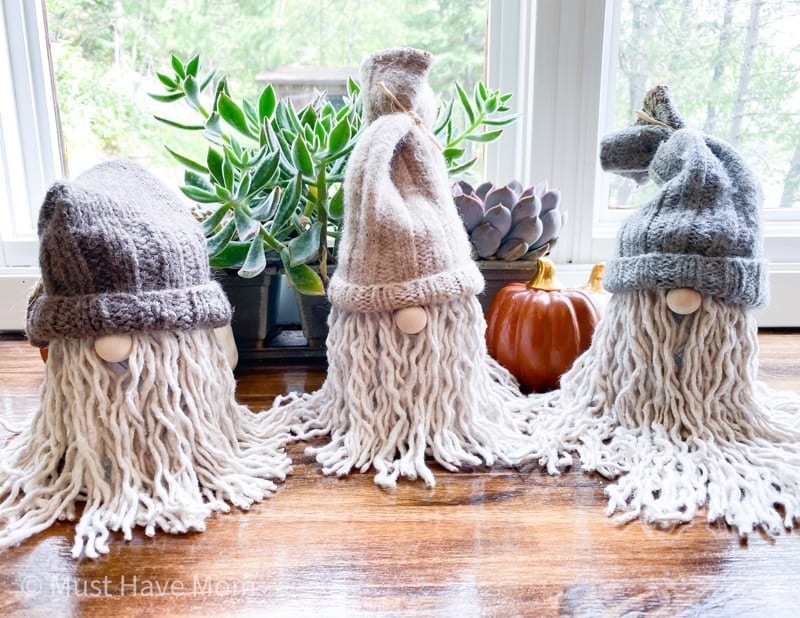
You’re done! These Dollar Tree gnomes are so adorable I guarantee you won’t be able to make just one! Thankfully, they are so inexpensive that you can make several of them without breaking the bank.
Pin DIY Gnomes
So darn cute. I love them
Thank you!
Great craft. One tip : you can pop of the head of the mop without cutting the string.
Adorable. I used what I had laying around. A pickle jar, an old work sock and stuffing from an old pillow.
Loved making these. We added additional cups glued together the make them taller. Also added a 2nd layer of mop strands to make fuller and cover the cup better. On one we slipped a sock over the cup for a sweater look. Thanks for the post.
Hello, do you have a picture of your Gnomes??? I go away every March for a weekend with my friends from High School and we are always looking for a new craft idea. This sounds so easy and inexpensive.
Thank You So Much for Sharing
I do Appreciate You, You make them look so easy to make and Just Adorable.
You Did Good !
Thank you!
I can’t wait to make one thanks for posting
These for fun I’m pretty easy way to look as nice as yours but I do like them I think they arecute.
What size paper cups do you recommend? I can’t wait to make these cuties!!
The to-go coffee cups are a good size! The medium size. Not sure how many oz that is maybe 16?
Me encanta la idea, muy fáciles de hacer. Mañana intentaré hacer mi primer gnomo. Creo que pondré tela o fieltro de color rojo o gris forrando el bote o el vaso, para que parezca la ropa. Gracias por compartir y por las explicaciones.
I would love to make these as favors for a party of 8. How many mops should I get? So, how many gnomes do you get from a DT mop? Thank you for posting!
Generally you can stretch it and get 2 gnomes from one mop. Have fun!
Love, love, love your gnomes!!! Can’t wait to make them.
awe thank you so much!
Sarah I have a gnome obsession and these are beyond adorable! I pinned and will have to try your DIY
Haha so do I!!
These are just adorable!! And I really can’t believe how easy they are to make. I have pinned these, so I can have a go at making my own.
Thank you! Yes so easy!!
These are so adorable and easy to make . do you have a instruction list to make a gnome as a front door hanging made with thee mop head. thanks so much
Thank you! No, I don’t have a front door hanging instructions. I will have to consider making one!
Hi , these are so cute ,, would you have a step by step instructions sheet that I could follow, for my craft friends
Thanks Sharen
Thanks Sharen! I’m glad you enjoy them. I don’t have a printable sheet – just this post 🙂
I love gnomes and appreciate you sharing this tutorial so much. Pinned ????.
Visiting today from SSPS 277 #56&57
SUPER CUTE, Sarah!
We will be featuring you starting Wednesday at the Creative Crafts Linky Party! Pinned and shared!
Creatively, Beth
I want to make a black beard for someone, should I dye the mop or use spray paint?
Tischspiele in Beep Beep unterscheiden sich von klassischen Slots durch
das Vorhandensein von Tischen, wie in Casinos. Der Automat öffnet sich mit virtuellem Geld, mit dem Sie Freispiele machen können. Es bietet die meisten Spiele der Bibliothek, die sowohl kostenlos als auch um
echtes Geld gespielt werden können. Alle Ergebnisse, die
in den Maschinen erhalten werden, sind zufällig, und sie werden nicht von der Spieleinrichtung beeinflusst.
Es genügt, die ersten Buchstaben des Namens einzugeben,
und das System wird die verfügbaren Optionen anbieten. Die Gaming-Plattform bietet Spielern nur lizenzierte Slots, die von Glücksspiel-Regulierungsbehörden auf Sicherheit geprüft werden.
Unser Kundenserviceteam steht rund um die Uhr zur Verfügung,
um Anfragen auf Deutsch zu bearbeiten, und ist bestrebt, Unterstützung zu bieten, um
Ihr Erlebnis zu verbessern. Wir setzen uns für verantwortungsvolles Spielen ein, indem wir verschiedene Unterstützungswerkzeuge anbieten, wie z.
Entdecken Sie unsere riesige Sammlung von Spielautomaten online, die Slots mit hoher RTP
und aufregende Jackpot Spiele, einschließlich progressiver Jackpots, präsentieren. Unser Kundenservice steht rund um
die Uhr auf Deutsch zur Verfügung, damit Sie jederzeit
Hilfe erhalten, wenn Sie sie benötigen. Erleben Sie eine umfangreiche Auswahl an Spielen von angesehenen Entwicklern, darunter hoch RTP Slots, klassische Tischspiele wie Roulette und Blackjack sowie ein aufregendes
Live Dealer Casino.
References:
https://online-spielhallen.de/casino-bregenz-login-ihr-zugang-zum-glucksspiel-erlebnis/
Understanding how King Billy Casino compares to other platforms helps you make informed decisions about where
to invest your gaming time and money. Every support interaction is logged and monitored
for quality assurance, ensuring that we continuously improve our service and maintain the high standards our community expects.
King Billy Casino delivers financial freedom through payment options that adapt to your unique banking preferences and lifestyle, ensuring
your gaming momentum never stops due to banking constraints.
Your VIP journey is supported by a dedicated team that monitors your progress
and ensures you receive every benefit you’ve earned, creating a personalized experience that makes you feel valued and appreciated.
The VIP Express option represents our commitment to recognizing high-value players immediately, allowing you to reach Duke/Duchess status through a single $1,
000 qualifying deposit.
Sometimes you mistype your password, sometimes your internet decides to hiccup at the worst moment, and sometimes you just can’t
remember which email you used to register. Once you’re in, the platform takes you straight to
your personalized dashboard. King Billy Casino offers social media login options that can save you precious seconds.
The standard login route is pretty straightforward. No complicated forms or endless security checks
– just enter your details and you’re in. Getting into
your King Billy Casino account takes just seconds.
Every login at King Billy Casino brings you back into a world built for your enjoyment, security, and success.
Every security event is meticulously logged with detailed information, ensuring
complete transparency and giving you the data needed to understand and address any potential issues.
King Billy Casino employs a vigilant and continuous monitoring system for all login activities,
serving as your proactive shield against suspicious behavior and potential security threats.
References:
https://blackcoin.co/list-of-casinos-in-brisbane/
First, you have to Rocketplay register, then select a comfortable payment option and make your
initial deposit, which must be at least 20 AUD.
Additionally, there are several chances to win prizes thanksto the Rocket casino bonus promos.
3,900 games from 46 reliable sources that arewell-known for their excellent quality
and solid reputation are availableon the website. In just a few years, the global gaming platform RocketPlay has
becomequite well-liked by gamers. From free spins to the most attractive bonuses,
Keith is the mastermind behind every detail.
The best online casinos in Australia feature thousands of
pokies in addition to blackjack, poker, baccarat, roulette, craps, specialties, and classic
card games. The best online casinos are transparent, user-focused, and consistently deliver a great experience — just like Rocketplay.
A solid online casino should also reward regular players with VIP perks, cashback,
and reload bonuses. Many online casinos claim to
be “the best,” but Rocketplay is quickly proving itself with real features
Aussie players care about.
The best Australian online casinos share several characteristics, but the best of them provide all the following.
We’ve investigated and reviewed the top online
casinos in Australia to give you a sense of what to expect.
For details search rocketplay no deposit bonus and the full Bonus T&C in your profile.
References:
https://blackcoin.co/woolworths-canterbury-street-casino-nsw/
online australian casino paypal
References:
classifylistings.com
online casino real money paypal
References:
centerdb.makorang.com