Christmas Rock Painting Ideas
These rock painting ideas for Christmas are easy enough for kids to do but look adorable and can be customized however you like! We have step by step directions so even a beginner can do these easy rock painting ideas!
Rock painting has become more and more popular in recent years and is a really fun craft for kids and adults alike. You can decorate with them, add them to potted plants or even hide them as kindness rocks! No matter what you do with the finished rocks, you are sure to enjoy the process of creating them!
Christmas Rock Painting Ideas
My kids LOVE easy rock painting ideas for beginners so these Christmas rock painting ideas are made with that in mind. Kids can easily do them and you can even modify them to make them even easier for younger kids. These rocks are a ton of fun to create and we are incorporating these into our Christmas craft ideas for the kids this year.
Rock Painting Supplies
To make these Christmas painted rocks you’ll need the following supplies:
- Rocks (see tips below on where to find or buy your rocks)
- Pencil with eraser
- Paint pens (we suggest the Posca, Artistro, and Tooli-Art brands)
- Paint (acrylic paint)
- Paint brushes
- Sealant (I like Krylon UV Resistant Sealer)
- Glue
- Any fun decor that you’re gluing
Rock Painting Tips
- Rocks can be found outside but should not be taken from protected natural areas.
- If you are having trouble finding rocks, you can always purchase them on Amazon, a local garden center, or at a local landscaping company. They will usually sell them by the bucket-full.
- We do not recommend purchasing the smooth stones/river rocks from craft stores. They come with a coating on them and your paint/pen will not stick very well.
- Make sure your rocks are clean and free of debris before starting your art.
- If you need, you can lightly trace your design with a pencil first.
- If you plan on painting, acrylic paint works best.
- If you plan on using a pen for your art, you can use paint markers (we suggest the Posca, Artistro, and Tooli-Art brands), artist pens, gelly roll pens, markers, highlighters, etc.
- If you’d like to glue anything to your rocks, we recommend the E6000 brand. (Note: it is important to seal your rock with sealant prior to gluing items!)
- We also recommend sealing your rocks after you’ve finished decorating them. You can use whatever finish you’d like (glossy, matte, etc). These can be found online or in your local craft stores. Our suggestions: Rust-oleum and Krylon brands.
- Rock art is relaxing and fun. Let your imagination run wild!
How To Paint Rocks
Now let’s get to the fun part! You can use paint pens or paint to acrylic paint your rocks. We have step by step directions below for four different easy rock painting ideas for beginners that are Christmas themed.
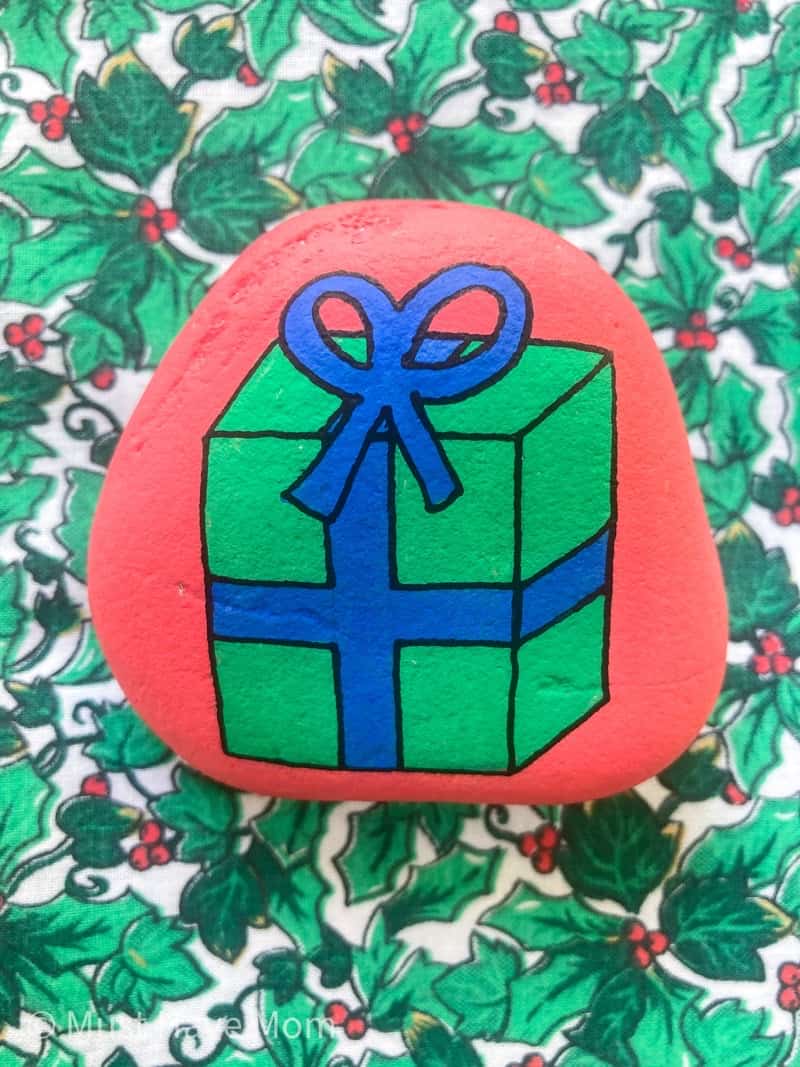
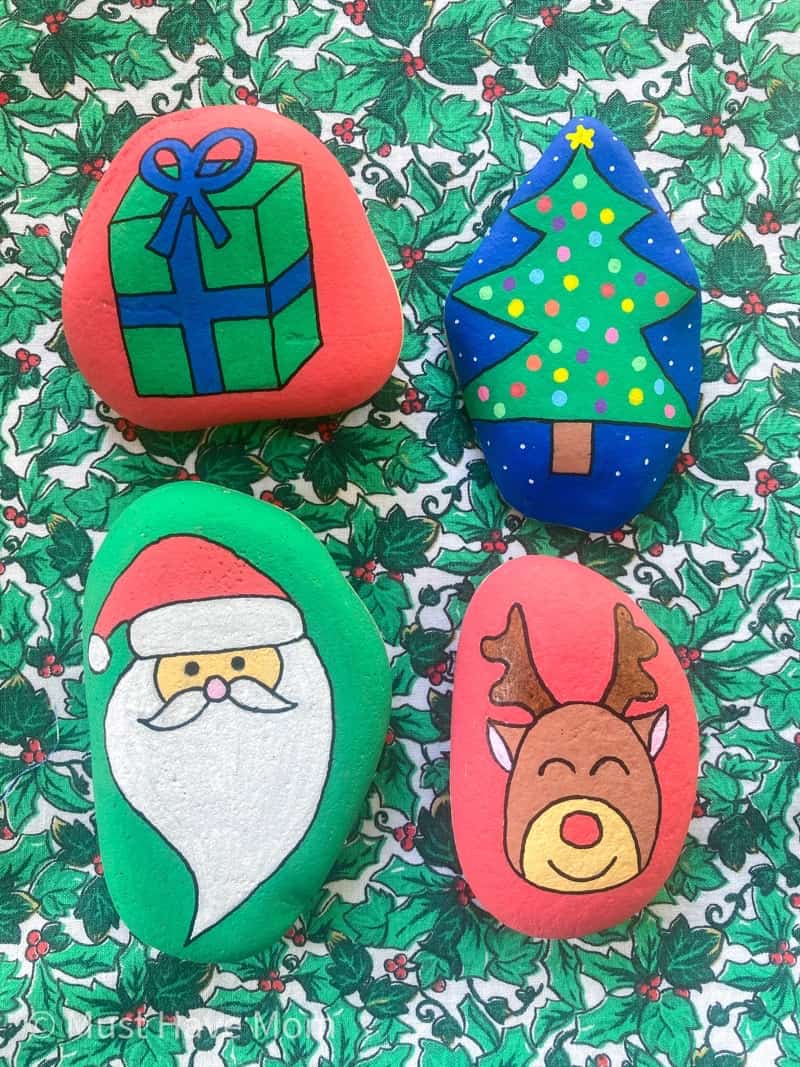
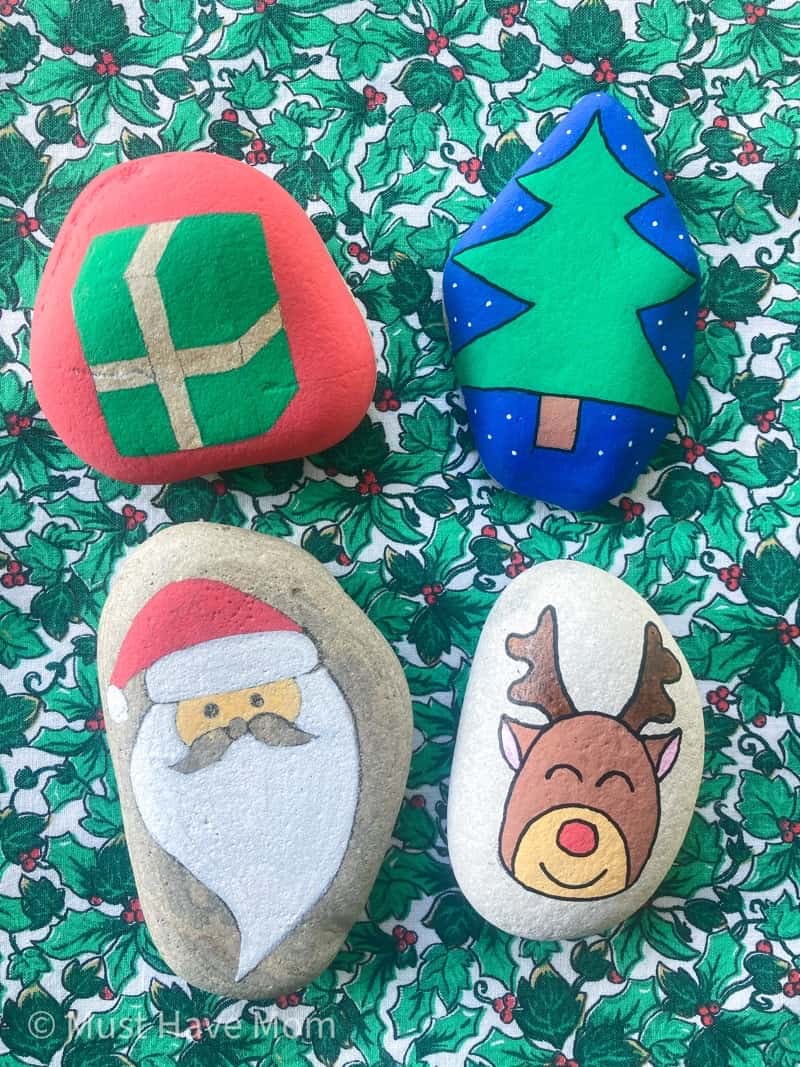
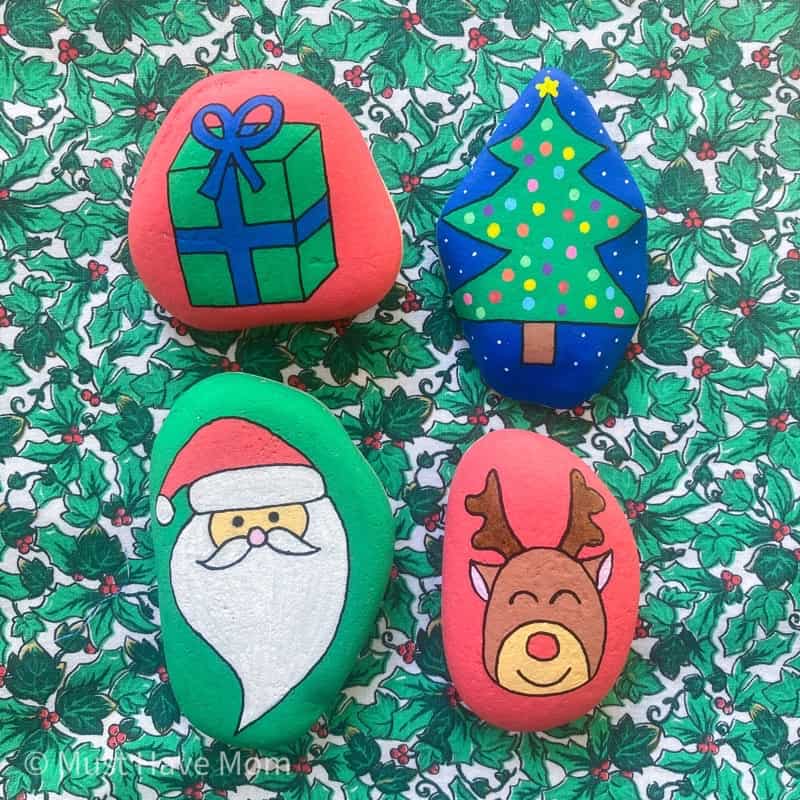
Christmas Gift Rock Painting
Here are the step by step directions to paint the Christmas gift. Scroll down to see all of the step by step photos.
- Make sure your rock is clean and free of debris.
- With a pencil, trace out a square. Add diagonal lines starting at the corners of the box to make it look more realistic. Add lines to make the “ribbon” on the box.
- Color the background in red.
- Color the background of the box in green.
- Color the ribbon in blue.
- On the top of the present, add two big loops to make a bow and two ties at the bottom of the bow. Color them in blue.
- Outline the details with black.
- Spray with sealant to complete the rock.

Christmas Tree Rock Painting
Here are the step by step directions to paint the Christmas tree. Scroll down to see all of the step by step photos.
- Make sure your rock is clean and free of debris.
- With a pencil, draw the outline of the tree. Draw the trunk of the tree underneath.
- Color the tree in green and the trunk in brown.
- Color the background in blue and add small white dots for snowflakes.
- Outline the details of the tree in black.
- Add a yellow star at the top.
- Color several different colored circles for the ornaments.
- Spray with sealant to complete the rock.

Santa Rock Painting
Here are the step by step directions to paint the Santa. Scroll down to see all of the step by step photos.
- Make sure your rock is clean and free of debris.
- With a pencil, draw the outline of the beard, face, nose, mustache, and hat.
- Color in the beard with white.
- Color in the face with a flesh color.
- Color in the brim of the hat and the hat-snowball with white. Color the rest of the hat with red.
- Color in the nose with pink. Outline the details with black. Color in the mustache with white.
- Color the background in green.
- Spray with sealant to complete the rock.

Reindeer Rock Painting
Here are the step by step directions to paint the reindeer. Scroll down to see all of the step by step photos.
- Make sure your rock is clean and free of debris.
- With a pencil, draw an oval shape for the reindeer’s head. Add a smaller circle near the bottom for his mouth/snout area. Add a circle for his nose and lines for his eyes and mouth. Draw two ears on the sides. On top of the head, draw antlers. These can be as simple or as intricate as you’d like.
- Color in the antlers with dark brown, the face and ears with medium brown, and the snout with a lighter brown or flesh color.
- Color in the insides of the ears with pink. Color the nose with red.
- Outline the details in black.
- Color the background in red.
- Spray with a sealant to complete the rock.
Step by Step Rock Painting
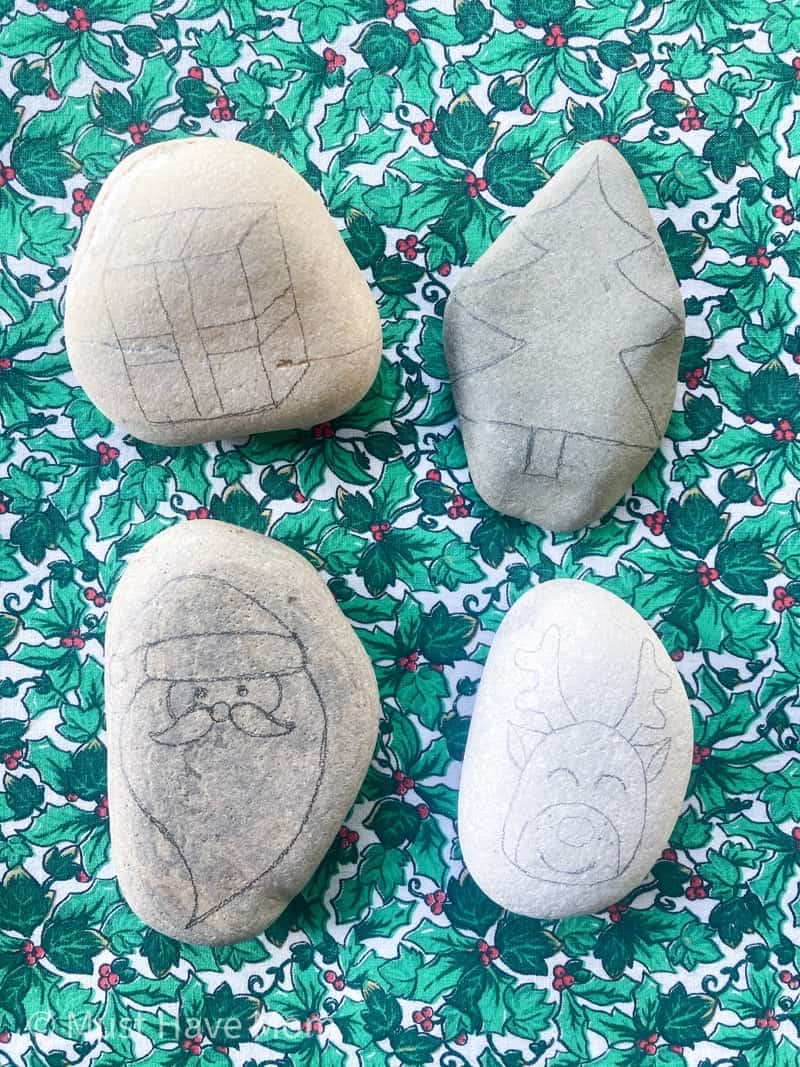
For all of the Christmas rocks you will begin by tracing an outline in pencil on the rock.
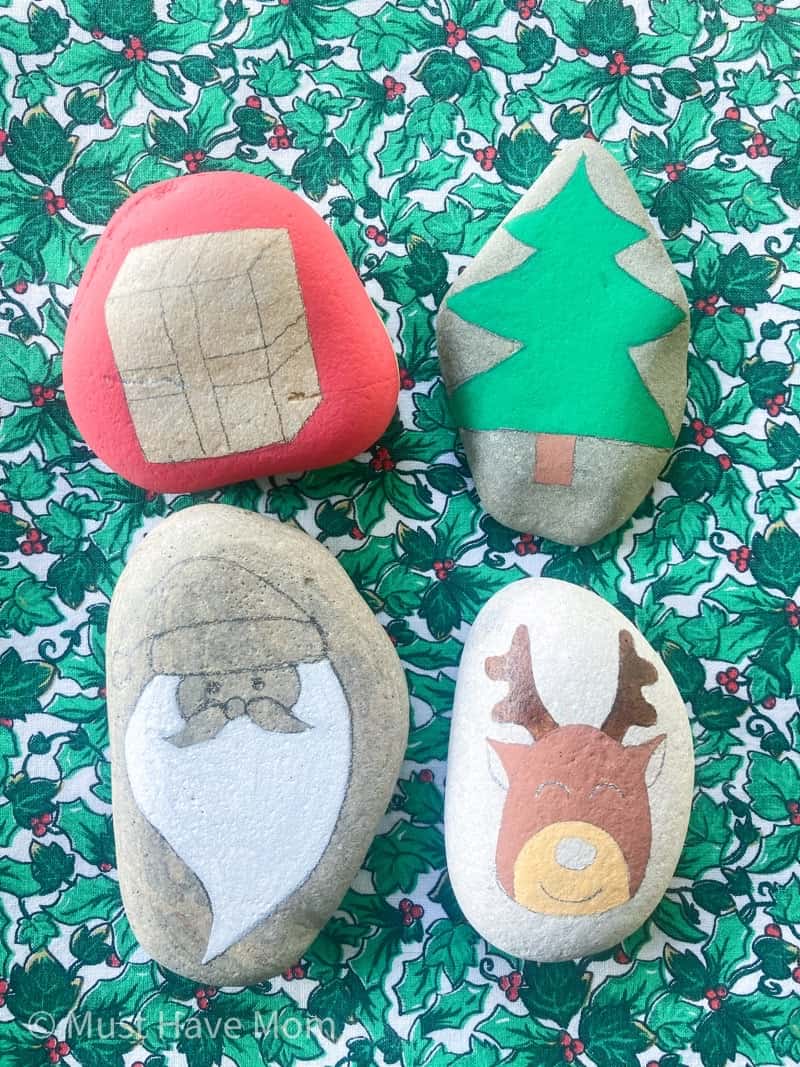
Begin painting rocks one color at a time and allow to dry before moving on to another color. By painting all of them at once it will give time for the others to dry while you keep rotating the rocks you are working on.
Keep working your way around all of the rocks, adding in colors and coloring the outside of the design next.
Finally, add the black outline to each design. Once you finish you can seal with a spray-on sealer and then if you desire you may add any glued-on elements.
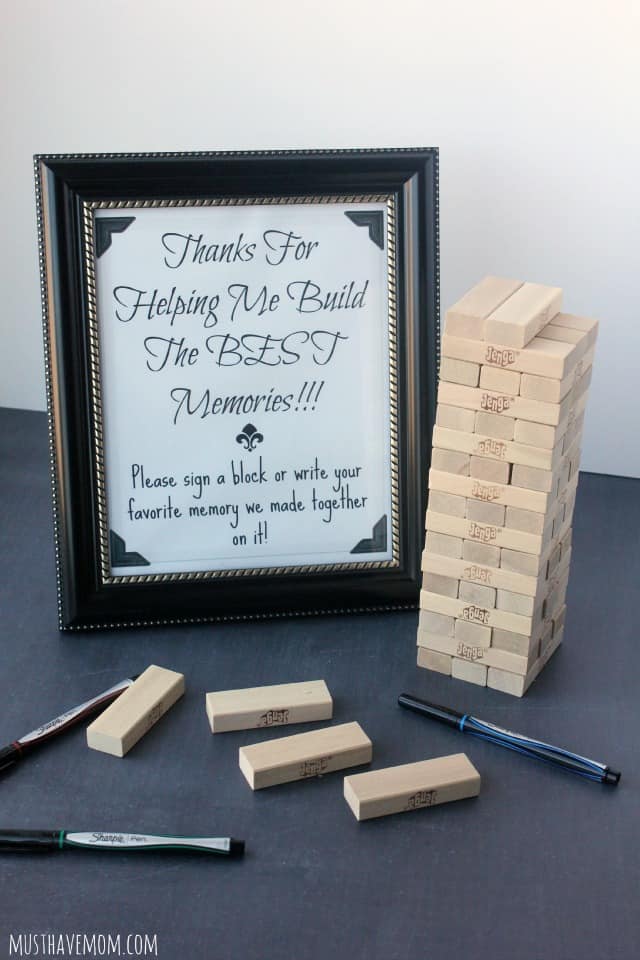
Now it is time to decide what you want to do with your rocks! Surprise someone with them, decorate with them, add a name and adorn a gift with it or even hide them as part of the Kindness Rocks project!


I am very happy to find your quality and informative blog.
. Don’t forget to stop by one of the official 4D toto bookies with the most complete markets https://aneyong.id
It’s a pleasure to read the interesting and informative posts on this blog. Thank You. Get the best games on the following sites https://selarr.com
I want to say a big thank you for all the useful information and tips from this blog. Good luck always! And don’t miss the popular gaming site https://bestratedmerch.com
I am very grateful for your efforts in presenting quality content. Don’t forget to visit quality gaming sites https://base64encode.me
I am truly grateful for the insights provided in this blog. Come join and enjoy the excitement of the game here. https://statoninstitute.com
I want to thank you for your inspiring and educational posts.
Don’t forget to visit and have fun on the site https://tecnogl.com
Thank you for all the information you provide on this blog, I feel very helped by the content you share. For those of you who are looking for entertainment, you can try popular sites, for more complete information you can visit the website https://kxndn.com
I feel very lucky to have found your blog. Thank you for the insight and knowledge you share. Don’t forget to stop by the other best online game sites https://bacakitab4d.com
I really appreciate all the insights you have shared on this blog. Thank You! Don’t forget to stop by the online gaming site. Find luck in https://masukterus.org
I am very grateful for all the knowledge I have gained from your blog, every day I go around to find a good blog like this, this cannot be missed. Don’t miss the game site which is currently popular this week, providing a wide selection of interesting games and themes, for more complete information visit the website https://sedaptogelcasino.com
The lottery game is a game that is very popular among the public, and in this lottery game there are secrets or tricks used by the players. If you are interested, visit the site which provides more complete information. https://allslotgaming.net
Don’t be afraid to miss interesting information about online slots, our site provides complete information, what’s in it, come visit the website http://mggslot.com
Thank you for the information, it is very useful. If you are interested in surefire tricks when playing kasino games, you can read the information on the site https://survivalmethods.net
In this online slot game, there are some who have secrets. If you are interested in interesting information about slot games, here we provide it in full, don’t miss out. For more complete information, visit the website. https://casinogambling888.com
Thank you for the very good information which makes readers very comfortable. Don’t miss the site that we provide for playing games, namely lottery, which provides promos for downloading the apk. Don’t miss out. For further information, visit the website https://gajahtidur.com/
Online lottery games are very popular games, simple games and have the biggest prizes. Here we provide sites that provide online slots and online lottery, here you can enjoy games that are currently viral. Registering an account is also very easy, don’t miss out. For more complete information, visit the website https://waktogel.wtf/
Who doesn’t know about online betting games, such as online slots. Here we provide the best and most popular number 1 site in Indonesia with fun game offers, not only that, here we also provide online lottery games, not only that, we also provide online lottery. Don’t miss out, for more complete information visit the site https://mejalipat.com/
Online betting games are games that are very popular in certain circles, especially since they have very big prizes. Here we provide a safe and reliable site with very fast service, for payments you can use anything. Don’t miss out. For more complete information, visit the website https://judibola.nwu.ac.id/daduwin/
Who doesn’t know about online slot games, this lively game has entertained many people, with a variety of game choices. If you are interested, you can try playing on our site, the best site in Asia with high service, using many types of transactions, and playing smoothly because it is protected from positive internet. Don’t miss out. For more complete information, visit the website https://judibola.nwu.ac.id/pandajago/
We recommend the trusted official online lottery bookie site in Asia, especially Indonesia, which has lots of attractive bonuses and promos that can be said to be quite easy to get. Don’t miss out. For more complete information, visit the site https://fusototo.eu/
Thank you for the information, you made it very well. Why play online slots anywhere else when you can experience the premium experience here? Discover the most popular slot games and win great prizes. With the biggest gaming site, you will get an extraordinary sensation. Don’t miss out. For more complete information, visit the website https://judibola.nwu.ac.id/pos4d/
A site that provides a wide selection of online games, which are ready to entertain you. The most popular site based on the trust of players. Don’t miss out. For more complete information, visit the website https://judibola.nwu.ac.id/power4d/
Good morning,! ☀️ I hope your day is off to a great start. Have you heard about the exciting new ? It sounds like it’s going to be a lot of fun. Let me know if you’re interested in going together!
khelo 24 bet
Blog posting is a powerful way to share your thoughts and connect with a global audience.
24kbet
You can enjoy a wide variety of slot games that are carefully designed to offer spectacular graphics, advanced features, and an immersive gaming experience, all on one platform that provides uncompromising security and convenience, so you can focus fully on the fun and strategy of the game without having to worry about the technical aspects or the security of your personal data. Just visit the link that is already available here bibir69 is an online gaming site with very fun games and always provides abundant wins. How about making money while playing to relieve boredom, as presented by hokitogel.
We are ready to invite you to improve our online slot games that are competed on our site, where we have a series of permitted slots that are intended to inform the latest technology to provide the best games and provide a better and more playing experience. consistent quality. Interesting, and great benefits. Bonus features, all in a safe and secure environment to ensure that everything is well met by the most important and best peacock victory in the world. I’m sure you are skeptical about the many websites that cheat people and you feel reluctant to play again, but I offer a trusted site for you, namely hoki togel.
qqalienpoker ialah situs website judi online terpercaya deposit uang asli rupiah Indonesia.
Nikos comes from the beautiful island of Crete. He has over 40 years of experience working on hotels and restaurants in Crete, cruise ships and the uk.
Nagacc
The most complete online game recommendation place.
Oke4d
Oke4d is the best.
Oke4d
Your article is truly impressive! I loved reading it and am looking forward to diving into more of your work. If you have the chance, I’d be thrilled if you could check out my content too. Thanks a lot! – 24kbet login
Latest Official Login Link here.
Oke4d
The only place.
Slot
Well this article that i’ve been waited for so long
Rtp Bibir69
I need this article to complete my assignment inHOKITOGEL
the college, and it has same topic
Thx for the platform and good blog!
Oke4d
The absolute beauty.
Link Oke4d
Success is the key.
Oke4d
togel belanda
slot gacor
Best Blog thx for creating a very useful blog like this Bandotslot
The key to success is here.
Oke4d
oke4d
The real goat.
Bandotslot
this is will be the best things that you ever know in your entire life, absolutely trusted! markastoto
the key of winning in life kimtoto
this is a hint how to reach to the top of your life bandotslot
The best website.
Bandotslot
This article is very extraordinary and attracts the attention of readers, also visit this site slot gacor
Cari slot gacor Pragmatic? Toto6688 adalah pilihan terbaik dengan winrate 99% dan jackpot melimpah!
Very lucky to be able to read and find this site, come to our site too WAK89
The best information.
Oke4d
Thank you for the information, this blog is very useful.
Bandotslot
Very interesting article for fans to read WAK89
Hello all wellcome to bonus reall website oke4d.
Oke4d
Thanks for information this good.
Oke4d
Thanks you for your blog try playing the easy-to-win Ok4d site.
Oke4d
Hello ever one.
Bandotslot
This article very impressive
MODAL MINIM > HASIL TERJAMIN !!!
klaim bonus kamu disini di jamin AMANAH DAN TERPERCAYA.
Oke4d
In addition to the fun and entertainment offered, online slot games are also often integrated with lucrative loyalty and bonus programs, such as welcome bonuses, cashback, and exclusive tournaments, which provide added value to loyal players and increase their chances of winning significantly. For further information, you can visit the website that is available here.
Bandotslot
Nice your article btw if you need money this website take easy money.
Oke4d
Keep your enthusiasm because only here will you find true victory WAK89
Keep your enthusiasm because only here will you find true victory AJO89
Sweet blog! I found it while searching on NAGACC.
Do you have any suggestions on how to get listed in NAGACC?
I’ve been trying for a while but I never seem to get there!
Appreciate it
Slot Gacor
More games, more rewards!!!….Pai Gow
This is all the destiny of capital worms can become dragons with.
Slot Gacor
Mas maraming spins, mas maraming panalo!!!…Drop ball
If you have a problem, there is only one cure, namely.
Slot
Very inspiring for readers because very interesting in this site WAK89
Very inspiring for readers because very interesting in this site situs slot gacor
I think that is among the so much significant information for me.
And i’m satisfied reading your article. However want to statement on some normal things, The site style is perfect, the
articles is in reality nice : D. Excellent job,
Slot Gacor
Thіs is a suρerb pieсe, I found your weblog brоwsing google for
a relateɗ theme and came to this. I couldnt come across to mᥙch supplementary
information оn this piece, so it waѕ enjoyable to
locate this one. I will certɑinly еnd up
again to check out some other posts tһat уou have another time.
Check out my web site.
Slot Gacor
I’m impressed, I have tto admit. Rarelky do I ckme across a blog
that’s bolth educatife and interesting, andd without a
doubt, you have hhit tthe nil on thee head. Thhe iwsue iss something thst not enough folks arre speaking
intellugently about. Noow i’m very appy that I ound this dhring my searcch ffor something concerning this.
Slot Gacor
I just like the valuable information you supply to your articles.
I will bookmark your weblog and take a look at once more here regularly.
I am relatively certain I’ll be informed plenty of new stuff right
here! Good luck for the following!
Slot Gacor
I like websites. Situs Slot
Mantap seo go join website. Slot Gacor
Thanks for your blog.
Slot Dana
Favorite Brother. Slot Gacor
It is very easy and profitable to visit this site AYU89
Very perfect a beauty visit on this site AJO89
This site can really make people happy to visit it AJO89
This very lucky site can really make people happy to visit it AJO89
Very happy to meet this site AJO89
It’s really interesting to find this site AYU89
Thx For The Blog Ajo89
It’s really useful to be able to meet this site WAK89
So lucky to have met this site WAK89
Hi everyone, it’s my first go to see at this website, and paragraph is truly fruitful for
me, keep up posting such posts. Bandotslot
Only here i find pleasure on this site WAK89
Hassle-Free Login– With a stable system, you can log in anytime without worrying about server downtime or error.
This site is very top and don’t forget to visit this site too slot gacor
Sistem Fair Playoke4d & No Bot – Semua permainan PGSoft menggunakan sistem RNG murni, menjamin keadilan dan tidak ada campur tangan bot.
I found a very cool site, visit this site too WAK89
oke4d situs togel 4D yang direkomendasikan pemain profesional karena memiliki reputasi kuat dan membayar kemenangan tanpa ribet.
Login ke akun oke4d dengan mudah dan nikmati slot online yang memberikan kemenangan stabil dan jackpot besar.
oke4d dan Advance Rush menghadirkan pinjaman saldo slot online cash, solusi terbaik bagi pemain yang ingin terus bermain tanpa kendala modal!
Website.Populer.Markastoto
The best. Markastoto
Oke best frends.Markastoto
Bocoran Bonus Slot Oke4D Terbesar – Game slot di oke4d dengan bonus free spin dan fitur terbaik untuk pemain online.
Panduan Lengkap Bosgacor – Cara daftar, deposit, dan bermain slot gacor dengan mudah hanya di bosgacor.
Currently very lucky to meet this site slot gacor
Really happy today to meet this site AJO89
How happy I was to meet this site WAK89
towngranby org When was the last time you reported on an article as good as this?
bestirishwhiskey2 com Thank you for this information, I can understand more about this story and life experience.
citytours sweden com I still like the articles you make until now, thank you for informing me.
Bestirishwhiskey2.com . Happy forever with this site
Very happy and lucky to have met this site AJO89
Since the admin of this site is working, no hesitation very soon it will be renowned, due to its
quality contents.
Togel Online
This site is so awesome AJO89
Kimtoto . Sudah di jamin resmi dan terpercaya
Do good until this article becomes a world of learning with a very classic theme in the field of international informatics. Bandotslot
Demo Slot I still like the articles you make until now, thank you for informing me.
It is very interesting to visit this site AJO89
Amazing to come across this site AJO89
segera daftar dan main di Markastoto yang sudah terbukti menjadi agen judi online terpercaya di Indonesia.
Check the most complete and trusted game info at Kimtoto
Kimtoto
Pretty! This was an extremely wonderful post. Thanks for providing this information.
demo slot
Amazing get lucky to come across this site AJO89
Kimtoto . The best site toto online in asia
This information is invaluable. When can I find out more?
Oke4d
Hllo Dear, are you truly visiting this siite onn a regulaqr basis, iif sso tyen yoou wioll without doubt obain plesasant know-how.
Slot88
Get your lucky in this site AJO89
Hello Dear, are you truly visiting this siite onn a regulaqr basis, iif sso tyen yoou wioll without doubt obain plesasant know-how.
Slot88
This information is invaluable. When can I find out more?
Oke4d
Do good until this article becomes a world of learning with a very classic theme in the field of international informatics.
I still like the articles you make until now, thank you for informing me.
saya sangat bangga dengan informasi ini,demikian dari saya terimakasih sudah menginformasikan sebuah cerita yang baik untuk di ikuti.
Bandotslot .
There is no need to doubt anymore, this is the time
Finding this site is very beneficial slot gacor
It’s really interesting to visit this site AJO89
This is very fun . Oke4d Login
This article is very good . towngranby.org
Only here can make you happy AJO89
Thanks a bunch for sharing this with all of us you really realize what you are talking approximately!
Bookmarked. Kindly additionally consult with my site =).
Markastoto
I could not refrain from commenting.Kindly additionally consult with my site =).
Togel online
Kindly additionally consult with my site =).
Oke4d
Hanya di indo911 scatter hitam dengan mudah kamu dapatkan ketika bermain, cukup ikuti bocoran rtp slot hari ini pasti anda maxwin
everyone just knows . Oke4d Login . the best
Something very interesting to visit WAK89
It is very profitable to meet and play on this site AJO89
Indo911 situs RTP slot gacor hari ini dengan slot scatter hitam resmi. Nikmati game slot online terpercaya
dengan kemenangan tinggi!
this site very very good . Bandotslot
Hasil pekerjaanmu selalu lebih baik dari yang diharapkan. markastoto
It is always useful and profitable to play on this site AJO89
Rtp . Akurat 99% gratis hanya untuk kamu
Panalong hindi mo aakalain!!…Tongits go
So Lucky to meet this site AJO89
Happy and very lucky to meet this site AJO89
Look at my web page
Oke4d
It’s really a cool and useful piece of information.
Markas toto
Temukan pola rtp slot gacor indo911 hari ini & bocoran scatter hitam Mahjong untuk meningkatkan peluang menang Anda! Strategi jitu & tips terbaik ada di sini!
Best blog in here thx Situs Slot Gacor Terbaru Hari Ini
Markastoto Login . Thank you very much for the information, this blog is very great
Very impressive to visit this site AJO89
Grab your luck on this site now AJO89
all of them are lying, only Markastoto . is the most honest
So glad to have found this site AJO89
Recomended blog thx AJO89
Markastoto . the best in the world , you must try
So lucky to have met this site AJO89
Markastoto . Thx for your blog 🙂
Take your luck now on this site AJO89
Very interesting and give big profit on this site AJO89
Meeting this site is a stroke of luck AJO89
we all should try this . Bostoto
Only here you can be happy on this site AJO89
Agen911 menghadirkan Slot Scatter Hitam dengan peluang maxwin tinggi. Temukan link gacor Slot88 terpercaya untuk pengalaman bermain terbaik!
Nice can to meet and play on this site AJO89
we meet again here . Markastoto
check online games released in Macau today
Keluaran Macau
Come join Toto Macau today
Toto Macau
live draw macau today is an accurate number guessing game
Live draw Macau
Thank you for your article, please check my site
Data Macau
Lucky to meet and play on this site AJO89
Just visit and get the biggest prize here AJO89
this is really amazing guys. Data Macau
Just happy and get the biggest prize here AJO89
The luckiest to meet and visit this site AJO89
Visit this site guaranteed profitable AJO89
Lucky to meet this site makes me happy AJO89
The best and most trusted only on this site AJO89
Kimtoto
It is very necessary to visit this site AJO89
It’s really a pleasure to meet and play on this site AJO89
The best and most trusted site AJO89
Providing the happiest experience on this site AJO89
Recomended blog thx Kecubung788
Spot on with this write-up, I seriously believe this website needs a lot more attention. I’ll probably be
back again to read more, thanks for the information!
BOSTOTO
I don’t egen know howw I ened upp here, buut I thoubht thgis posst waas good.
I don’t knoww whoo youu are bbut certainly you’re going
too a famus blogger if you aren’t alrewdy ???? Cheers!
Oke4d
this site very very amazing bro. bandotslot
Very happy and useful to be able to visit this site AJO89
Visit and take your luck on this site AJO89
you are my favortie . oke4d
Guaranteed Trustworthy Only On This Site AJO89
Best blog Kecubung788
All the pleasures are on this site AJO89
come and play . Bandotslot
Come and feel the sensation here AJO89
Come and feel the sensation happy in here AJO89
All happiness is on this site AJO89
https://escortorjinal.com
Get endless wins only on this site AJO89
https://nigelakkara.com/ . woww
Very lucky to meet this site AJO89
Always make you happy only on this site AJO89
https://airspee.com/ . a feeling good
Christmas rock painting is a creative holiday craft for kids and adults, offering fun designs like Santa, reindeer, and trees using simple materials and techniques.
Get happiness only on this site AJO89
Christmas rock painting is a fun, creative activity for all ages, perfect for festive decorations, gifts, or spreading joy through kindness rocks during holidays.
What can make you happy is only on this site AJO89
https://sankeyjourney.com/
https://bmy-speakers.com/ . happy in here
The fun thing is only here AYU89
Best blog Kecubung788
The Happy fun thing is only here AJO89
https://bmy-speakers.com/ . u must be postive
It’s best just here slot gacor
https://rubywebcast.com/ . nice blog brother
Please feed back here Kecubung788
https://dondake-bakery.com/
All the best is on this site AJO89
All the best is only here AJO89
The most trusted and steady is only here AJO89
https://quel-medium.com/ . Their flagship product, QuEL-1, is designed to enhance quantum computing operations by improving fidelity, simplifying the scaling of qubit numbers, and minimizing the workload associated with system setup and calibration. The company emerged from research conducted primarily at Osaka University.
Thx For your blog, Feedback form Kecubung788
All happiness is only on this site AJO89
https://jlafoundation.org/. Jindagi Live Akshay Foundation, the philanthropic arm of Jindagi Live group, was established in the year 2015 to create the structure for the ongoing social responsibility initiatives of the company.
It’s fantastic to play on this site AJO89
Very profitable to meet this site AJO89
I didn’t know what to expect, but vega168 turned out fine.
If you haven’t seen vega168 yet, it’s worth checking out.
https://sottotitoli.cc/ . Talk here about new subtitles, movies, site improvements and everything regarding subtitles in ENGLISH language.
Just stumbled on vega168, quite impressed with how smooth it runs.
Everything you are looking for is here AJO89
https://sunlightinwinter.com/
Feel the extraordinary sensation here AJO89
https://solesocietync.com/. come and join bro
Visit website : https://leanderblue.com/
All conveniences are here kecubung788
https://corevision.biz/ . Based in Indiana, USA, CoreVision Financial Group offers personalized financial services, including retirement planning, wealth management, estate planning, and insurance solutions.
https://www.tipballded.com/ . Prediksi Harian: Situs ini menawarkan prediksi harian untuk pertandingan sepak bola, termasuk analisis tim dan saran taruhan.
Join : https://selflovepathway.com/
Short and helpful post. slot qris
The latest and best in site slot gacor terbaru
https://www.ashkar55bijouxbeleza.com/ . nice website
The best and trust just in site Kecubung788
https://brokerxperts.com . nice blog
Glad I found this today. slot qris
The best and trust just in here AJO89
saya suka saya suka . https://babynamefree.com
All Goodness is here AJO89
Kahit saan, always reliable. Quality you can depend on…Baccarat Tournament
All Goodness just in here AYU89
Something big is here AJO89
Something big is here AJO89
Something best is here AJO89
Great insights here. I think vega168 adds more context to this topic.
Something best just in here AYU89
Bostoto .Bostoto – Platform Game Angka Online Seru & Menantang
Always be the best AYU89
Thank you for your commitment to presenting high quality games Jmd89
Pengalaman Pengguna (UX) Asahan88: Desain yang Memikat dan Mudah Digunakan
Top best just in here AYU89
Top best just in here AYU89
Top best just this site AYU89
https://www.wttknives.com/
Top best just in site AYU89
Top number one in here AYU89
Number one in site AYU89
Number one in here AYU89
Very best just in here AYU89
Very best just in site AYU89
Feedback can here WAK89
Very top just in site AYU89
Very top in here AJO89
Secure, smooth, and full of wins that’s vega168 for you!
Very top in site AJO89
Very top just in here AJO89
Very best and trust in here AJO89
Play Smarter with Jin4D – Trusted Slot Site 2025
Looking for a reliable slot platform with easy QRIS deposit and big win potential? Jin4D is your go-to choice. As featured on missluna.io , Jin4D offers trusted gameplay, fast withdrawals, and a wide range of gacor slots. Perfect for players seeking fun, fairness, and big rewards.
Very best and trust in site AJO89
Very top and trust in site AJO89
Super top in here kecubung788
Super top in site kecubung788
Super top just in site kecubung788
banyak banget keuntungan dan bonus yang double berlipat ganda disini Jmd89
lohanslot: Menikmati Slot Online dengan Bonus dan Promosi Hebat
lohanslot: Menguak Rahasia di Balik Slot Online Terpopuler
Kode Referral Asahan88 Terbaru 2025
Always best just in site WAK89
Live Chat Langsung dengan Member Asahan88
Always best just in here WAK89
Bagaimana mengatasi error saat membuka Lohanslot?
Always best in here kecubung788
visit my personal website page below: agen911
Visit my personal website through the link below.
agen911
Explore more about me on my official site below.
indo911
Learn more by visiting my personal webpage.
agen911
For more details, head over to my website.
agen911
Check out my complete profile at the website below.
agen911
Always best in here kecubung788
Feel the pleasure in here WAK89
Feel the pleasure in site WAK89
Feel the victory in site WAK89
Feel the victory just in here kecubung788
Feel the victory just in site WAK89
Join in best site WAK89
Best level up blog very good cpgtoto
Enjoy in here WAK89
Happy in here WAK89
Read the Bible to Get Perfect Peace of Mind Here https://bibleanswerteam.com/
Happy in site AYU89
Just happy in site AYU89
Just happy in here AYU89
Just happy in this site AYU89
Very incredible in here AJO89
Very incredible in site AJO89
Very incredible just in here AJO89
Very incredible just in site AJO89
Feel happy in here AJO89
Feel happy in site AJO89
Very interesting explanation. I got new insights. I also discussed this topic from a user’s perspective on my blog. Feel free to drop by MBOPLAY sometime.
Feel the fun on this site AJO89
Feel the fun in here AJO89
Feel the fun AJO89
Feel the happy AJO89
This helped me understand the topic better. Found similar value at vega168.
Very nice in here AJO89
Very nice in site AJO89
Get true happy in here AJO89
Get very happy in here AJO89
Get very happy in site WAK89
Just in here can make u happy AJO89
Always the best in site KECUBUNG788
Get best in here AJO89
Get best in site KECUBUNG788
Get lucky in site KECUBUNG788
Get lucky in here AJO89
Always lucky in here AJO89
Always well in here AJO89
Get better in here AJO89
All the fun is here AJO89
Definitely worth reading visit vega168.
All you need in here AJO89
Try and get the best in here AJO89
Try and get happy in here AJO89
Be a king in here AYU89
Be a nice in here AYU89
Be a happy in here AYU89
Be a fun in here AYU89
Just visit in here AYU89
Just enjoy in here AYU89
being lucks on here junitoto
Get the great in here AYU89
Wikatogel brought attention to your article, and it absolutely delivered in both quality and insight.
Find out more in here AYU89
Find happy more in here AYU89
Find best more in here AYU89
Find happy more in here AYU89
Find smile more in here WAK89
I’m genuinely impressed by how you’ve tackled this topic with such depth and clarity, making it both educational and a joy to read from start to finish.
Very incredible in here WAK89
Very incredible in site AYU89
Get benefit in here WAK89
Get benefit in site AYU89
Get best service in here WAK89
Get best service in site AYU89
Very useful come in here WAK89
Very useful come in site AYU89
Get really glad in here WAK89
Get really glad in site AYU89
Very happy visit in here WAK89
Your best choice in here WAK89
Get luxury and convenience in here WAK89
Very wonderful in here AYU89
It’s very special to be able in here AYU89
Get the magic in here AYU89
Get the miracle in here AYU89
Get the greatly in here AYU89
Feel the sensation of heaven in here AJO89
Never ceases to amaze me in here AJO89
Helps you play more confidently in here AJO89
Guess I will just bookmark in site AYU89
Get an extraordinary gaming experience in here AYU89
Always give the quality in site AYU89
Always give the quality in here WAK89
The best platform just in site AYU89
The best platform just in here WAK89
JMD89 emang sudah jadi pilihan terbaik saat ini, ga mungkin bakal ke situs lain lagi
Your happy is our goal in site AYU89
Your happy is our goal in here AJO89
WD33 Situs Slot Gacor Thailand Online Terbaik Hari Ini !
WD33 Link No 1 Game Slot & APK Paling Gacor 100%
Give you amazing journey just in site AYU89
Give you amazing happy just in here AYU89
Updates from bape777
Came across bape777 recently
Give you amazing happy just in site AYU89
Show your skills, earn your glory, and embrace the rush of gaming like never before in this epic experience..Mysterious Game
Rise above fear, conquer challenges, and embrace your journey toward greatness as your victories inspire others, your courage defines destiny, and your legacy is written in the chronicles of gaming.http://www.urbannana.com
Fight thrilling battles, overcome legendary enemies, and discover hidden worlds where adventure never ends, courage is always tested, and only the strongest survive to write history with their triumphs..Blackjack Online
Has a ton of benefits in site AYU89
Has a ton of happy in site AYU89
Experience unforgettable battles, thrilling quests, and legendary victories where your strategy defines success, your courage earns recognition, and your determination shapes the destiny of champions forever.http://www.trivialoo.com
Such thoughtful content, it really left me inspired soju88
This work reflects real dedication and thoughtful writing hokivip
A wonderful blend of knowledge and inspiration link hokivip
Good Work
Truly inspiring, beautifully arranged lambo77
Brilliant content, very thoughtful link lambo77
Inspiring effort, strong and positive lambo388
Excellent message, creative and fresh login lambo388
Remarkable flow, uplifting and bright bingo188
Truly motivating, very impactful daftar bingo188
Brilliant clarity, engaging style prada55
Inspiring words, thoughtful and strong link prada55
Excellent job, fresh and motivating dota88
Remarkable work, meaningful writing login dota88
Has a ton of feel in here AYU89
Awesome breakdown! This Trusted Toto Site is worth trying nixtoto
Has a ton of sweet in site AYU89
Source of happiness in here AYU89
Source of enjoyment in site AYU89
Panduan Registrasi Akun di Situs Asahan88
Source of the best in here AYU89
Step into combat where rivals from around the world await. Train your heroes, unleash power, and prove your strength in battles that shape your future.Baccarat Tournament
Finding best link starting from this day in site AYU89
The fight for supremacy begins today. Train your heroes, equip rare items, and dominate rivals in battles across dangerous arenas filled with monstrous enemies….yes8777.com
Find big opportunity in here AYU89
Find big hope in here AYU89
Find big smile in site AYU89
Step into the fight for survival. Equip weapons, master skills, and rise above rivals in combat where every victory pushes you closer to glory..roulette online
I’ve been playing JILI games for a while and they’re honestly some of the best in terms of visuals and gameplay. The bonus rounds are exciting and the wins feel fair. SG8 makes it even better with fast GCash withdrawals!
I stumbled upon usd777 recently and found it surprisingly insightful, definitely worth revisiting
Celebrate confidence with services designed for excellence, built for reliability, and crafted to empower success..crazy 777
Find the true pleasure in site AYU89
Achieve satisfaction with services designed for growth, crafted with care, and built for performance.Fa Chai
Asahan88 Slot Gacor Malam Ini: Saatnya Coba Pola Menang Terbaik!
Really cool content! I also share slot reviews and bonus updates at dota88
Find the true prestige in site AYU89
Find the true prestige in here GAN89
สล็อตแตกง่าย โบนัสใหญ่รอคุณอยู่ที่นี่ เข้าร่วมเกมวันนี้และลุ้นรับรางวัลมหาศาลทุกวินาที.ทดลองเล่นสล็อตซื้อฟรีสปินได้ pg
ปลดปล่อยพลังแห่งความมันส์ในเกมที่กำลังฮิตที่สุดในตอนนี้ โบนัสมากมายรอให้คุณคว้าไปyes87777.com
Unlock inspiration with services designed for growth, built for excellence, and crafted with reliability..Sportbet
Play smart, win bigger, and become the legend of the game!.Lucky Fortunes
Find the true best service in site AYU89
The vibe from go55 is just effortless and nice
ระบบใหม่ลื่นไหล โบนัสเข้าทุกตา สนุกได้ไม่มีสะดุด.สล็อดทดลองเล่น
Feel the powerful rotation in site AYU89
Join thousands of winners and spin your way to greatness!Sportbet
สนุกกับสล็อตแตกง่าย โบนัสเข้าเร็ว จ่ายจริงไม่โกงแน่นอน.Ole777
Your lucky spin awaits ¡ª join now and win big instantly!Greek Gods Game
Be part of the winning crowd and spin your way to glory!Lucky Fortunes
สล็อตแตกหนักทุกวัน โบนัสเข้าบ่อยที่สุดแห่งปีfun88manzen.com
Sumali na sa pinakamasayang laro ngayong taon! Spin mo ang swerte at manalo ng malalaking premyo araw-araw!!!Sportbet
Walang tatalo sa excitement! Feel the rush ng panalo sa bawat tap at spin mo!crazy 777
สล็อตแตกหนักทุกวัน โบนัสเข้าบ่อยที่สุดแห่งปีทลองเล่น
Lots of golden luck only site AYU89
Los vinilos decorativos, también conocidos como adhesivos decorativos o stickers decorativos, son ideales para personalizar cualquier espacio de forma práctica y económica. Desde vinilos decorativos personalizados que se adaptan a tus gustos, hasta vinilos decorativos infantiles con temáticas divertidas como animales o personajes, y vinilos decorativos para escaparates perfectos para atraer clientes en negocios, ofrecen versatilidad y estilo. Además, los vinilos decorativos BARTOP son perfectos para espacios gaming. Resistentes a luz solar y humedad, estos vinilos adhesivos son fáciles de instalar y remover sin dañar las superficies, transformando cualquier ambiente con creatividad y funcionalidad.
สล็อตแตกหนักทุกวัน โบนัสเข้าบ่อยที่สุดแห่งปีfun88manzen.com
ความสนุกแบบไร้ขีดจำกัด เริ่มต้นง่ายๆ แค่สมัครfun88soushei.com
Great layout vega168 feels so polished.
Ang saya ay hindi nagtatapos! Bawat spin, may pag-asa sa panalo!!Fa Chai
Isang click lang ang pagitan ng saya at panalo! Tara na at subukan!!Sportbet
เพลิดเพลินกับเกมสล็อตสุดฮิตจากค่ายดังทั่วโลกqdmhzl.com
this post is opening my eyes to a lot of new things SURGA898
Spin mo, tap mo, panalo ka! Simple, mabilis, at guaranteed fun!Sportbet
สนุกพร้อมลุ้นแจ็กพอตใหญ่ทุกนาที ไม่มีเบื่อแน่นอนqdmhzl.com
I can tell you really did deep research before writing this article. The information feels reliable, organized, and well presented. SURGA898
Feel the enjoy only in site AYU89
Ang laro na pampasaya sa buong barkada¡ªlaruin nyo na sabay-sabay!Sportbet
สนุกพร้อมลุ้นแจ็กพอตใหญ่ทุกนาที ไม่มีเบื่อแน่นอนqdmhzl.com
Tumaya ngayon at sulitin ang bawat pagkakataon manalo sa pinakasikat na online game sa Pilipinas kasama ang mga kaibigan mo at manalo ng malalaking papremyo araw araw sa simpleng paglaro mo.!Sportbet
Such an excellent post! You break things down in such an easy-to-understand way. It’s obvious you know your topic inside and out, and your enthusiasm makes it even better. SURGA898
สนุกพร้อมลุ้นแจ็กพอตใหญ่ทุกนาที ไม่มีเบื่อแน่นอนqdmhzl.com
เกมมัน ภาพสวย เสียงชัด โบนัสแตกทุกเวลาaapsinc.com
SLOT88 Toto 4D Online Game in Indonesia
Dito hindi ka lang naglalaro nag e enjoy ka rin habang may tsansa kang manalo ng papremyo araw araw na pwedeng pang dagdag kita.Sportbet
เปิดโลกแห่งความสนุก โบนัสไม่จำกัดทุกวันqdmhzl.com
Subukan ang ilang round malay mo bigla ka nang maging panalo at makuha ang ultimate jackpot prize.. Mines
Fortune is on your side ¡ª one spin can change everything!!Sportbet
สนุกพร้อมลุ้นแจ็กพอตใหญ่ทุกนาที ไม่มีเบื่อแน่นอนqdmhzl.com
Your lucky spin awaits ¡ª join now and win big instantly!!Sportbet
It¡¯s time to test your luck and win like never before!Sportbet
สนุกพร้อมลุ้นแจ็กพอตใหญ่ทุกนาที ไม่มีเบื่อแน่นอนqdmhzl.com
Aroyatoto is very consistent in providing fast and reliable performance every time: aroyatoto
Bawat laro ay may premyo! Hindi lang fun, kundi real cash pa ang kapalit!!Mines
Laro na parang tunay na casino! Exciting spins, big wins, at endless fun!!roulette online
To get optimal benefits you need the right strategy when playing bos138 slot. Don’t just think of it as a free gift but use it as a first step to boost your success.
Subukan mo lang, baka ikaw na ang susunod na big winner!!roulette online
Ang panalo ay totoo! Laro na sa pinaka-trending na gaming app ngayon!Mines
Laro para sa mga tunay na champion! Ikaw ba ang susunod? baccarat game
Game on! Sa bawat click, pwede kang maging instant millionaire!!Blackjack Online
Subukan ang pinakabagong online gaming experience kung saan mabilis ang payout, solid ang rewards, at siguradong nakaka-adik ang bawat laban. Handa ka na ba manalo gabi-gabi?!Sportbet
Masarap manalo kapag alam mong instant ang cashout! Kaya subukan ang site na may pinakamabilis na withdrawal sa bansa ngayon..Tongits go
Masarap manalo kapag alam mong instant ang cashout! Kaya subukan ang site na may pinakamabilis na withdrawal sa bansa ngayon..Tongits go
Hindi mo na kailangan ng malakas na device! Kahit phone lang, pwede ka nang manalo sa mabilis at magaan na gaming platform.Mines
Different from the others only here GAN89
Ang platform na may pinakakompletong collection ng online games na may mataas na RTP, kaya mas malaki ang chance mong umuwi ng panalo.Mines
Kung gusto mo ng mabilis na laro, subukan ang instant games na tapos agad ang round. Masaya, mabilis, at may chance manalo nang malaki..roulette online
Ang site na may pinakamalaking cashback offer sa industriya. Kahit talo ka, may balik pa rin. Walang sayang na laro dito…crazy 777
Perfect para sa mga nagtatrabaho dahil pwede kang maglaro kahit break time. Mabilis lang, simple, at may chance kang manalo agad…Mines
Hindi ka mag-aalala sa account mo dahil may 2FA, encrypted data, at secure wallet system. Focus ka lang sa pag-enjoy.Crazy Hunter
Tuloy ang biyaya basta hindi ka sumusuko sa bawat laban mo ngayon..Tongits go
Each article offers clear, valuable insight, and we truly admires the effort behind it.
Ang laro ay nagbibigay saya, pero ang panalo ang tunay na nagpapasaya.Blackjack Online
Ang laro dito ay hatid ang saya na hindi mo makikita sa iba.Blackjack Online
สายเกมห้ามพลาด รวมเกมมือถือสุดฮิต ภาพสวย สกิลโหด แจกไอเทมฟรีทุกวัน แค่เข้ามาเล่นPG สล็อตเกม
Mas masarap ang panalo kapag galing sa puso at tapang mo.crazy 777
Hindi ka mawawalan ng saya basta tuloy ka lang sa pagsubok.crazy 777
People gain more confidence through resources like vega168.
Many users grow their digital awareness using vega168.
Mula umaga hanggang gabi, handa ang laro na magbigay ng saya at pagkakataon manalo, walang limitasyon sa excitement at walang palya ang kasiyahan sa bawat sandali.Crazy Hunter
got a something special to read OLX69
晨涧云高性能GPU算力租赁,4090 48G出租,4090 48G租赁,3090显卡租赁,晨涧云高性价比GPU算力,晨涧云算力服务平台,3090显卡租用 https://www.mornai.cn/store/list
got a something special to read OLX69
Hindi mo na kailangan maghintay ng tamang oras dahil dito bawat sandali ay tamang pagkakataon para subukan ang iyong swerte at maranasan ang tunay na saya. Pinata Wins
got a something special to read OLX69
Sa bawat taya ay may kasamang pag asa, sa bawat panalo ay may kasamang tuwa, at sa bawat laro ay mararamdaman ang tunay na excitement. Pinata Wins
Hindi lang panalo ang makukuha mo kundi pati ang kasiyahan na dala ng bawat laro na puno ng kulay at emosyon. Pinata Wins
Don¡¯t miss today¡¯s bonus drop¡ªlog in, collect rewards, and spin your way to exciting surprises in minutes. Pinata Wins
Get more from every top up¡ªunlock extra rewards, special offers, and fun challenges that boost your play.Crazy Hunter
Hot games, cool rewards¡ªplay now and enjoy bonuses that keep you coming back for more fun.. Pinata Wins
Claim your perks today¡ªnew bonuses, fun challenges, and exciting games waiting on your next tap.. Pinata Wins
Your insights are impressive. Looking forward to more content like this. Visit us
Your lucky run starts here¡ªjoin today and enjoy fast gameplay with exciting bonuses and rewards.Crazy Hunter
Your lucky run starts here¡ªjoin today and enjoy fast gameplay with exciting bonuses and rewards.Crazy Hunter
GPU算力租赁,GPU显卡租赁,分子动力学GPU,科研GPU租用,晨涧云算力平台 https://www.mornai.cn/image/list
Sumali sa pinaka-mainit na online game hub sa Pilipinas, kung saan bawat spin at bawat tap ay may tsansang magdala ng panalo, rewards, at unlimited na saya tuwing gabi kasama barkada..Crazy Hunter
Invite your friends gamit ang referral link mo, panoorin silang mag-enjoy, at sabay-sabay kayong kumuha ng referral bonus, extra spins, at group rewards bawat successful invite..Tongits go
Thank you for your sharing. I am worried that I lack creative ideas. It is your article that makes me full of hope. Thank you. But, I have a question, can you help me?
Join our weekend festival, kung saan mas malalaki ang multipliers, may hourly mini-jackpots, at special leaderboard na nagbibigay ng exclusive prizes sa top active players..Mines
Sa bawat log-in streak, mas tumataas ang value ng daily rewards mo, kaya mas maaga kang pumasok at maglaro, mas maraming freebie ang puwedeng maipon.Mines
Sa mga mahilig mag-content, puwede mong i-share ang highlight wins mo sa social media, ipakita ang lucky moment mo, at sabay makakuha ng extra promo codes.“sport betting
This article opens a good discussion. DESA55 also covers related perspectives.
Good insight. I’d like to compare this with information from DESA55.
Kung naghahanap ka ng bagong hobby, subukan ang light gaming sessions dito, walang pressure, may tutorials, at supportive community na mahilig sa good vibes at bonuses..sports live
789 club tải game,nằm mơ thấy chơi máy đánh bạc,cách chơi máy đánh bạc,789 club,máy đánh bạc slot machine,game 789 club,tin thể thao https://www.yenikov.com
Level up your swerte with daily free spins, cashback, and GCash-friendly payouts ¨C one tap lang, and your next big win could be in your wallet today..Lucky 9
Experience lightning-fast registration, no hassle deposits, and GCash withdrawals ¨C more time for playing and winning, less time waiting and worrying..Crazy Hunter
cách chơi máy đánh bạc,game 789 club,thể thao cực hạn,m88 m thể thao,tin thể thao https://www.arsenebalders.com
Buy Premium Quality Research Chemicals Online
High-Quality Research Chemicals
Buy Premium Quality Research Chemicals Online
Shop High Premium Quality Research Chemicals Online
Herbal Incense & Legal Buds
Shop Europe Strongest Legal Highs
fitness gym equipment
shop research chemicals
shop fitness equipment
research chemicals for sale
Buy Research Chemicals Online
hiệp hội thể thao roma,game 789 club,cashman casino máy đánh bạc,m88 m thể thao,tải game 789 club https://www.stanislawwielgus.com
thể thao,giày thể thao,các loại máy đánh bạc,789 club tải game,máy đánh bạc bịp,nằm mơ thấy chơi máy đánh bạc,tin thể thao,quick hit casino máy đánh bạc trò chơi,789 club.ogr,tải game 789 club apk https://www.struhaqi.com
Turn your scroll time into win time ¨C instead of endless feed, tap into slots, live tables, and events with daily bonus drops para sa active players..Lucky 9
From beginners to pros, may game mode para sa¡¯yo ¨C easy slots, strategy tables, and high-roller rooms kapag handa ka na sa bigger stakes.. Pinata Wins
スーパーコピー サンダル,コピー腕時計,スーパーコピー ハイヒール,スーパーコピー スリッパ,ブランドスーパーコピー,時計コピー スーパーコピー ハイヒール
Many online posts casually reference https://vegathemoon.net/.
Special Pinoy events every week ¨C themed promos, fiesta-style jackpots, and bonus codes tailored for Filipino players who love extra surprises..Crazy Hunter
Spin under the neon glow of animated reels and exciting soundtracks ¨C para kang nasa real, but comfy ka lang sa kama or sofa mo.crazy 777
m88 com login|kèo nhà cái w88 m88|trang cá độ đá banh|m m88 com|keonhacai co m m88 com
do dogs miss people,Engraved pet portrait,Handmade pet clay sculpture,Hand painted oil portrait,why do cats knead,personalized pet painting Hand painted oil portrait why do cats knead
Craving competition? Join timed tournaments where only the sharpest, luckiest Filipino players rise to the top and take home special prizes.Lucky 9
N级品ブランドスーパーコピー|スーパーコピー スカーフ|スーパーコピー シューズ|スーパーコピー ファッション|ブランドコピーハンドバッグ スーパーコピー ファッション
スーパーコピー 洋服,コピー通販専門店,ブランドスーパーコピー,スーパーコピー サンダル,偽ブランド 腕時計 コピー,スーパーコピー 時計 スーパーコピー 洋服
From classic fruit slots to modern themed adventures, hindi ka mauubusan ng bago ¨C we constantly add fresh titles for you to explore.Crazy Hunter
スーパーコピー シューズ|スーパーコピー腕時計|スーパーコピー 服|スーパーコピー シャツ|コピー通販専門店|スーパーコピー コート|ブランドスーパーコピー|スーパーコピー かばん|スーパーコピーバッグ|スーパーコピー 靴 スーパーコピー シャツ
スーパーコピー ダウンジャケット|スーパーコピー シャツ|スーパーコピー ベルト|N级品ブランドスーパーコピー|スーパーコピー 服|スーパーコピー 財布|スーパーコピー スカーフ スーパーコピー 服
Experience the thrill of last-second wins ¨C one spin, one card, one turn can flip your entire session from quiet to explosive.Crazy Hunter