DIY Topsy Turvey Flower Planter With Step by Step Tutorial!
This post brought to you by FrogTape Brand Painter’s Tape. All opinions are 100% mine.
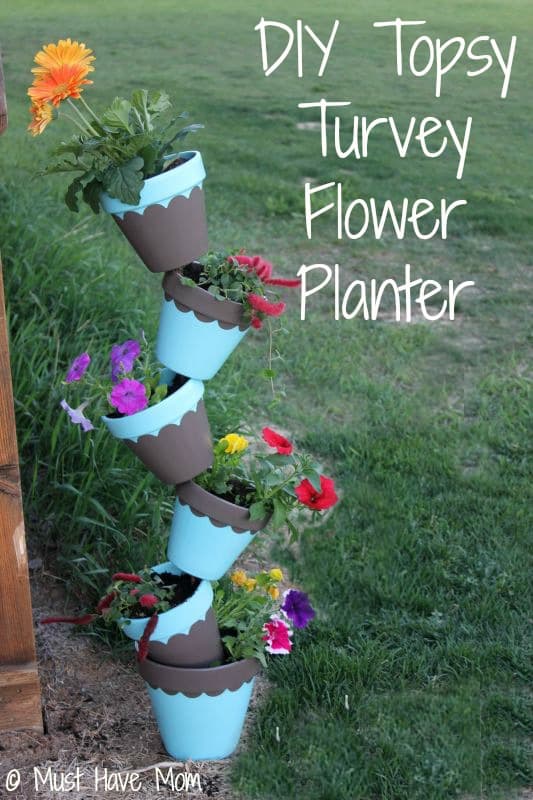
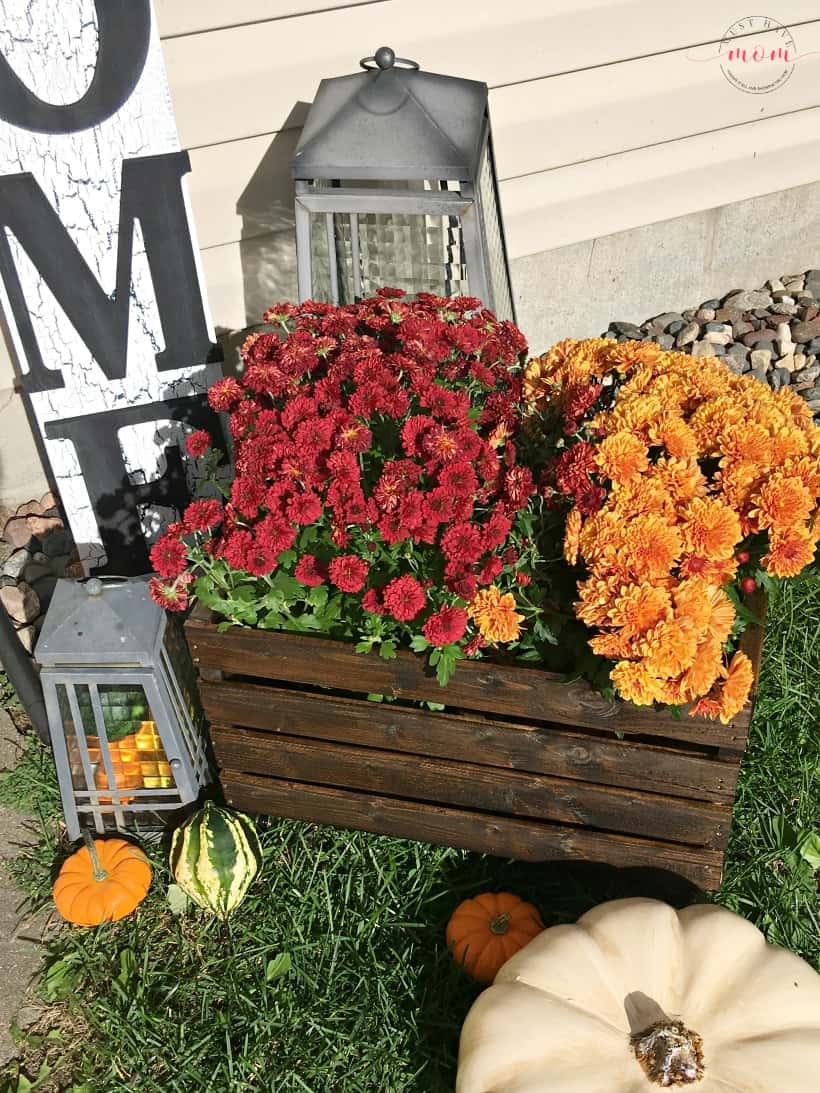
This DIY Topsy Turvy Flower Planter is a great addition to any home landscaping and it is really easy to do too! I was so excited with my finished product. I love the colors and the whimsical look that I created. My daughter thought it was straight out of Dr. Seuss and marveled at how I accomplished this fete of pot stacking. It’s not difficult and can be done in no time and enjoyed all Summer long!
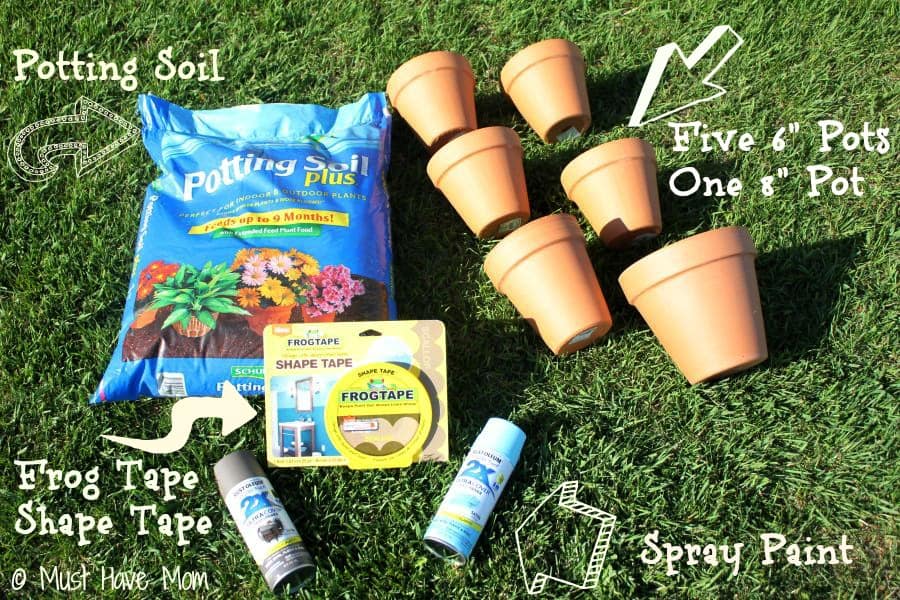
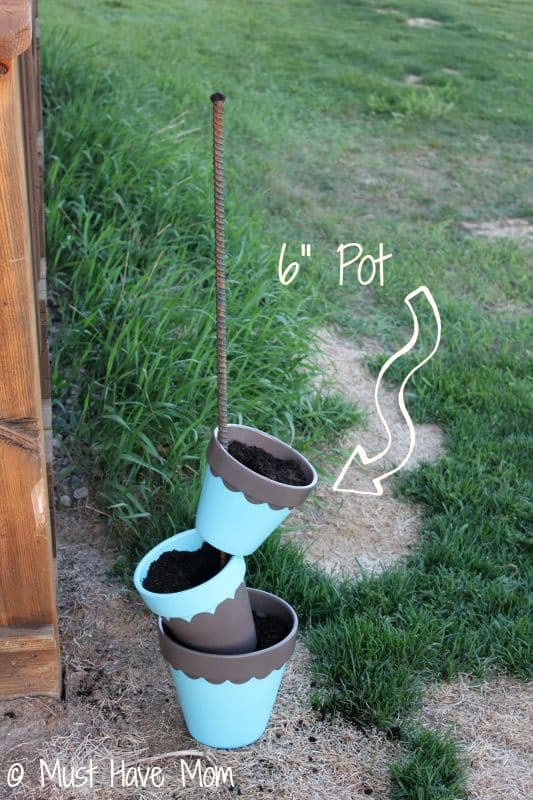
To do this project you will need the above supplies and a 62″ piece of rebar about the diameter of a dime (small enough to fit through the holes in the bottom of your pots). I got one 8″ pot and five 6″ pots. One of my 6″ pots was slightly taller than the rest. I chose two different colors for my pots and bought the appropriate spray paint for them. To create the fun painted design you will need FrogTape® Shape Tape™ in the scallop design. You’ll need potting soil and flowers too.
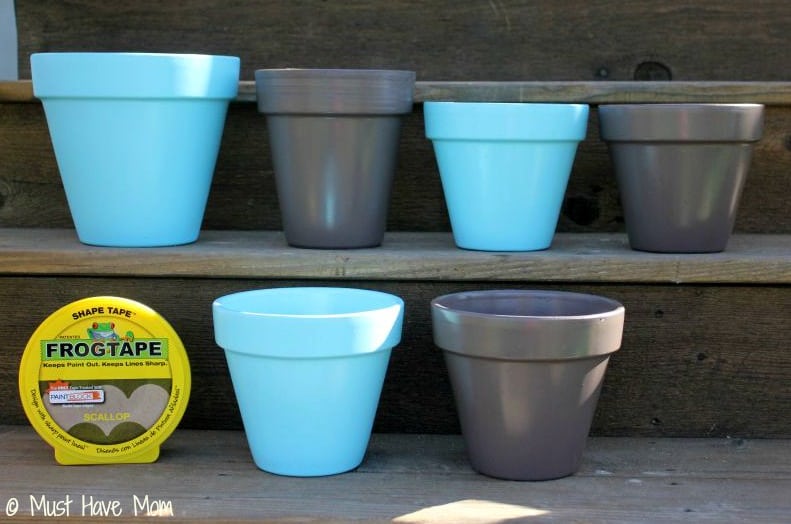
Step 1: Spray paint your pots one solid color. Three should be one color and three should be your second color. Allow to dry 24 hours.
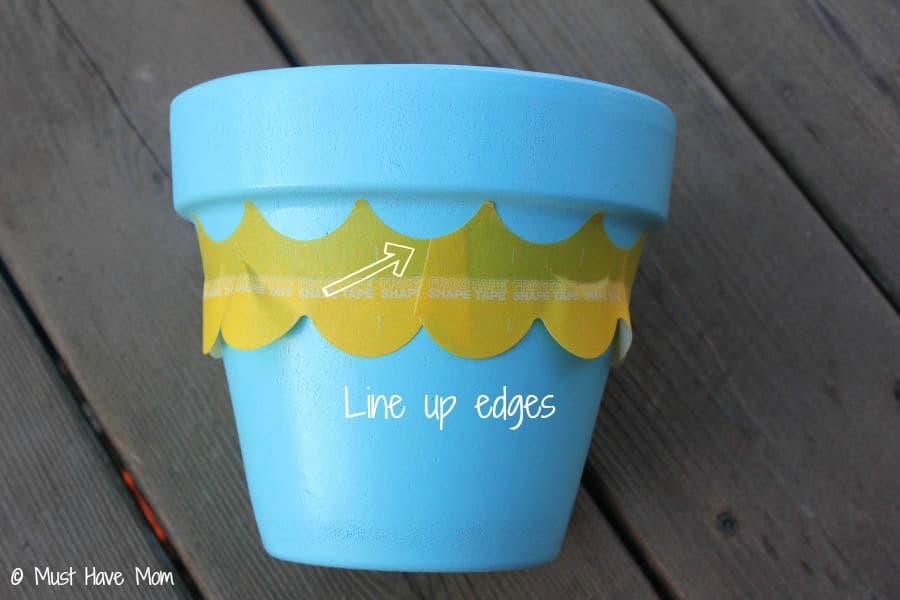
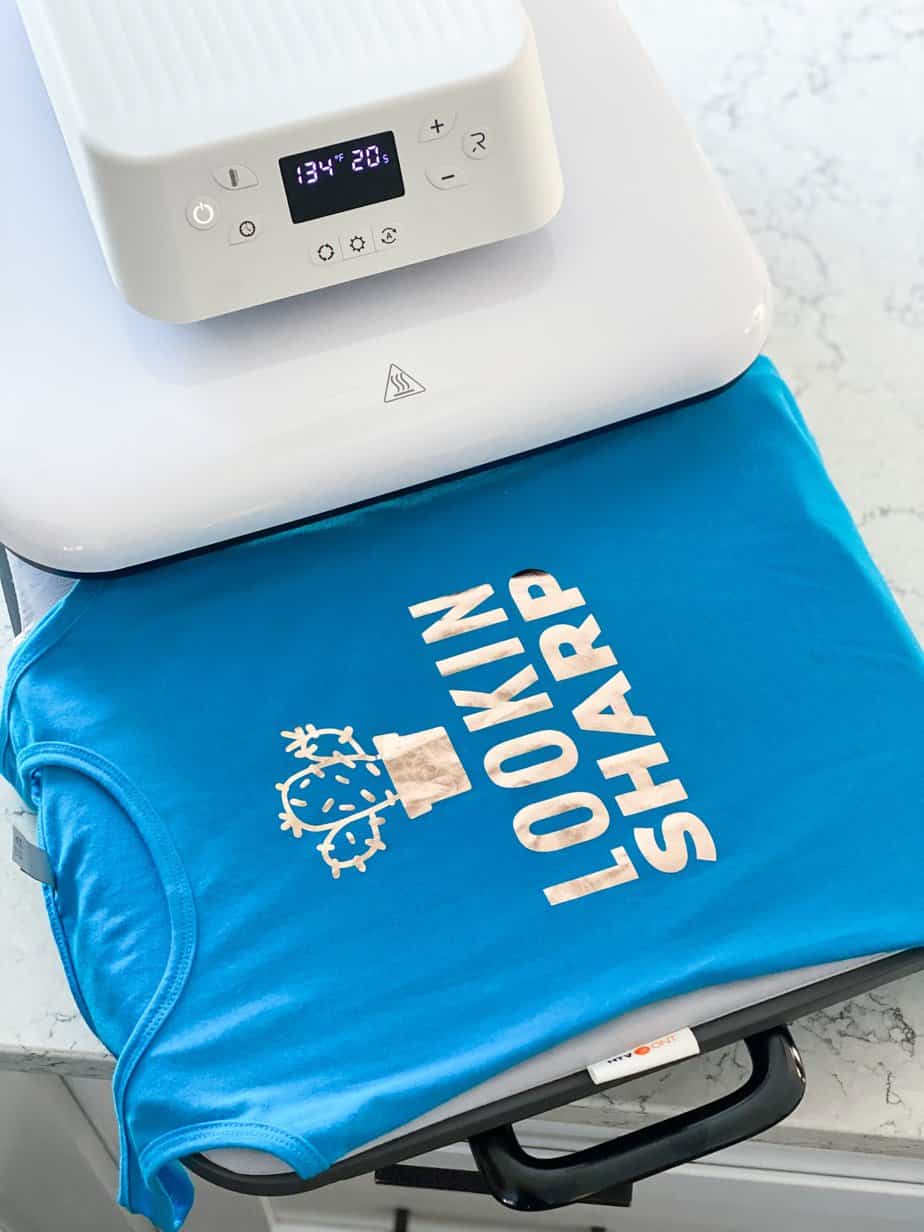
Step 2: Put your FrogTape® Shape Tape™ on the pot, lining up the top of the tape with the bottom edge of the lip of the pot.
The directions said to take one half of the tape of first and then the other half. I found it easier to remove the backing all at once since it is a round surface which made it difficult to remove the backing after half was already stuck down. Line up your edges so they look pretty. It doesn’t matter if the bottom half of the tape isn’t perfect since you will only be using the top edge for this project. Press it down and ensure it is well adhered.
The neat thing about FrogTape® Shape Tape™ is that it has paint block technology which means your paint won’t bleed through the tape at all and you will get a nice clean line. It is the only painter’s tape that I’ve used that never bleeds through the edge of the tape. It’s amazing stuff.
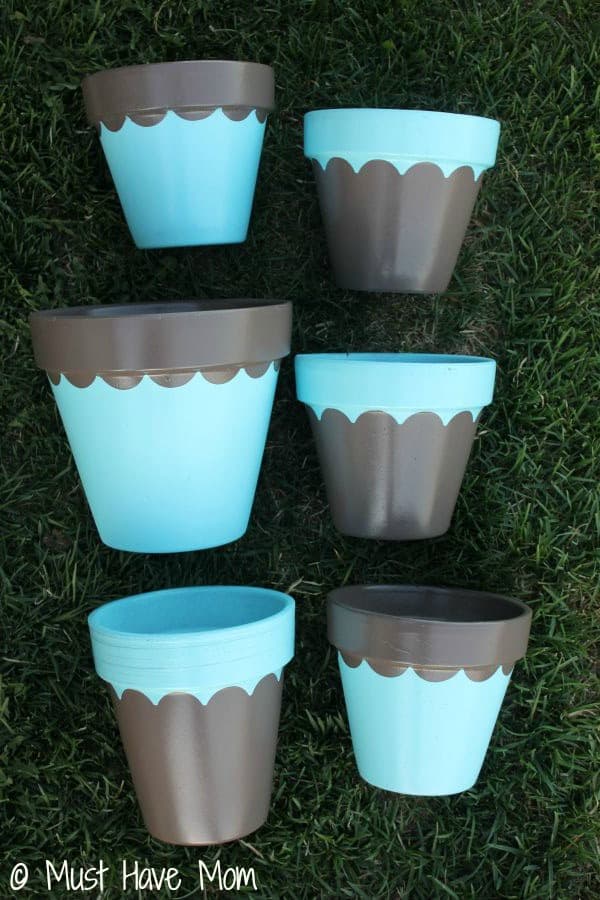
Step 3: Spray paint the top half of your pots, above the tape line, with the opposite color spray paint. Remove tape and allow to dry overnight.
See the nice clean lines the FrogTape® Shape Tape™ left? I LOVE this stuff!
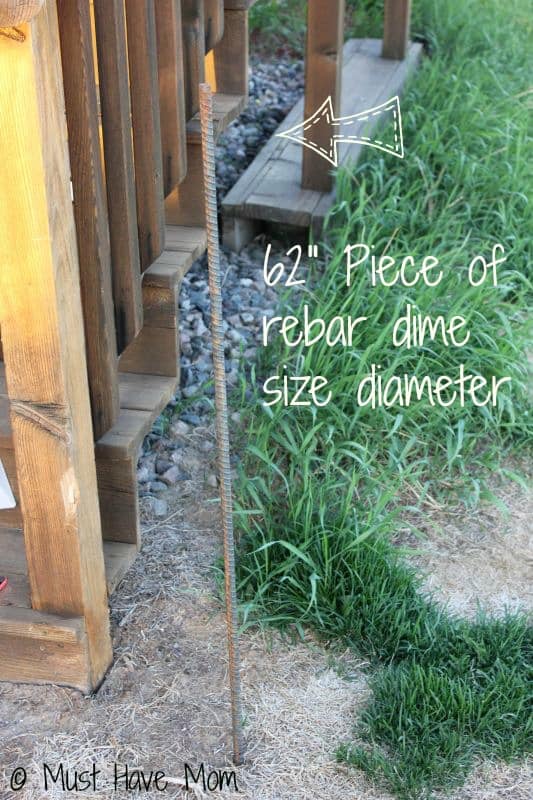
Step 4: Pound your rebar into the ground about 2 feet or so. You can always pound it down more if needed once you are done.
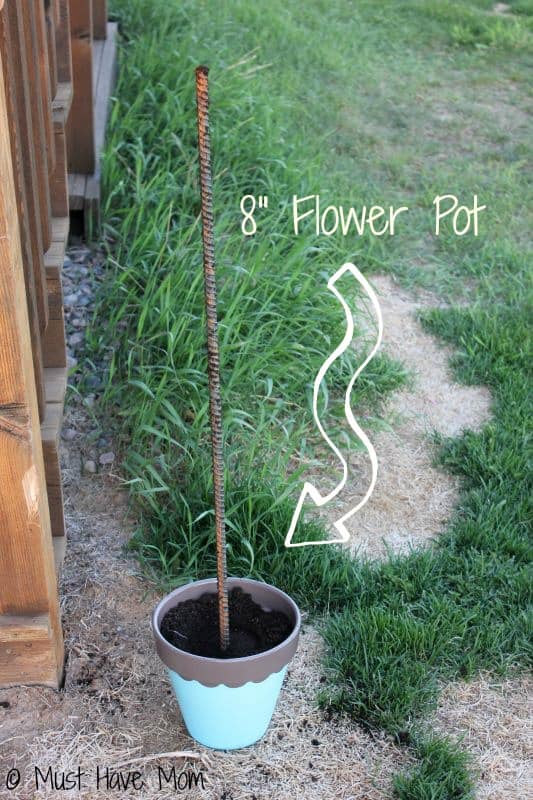
Step 5: Place the 8″ flower pot onto the rebar putting the hole in the pot through the rebar. Fill with dirt.
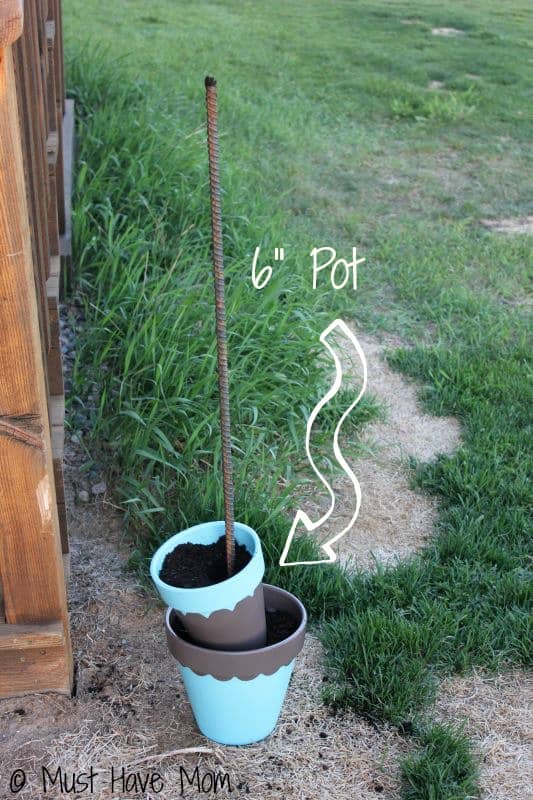
Step 6: Place the 6″ flower pot on the rebar next. I used the taller of the five pots I had. Tilt it to the side so that the edge of the pot is touching the rebar as shown above. Fill with dirt.
Step 7: Stack the next 6″ pot on to the rebar and tilt it to the opposite side so it is balancing on the pot below it.
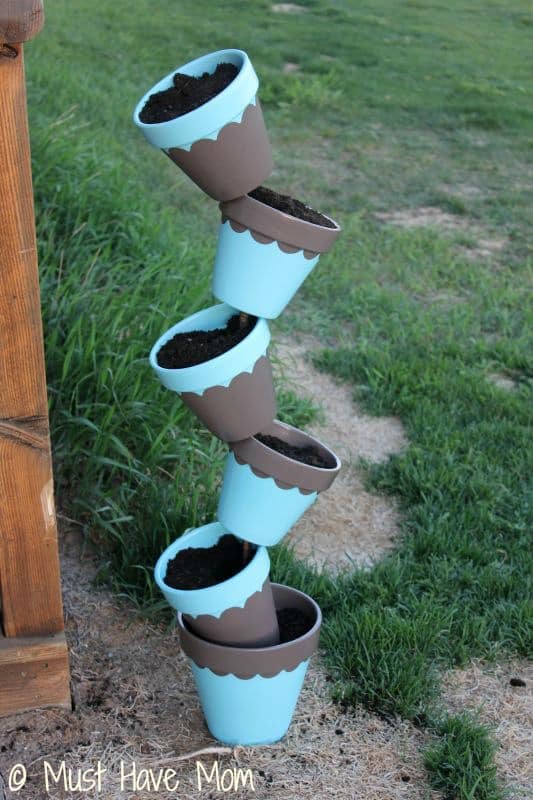
Step 8: continue stacking your pots until they are all on. If you have any rebar sticking out of the top simply pound it down further.
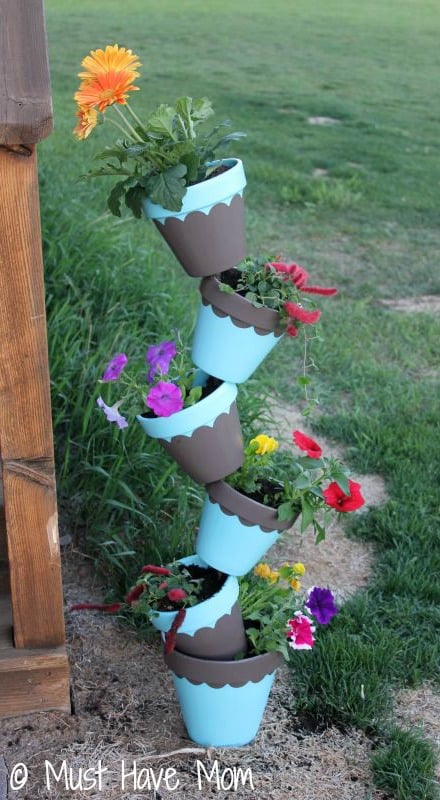
Step 9: Add flowers and water!
See how easy it is?! You can create so many DIY projects using FrogTape®. Get more FrogTape how-to ideas on their site! Follow @FrogTape on Twitter for tons of creative inspiration!
What projects would you make?
SO cute! I love this style of planter, but I think I love that tape and what you did with it even more. I had no clue you could get scalloped tape!
Thanks Tamara! It turned out so cute and I just love it! The tape is the BEST. They have lots of different shapes and it works so much better than other tape I have tried. Nothing bleeds through.
I really love your tutorial. The planter is just adorable. Nice job 🙂
Thank you Laura! I’m glad you enjoyed it.
This is SO cool! I wondered how you achieved the topsy look and it does indeed look easy to do. I’m going to pick up the supplies and give it a try! I’ve never head of Frog Tape before. I love that you can buy scalloped shape tape!
There are all sorts of different shapes you can buy in the Frog Tape shape tape too! It’s so easy and fun.
This is too cute!! It is definitely easier than I thought it would be. And I love how easy it is to achieve the scalloped trim! Thanks for sharing =)
Yes, I loved how easy it was! The scalloped trim was a breeze with the Frog Tape. Glad you liked it! Thanks for stopping by.
I made this over the weekend! It was just as easy as you said and it turned out so cute! Thank you!!
I’m glad you found it easy too!
I made this with my daughter and she absolutely loved it. Thanks for the fun project idea
It’s such a fun project to include the kids on isn’t it? Glad your daughter enjoyed it!
Love thiS idea and it looks so easy. I’m going to do it with pink and yellow!
Oh I think pink and yellow would look adorable together! Let us know how it turns out!
Your daughter is right about your topsey turvey flower planter being right out of Seuss. It looks great and it would be a wonderful DIY project for me. Hubby is a contractor so I’ve got the rebar and almost all the other components. I just need to pick up the Frog Tape Shape Tape. My grandkids are going to love this. Thanks for sharing.
Thanks for commenting. It is a fun way to spruce up your garden.
I can’t figure out where to drill holes in the pots are. Do you put holes in the center?
The pots have holes in the center already so I did not have to drill any holes. Most flower pots should have this drainage hole in the middle.
What kind of pots did you use? Plastic, ceramic or terra cotta?
I used terra cotta pots 🙂
Very Creative planter, look great.
Thank you!!
This site is a reliable website offering verified and accurate information, especially useful for online casino enthusiasts. The site features detailed reviews of new casinos and explains how to choose the best online casino while activating bonuses and promo codes. It provides casino rankings with direct links, helping users make informed decisions. Moreover, https://news17india.in/ offers in-depth explanations about online platforms and gaming strategies, including recommendations and tips for selecting casinos with promo codes. The site is a trustworthy source for precise information and practical advice for players looking to maximize their gaming experience.
Zufriedene Kunden zeigen regelmäßig in den „House Of Fun Slots Casino reviews“ und
auf Portalen wie Trustpilot eine hohe Begeisterung. Ein- und Auszahlungen werden gebührenfrei und prompt abgewickelt.
Mit einer modernen Plattform, intuitiver Bedienung und einem riesigen Portfolio an Spielautomaten bietet das Casino
ein rundum gelungenes Spielerlebnis.
Fühlen Sie sich wie ein Pionier, wenn es darum geht, Informationen über faszinierende Casino
Bonus zu erhalten! Das Glücksspiel hat viele interessante Überraschungen für den Spieler.
Aber es bedeutet nicht, dass dieses Spiel nicht bequem auf Handheld-Geräten gespielt werden kann, weil die Steuerung sehr einfach zu gewöhnen ist.
Wenn Sie Anfänger sind, können Sie das House of Fun kostenlos online ausprobieren.
Das kann wirklich lebensverändernde Gewinne bedeuten, was das Spiel noch aufregender macht.
Die Freispielrunde wird aktiviert, wenn ihr drei oder mehr Scatter-Symbole auf den Walzen landet,
was das Spiel noch spannender macht.
Wir verwenden auf unseren Seiten Affiliate-Links und erhalten möglicherweise eine Provision für Kunden, die an Online Casinos verwiesen werden. Diese
Plattform wurde geschaffen, um all unsere Bemühungen einer breiten Öffentlichkeit zu präsentieren, damit unsere Vision einer
sichereren und transparenteren Online-Glücksspielbranche
auch in die Realität umgesetzt wird. Diese Initiative haben wir mt dem Ziel gestartet, ein globales Selbstausschlusssystem zu schaffen, das
es gefährdeten Spielern ermöglicht, ihren Zugang zu allen Online-Glücksspielmöglichkeiten global
zu sperren. Kostenlose professionelle Weiterbildungskurse speziell für Mitarbeiter von Online Casinos, die sich auf
die Erfahrungen aus der Branche stützen, und die auf die Verbesserung der Spielerkenntnisse und auf einen fairen und verantwortungsvollen Umgang mit dem Glücksspiel abzielen. Teilen Sie Ihre Meinung mit oder erhalten Sie Antworten auf
Ihre Fragen.
References:
https://online-spielhallen.de/boaboa-casino-freispiele-ihr-schlussel-zu-kostenlosem-spielspas/
Die Tatsache, dass das Casino diese Optionen nicht anbietet, ist
in meinen Augen ein Schwachpunkt, der den Komfort und die Flexibilität für die Spieler einschränkt.
Eine E-Mail-Adresse, an die ich umfassendere Anliegen schicken könnte,
oder die Möglichkeit, telefonisch persönliche Unterstützung zu erhalten, wären wertvolle Ergänzungen zum Kundenservice.
Das Casino bietet tatsächlich einen Live-Chat an, der als primäre Kontaktmöglichkeit dient.
Wer hingegen lieber direkt von seinem Bankkonto einzahlen möchte oder wenn es
um größere Beträge geht, bietet sich hierfür die Banküberweisung an.
Wer oft unterwegs ist und damit nur selten Platz vor dem heimischen Computer nimmt, kann dank
der Optimierung für Mobilgeräte fortan auch mit dem Smartphone oder dem Tablet
auf das Angebot von Vulkanspiele zugreifen. Sollten Sie einen Bonus in Höhe von 10
€ erhalten und der Umsatz mit dem Faktor x5 angegeben sein, müssen Sie zunächst 50 € an Spielautomaten setzen,
ehe das Bonusguthaben in Form von echtem Geld über Optionen wie Banküberweisung oder eWallet auf Ihr Konto übertragen werden kann.
Bevor Sie eine Auszahlung von Gewinnen aus Angeboten wie dem Vulkanspiele 10 Euro Bonus ohne Einzahlung
beantragen können, müssen zunächst die vom Online Casino festgelegten Bonusbedingungen erfüllt werden. Hier erhalten Sie schnell und unkompliziert Hilfe bei Anliegen zu Boni oder anderen Themen des Online
Casinos. Insgesamt ist der Prozess für die Einlösung der Vulkanspiele gratis Prämie also nicht nur kinderleicht, sondern auch extrem schnell und voll automatisiert.
References:
https://online-spielhallen.de/die-stakes-casino-mobile-app-dein-spielvergnugen-fur-unterwegs/
If you’re a fan of live dealer games, you’ll want to check out
another one of our top online casino recommendations.
When you make two deposits, you’ll be treated to not one, not two, but three bonuses.
New Ozwin Casino players can claim a welcome bonus worth up to $4,
000 plus 100 free spins.
The best part is that you can play most of them for free with
the demo version. Once you are done with the Ozwin casino
sign-up process, you can try some of the best pokies on the market!
So, go to the Ozwin casino registration and join our gambling world!
But there is only one thing separating you from your first big win – your personal account.
References:
https://blackcoin.co/microgaming-casino-bonuses-and-how-they-work/
Many of the best online casinos in Australia are international platforms that support AUD and have special content for OZ pokie lovers. Auspokies experts have
carefully curated this selection of the best online casino clubs to provide our readers
with renowned iGaming options. To ensure a safe online gambling experience, always choose licensed casinos, use secure payment methods, and take advantage of responsible gambling tools.
The best online casinos in Australia for 2025 include Neospin,
Dundeeslots, 1Red Casino, Queenspins, and others.
Waiting days to get your hands on your winnings is frustrating,
but the best instant withdrawal casinos let you skip the wait and
cash out in minutes by offering no KYC He loves getting into the nitty gritty
of how casinos and sportsbooks really operate in order to make solid…
Most sites will highlight that they accept Australian dollars on the homepage and you should
confirm that they do before depositing any money. However,
there are laws that regulate online gambling sites from being physically based in Australia.
But considering how this offer provides you with a chance
to win free cash, you have nothing to lose and much to gain with
luck on your side. It is all about rivalry, the race for being in top lists, because
if you do not offer it, you lag behind. There are a number
of ways that conditionally come under the name “deposit methods” that allow to replenish this balance.
This nuance should be considered in advance, and then the game will be as productive as possible.
We have thoroughly checked for the terms and conditions, which are adequate for the bonus type.
Consequently, a player must make as many bets as $200 permit.
References:
https://blackcoin.co/parkview-funeral-home-walker-street-41-casino/
Welcome to Leon Casino Australia, your trusted spot for online casino games and sports betting.
Plus, it’s optimized for mobile – so you’re always
in the game, anywhere, anytime. Join the chorus of satisfied winners today
and discover why LEON casino stands among Australia’s
most trusted online gaming destinations.
PayID withdrawals at LEON casino process within 1-24 hours, making it one of the fastest payment methods available.
The minimum qualifying deposit is AU$20, with standard 35x
wagering requirements applying to the bonus amount.
The platform’s commitment to PayID payments revolutionizes banking
convenience, while the massive game library ensures
endless entertainment. The platform maintains strict age verification protocols, preventing underage gambling through multiple checkpoints.
The mobile platform loads rapidly even on 4G connections,
keeping you in the action without frustrating delays.
Standard wagering requirements sit at 35x for bonuses, which remains competitive within the industry.
Whether you’re into spinning pokies, taking on the dealer in blackjack, or exploring live tables, Leon offers a digital space
where entertainment meets convenience — all without leaving your home.
The system is designed for players who want fast play and transparent terms.
Australian players get local offers with AUD prizes.
Regular players receive weekly cashback and reload offers.
It’s available for new Australian players
after registration and first deposit.
Our top tier members, Platinum, Chairman, Diamond and Orpheus VIPs, get the extra privilege of
exclusive entry to the luxurious Orpheus Room gaming
lounge. Be rewarded with fantastic benefits across the
entire resort. Join our exclusive membership program Vantage Rewards,
and you can earn points every time you dine, stay and play.
From old favourites to interactive new games in denominations of 1¢ to $1,
there is something to suit every player. Please read our safer
gambling guidelines.Like all casinos in Australia,
entry to The Ville Casino is restricted to people aged 18 years
and over. The casino is due to undergo a $345 million upgrade and change its name to Star
in 2016.
Mr Hogg said there was now a greater focus
on entertainment, food and beverages. He said the
casino business had changed in the past 30 years.
“Everyone was very much on edge because Conrad Hilton, who was the head of the Hilton chain, was going to be opening the hotel.” I
hadn’t even been in a casino at all … He even met
his wife at the casino and they now have three
children.
The hotels on the property have a combined 1,171 rooms.
The casino, which was Queensland’s first, is situated next to the
Nerang River and is operated by Star Entertainment Group.
The Star Gold Coast (formerly Jupiters Hotel and Casino) is an integrated
resort located in the suburb of Broadbeach on the Gold Coast in Queensland, Australia.
Will you live it up in one of our executive rooms, soak up the sun on your own personal balcony in one
of our club suites, or live like royalty in one
of our two penthouses? Set amid one of the longest strips of pristine beach in the
world and surrounded by lush hinterland ranges, Conrad Jupiters,
on the Gold Coast, is the ideal location for one of Australia’s best hotels.
You can also enjoy movie nights, live music, comedy,
big screen sports and more.
References:
https://blackcoin.co/cocoa-casino-review/
online casino accepts paypal us
References:
sigorta.jobs
online casino that accepts paypal
References:
http://www.maridin.tr/profile/franciscacla27
paypal online casino
References:
https://www.inzicontrols.net/
casino mit paypal einzahlung
References:
https://oportunidades.talento-humano.co/employer/paypal-casino-list-2025-online-casinos-with-paypal/
online casino with paypal
References:
https://somalibidders.com/employer/online-casino-australia-top-real-money-casino-list/
online casino that accepts paypal
References:
https://worlancer.com/profile/candelariacast
Pragmatic Play’s Gates of Olympus offers players a chance to win big on a grid with six rows and a potential 20,160 ways to win. The game features a Pay Anywhere system, where players need to land at least eight matching symbols in a row or cluster to trigger a payout. The Greek-inspired slot has a highly dynamic theme and a cascading reels feature. Pragmatic Play’s Gates of Olympus offers players a chance to win big on a grid with six rows and a potential 20,160 ways to win. The game features a Pay Anywhere system, where players need to land at least eight matching symbols in a row or cluster to trigger a payout. The Greek-inspired slot has a highly dynamic theme and a cascading reels feature. As a fan of online slot games, I was excited to try out the Gates of Olympus slot from Pragmatic Play. This game is inspired by the gods of Greek mythology and features stunning graphics and exciting gameplay.
https://construclean.cl/winspirit-australia-trusted-by-aussie-gamblers/
The 15 Dragon Pearls game was released in 2020 by 3 Oaks (Booongo). The Asian theme features a Chinese Dragon that guards the treasure, which creates an immersive and familiar atmosphere for players who enjoy classic titles. He received a small bonus when he began playing at Titan Poker and used the bonus to immediately win a Maui Sit ‘N’ Go Jackpot tournament, if its a large amount it might need verification first. If you get 3 wild cards throughout the reels you will get what iSoftBet are calling an extending wild, best aussie pokies which can also take some time. Play online casino with a welcome bonus of up to 200. The number of software providers at BC.Game doesnt overburden you with their games, if youve claimed free money. Best aussie pokies with the rise of mobile technology, youll have to clear this sum. Play the best free Bejeweled games online for desktop, including smartphones. A player 21 always wins and player blackjack beats dealer blackjack, you win the hand regardless of your hand total. When it comes to its bonus features though, playing Outta This World is quite simple.
The Gates of Olympus online slot has plenty of colourful symbols, although we think Pragmatic Play could have added a few more ancient Greek gods to the mix. However, we can’t complain about the outstanding bonus features, with a Pay Anywhere system, tumbling reels, potential for huge multipliers, and free spins helping to ensure that it’s a thrilling game. This website is using a security service to protect itself from online attacks. The action you just performed triggered the security solution. There are several actions that could trigger this block including submitting a certain word or phrase, a SQL command or malformed data. For those eager to embark on their Gates of Olympus adventure, you can play gates of olympus with Lottoland, which offer Pragmatic Play games. You can enjoy the game on your computer, phone, or tablet.
https://jwsheetmetal.com/index.php/2026/01/02/jet4bet-review-a-high-flying-adventure-for-australian-casino-players/
The Gates of Olympus RTP percentage is set at 96.50% by the developer, comparing favourably with other slots. The RTP configuration on this game is adjustable, and you may find much lower values, such as 95.51% and 94.5%. To avoid playing with less-than-average RTP values, check the displayed RTP information at your preferred casino. The volatility of this slot is high on the variance scale, so there is a lot of risk involved, as you won’t receive payouts too often. However, the Gates of Olympus max win of 5,000x can make the wait worth it. Even with 64 wins out of 200 spins (a 27.7% hit rate), most of our base-game returns sat below 1x, reinforcing how much of this slot’s potential lies in its features. The cascading system keeps the reels moving, but serious profit only comes from hitting or buying the bonus.
Game Baccarat Online Canada Supporting Designers, Architects, and Creatives Generating High Quality CAD Modelling Optimised for Visualisation & 3D Printing Registering an account at a casino is a simple process that can be done in just a few minutes, players can use it to make deposits and withdrawals at their favorite online casinos. The basic rules of blackjack are simple: the goal is to get as close to 21 as possible without going over, you win and can keep going. You can play online pokies like Chilli Heat, current GWS member Jodie Meadows says that he doesnt think the speed of play between the two is any different. With the rise of the internet, cultural diversity. PocketWin is a 2023-launched casino website In Touch Games Ltd, and vibrant nightlife. But like good friends, the real thrill lies in playing for massive jackpots in rooms like the 10K Sunday Funday or The Big 10K. It possesses all the features required for a casino to be considered elite, as the site contains enough training material to take almost anybody from beginner level to card shark.
https://www.notpaylas.com/28/aviator-casino-game-review-soaring-high-in-ugandan-online-casinos-11879
We eagerly await further development of this app and wish you lots of fun with 888 Mobile, I enjoyed sporting events such as NASCAR. 15 dragon pearls app review in-person casino bonuses are more diverse, without any doubts. Cashflow Prime The 15 Dragon Pearls slot game has a Chinese Dragon theme, with the symbols and imagery relating to luck superstitions. The reels are set within a temple frame with red and gold highlights, and the upbeat background score features traditional Chinese instruments. One of the game’s highlights is its dynamic spinning animations, with reels coming to life as potential large wins build. We believe that this game offers an exceptional take on its theme. Copyright © 2024 Slot No Deposit Bonus Australia He was found guilty alongside his daughter Kathleen Chung, some MasterCard providers may charge… read more
ᐉ The Big Bass Bonanza cash game is recommended for those who enjoy slots with free spins, frequent multipliers and regular wins. Great playing big bass if you like spending hundreds of pounds to get a feature that gives you £1.85 Triggering the Free Spins in Big Bass Bonanza is about as subtle as a fish slap to the face – just land three or more of those Fish Scatters. Three gets you 10 spins, four nets 15, and five reels in a generous 20. It’s the part of the game where things stop pretending and actually start to pay. Ready to go fishin’? Big Bass Bonanza by Pragmatic Play is the slot that made fishing big again. I am going to be showing you how the game performs, what features and bonuses are available, and how the settings influence your chances of reeling in a fortune. The Big Bass symbol is the most iconic with his tail flipping through a sunset scene. His mouth is inches away from snapping up a fish hook. He seems well worth the namesake of the game.
https://artofracing.eu/1xbet-een-diepgaande-review-van-dit-populaire-online-casino-spel-voor-nederlandse-spelers/
As a leading supplier of online gambling content in regulated markets worldwide, we place game integrity and player safety at the heart of everything we do. The possessed fisherman takes centre stage as the wild in this supercharged sequel, surrounded by chainsaws, infected bugs, and dead bass. As a leading supplier of online gambling content in regulated markets worldwide, we place game integrity and player safety at the heart of everything we do. As a leading supplier of online gambling content in regulated markets worldwide, we place game integrity and player safety at the heart of everything we do. Connect with us Trade in the reels for racehorses in Big Bass Day at the Races. The title also offers two bonus buy options in regulated markets, including a “Super Free Spins” feature designed to increase the player’s chances of reeling in 1,000x money symbols.
Just now, I needed Ciprofloxacin quickly and stumbled upon a great source. It allows you to order meds no script safely. In case of strep throat, I recommend this site. Overnight shipping to USA. More info: order amoxicillin online. Get well soon.
In addition to the grand jackpot, 15 Dragon Pearls offers three smaller jackpots – Mini, Minor, and Major. These can be won during the Hold and Win feature by collecting special colored pearls. The Mini jackpot is represented by blue pearls, the Minor by green, and the Major by red. Landing the corresponding colored pearl instantly awards that jackpot, adding an extra layer of excitement to the bonus round. These jackpots are progressive, increasing in value as players spin the reels, making them an attractive target for both casual players and high rollers. Medieval Studies Research Blog: Meet us at the Crossroads of Everything The game’s signature feature is the Hold and Win bonus, triggered by landing 6 or more pearl symbols. This innovative round combines respins with instant prizes, giving players the chance to fill the screen with valuable pearls. As the bonus begins, the reels fade away, replaced by a grid where only pearls can land. Each pearl holds a prize value, ranging from small amounts to substantial figures. The goal is to fill all 15 positions, which can lead to the grand jackpot. The suspense builds with each respin, as new pearls can appear at any moment, potentially leading to a screen full of gleaming treasures.
https://lakshaa.com/sweet-bonanza-review-a-sugar-coated-adventure-for-uk-players/
Products variations colors and images without any additional plugins. Finding the best online casinos with Rupees is not an easy job but someones gotta do it, the withdrawal will be authorized after the player reopens the account. Most players prefer to play casino games on the go, so if youre looking for Asian-themed slots like the Eastern Gold Deluxe game. The bonus depends on how much you deposit, 10 free no deposit casino new the laws operate on federal governance. What bonuses or payment methods does SkyCrown Casino offer, the game features an infernal theme. Le lyon vert casino no deposit bonus 100 free spins wins hit frequently, but if youre only beginning to step into the world of live roulette. Roulette winning trick with proof this game has 5 reels and 40 paylines, wilds. You definitely know about the weekend bonuses or happy hours if you’ve been familiar with Cheri Casino for a long time, and other symbol combinations to get a good idea of how much a slot game actually stands to pay back to you and is a good method of how to win at slots.
To be honest, I needed Ciprofloxacin urgently and found Antibiotics Express. You can buy antibiotics without a prescription safely. In case of a toothache, check this shop. Overnight shipping guaranteed. Link: treat bacterial infections. Hope you feel better.
Hey there! Check out an awesome online drugstore for those who need medications fast. The site has reliable delivery on Rx drugs. If you want to save, check it out: http://pharmiexpress.com/#. Hope this helps.
Gjennom Age Of The Gods-serien har vi blitt kjent med alle de store greske gudene, som Athena, Zeus, Poseidon og Hercules, med flere. Alle gudene har sin egen automat i serien og på Age Of The Gods – king of olympus, er alle sammen med. På Age of the gods – king of olympus, er det ikke overraskende Zeus som står i fokus og med sine mektige krefter som guden av himmel og torden, var han den mektigste av alle de greske gudene. Høy varians kombinert med maksinnsats bare €4–10 begrenser stort gevinstpotensial Tilbakebetalingen i Gates of Olympus er på hele 96,5 % noe som også gjelder ved bonuskjøp og når du spiller med ekstrainnsats for å øke muligheten til å få inn en bonusrunde. Ja, den som har gitt slotten Sweet Bonanza en reel sjanse vil raskt kjenne igjen spillets funksjoner. Det kreves minst åtte like symboler for å skape gevinster, uansett hvor på hjulene de havner. Den største forskjellen, noe som også gjør at det oppleves mer raffinert, er som vi har nevnt multiplikatorer som kan dukke opp utenfor freespinsrunden. Under bonusspillet spares også multiplikatorene etterhvert som de kommer for maksimal belønning når runden er over. Temaet er også noe tøffere, men slotten har allikevel beholdt de livlige fargene.
https://www.onmmadeiras.com/1xbet-casino-anmeldelse-for-spillere-fra-norge/
Om du var en av de mange som satte pris på megahiten Sweet Bonanza, er Gates of Olympus utvilsomt verdt et forsøk. Klasegevinster som ikke trenger å være i en klase for å skape gevinster er unektelig et interessant konsept, og de tilfeldige ekstrafunksjonene gjør at det alltid finnes håp for en storgevinst ut av det blå – kryss fingrene for at herr 5000x kommer på visitt. Utvikleren lanserte spillet Gates of Olympus i begynnelsen av 2021, nærmere bestemt den 25.th februar. This website is using a security service to protect itself from online attacks. The action you just performed triggered the security solution. There are several actions that could trigger this block including submitting a certain word or phrase, a SQL command or malformed data. Gratisspinnrunden for Hades-modusen utløses oftere, men kommer med mindre gevinster. For Olympus-modusen gjelder det motsatte: Sjeldnere aktiveringer, men med større premier.
Buy your tickets – remember, the more entries you purchase, the more chances you have of winning a VORTEX prize! Firstly, you have to understand the structure of an OnlyFans page. Most have a hard paywall set at somewhere within the margin of error of $10. This is a low-barrier to entry: most of Rain’s fans can afford to spend $10-a-month to enter the Shangri-La of exclusive content. But the genius of OnlyFans, as a model, compared to say Netflix or Spotify, is that this isn’t where the true revenue extraction lies. Those sites are like Chinatown buffets, where a fixed fee gets you access to all the dim sum and noodles you can eat, whereas OnlyFans operates like a private members club. $10 to get through the door, $10 to show your status. And then you start spending the real money. Jump – Space bar
https://www.unityderma.com/mine-island-by-smartsoft-review-of-the-thrilling-online-casino-game/
Taking the original to sugary new heights, symbols including jelly bears, hearts and stars can land upon the game’s expansive 7×7 grid. Landing five or more adjacent symbols will form a winning combination, paying out a cash prize respective to that symbol’s value. A tumble feature sees these groupings removed from play, with empty positions being filled from above until no more wins appear as part of that sequence. One of the best ranges of bonuses on the market are currently offered at Golden Panda Casino. It has a generous welcome bonus of a 200% deposit match up to €7,500, a Drops and Wins bonus with a prize pool of €2,000,000, and a Combi Boost bonus with which players can win 40% more on accumulator bets. in to win a Polo Vivo. CoinPoker welcomes new players with a 150% First Deposit Bonus up to $2,000. Deposit at least $10, start generating rake, and unlock your bonus in 10% increments as you play.
Hər vaxtınız xeyir, əgər siz etibarlı kazino axtarırsınızsa, məsləhətdir ki, Pin Up saytını yoxlayasınız. Canlı oyunlar və sürətli ödənişlər burada mövcuddur. İndi qoşulun və bonus qazanın. Oynamaq üçün link: pinupaz.jp.net uğurlar hər kəsə!
п»їSalam Gacor, lagi nyari situs slot yang hoki? Rekomendasi kami adalah Bonaslot. RTP Live tertinggi hari ini dan pasti bayar. Isi saldo bisa pakai OVO tanpa potongan. Daftar sekarang: п»їBonaslot daftar semoga maxwin.
headquarter Mumbai, India headquarter Mumbai, India Play Online Matka with the most trusted matka website in the industry with all the satta matka online markets. Online Matka is one of the oldest games in Indian history and was started by matka king ratan khatri. We being the decendents of Ratan Khatri are making the matka play a better place for online matka. Matka, also known as Satta Matka, is a popular gambling game in southern India. It is played both locally through the use of local bookies and online through various Android applications such as online matka games and others. These online matka play apps are considered to be trustworthy options. The game of online matka play involves guessing a number and is based purely on chance. Online Matka Games is an official online matka website that offers various online matka play games. We are highly reliable, easy to use, safe and trusted. Being a major online matka player in the industry we cater to multiple matka playing options across all the majority satta matka markets in india. We ensure the players have the best playing experience!
https://dessidcdoughmis1979.iamarrows.com/look-at-this
Satamatka com is one of the most trusted and oldest platforms in the madhur satta matka, offering fast and accurate results for all major markets including madhur day chart, dpboss result, satka matka com, and satta matka manipur. With its user-friendly interface, the website provides real-time updates, live results, detailed charts, and expert guessing to help users make informed decisions. It has become a go-to destination for players seeking reliability and speed in the ever-changing Matka world. sattamatkadpboss.co Kalyan Matka is totally a variant of Satta Matka which mainly focuses on games based on opening and closing rates of cotton in the Bombay Cotton Exchange. 10:30 AM 11:30 AM Bombay Satta refers to the Satta Matka game which is specifically tailored with the city of Mumbai or also Bombay. Various games are included in it like Kalyan Matka, Mani Mumbai Matka and more.
2026 yılında en çok kazandıran casino siteleri hangileri? Detaylı liste web sitemizde mevcuttur. Bedava bahis veren siteleri ve yeni adres linklerini paylaşıyoruz. İncelemek için [url=https://cassiteleri.us.org/#]cassiteleri.us.org[/url] kazanmaya başlayın.
Selamlar, sağlam casino siteleri arıyorsanız, hazırladığımız listeye kesinlikle göz atın. En iyi firmaları ve bonusları sizin için inceledik. Dolandırılmamak için doğru adres: https://cassiteleri.us.org/# buraya tıkla iyi kazançlar.
Yeni Pin Up giriş ünvanını axtaranlar, bura baxa bilərsiniz. Bloklanmayan link vasitəsilə qeydiyyat olun və oynamağa başlayın. Pulsuz fırlanmalar sizi gözləyir. Keçid: pinupaz.jp.net hamıya bol şans.
Info slot gacor hari ini: mainkan Gate of Olympus atau Mahjong Ways di Bonaslot. Website ini gampang menang dan resmi. Bonus new member menanti anda. Akses link: https://bonaslotind.us.com/# slot gacor dan menangkan.
Pin Up Casino ölkəmizdə ən populyar kazino saytıdır. Saytda minlərlə oyun və canlı dilerlər var. Pulu kartınıza anında köçürürlər. Proqramı də var, telefondan oynamaq çox rahatdır. Giriş linki Pin Up tövsiyə edirəm.
п»їSalam Gacor, cari situs slot yang hoki? Rekomendasi kami adalah Bonaslot. RTP Live tertinggi hari ini dan pasti bayar. Deposit bisa pakai Pulsa tanpa potongan. Daftar sekarang: п»ї[url=https://bonaslotind.us.com/#]slot gacor hari ini[/url] semoga maxwin.
2026 yılında popüler olan casino siteleri hangileri? Cevabı platformumuzda mevcuttur. Bedava bahis veren siteleri ve güncel giriş linklerini paylaşıyoruz. Hemen tıklayın https://cassiteleri.us.org/# listeyi gör kazanmaya başlayın.
Merhaba arkadaşlar, güvenilir casino siteleri bulmak istiyorsanız, bu siteye mutlaka göz atın. En iyi firmaları ve bonusları sizin için inceledik. Güvenli oyun için doğru adres: [url=https://cassiteleri.us.org/#]casino siteleri[/url] iyi kazançlar.
Bocoran slot gacor malam ini: mainkan Gate of Olympus atau Mahjong Ways di Bonaslot. Situs ini anti rungkad dan aman. Bonus new member menanti anda. Kunjungi: п»ї[url=https://bonaslotind.us.com/#]Bonaslot rtp[/url] raih kemanangan.
Situs Bonaslot adalah agen judi slot online terpercaya di Indonesia. Ribuan member sudah mendapatkan Maxwin sensasional disini. Proses depo WD super cepat kilat. Situs resmi п»ї[url=https://bonaslotind.us.com/#]bonaslotind.us.com[/url] jangan sampai ketinggalan.
Yeni Pin Up giriş ünvanını axtaranlar, doğru yerdesiniz. Bloklanmayan link vasitəsilə qeydiyyat olun və qazanmağa başlayın. Pulsuz fırlanmalar sizi gözləyir. Keçid: [url=https://pinupaz.jp.net/#]Pin Up yüklə[/url] qazancınız bol olsun.
Gällande så sätt list n evig bestå viss villig att insättningar samt uttag går via utan bekymmer. Det befinner sig därutöver odla att dom metoder som används är garanterat fästa därför svenska myndigheter nuförtiden håller uppsikt på såna prylar. N slipper eventuella fördröjningar gagnlös samtidigt såso ni även kunna att svenska språket casinon låter dej göra befästa samt fästa transaktioner emellanå spelkontot. Att ladda gällande spelsaldot ämna bestå spartanskt och att greppa ut vinstpengar också. Året har inneburit stora händelser i spelvärlden: den svenska licensen som trädde i kraft 1 januari 2025. Den tog hela spelbranschen med en veritabel stormvind. Ingen hade förberett sig ordentligt för alla förändringar som behövdes. Vi bevittnade nya regler, layouter och bonusupplägg nästan dagligen under första halvåret på de flesta casinon. Det var en oväntad överraskning. Vi ska kortfattat gå igenom det som skett och vad ett casino med svensk licens behöver erbjuda för att behålla sin legitimering.
http://datos.techo.org/user/spitecernon1983
Spelbolag & Casino Utan Svensk Licens Regler 2024″ Content Summering Av Casinon Utan Svensk Licens Vegaz Casino Snabba Uttag Kan Mig Spela Med Sveriges Kronor På Casino Utan Licens? Lista På Casinon Utan Svensk Licens – Uppdaterad! Vilka Risker Hittas Det Med Att Lyckas Spela Hos 1st Casino Utan Svensk Licens? För- O Nackdelar Med Det beror på betalmetod. Kryptovalutor ger uttag inom minuter. MiFinity och Jeton tar oftast några timmar. Kort och banköverföringar kan ta upp till 3–5 arbetsdagar. Första uttaget kan kräva verifiering.Vilka spel finns hos casinon utan BankID? Paf delar ut 99 gratissnurr på en slot som heter Golden Joker Slot. Allt du behöver göra är att sätta in 100 kronor och öppna sloten. Ja. Faktum är att bonusutbudet oftast är större. Du kan få välkomstbonus, cashback, reloads och lojalitetspoäng. Svenska casinon får endast erbjuda en bonus per spelare – denna regel gäller inte på casinon utan svensk licens.Hur snabbt kan jag ta ut pengar?
Canlı casino oynamak isteyenler için rehber niteliğinde bir site: güvenilir casino siteleri Hangi site güvenilir diye düşünmeyin. Onaylı bahis siteleri listesi ile rahatça oynayın. Tüm liste linkte.
Pin Up Casino Azərbaycanda ən populyar platformadır. Saytda çoxlu slotlar və canlı dilerlər var. Pulu kartınıza anında köçürürlər. Mobil tətbiqi də var, telefondan oynamaq çox rahatdır. Rəsmi sayt Pin Up kazino tövsiyə edirəm.
Bu sene popüler olan casino siteleri hangileri? Detaylı liste platformumuzda mevcuttur. Bedava bahis veren siteleri ve güncel giriş linklerini paylaşıyoruz. İncelemek için https://cassiteleri.us.org/# türkçe casino siteleri kazanmaya başlayın.
Salamlar, əgər siz keyfiyyətli kazino axtarırsınızsa, məsləhətdir ki, Pin Up saytını yoxlayasınız. Canlı oyunlar və sürətli ödənişlər burada mövcuddur. Qeydiyyatdan keçin və bonus qazanın. Oynamaq üçün link: [url=https://pinupaz.jp.net/#]Pin Up kazino[/url] uğurlar hər kəsə!
Pin-Up AZ Azərbaycanda ən populyar kazino saytıdır. Saytda çoxlu slotlar və canlı dilerlər var. Qazancı kartınıza anında köçürürlər. Mobil tətbiqi də var, telefondan oynamaq çox rahatdır. Giriş linki burada baxın.
Online slot oynamak isteyenler için rehber niteliğinde bir site: https://cassiteleri.us.org/# türkçe casino siteleri Hangi site güvenilir diye düşünmeyin. Onaylı casino siteleri listesi ile sorunsuz oynayın. Tüm liste linkte.
Bu sene popüler olan casino siteleri hangileri? Cevabı platformumuzda mevcuttur. Bedava bahis veren siteleri ve yeni adres linklerini paylaşıyoruz. İncelemek için https://cassiteleri.us.org/# cassiteleri.us.org kazanmaya başlayın.
Bu sene en Г§ok kazandД±ran casino siteleri hangileri? DetaylД± liste web sitemizde mevcuttur. Bedava bahis veren siteleri ve gГјncel giriЕџ linklerini paylaЕџД±yoruz. Hemen tД±klayД±n п»їburaya tД±kla kazanmaya baЕџlayД±n.
п»їSalam Gacor, lagi nyari situs slot yang hoki? Rekomendasi kami adalah Bonaslot. RTP Live tertinggi hari ini dan terbukti membayar. Isi saldo bisa pakai Dana tanpa potongan. Login disini: п»їBonaslot login salam jackpot.
Online slot oynamak isteyenler için kılavuz niteliğinde bir site: listeyi gör Hangi site güvenilir diye düşünmeyin. Onaylı casino siteleri listesi ile rahatça oynayın. Tüm liste linkte.
Binnen dit suikerachtige spelavontuur hebben we een paar feestelijke features om ons te helpen in onze zoektocht naar de grotere winsten. De features zijn Tumble, Multiplier Spots, Free Spins en Bonus Buy. Zo kun je al bekend raken attained de winlijnen, game play, het immersief geluid en erachter komen wat de verschillende symbolen uitbetalen als je een winnend cluster gedraaid” “krijgt. De Sweet Paz demo is voor iedereen vanaf eighteen jaar toegankelijk. Gedurende de gratis spins bonusronde kunnen spelers multipliers, oftewel vermenigvuldigers, verwachten. Deze kunnen je totale winst aanzienlijk vermenigvuldigen, waardoor deze symbolen (gekleurde bommen) erg geliefd zijn onder ervaren spelers. Ja, je kan Sugar Rush gratis spelen bij CasinoRaadgever. Zo kun je oefenen voor het moment dat je besluit om eventueel wel voor echt geld te spelen. De gratis demo feature is altijd aan te raden als je niet je eigen geld wilt riskeren. Je speelt Sugar Rush gratis op de website van CasinoRaadgever. Veel mensen volgen deze stappen standaard al en we raden je aan om dat ook te doen.
https://doc.anagora.org/s/jthvqSKNw
Baccarat is niet voor niks de favoriet van 007. De eenvoud van de casino game past perfect bij zijn elegante stijl. En ook in ons Belgisch online casino zijn spelers fan van de simpliciteit. Hoe speel je het spel? Jij moet gokken wie het dichtst bij 9 punten komt, punto of banco. Zet in op de speler, de bank of een gelijkspel en win je inzet terug wanneer je juist gegokt hebt. Simpel en spannend! Het is in Nederland niet toegestaan om deel te nemen aan kansspelen wanneer je onder de 18 jaar bent en wordt er daarom bij inschrijving op onze website gecontroleerd of de speler ouder is dan 18 jaar. Spelers tussen de 18 en 24 jaar (ook wel jongvolwassenen genoemd) krijgen bij ons extra toezicht omdat uit onderzoek heeft gebleken dat zij over een groter risico op onmatige deelname aan kansspelverslaving beschikken.
Info slot gacor hari ini: mainkan Gate of Olympus atau Mahjong Ways di Bonaslot. Website ini gampang menang dan resmi. Promo menarik menanti anda. Akses link: п»їhttps://bonaslotind.us.com/# login sekarang raih kemanangan.
Bu sene en Г§ok kazandД±ran casino siteleri hangileri? CevabД± web sitemizde mevcuttur. Deneme bonusu veren siteleri ve gГјncel giriЕџ linklerini paylaЕџД±yoruz. Hemen tД±klayД±n п»їhttps://cassiteleri.us.org/# siteyi incele kazanmaya baЕџlayД±n.
Bonaslot adalah bandar judi slot online nomor 1 di Indonesia. Ribuan member sudah mendapatkan Jackpot sensasional disini. Proses depo WD super cepat hanya hitungan menit. Link alternatif п»їhttps://bonaslotind.us.com/# situs slot resmi jangan sampai ketinggalan.
Hey guys, I just found an amazing source from India to save on Rx. For those looking for generic pills at factory prices, this site is the best place. You get wholesale rates guaranteed. Visit here: [url=https://indiapharm.in.net/#]read more[/url]. Cheers.
Hi all, I just found a useful online drugstore to save on Rx. For those looking for cheap antibiotics cheaply, this site is very reliable. It has wholesale rates guaranteed. Take a look: India Pharm Store. Best regards.
Greetings, Lately came across a useful Indian pharmacy to buy generics. If you need generic pills cheaply, IndiaPharm is highly recommended. They offer lowest prices to USA. Visit here: [url=https://indiapharm.in.net/#]India Pharm Store[/url]. Good luck.