DIY Pillowcase Tutorial! Easy Pillowcase With No Seams Showing! Create Your Own Boutique Quality Pillowcase!
Supplies (for EACH pillowcase):
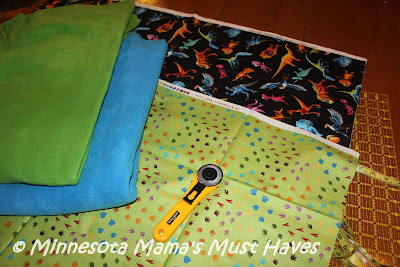
~This pillowcase requires 3 coordinating fabrics. Your main pillowcase fabric, the cuff fabric and the trim fabric.
~Main fabric – 27” long x 41” wide
~Cuff fabric – 12” long x 41” wide
~Trim – 1 1/2” wide strip (selvage to selvage)
~Coordinating thread
~Rotary cutter and mat (scissors and a ruler work as well)
You will also need a sewing machine. I have a Brother sewing machine and just love it!
1. Fold the 1 1/2” strip of trim fabric in half lengthwise, wrong sides together. Press.
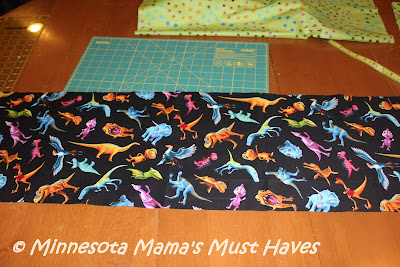
2. Place the cuff fabric right side up on the table.
3. Place the folded trim fabric on top and match up the raw edges. Pin in place if necessary. *I used a fleece for my trim fabric so it was necessary to pin in place. If you use a cotton or something that will lie flat pinning will not be necessary.
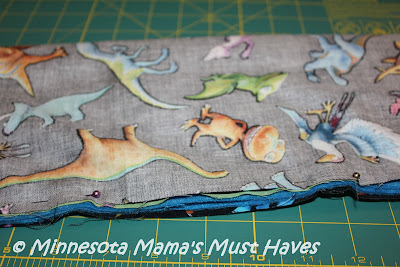
4. Place your main fabric on top of the trim fabric, right side down, lining up the raw edges. Pin in place.
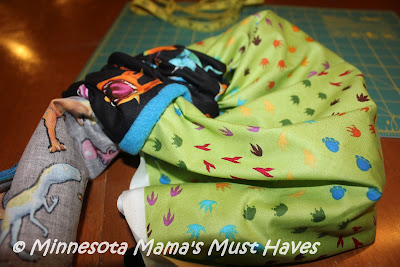
5. Roll up the main fabric until about 3” of cuff fabric is exposed then STOP.
6. Fold the exposed 3” of cuff fabric over the main fabric you rolled up and line up it’s raw edge with the raw edge you pinned to the trim in step 4.
7. Re-pin by undoing your pins already in place and re-pinning all layers together evenly.
8. Stitch a 1/2” seam along the raw edge.
9. Turn the pillowcase right side out by pulling the main fabric section out through the side opening of your “burrito”. *Also why this is called the burrito pillowcase method.
10. Lay flat WRONG sides together, folding the cuff exactly in half and lining up the trim seams. Press.
11. Line up your raw edges. *Make sure you have the wrong sides of the pillowcase together and NOT the right sides like you would to sew a regular seam. We will be sewing French seams. Pin along both raw edges.
12. Stitch the side and end of the pillowcase along your raw edges you pinned using a scant 1/4” seam. *See how you are stitching on the right side of the fabric.
13. Now turn the pillowcase wrong side out using a chopstick or turner to push out the corners. *Don’t push too hard or you will poke through the seam. Press.
14. Stitch along the side and end of the pillowcase again using a 3/8” seam. This will enclose the raw seam edge.
15. Turn the pillowcase right side out and push out the corners. Press.
That’s it! You’re done 🙂 I just love how the two fabrics coordinate so well and are pulled together by the solid blue trim piece.
I also made a coordinating pillow case in the opposite prints with a green trim piece. Aiden LOVED his new pillowcases!
If there’s a Dinosaur Train fan in your household, then joining Dinosaur Train’s Nature Trackers Club is a must. This FREE community of young children, their families and educators who, like Buddy, Tiny Shiny and Don, enjoy exploring and having adventures and respect their environment,offers a number of fun activities, games and craft projects each month! Register for Nature Trackers Club today.
There are a number of fun and easy craft projects using Quilting Treasures’ Dinosaur Train prints that can help you transform your child’s bedroom into the ideal Dinosaur Train Nature Tracker’s Club Room. From bulletin boards, to upholstered headboards, pillowslips and cushions, notebook covers and more… creating a Nature Tracker Club room is a fun activity to enjoy with your children!
You can visit Quilting Treasures to find a retailer near you that carries the Dinosaur Train fabric.

*Thanks to Quilting Treasures and Dinosaur Train for providing me with 2 yards of Dinosaur Train fabric to share this project. No compensation was received for this post.







I remember making these in high school but I can't remember how, now I can make them for my kids! Thanks for sharing
That turned out great! What a fun kid’s pillowcase 🙂
I’ve been meaning to make my own (silk) pillowcases for ages! Thanks for the tutorial!
I love how that turned out..I was just never much of a seamstress
thats really cute. I need to make some for my couch because the dog is ruining them. Ide have to make a few changes on the design.
how cute,ive got some of that same material,that would perfect for the grandsons bedroom
Your article reads as intentional and grounded.
You’ve offered a calm and structured approach to the topic. zeusbola link alternatif
Your message is straightforward and well-organized. zeusbola
Your writing feels well-structured and sincere. zeusbola
The way you simplify key points is effective and respectful. zeusbola
You make room for nuance in your explanation. zeusbola
You deliver your message with admirable restraint. zeusbola
You’ve stayed true to your point while remaining open.
Your calm delivery enhances the credibility of your message. zeusbola
The writing flows with a quiet sense of direction. login zeusbola
Your points are shared with gentle confidence. zeusbola
Your writing offers guidance without pressure. zeustoto
You’ve shared your views with admirable poise. zeusbola
You stay respectful even when disagreeing. zeusbola
The piece feels thoughtful without being heavy. zeustoto
Each idea feels connected to the bigger picture. zeusbola
The tone you use makes it easy to stay focused. zeusbola login
The article feels complete without being overwhelming. zeusbola
Casino.guru sieht sich als eine unabhängige Informationsplattform über Online Casinos und Online Casinospiele, die von keinem Glücksspielanbieter oder irgendeiner anderen Instanz kontrolliert
wird. Spielautomaten sind reine Glücksspiele,
bei denen die Ergebnisse der Walzendrehungen mittels
eines sogenannten Zufallszahlengenerators („RNG”) ermittelt werden. Sie sollten jedoch mindestens 18 Jahre alt sein, um diese Gratisspiele ausprobieren zu können. Sie müssen für das kostenlose Spielen der vielen Slots keinen Download durchführen und sich nirgendwo registrieren. Sie können bei uns auch alle zuverlässigen und sicheren Online Casinos finden, die Spielautomaten anbieten.
In Deutschland bieten Online Slot Casinos eine riesige Auswahl an Automatenspielen. Online Slots zählen zu den beliebtesten Glücksspielen in Deutschland – kein Wunder, denn sie bieten spannende Themen, innovative Features und attraktive Gewinnchancen. Wer Echtgeld Slots spielen will, sollte immer daran denken, dass Glücksspielsüchtig machen kann. Ja, Sie können tausende Online Slots in legalen Online-Casinos mit offizieller GGL-Lizenz spielen. Ja, bei vielen Anbietern können Sie Online Slots kostenlos spielen. Für Sie bedeutet das, dass Sie nur auf offiziellen Seiten mit GGL-Lizenz sicher und legal spielen können.
Du kannst Spielautomaten online kostenlos auf der Seite ohne Registrierung spielen.. Zusammenfassend kann man sagen, dass es keinen besseren Ort im Internet gibt, wenn Sie kostenlose Demo-Spielautomaten zum Spaß spielen möchten. Die Benutzer unserer Webseite können wählen, ob sie kostenlose Glücksspiele spielen wollen, die den Test der Zeit überstanden haben, oder neuere Versionen mit neuen und aufregenden Funktionen. Unsere besten kostenlosen Casino-Slotspiele mit Bonus-Runden sind Siberian Storm, Starburst und 88 Fortunes. Bietet Ihre Website kostenlose Slots mit Bonus und Freispielen? Sie können kostenlose Slots ohne Download direkt hier bei VegasSlotsOnline spielen.
References:
https://online-spielhallen.de/888-casino-promo-code-ihr-weg-zu-exklusiven-boni-und-vorteilen/
Er wird von Bars und Restaurants flankiert und in der Mitte befinden sich zahlreiche
Würfeltische. Sie werden schnell den Europasaal erreichen, unser Highlight des Besuchs.
Verpassen Sie es nicht, Ihren Kopf zu heben, um die Glasdecke und die dekorativen Ornamente der Gewölbe
zu bewundern. Wir hatten nicht erwartet, nach dem Betreten des
Gebäudes ein so schönes Atrium zu sehen. Sie wurden von Fabio Stecchi geschaffen, einem französischen Bildhauer italienischer Herkunft, der in Nizza
im 19.
Diese legendäre Institution ist nicht nur ein von Berühmtheiten besuchter Ort der Unterhaltung,
sondern auch ein bemerkenswertes Denkmal. Das Casino de
Monte-Carlo ist ein luxuriöses Wahrzeichen Monacos und wurde in zahlreichen Filmen, insbesondere in der James Bond
Saga, verewigt. Copyright © weltweitvon Iconic® Riviera.Datenschutz-Bestimmungen
Hierfür gibt es sogar ein Gesetz, das strenge Ausweis- und Passkontrollen in den Eingangsbereichen der Casinos in Monaco vorsieht.
Obwohl alle Casinos in Monte Carlo eine große Einnahmequelle für
die Region bedeuten, ist den Einwohnern Monacos der Zutritt zu den Spielhallen untersagt.
Umliegende Boulevards laden zum Flanieren und Restaurants der Region zum Schlemmen ein. Außerhalb der Casinos
haben Besucher die Gelegenheit, sich bei entspannenen Spas zu erholen oder das aufregende Nachtleben in vollen Zügen zu genießen.
Zudem ist Monacos Vorzeige-Hotel, das Hotel de Paris Monte-Carlo, nur einen Katzensprung
von der Spielhalle entfernt.
References:
https://online-spielhallen.de/admiral-casino-mobile-app-dein-umfassender-leitfaden/
“It’s going to be important for both government and the Star casino, or whoever ends up taking that over, for it to be an ongoing viable solution.”
Mr Hughes said Star would likely look to shore up some of its
stronger assets, including the Brisbane casino, ahead of the 2032 Olympics.
Ensuring Brisbane’s casino doesn’t become an “eyesore without tenancies”
should be a priority as further doubt is cast
over the future of Star Entertainment, a business expert says.
Star Entertainment is falling into deeper financial trouble and its pockets are empty.
At the time of the offer, Bally’s said it was “the best alternative for Star and its shareholders”.
Buying a stake in the company won’t help Star’s precarious financial position.
If he had been lined up or approached by the Star board as part of the rescue
attempt, the company would need to have disclosed any deal or
association. Mr Costello said it was more in the public interest to let the facility be
sold off for “a shopping centre” than to prop up a failing casino with taxpayers’ money.
He said the public could have “no confidence” in a casino owner that had failed to disclose business dealings with
organised crime figures.
Whether you’re a movie buff, TV enthusiast, or just looking for something new to watch, TubiTV has you covered.
TubiTV is an excellent choice for anyone looking to enjoy free entertainment
without the hassle of subscriptions or fees. Parental controls allow parents to restrict access to certain content,
ensuring a safe viewing experience for children. With content across all genres, TubiTV
has something for everyone, from comedy and drama to
horror and sci-fi. The platform continues to expand its offerings, including new original content and partnerships
with major studios. The platform’s success is driven by its free, ad-supported model and its extensive content library.
References:
https://blackcoin.co/paris-las-vegas-hotel-casino-adults-only/
Users on ChatGPT’s free tier can now access the new version of Advanced Voice Mode, while paying users will receive answers that
are “more direct, engaging, concise, specific, and creative,” a spokesperson from OpenAI told
TechCrunch. The update enables real-time conversations, and the AI assistant is said
to be more personable and interrupts users
less often. OpenAI has updated its AI voice assistant with
improved chatting capabilities, according to a video
posted on Monday (March 24) to the company’s official media
channels. OpenAI also said Mark Chen would step into the
expanded role of chief research officer, and Julia
Villagra will take on the role of chief people
officer. Brad Lightcap, OpenAI’s chief operating officer, will
lead the company’s global expansion and manage corporate partnerships
as CEO Sam Altman shifts his focus to research and products, according to a blog post from OpenAI.
The protocol is currently available in the Agents SDK, and support for
the ChatGPT desktop app and Responses API will be coming soon, OpenAI CEO Sam
Altman said.
In September 2024, OpenAI introduced o1-preview and a faster, cheaper model named o1-mini.
On July 18, 2024, OpenAI released GPT-4o mini, a smaller version of GPT-4o which
replaced GPT-3.5 Turbo on the ChatGPT interface.
GPT-4o (“o” for “omni”) is a multilingual, multimodal generative pre-trained transformer developed by OpenAI and released
in May 2024.
References:
https://blackcoin.co/play-free-slots-%f0%9f%8e%b0-browse-19430-online-slot-games/
With our list of top casino websites, you can deposit with
a huge range of banking methods and earn free bonus cash when you do.
We make sure we recommend only the best places to play,
with a huge range of pokies, good security, and 24/7 customer support with toll-free phone numbers for Aussies.
The Crown Entertainment Complex contains a top hotel, as well as a casino that features
over 2,000 pokies, 500 table games, and virtually every game in between.
The first major expansion of the campus came in 1992,
bringing the total amount of office space to 1.7 million square feet (160,000 m2) on 260 acres (110 ha)
of land. Architectural portals connect the campus to the garage below, allowing employees and visitors quick access
and creating a pedestrian focus on campus. Quickly design anything for you and your family—birthday cards, school
flyers, budgets, social posts, videos, and more—no graphic design experience needed.
Register your details to receive our latest news and offers.
References:
https://blackcoin.co/crypto-casinos-top-sites-in-2025/
Make deposits using trusted payment methods and make use of three types of customer service options.
Yes, there’s no MGA/UKGC license and no live dealer section. No fancy SSL certificate seal,
but everything felt secure, discreet, and reliable. On Day 2,
funds were in my crypto wallet. I requested a 200 AUD crypto payout, uploaded ID and proof
of address right away.
Live – online chat @2023 Ripper Casino encourage responsible gaming.
Play on desktop, tablet, or mobile with a stable internet connection. Our Ripper Casino review experts tested
the site on various devices and found that it is a great mobile casino.
Ripper Casino does not have a mobile app but is compatible with both Android
and iOS devices.
As you visit Ripper Casino and play regularly,
there’s always something to boost your bankroll. After that, verify your account via an activation link sent to your email, and you’re ready to
go. Creating an account at Ripper Casino is a straightforward process that can be completed with ease.
Plus, get ready for a thrilling experience with our Free
Spin Fridays and Weekly Crypto Bonuses.
online casino with paypal
References:
http://www.advertiseajob.co.uk
online casinos mit paypal
References:
didiaupdates.com
online casino for us players paypal
References:
https://kairoskonnectinc.com/employer/paypal-casinos-2025-top-australian-casinos-accepting-paypal
online casino for us players paypal
References:
forwardingjobs.com
gamble online with paypal
References:
divyangrojgar.com
casinos paypal
References:
precisionscans.net
This is one of the best explanations I’ve come across. Thanks!